
 Email
Support
Email
Support Frequently
Asked Questions
Frequently
Asked Questions
Accepting Payments
Table Of Contents
Section 2. Splitting the Bill Evenly
Section 3. Using a Non-Integrated Payment Processor
Chapter 4. Using an Integrated Payment Processor
Chapter 1. Introduction
When the customer is ready to pay, you have one of two options:
1. You can use the Quick Pay buttons to accept payment.
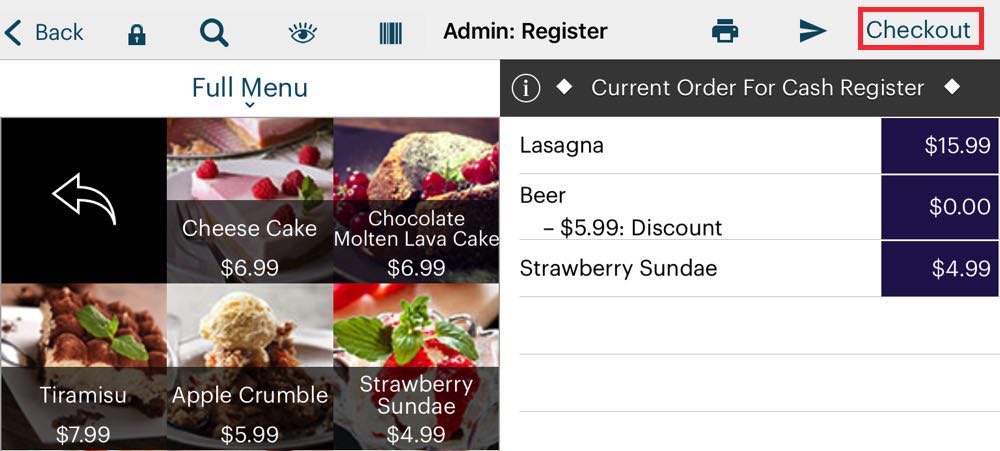
2. Or you can tap Checkout on the top right.
Chapter 2. Quick Pay Buttons
Section 1. Video Tutorial
Section 2. Details
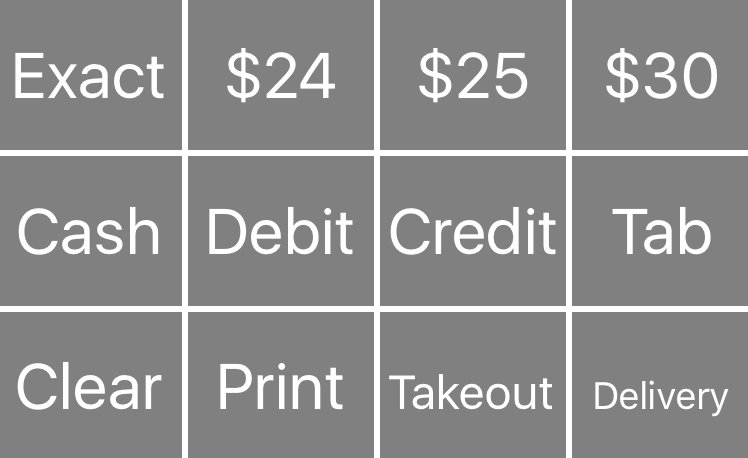
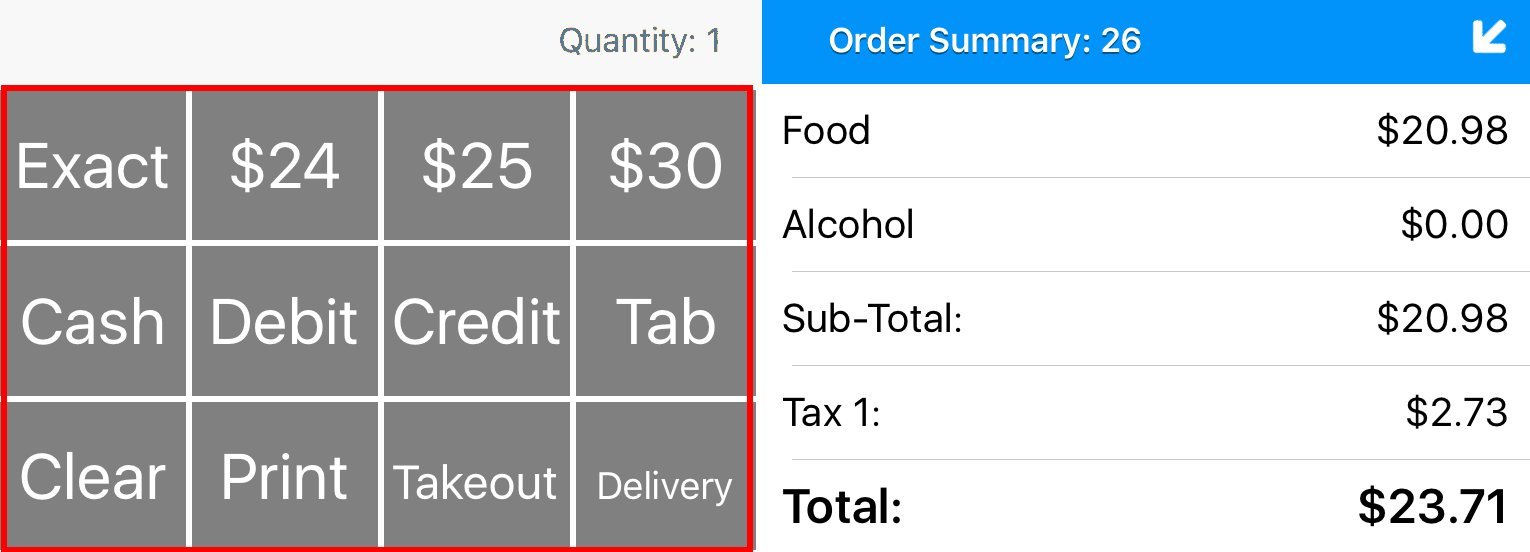
One important way the cash register screen is different from table service is there is no table representation. The table representation is replaced by quick pay buttons. These buttons are customizable by the TouchBistro administrator. Possible buttons that may appear:
|
Option
|
Description
|
|
Exact
|
Tap if you’re given the act amount of cash.
|
|
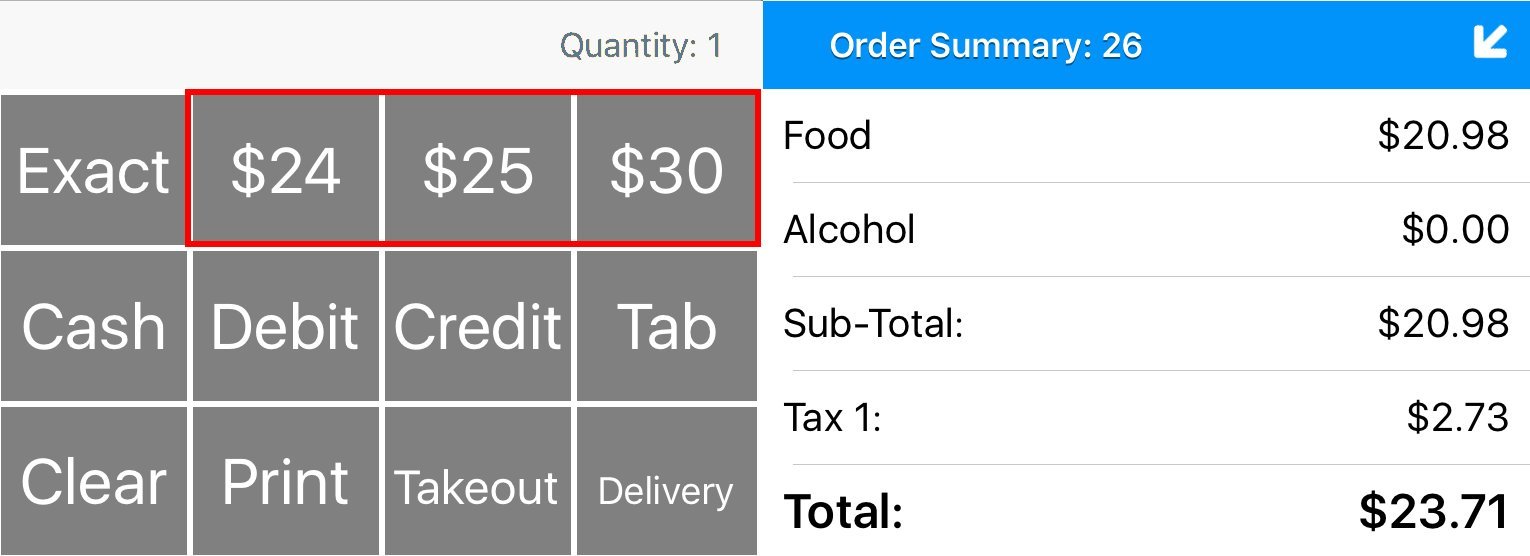
Denomination Buttons
|
These will change depending upon the bill total. They try to predict likely bills offered as payment.
For example, if the bill is $23.71 (pictured above), TouchBistro will predict the customer may offer $24 (a $20 + $4 in bills or coins), $25 (a $20 + $5), or $30 ($20 + $10).
If the bill is $4.51, TouchBistro will predict a $5, $10, or $20 bill will be offered. If you tap one of these, it will take you to the Receipt Option screen and report the required change.
|
|
Cash
|
Tap if the customer offers bills not predicted by a denomination button. You will be prompted to enter the amount offered.
|
|
Debit
|
Tap if the customer offers a debit card.
|
|
Credit
|
Tap if the customer offers a credit card.
|
|
No Sale
|
If no items have been added, the No Sale button will be available. Tap to open the cash drawer without a sale. You may be prompted to enter a manager passcode.
|
|
Clear
|
Quickly delete all ordered items.
|
|
Print Bill
|
Print the current bill.
|
|
Print Prev.
|
If no items have been added, you can print the previous bill even though you’ve accepted payment and closed the order. This is useful if a customer rejected the offer of a bill but then has second thoughts and requests it.
|
|
Tab
|
Move the order to a bar tab. Note, if the admin has the Can Access Takeout/Delivery staff permission disabled, you cannot transfer orders from cash register to a tab, takeout, or bar tab under Orders.
|
|
Takeout
|
Move the order to a takeout order. Note, if the admin has the Can Access Takeout/Delivery staff permission disabled, you cannot transfer orders from cash register to a tab, takeout, or bar tab under Orders. Also note, if you have an Order Type Exclusion set up to make certain menu items tax free when ordered as takeout, orders started on the register and transferred to a takeout order will not result in the tax being removed.
|
|
Delivery
|
Move the order to a delivery order. Note, if the admin has the Can Access Takeout/Delivery staff permission disabled, you cannot transfer orders from cash register to a tab, takeout, or bar tab under Orders. Also note, if you have an Order Type Exclusion set up to make certain menu items tax free when ordered as delivery, orders started on the register and transferred to a delivery order will not result in the tax being removed.
|

Chapter 3. Checkout
Section 1. Checkout Options
Most of the time, you can process an order using the Fast Pay buttons. However, you may need to access options on the Checkout screen. Tap Checkout to access additional options.
Section 2. Splitting the Bill Evenly
If the order needs to be split evenly among two or more customers, tap Split Evenly By #. Enter the number of bills required. TouchBistro places the split bills at the bottom of the Checkout screen. Tap each split bill to process payment.
Section 3. Using a Non-Integrated Payment Processor
A non-integrated payment processor is one that doesn’t interface with TouchBistro. That is, no payment information is transmitted between the credit card reader and TouchBistro. Because payment information captured by the credit card terminal doesn’t get transferred into TouchBistro, you need to enter payment information. This ensures your end of day figures and your non-integrated terminal batch totals match.
Note: The non-integrated option is not an option to use if your integrated system is offline. It will not capture payment information. It should only be used if you have signed up with a non-integrated.
If your venue is using a non-integrated payment processor, follow these steps to accept a card payment with a non-integrated payment processor:
1. After you’ve processed the payment on the credit card terminal, return to TouchBistro.
2. Tap Manual Charge/Credit.
3. Tap the card offered.
4. Enter the amount paid for the bill and the amount written on the tip line or entered into the mobile card processor.
5. Tap Pay.
6. Close the table.
Chapter 4. Using an Integrated Payment Processor
If your venue uses an integrated payment processor, payment procedures are different depending on the payment processor. Consult the Payment Gateways documentation for help on using your venue’s chose payment processor.
Chapter 5. Pay on Account
1. If your manager or owner has set up valid accounts that this payment can be charged to, tap the Information ![]() icon next to Pay On Account.
icon next to Pay On Account.
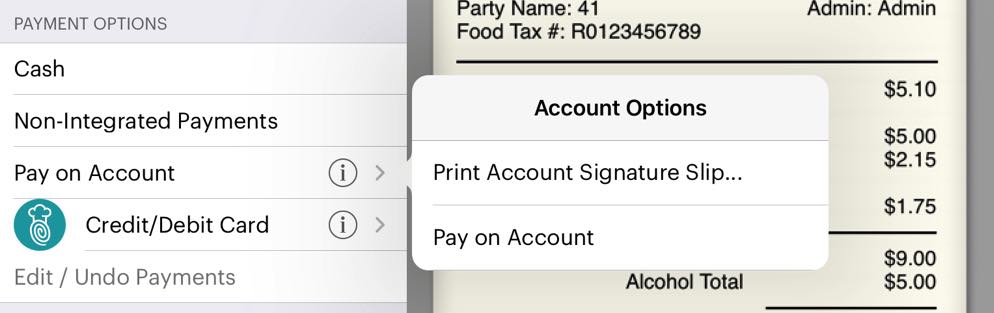
2. Tap Print Account Signature Slip if you’re required to get an account holder signature.
3. Tap Pay on Account when you’re ready to charge the bill to the account.
4. Tap the appropriate account to bill this to.
Chapter 6. Adjustments
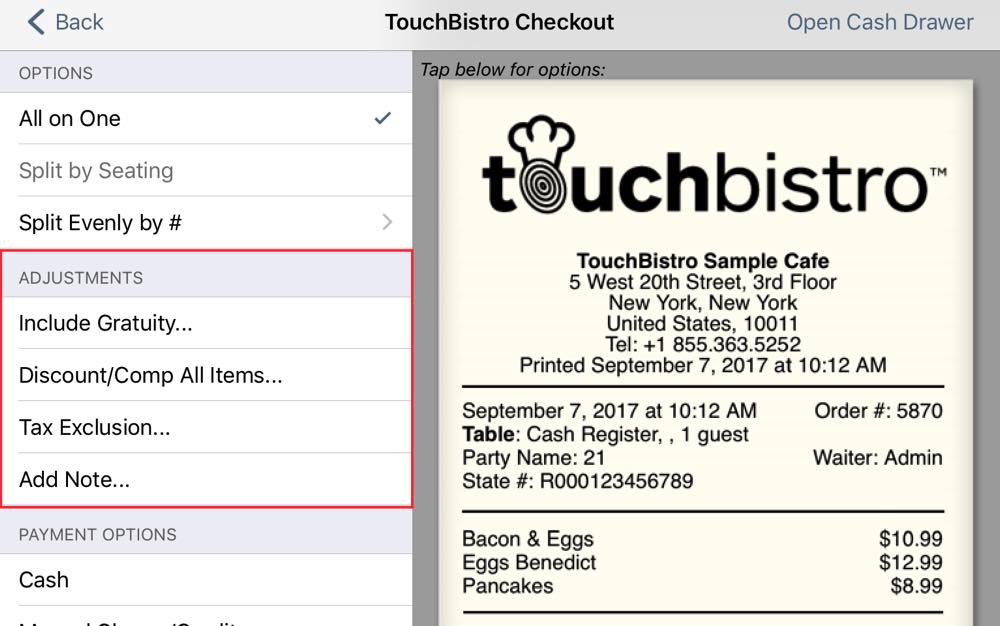
You can make the following adjustments to a bill:
|
Option
|
Description
|
|
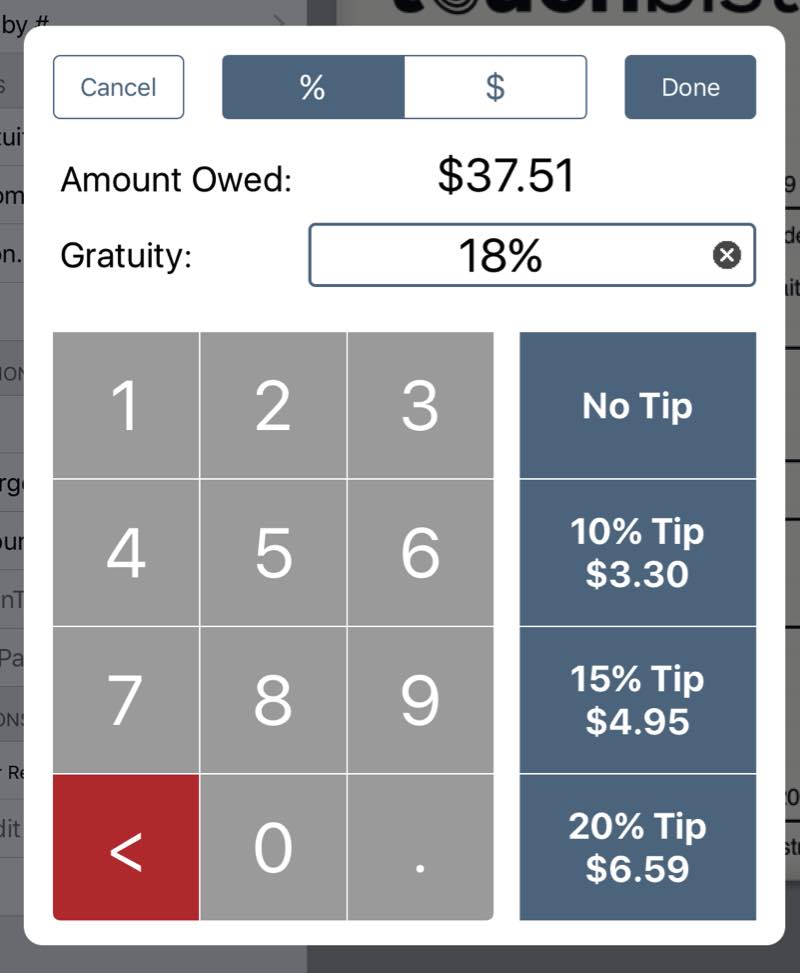
Include Gratuity
|

If you need to add an autograt, tap this option.
Enter the gratuity percentage or a fixed amount. If your system is set up to include a gratuity automatically (say for a party of 6 or more), you can remove the autograt by tapping this option. Note: If your autograts are set by the admin to treat them the same as tips, if you remove the gratuity after a customer has paid his/her split seat with cash, TouchBistro will not record the paid autograt on the closed bill. |
|
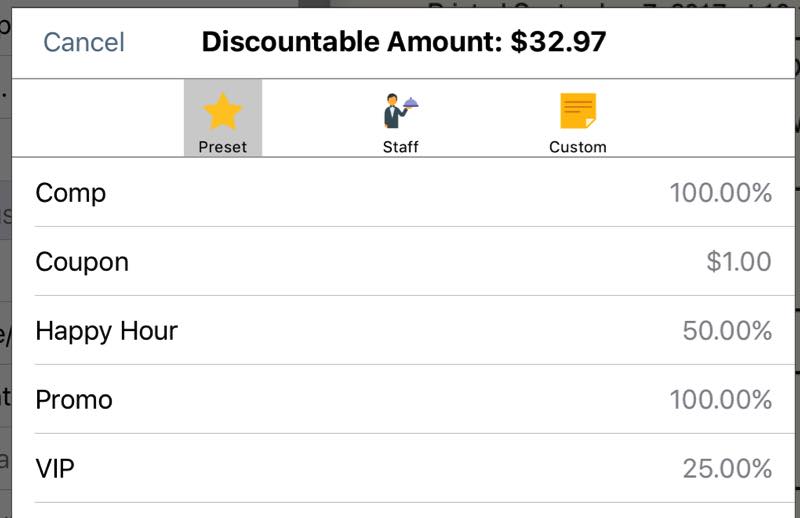
Discount/Comp All Items
|
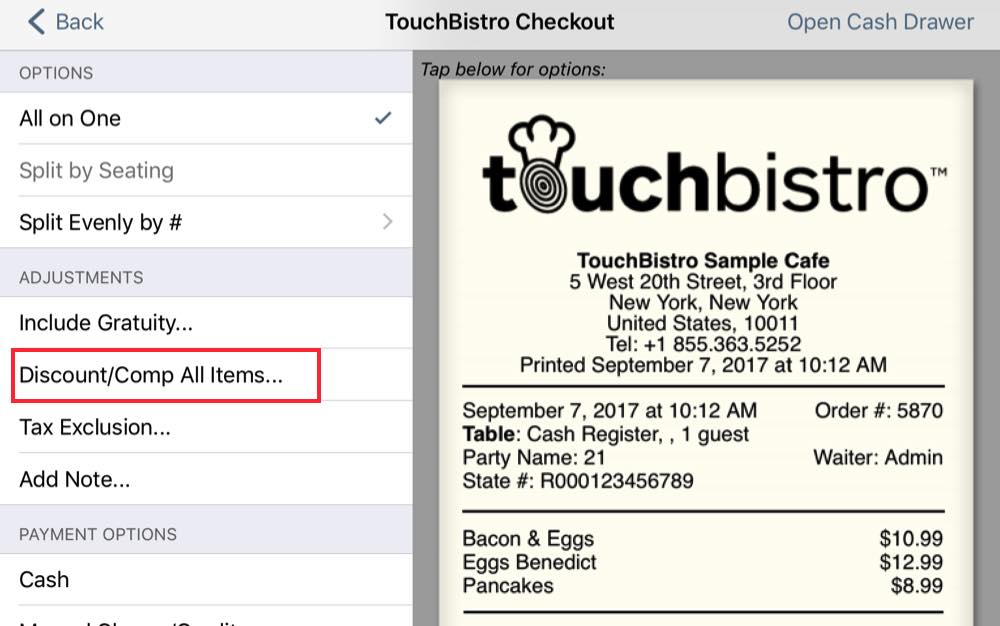
Tap if you need to apply a discount or 100% comp to all items on the bill.
You will be presented with a list of fixed discount reasons as well as the ability to create a custom discount reason.
|
|
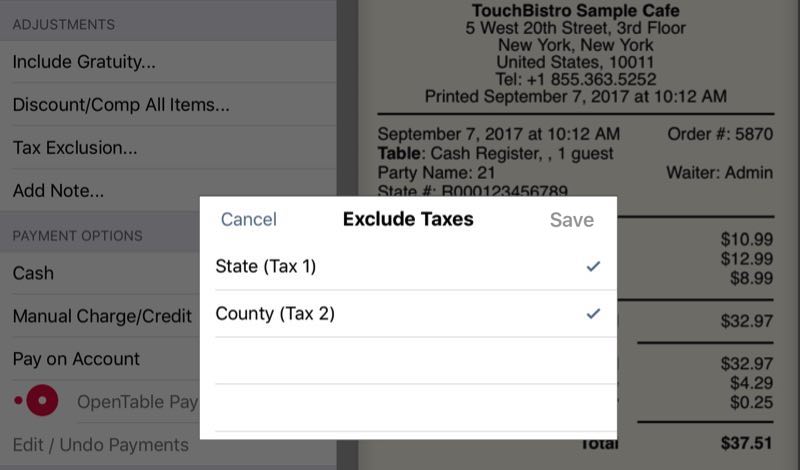
Tax Exclusions
|
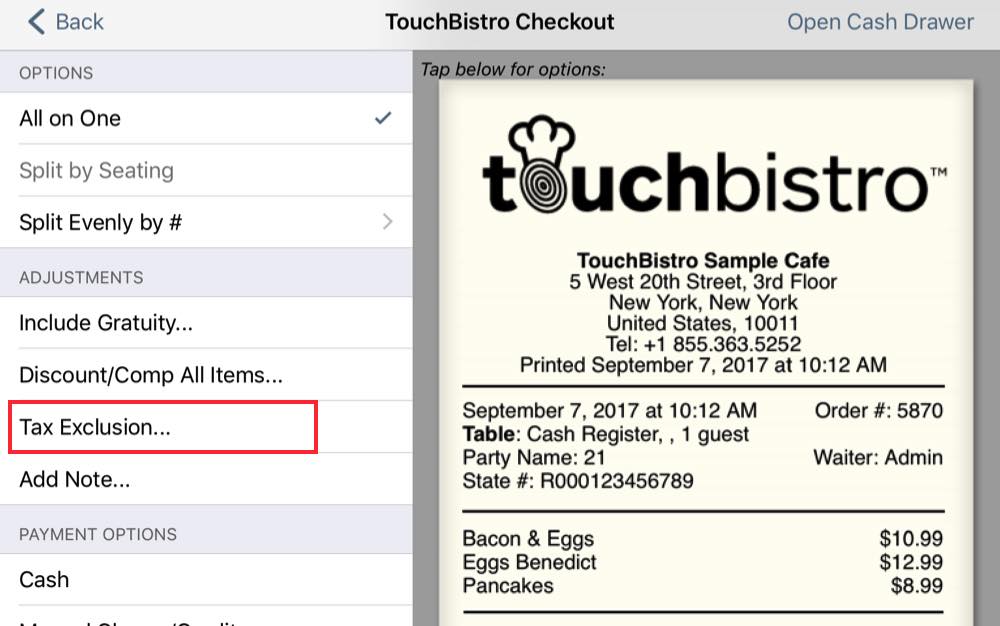
Tap if the customer or table qualifies for an exclusion of one or more taxes (for example, the diner is a diplomat or qualifies for some tourist exemption).
Uncheck which taxes no longer apply.
|
|
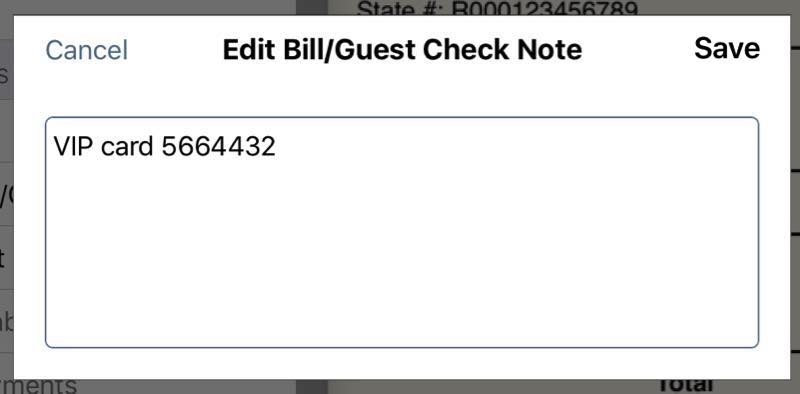
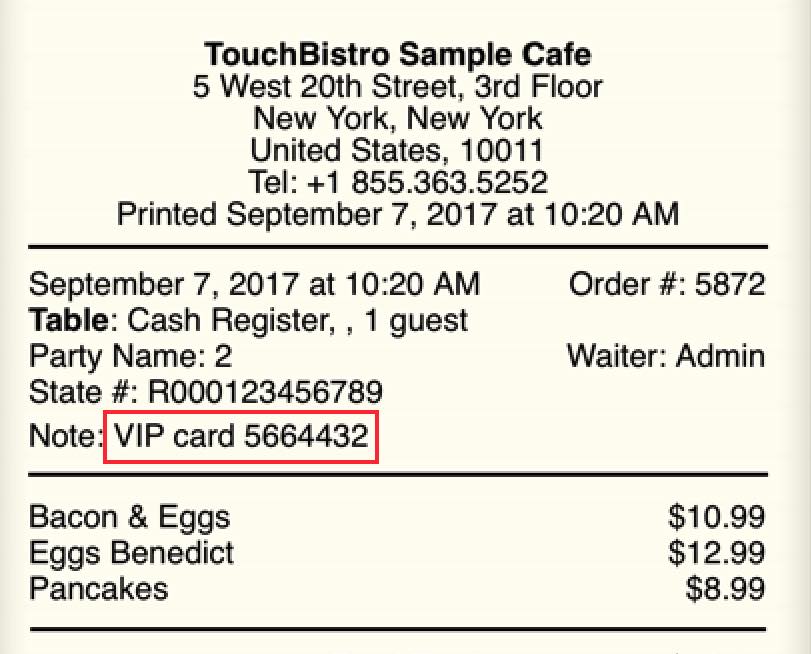
Add Note
|

If you need to add a note, tap Add Note and enter the note.
Notes can be used to support reasons for including or removing an autograt or a comp.
Remember, notes will appear on the receipt. Make sure your notes are public facing.
|
Chapter 7. Change Receipt Printer
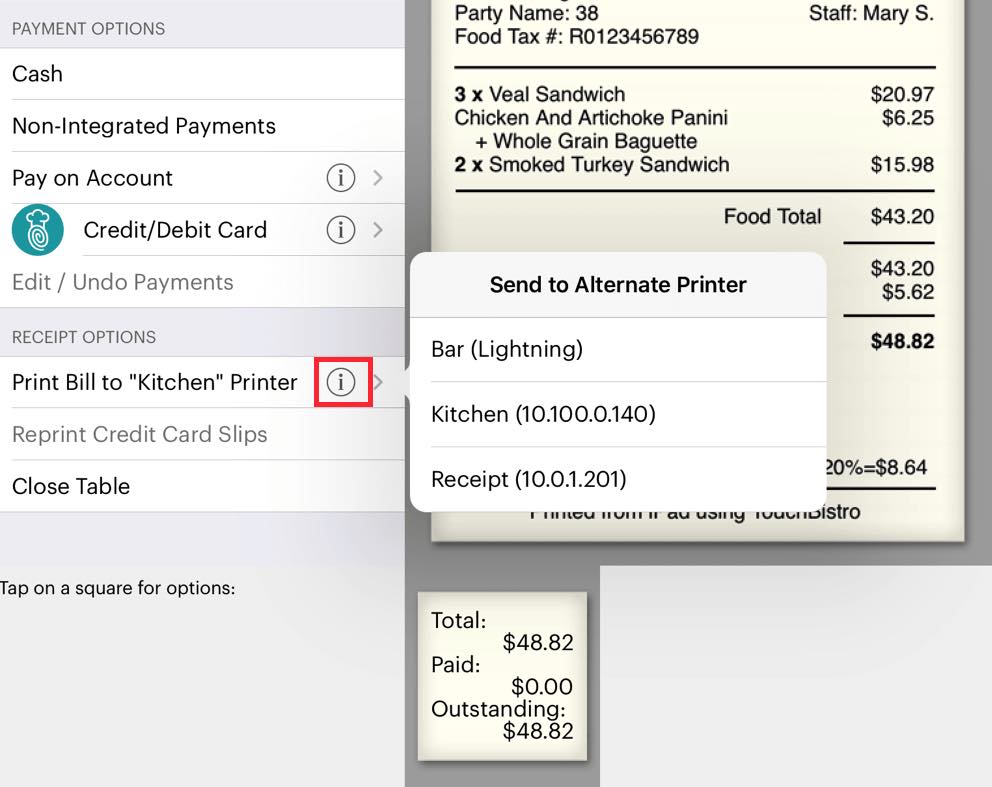
If you need to print the bill to a different printer (for example, your default Receipt printer is temporarily out of paper), you can tap the Information ![]() icon and select another available printer.
icon and select another available printer.
Chapter 8. Correcting an Error
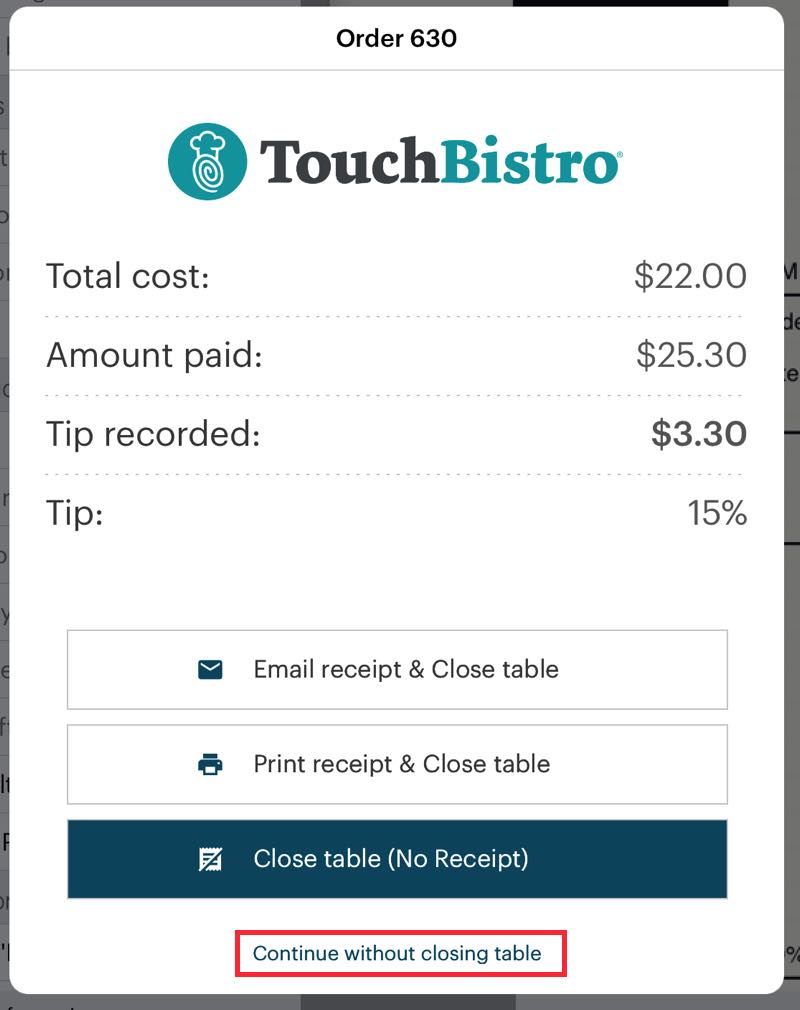
1. If you made a mistake about the payment and only realize at this point, you can tap Continue Without Closing Table.
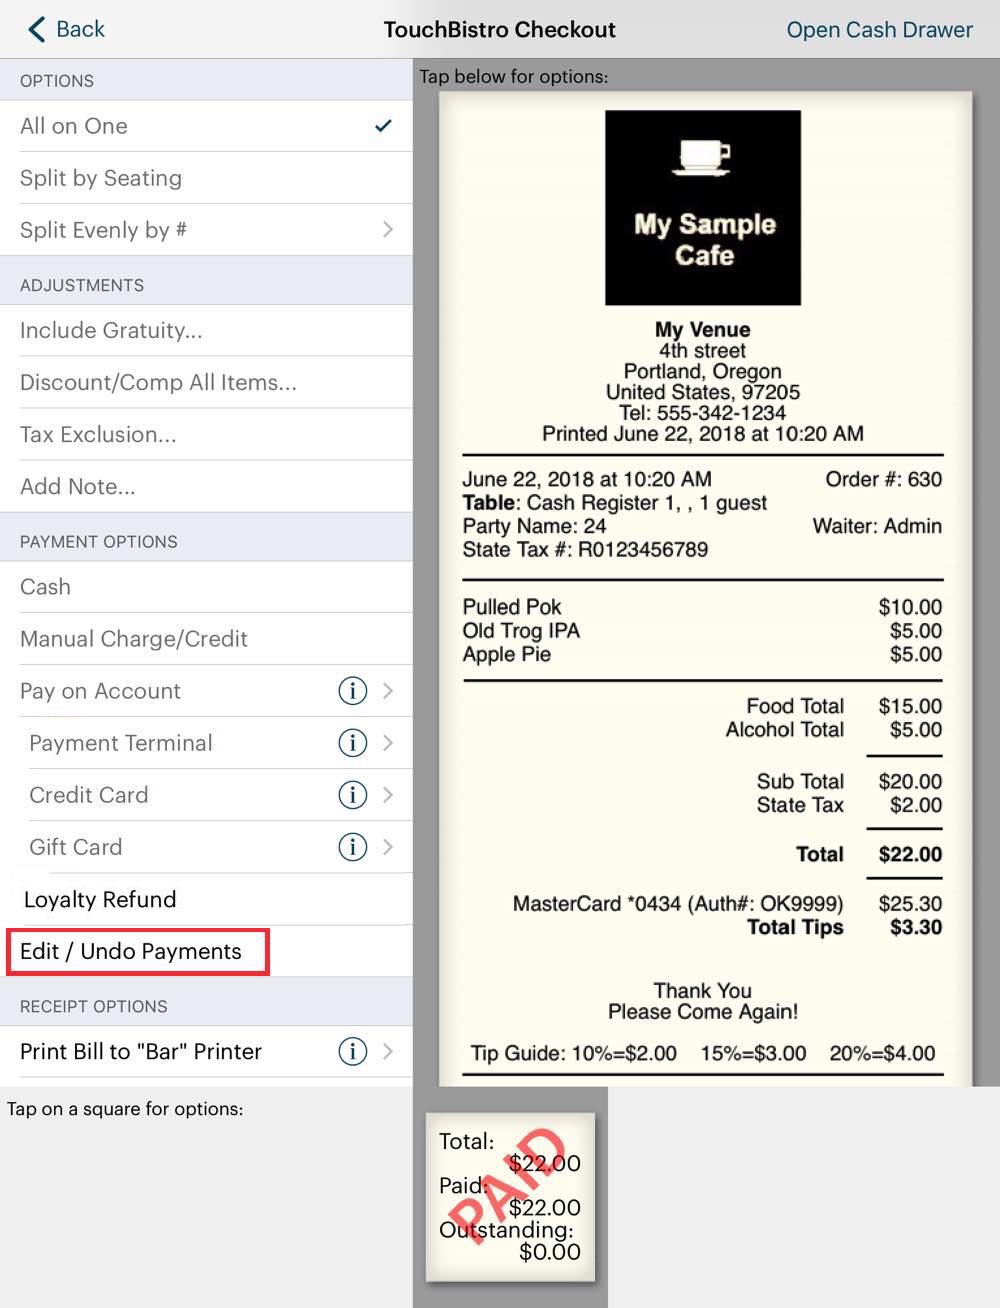
2. Tap Edit / Undo Payments.
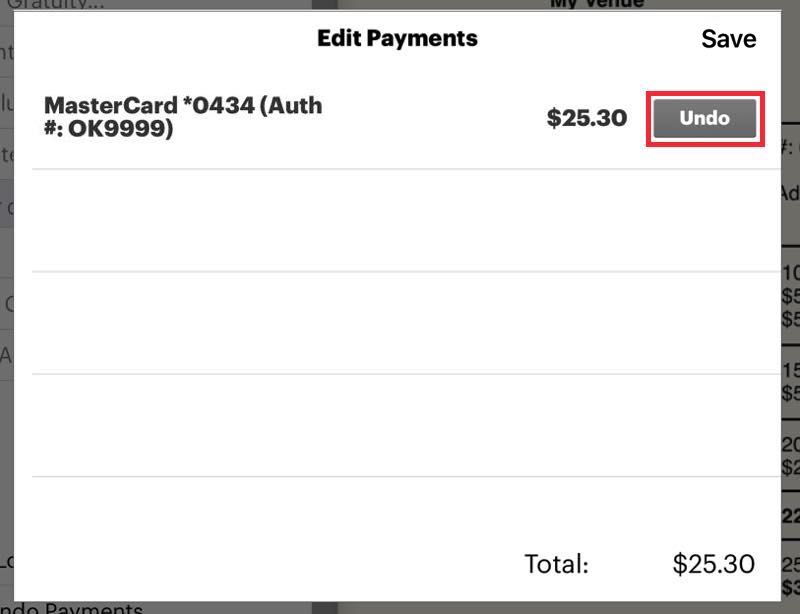
3. Tap Undo.
4. Tap Save.
5. Process the payment again.
 Return to Table of Contents