
 Email
Support
Email
Support Frequently
Asked Questions
Frequently
Asked Questions
Bill & Order Ticket
Table Of Contents
Chapter 2. Order and Bill Numbers
Chapter 3. Edit Bill / Guest Checks
0.8. Include Bill Number for Closed Bills
0.9. Show Each Item’s Discount
0.10. Include Sales Category Totals
0.13. Print TouchBistro Notice
Chapter 1. Introduction
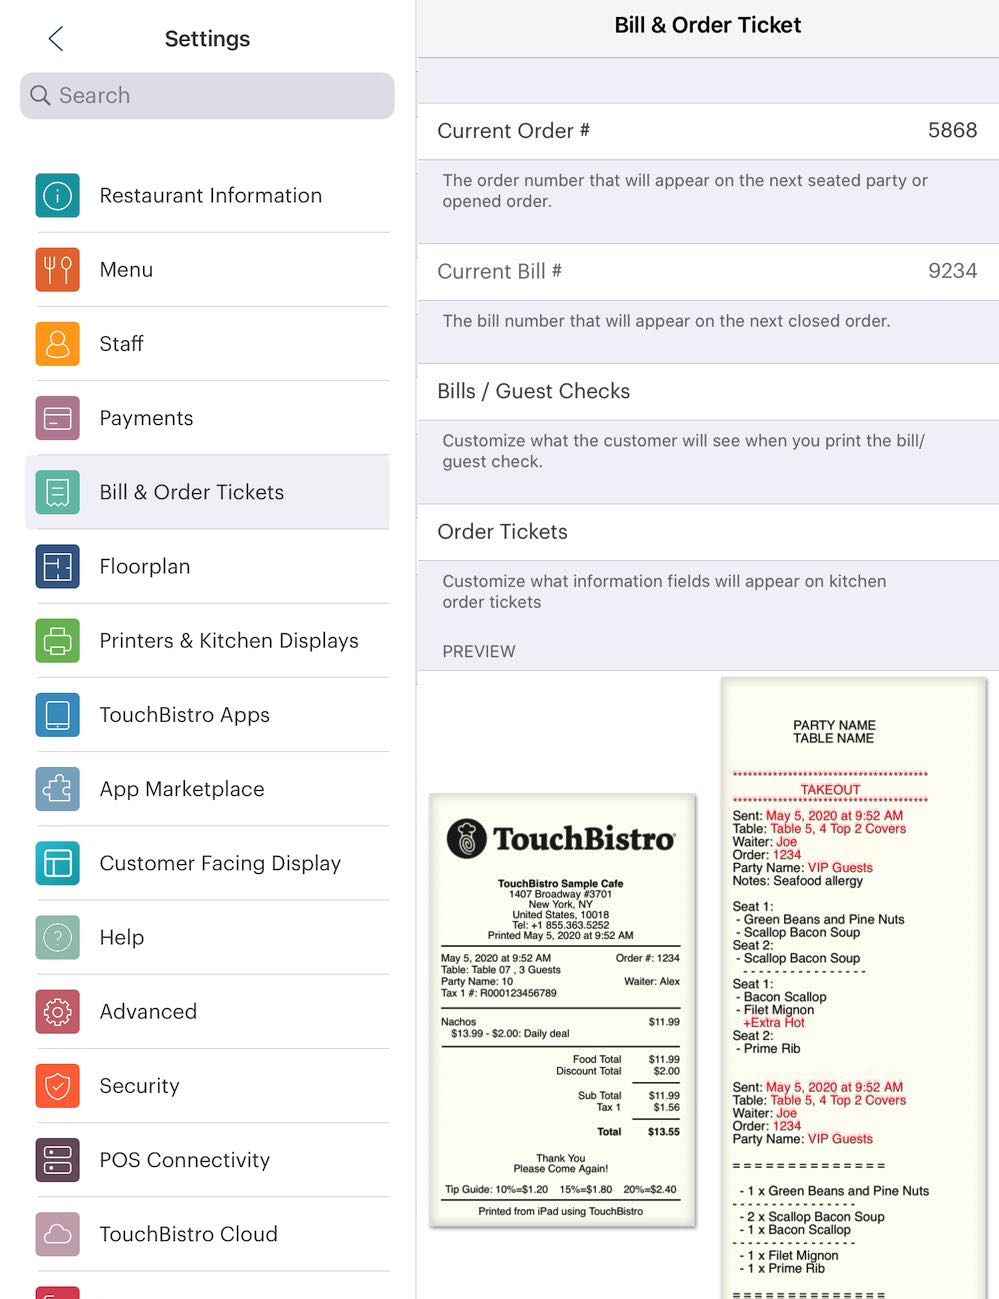
These settings let you customize how your bills or guest checks look. As well, it lets you customize how your paper kitchen order tickets (sometimes referred to as “chits”) look.
Chapter 2. Order and Bill Numbers
If you want to keep your order numbers generated by TouchBistro in sync with your current records, tap Current Order # and enter the desired starting order number. The Current Bill # is displayed but cannot be edited.
Order #: The order number is incremented by one and assigned to any kind of order created (at a table, at a POS, or via takeout/delivery/bar tab).
Current Bill #: A bill number is incremented by one and assigned to a printed receipt.
Example
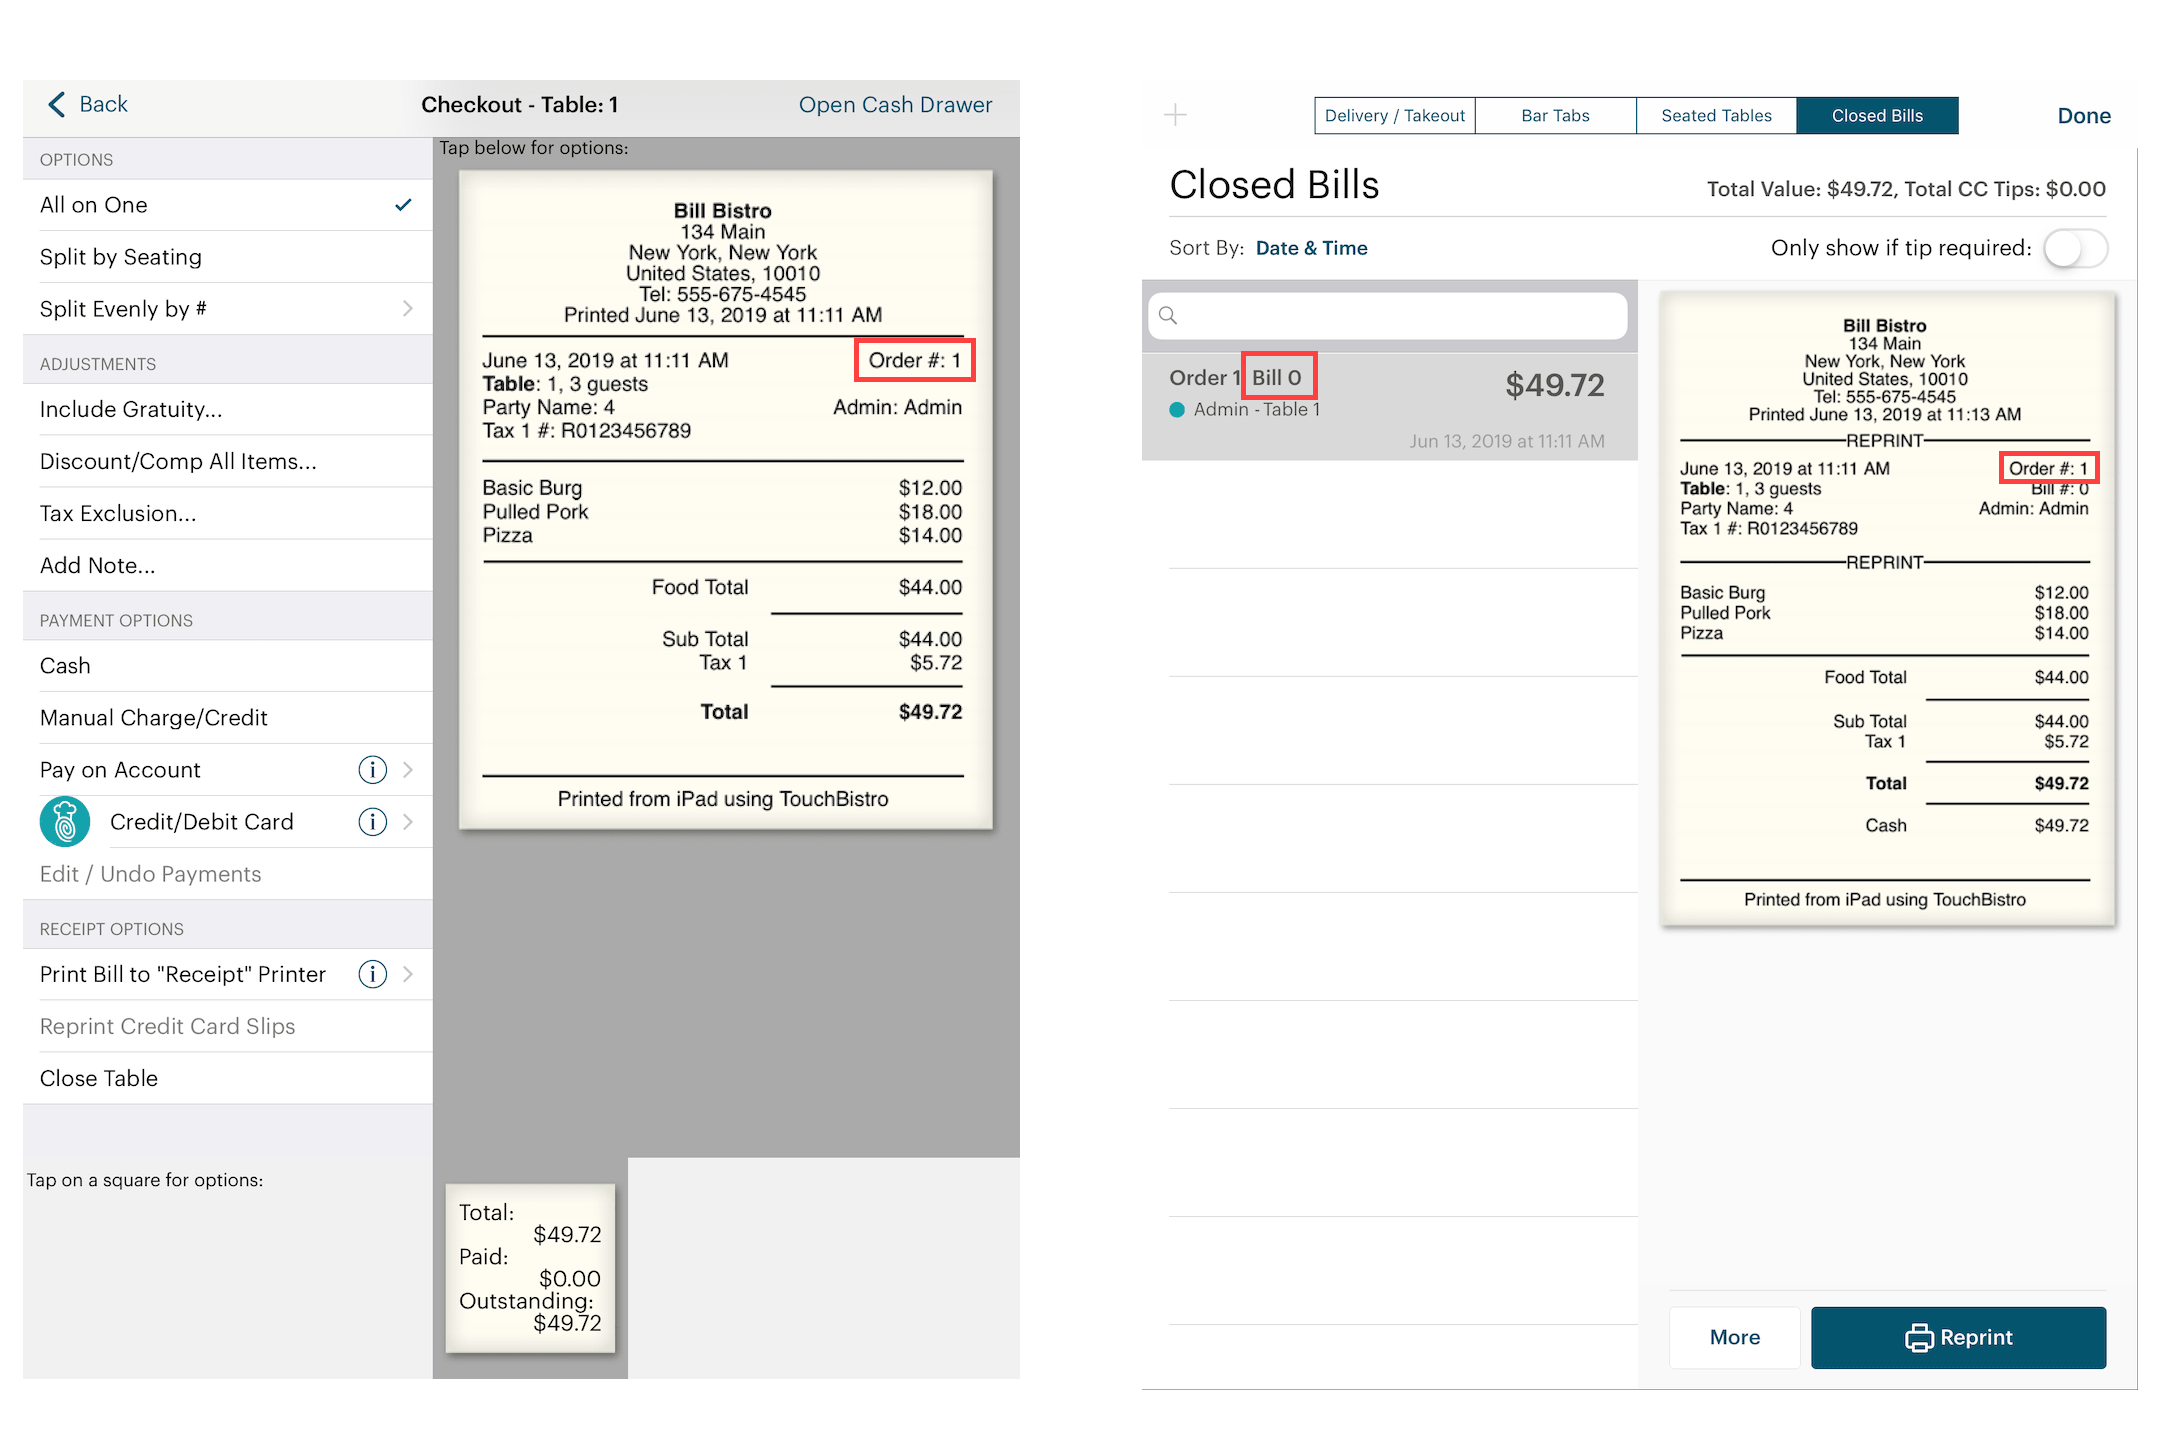
Your very first party (a party of three) enters, sits at a table, and orders. TouchBistro assigns that order number Order 1. The table requests one guest check. That printed bill is assigned Bill #0 (bill number starts a 0).

Another party of three arrives and orders. TouchBistro assigns that order number Order 2. If this second party also requested one guest check, TouchBistro would assign that printed bill Bill #1. However, in this case, this table requests separate checks. When you use TouchBistro’s Split by Seat option, TouchBistro creates 3 guest checks and numbers them Bill #1, Bill #2, and Bill #3.
Chapter 3. Edit Bill / Guest Checks
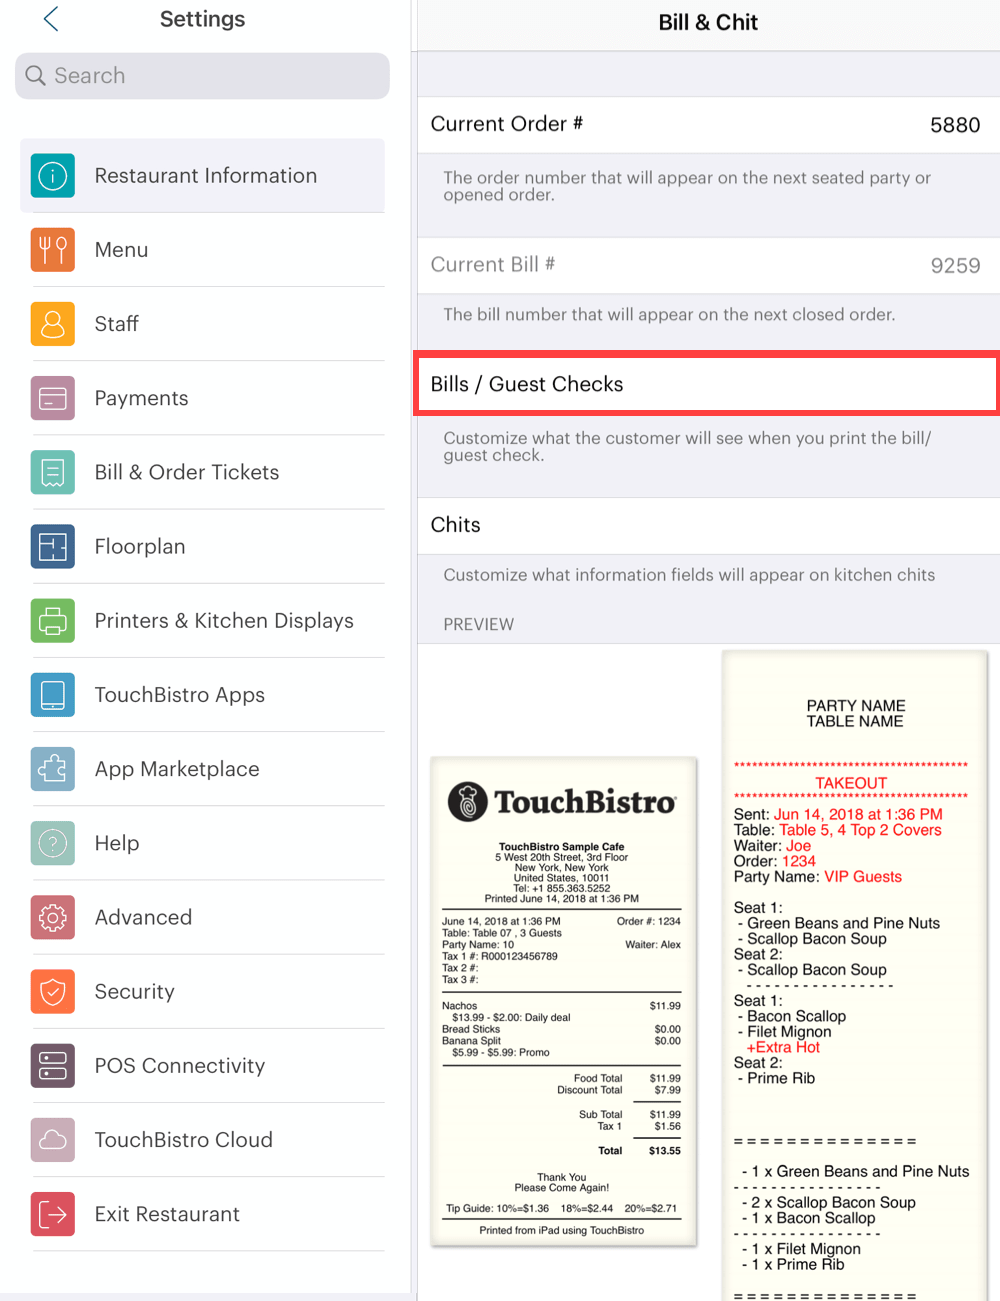
Tap Bills / Guest Checks to customize what appears on your bill/guest check, that is the bill your customer receives.
Tap Done if you’ve made any modifications.
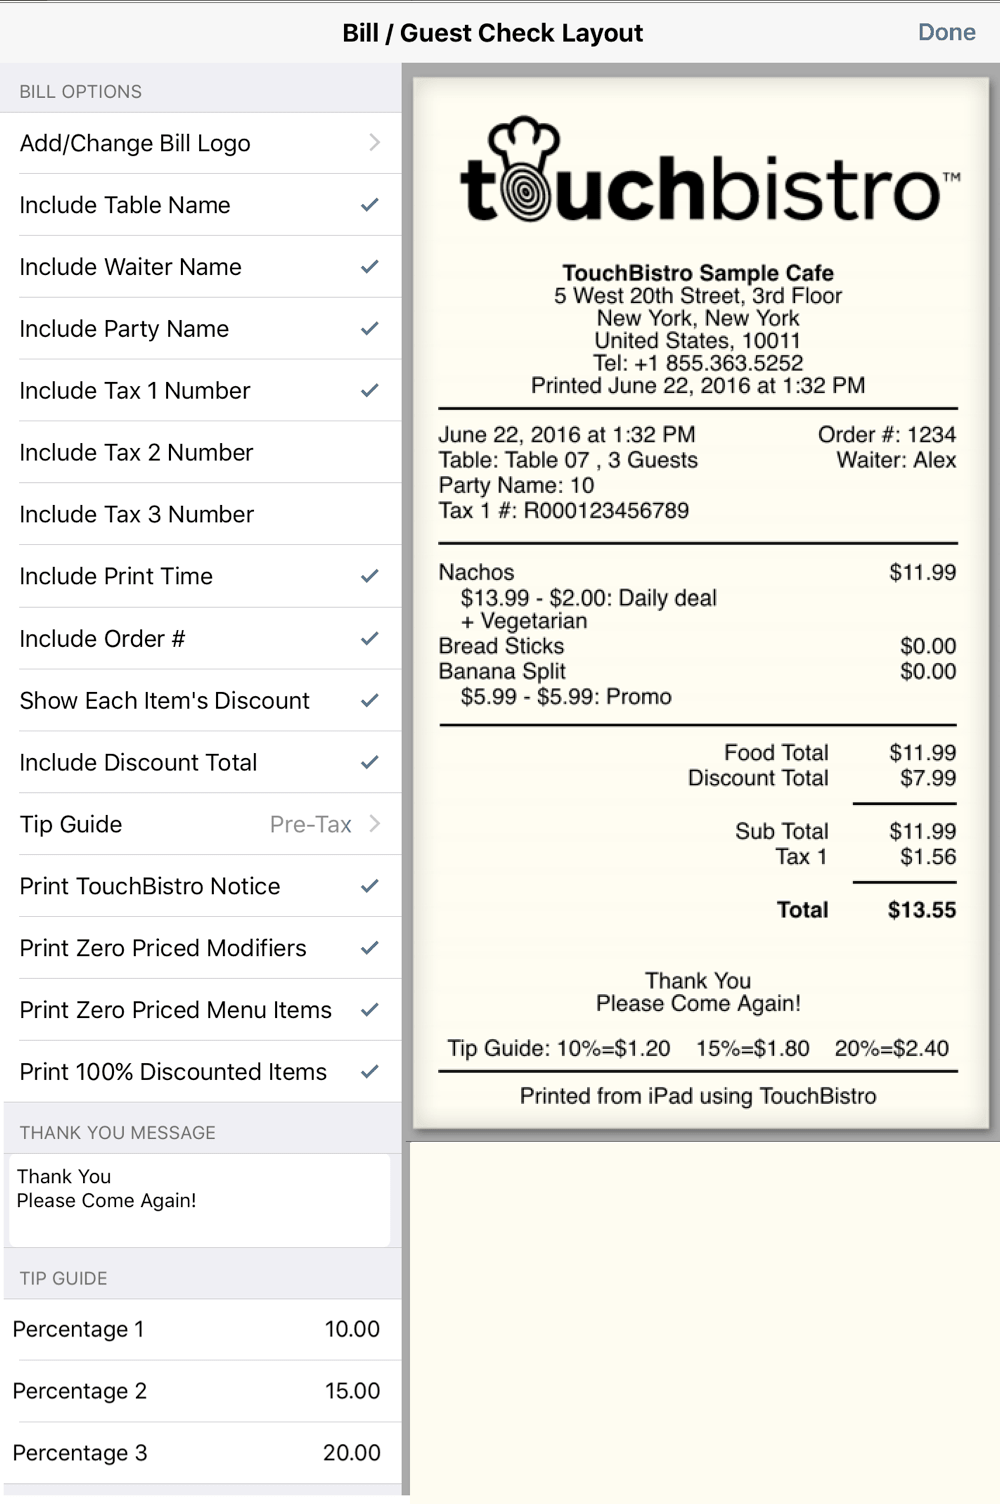
Section 1. Bill Options
Tap to include/remove certain items from appearing on your bill. A checkmark ![]() indicates the item will appear on your bill.
indicates the item will appear on your bill.
0.1. Add/Change Bill Logo
Add a logo that will print to a thermal printer. TouchBistro supports logos up to 750 pixels wide and 300 pixels high.

If the image’s width is greater than the image’s height (for example a landscape logo 500 pixels wide and 200 pixels high), TouchBistro will automatically scale to width, preserving the landscape orientation. If the image’s width is less than the image’s height (for example a portrait logo 200 pixels wide and 500 pixels high), TouchBistro will automatically scale to height, preserving the portrait orientation.
If you want to prevent the image from scaling, ensure the image is exactly 750 pixels wide or exactly 300 pixels high.
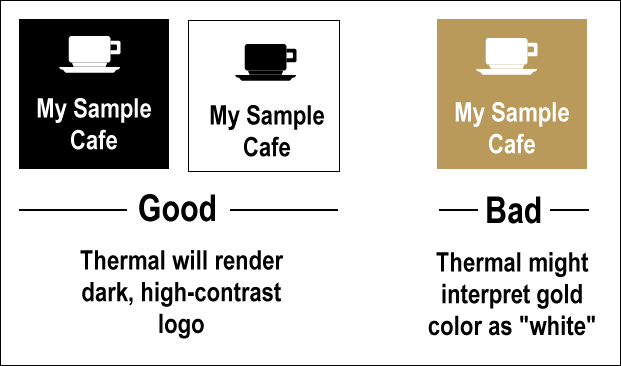
Keep in mind the thermal printer won’t print greyscale or color. Logos that work best are logos with black (or very dark foregrounds) and white (or very light) backgrounds. A color that may appear “dark” to you (e.g., the gold color in the image above) may get rendered as white and it will appear as if no logo has printed.
Choose the picture source:
|
Option
|
Description
|
|
Take Photo
|
Let’s you use your iPad’s main camera to add the bill image.
|
|
Choose from photo library
|
If your logo is on your iPad, use this option to select the image. Use two fingers to zoom in or out on the photo. Use one finger to center the image. When you’re ready, tap Use in the top right.
|
|
Remove photo
|
If you already have an image displaying here, you can tap Remove photo to remove it.
|
Note: If you change your logo at a later date, you need to restart TouchBistro for the new logo to take effect.
0.2. Include Table Name
If enabled, displays the table’s number.
0.3. Include Waiter Name
If enabled, displays the name (Name/Alias field) of the server that started the table or opened the bill.
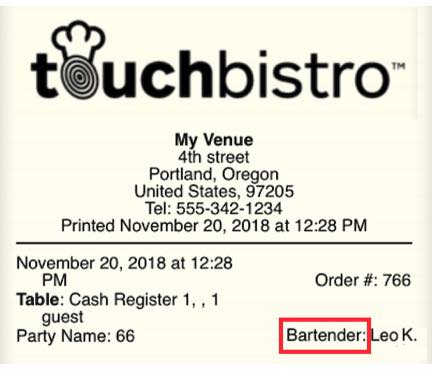
If you include the server name on the guest check, TouchBistro uses the name of the Staff Type the server clocked in under.
For example, Leo K. clocked in as a Bartender staff type. The guest check will use the Bartender staff type name to identify the role of the person who opened the order.
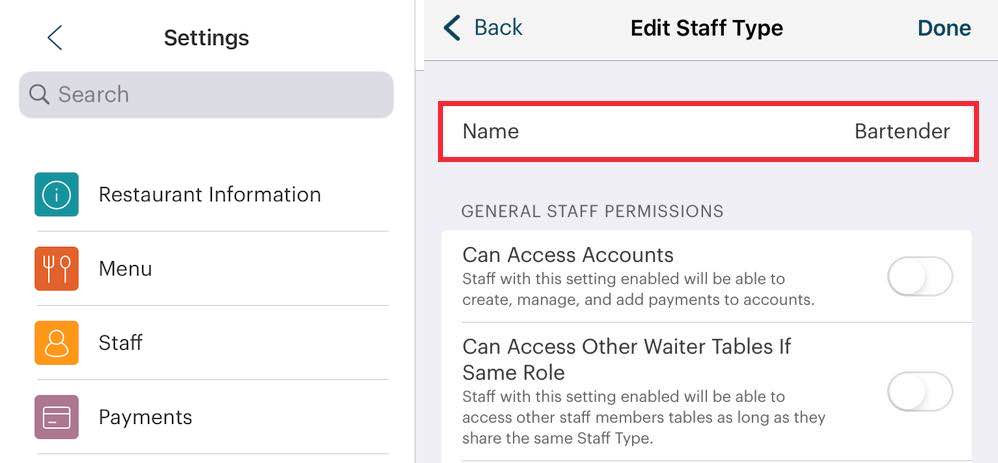
Because staff type names appear on guest checks, we suggest reviewing all your Staff Type names (Admin | Admin Settings | Staff) for spelling and appropriateness. Review this guide for a list of all fields in TouchBistro that are used in a customer-facing way. As well, if you’re interested in what aspects of the guest check are customizable, see this guide.
0.4. Include Party Name
If enabled, displays the name assigned to the table or order or the default party name number. When you start your day, TouchBistro assigns the first order a party name number of 1. Each new order gets incremented by 1. When you close your day, the party name number is reset for the next day.
0.5. Include Tax Number
If you have one or more tax numbers to display on your customer bills, enable the appropriate Include Tax Number options.

0.6. Include Print Time
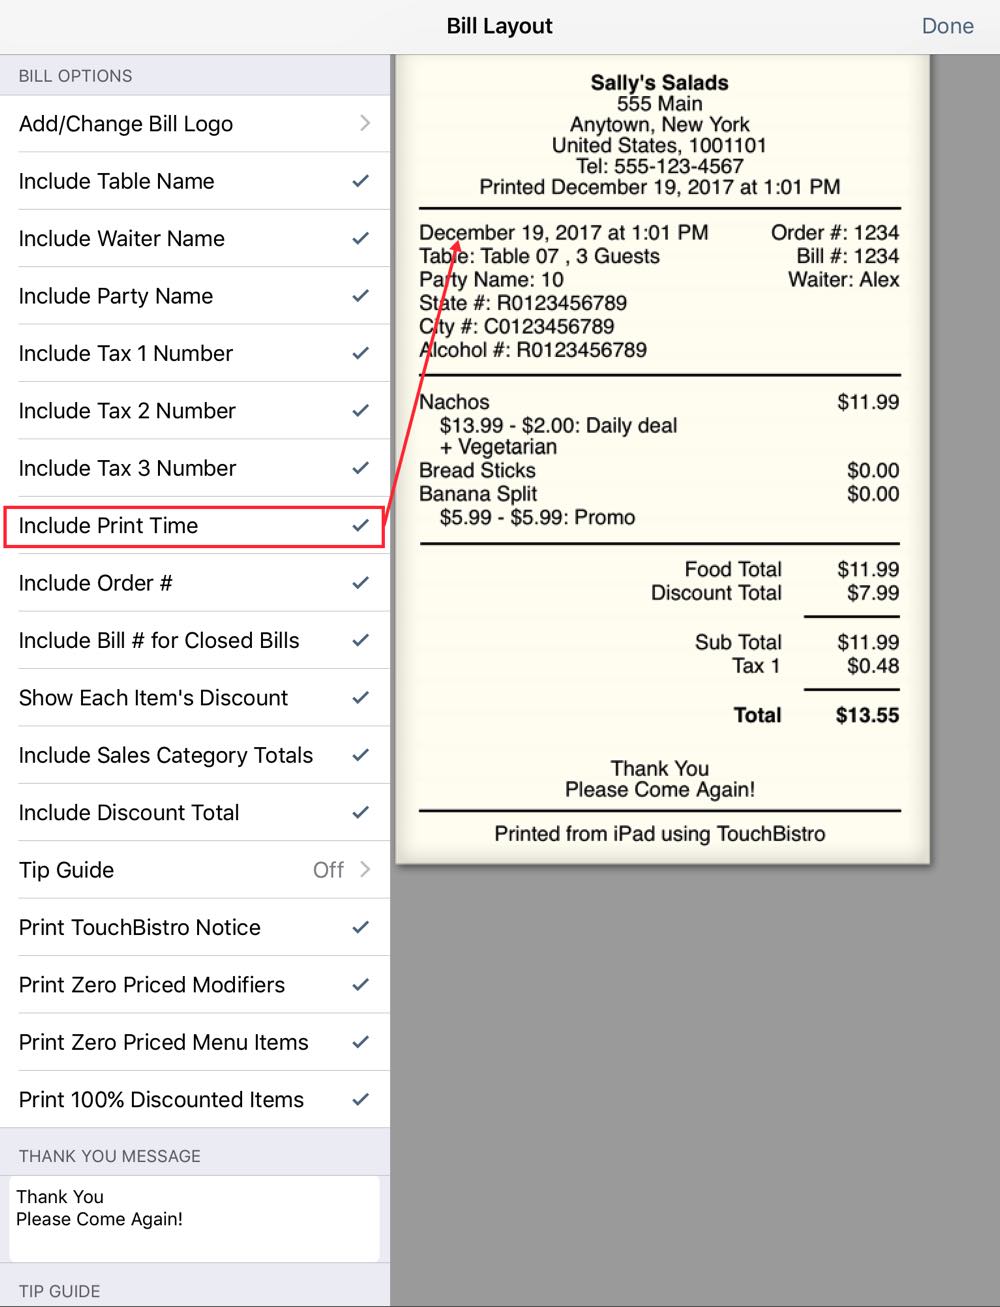
If enabled, displays date and time the bill was originally printed. If the bill is closed without being printed, the Print Time stamps the bill with the time the bill was closed.
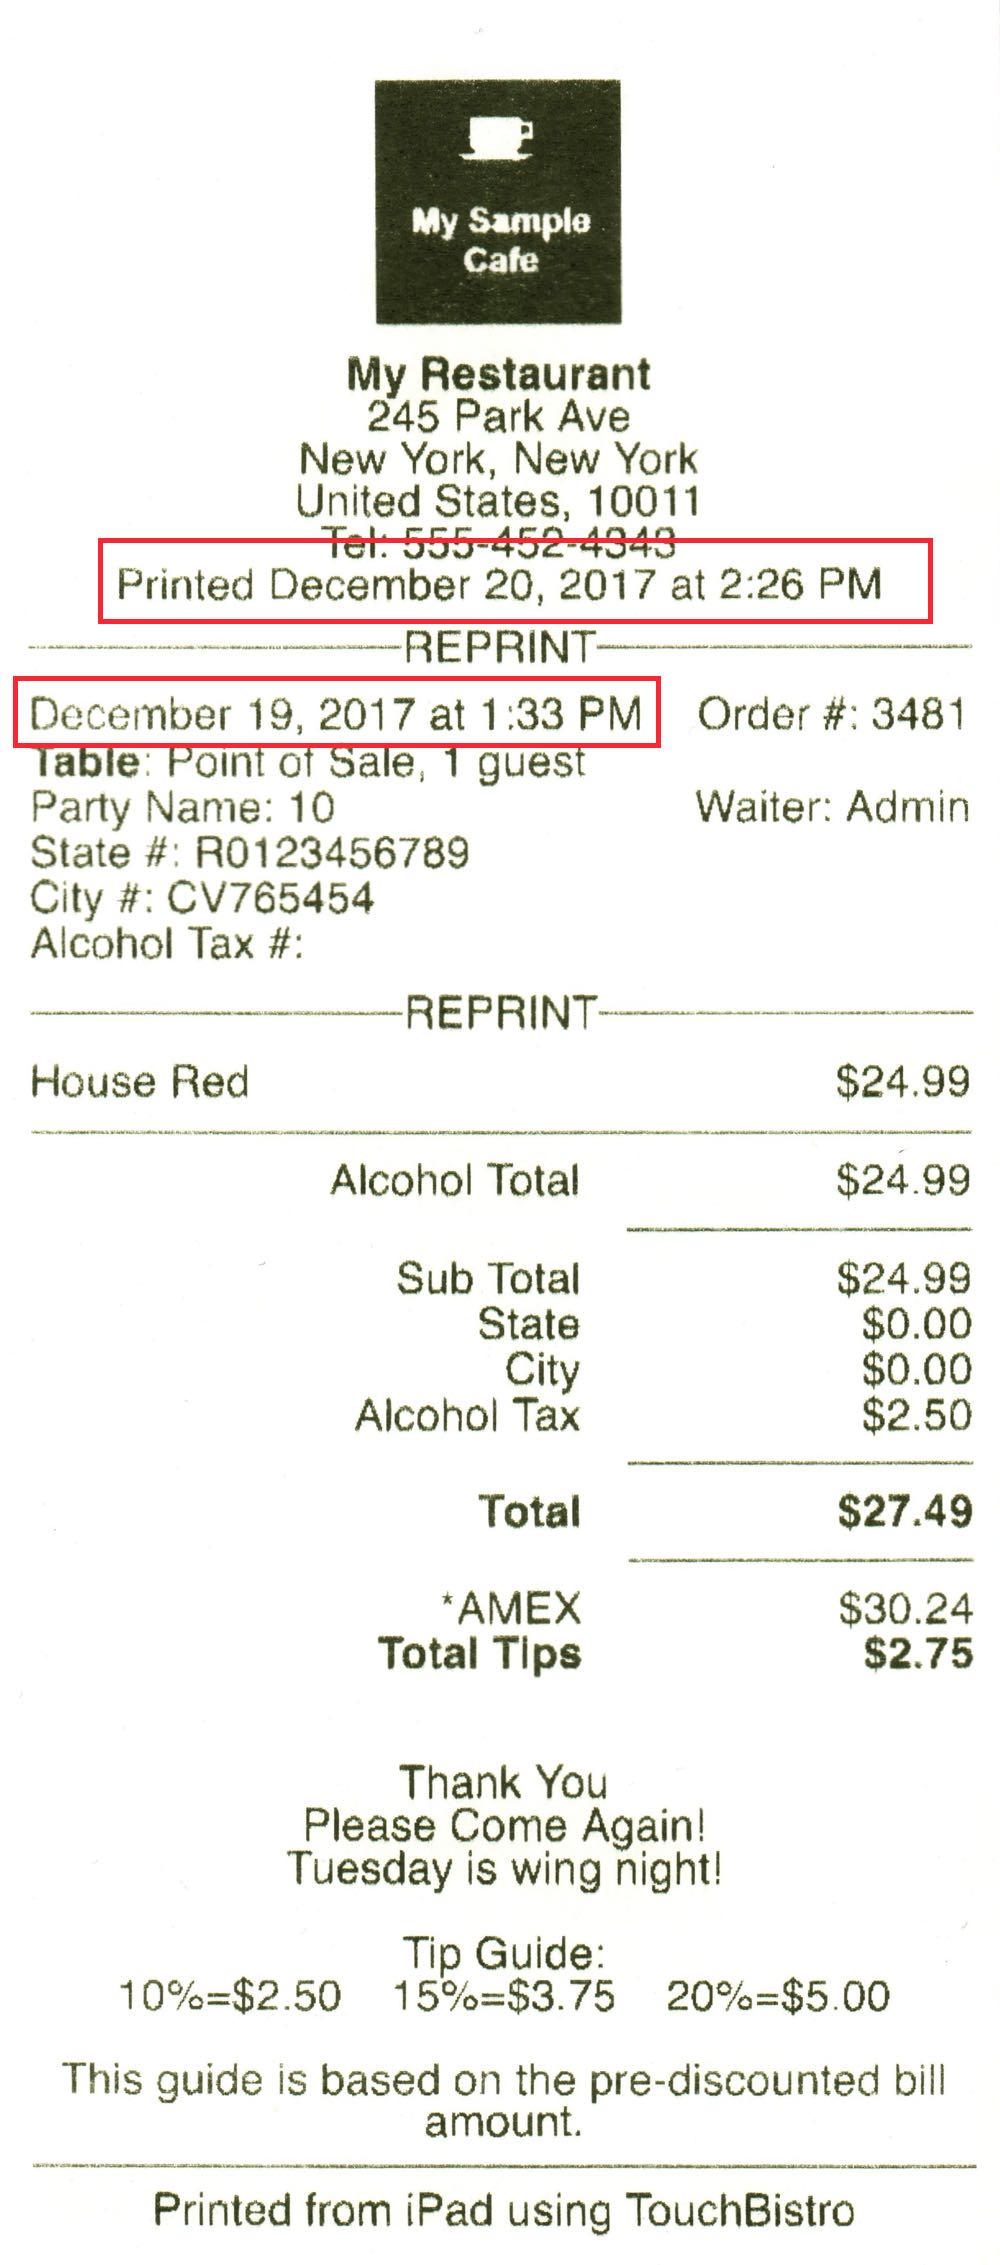
Print Time is helpful to distinguish when a bill was originally printed/closed and when it was reprinted. The time/date under the venue address indicates the time the bill was reprinted. The time/date in the bill header is the time this bill was originally paid and closed. In the pictured example, we can see this bill was reprinted on Dec 20 but originally printed and closed on Dec 19.
0.7. Include Order Number
If enabled, displays the Order Number.
0.8. Include Bill Number for Closed Bills
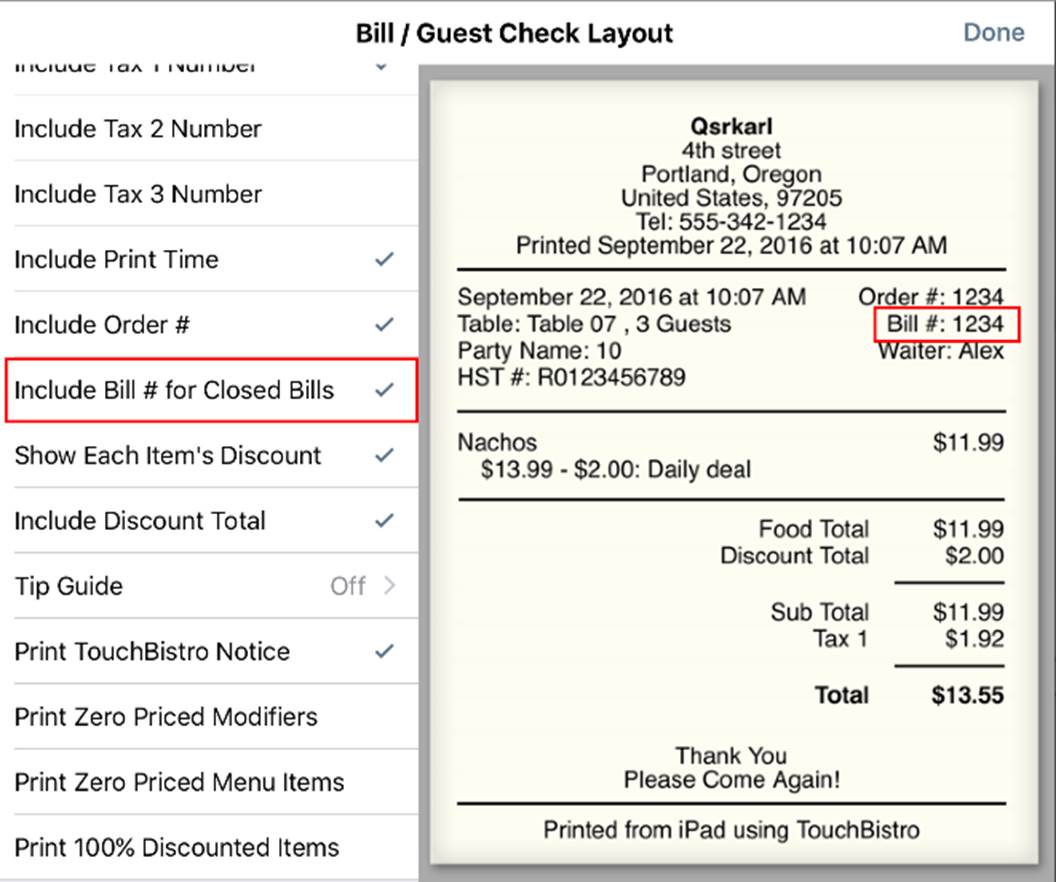
Enable Include Bill # for Closed bills if you would like the guest check to display the Bill #. It can be useful to cross-reference with the following reports that reference a bill number:
1. Detailed Takeout Report
2. Void Report
3. Detailed Discount Report
4. Detailed Account Report
5. Detailed Sales CSV
0.9. Show Each Item’s Discount

Enable Show Each Item’s Discount if you would like the guest check to display discounts applied to individual items.
0.10. Include Sales Category Totals
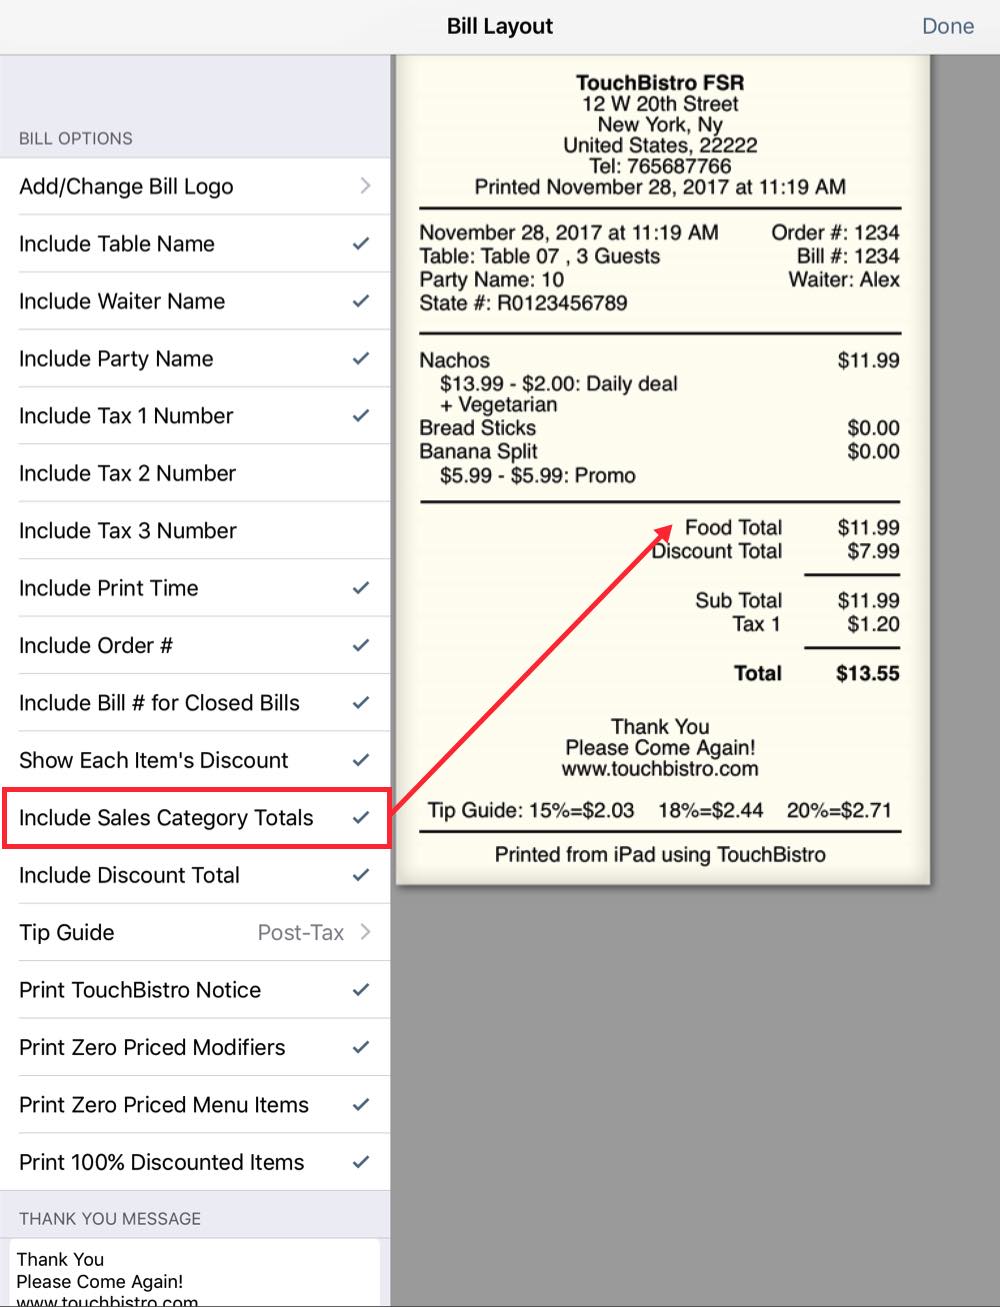
If enabled, displays sales category sub totals. For example, the sub total of Food, Alcohol, Merchandise, etc.
0.11. Include Discount total

Enable Include Discount Total if you would like TouchBistro to summarize the total of all discounts.
0.12. Tip Guide

TouchBistro provides three default tip percentage suggestions. Tap each percentage to customize. Bills generated with TouchBistro will show the suggested dollar amounts on the bill.
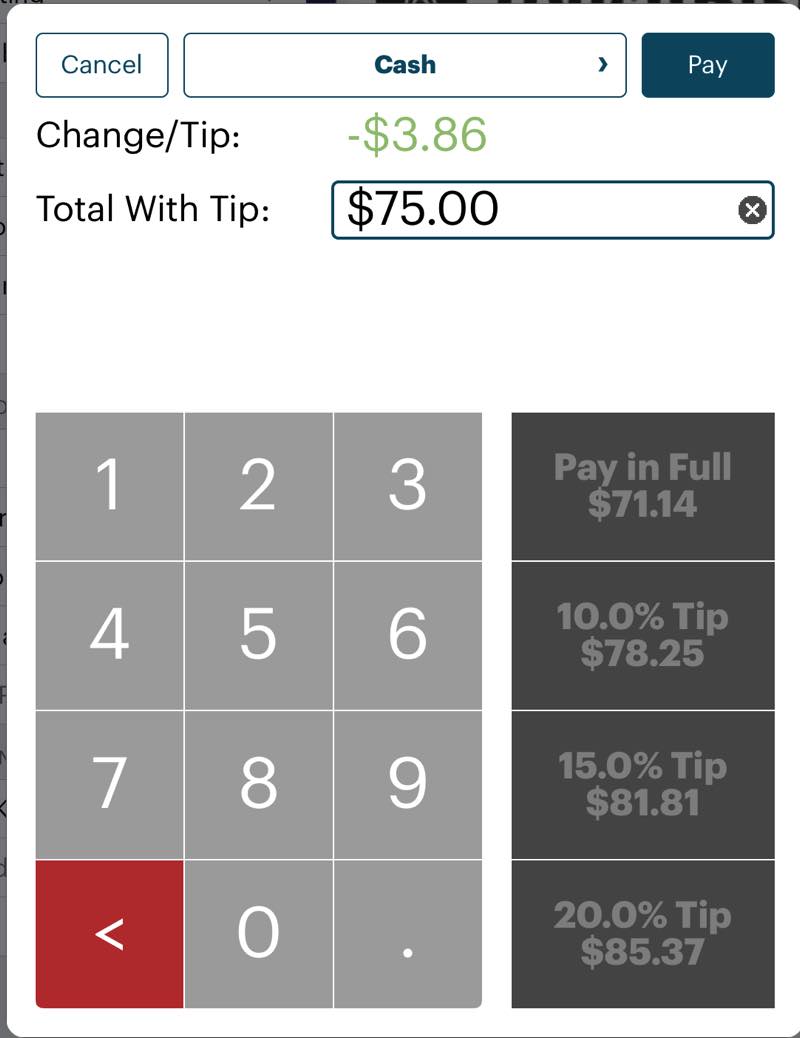
Your tip guide items will also be used on the payment screen’s tip suggestion buttons. These values will NOT reflect the post-/pre-tax Tip Guide setting (see below).
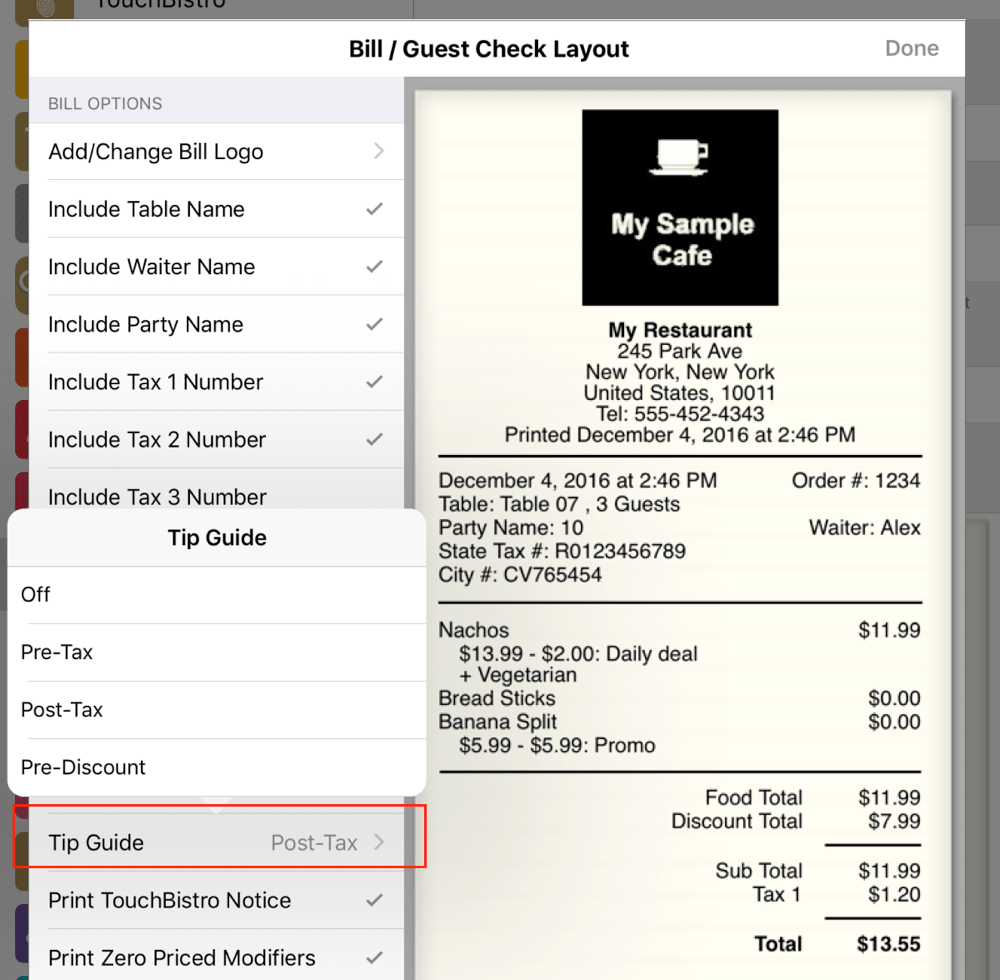
You can tap Tip Guide to change the behavior of the tip guide and the tip suggestions on the cash out screen. You can remove it altogether from guest checks or control if it calculates the tax pre-tax, post-tax, or pre-discount. Pre-Discount is useful if your venue makes use of a lot of discounts. Servers are not penalized with lower tips based on post discount tip suggestions. Note: Pre-Discount suggests pre-tax.
Notes: Auto Grats will always calculate pre-tax, post-discount regardless of what you set here. If you’re using an integrated PIN pad, PIN pad manufacturers configure tips to calculate post-tax. Payment devices (PIN pads, swipers) will not use the settings here.
0.13. Print TouchBistro Notice
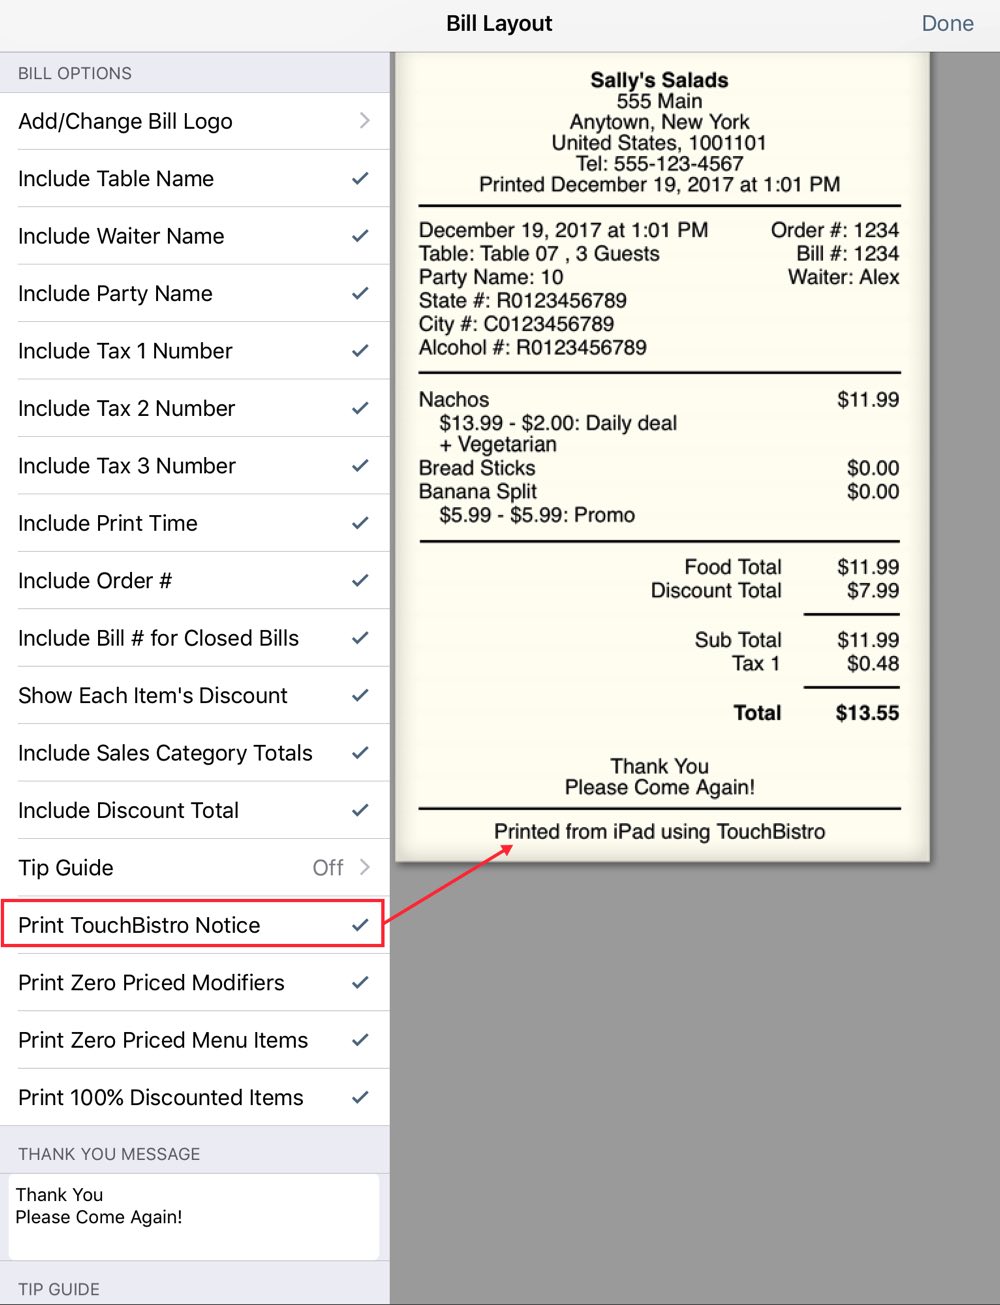
If disabled, the Printed from iPad using TouchBistro footer will no longer appear.
0.14. Zero Priced Items
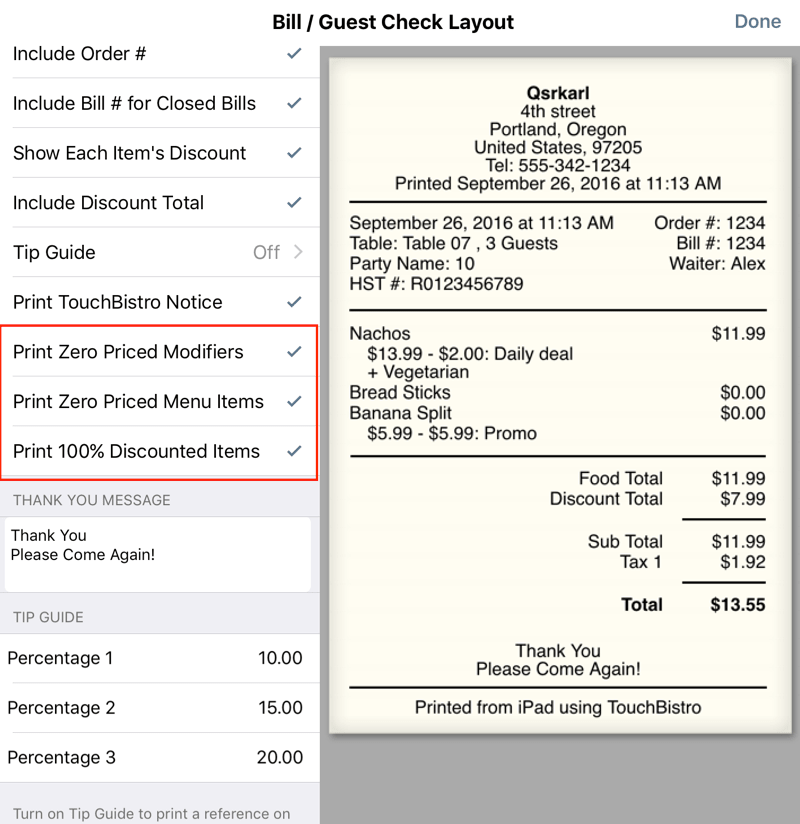
Enable zero priced items if you would like certain zero-priced items to appear on the bill.
|
Setting
|
Description
|
|
Print Zero Priced Modifiers
|
When enabled, you can force modifiers without additional charge to appear on a customer bill.
|
|
Print Zero Priced Menu Items
|
If enabled, TouchBistro will print menu items with a zero price.
|
|
Print 100% Discounted Items
|
If enabled, TouchBistro will print menu items that have been discounted 100% (that is to $0).
|


0.15. Thank You Message
Enter a message that will print on the bill.
Chapter 4. Order Tickets
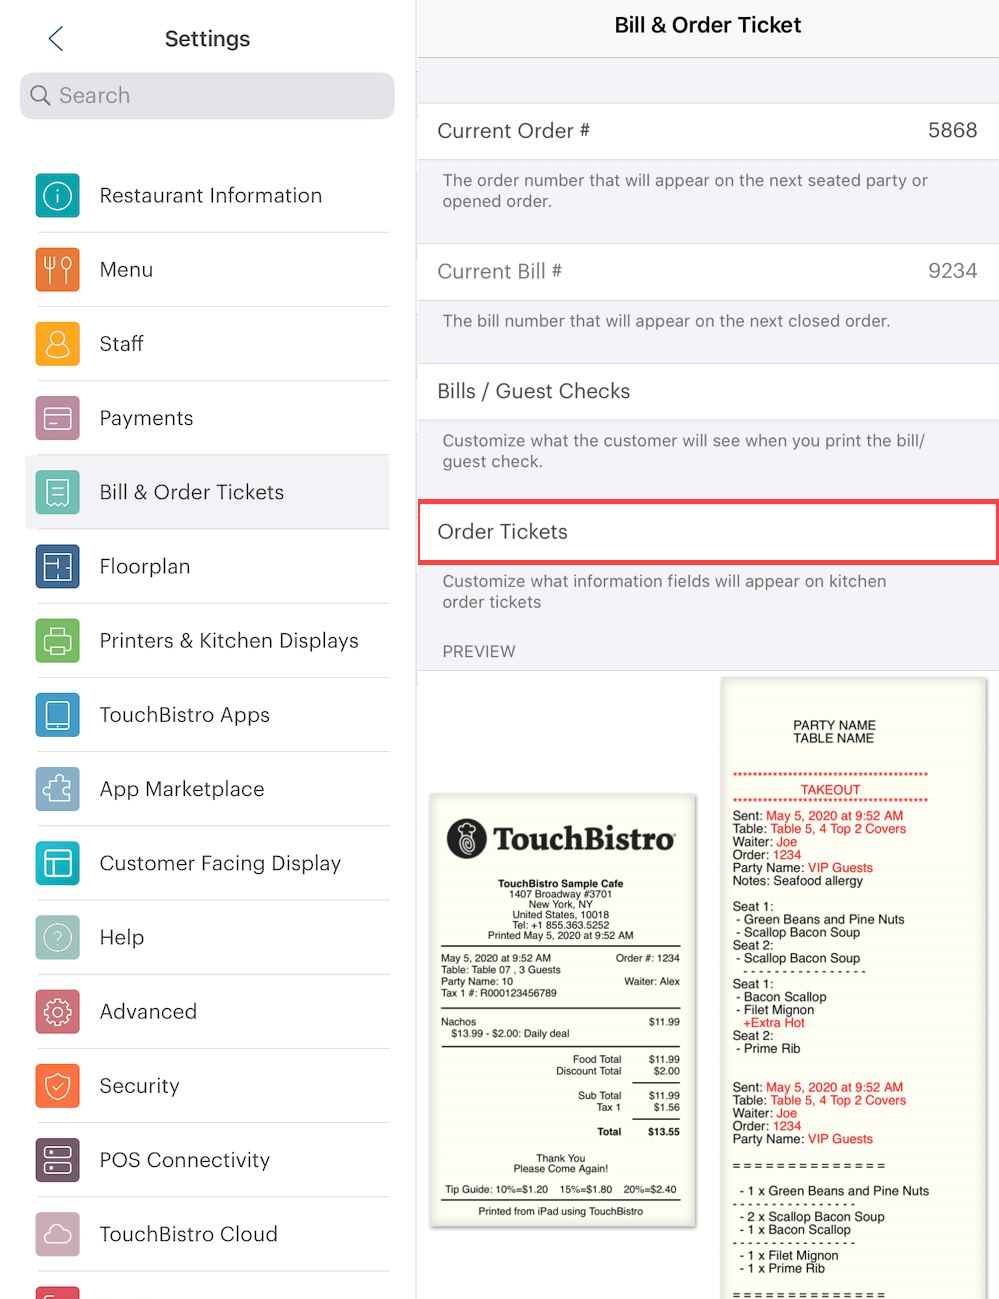
Tap Order Tickets to customize what appears on your kitchen tickets.
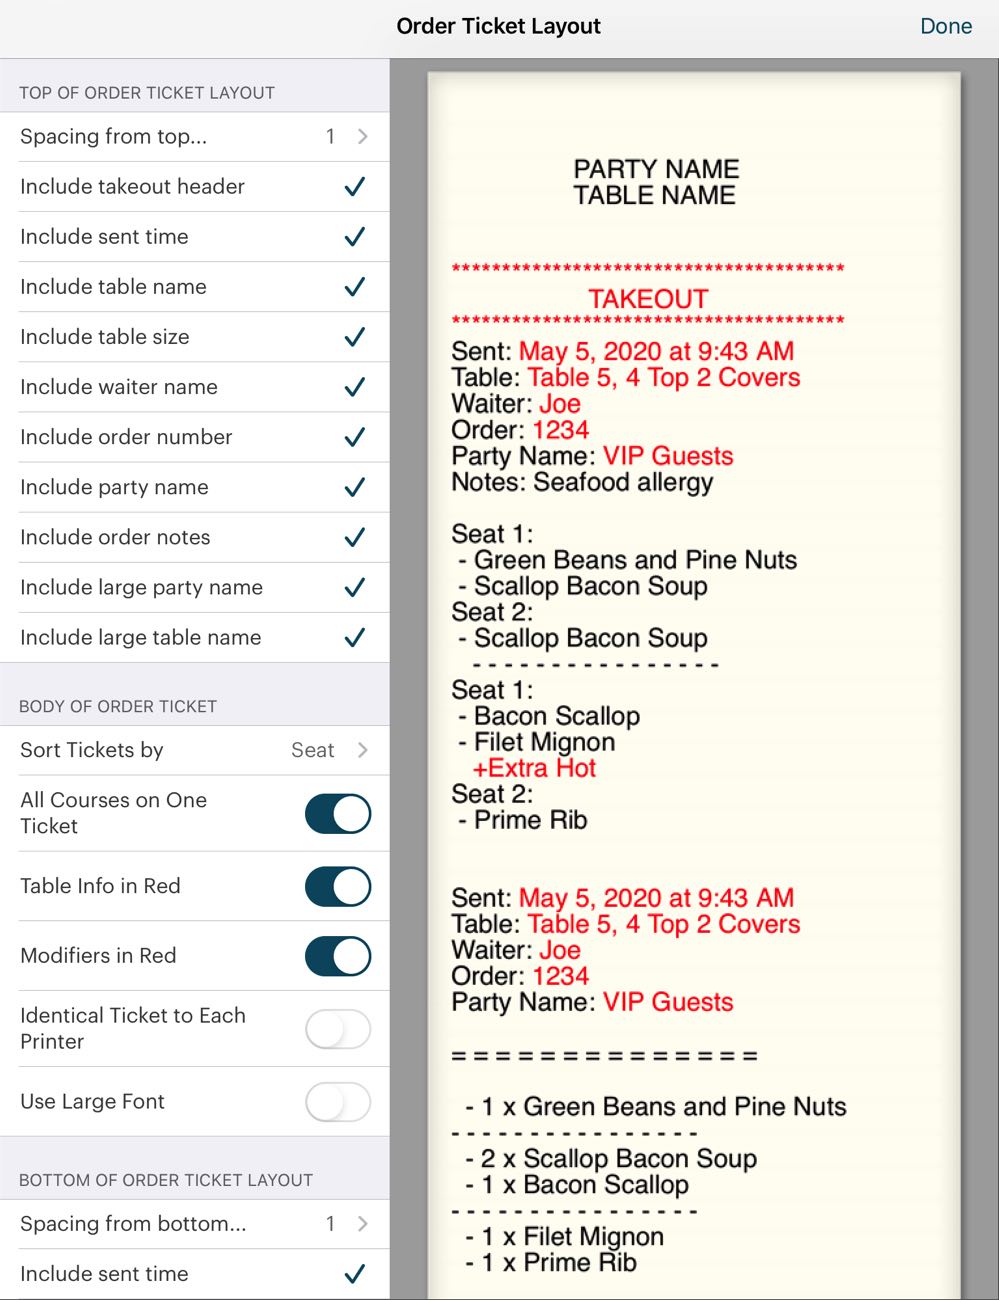
You can configure three areas: Top of Order Ticket, Body of Order Ticket, and Bottom of Order Ticket. Tap Done if you’ve made any modifications.
Section 1. Top of Ticket
|
Option
|
Description
|
|
Spacing from top
|
By default, the ticket will skip down two lines before printing the body. If you want to increase or decrease the number of lines skipped, tap this.
|
|
Include takeout header
|
If enabled, TouchBistro will print a TAKEOUT or DELIVERY banner across the top of the ticket. If a custom takeout type was selected, the ticket will print the banner with the custom takeout type.
|
|
Include sent time
|
If enabled, TouchBistro will print the time the order was sent to the printer.
|
|
Include table name
|
If enabled, TouchBistro will print the name of the table (for example, “Table 5”). This should not be confused with the Party Name (see below). This will always print the table name even if the party was named.
|
|
Include table size
|
If enabled, TouchBistro will print the table’s default table size (e.g., 4 top) plus the number of actual covers at the table at the time the ticket was sent.
|
|
Include waiter name
|
If enabled, TouchBistro will print the name of the server who opened the table or was transferred the table at the time the ticket was sent.
|
|
Include party name
|
If enabled, TouchBistro will print the party name in the header.
|
|
Include order notes
|
If enabled, TouchBistro will include any notes added to the guest check before sending the ticket. If you are using Online Ordering, this will be defaulted on and you cannot disable it.
|
|
Include large party name
|
If enabled, TouchBistro will print the party name at the top of the kitchen ticket.
This helps to expedite the order by customer name.
|
|
Include large table Name
|
If a table has been given a party name but you would like both the party name and the original table number to appear at the top the kitchen ticket, you can now enable Include large table name.
This helps to expedite the order by customer name.
|

Section 2. Body of Ticket
|
Option
|
Description
|
|
Sort tickets by
|
Tap to select if you want the table order to be sorted by Seat or Course. If sorted by Course, items will be identified by seat in brackets next to the item. For example (S1) for seat one.
|
|
All Courses on One Ticket
|
If you prefer courses to print to their own tickets, slide this item to the off (non green) position.
|
|
Table Info in Red
|
If you prefer to have your header/footer information in red, enable this setting. (Note the Epson TM-U220 does not support this feature.)
|
|
Modifiers in Red
|
If you prefer order modifiers (see Setting up Item Modification) to print in red and your ticket printer supports two ink ribbons (e.g., the SP700), slide this option to the green position.
|
|
Identical Ticket to Each Printer
|
If you have different items going to different printers (say, drinks to a bar printer, food items to a kitchen printer), by default the printers will only print the order items for the flagged printer. If you want all items ordered to print to all printers, enable this.
|
|
Use Large Font
|
Slide to the green position if you prefer a larger font and your printer supports a larger font.
|
Section 3. Bottom of Ticket
|
Option
|
Description
|
|
Spacing from bottom
|
By default the ticket will skip down two lines before printing the bottom of the ticket. If you want to increase or decrease the number of lines skipped, tap this.
|
|
Include…
|
Tap remove or add the items to the ticket. The item will appear if flagged with a checkmark
|
Section 4. Consolidation Settings
|
Option
|
Description
|
|
Include Consolidation in Header
|
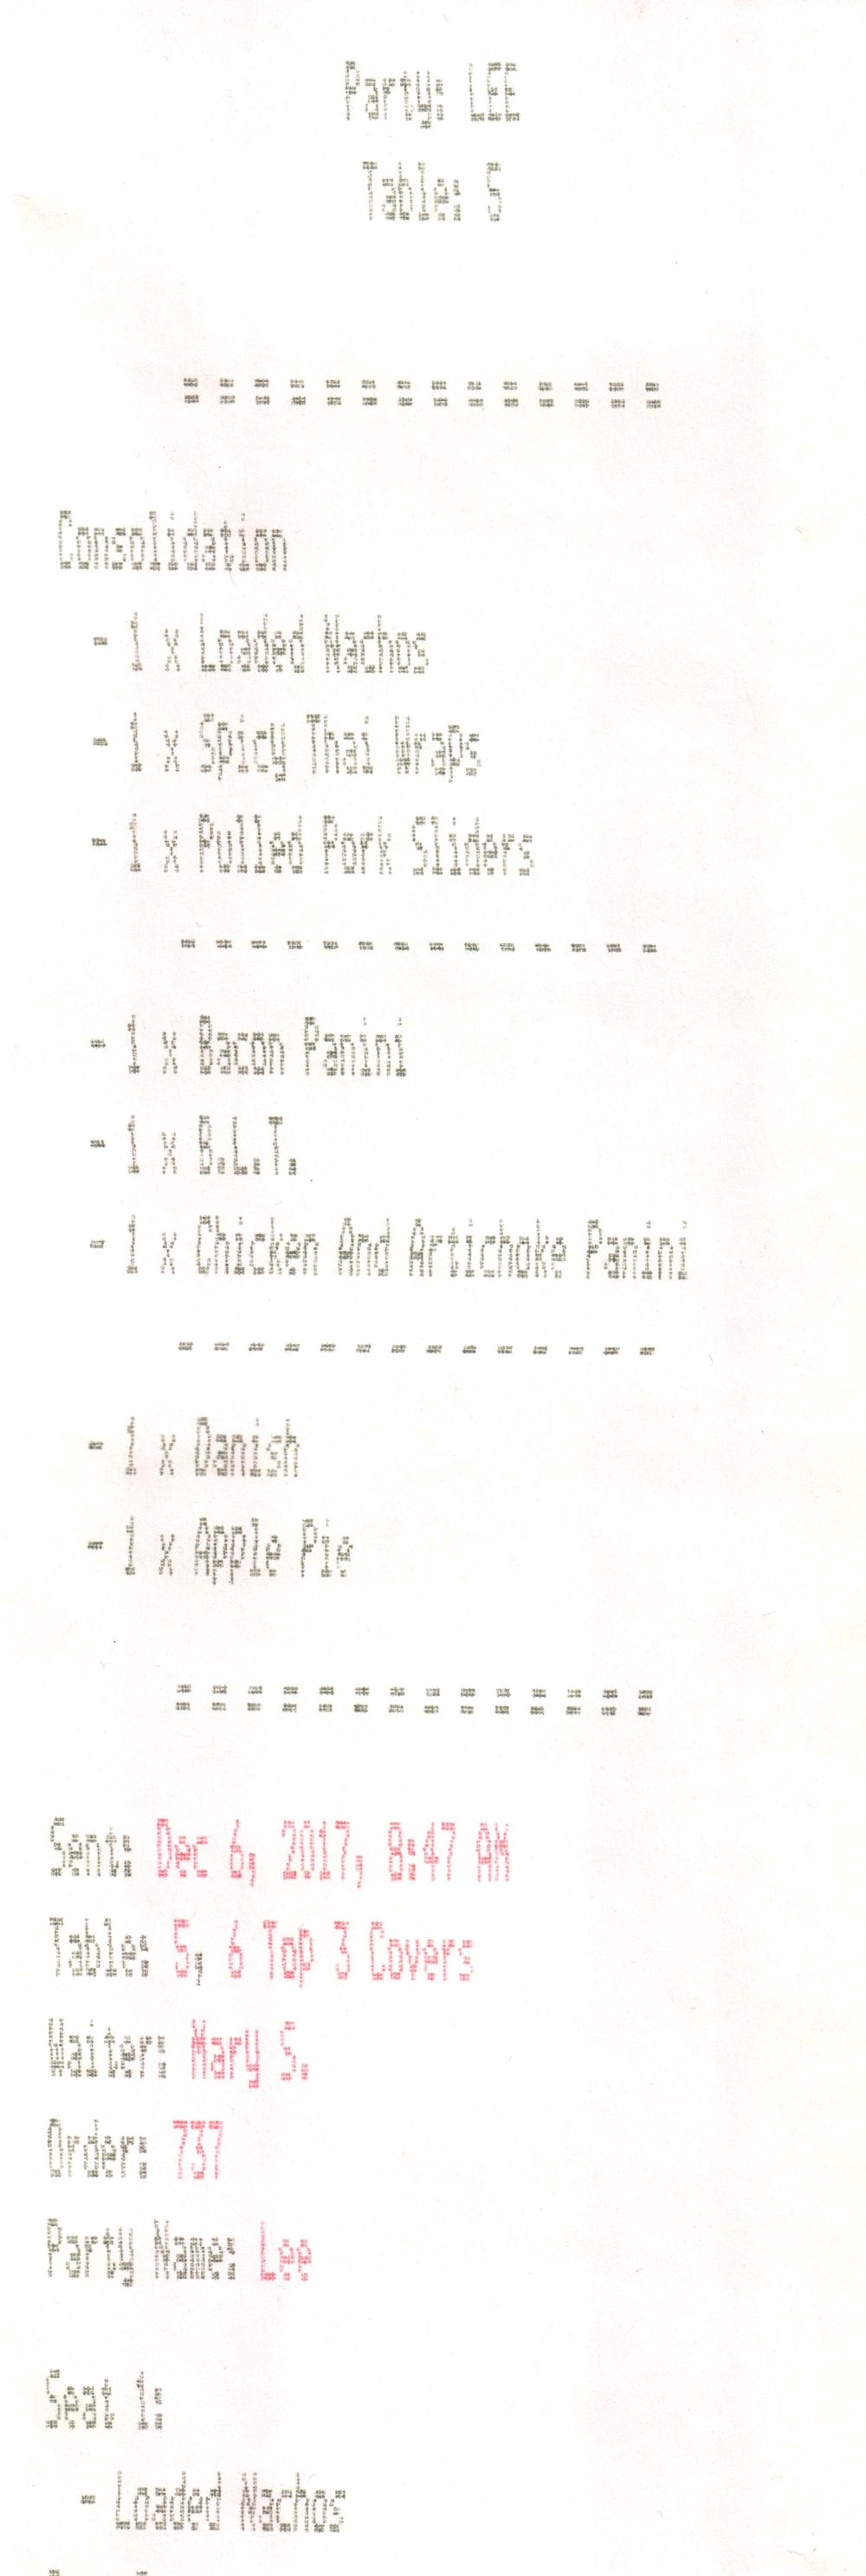
If enabled, TouchBistro groups menu items by number at the top of the ticket.
If any menu item was set to print on its own ticket (specified when you edited that menu item), the consolidation will not list the item set to print on its own ticket.
|
|
Include Consolidation in Footer
|
If enabled, TouchBistro groups menu items by number at the bottom of the ticket.
If any menu item was set to print on its own ticket (specified when you edited that menu item), the consolidation will not list the item set to print on its own ticket.
|
|
Consolidate by Course
|
If enabled, the consolidation will be visually separated by course.
|
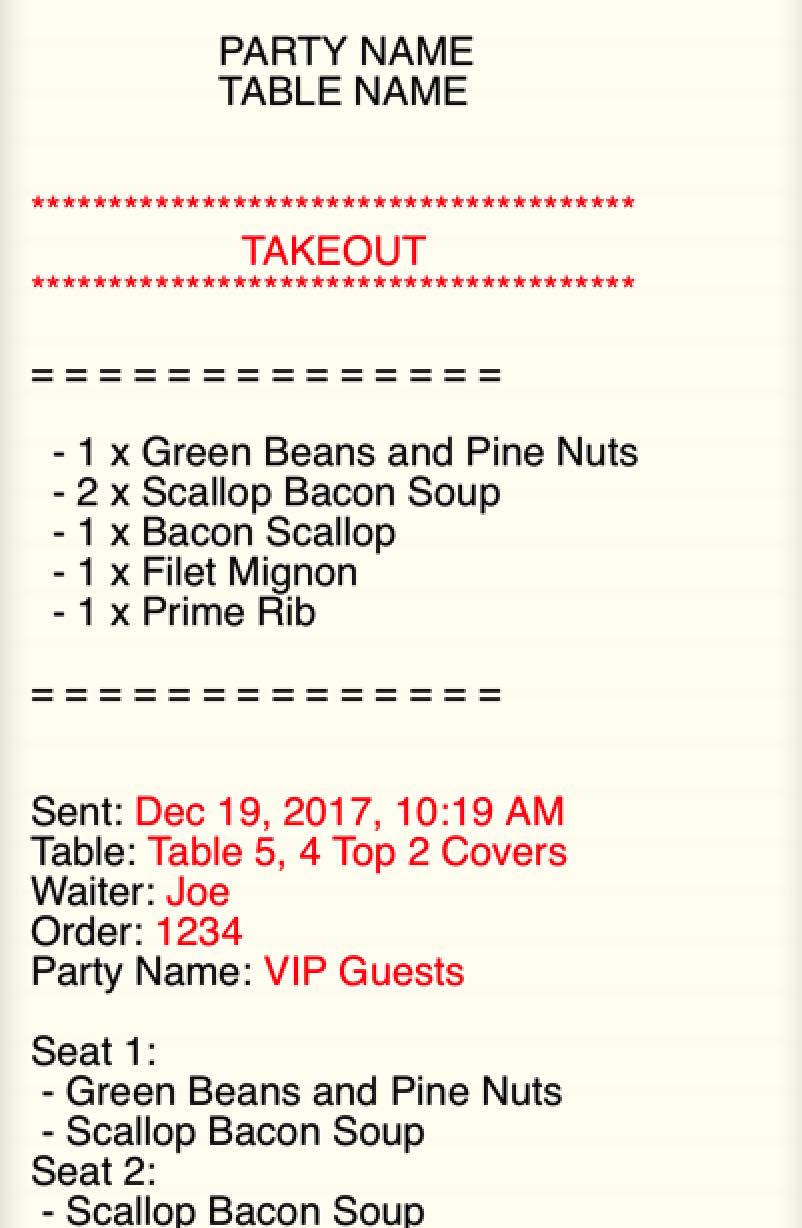

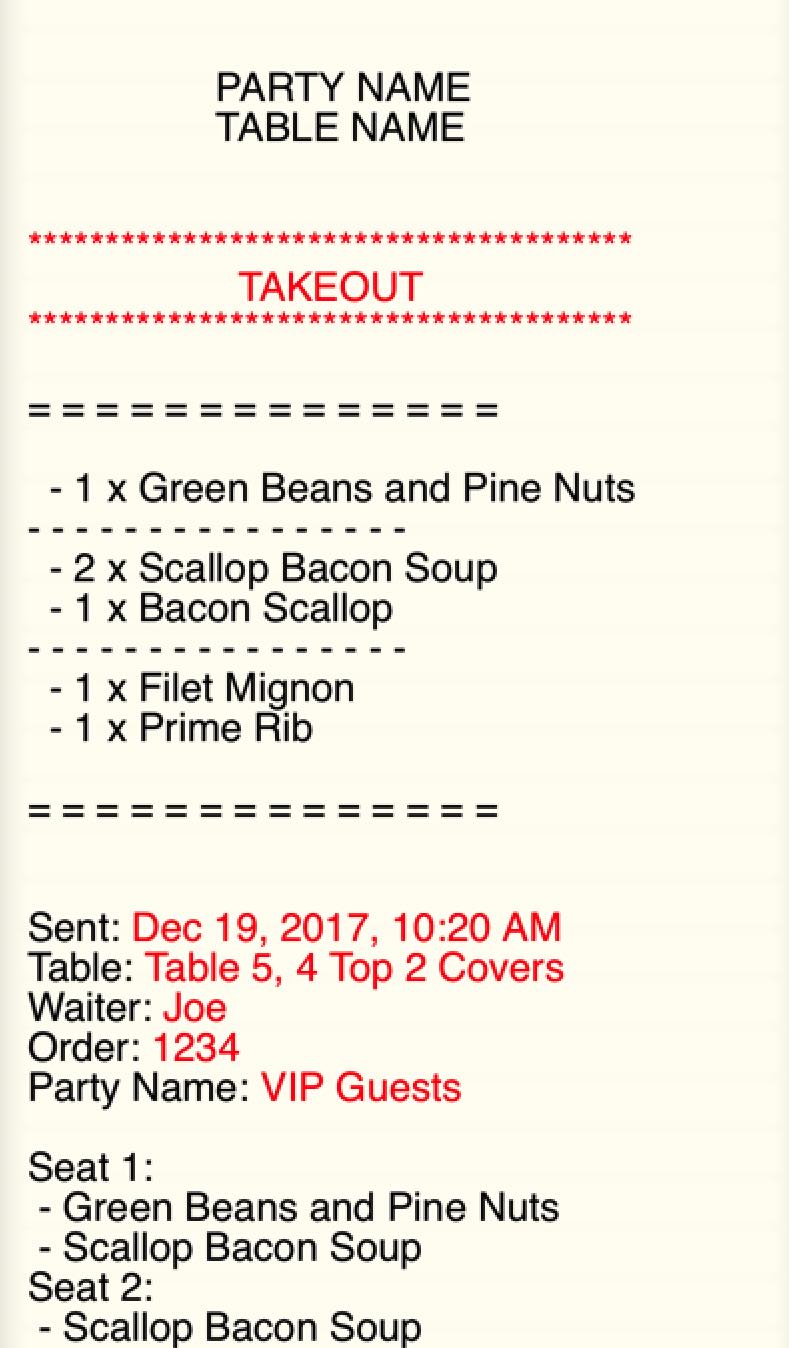
For a sample of what kitchen tickets look like in TouchBistro, click here.
Chapter 5. Related Articles
Customizing Printers for Bartenders
Printer Samples
Printing Chinese or other Non English Characters on your Kitchen Tickets
 Return to Table of Contents