Reservations – Creating a Setup and Schedule Configuration for Valentine’s Day
Table Of Contents
Chapter 2. Create an Alternative Floorplan Setup
Chapter 3. Creating a Configuration for Valentine’s Day
Chapter 4. Create an Exceptional Schedule
Chapter 5. Schedule Your Floorplan’s Setup
Chapter 6. Fine Tuning Reservations Valentine’s Day
Section 1. Limit Covers and Reservations
Chapter 1. Introduction
Normally your venue might have a mix of tables sizes (two tops, four tops, six seaters, larger group tables, etc.). However, Valentine’s Day, notably the PM timeslot, tends to be a day when two-seaters are in high demand. You might roll out larger group tables and replace them with several two tops, which will allow you to accommodate more couples.
This guide will walk you through how to create an alternative floorplan for Valentine’s Day as well as ensure the alternative tables automatically become available for the Valentine’s Day PM timeslot.
As well, it will show you how to optimize online reservations for Valentine’s Day.
Chapter 2. Create an Alternative Floorplan Setup
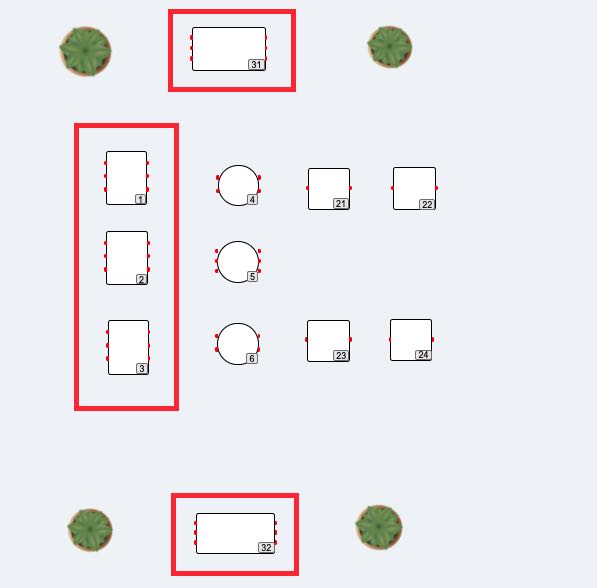
If we look at this floorplan, we can see it is very unlikely these five 6-seat tables will get used on Valentine’s day. We could seat 5 couples at each. However, on February 14, we could roll those tables out of the dining area and replace them with 10-15 two tops. We could double or triple the number of available tables for couples. To do this:
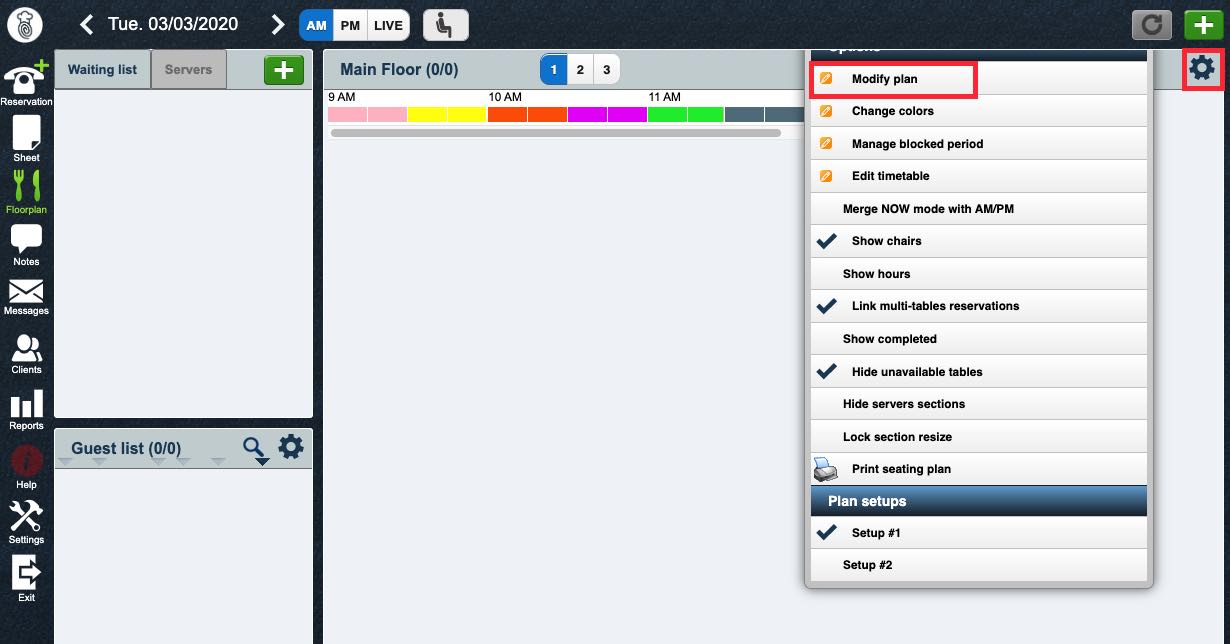
1. Click the Gear icon and then click Modify Plan. If you do not see Modify Plan, it indicates you’ve selected one or more tables or other items on your floorplan. Unselect the table or item and then click the Gear icon again.
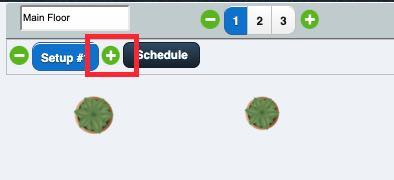
2. Ensure you’ve selected the proper floor. Click the + icon next to Setup #1.

3. You will now see your Setup #2 tab. Ensure it’s highlighted blue. You can now modify your floorplan.
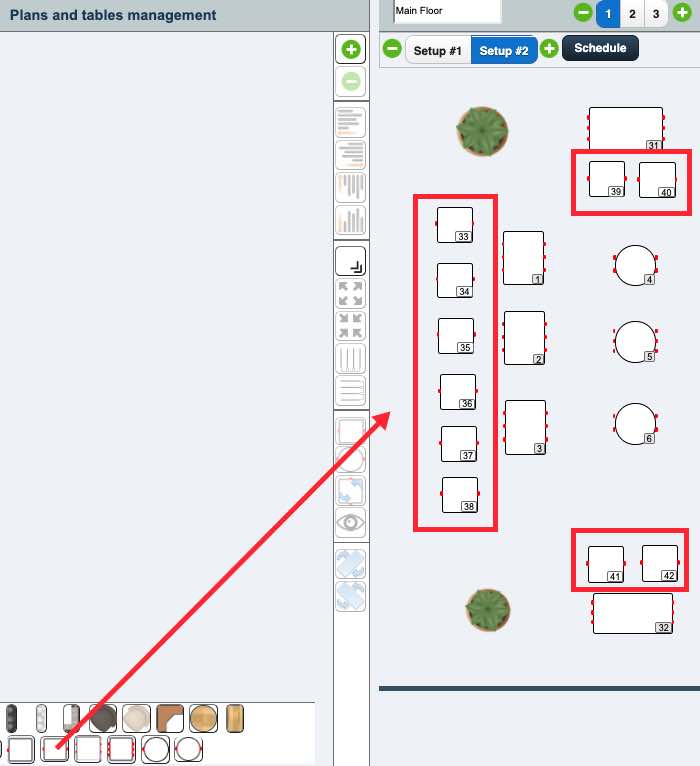
4. Use the table palette to add where you want your two tops to be located. Do no delete any existing tables. In the above example, we are adding ten 2-tops (tables 33-42) to our floorplan.
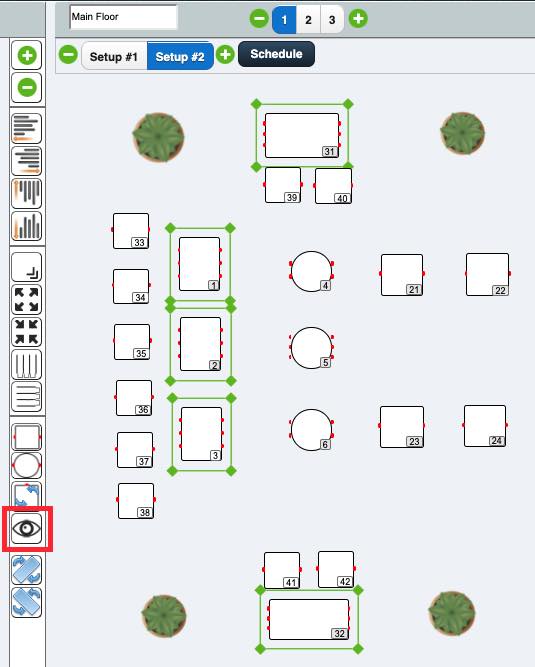
5. Because table 1, 2, 3, 31, and 32 will not be physically present in the dining room we can click all those tables and then click the Hide button.
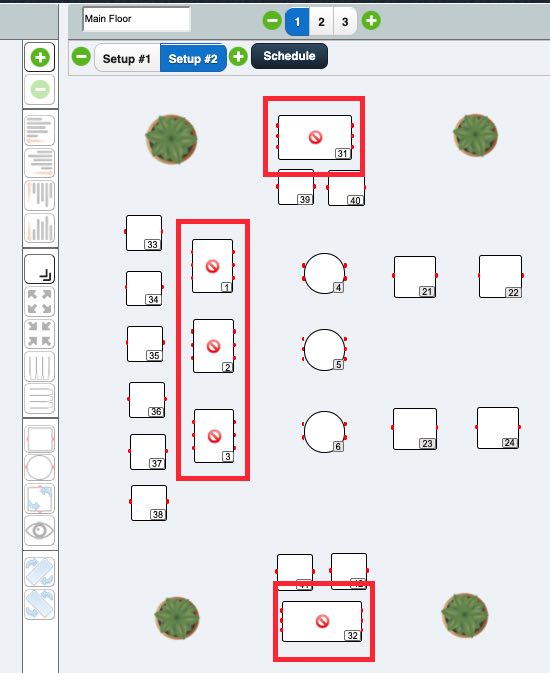
6. Your six seaters are hidden for Setup #2.
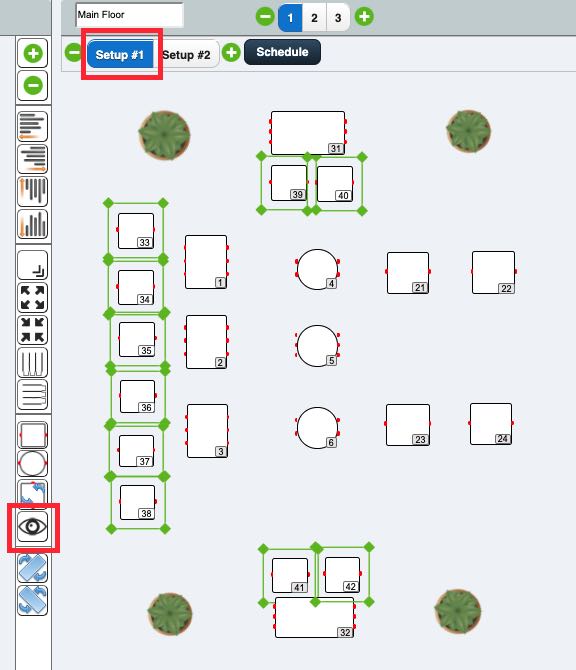
7. Click back to Setup #1. Click all the 2-tops you added for Setup #2 and then click the Hide button.
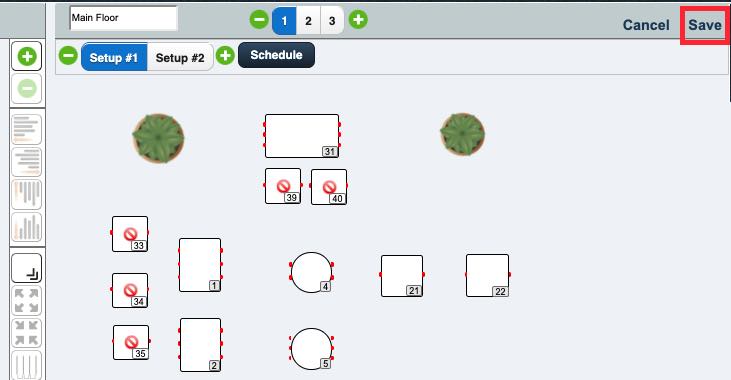
8. Your 2-tops are hidden for Setup #1. Click Save.
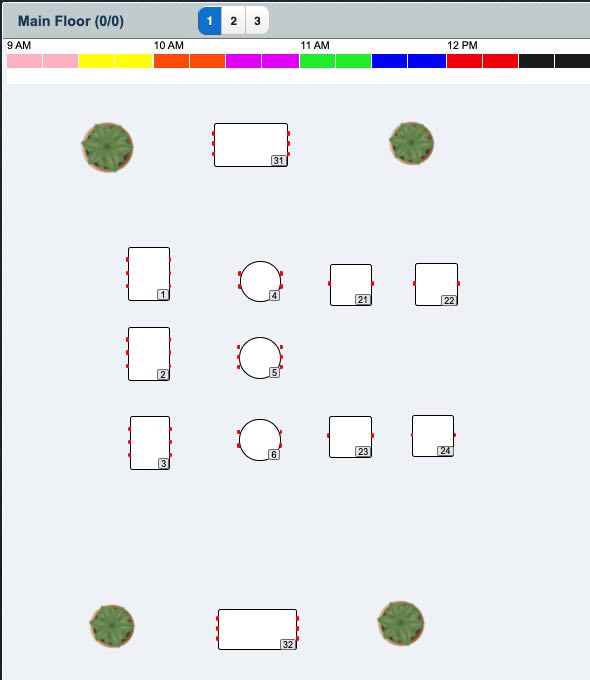
9. You will notice after you’ve clicked Save, the 2-tops you added in Setup #2 do not appear, as they were hidden for Setup #1. By default, TouchBistro Reservations displays Setup #1.
Chapter 3. Creating a Configuration for Valentine’s Day
Next we’re going to create a schedule configuration unique to Valentine’s Day.
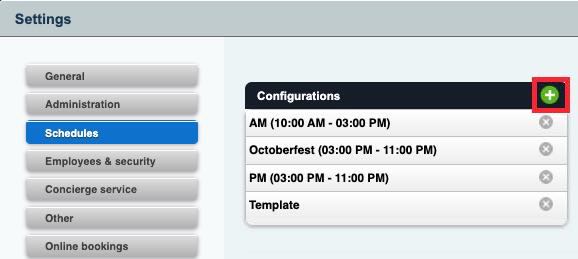
1. Click Settings | Schedules. Click the Add + icon at the top right. We will create a Sunday brunch configuration.
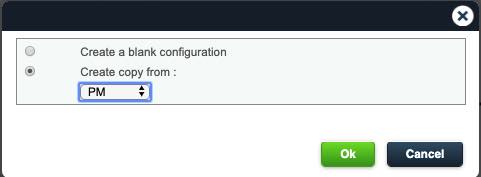
2. Create your configuration based on either your template or your PM timeslot configuration. In this case we’ll base our Valentine’s Day configuration on your PM timeslot configuration. Click Ok.
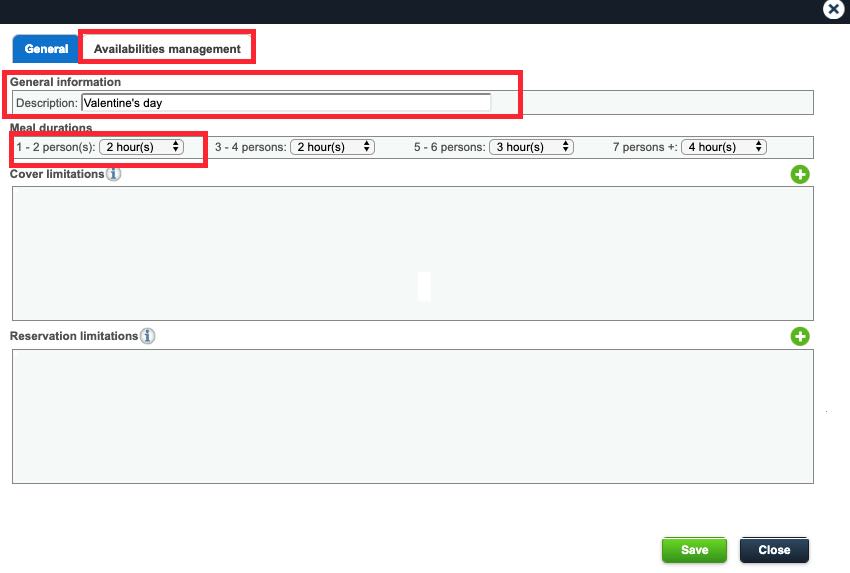
3. Name your configuration Valentine’s Day. You might also want to adjust 1-2 person default meal durations to 2 hours if you have set this lower.
4. Click the Availability management tab.
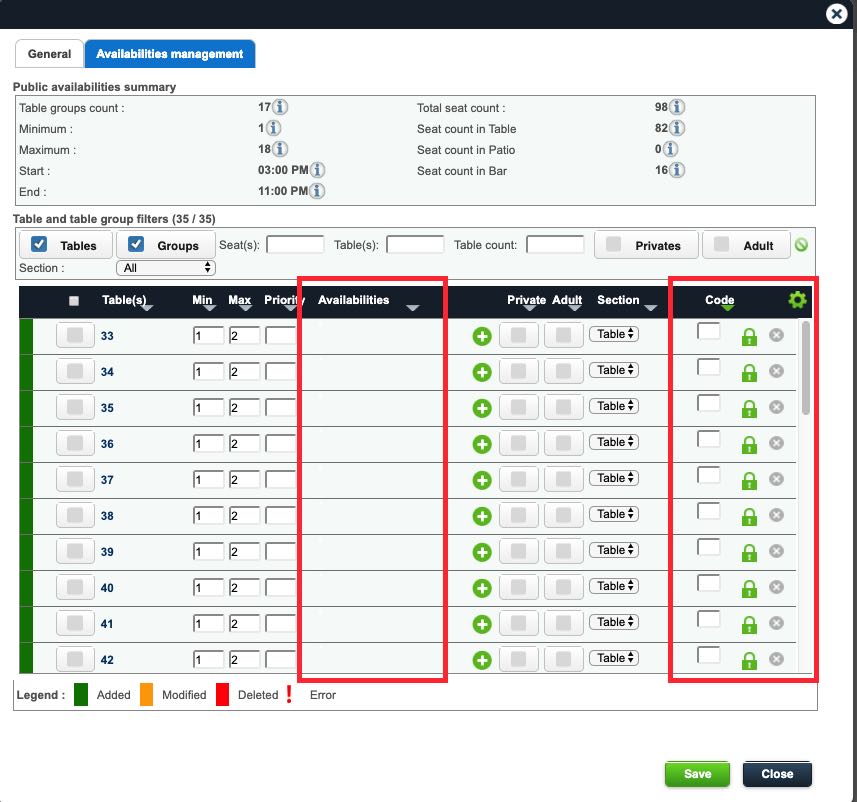
5. Scroll down to locate the tables you added to Setup #2. You will see them here. Whenever we add new tables to the floorplan, they default to locked and lack Availabilities.
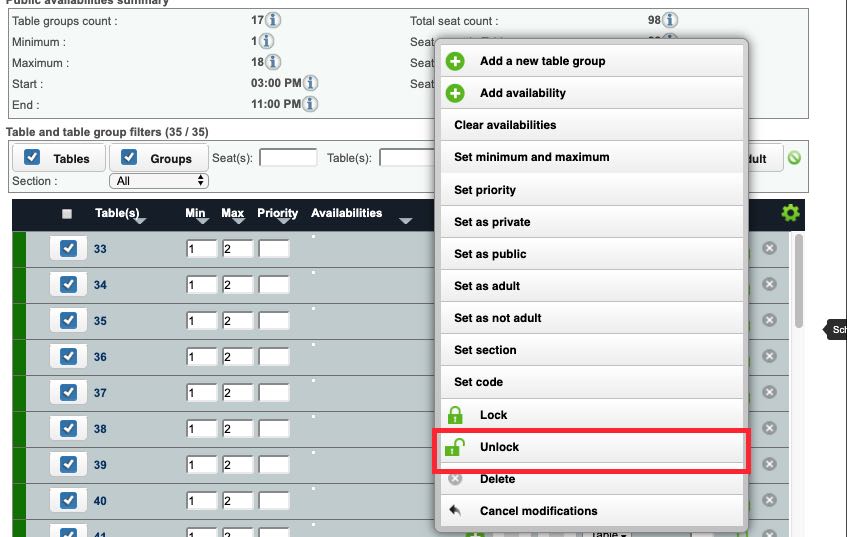
6. Select each new table and click the Gear icon. Click Unlock.
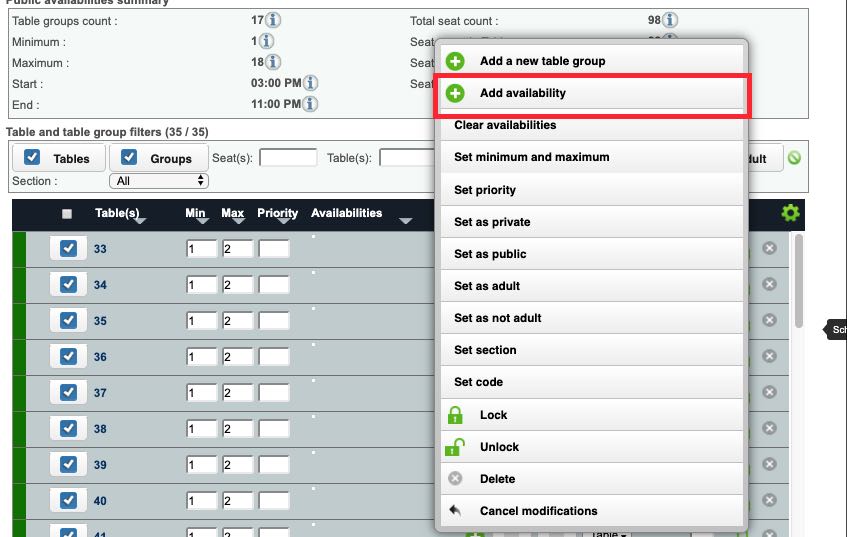
7. Click the Gear icon again and click Add availability.
8. Set the availability for your PM timeslot hours (say 3 pm to 11 pm).
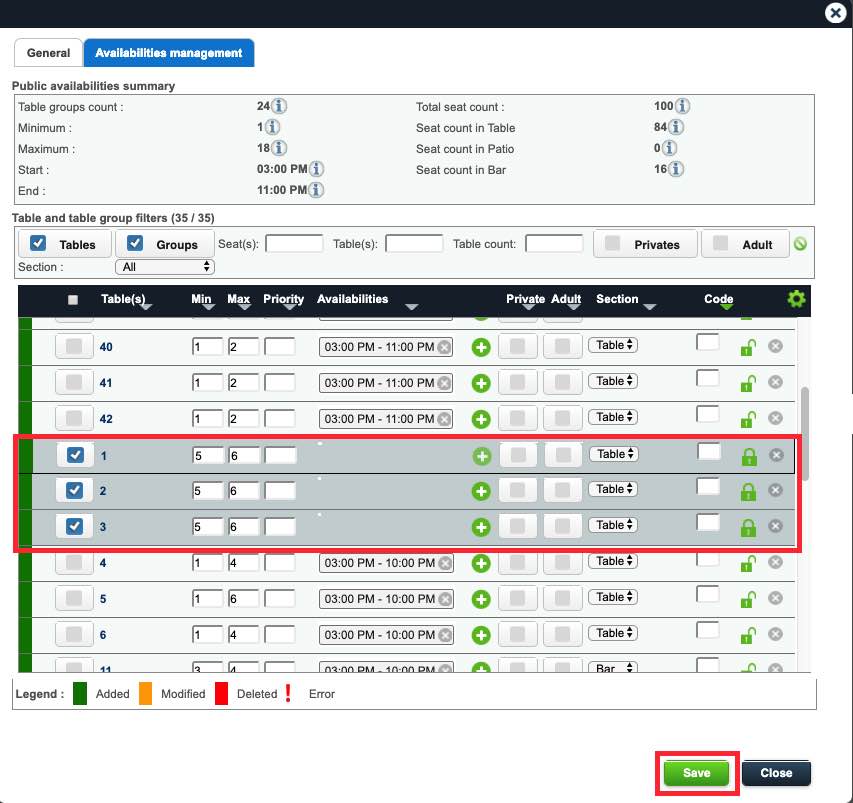
9. We need to lock the tables we plan to remove from the dining room floor on Feb 14. Scroll and select those tables (in the example, we’d check tables 1, 2, 3, 31, and 32). Remove their availability and lock them.

10. If you’ve set up group tables (especially for tables that won’t exist in your dining room), don’t forget to lock those as well.
11. Finally, click Save.
Chapter 4. Create an Exceptional Schedule
After creating the Valentine’s Day configuration, you need to create an Exceptional schedule. This would be a schedule that makes the Valentine’s Day configuration (and its unlocked tables) active for your Feb 14 PM timeslot.

1. Click the Add + icon at the top right of the Exceptional schedule section.
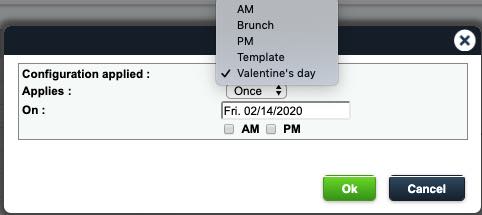
2. Select your Valentine’s Day configuration. As well set Applies to Once and select Feb 14 for the On field. Finally select this configuration to apply to the PM timeslot on Valentine’s Day.
3. Click Ok.

4. Your Valentine’s Day schedule with associated configuration will be created as an Exceptional schedule.
Chapter 5. Schedule Your Floorplan’s Setup
Finally, we’re going to set our Setup #2 to automatically invoke on Feb 14, for the PM timeslot.

1. Open your floorplan and use the calendar control to select the upcoming February 14. Click the PM timeslot.
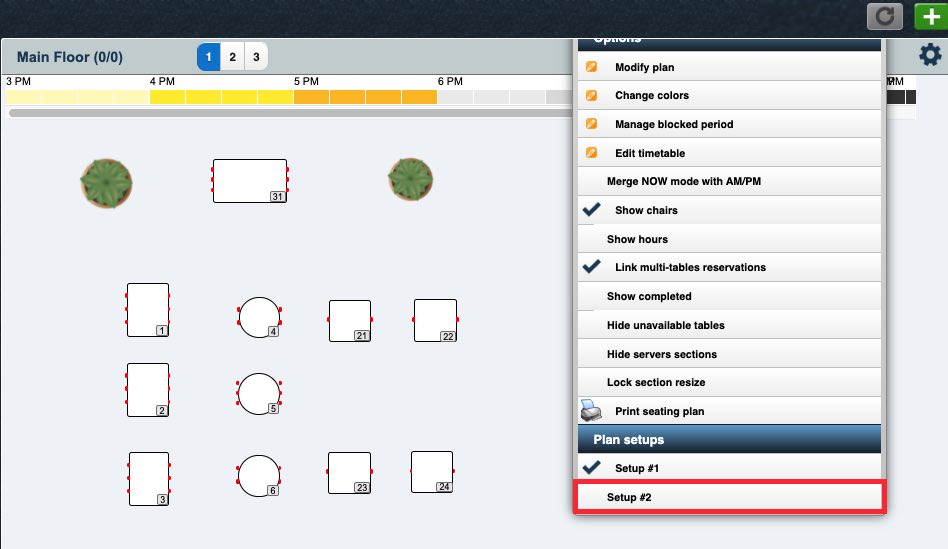
2. Click the Gear icon and select Setup #2.

3. You are prompted if you want to apply an exceptional schedule. We can see for Feb 14, the underlying configuration schedule is already set to the Valentine’s day configuration we created. It’s automatically in effect for the Feb 14 PM timeslot because of the Exceptional Schedule we set for Feb 14.
4. So select the No default and click Ok.
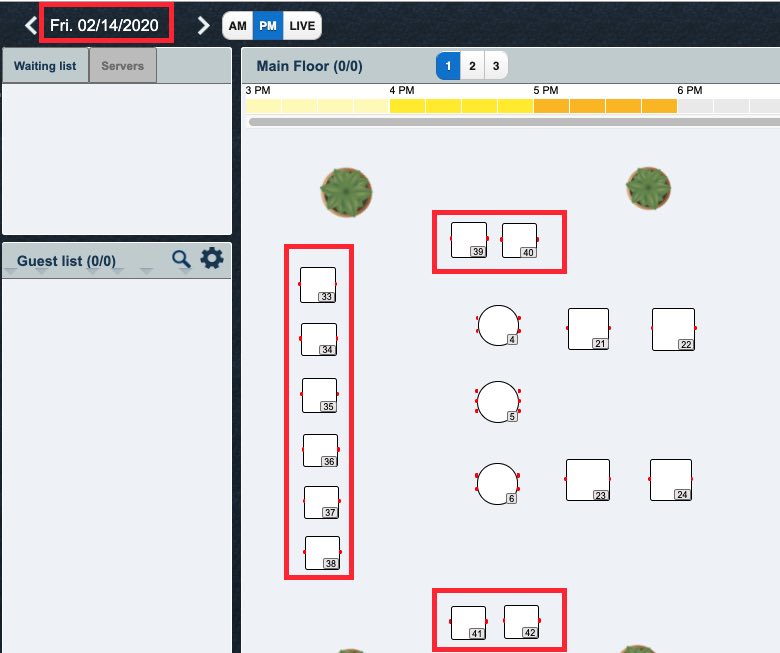
5. The Feb 14 PM timeslot view now reveals the tables that were hidden on Setup #1 and hides the tables that were hidden on Setup #2.
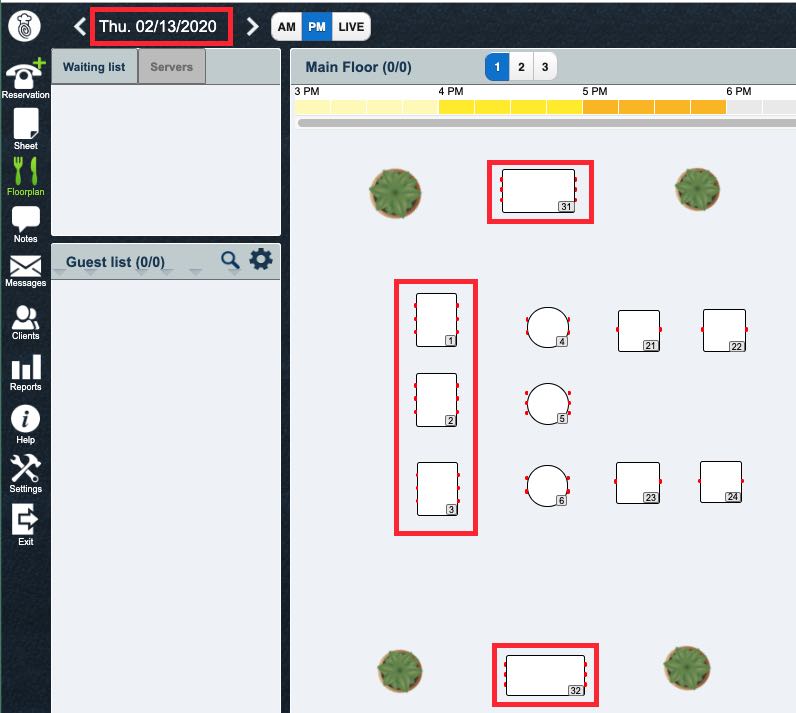
6. If we were to go backwards or forwards (say back to Feb 13, PM), we would see the floorplan would revert to the Setup #1 default.
Chapter 6. Fine Tuning Reservations Valentine’s Day
You may want to limit how and when people can reserve for Valentine’s Day. This section lays out various ways you can ensure Valentine’s Day reservations are taken in an orderly and equitable fashion.
Section 1. Limit Covers and Reservations

Return to Settings | Schedules and open your Valentine’s day configuration.
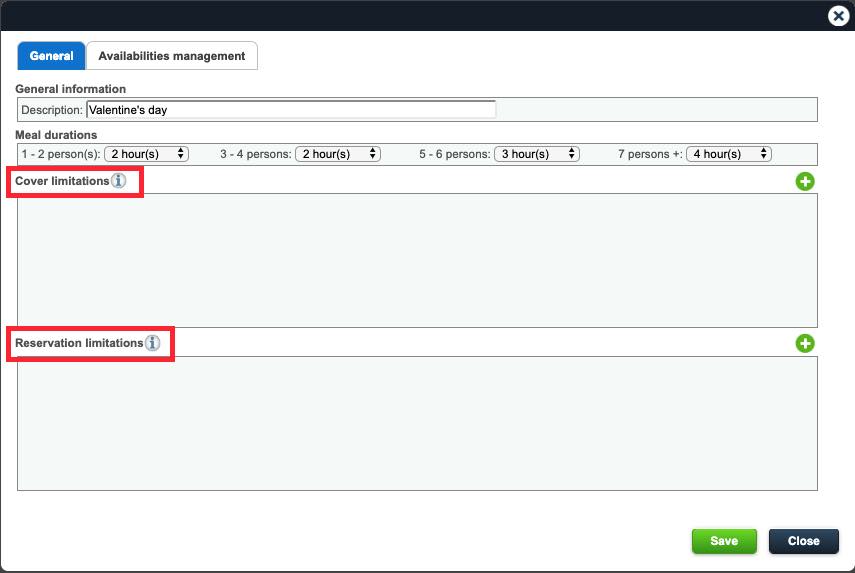
Here we can set either a Cover limitation or a Reservation limitation.
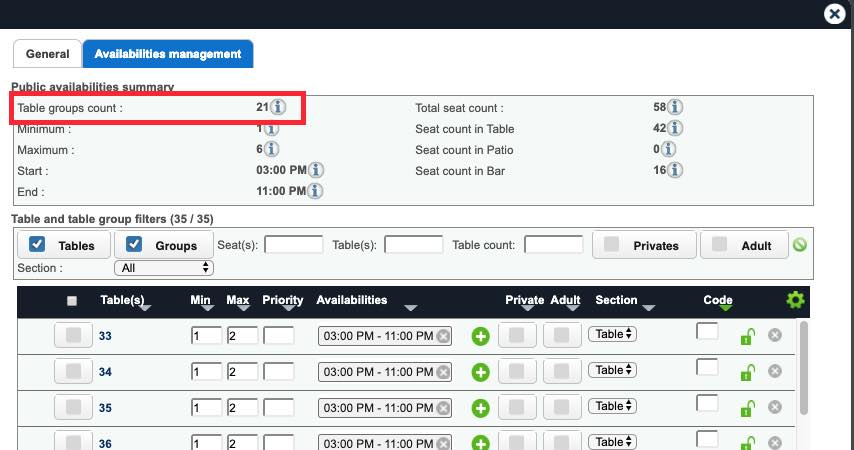
If you click the Availability management tab, you can see you have 21 tables available for online reservations. Although the ease of online reservations is normally a plus, on days like Valentine’s Day there can be more people looking for tables at prime times than there are tables. This leads to “panic reservations” and results in increased no shows.
To help ameliorate panic reservations, we can set the Valentine’s day configuration to limit the number of online reservations. We can do it either by cover number or by reservation number (roughly by table number). Since we want to limit the number of available tables for online reservations, we’ll set up a Reservation limitation.
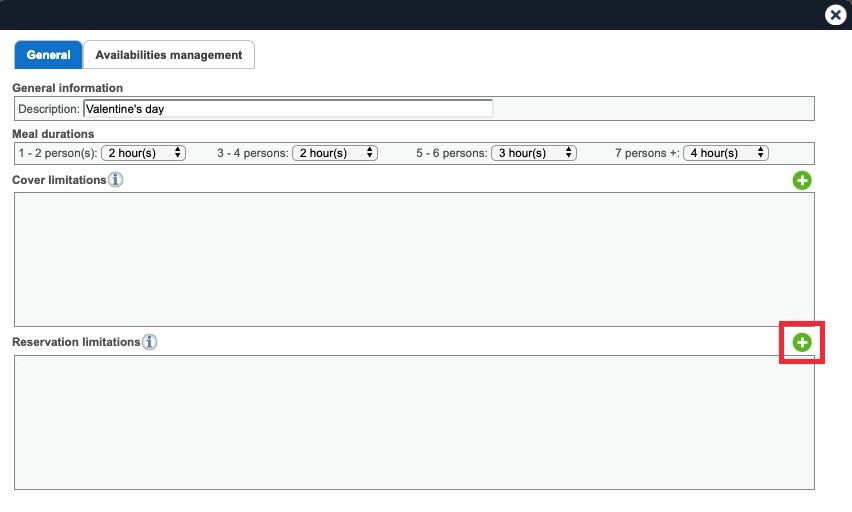
Click the Add + button.
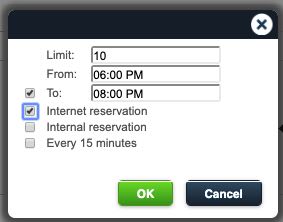
For limit, enter the maximum number of tables you want to make available for reservation. In this example, we’ll make slightly less than half our tables available for online reservations on February 14. We can also set a time range this limitation applies. In this example, between 6 pm and 8 pm, only 10 reservations can be made. Since we’ve selected Internet reservations, this ensures only 10 reservations can be made online between those hours. Once exceeded, diners will have to call to make a reservation.
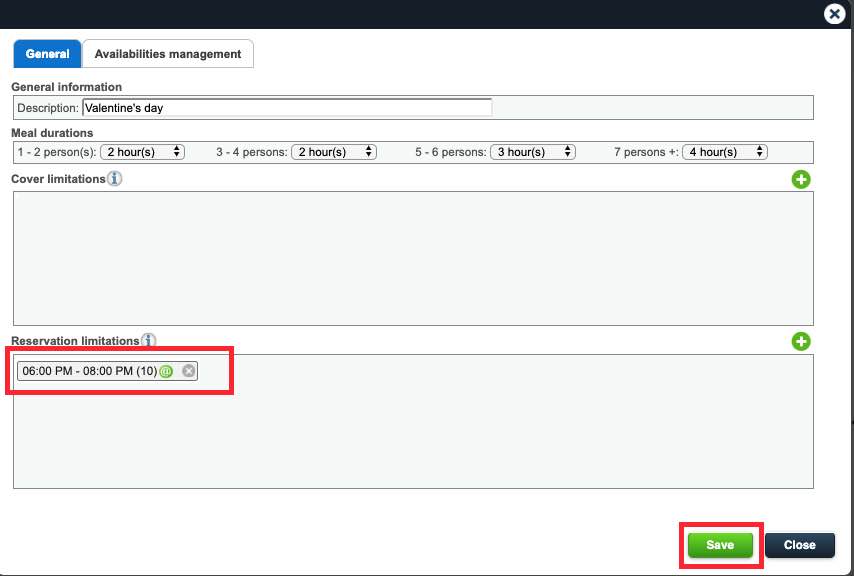
Your Reservation limitation is added. Click Save when you’re done.
Section 2. Activate a Credit Card/No Show Policy
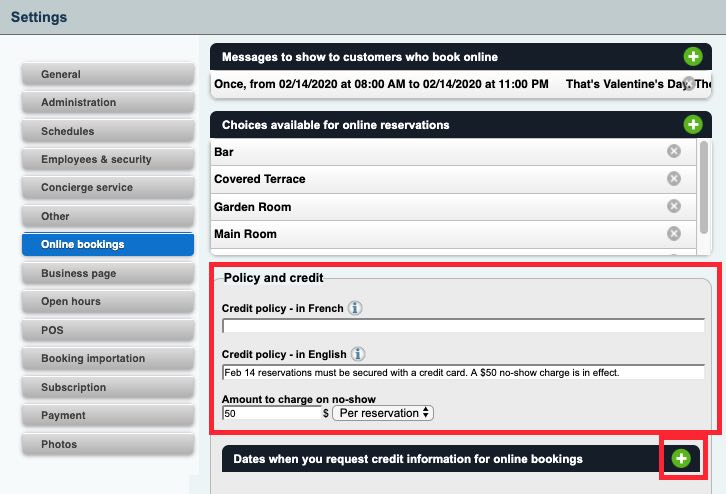
Access Settings | Online bookings and scroll down to the Policy and credit section. Here you can set up TouchBistro Reservations so it requires a credit card before an online reservation can be made. Complete the Credit Policy field. This will be displayed to a customer making an online reservation. Enter the no-show charge. For example, $50 for a no-show reservation.
Click the Add + button to set up the date (February 14) when the no-show policy should be in effect.
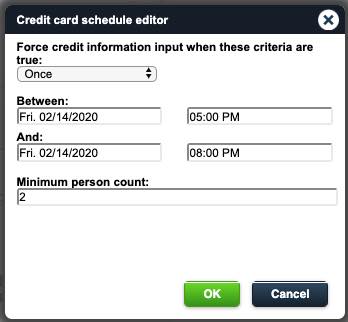
For a Valentine’s Day no-show charge, set this to Once. For the date range set it to either the upcoming February 14 only (e.g., between 02/14/2020 and 02/14/2020) or set the terminal date further into the future. For example, if you set it between 02/14/2020 and 02/14/2025, you don’t have to return here every year and set this.
For the time, you might want to set it during your core dining hours (say 5 pm to 8 pm). So any reservation made for Feb 14 between 5 pm and 8 pm will require a credit card.
When you click OK, the credit card requirement will be created for Valentine’s Day. Click it to edit it or click the X button to delete it.
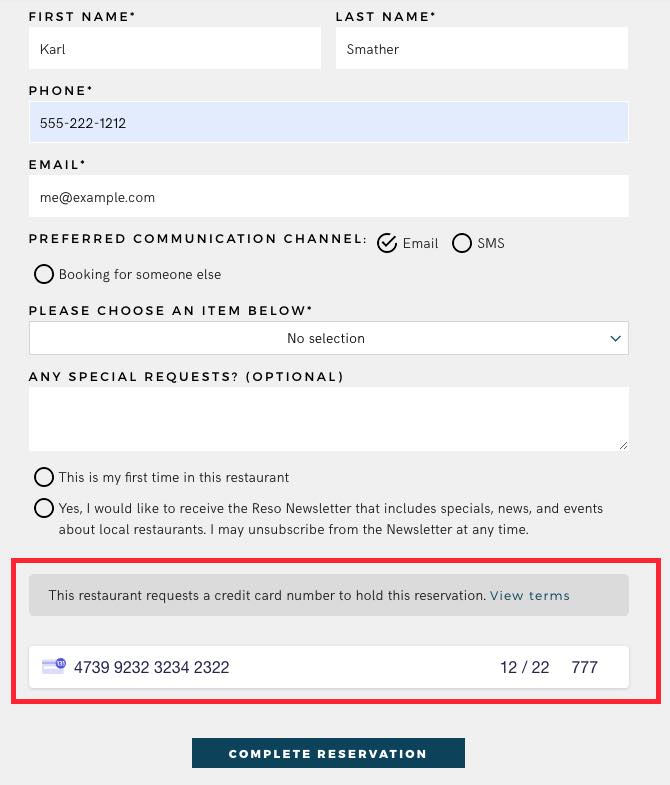
When set and a customer tries to book a reservation for that time, they will see the prompt for credit card details before they can complete the reservation.
Section 3. Custom Valentine’s Day Message
Settings | Online bookings also lets you set up a message for customers using TouchBistro Dine to book for Valentine’s Day.
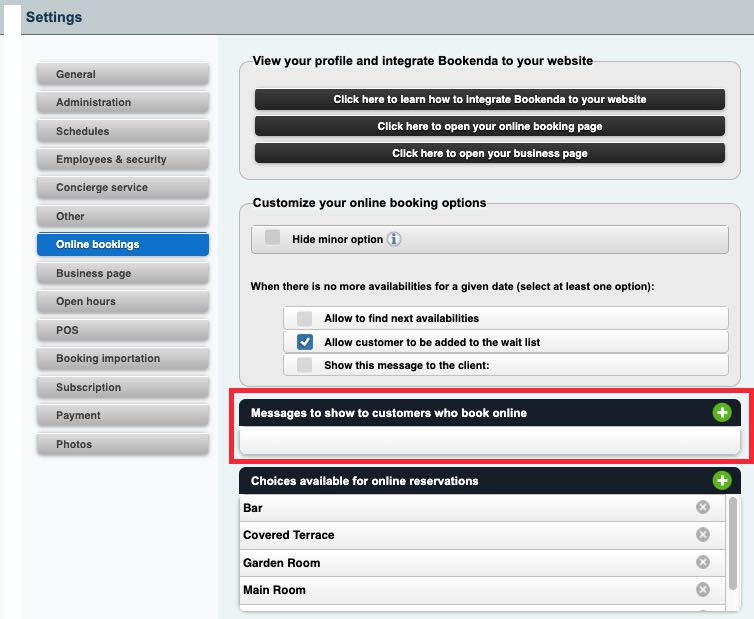
Locate the Messages to show to customers who book online section.
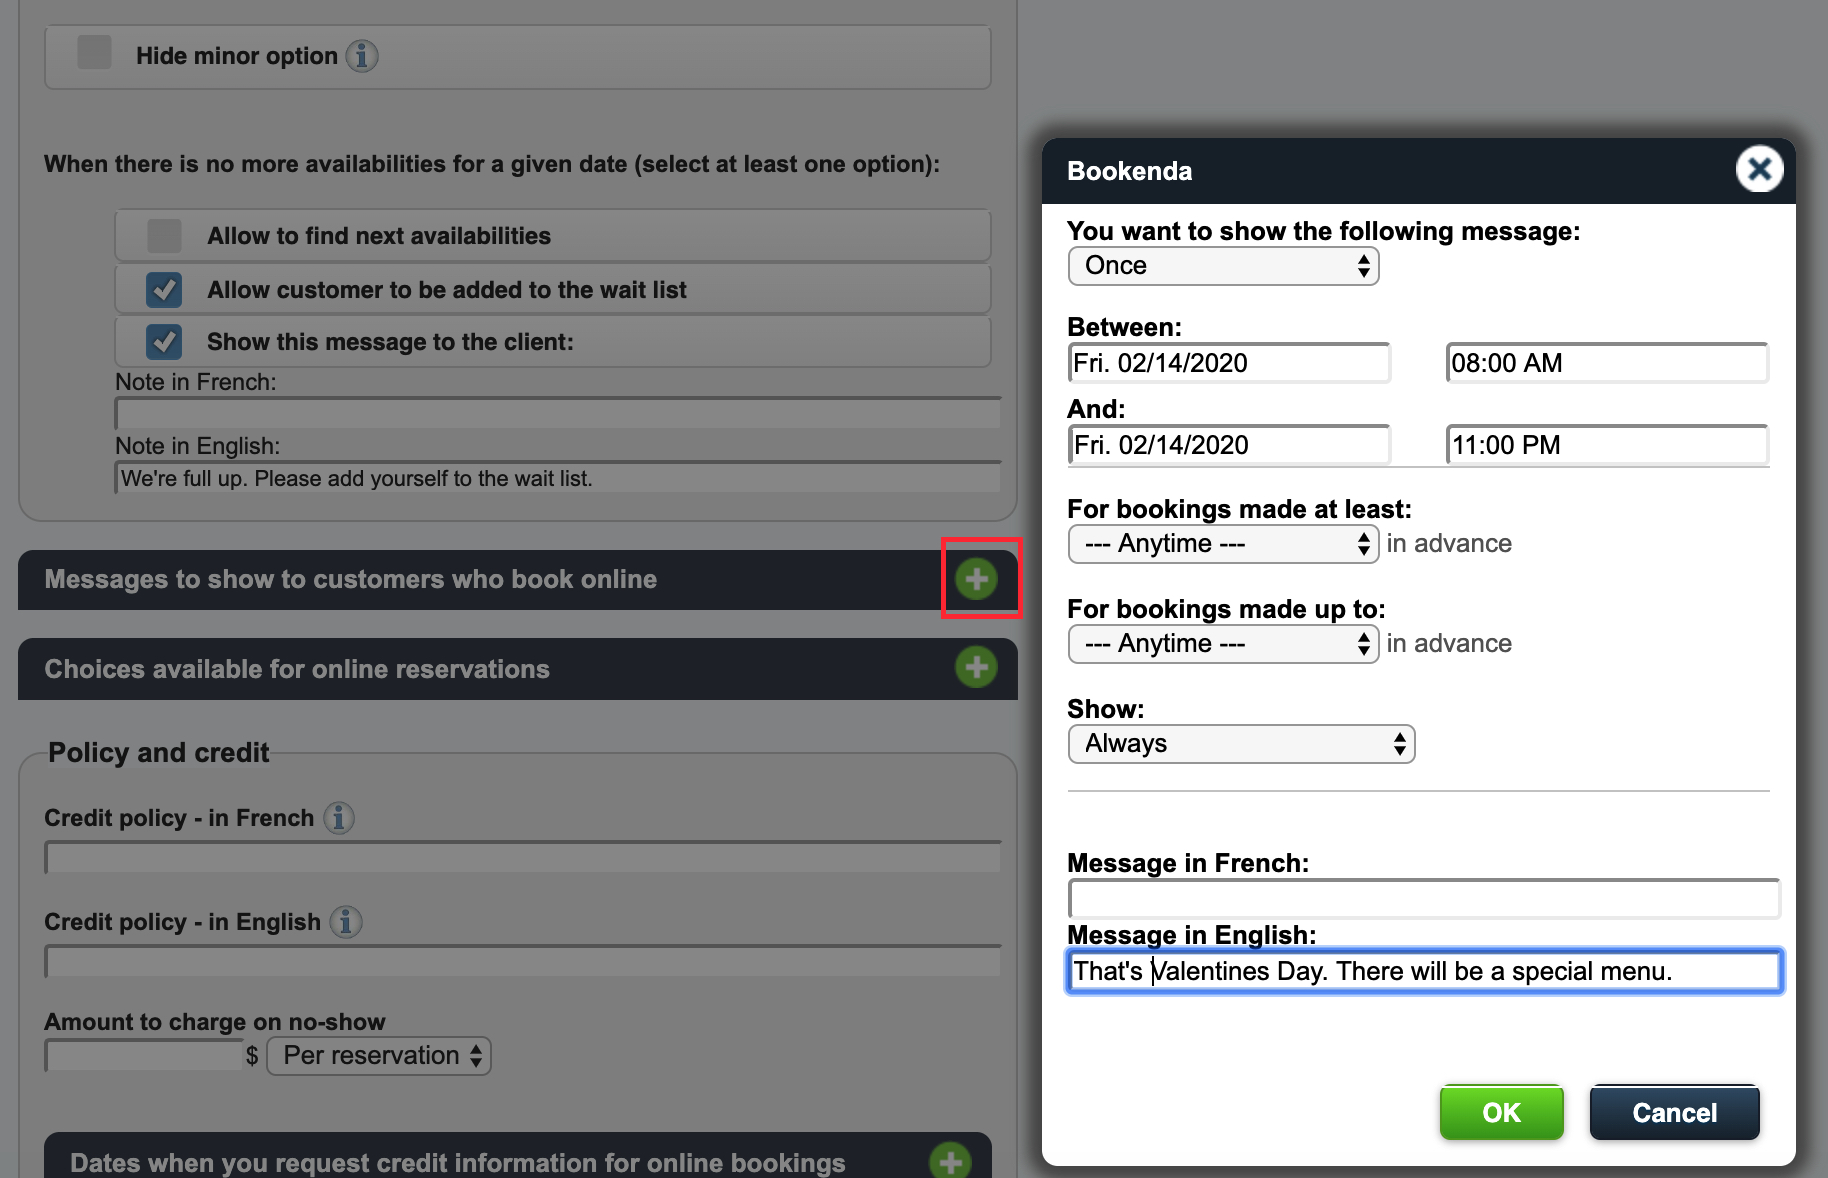
Click the Add + button to set up the message. In the above example, we want to let people know there’s a special menu for Valentine’s Day.
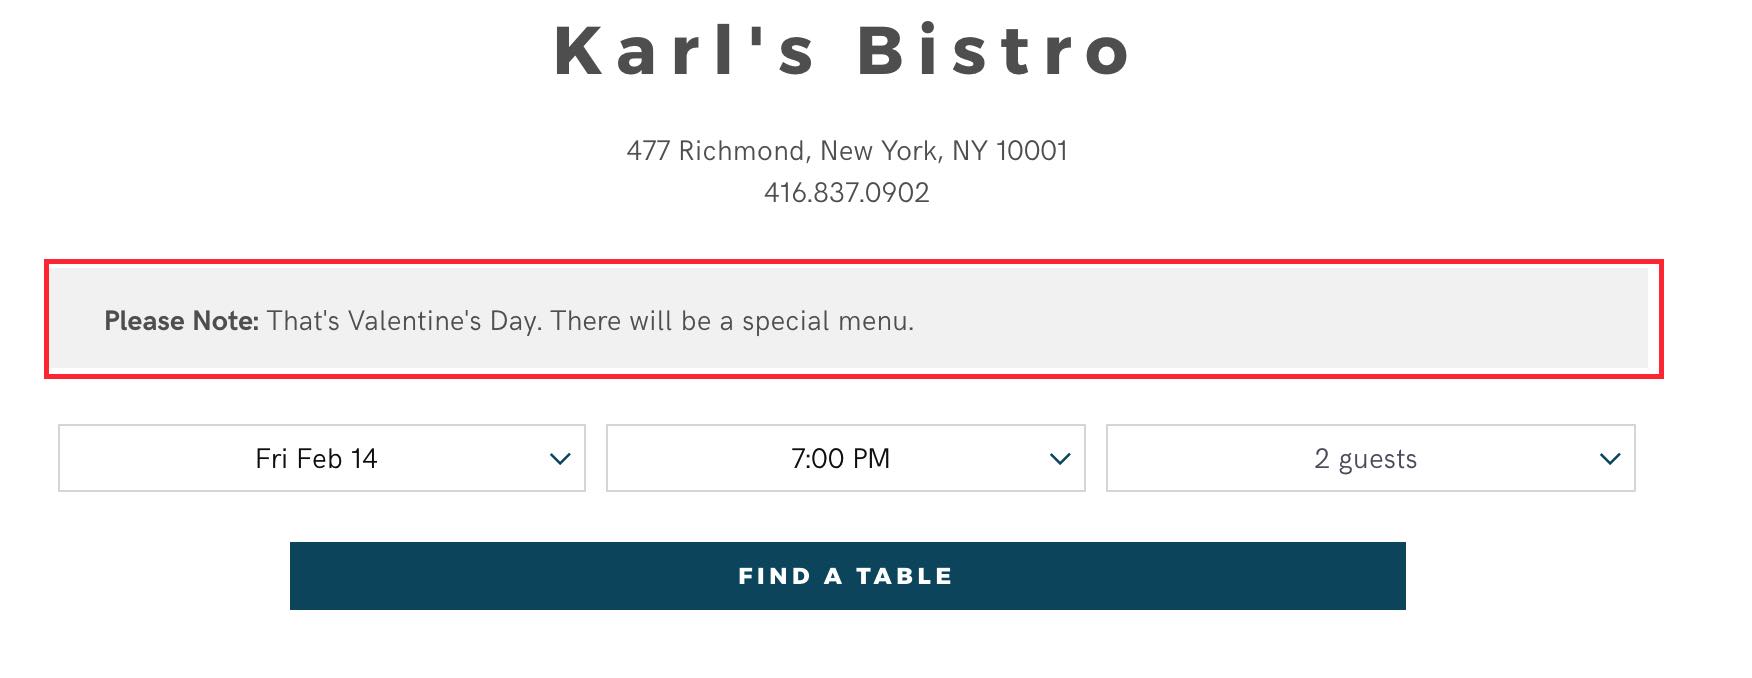
When they select Feb 14, TouchBistro Dine will automatically inject the message copy above the reservation dialog area.


 Email
Support
 Frequently
Asked Questions
