
 Email
Support
Email
Support Frequently
Asked Questions
Frequently
Asked Questions
Customizing Printers for Bartenders
Table Of Contents
Chapter 1. The Basics of How TouchBistro Routes Tickets and Receipts
Chapter 2. Bartender Exceptions
Section 1. Setting Up Receipt Printers for Bartenders
1) Assign Bartenders a Bartender Staff Type
2) Setting Up the Global Bartender Printer
Chapter 3. Setting the Bar Receipt Printer to Print Your Drink Tickets
Section 1. Setting Specific Menu Items to Print to Bar Printers
Chapter 4. Suppressing Drink Ticket Printing at the Bar
Chapter 5. Set the Bar’s iPad to Do Not Print Tickets
Chapter 1. The Basics of How TouchBistro Routes Tickets and Receipts
Section 1. Receipts
Receipts or guest checks are typically set up to go to a receipt printer.

After you’ve configured your printers, you can assign which printer should be the default receipt printer on the Admin | Admin Settings | Printers & KDS screen.
Section 2. Tickets
In TouchBistro you can set menu categories to print to different printers. For example, alcohol/drink categories you can send to a bar ticket printer. So after your server takes a table’s order and taps Send, TouchBistro sends the tickets to the appropriate printers based on printers assigned at the Menu Category level. The main and app categories get sent to, say, the kitchen printer. Maybe items in a sushi category get send to a sushi bar. Drinks get sent to a bar ticket printer. The bartender sees the ticket and prepares the drinks for the table.
Chapter 2. Bartender Exceptions
The bar area and bartenders usually have special printing needs:
1. Usually bars will have their own printers for printing receipts and tickets.
2. When drinks are ordered by patrons at the bar, the bartender typically doesn’t need to print a ticket for those drinks ordered. However, many patrons may order more than drinks at the bar. They may order sides or mains. A bartender, then, needs to be able to send food tickets to the kitchen but suppress drink tickets going to his/her very own printer.
Section 1. Setting Up Receipt Printers for Bartenders
There are two steps for setting up a printer for bartender use:
1. Identify which TouchBistro users are bartenders and need to print to a bar receipt printer.
2. Tell TouchBistro which printer is the Global Bartender printer.
1) Assign Bartenders a Bartender Staff Type
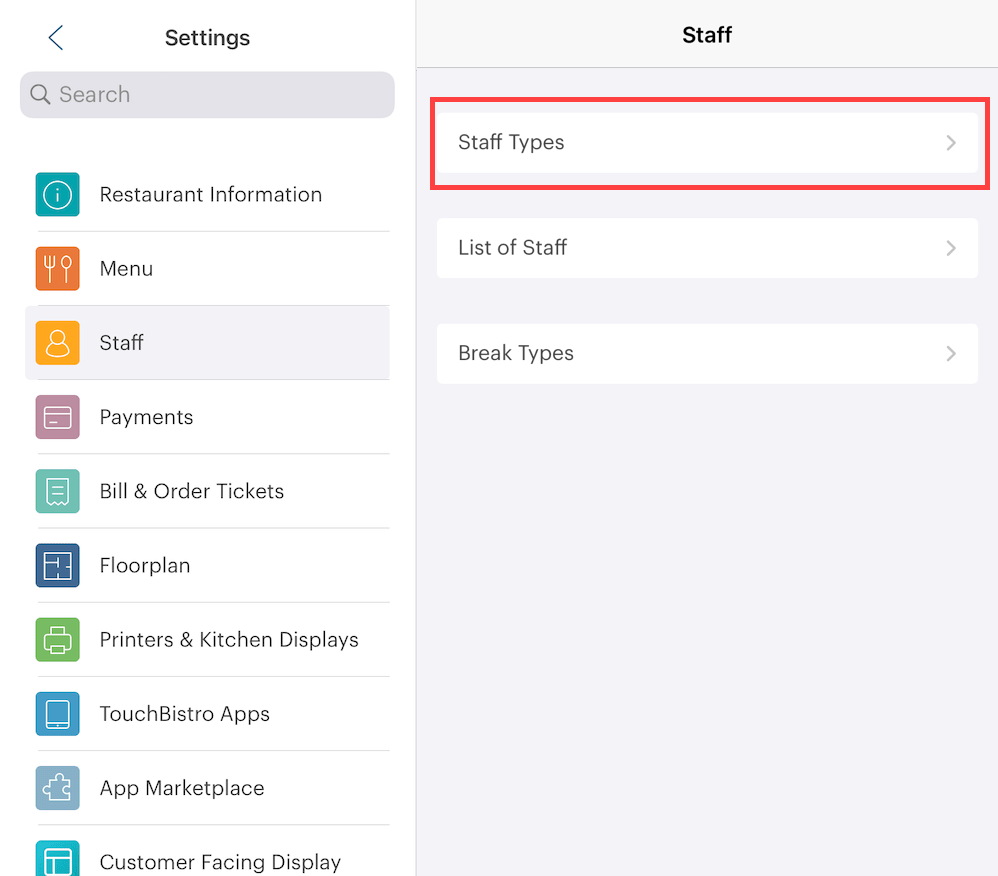
1. Access Admin | Admin Settings | Staff | Staff Types.

2. If you don’t already have a bartender staff type, tap Add on the top right to create a new staff type. If not, tap your bartender staff type.

3. If you’re creating a bartender staff type, enter a name for the Staff Type in the Name field. In this case we should enter Bartender.
4. Under Staff Permissions, ensure Uses Bartender Printer is enabled.
5. Review the additional security settings and enable or disable as necessary. However, the default settings should be correct for a bartender type.
6. Tap Staff Types to exist and save your changes.
7. Tap Staff to return to the Staff page.
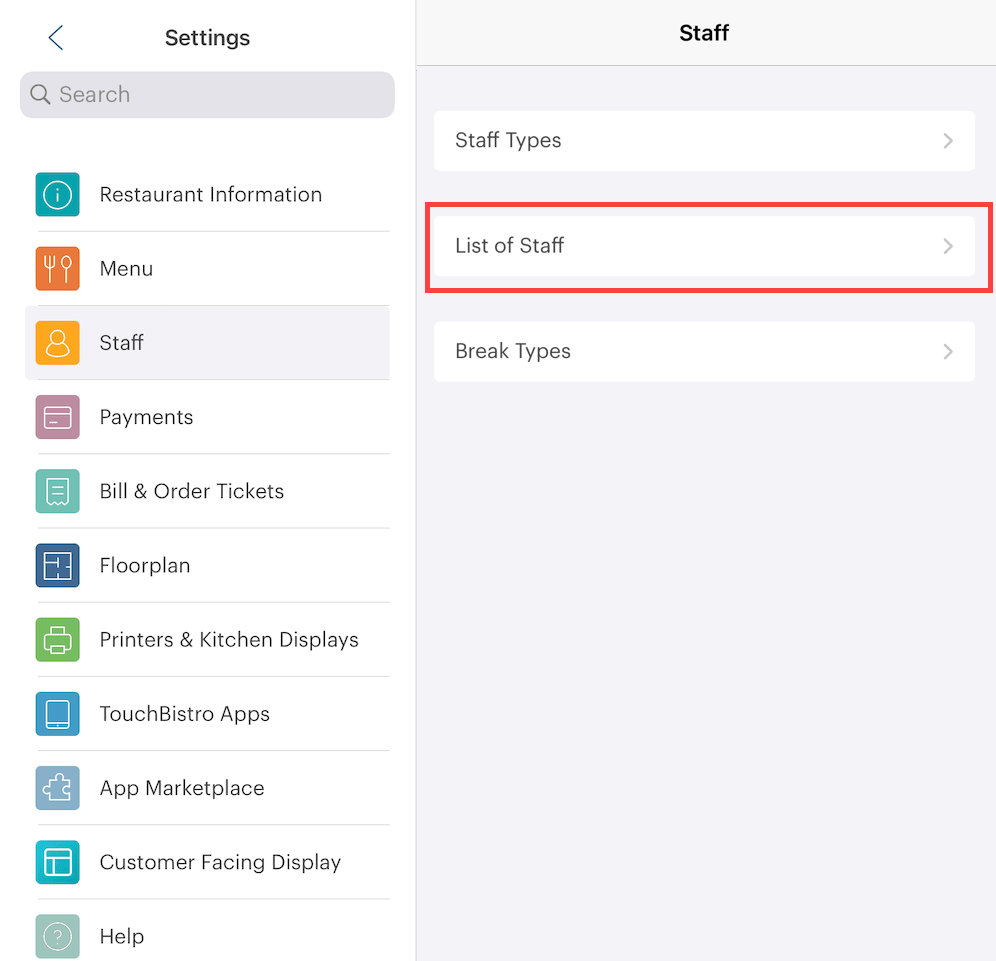
8. Tap List of Staff to assign this Bartender Staff Type to current staff members who are bartenders who you want to prevent bar ticket printing.
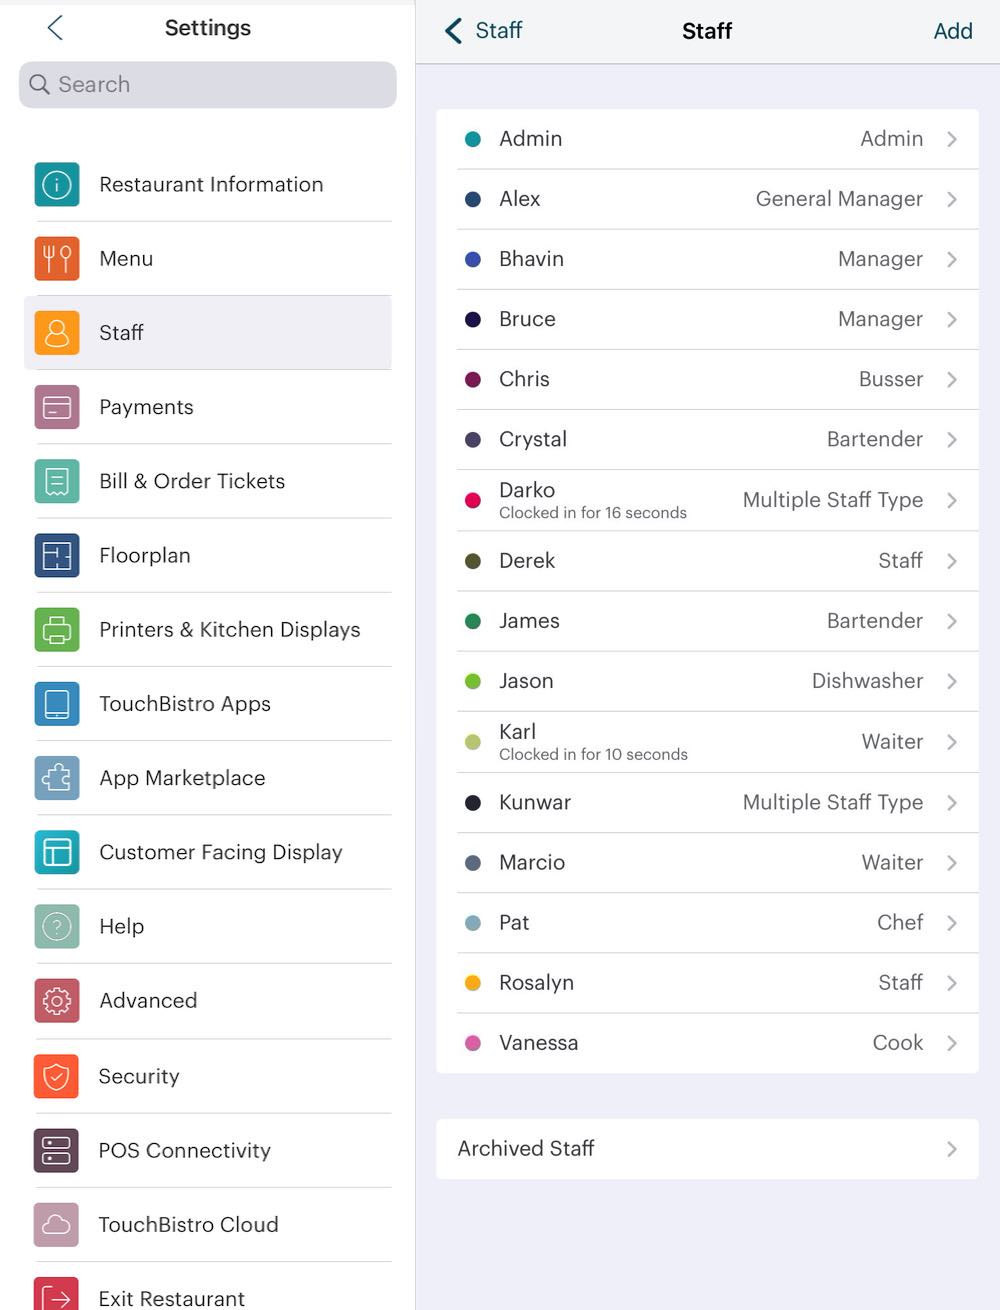
9. Tap a staff member you wish to set as a bartender.
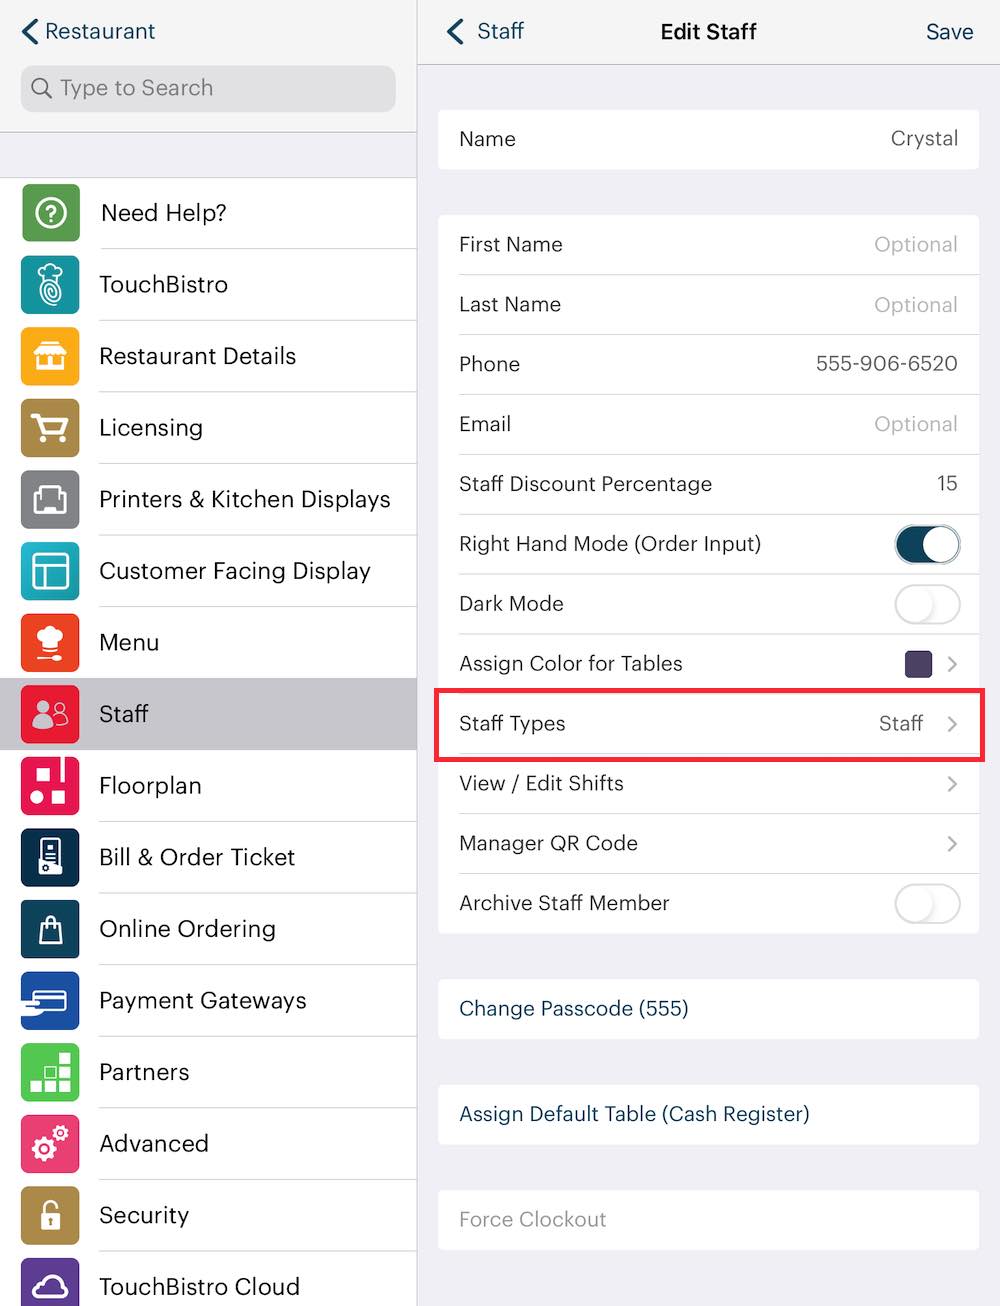
10. Tap Staff Types.
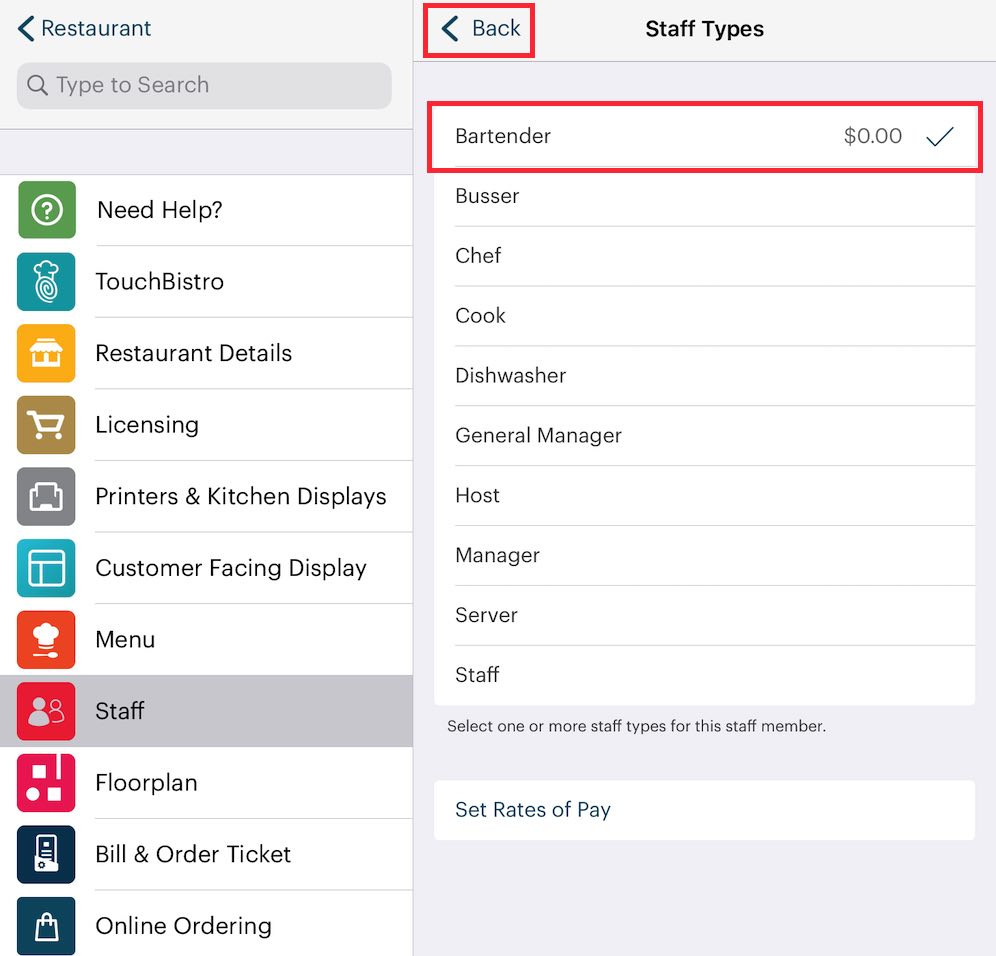
11. Tap your Bartender staff type. Tap Set Rates of Pay to set a rate if so desired. Tap the old staff type to remove it if you wish. Tap < Back after assigning the bartender staff type.
12. Tap Done.
13. Repeat for any additional staff.
2) Setting Up the Global Bartender Printer
This guide assumes you’ve already configured your bartender printer hardware and you have a Bar printer with a properly assigned IP address. If not, you can follow this guide for setting up a printer. Typically a printer at a bar (whether it’s for receipts or tickets) will be a thermal printer. Because bars are in areas open to dining areas, thermal printers are preferred as they print silently.
1. Tap Admin | Admin Settings | Printers & KDS.
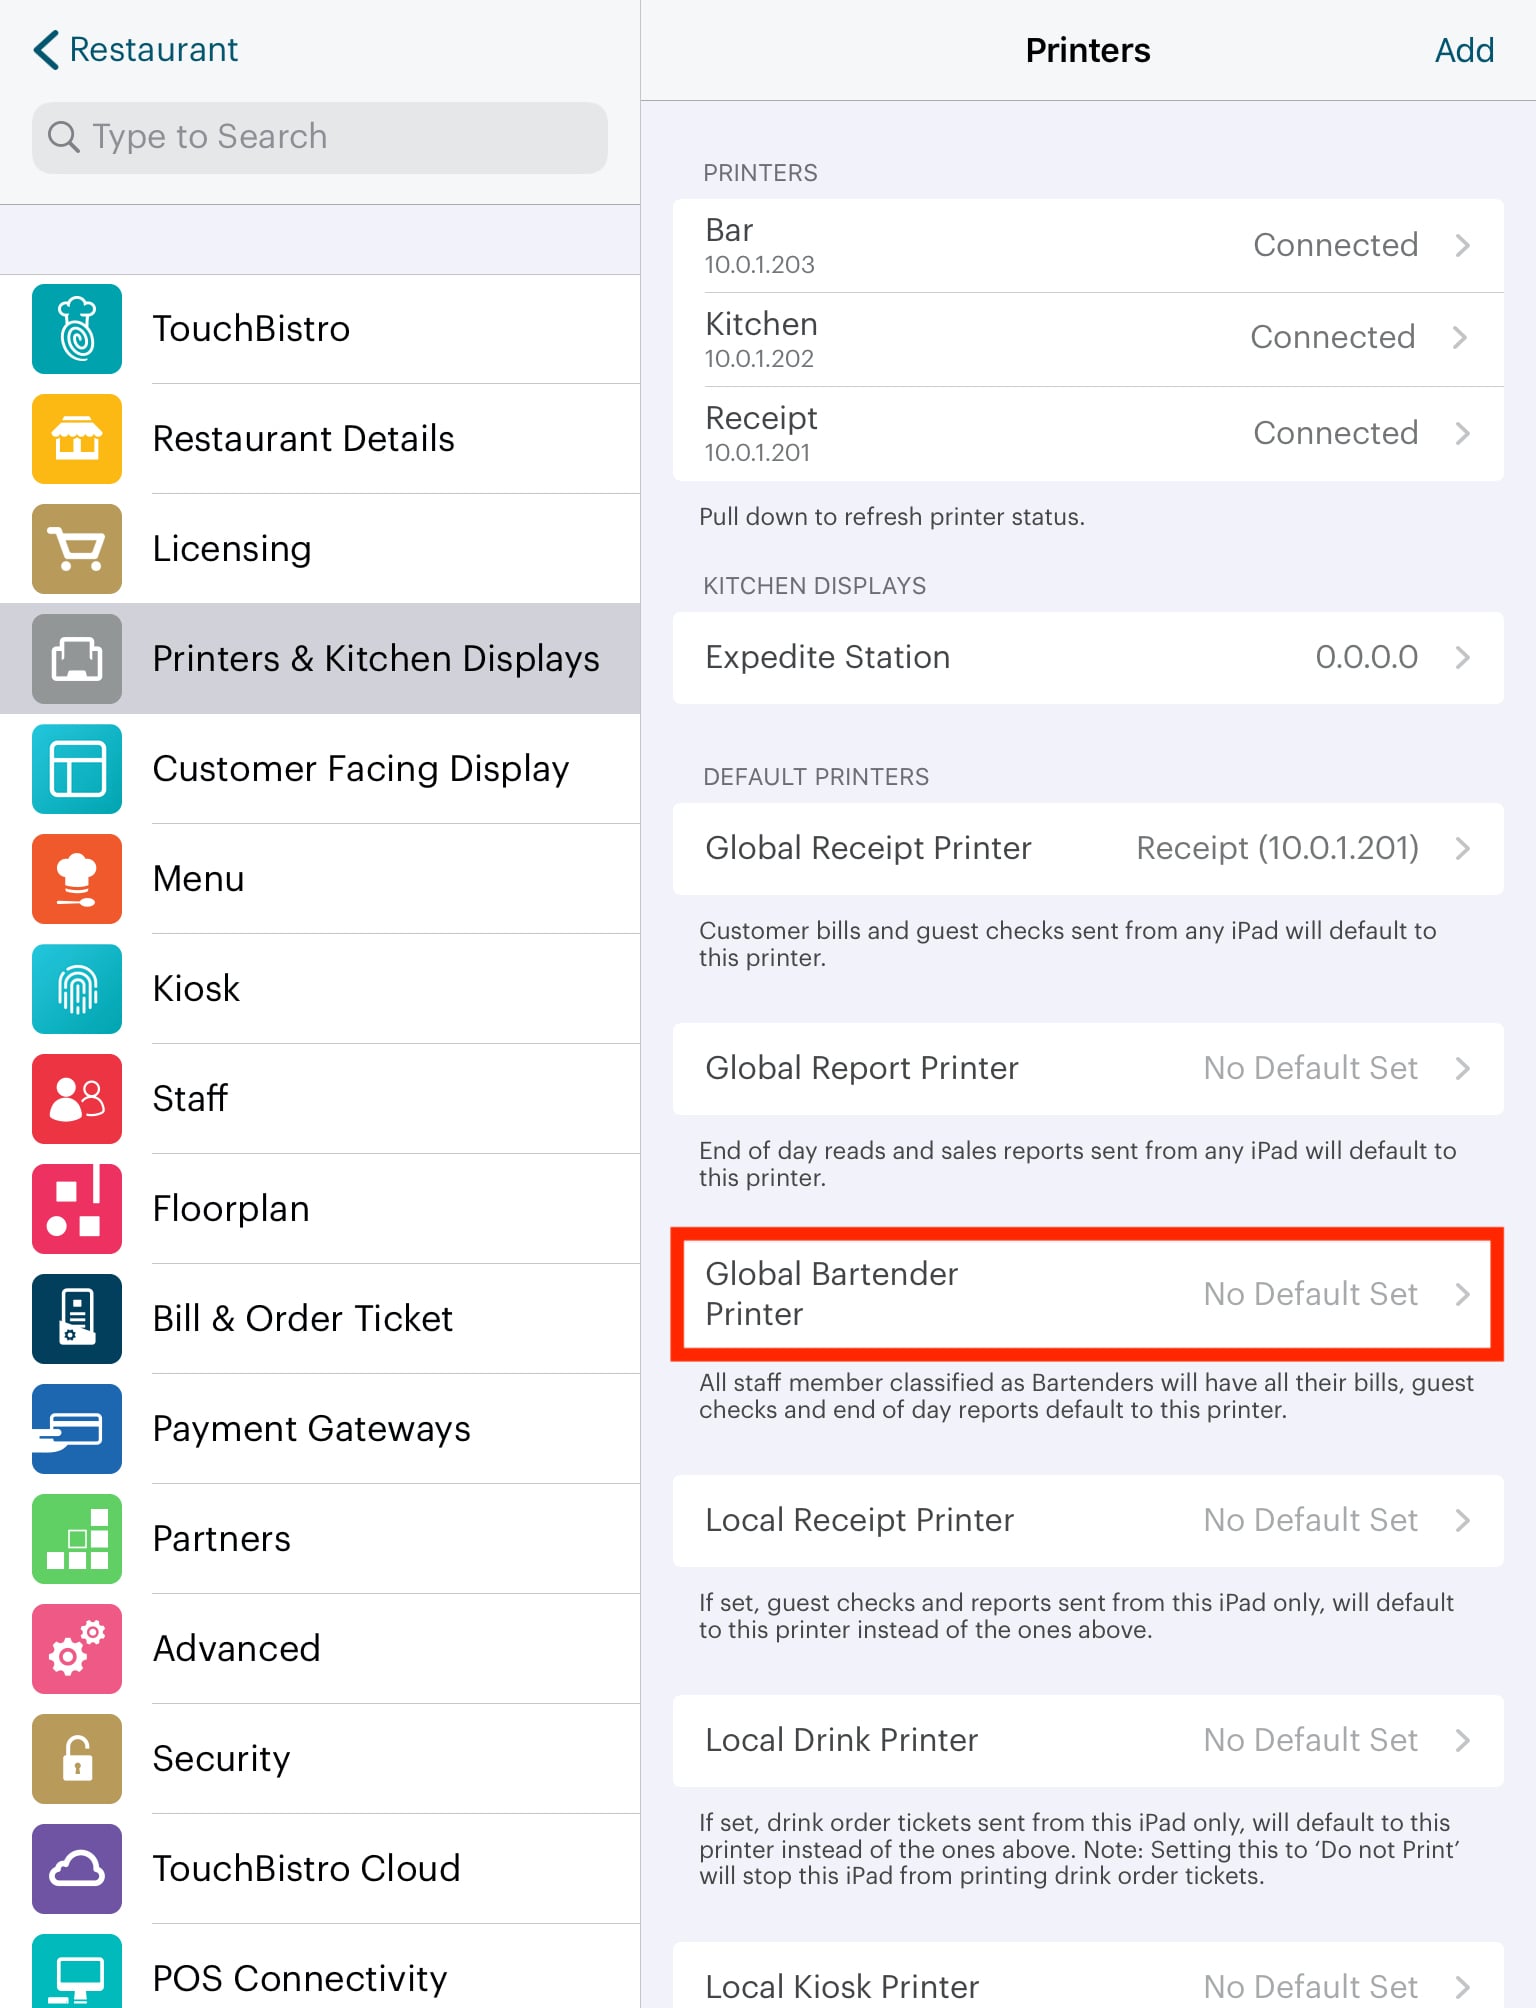
2. Tap Global Bartender Printer.
3. Tap your Bar printer and tap Done.

4. When you Global Bartender Printer is set, any staff member set to your Bartender staff type will have their receipts and end of day reports routed to this printer. If a staff member has another staff type (for example Staff or Manager), their receipts and reports are routed to the Global Receipt Printer.
Chapter 3. Setting the Bar Receipt Printer to Print Your Drink Tickets
Once your bar printer is set up, you can select it as a destination for drink tickets via your Menu Category settings. This step will ensure when servers take orders with drinks that need to be prepared at the bar, the order ticket will properly route the drink orders to the bar printer.
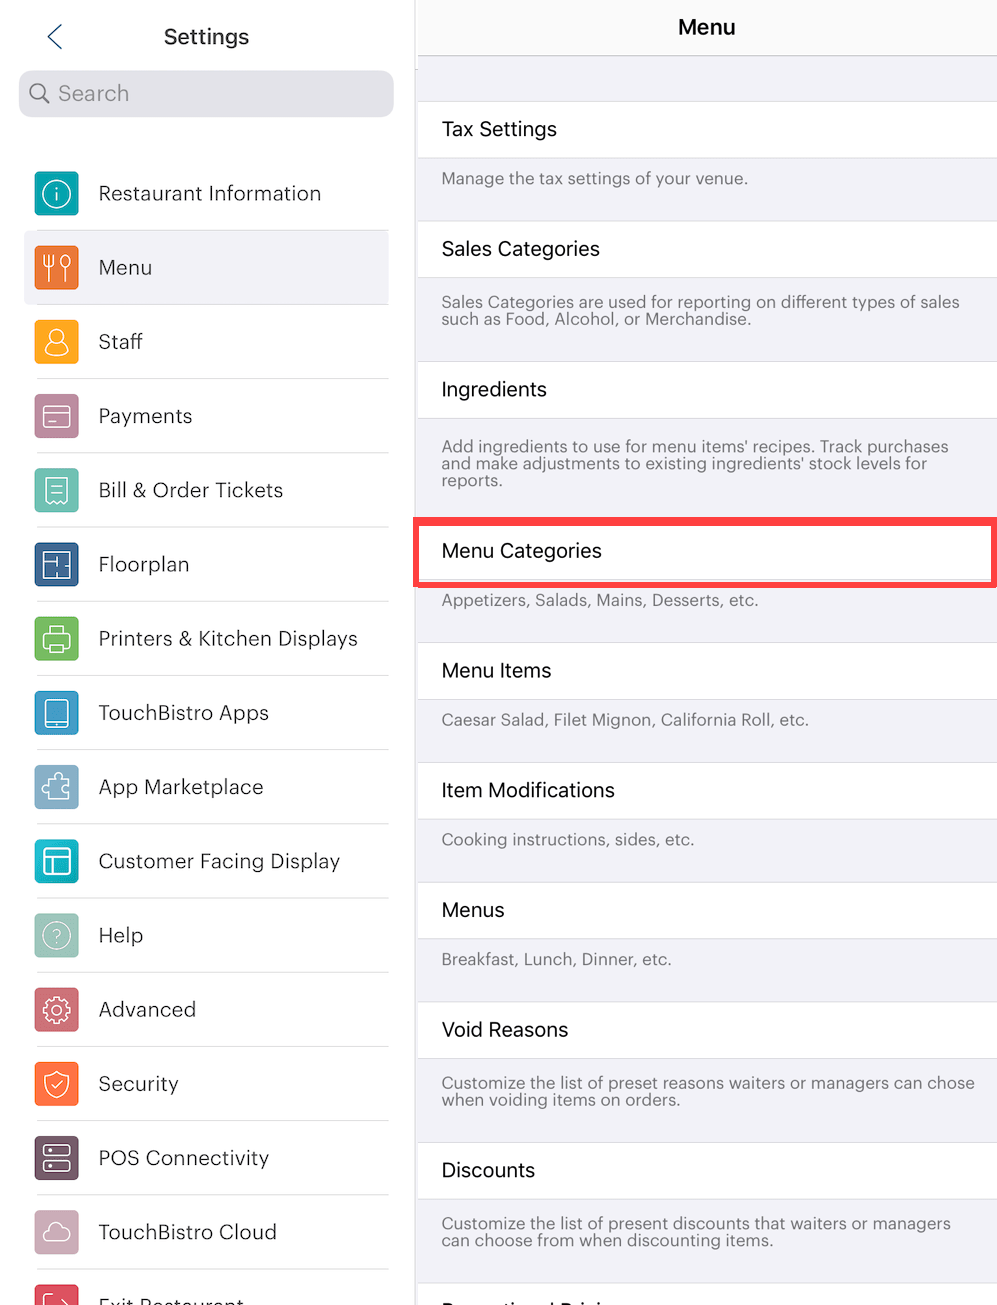
1. Tap Admin | Admin Settings | Menu | Menu Categories.

2. Tap each of your drink categories.

3. Tap Default Printer.
4. Select your bar printer.
5. Tap Save.
6. Tap Save. You’re returned to your list of Menu Categories. Open up your next drinks category and repeat the printer assignment.
Section 1. Setting Specific Menu Items to Print to Bar Printers
You may need to set some menu items to print to the bar, even though most of the items in the Menu Category go to a Kitchen printer. For example, your non-alcoholic drink category goes to the kitchen but you have an Irish Coffee that goes to the bar. If this is the case:
1. Tap Admin | Admin Settings | Menu | Menu Items.

2. Tap the appropriate menu category (for example Soft Drinks).

3. Tap the menu item that needs to go to the bar printer.
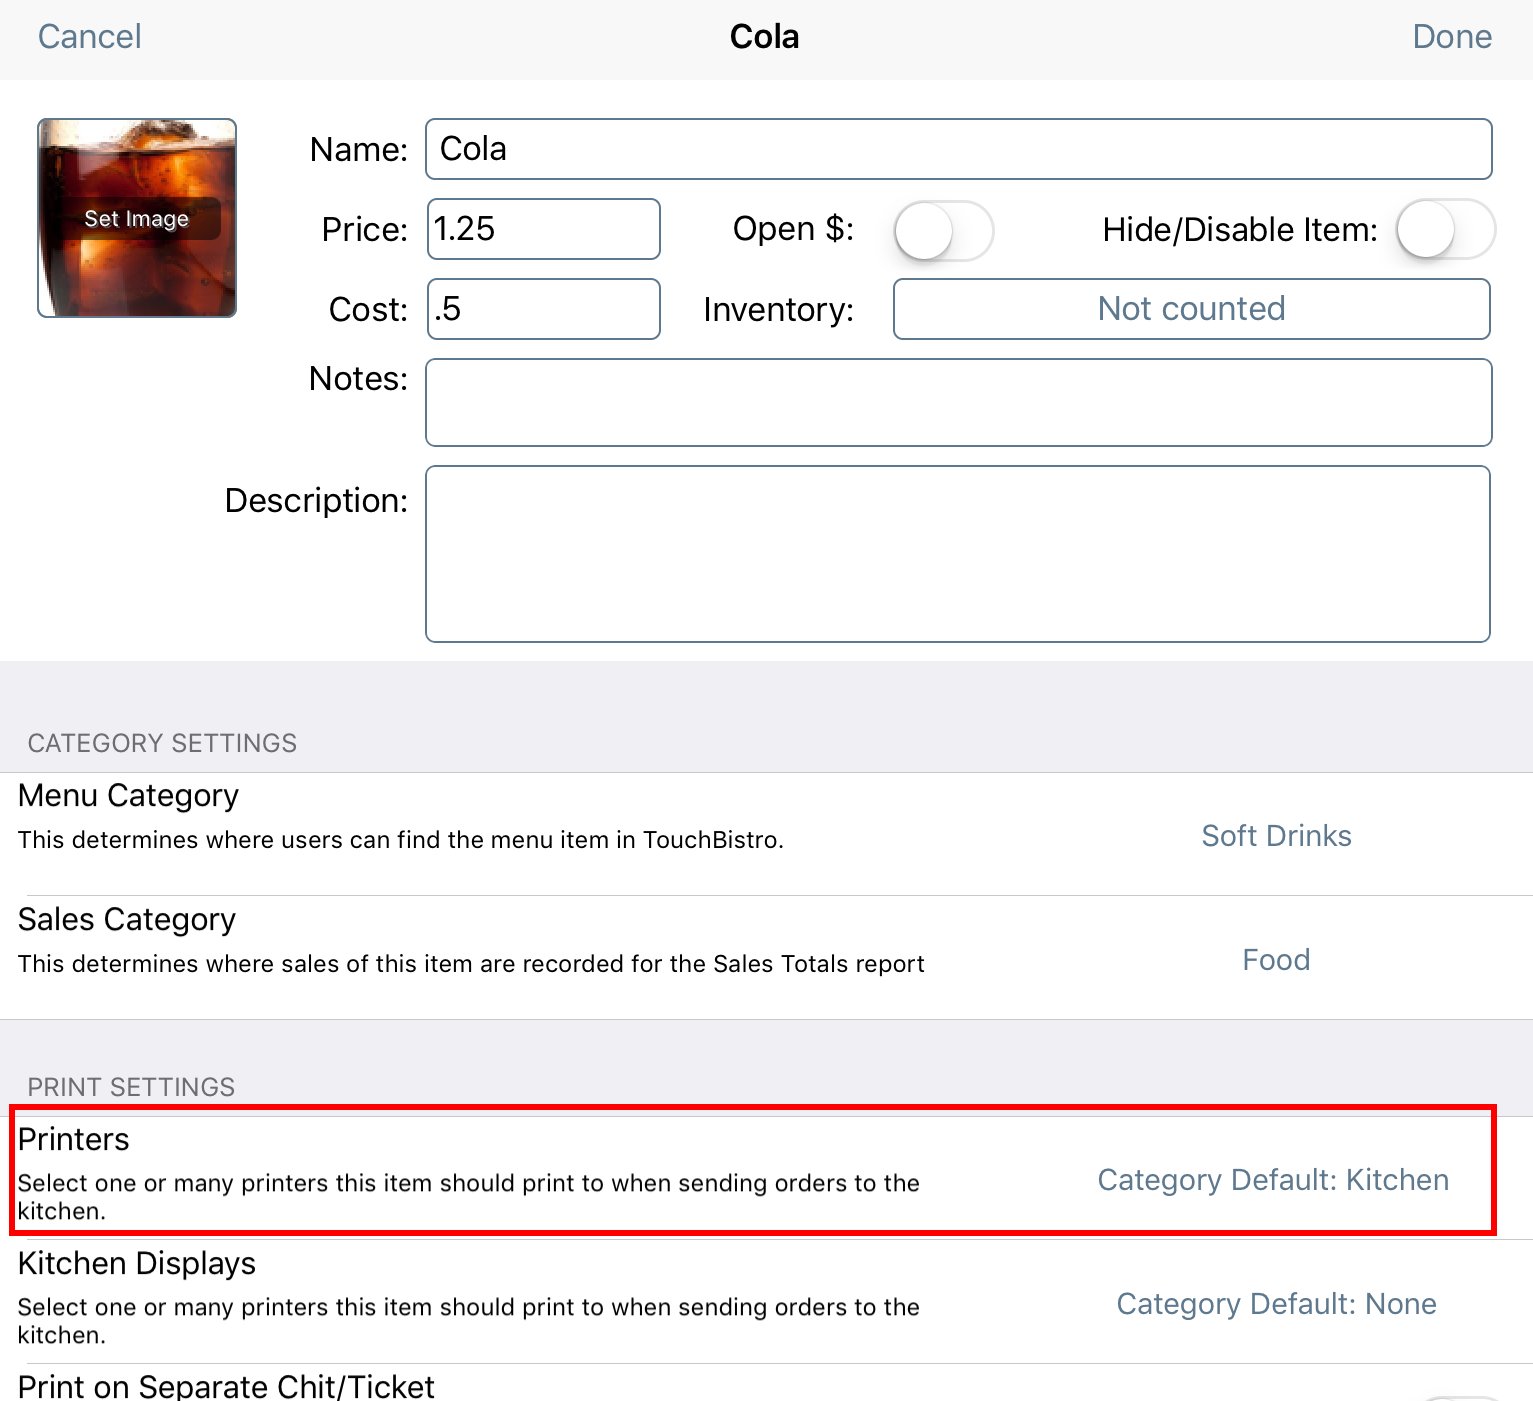
4. Tap Printers. It will be initially set for Category Default.
5. Select your Bar printer. (If it’s set for Do no print this item, disable that setting).
6. Tap Save.
7. Tap Save again to exit the Menu Item edit screen.
Chapter 4. Suppressing Drink Ticket Printing at the Bar
If you need to send tickets to the kitchen from the bar, because patrons may order sides or mains at the bar, but you don’t need the drink orders to print to your bar printer, you can disable sending tickets for any Menu Category or Menu Item set for a Drinks course as a ticket.
1. Tap Admin | Admin Settings | Menu | Menu Categories.
2. Tap each of your drink categories.

3. Ensure Default Course is set to Drinks. If not tap, Default Course.
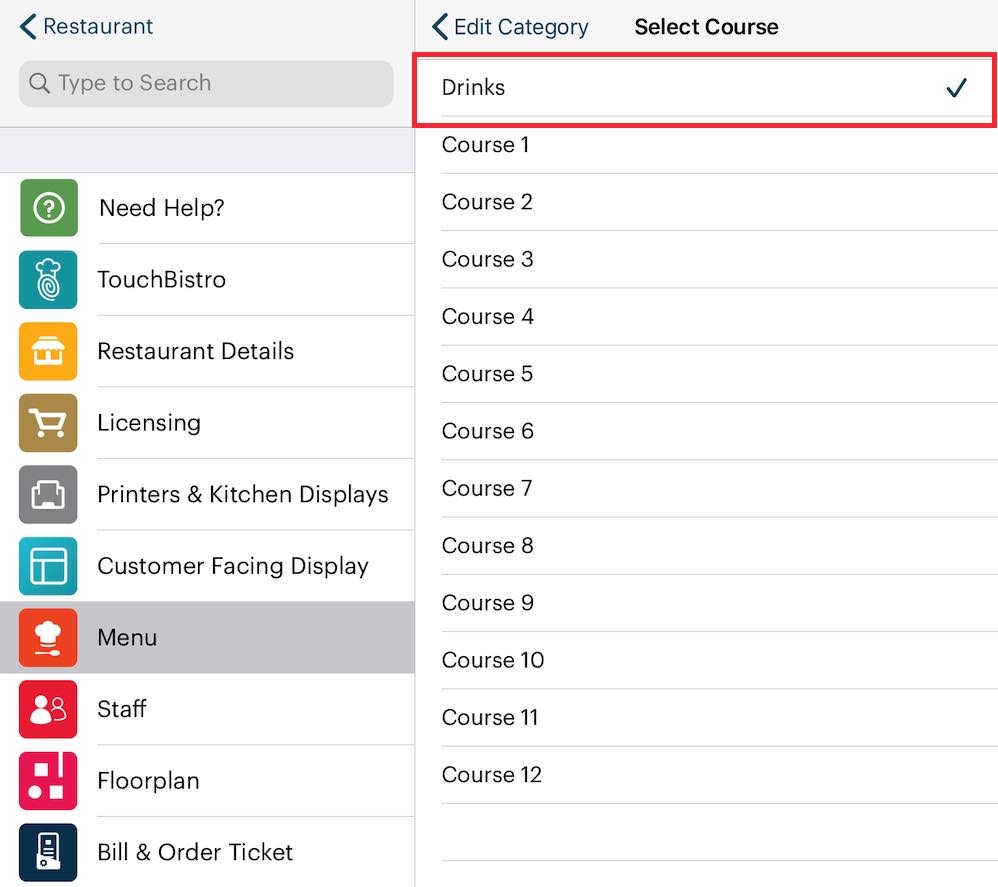
4. Tap Drinks.
5. Tap Save and open your next drink menu category and repeat.
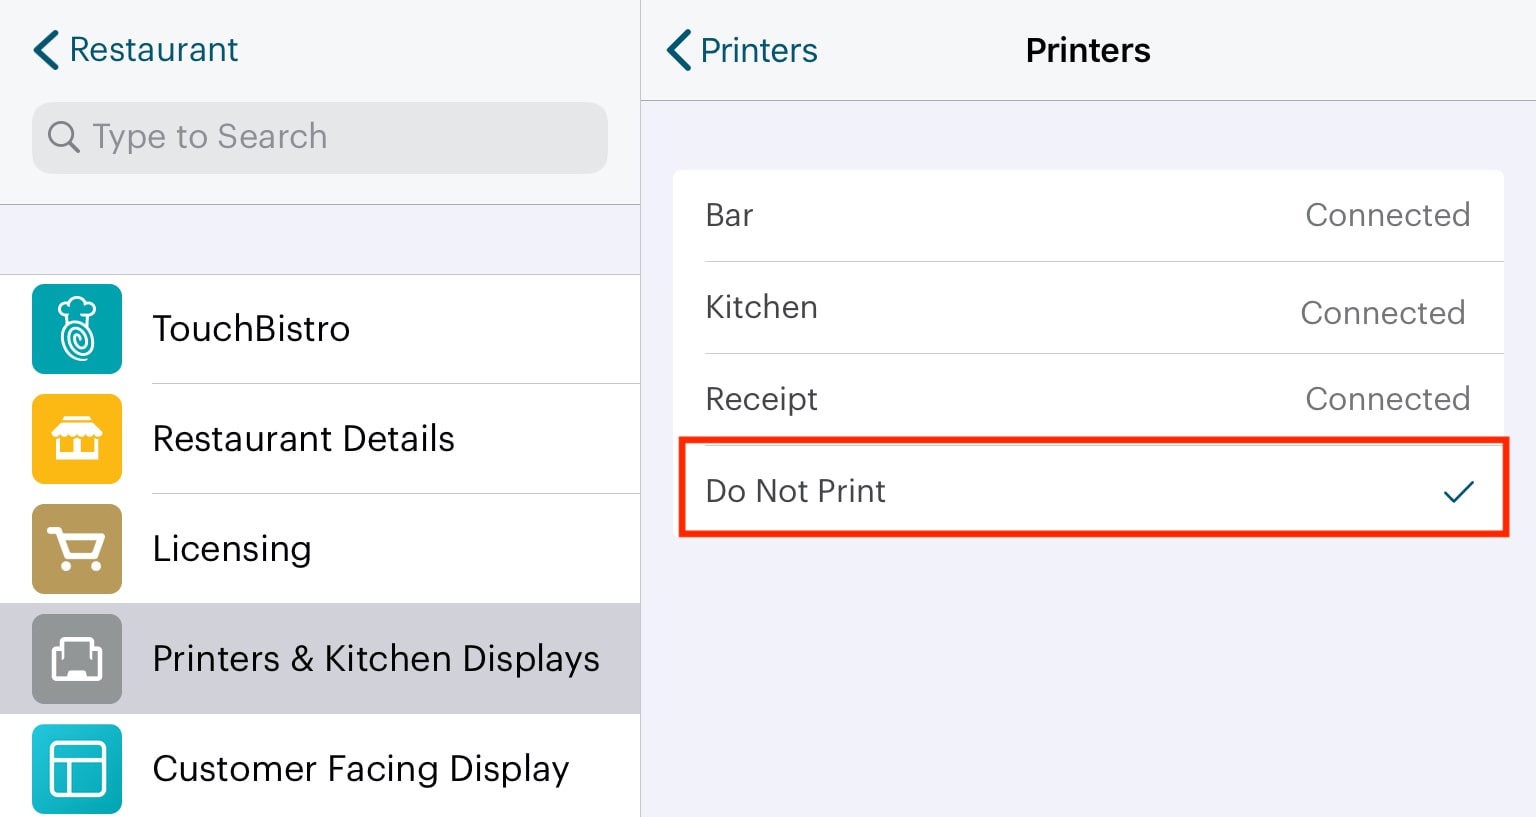
Chapter 5. Set the Bar’s iPad to Do Not Print Tickets
On the iPad you intend to use at the bar, you can set it locally not to print drink tickets.
1. Tap Admin | Admin Settings | Printers & KDS.
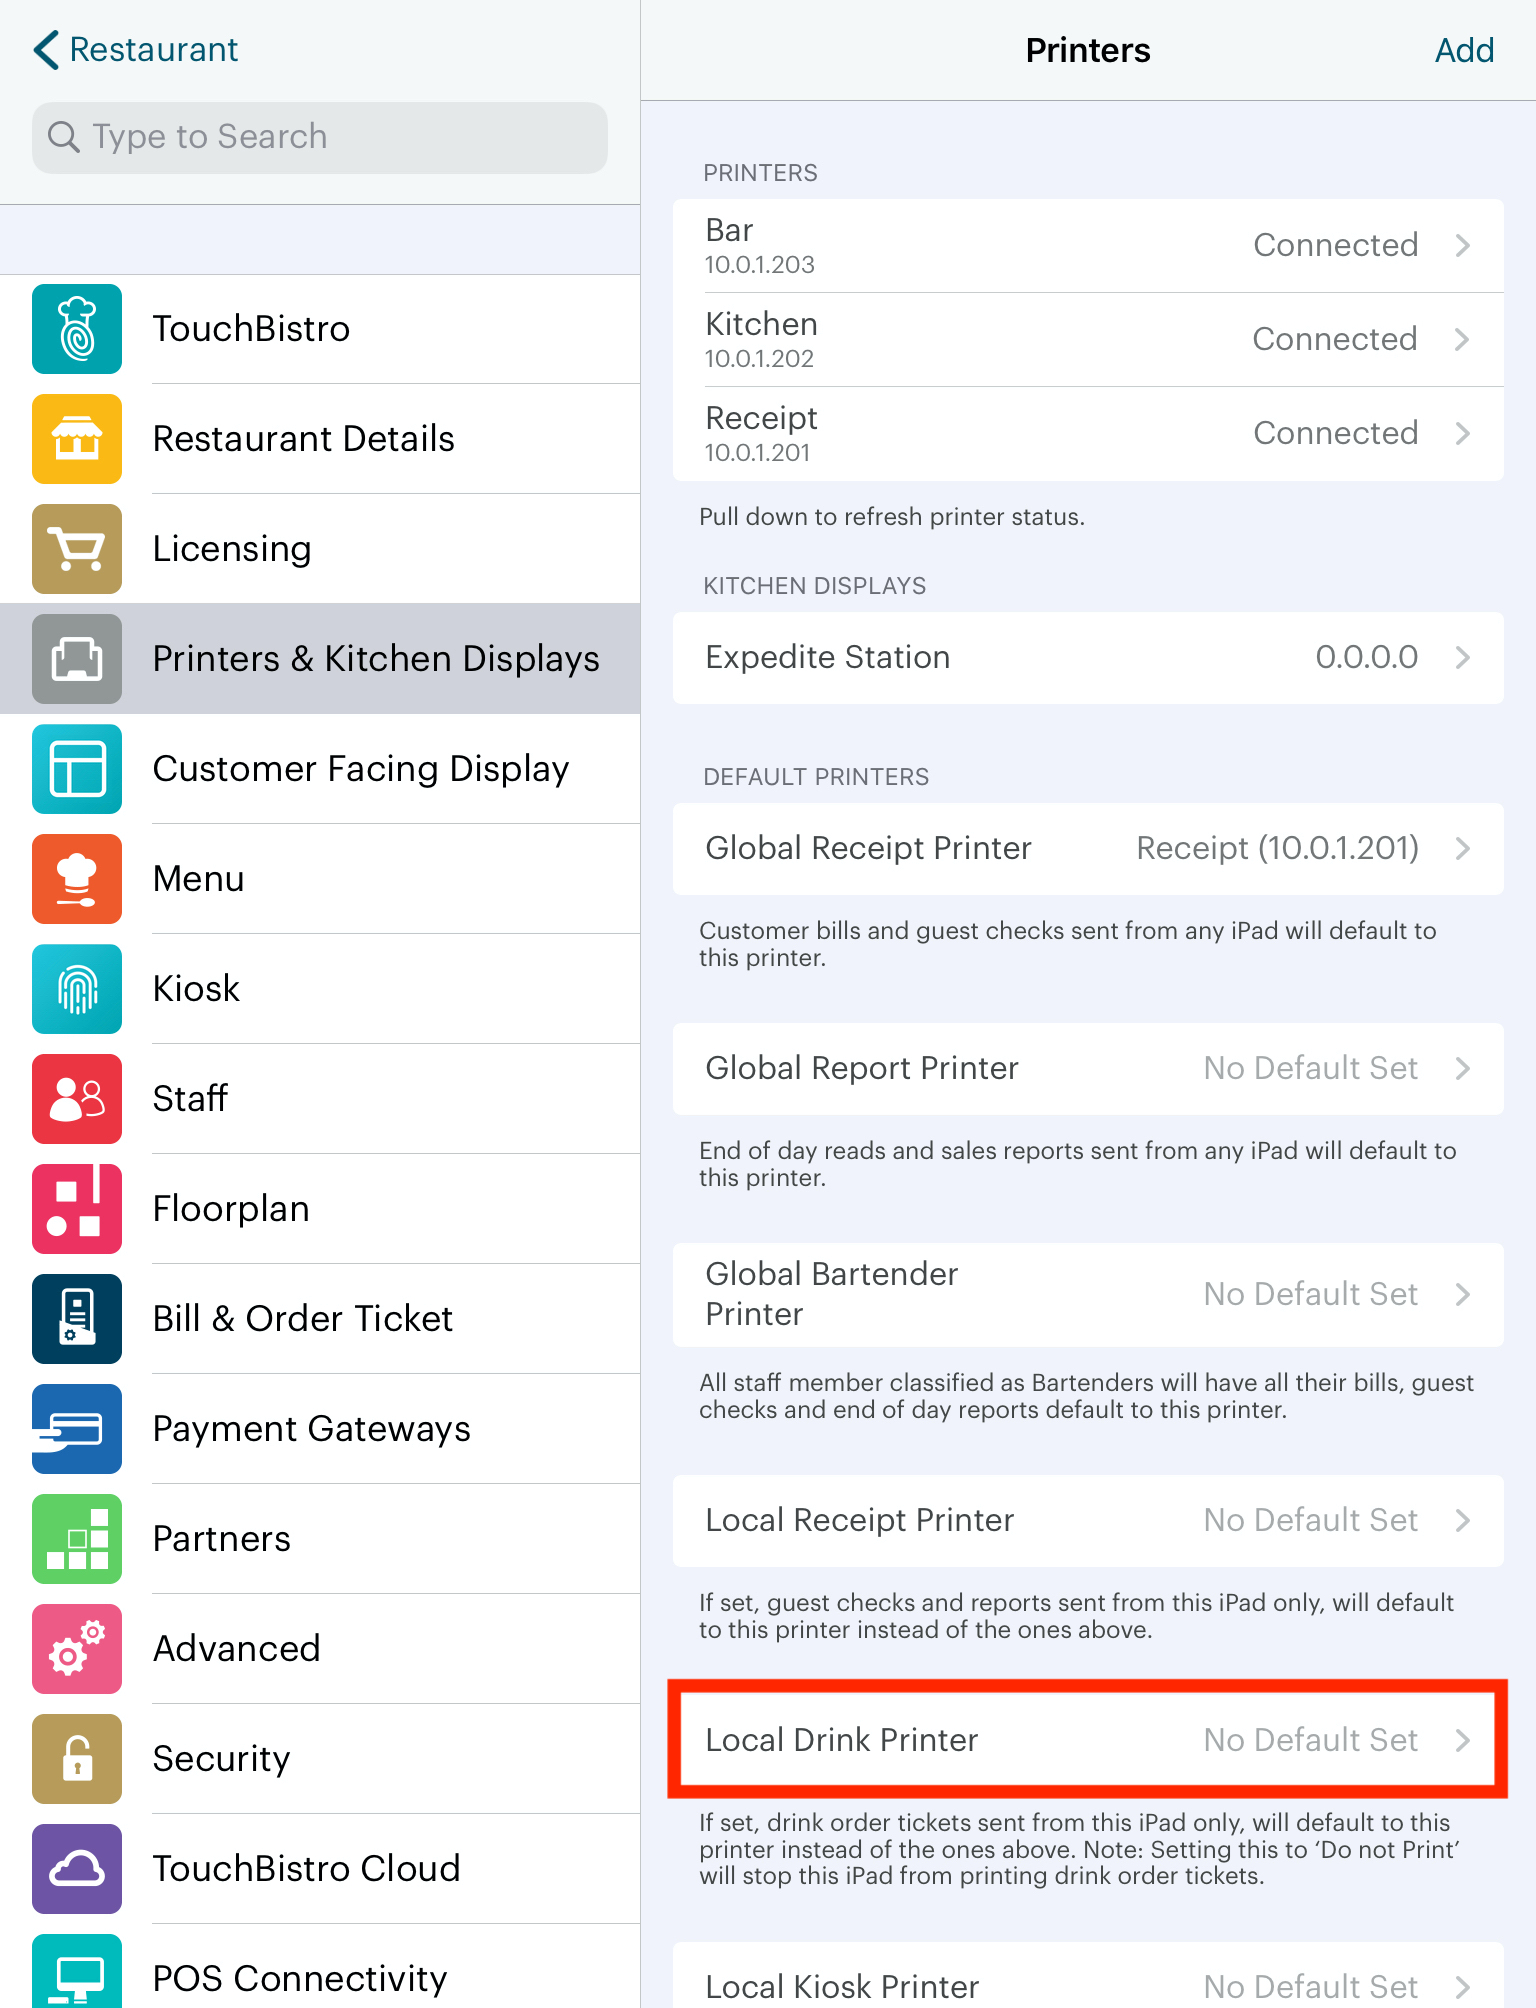
2. Scroll to the bottom and tap Local Drink Printer.
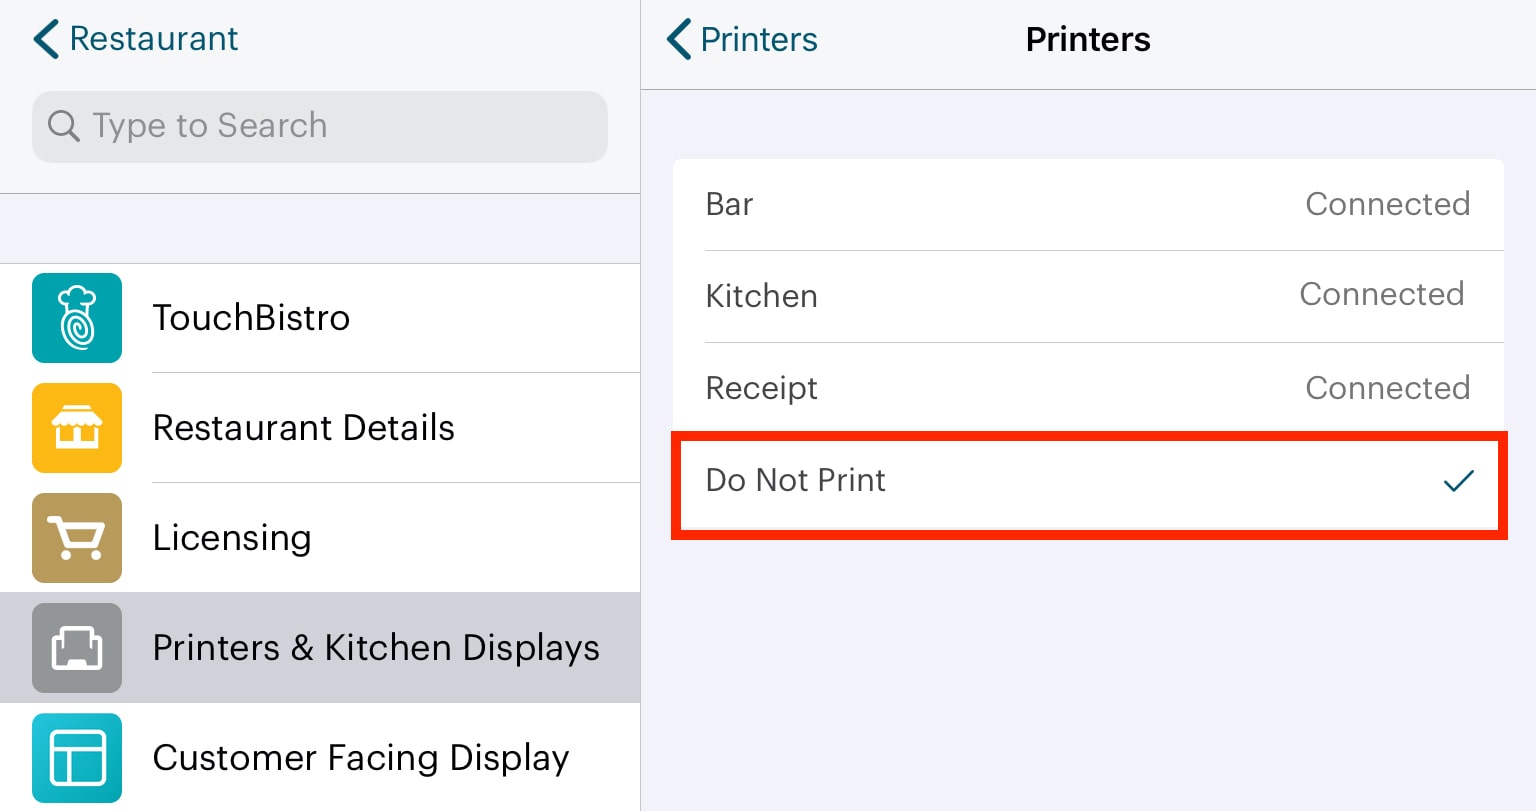
3. Enable Do not print.

4. Ensure your Local Drink Printer is now set for Do Not Print.
Chapter 6. Set a Specific iPad to Print Bar Receipts
If you want to quickly set this iPad to print receipts using the bar printer, follow these steps:
1. Tap Admin | Admin Settings | Printers & KDS.
2. Scroll to the bottom and tap Local Receipt Printer.
3. Select your bar printer.
Chapter 7. Related Articles
Setting Up the Ingredient Inventory System for a Bar
Printing Chinese or other Non English Characters on your Kitchen Tickets