
 Email
Support
Email
Support Frequently
Asked Questions
Frequently
Asked Questions
Generating Accounting Reports
Table Of Contents
Chapter 2. Ensure Your iPad Email Account is Set Up
Chapter 4. Generating an Accounts Report
Section 1. How is the Accounts Report Generated?
Chapter 5. Adding Additional Reports
Chapter 6. Detailed Account Report
Section 2. How is the Detailed Account Report Generated?
Section 1. How is a Tax Report Generated?
Chapter 8. Tax Exclusion Report
Section 1. How is a Tax Exclusion Report Generated?
Chapter 9. Statistical Summary
Section 1. How is a Statistical Summary Generated?
Chapter 10. Details Sales CSV reports
Chapter 11. Bills with Open Balances
Section 1. How is a Bills with Open Balances Report Generated?
Section 1. How is the Payouts Report Generated?
6) Adding Payout Reports to Waiter Read and End of Day
Chapter 13. Gift Card Activity Report
Section 1. How is the Gift Card Activity Report Generated?
Chapter 1. Introduction
TouchBistro’s Accounting Reports section allows you to generate reports about your accounts, taxes collected, and average spends. The Accounting Reports sections also lets you generate CSV files for importing into third-party accounting apps like bevIntel.
Note: If you are using Inclusive Tax, see this discussion about how that affects reporting.
Chapter 2. Ensure Your iPad Email Account is Set Up
Many reports can only be viewed by emailing them to yourself as a CSV file. Before you start to generate reports, you should ensure you have an email account set up on your iPad(s). To set up an email account see this guide on the Apple site.
Chapter 3. Accessing Reports
To access a report login either as a manager profile or the admin profile. Best practices are not to use the admin login unless you need to access admin function to make permanent changes to your restaurant.
In this guide, we’ll assume you’re using a manager profile (or a profile that has Can Access Reports enabled).
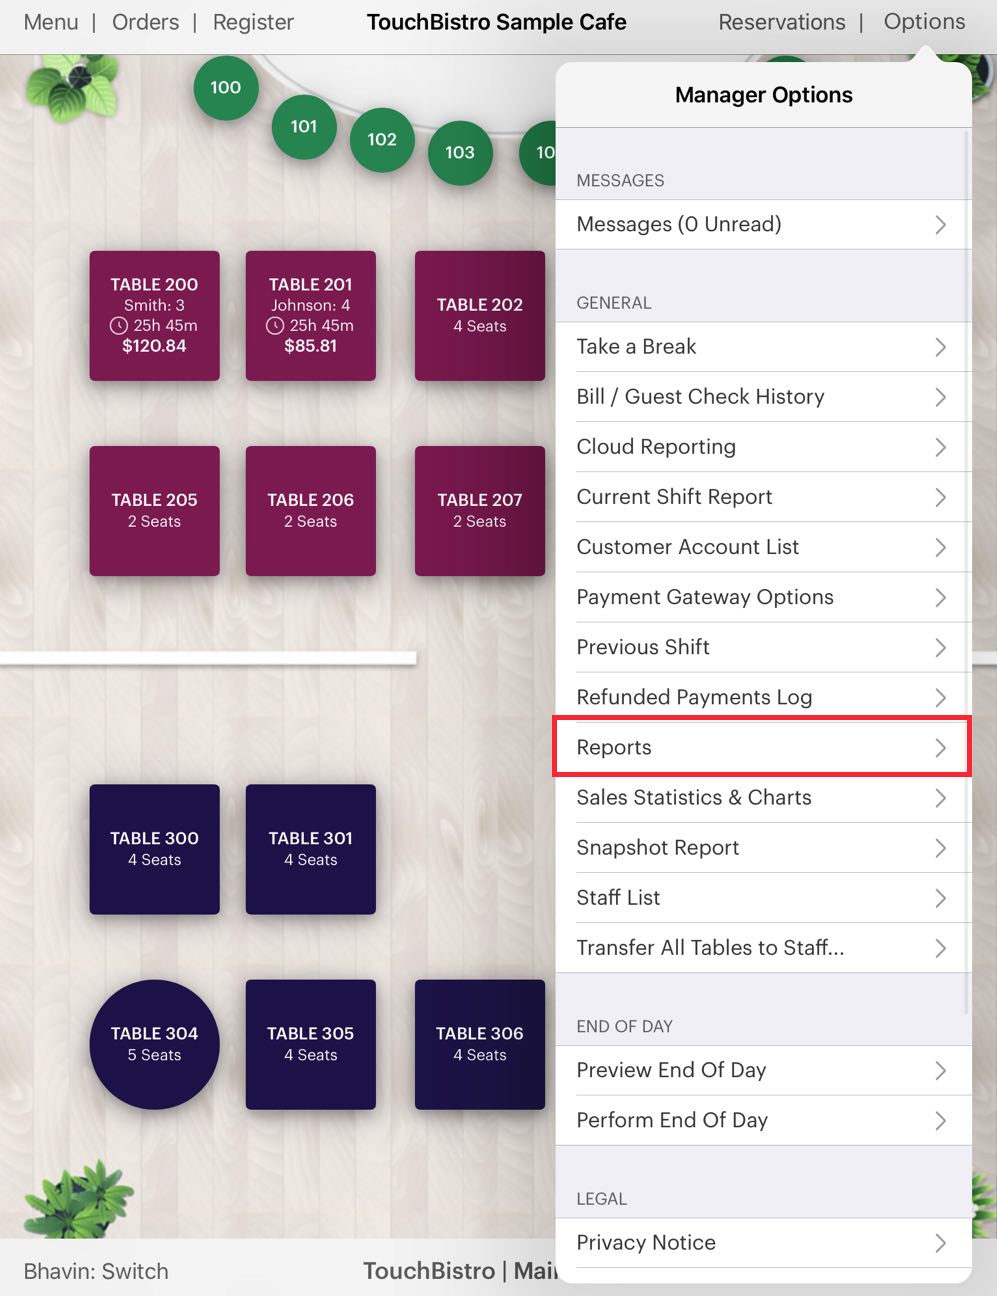
1. From your floor plan screen tap Options.
2. Tap Reports.
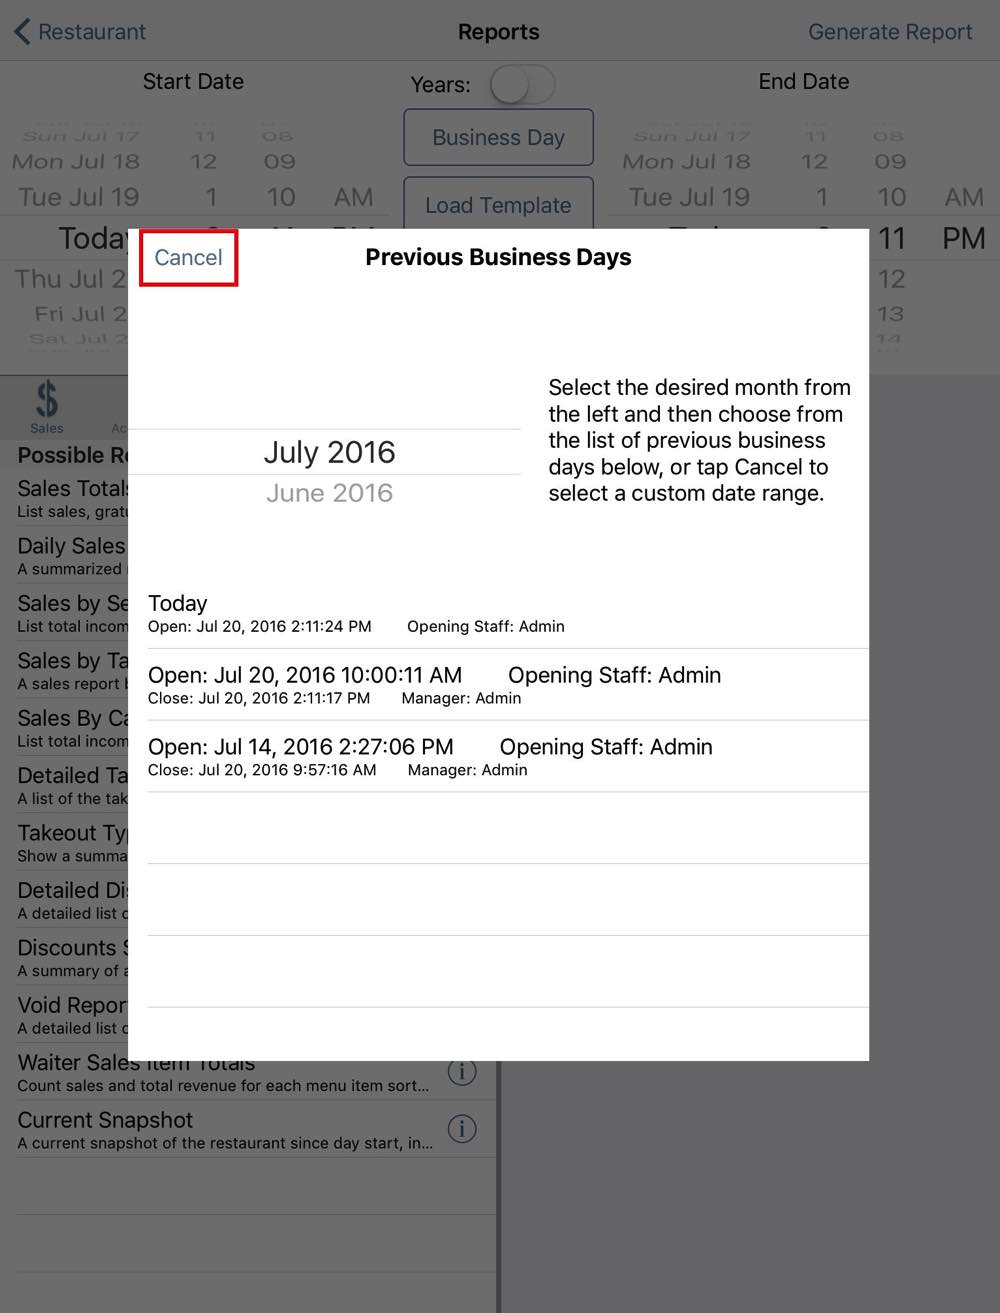
3. The Previous Business Days screen lets you quickly access individual business days (that is the block of time when you opened your venue via TouchBistro and when you closed it). Hence, a Business Day will not be 24 hours. If you opened your venue at TouchBistro at 9 am Tuesday and did your end of day and closed it Wednesday 3 am, TouchBistro will record that as a business day. In this example, we’re interested in a date range. We’ll generate a payments report for all staff for a week. Tap Cancel to set a date range.
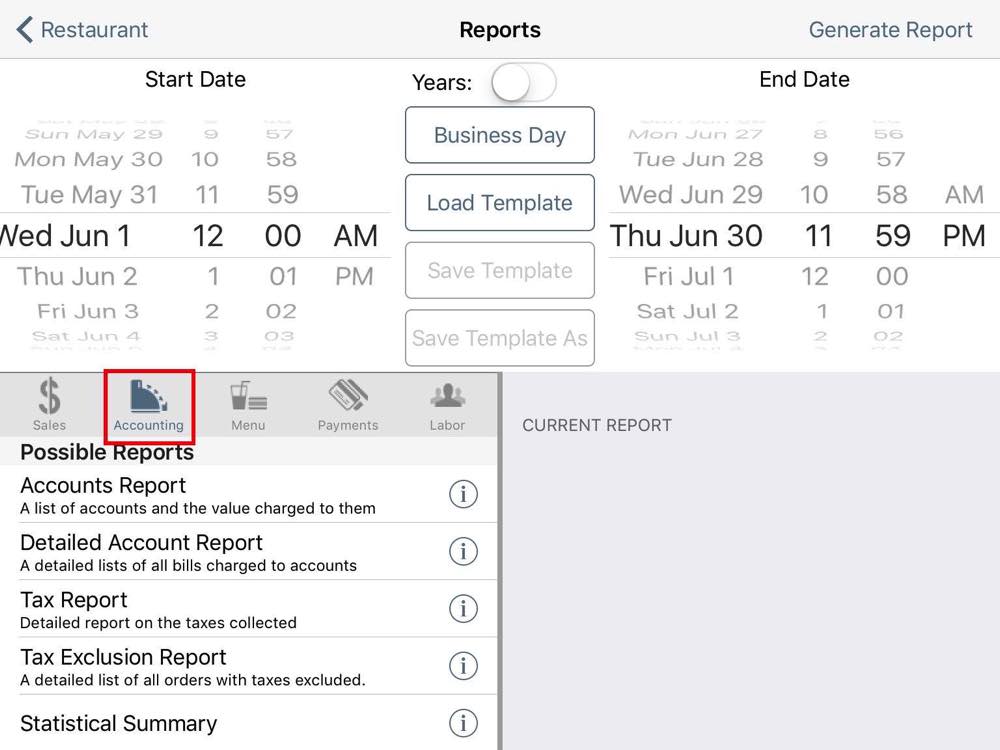
4. Use the date wheels at the top to set the start and end of the range. In this example, we’re setting the range from the very start of June 1 to the end of June 30. So, the whole month of June. TouchBistro treats 12:00 AM as the start of the day and 11:59 PM as the end of the day.
5. Tap Accounting to access reports associated with your accounts, tax, and other data.
Chapter 4. Generating an Accounts Report
The Accounts report will give you a breakdown of purchases and tips charged to accounts for the time period. The report also gives you a summary of all payments made against accounts as well as all deposits to accounts for the time period. This does not give you a report of outstanding balances.
1. Before you add the report, tap the Information ![]() icon associated with the report to specify the sort order:
icon associated with the report to specify the sort order:
|
Option
|
Description
|
|
Account Name
|
Sorts accounts alphabetically.
|
|
Total
|
Sorts accounts from the highest to lowest totals.
|
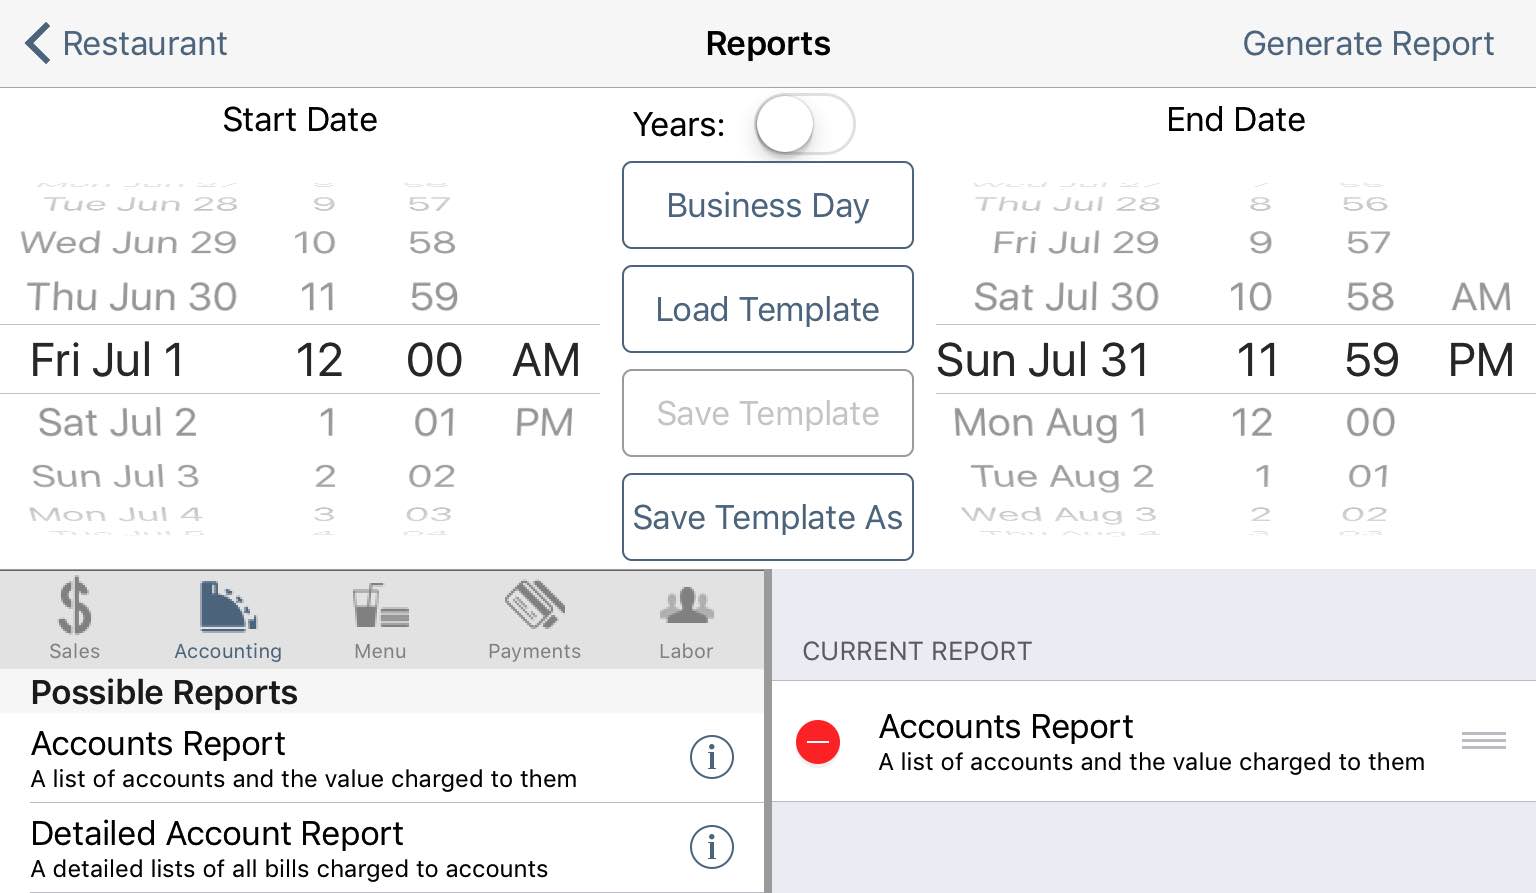
2. Add the Accounts Report to the Current Report column by tapping it.
3. You can add in additional reports by tapping them. For example, tap Tax Report.
4. You can remove a report at any time by tapping the Delete ![]() icon next to the appropriate report and then tapping Delete.
icon next to the appropriate report and then tapping Delete.
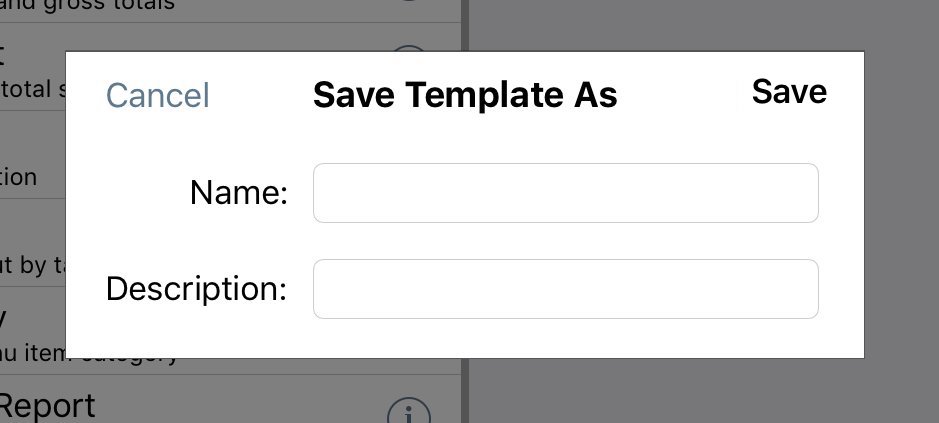
5. If you’ve created a report with multiple reports and you’ll need to re-generate the report at a later date, tap Save Template As. Use Load Template to access this saved report.
6. In this example, we’ll only generate an Accounts Report.
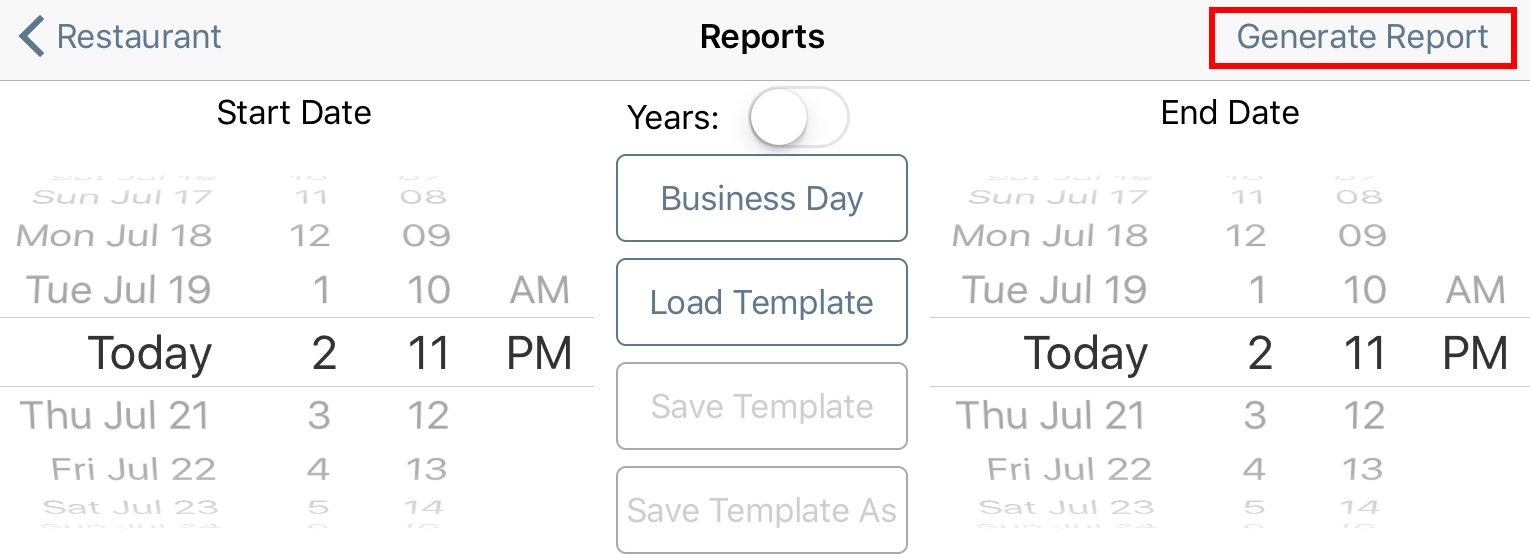
7. Tap Generate Report on the top right when you’re ready to view the report results.

8. When you generate a report, TouchBistro gives you the following options at the top of the report:
|
Option
|
Description
|
|
|
Tap CSV to email the report as a CSV (comma separated values) file. A CSV file can be opened in a spreadsheet.
|
|
|
Tap Email to email the report as a formatted email.
|
|
|
Tap Printer to print the report to a configured printer.
|
9. If you choose to email your report, ensure you’ve set up an email account under your iPad’s Settings. TouchBistro uses your iPad’s existing email credentials for emailing.
Section 1. How is the Accounts Report Generated?

The Accounts Report reports on bills paid via the Checkout screen’s Pay on Account option.
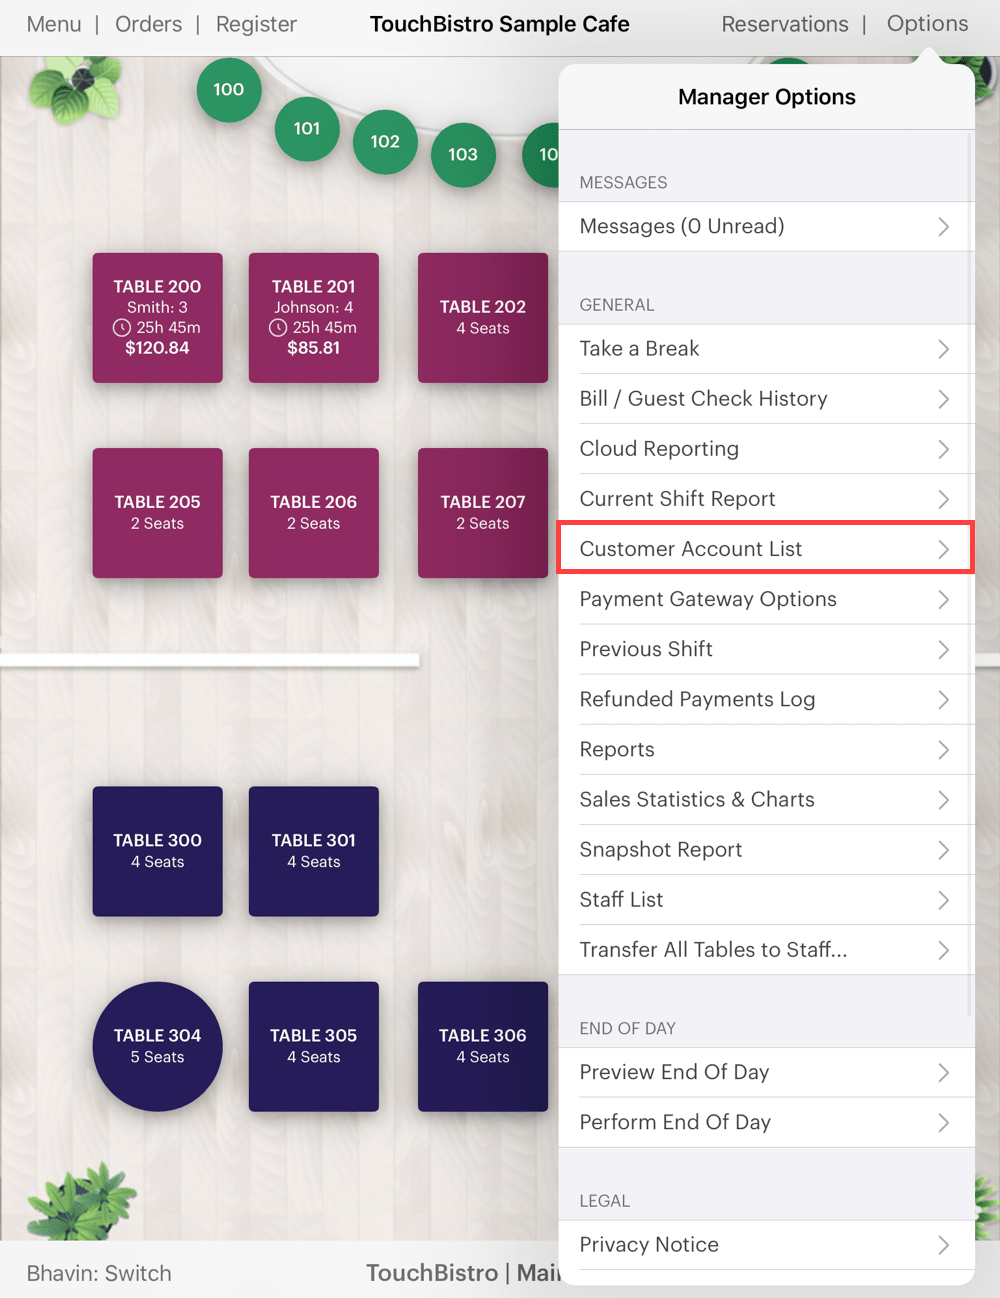
You can set up accounts via an Admin account or a Manager account with access to accounts enabled. Tap Admin | Customer Account List.
Tap Add ![]() to add a new account.
to add a new account.
Chapter 5. Adding Additional Reports
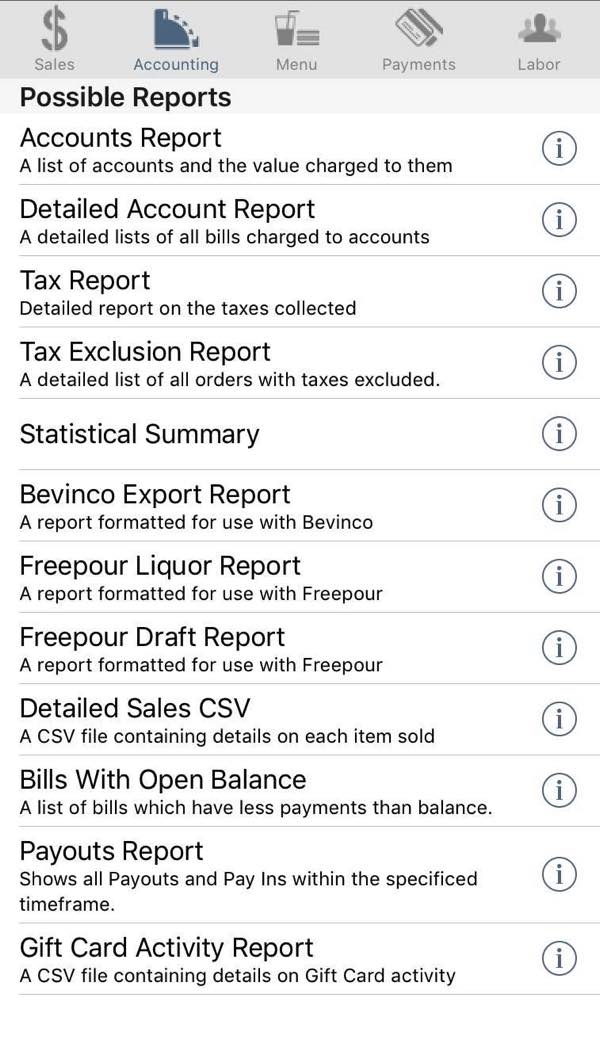
The Accounting reports section provides six reports in total. In addition to the Accounts Report, you can add a Detailed Account Report, Tax Report, Tax Exclusion Report, Statistical Summary, bevIntel Report, Freepour Liquor Report, Freepour Draft Report, Detailed Sales CSV, and Bills With Open Balances.
Chapter 6. Detailed Account Report
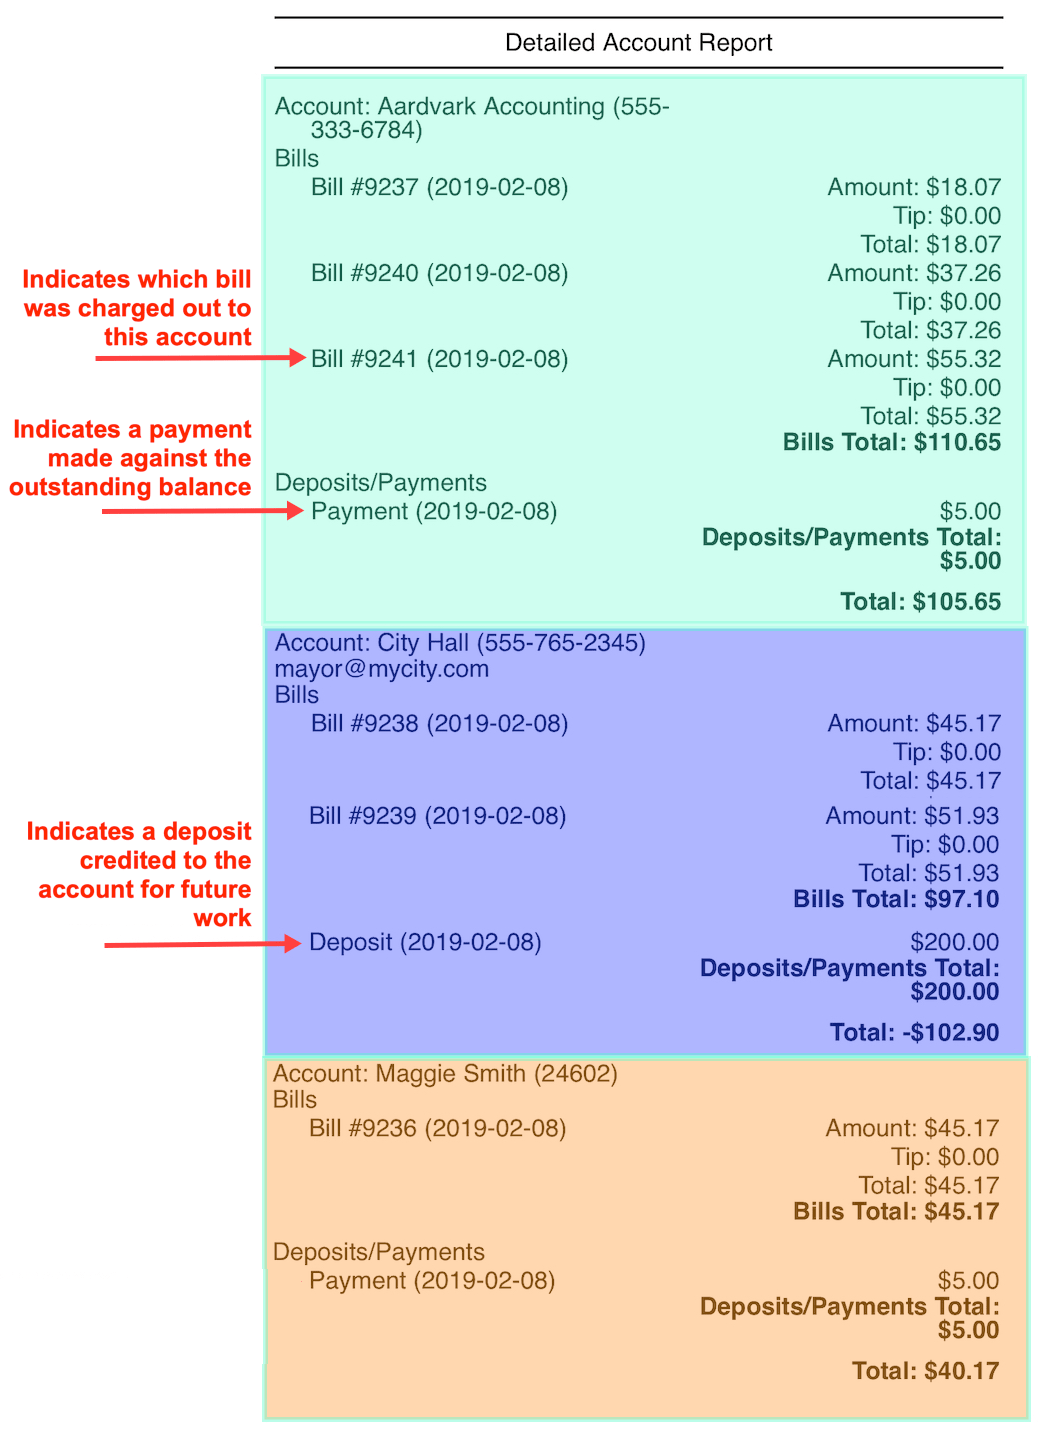
The Detailed Account Report is similar to the Account Report. However, the Detailed Account Report breaks down account totals by the closed bills associated with each account. It also indicates payments made to accounts (payments made to settle balances) as well as deposits added to secure future work (for example, a catering job).
Section 1. Sort by
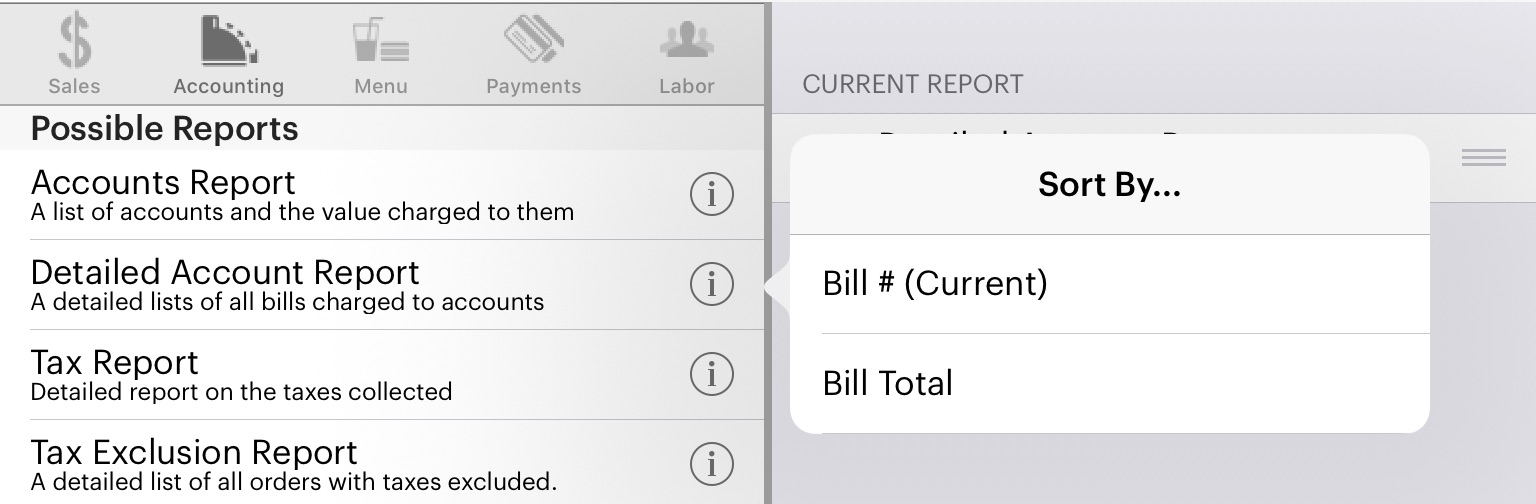
Before you add a Detailed Account Report, tap the Information ![]() icon associated with the report to specify the sort order:
icon associated with the report to specify the sort order:
|
Option
|
Description
|
|
Bill #
|
Sorts bills listed in each account by the bill’s number.
|
|
Bill Total
|
Sorts bills listed in each account by bill totals, from the lowest to highest totals.
|
Section 2. How is the Detailed Account Report Generated?
1) Bill Number
Bill # represents the number TouchBistro assigns to a printed receipt. If you need to look up a bill, access TouchBistro’s Bill / Guest Check History, set the time/date wheels for the same date range as this report, and locate the Bill # in the Search Results area.
2) Amount/Tip/Total
Represents the amount charged to the account (including the tip).
3) Payment

Represents a payment made via the Account History screen against an account balance. That is, an amount paid to pay down the account.
4) Deposit
Represents a deposit made via the Account History screen as a down payment on a future order (for example, a catering job).
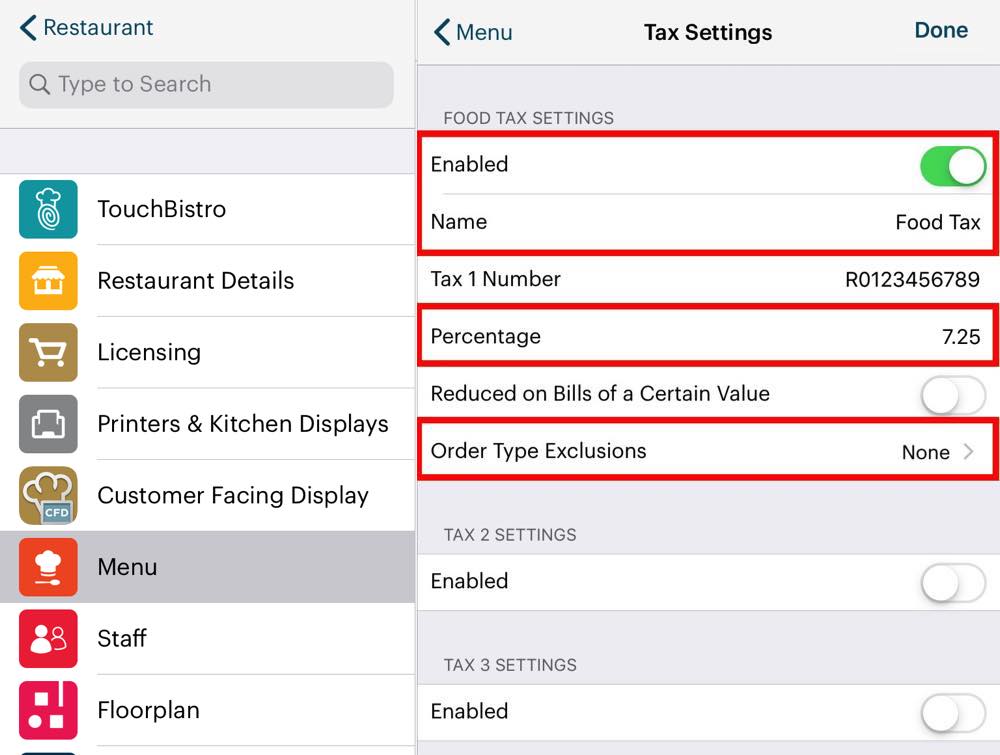
Chapter 7. Tax Report

The Tax Report gives you a breakdown of total tax paid, how many orders triggered a tax collection, how many order triggered a reduced tax, the total reduced tax collected, and if you have to charge a special alcohol tax, the number of orders that included alcohol and any special alcohol tax collected.
Section 1. How is a Tax Report Generated?
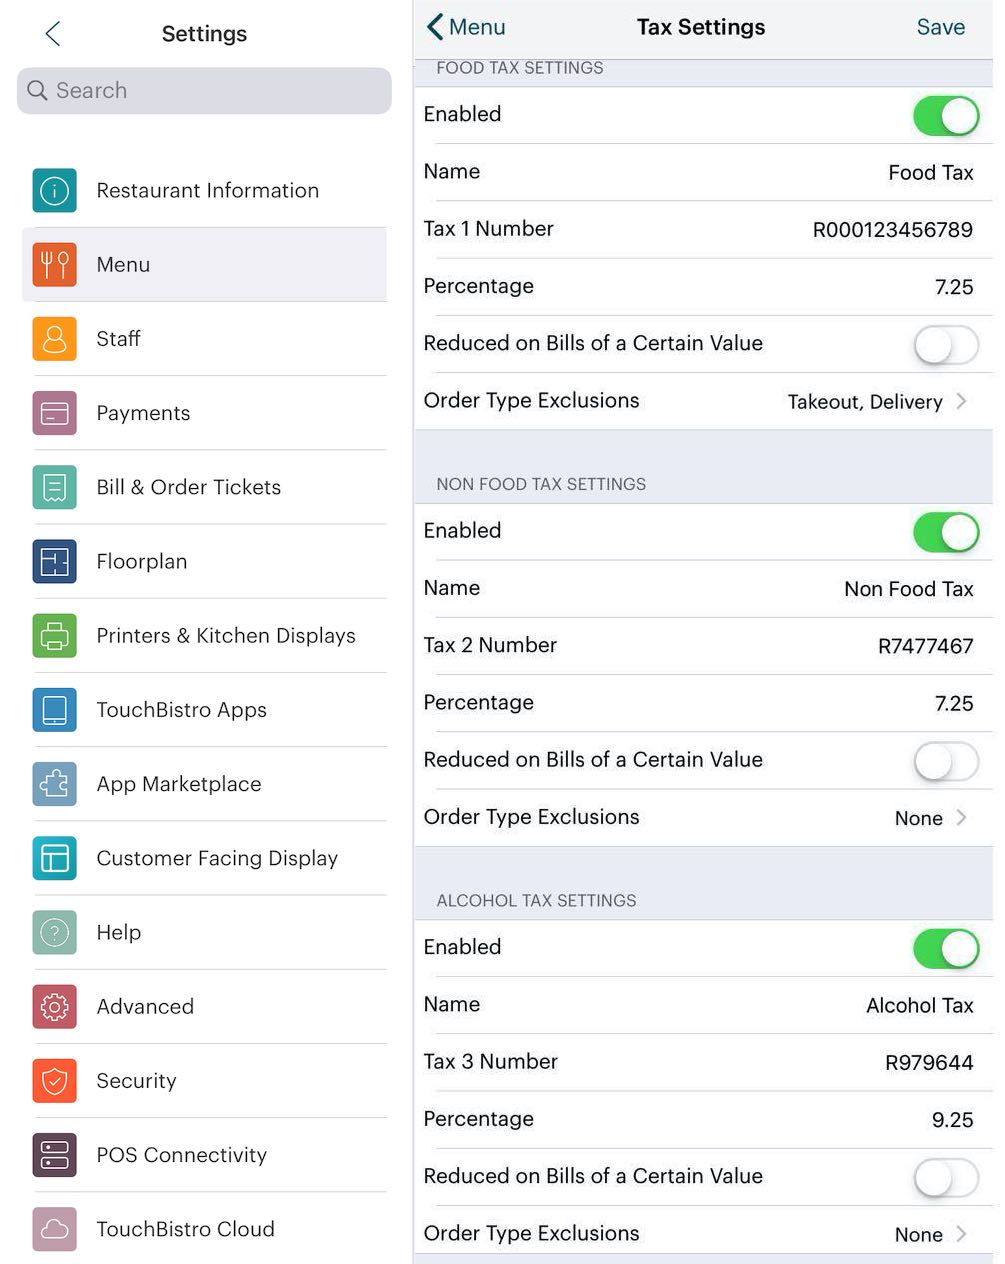
Taxes collected appear on bills. Taxes are setup under Admin | Admin Settings | Menu | Tax Settings. Reduce Tax data comes from your tax reduction settings.
Note: for a discussion about how rounding affects tax collected see this discussion.
Chapter 8. Tax Exclusion Report
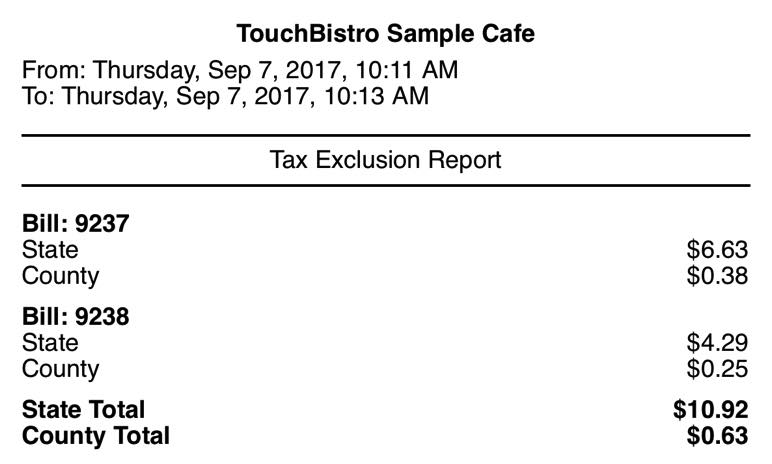
The Tax Exclusion report shows you which bills have had taxes manually excluded, the tax excluded, and the amount.
Section 1. How is a Tax Exclusion Report Generated?
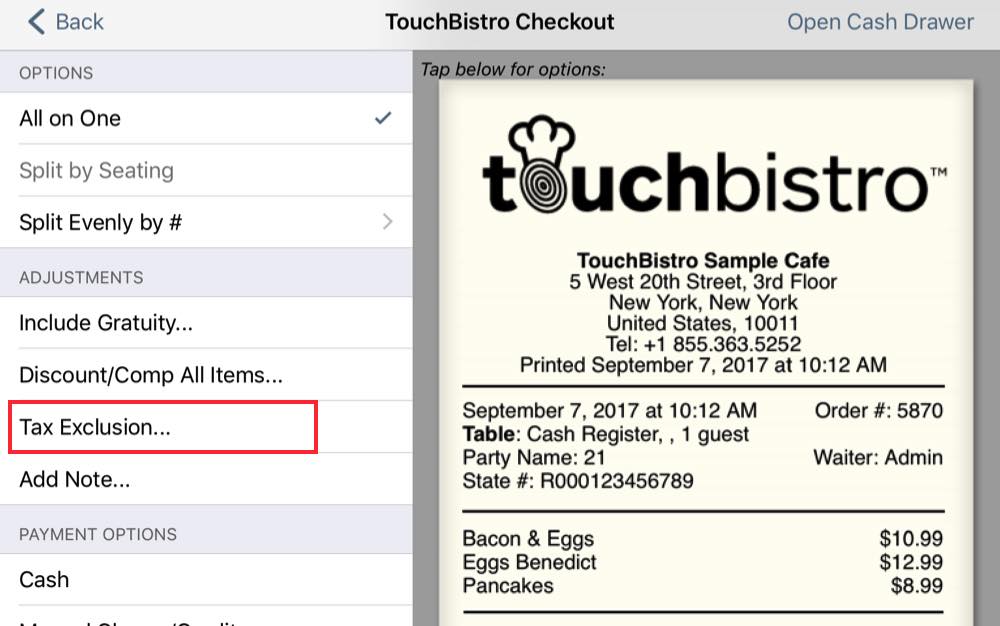
Taxes can be manually excluded from the Checkout screen as an adjustment.
As well, you can set up automatic tax exclusions based on order type.
Chapter 9. Statistical Summary

The Statistical Summary report gives you per bill and per guest (seats) average spends.
Note: if you have a lot of bar tabs that represent multiple guests, your Avg. Amount per Guest figure could be skewed unless you specify on the bar tab with the Set Seat Count option the number seats the bar tab represents.
Section 1. How is a Statistical Summary Generated?
Total bills and guest (i.e., seat) totals come from your guest check/bill data. Averages spend is based on pre-tax/pre-tip amounts on the bills.
Chapter 10. Details Sales CSV reports
Section 1.
The Detailed Sales CSV is also intended as a general export of sales data if you need to import data into a third-party accounting system. If you use QuickBooks or Xero, TouchBistro supports an integration with a third party app called Shogo that lets you import TouchBistro sales data into those packages.
If you would like to download a sample of the Detailed CSV Report TouchBistro generates, click here (105 KB ZIP).
1) Detailed Sales CSV Fields
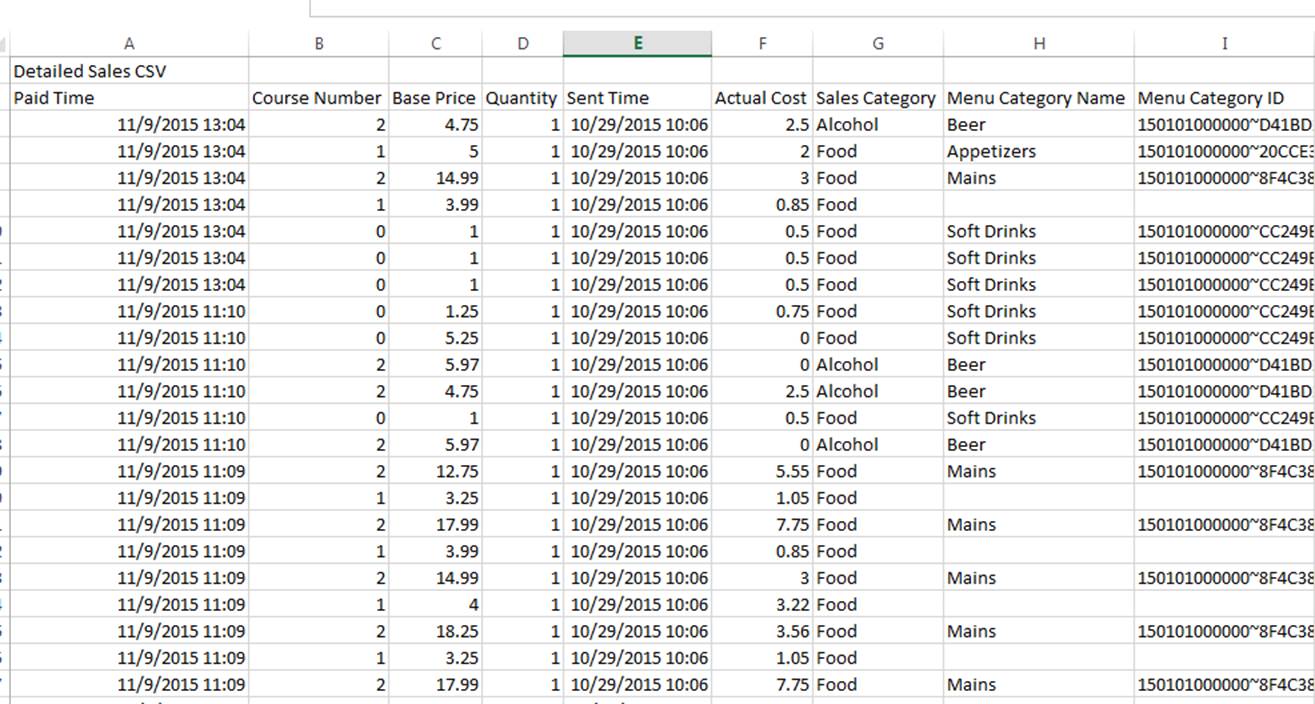
The Detailed Sales CSV has a large amount of sales data. The table below will help you understand what each column represents and where the data comes from within TouchBistro.
|
Field
|
Example Cell
|
Description
|
|
Paid Time
|
|
Indicates the time item was paid for via the checkout process.
|
|
Course Number
|
|
Indicates the course number the item was set to. By default it is the course number set at the Menu Category or Menu Item level. However, if the menu item’s course was modified at order time, this field will capture that.
|
|
Base Price
|
|
Indicates the price of the menu item ordered before tax, discounts, or modifier up charges. This value will be the menu item’s price field divided by any splits (split by table/split evenly). If the item was ordered in multiple quantities, the base price will reflect the item’s price multiplied by the quantity.
|
|
Quantity
|
|
Indicates if the item was ordered in multiple quantities. If this is not a whole number (e.g., .33 or 1.67) it indicates the item was split (by table or evenly).
|
|
Sent Time
|
|
Indicates the time the item was sent to a ticket printer or the KDS.
|
|
Actual Cost
|
|
The cost based on the menu item’s Cost field. If the item was ordered in multiple quantities, the Actual Cost field will be multiplied by the quantity ordered.
|
|
Sales Category
|
|
Indicates the Sales Category the menu item is under.
|
|
Menu Category Name
|
|
Indicates the item’s pre-set Menu Category.
|
|
Menu Category ID
|
|
Menu Category ID is the database ID used by TouchBistro for the menu category.
|
|
Default Course Number
|
|
Indicates the course number set at the Menu Item level.
|
|
Tax columns
|
|
There will be up to three columns that indicate tax rate applied.
|
|
Estimated Tax amounts
|
|
There will be up to three columns that indicate the amount of tax collected. Tax is rounded to the third decimal place (a fraction of a cent).
|
|
Menu Item ID
|
|
Menu Item ID is the database ID used by TouchBistro for the menu item.
|
|
Order Item ID
|
|
Order Item ID is the database ID used by TouchBistro for the item in the completed order.
|
|
Name
|
|
The name from the menu item Name field.
|
|
Short Name
|
|
If the menu item has an optional short name, this field will list it.
|
|
UPC
|
|
If you entered a UPC for the menu item, this field will list it.
|
|
Order ID
|
|
This is the order number generated by TouchBistro for a bill. You can use the Order ID to find the bill by Order Number in Bill / Guest Check History.
|
|
Discount Amount
|
|
If the item was discounted, this indicates the dollar value it was reduced by.
|
|
Amount
|
|
The total amount billed to the customer for this item (including taxes). It is the equivalent of the Pre-Tax Amount (see below) plus all tax amounts.
|
|
Is Voided
|
|
A 1 indicates the item was voided and was not charged to a bill.
|
|
Waiter
|
|
Indicates the staff member who closed the order.
|
|
Table Name
|
|
Indicates the table’s name. Table names were created when you set up the table on the Floorplan screen.
|
|
Party Name
|
|
If a name was entered when the table was sat, the name entered.
|
|
Section Name
|
|
If you’ve created sections, this cell will indicate the section the item’s order was created in. If this was an order (takeout, delivery, bar tab), the section name will indicate Takeout.
|
|
Order Type
|
|
Indicates where the order was created: Table, Cash Register, Bar tab, Delivery, or Takeout.
|
|
Bill Number
|
|
Indicates the bill number this item was on.
|
|
Is Modifier
|
|
If 1, it indicates this menu item was added as a modifier. You should ignore this item for any sales calculations.
|
|
Modifiers Amount
|
|
If a text modifier was added to this item, the value of the upcharge will appear here.
|
|
Pre-Tax Amount
|
|
The amount of the item after discounts and modifier upcharges.
|
Chapter 11. Bills with Open Balances
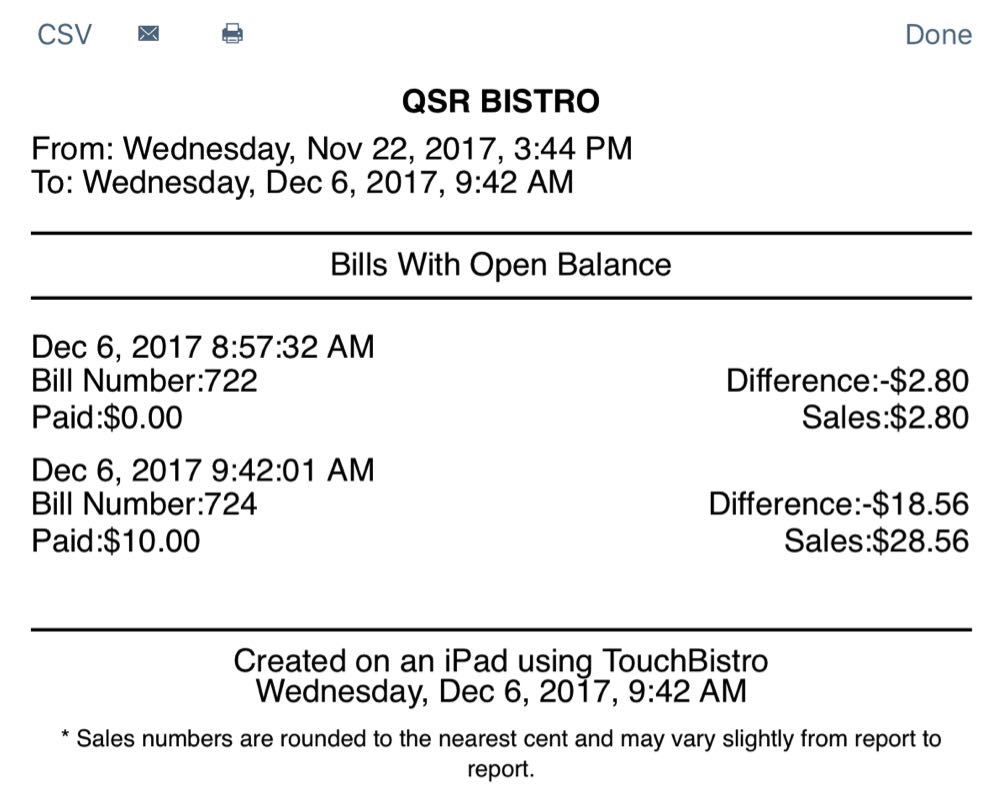
The Bills with Open Balances Report will report on any bills that were closed but later their integrated credit card payment was voided. If your payment integration gives you a void payment option, you should add this report to your end of day as a reminder of which bills have had payment voided and you can cross-check if the error that necessitated the void has been corrected. This report will not show bills that have had full/partial refunds or refunded using the Refund Sale option.
Section 1. How is a Bills with Open Balances Report Generated?
1) Void
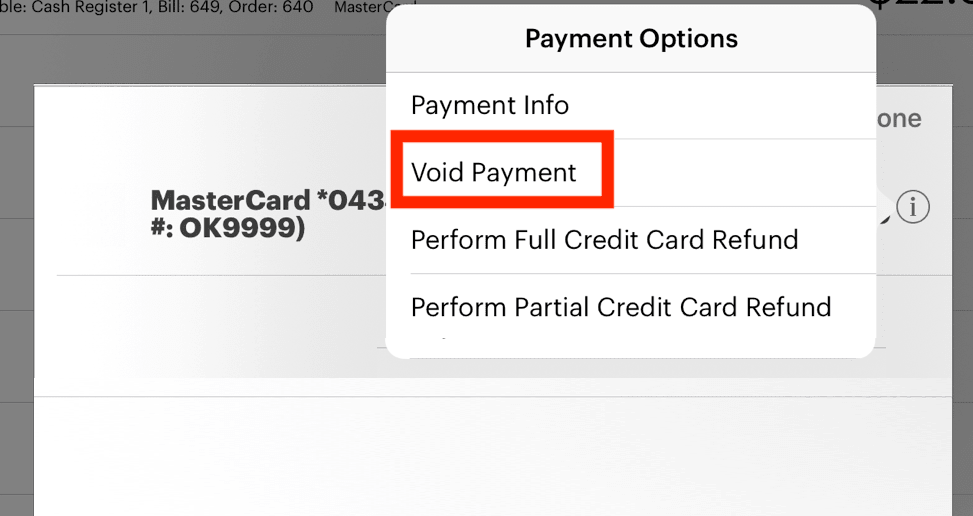
If you select a closed bill’s View/Edit Payments option, some integrations give you a Void Payment option. A payment void is usually used when you make a major payment error. You need to delete the payment and start again with a new bill. When payments are voided, the payment details are deleted from the batch and never submitted. The actual closed bill is not deleted, however. It remains so you can use the closed bill as a record as to what payment error you need to correct.
2) Difference/Paid
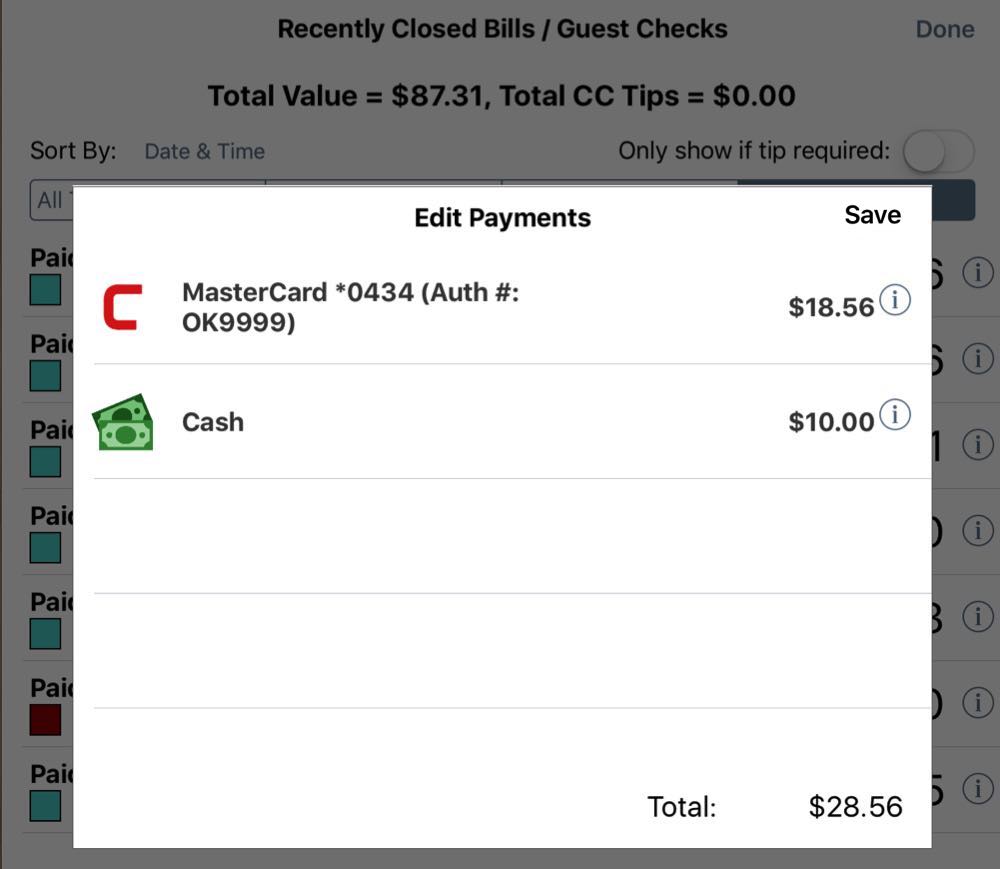
If a bill had multiple payments and some of the payments were not voided (for example, a bill was paid partially with credit card and partially with cash), the Bills with Open Balances Report will indicate the total of non voided payments applied to the bill next to Paid. Difference will indicate the voided amount.
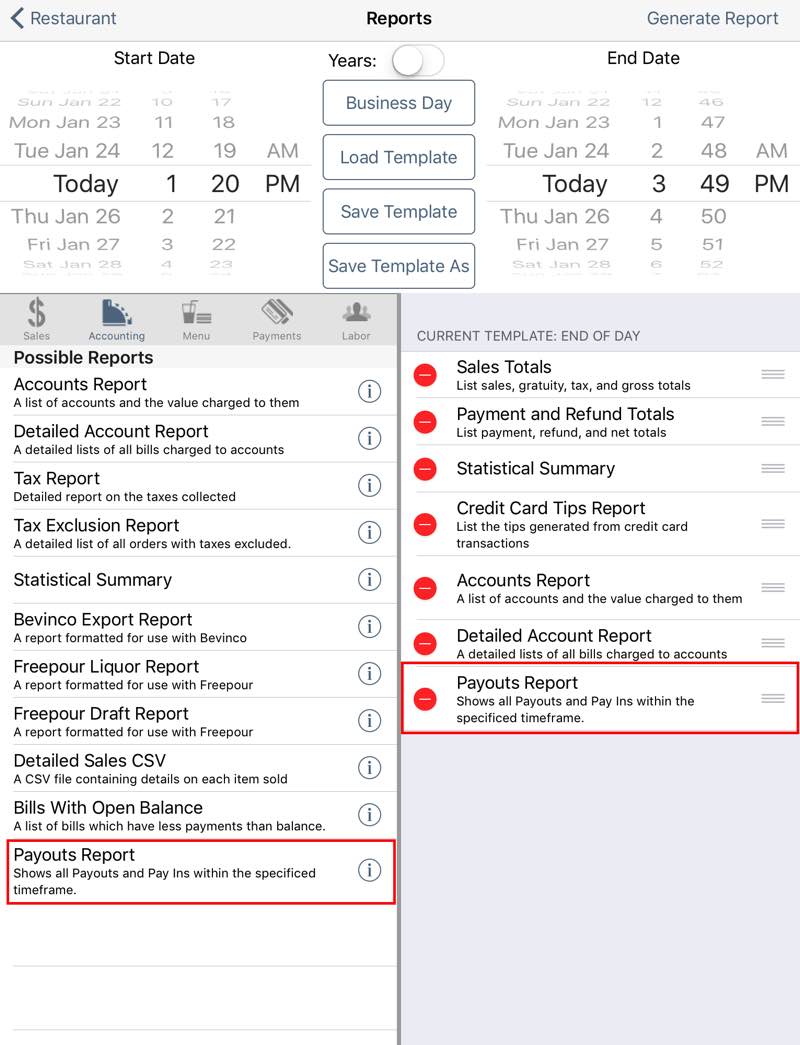
Chapter 12. Payouts Report
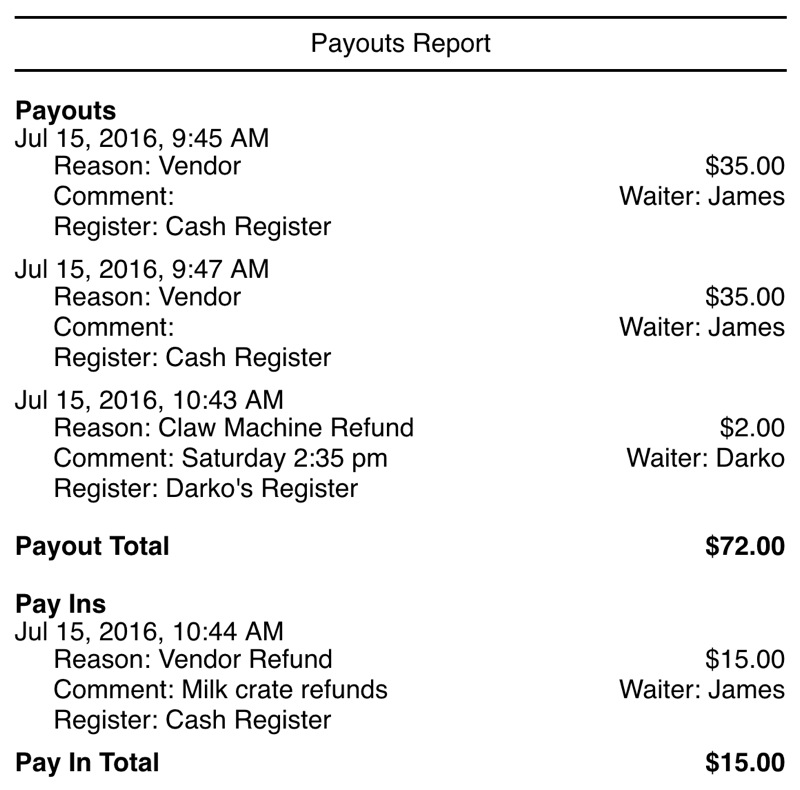
The Payouts Report tracks money going in and out when the Payouts/Pay in function is used.
Section 1. How is the Payouts Report Generated?
1) Amount
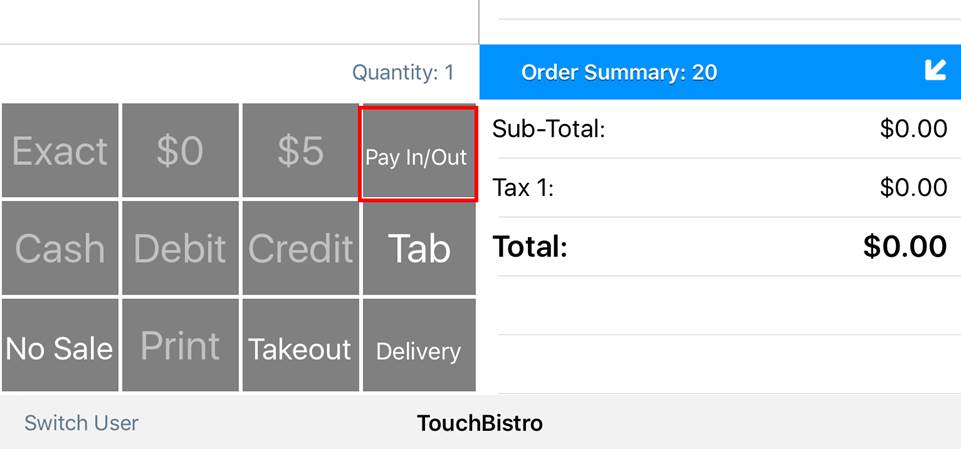
The Payouts Report reports pay ins and payouts generated by a staff member using the Pay In/Out button on the cash register screen. This button must be enabled under Admin | Admin Settings | Advanced | Change Register Buttons.
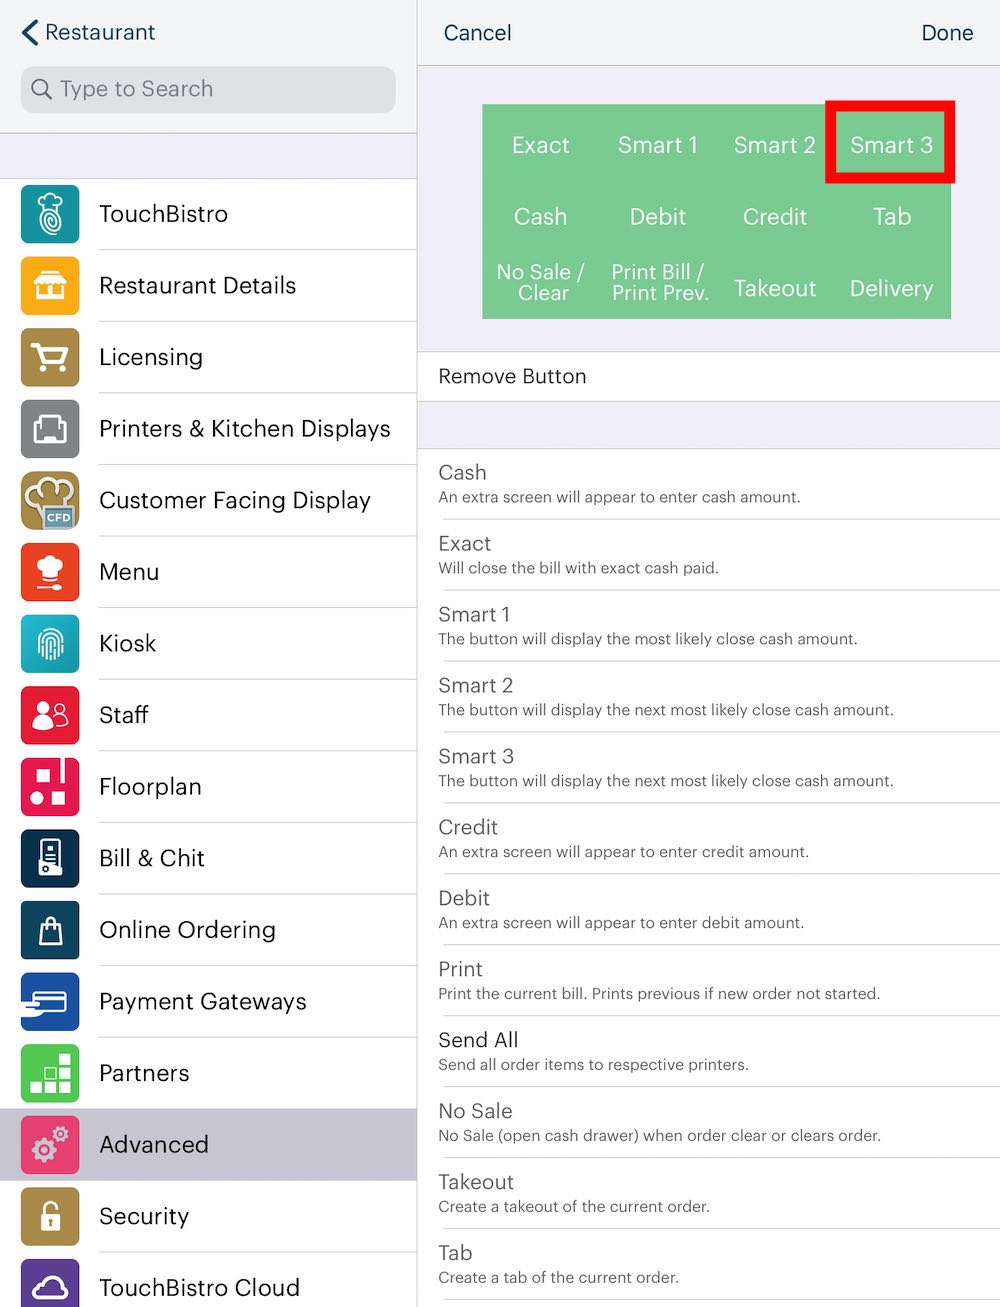
Swap out, for example, Smart 3 with the Pay In/Out button option.

The Amount represents the amount entered in the Amount field on the Pay In or Out screen.
2) Reason

Reasons are defined under Admin | Admin Settings | Menu | Payout Reasons.
3) Comment
Comments are added on the on the Pay In or Out screen.
4) Waiter
Waiter indicates the staff member who made the payout or pay in. Not all staff members can do payouts by default. You can enable it by staff type under Admin | Admin Settings | Staff.
5) Register
This will indicate which register the payout or pay in was made from, this is helpful if you have multiple cash registers (for example one on the main floor and one on the patio). Multiple cash registers can be set up under Admin | Admin Settings | Floorplan. As well, if a staff member uses his/her personal register, it will also indicate the pay in/payout was conducted through a personal register.
6) Adding Payout Reports to Waiter Read and End of Day
If you are using payouts/pay ins, we suggest adding this report to both the Waiter Read (the report that generates when a server clocks out) and your End of Day report (the report that generates when you close your day). The Payouts report if added to your End of Day can help you balance out your cash drawer at the end of the day. As well, if the server is doing a payout/pay in from his/her own float, it can help the server balance out his/her float.
To do this:

1. On the reports screen tap Load Template.
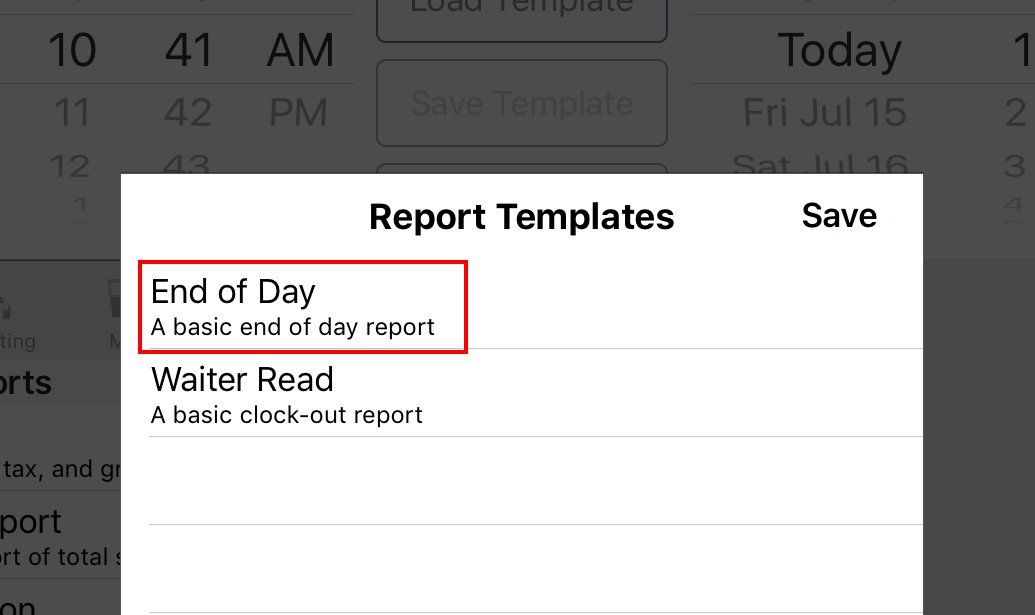
2. First tap End of Day.
3. Tap Accounting and tap Payouts Report.
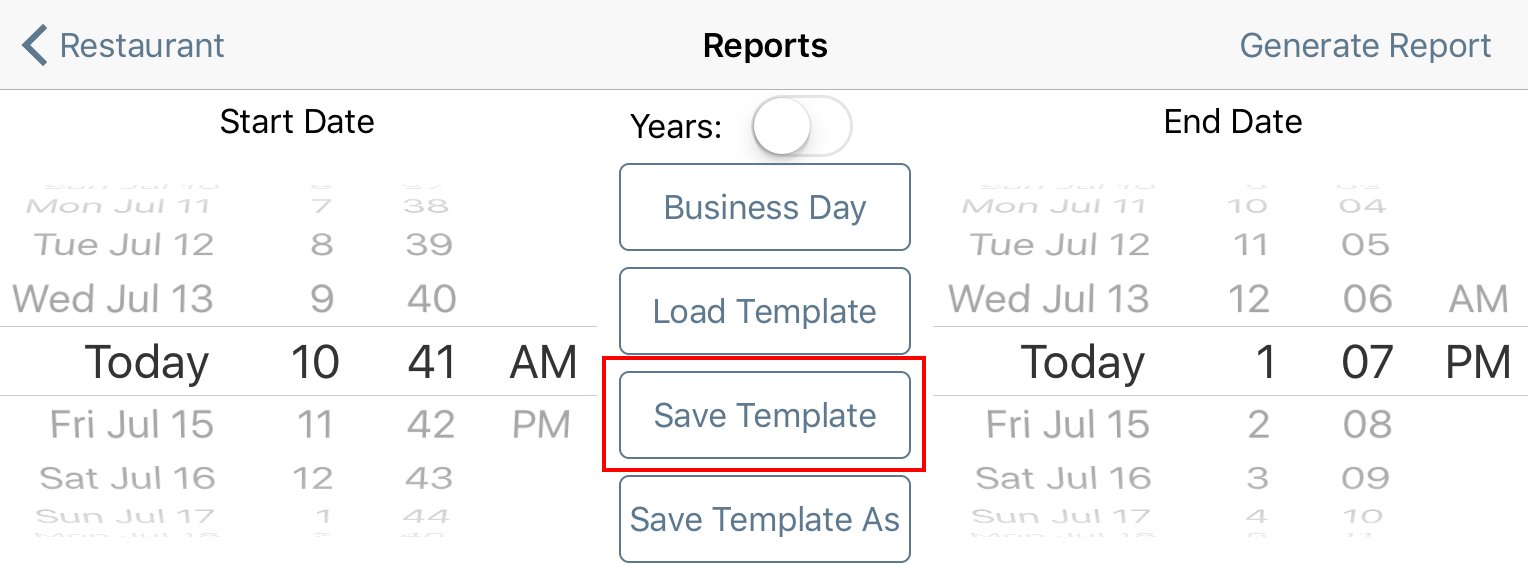
4. Tap Save Template.
5. Tap Load Template.

6. Tap Waiter Read.
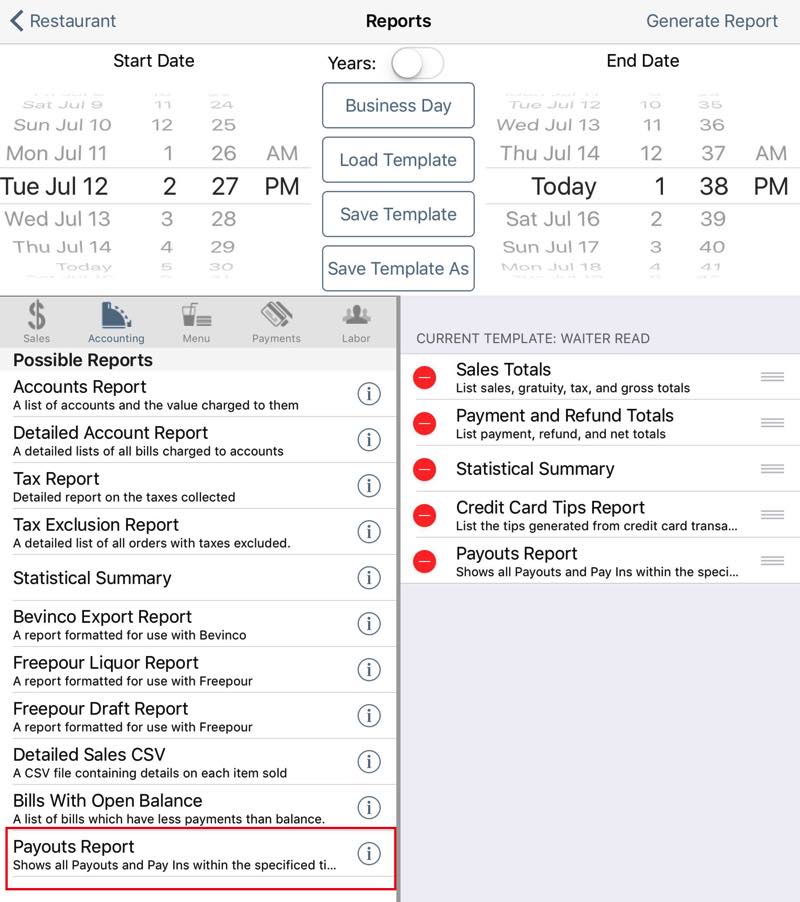
7. Tap Payouts Report to add it to the Waiter Read.
8. Tap Save Template.
Chapter 13. Gift Card Activity Report
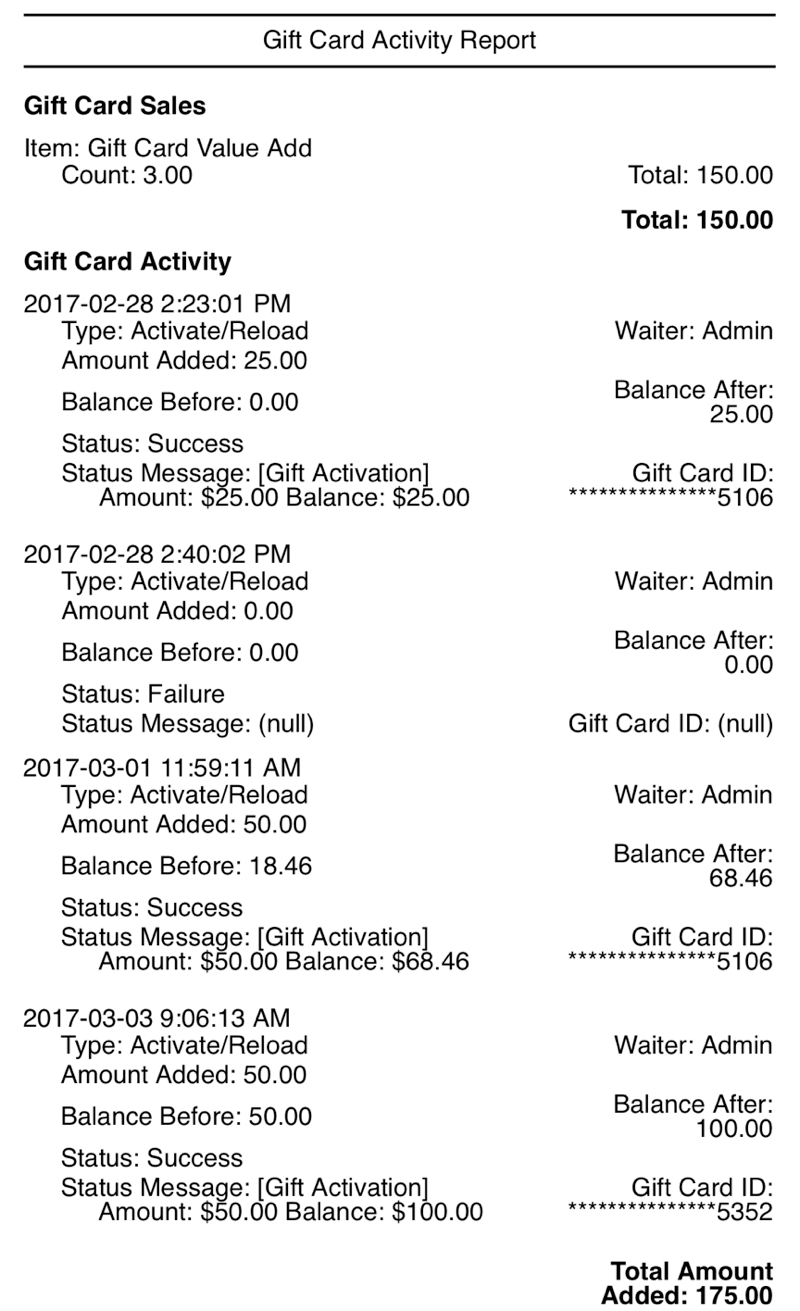
The Gift Card Activity report tracks items sold that were flagged as gift cards. As well, value additions/activations to integrated gift cards done via TouchBistro are reported on, along with information about which staff member did the value load. The Gift Card Activity report will also report on errors. In this report, Gift Card Sales total should be the same as the Gift Card Activity total. If the Gift Card Activity total is higher (as we see in the pictured example above), this indicates a staff member failed to log a sale via the cash register or a table sale.
Section 1. How is the Gift Card Activity Report Generated?
1) Gift Card Sales

Menu Items can be flagged as Is a Gift Card. The Gift Card Sales section of this report indicates any item sold at a register, table, or via an order that was flagged as a gift card.
2) Gift Card Activity
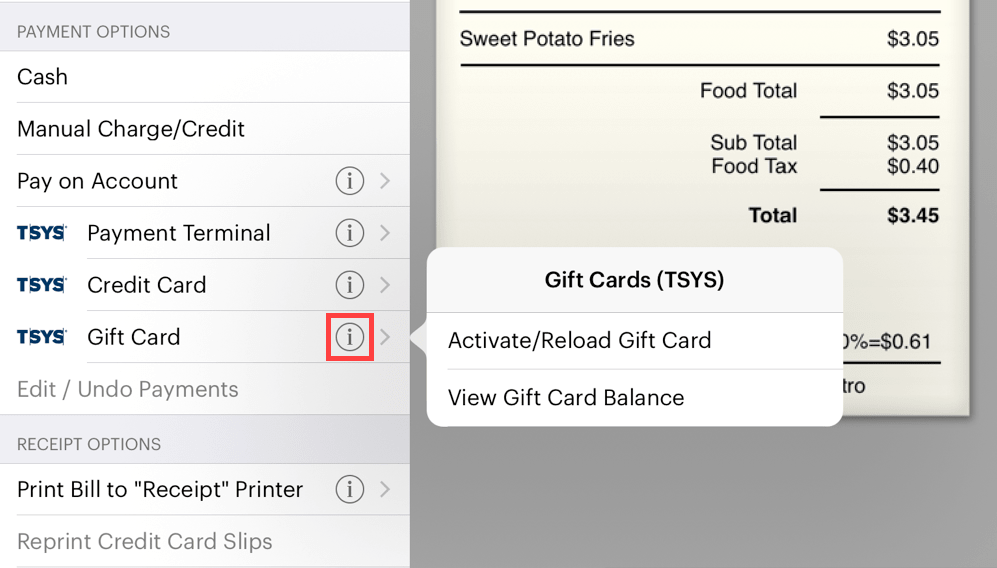
If you add value to a gift card via a gift card option in TouchBistro (for example, the Activate/Reload Gift Card menu item) in TouchBistro, the Gift Card Activity section of this report captures the amount added.
See Also
Chapter 14. Sample CSV Report Download
Click here to download a sample CSV report for the following Accounting Reports:
Tax Report
Tax Exclusion Report
Bevinco Export Report
Freepour Liquor Report
Freepour Draft Report
Bills With Open Balance
Chapter 15. Related Articles
Setting Up a Pay It Forward Account
Taking and Closing Deposits for Future Orders using Accounts