Getting TouchBistro Set Up for TouchBistro Online Ordering
Table Of Contents
Section 1. If You Are Using TouchBistro Pro Server with a Mac Computer
Section 2. If You Are Using TouchBistro Standard or Integrated Pro Server
Section 3. Disable Inclusive Taxes
Chapter 3. Modifying Your Menu Settings for TouchBistro Online Ordering
Section 1. Review Your Menu Item Modifiers
Section 2. Solving for Nested Modifiers
2) Method 2 – Replace with Text Modifiers
Section 3. Review Your Use of the Common Modifier Group
Section 4. Configuring and Uploading Your Menu
Section 5. Flag Individual Menu Items to Show or Not Show
Chapter 4. Modifying Other Aspects of your TouchBistro POS for Online Ordering
Section 1. Enable Safe Printing
Section 2. Enable Takeout Header and Party Name on Your Kitchen Tickets
Section 3. Receipt Printing and Notifications
Section 4. Using Chase Move/5000 (Canada)
Chapter 1. Introduction
TouchBistro uses the Orders section to manage orders being placed by your customers via your TouchBistro Online Ordering site. If online ordering is enabled for your account, an online ordering tab will appear on the Orders screen.
Chapter 2. Before You Begin
Section 1. If You Are Using TouchBistro Pro Server with a Mac Computer
After you’ve enabled TouchBistro Online Ordering on your Cloud Portal, you will need to re-log into your Pro Server and restart:
1. Go to the Apple computer running your server application.
2. Ensure that your Apple computer is connected to the Internet. To check this, you can open your browser and search a website like cnn.com or touchbistro.com.
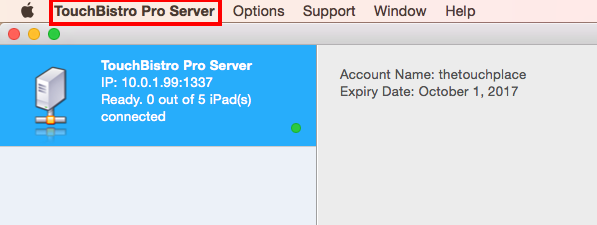
3. Click Touchbistro Pro Server at the top left of the screen.
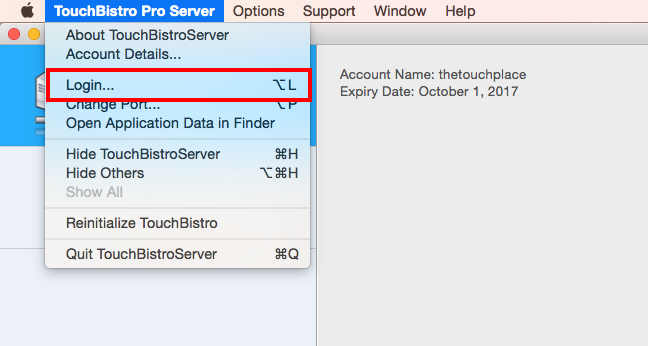
4. Select Login from the dropdown menu.
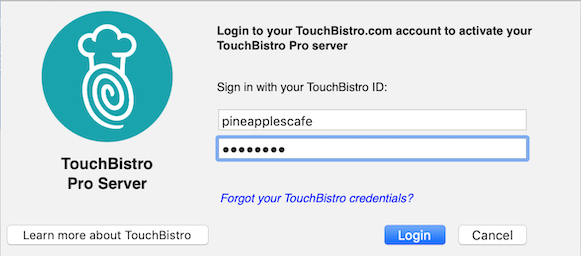
5. Type in your TouchBistro Username and Password into the fields.
6. Click Login.
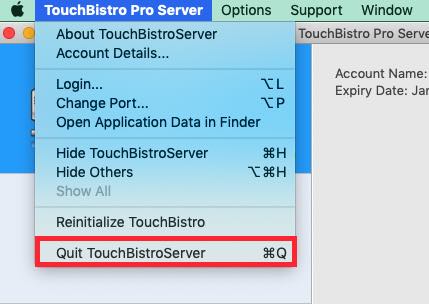
7. Click Quit TouchBistroServer.
8. Restart TouchBistro Pro Server.
Section 2. If You Are Using TouchBistro Standard or Integrated Pro Server
After you’ve enabled TouchBistro Online Ordering on your Cloud Portal, you will need to force close TouchBistro POS (Standard) or TouchBistro POS on the Main Device (Integrated Pro Server). To do this follow these steps:
1. Press the Home ![]() button twice, or swipe up from the bottom of the screen to reveal the App Switcher.
button twice, or swipe up from the bottom of the screen to reveal the App Switcher.
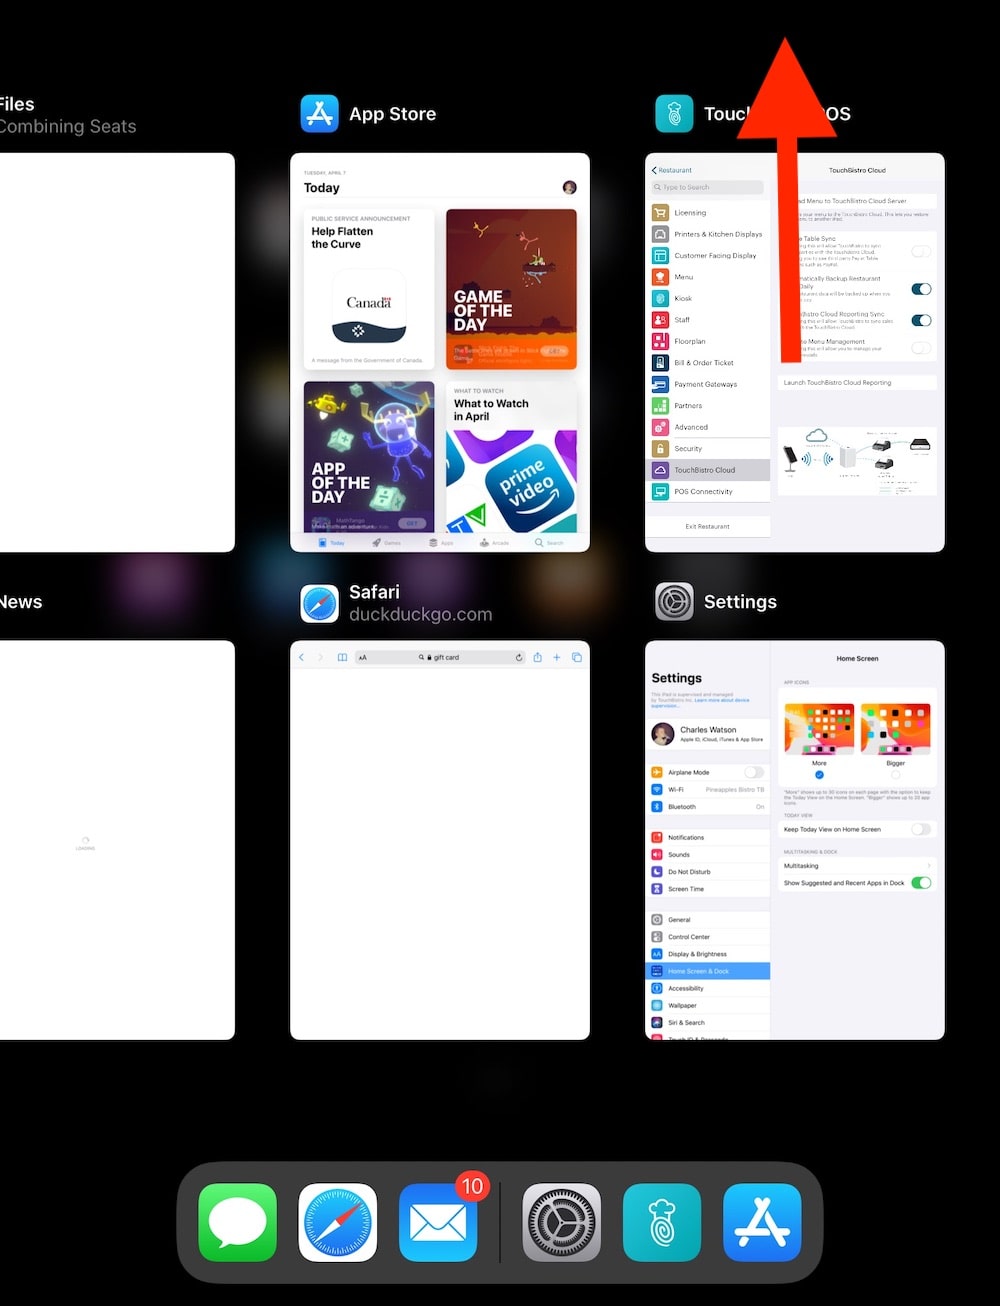
2. Swipe the TouchBistro app up to force close it.
3. Swipe up from the bottom of the screen, or tap the Home ![]() button.
button.
4. Relaunch TouchBistro and log in as admin.
Section 3. Disable Inclusive Taxes
TouchBistro Online Ordering does not support inclusive taxes. Before you begin, you need to disable inclusive taxes.
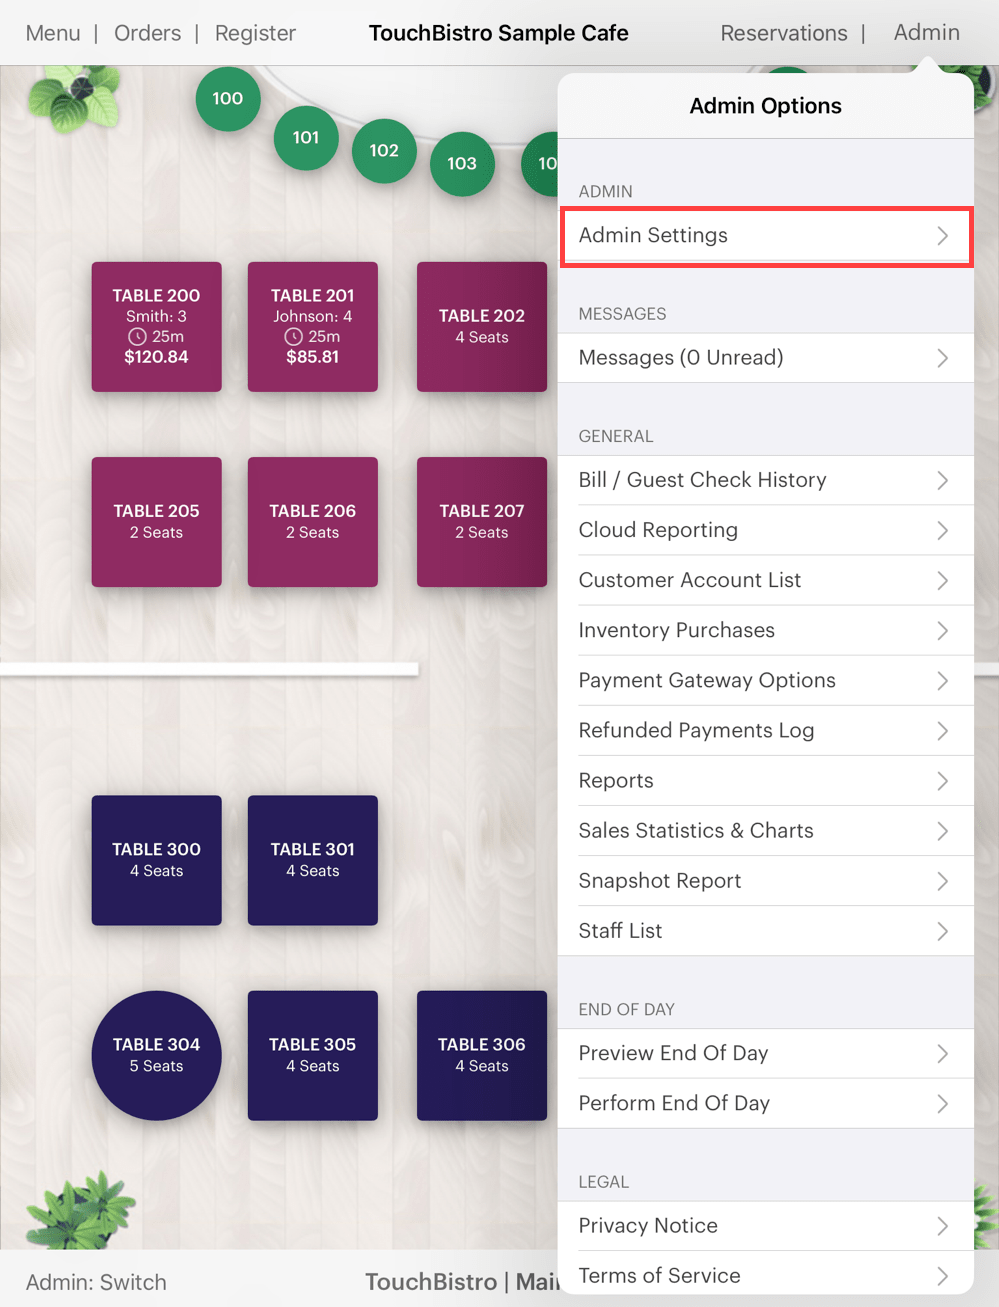
1. Tap Admin | Admin Settings.
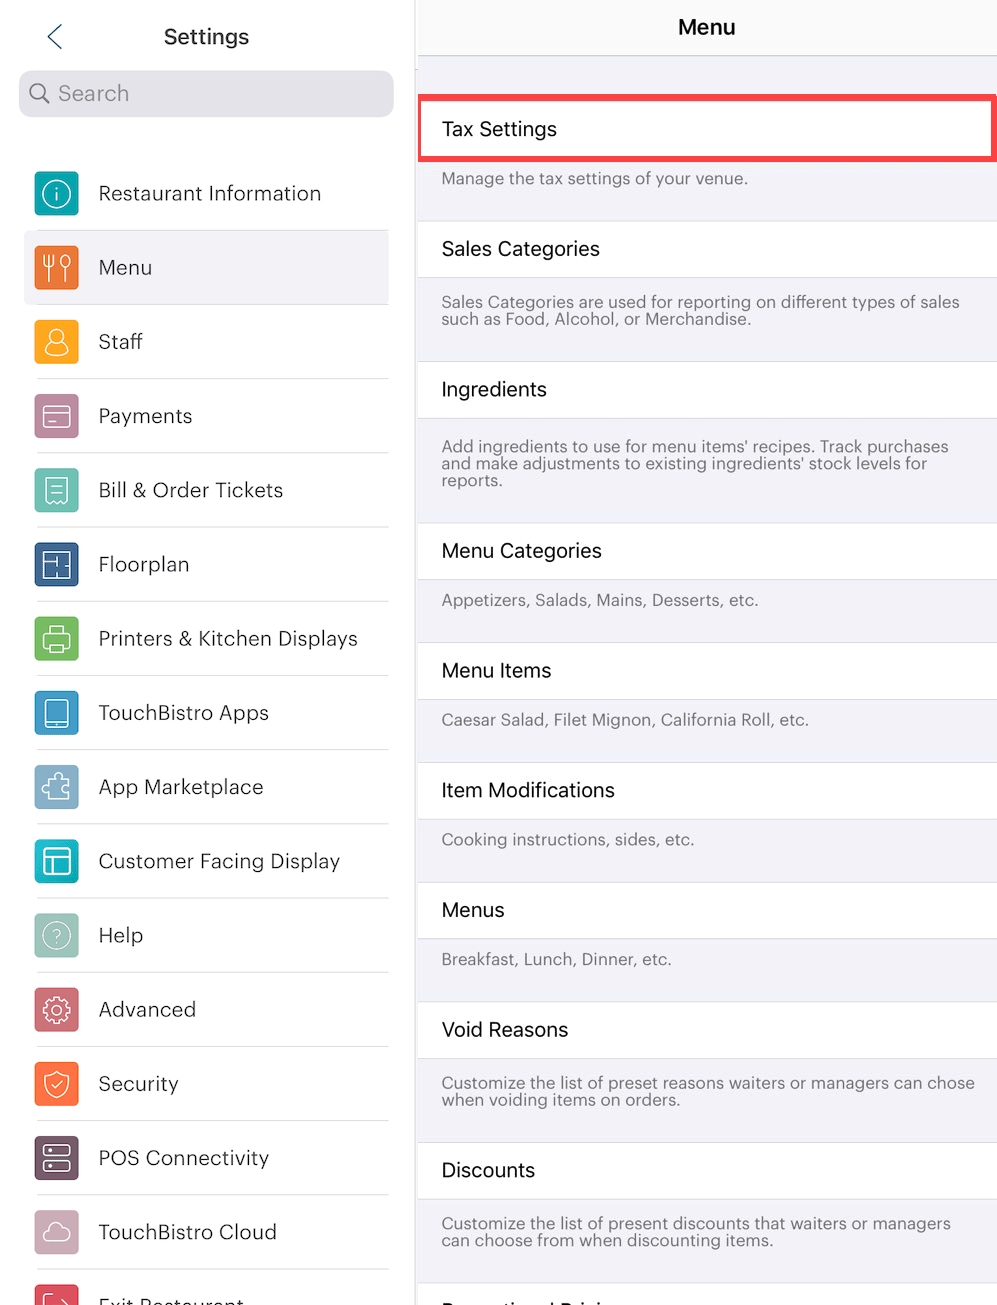
2. Tap Menu and tap Taxes.
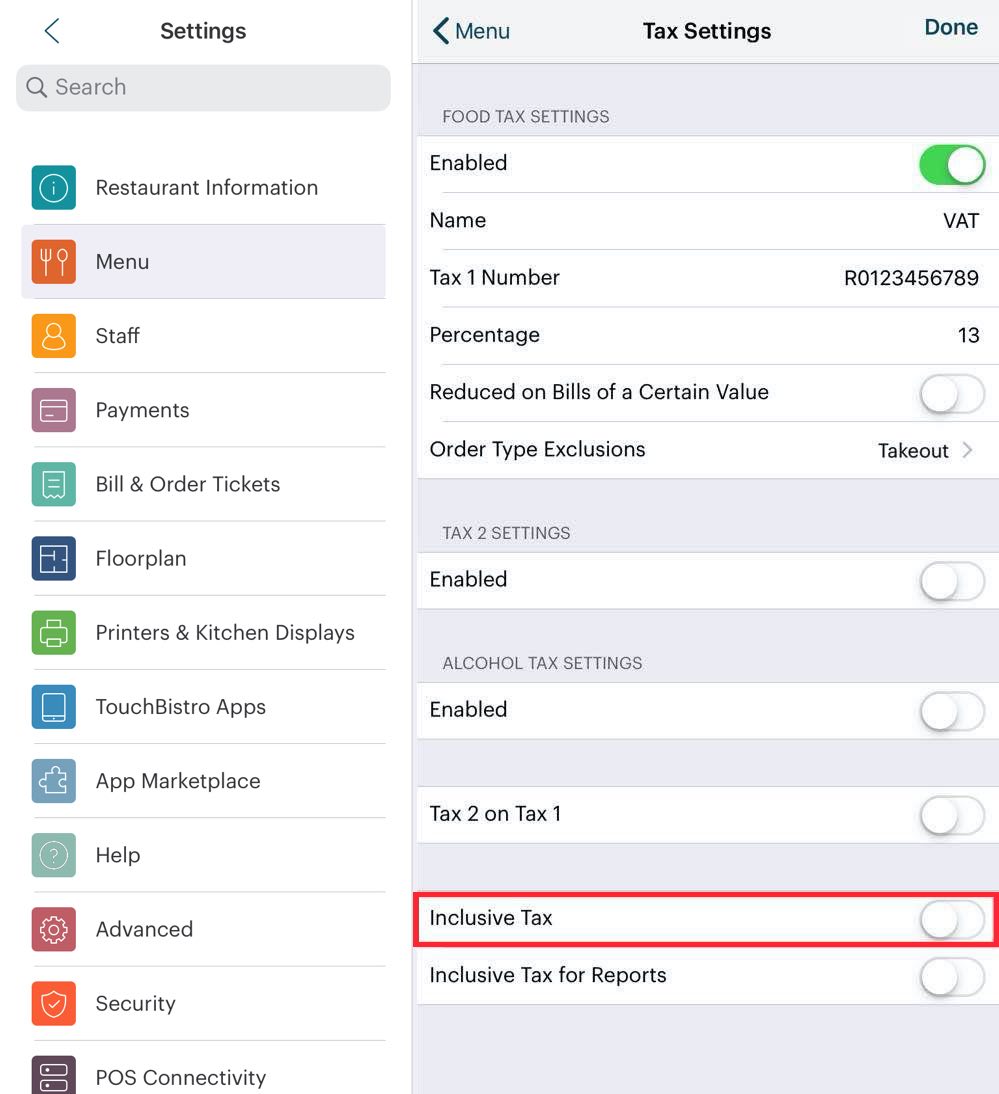
3. Scroll to the bottom and disable Inclusive Tax.
Note: Your menu items will now appear with their pre-tax prices. The numbers may look unfamiliar but they accurately represent the pre-tax price. If you want to add new items, you’ll have to add them at pre-tax prices. If you prefer them to round out to whole prices ($5, $9, etc.), see this guide. Chapter 4 will link to a utility you can use to determine what pre tax price you need to set a menu item to get it to round out to the desired price after taxes.
Chapter 3. Modifying Your Menu Settings for TouchBistro Online Ordering
Section 1. Review Your Menu Item Modifiers
TouchBistro Online Ordering does not work with “nested modifiers”. That is, if you have a menu item as a modifier and the menu item modifier has its own modifier, TouchBistro Online Ordering will not import the second level modifier.

For example, you have a burger meal that prompts for an included side. The customer can have the burger with either fries or a Caesar salad. Both of these modifiers are menu item modifiers (that is they’re also menu items that can be added a la carte).
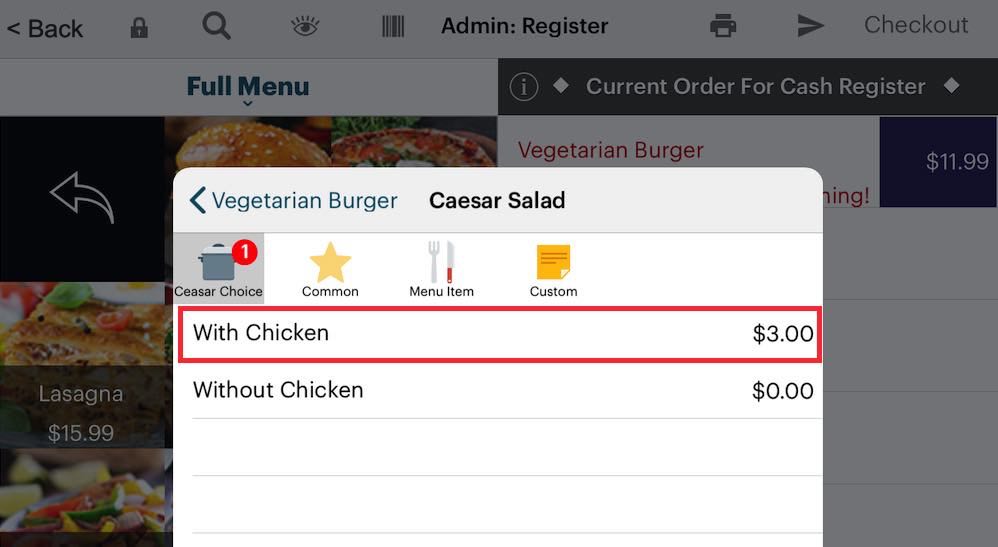
The customer selects the Caesar salad. The Caesar salad, being a menu item, is configured to prompt for its own modifiers (chicken/no chicken).

When added to the Order screen, the chain of modifier selections are “nested”.
Section 2. Solving for Nested Modifiers
There are a couple methods.
1. For any menu item modifier that spawns its own modifier, break into individual menu items with the modifier as part of the menu item name.
2. Replace the menu item modifier with simple text modifiers.
1) Method 1 – New Menu Items
Method 1 is useful if you’re using the inventory system or the costing system.
1. First, ensure there are no menu items on tables. You won’t be able to edit modifiers if the menu item is open on a table.

2. Access the modifier (for example, Sides) and delete the menu item modifiers that spawn their own modifier prompts (in this example, we’re deleting the Caesar salad).

3. Create menu items representing their modifications. For example, create a Caesar Salad – No Chicken and a Caesar Salad – With Chicken. In each case, give the menu item a zero price and hide the item. By hiding the item, it won’t be made available for order via the Order screen. However, it will still be available to set up as a menu item modifier. Set up the inventory recipe costing for each or use the simple Cost field.

4. Return to your modifier group (for example, sides).

5. Add the new hidden menu items as menu item modifiers.

6. If any of the options have up charges with the addition (for example, Caesar salad was complimentary with the burger but an extra $3 if modified with chicken), set the upcharge.

7. If ordered, the new modifier dialog will show the “flattened” modifier options.
2) Method 2 – Replace with Text Modifiers
Method 2 is useful if you’re not using the inventory system or menu item costing.
1. First, ensure there are no menu items on tables. You won’t be able to edit modifiers if the menu item is open on a table.

2. Access the modifier (for example, Sides) and delete the menu item modifiers that spawn their own modifier prompts (in this example, we’re deleting the Caesar salad).

3. Add text modifiers representing your menu item modifiers with the modifier option.
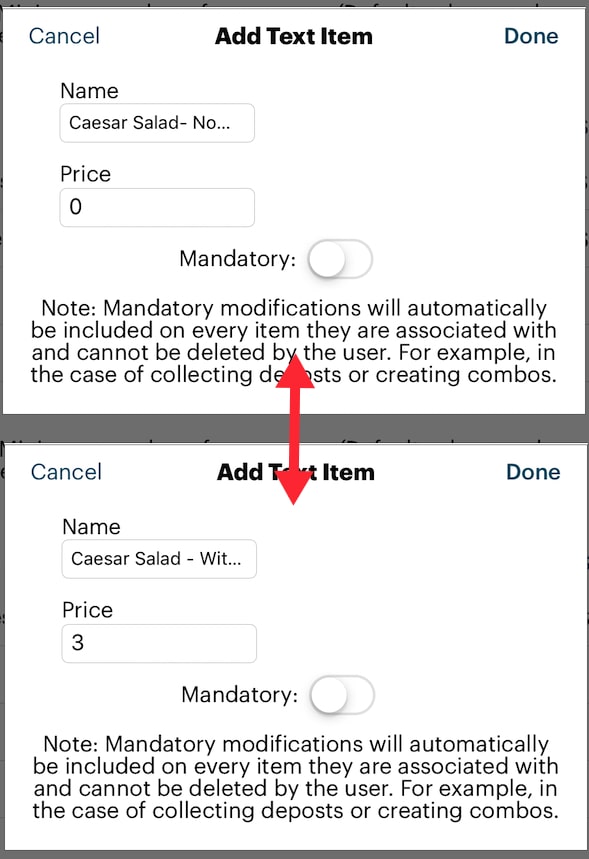
4. Add, for example, Caesar Salad – No Chicken and a Caesar Salad – With Chicken modifiers. Give the With Chicken version the appropriate upcharge ($3).

5. If ordered, the new modifier dialog will show the “flattened” modifier options. As noted, however, text modifiers selected will not factor in towards food cost data.
Section 3. Review Your Use of the Common Modifier Group

By default, TouchBistro assigns the Common modifier group to all menu items you create.
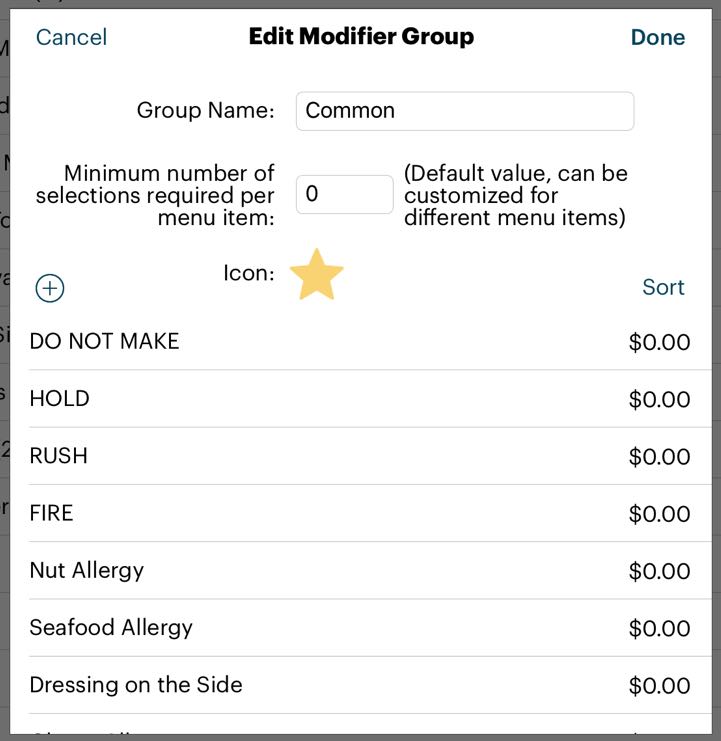
The Common modifier group is intended to convey in-venue cooking instructions and other kitchen directives. Hence, the Common modifier group is not included as an online ordering Modifier option when you upload your menu for online ordering. If you’ve added additional modifier options to the Common modifier group that are food modifications, you need to remove them and create a new Modifier Group.

In the above example, we have a limited menu and most menu items come with a choice of BBQ sauce. So we’ve thrown customer spicy level options under the Common modifier group.

For online ordering, we should swipe left on each BBQ sauce option and delete it.
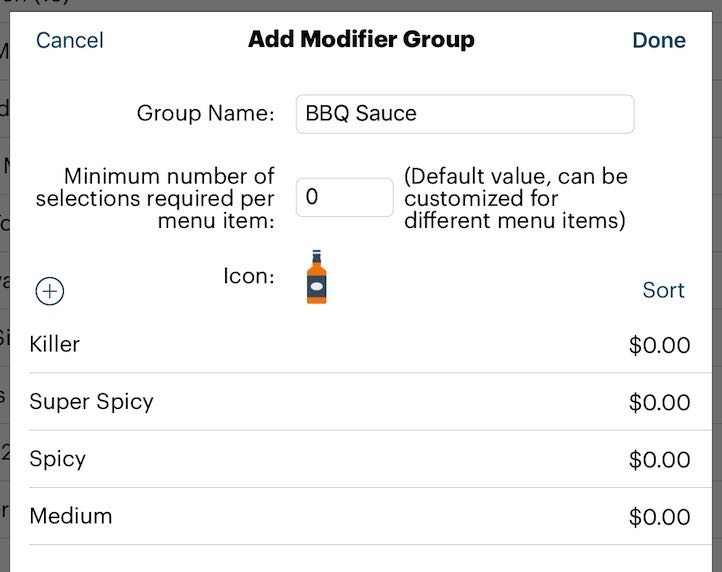
You should then create a modifier group for your BBQ sauces and reenter the BBQ sauce options.
Section 4. Configuring and Uploading Your Menu
If you have multiple Menus set up, you can only make one available for online ordering.

1. Tap Admin | Admin Settings.
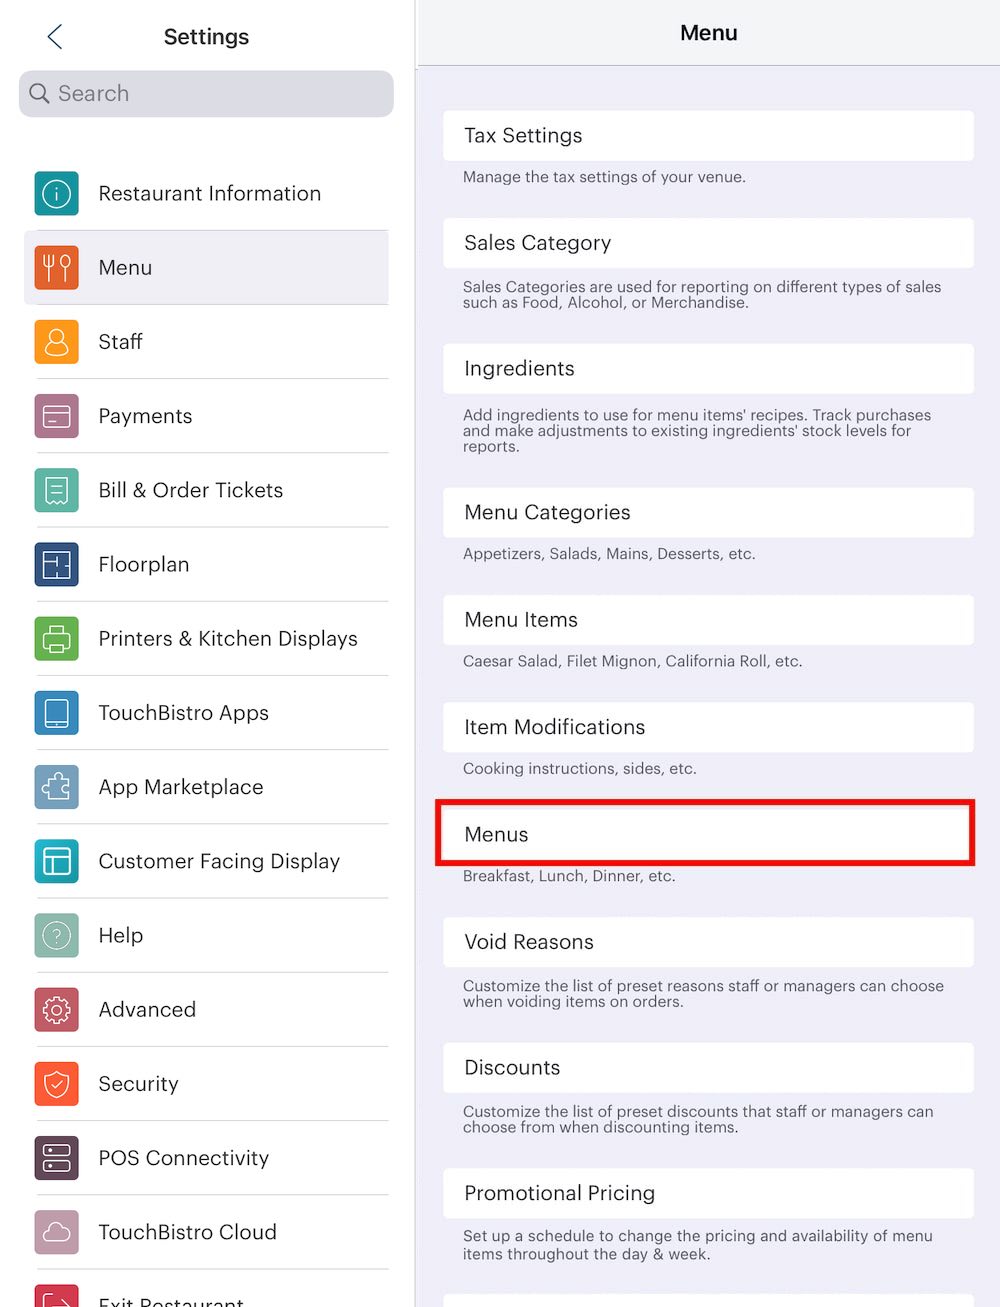
2. Tap Menu and then Menus.

3. Tap the menu you want to be available for online ordering. You may want to create a Menu specifically for online order. For example, create a Menu called Online Ordering.

4. Open the Menu. Add Menu Categories you want to make available for online ordering and enable Online Ordering. Tap Done.

5. If TouchBistro detects another Menu was enabled for online ordering, you will be given the choice to Continue, that is override the existing selection with this Menu. If you prefer to keep the previous menu, tap Cancel.
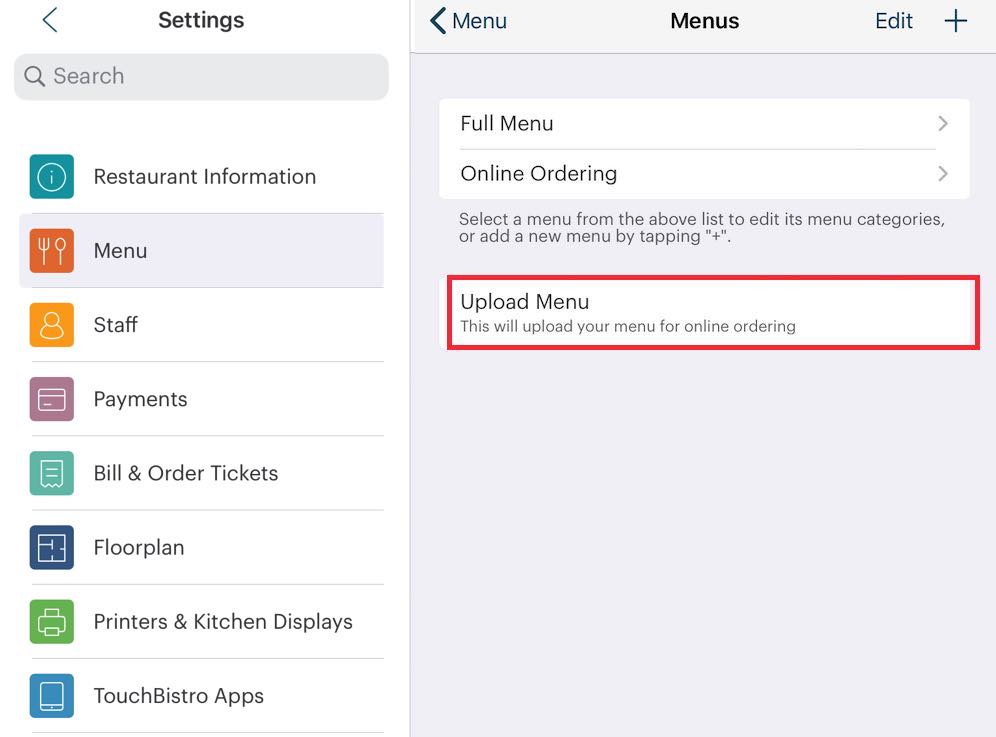
6. After selecting your menu, tap Upload Menu from the main Menus screen. If you do not see the Upload Menu button, your system has been configured to upload your menu and any changes you make automatically.

7. After a brief moment, you will see a Success dialog. Tap OK.
If you make any changes to your menu items, menu categories, or the menu, you will need to return to this screen and tap Upload Menu.
Changes are reflected on your online ordering site after about 5-10 minutes.
Section 5. Flag Individual Menu Items to Show or Not Show
Some menu items you may not want to make available for online ordering even if you want to make every other menu item in a Menu Category available.
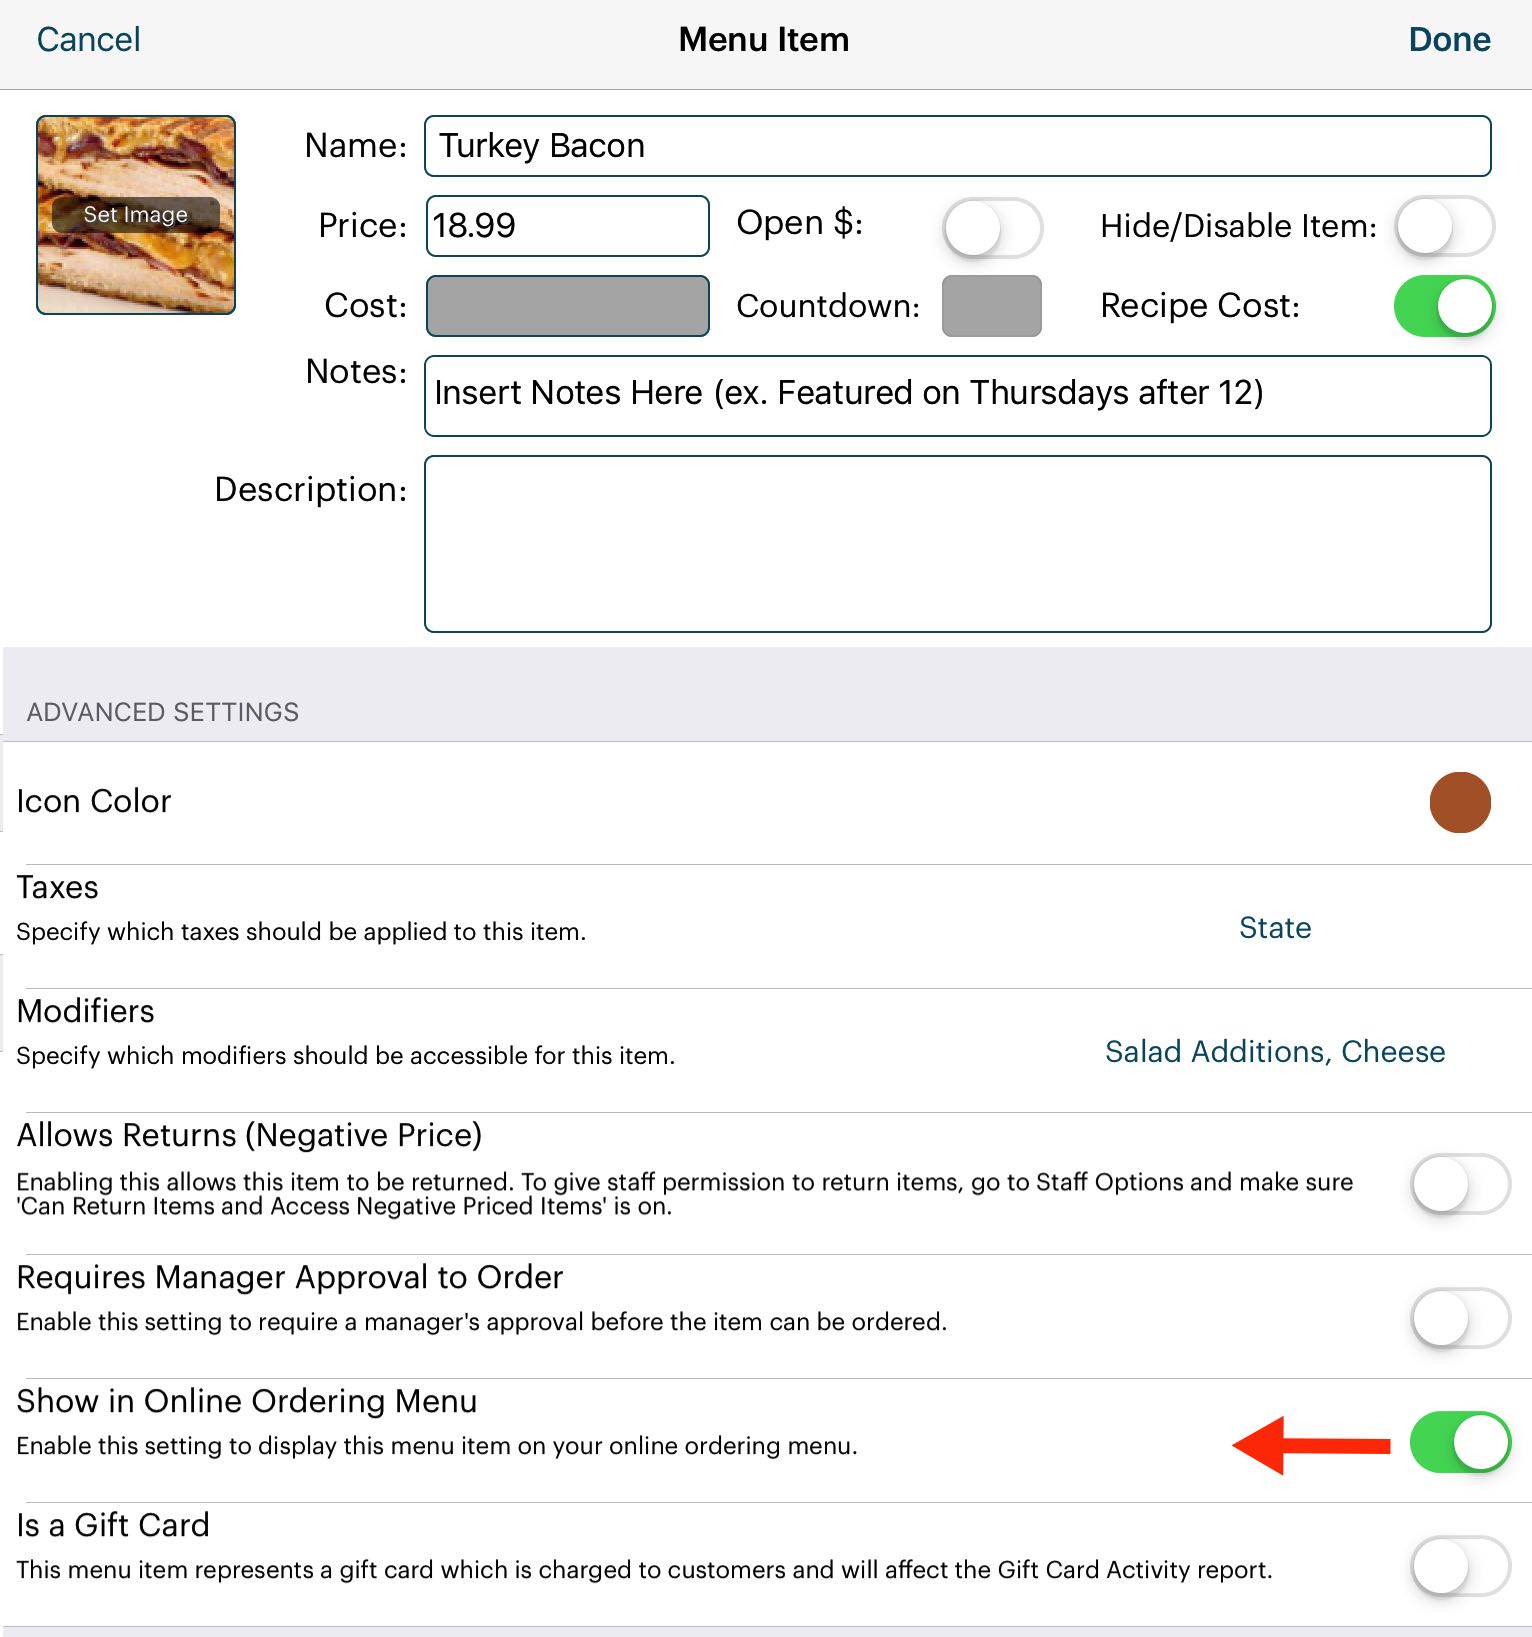
If there are some menu items you want to keep out of the online ordering menu, open the menu item. Scroll down to the Advanced Setting section and slide Show in Online Ordering Menu to the left to disable it. Tap Done.
If a menu item on your online ordering menu seems to be missing, double-check the menu item’s Show in Online Ordering Menu option is enabled. Typically, if you add a new menu item or a new menu category AFTER the initial uploading of the menu, these items will not automatically have Show in Online Ordering Menu enabled. You will need to manually enable it for the menu item added or all the menu items under the subsequently added Menu Category.
Chapter 4. Modifying Other Aspects of your TouchBistro POS for Online Ordering
Section 1. Enable Safe Printing

1. Tap Admin | Admin Settings.

2. Tap Advanced.
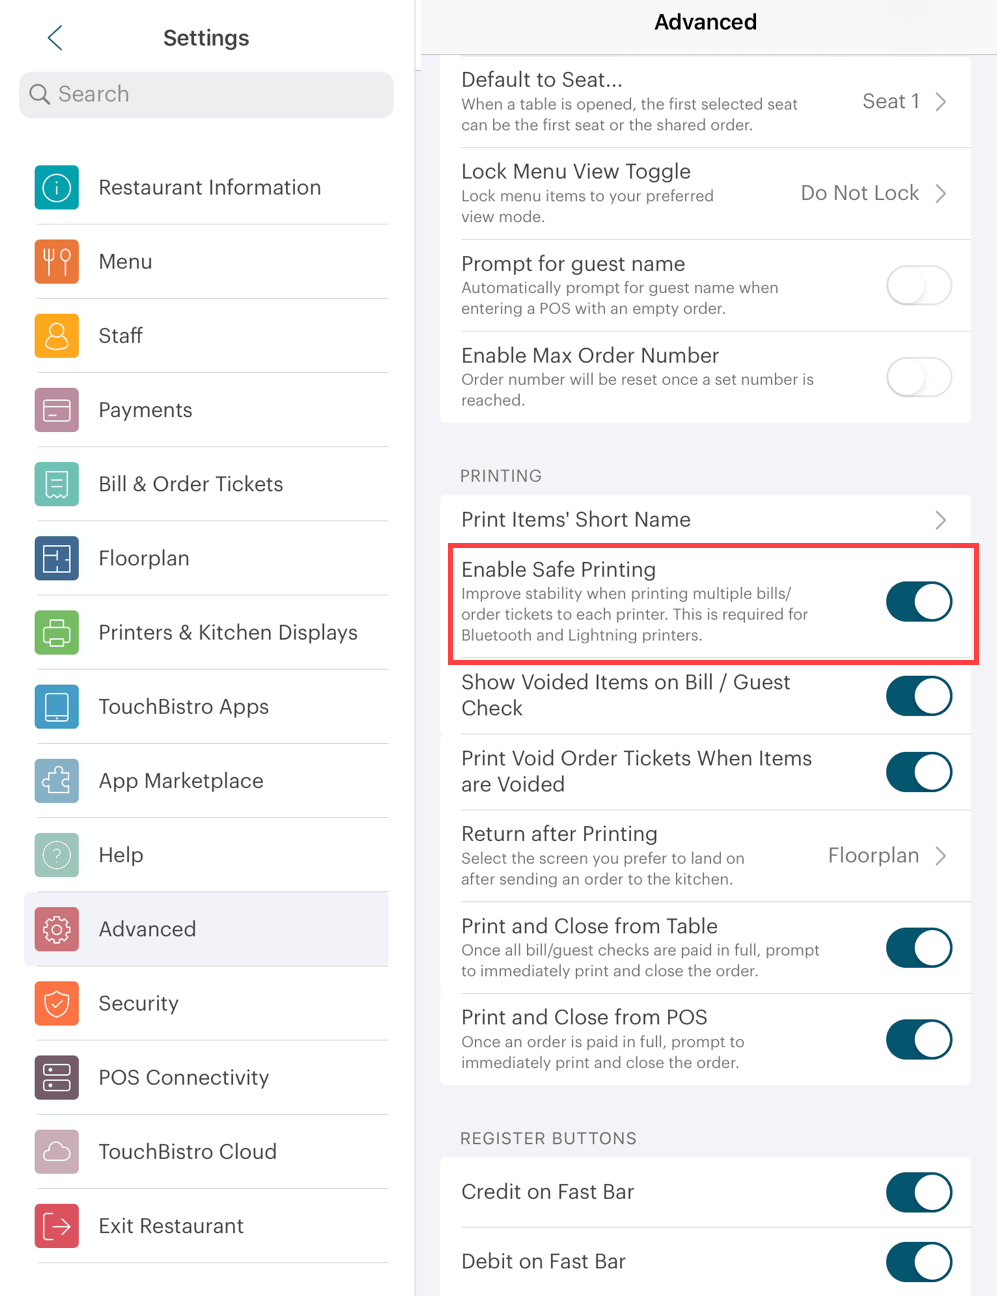
3. Scroll down to the Printing section and slide Enable Safe Printing to the on position.
Section 2. Enable Takeout Header and Party Name on Your Kitchen Tickets
If you plan to use a copy of the kitchen ticket to staple to the order takeout bag, you will probably want to ensure the person who ordered the food (the “party name”) and the delivery service are featured prominently on the kitchen ticket. To do so:

1. Tap Admin | Admin Settings.
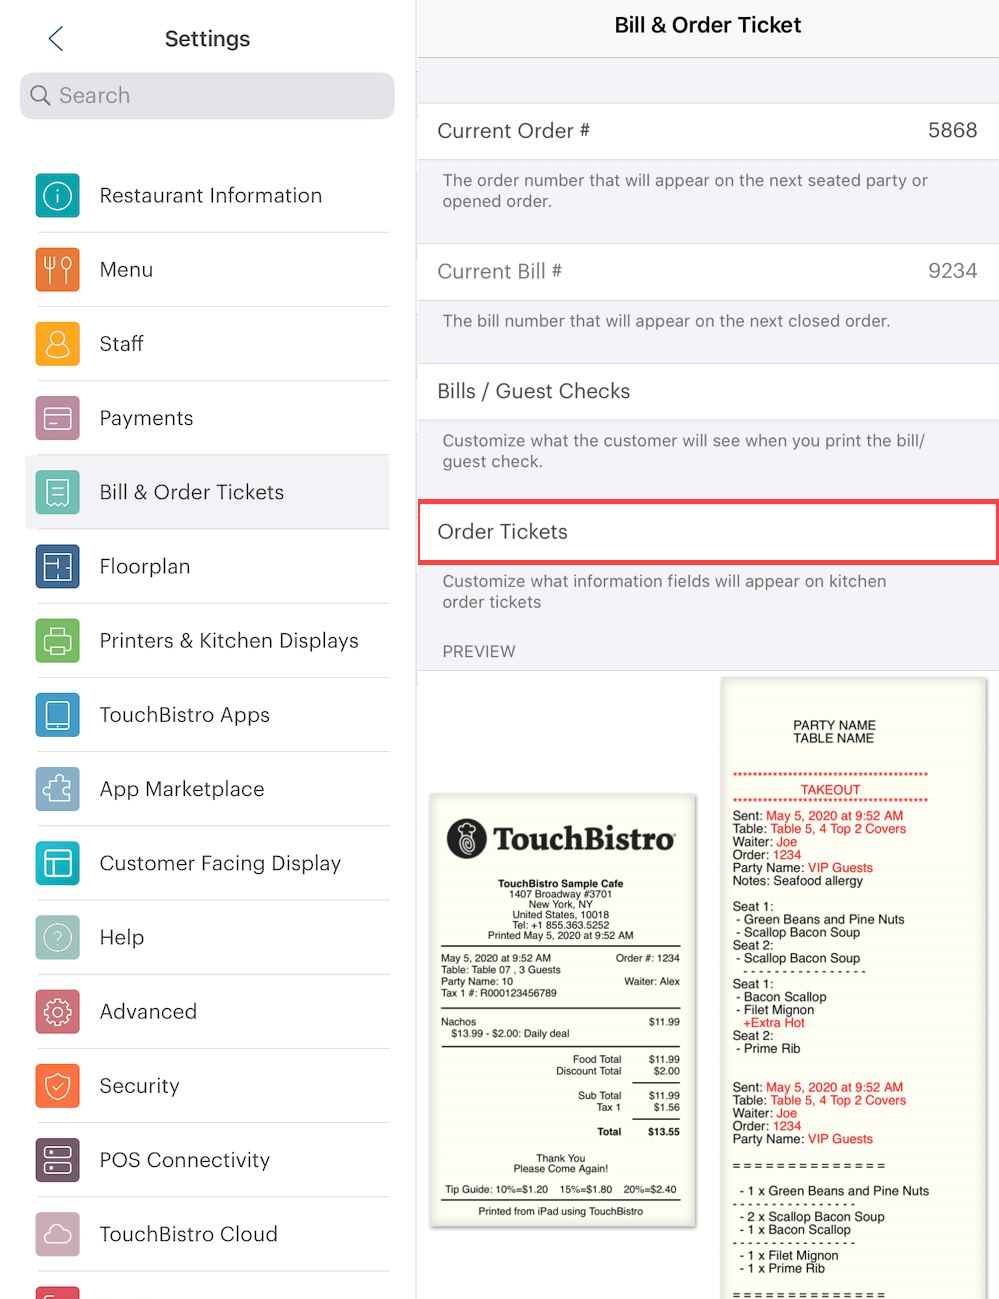
2. Tap Bill & Chit.
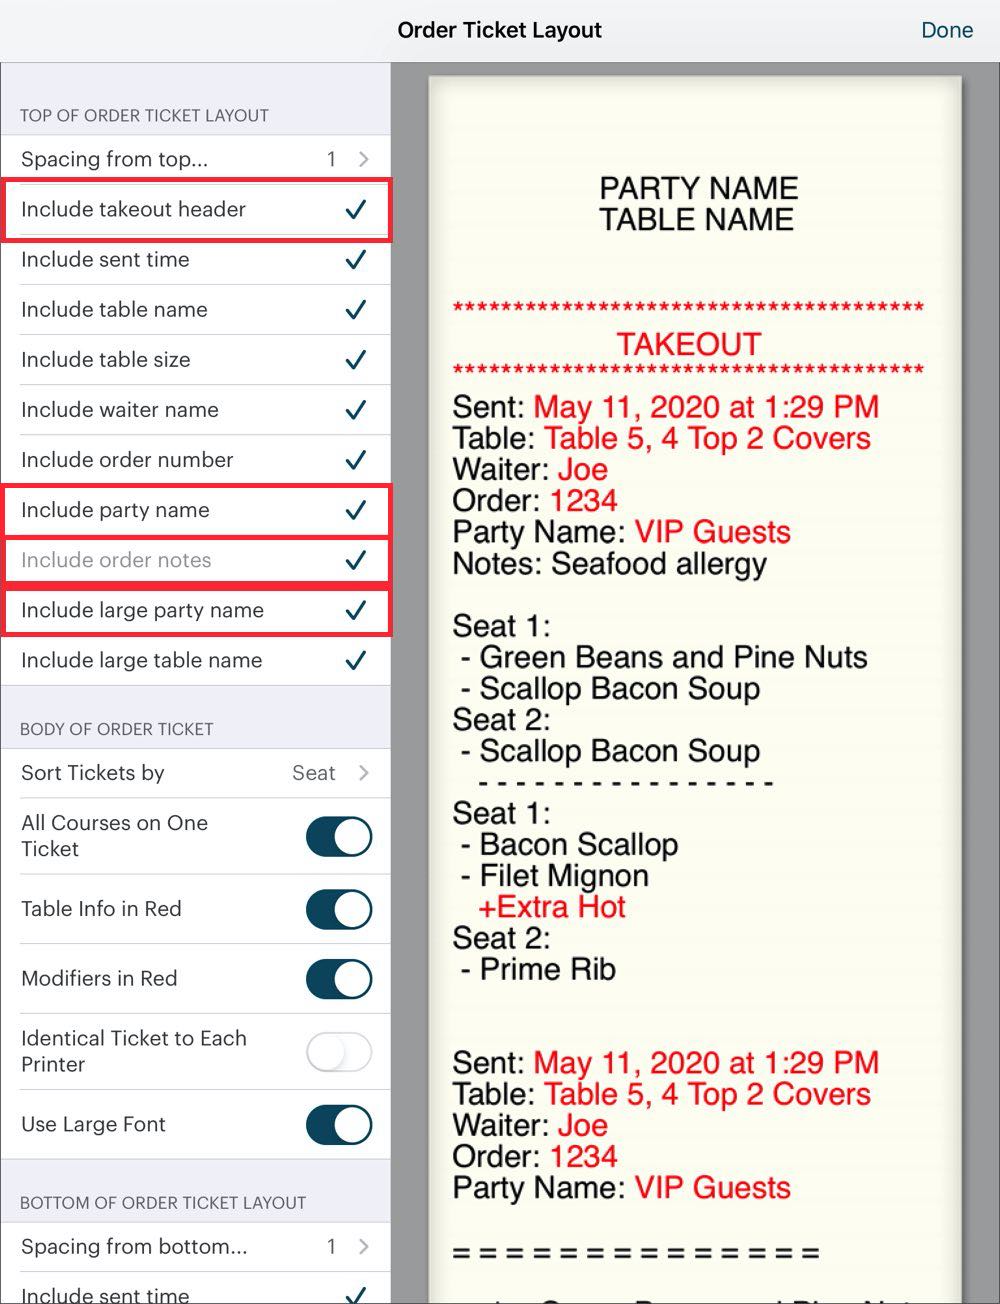
3. You should ensure Include takeout header and Include party name are enabled. Include Order Notes will be defaulted on and cannot be turned off. (Note: Order Notes do not get sent to the KDS.)
4. Tap Done.
Section 3. Receipt Printing and Notifications
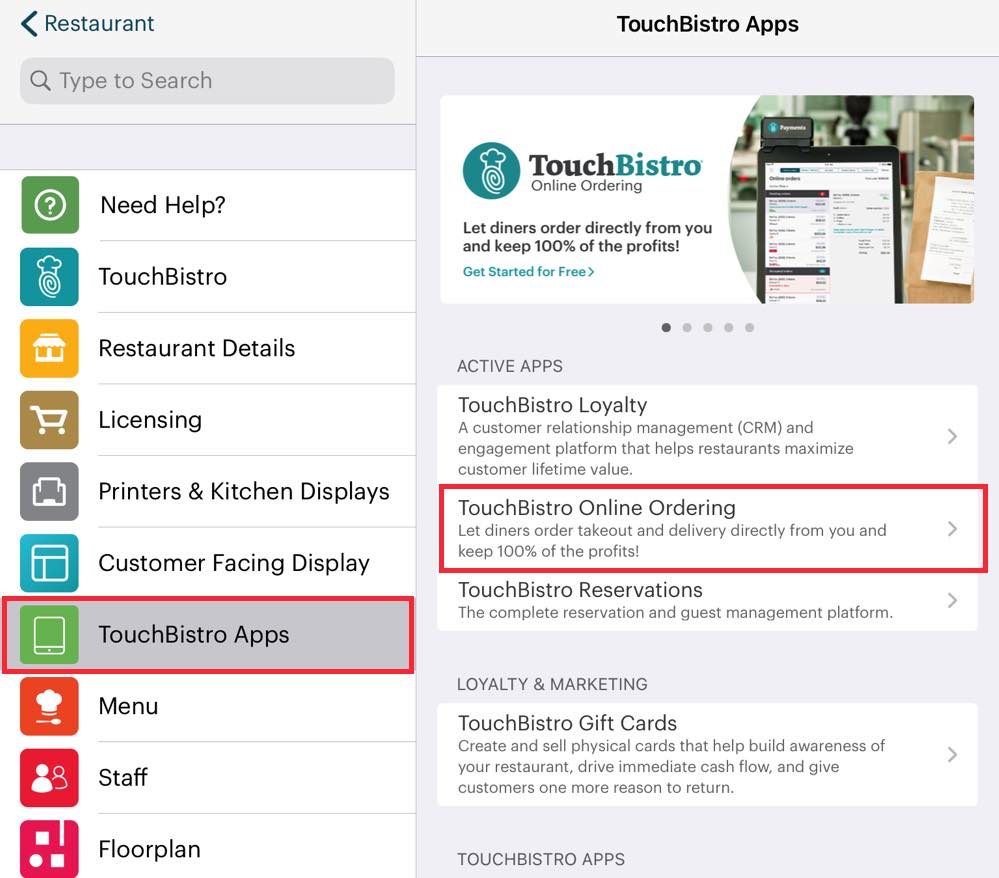
Under Admin | Admin Settings | TouchBistro Apps | Online Ordering you can control aspects of online ordering.

Enable Receipt Printing: When you acknowledge an order, by default TouchBistro will print out a receipt/guest check. If you wish to suppress the receipt printing, disable this option.
Enable Notifications: This option will only be available if you using a multi iPad set up (with Pro Server or Integrated Pro Server/IPS). This is a local setting for each iPad. You should disable notifications for all iPads except for the one iPad you have designated to manage online ordering. By disabling notifications, servers will be less likely to respond to online orders they’re not required to respond to. If you have an audio jack payment device installed on your iPad (for example a TouchBistro Payment RP457c reader), you will not receive audio notifications.
IPS Setups
If you are using an IPS setup, you should use the main device iPad and have notifications turned on for that iPad. Ensure, as well, the iPad designated as your main device is set not to auto-lock. Tap your iPad’s Settings app and then tap Display & Brightness | Auto-Lock | Never.
You should ensure your main device iPad is always plugged in and charging.
If your main device iPad is allowed to go to the lock screen, other iPads set to receive notifications will not receive them. It can take about 5 minutes for your satellite iPads to start receiving notifications once the main device is unlocked.
Section 4. Using Chase Move/5000 (Canada)
If you are using the Chase Canada Move/5000 device to take payments for online ordering, see this guide for special settings and workflow adjustments.
Section 5. Review Best Practices
1. Ensure you use only one iPad to manage and process online orders. If an order is acknowledged via one iPad, TouchBistro will not communicate order acknowledgment to the other iPads. Hence, to avoid confusion and preparing the same order multiple times, designate one iPad for online ordering.
2. If you are using an Integrated Pro Server setup, ensure you follow the notification practices outlined above.
3. You should disable online order messaging on all iPads except the iPad you’re using to manage online orders.
4. Review all your menu item names, your modifier category names and options, and your menu category names. Ensure they avoid keyboard characters ($&#<> etc.) and things like Emoticons.
Chapter 5. Supported Printers for Automatic Ticket Printing
If you plan to use scheduled orders and automated ticket printing, your ticket printers need to be one of the following supported models:
- Star Micronics SP742 Impact Printer (LAN)
- Star Micronics mc-Print3 Thermal MCP31LB (LAN setup) and MCP31L (LAN setup)
- Epson TM-T88VI Thermal Printer (LAN)
- Star Micronics TSP100III (TSP143LAN) Thermal Ethernet Printer
Note: We do not currently support automated ticket printing on the Kitchen Display System.
See Also
Setting up a Limited Take out Box Menu
See Also


 Email
Support
 Frequently
Asked Questions
