Printers
Table Of Contents
Chapter 1. Configuring a Printer Automatically
Chapter 2. Setting up a Printer Manually
Section 2. Adding a Printer Manually
Section 3. Setting up the Printer IP Address in TouchBistro
Section 4. Temporary Order Ticket Re-directs
Chapter 1. Configuring a Printer Automatically
TouchBistro automatically detects supported printers on your POS network, making setup easy.
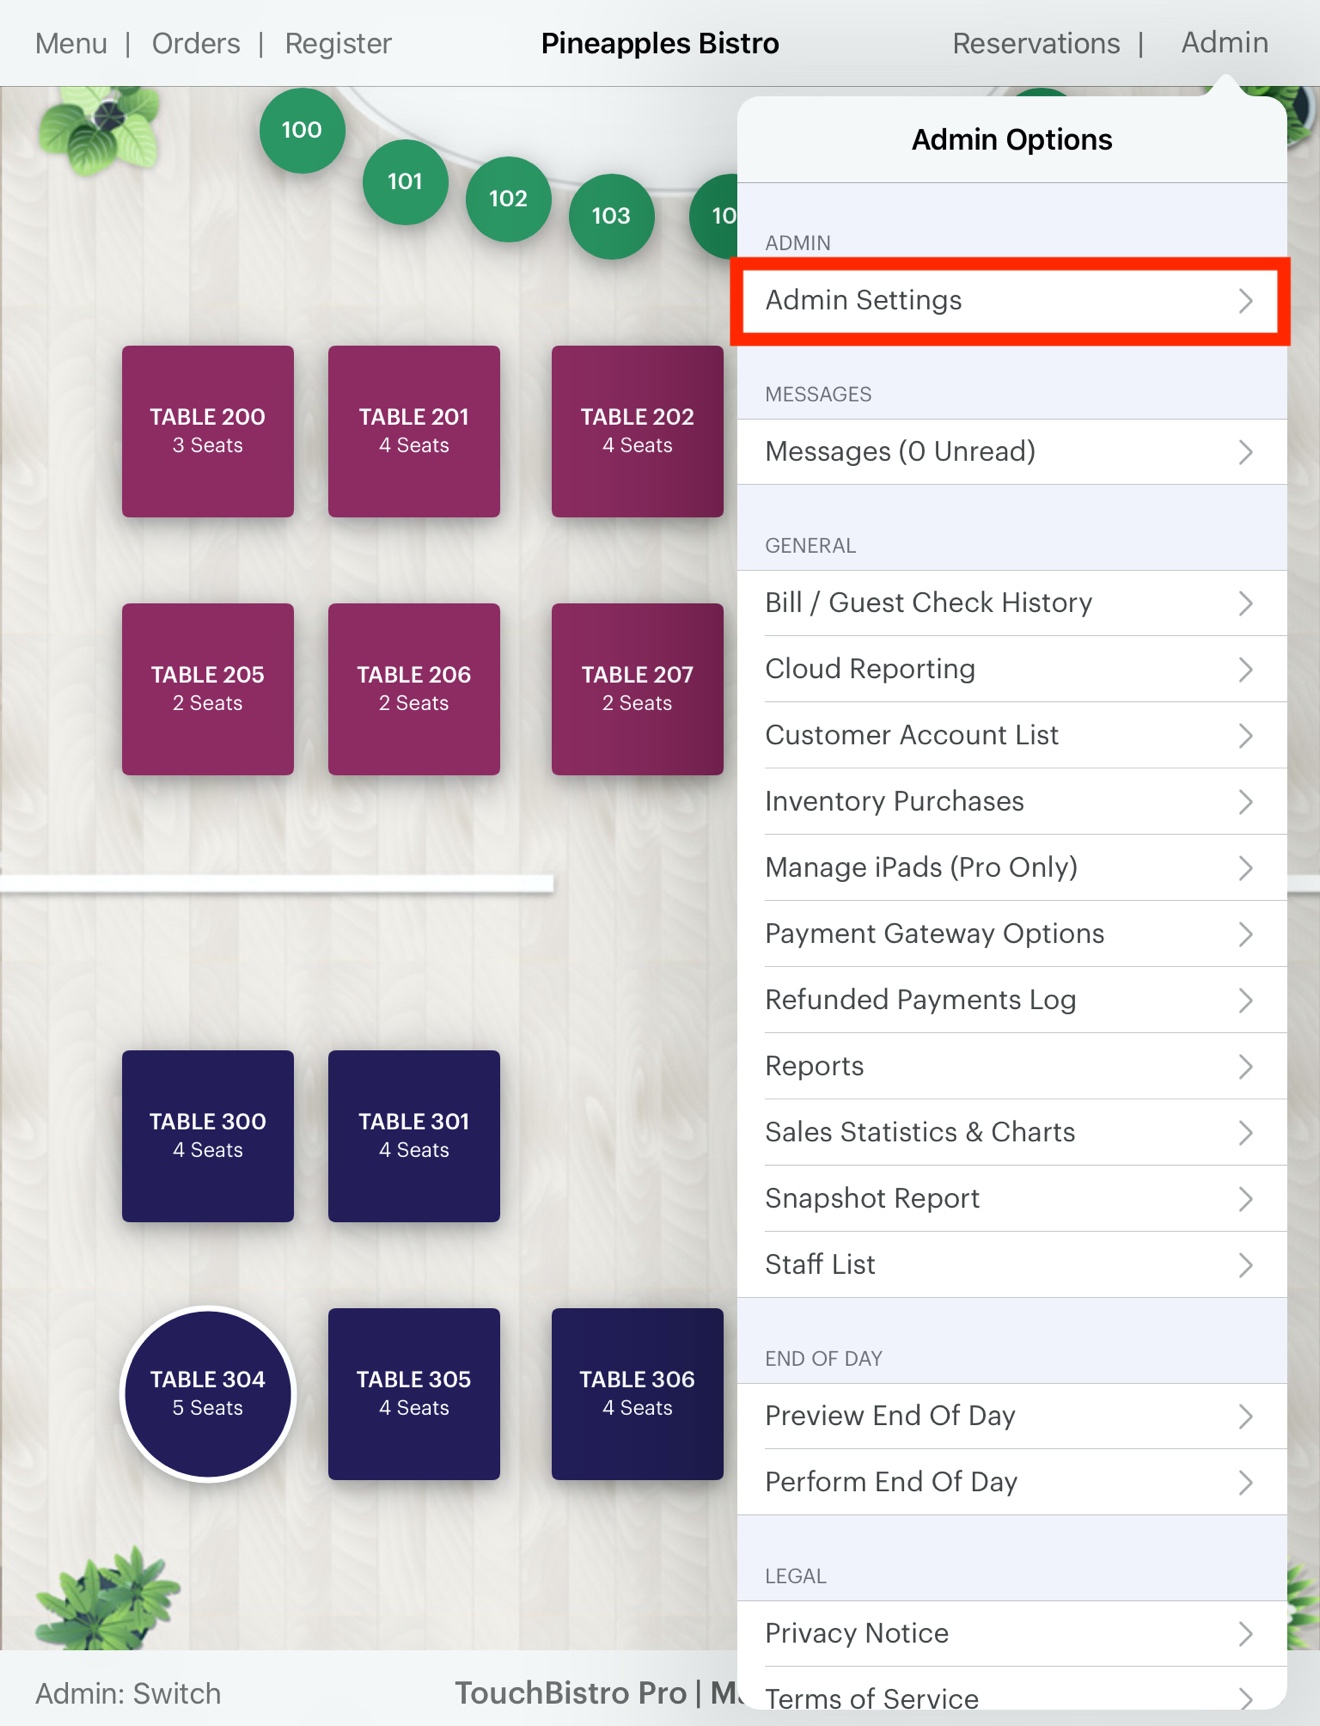
1. Tap Admin | Admin Settings.

2. Tap Printers & Kitchen Displays.

3. Tap Add on the top right. Tap Add Printer.
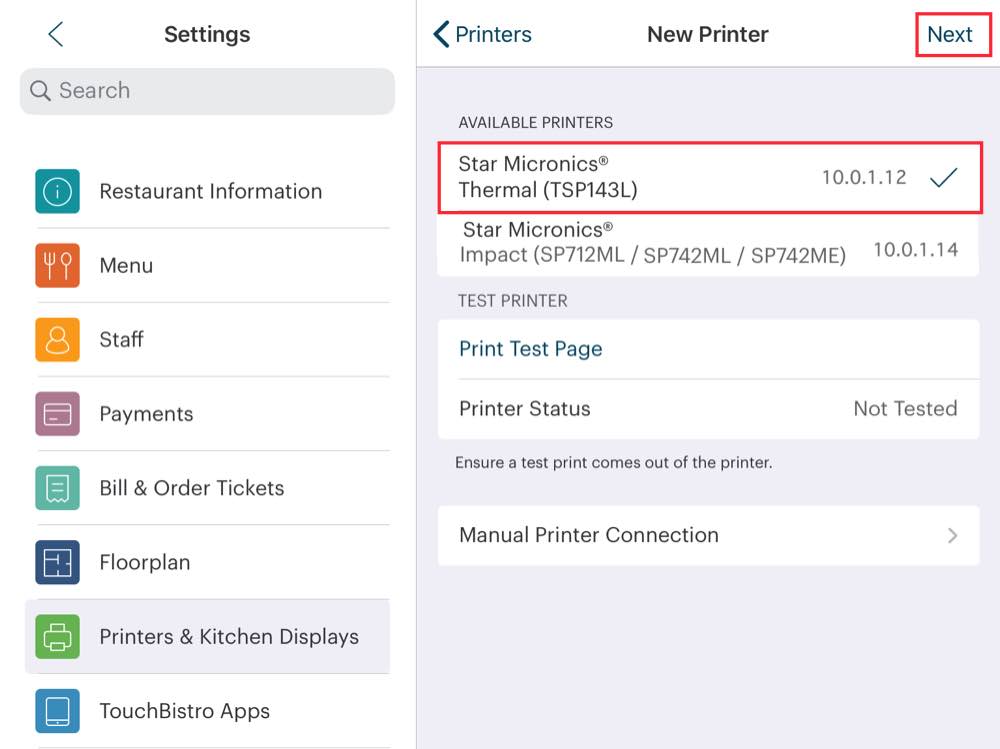
4. TouchBistro will automatically detect any supported printers on your network. Tap the printer you wish to configure under Available Printers. If multiple printers appear in the list, you can tap Print Test Page to verify that you’re configuring the correct printer.
5. Tap Next.
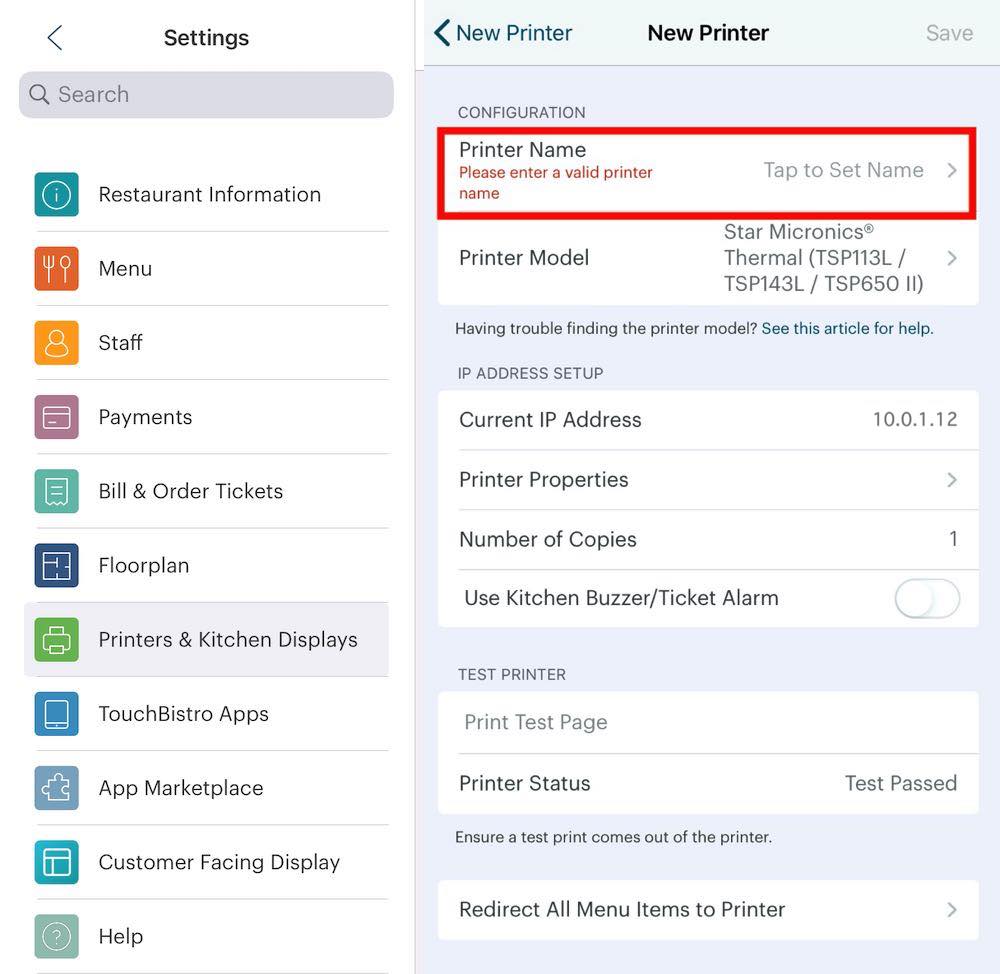
6. Tap Printer Name.
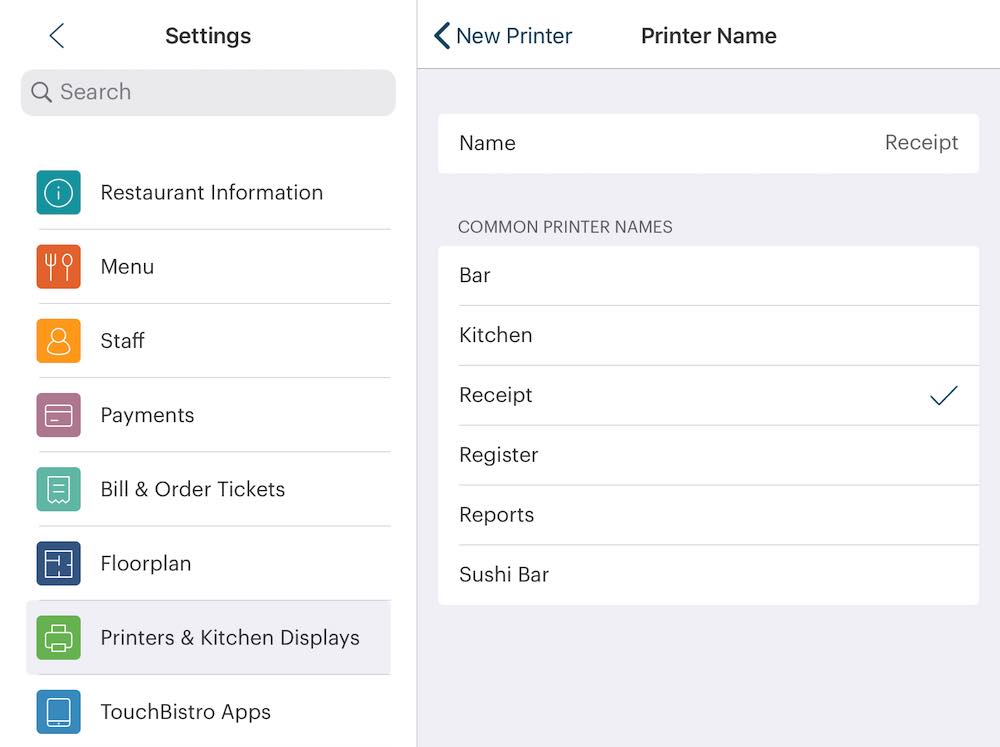
7. Type in a name for this printer, or make a selection from the list of Common Printer Names.
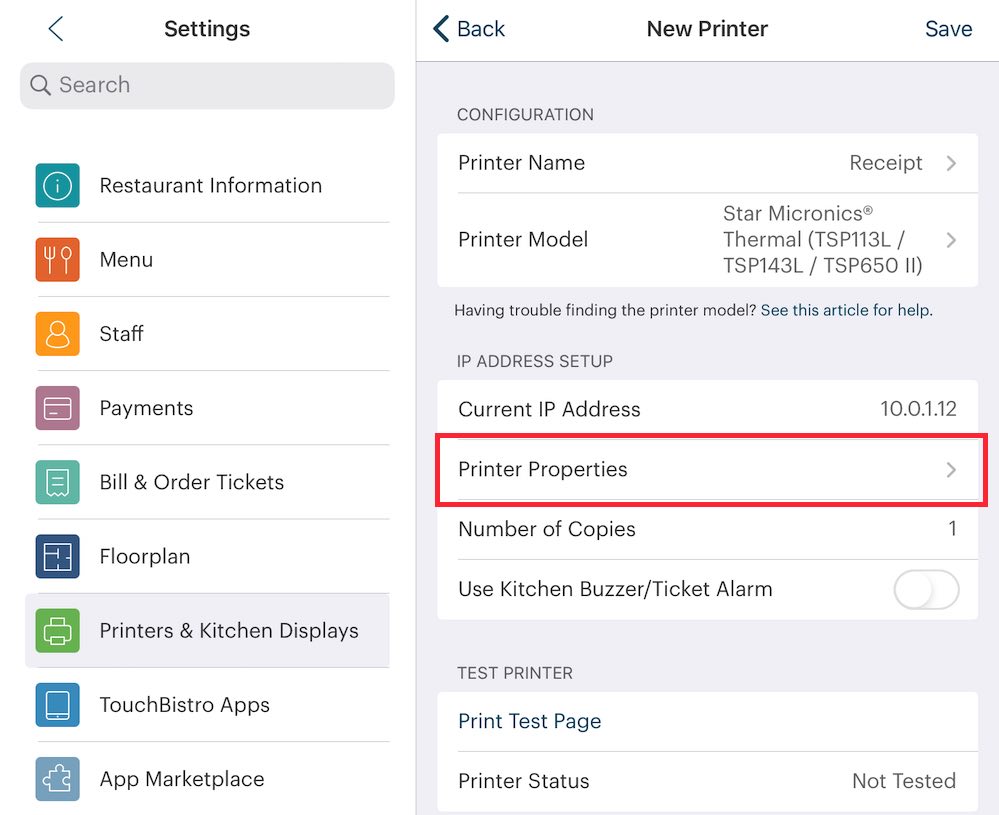
8. Tap Printer Properties.
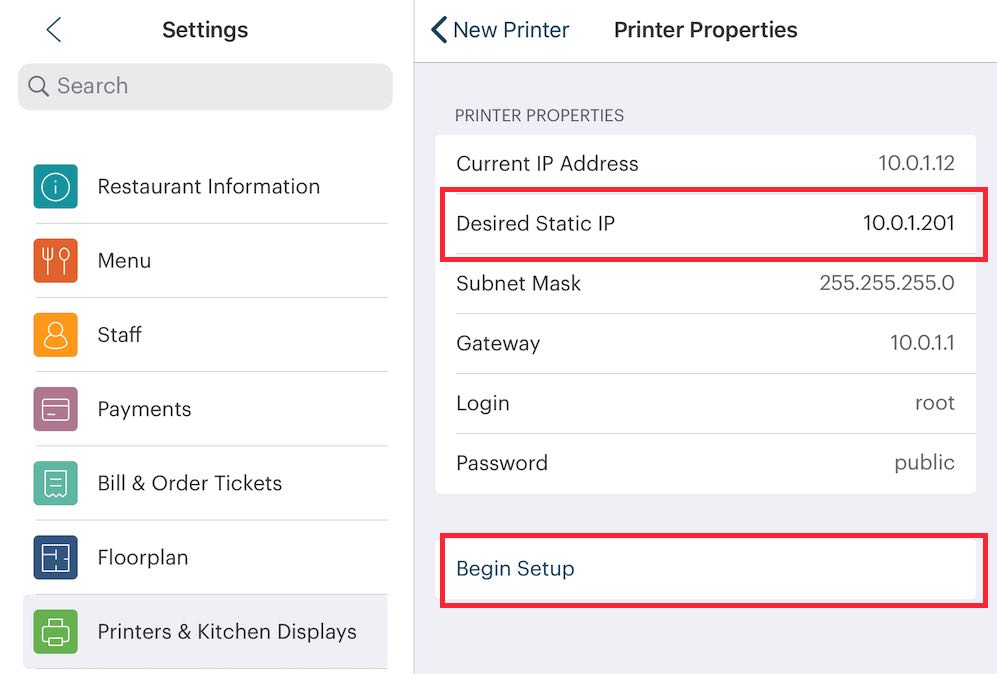
8. In the Desired Static IP field enter 10.0.1.201 if this is the first printer you’re adding. Add 1 to 201 for each additional printer. For example, if you’re setting up a second printer, enter 10.0.1.202. Tap Begin Setup.
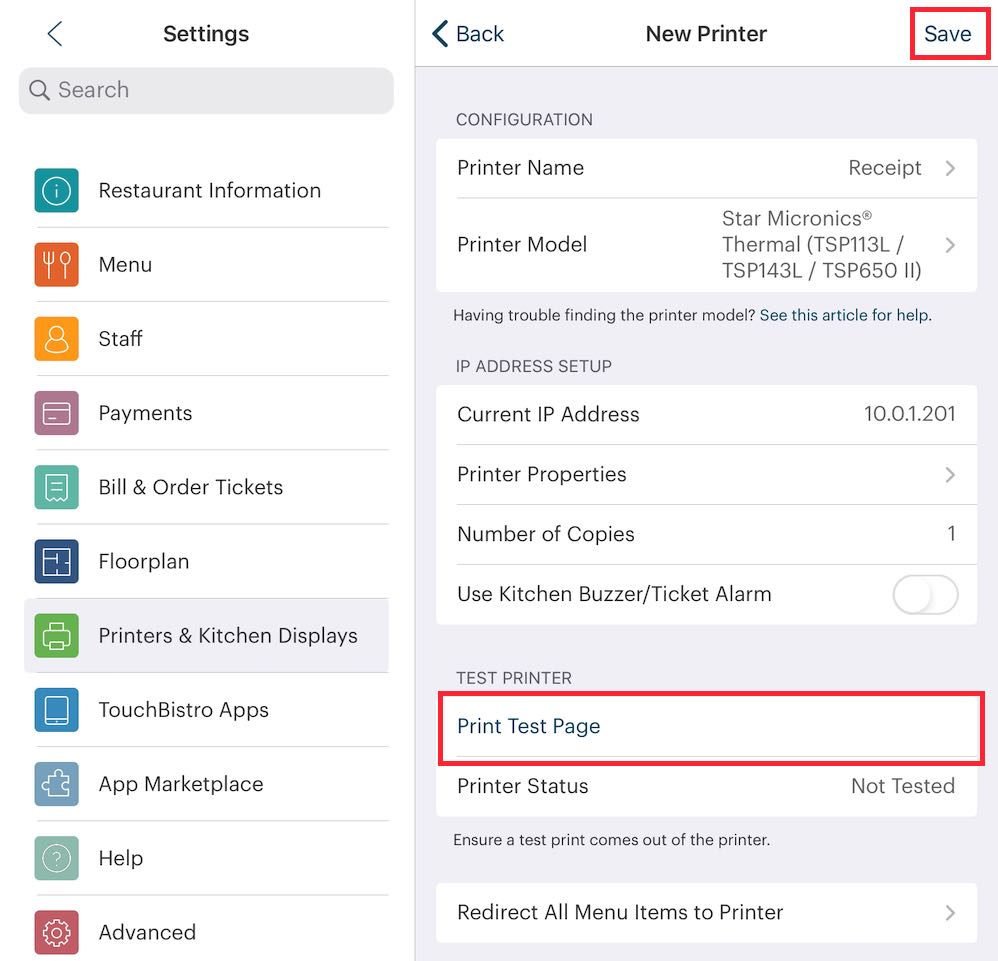
9. Tap Print Test Page to ensure your printer is connected properly and then tap Save.
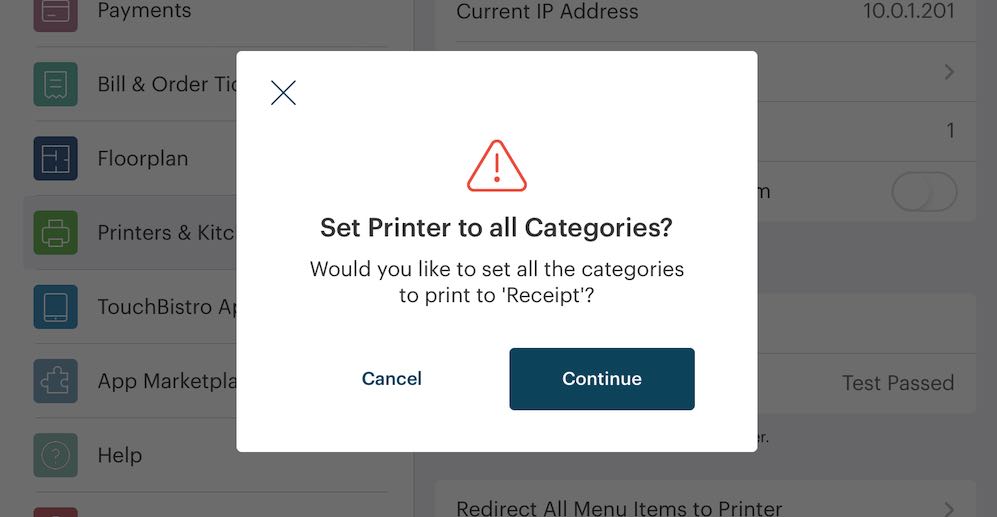
10. If you want this printer to also print kitchen tickets, tap Continue on the Set Printer to all Categories screen. If not, tap Cancel.
Note: if you enable this and have a cash drawer plugged into your printer and also use the printer to send order tickets, TouchBistro will automatically open the cash drawer when you send a ticket. Hence, ensure this is disabled if a cash drawer is or will be plugged into this printer.
Chapter 2. Setting up a Printer Manually
If a printer is connected to your network but isn’t automatically detected, you can set it up manually.
Section 1. Get the IP Address
1. If your printer is on, turn it off.
2. Hold down the printer’s Feed button and turn the printer back on.
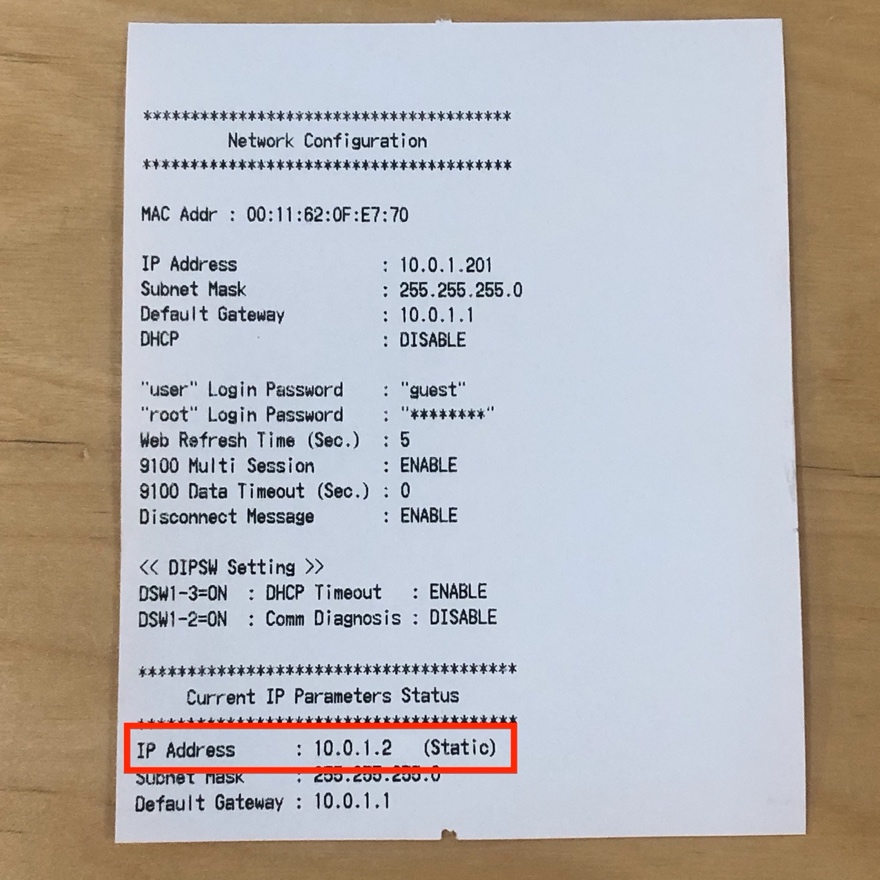
3. Wait until the printer starts to make noise and then release the feed button. The printer will print its IP address. Keep this handy.
Section 2. Adding a Printer Manually

1. Tap the Add + icon on the top right. Tap Add Printer.
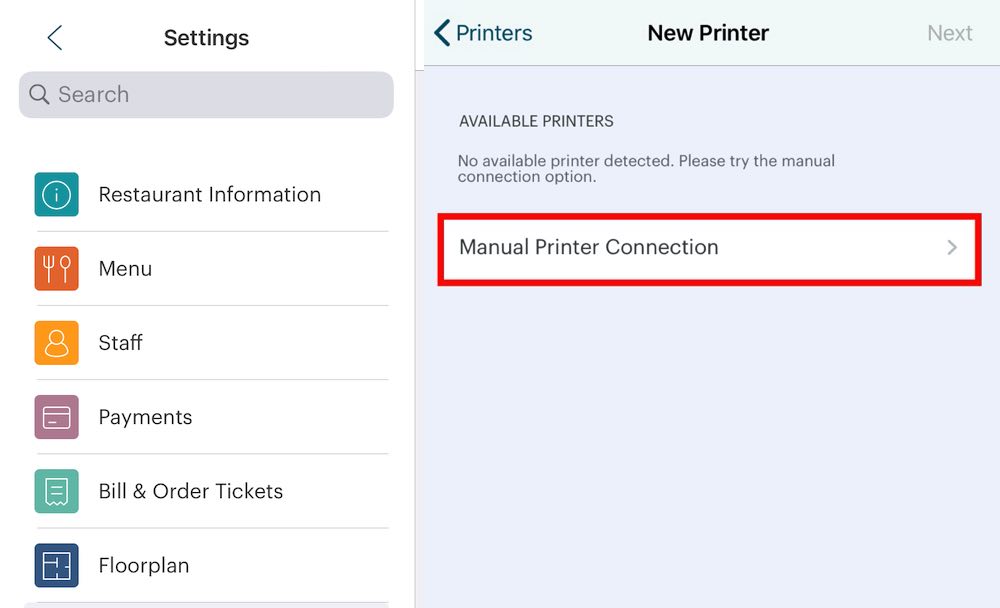
2. Tap Manual Printer Connection.

3. Tap Printer Name.

4. Type in a name for this printer, or make a selection from the list of Common Printer Names.
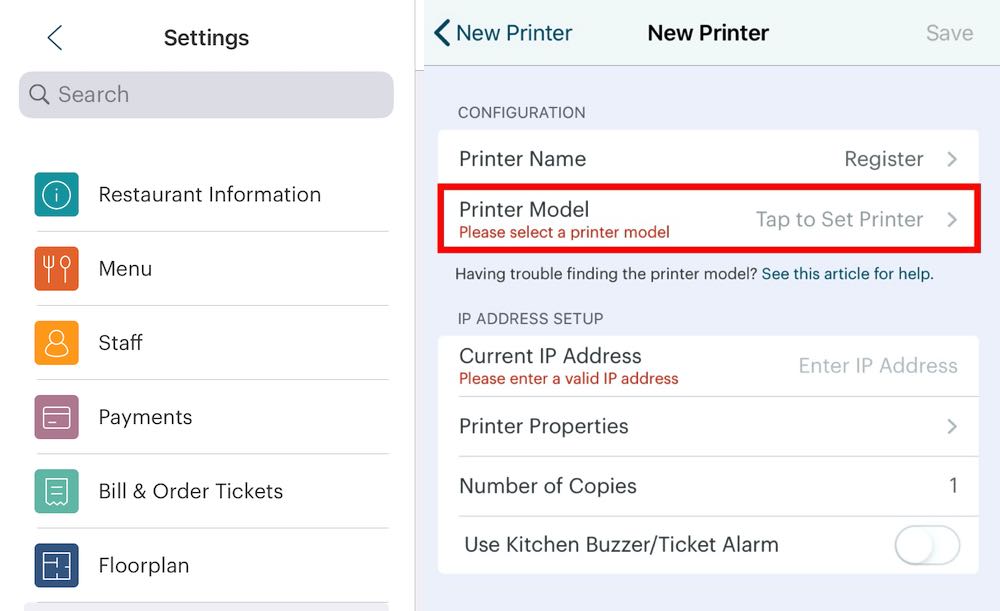
5. Tap Printer Model.

6. Select your Printer Model from the list. The specific model number can usually be found on the bottom of the printer.
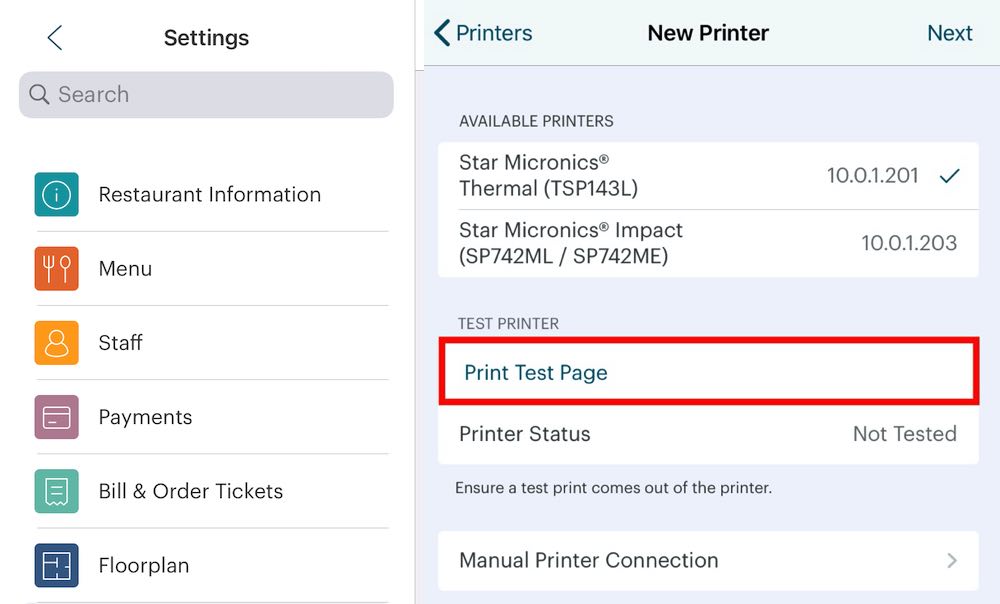
7. Tap Print Test Page.
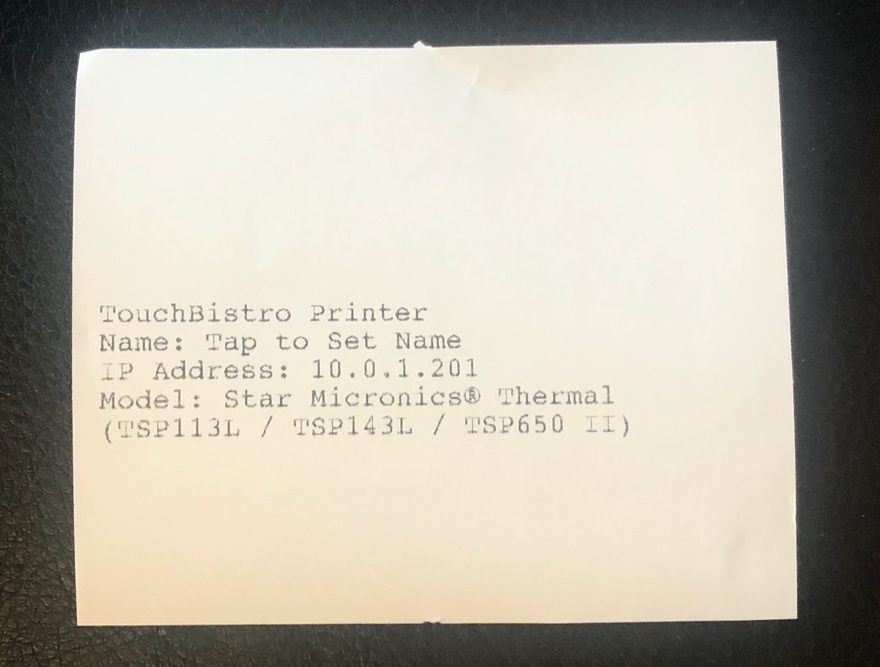
8. Verify that the test print comes out of the printer.
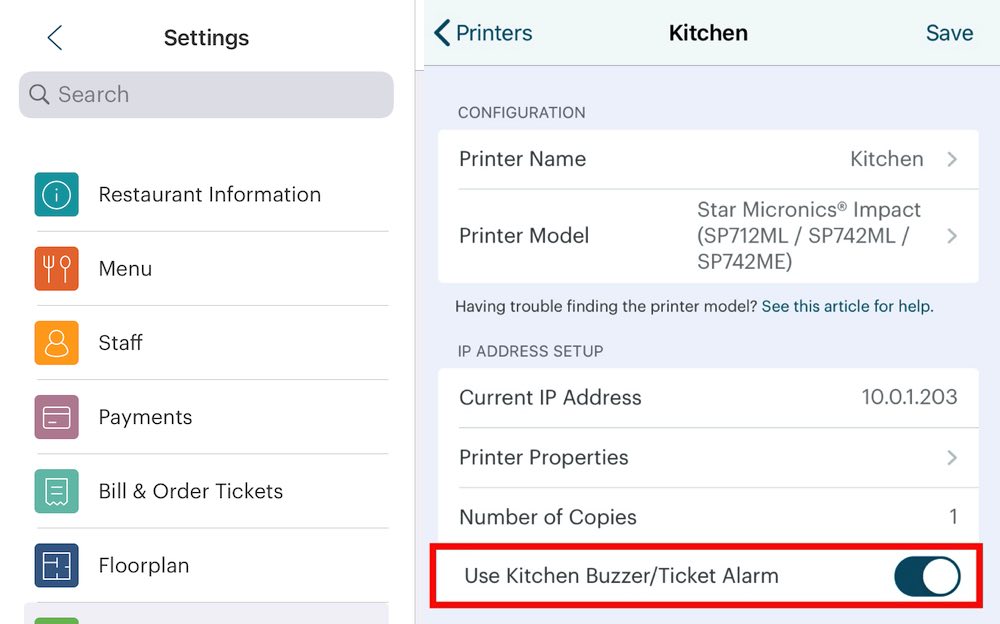
9. If this is a thermal printer and you intend to use it with the Star Kitchen buzzer, enable Use Kitchen Buzzer / Ticket Alarm.
Note: if you enable this and have a cash drawer plugged into your printer and also use the printer to send order tickets, TouchBistro will automatically open the cash drawer when you send a ticket. Hence, ensure this is disabled if a cash drawer is or will be plugged into this printer.
Section 3. Setting up the Printer IP Address in TouchBistro
1. Tap the printer you wish to configure. For example, Register.
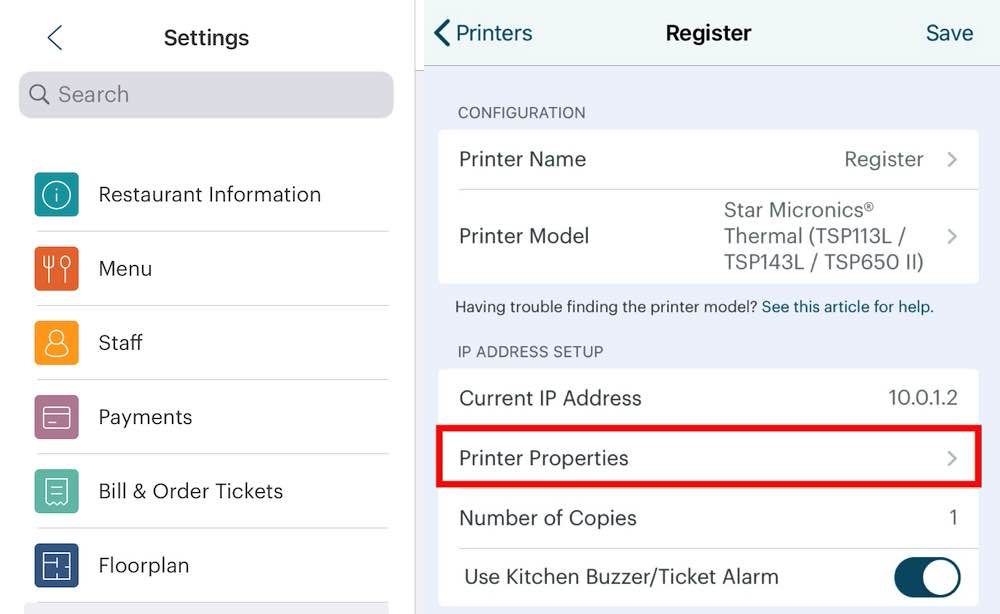
2. Tap Printer Properties.
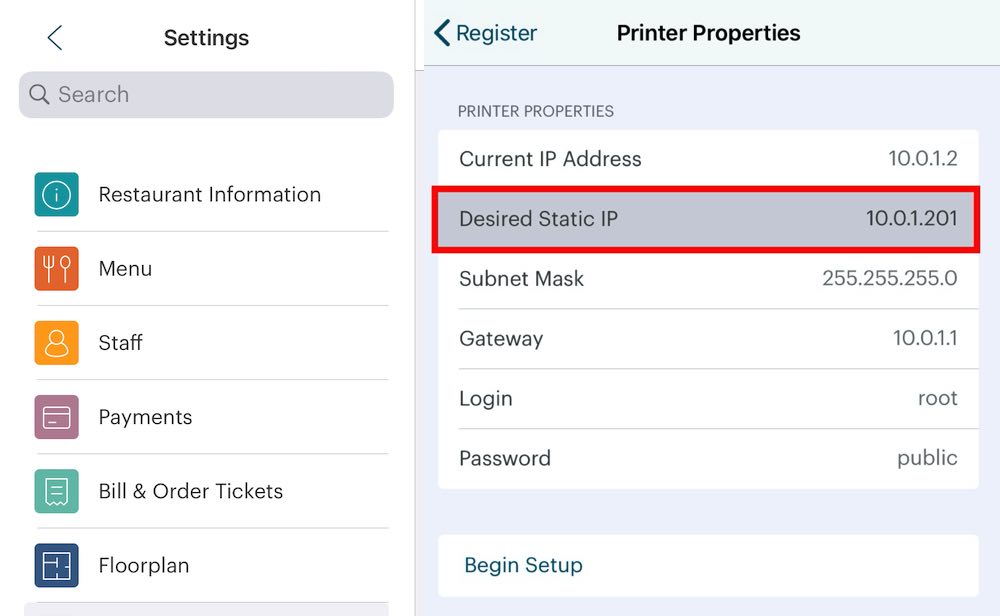
3. Tap Desired Static IP field, enter the IP 10.0.1.20x where x increases by one for each printer you add to TouchBistro. For example, if this is the first printer you’re adding, say the receipt printer, enter 10.0.1.201. If this is the second printer you’re adding (say a printer for your kitchen), If you’re adding a third printer for your bar, enter 10.0.1.203. It’s important to never duplicate an IP used by another printer and never give it an IP where the final block is lower than 201.
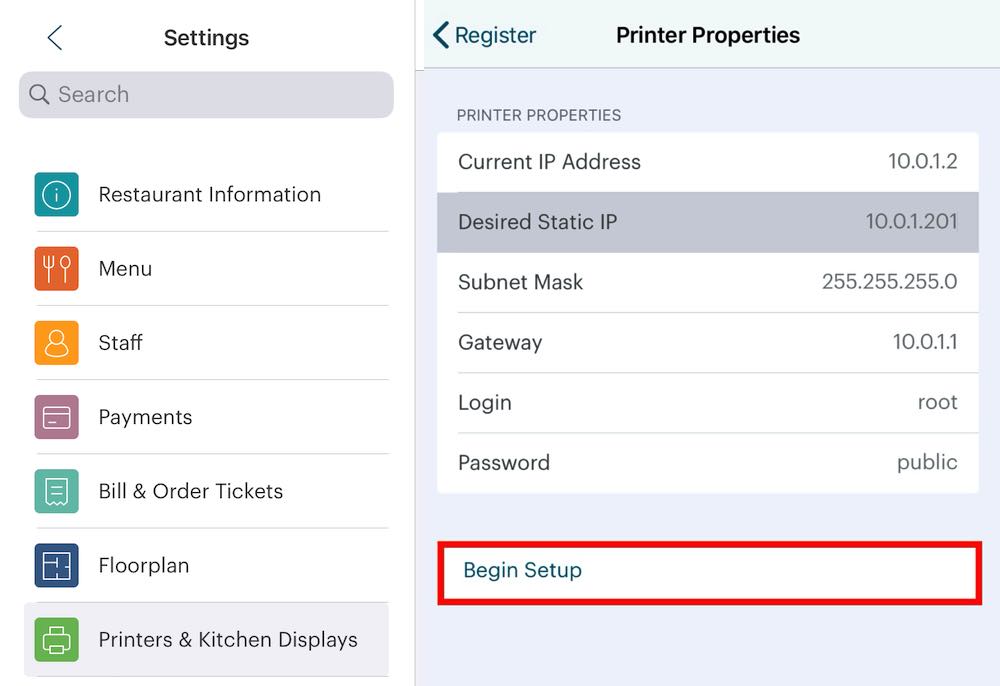
4. Tap Begin Setup.
Section 4. Temporary Order Ticket Re-directs
There are times when a order ticket printer is non operational. If this is the case and you have another printer you can temporarily use to print order tickets, TouchBistro lets you setup a temporary redirect.
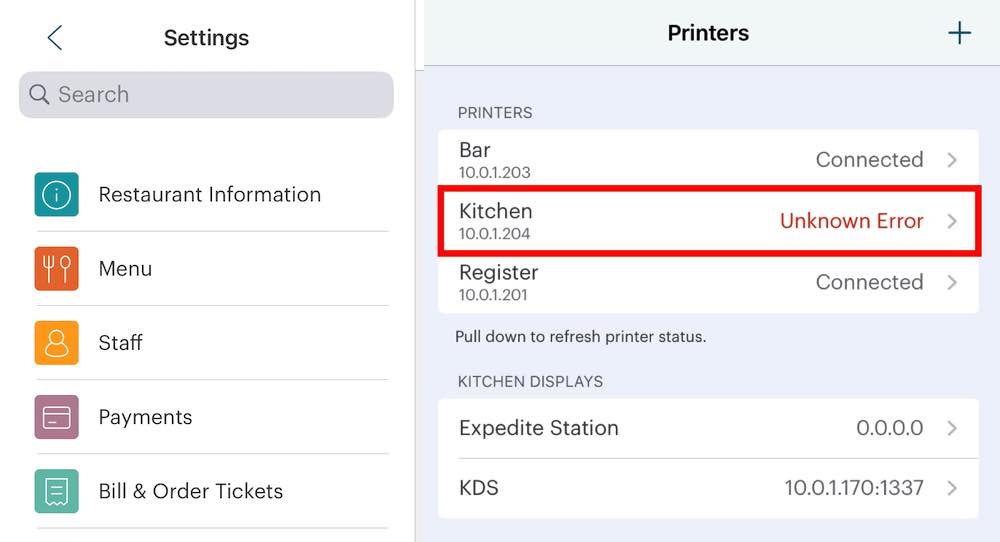
1. Tap the non-operational printer.
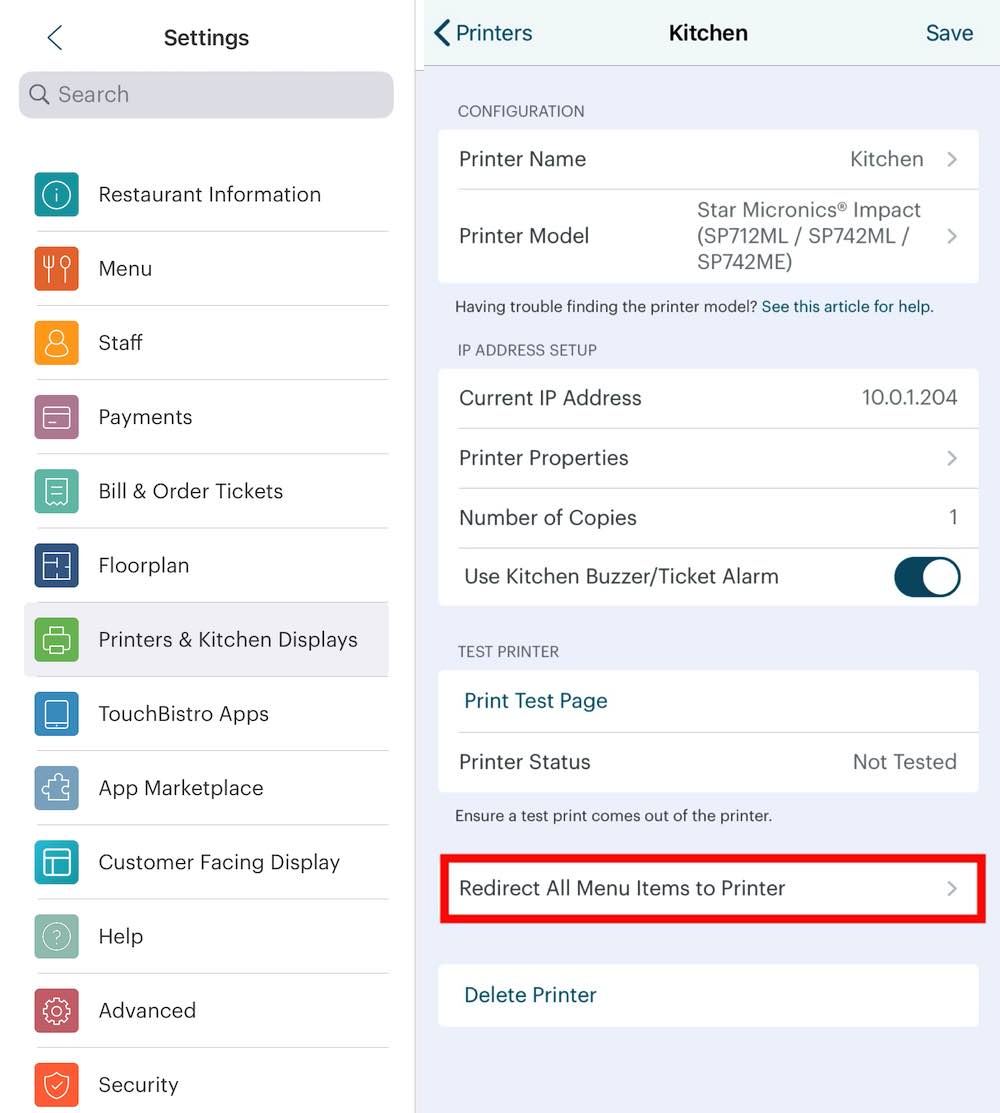
2. Tap Redirect All Menu Items to Printer.
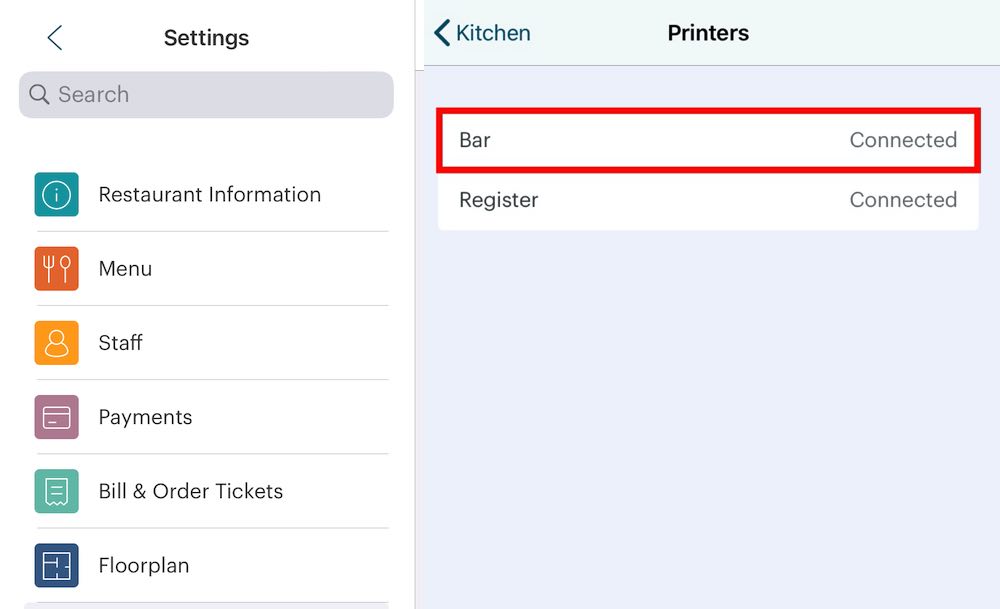
3. Tap the printer you wish to redirect your order tickets to, for example Bar.
When the printer becomes operational again, tap Disable Printer Redirection.
Chapter 3. Global and Local Printers
If you have multiple printers, you can use these options to specify how TouchBistro defaults when printing receipts, reports, and bar orders.
Global Receipt Printer
Sets which printer will print receipts. If you have multiple iPads, all iPads will default to this printer.
Global Reports Printer
Reports constitute end-of-day reports, TouchBistro generated reports giving you an overview of your business operations, credit card reports, and more. If you have multiple iPads, all iPads will default to this printer.
Global Bartender Printer
If the iPad user is logged in under a bartender Staff Type (see Staff), any print jobs sent from the iPad will default to this printer. Since most bars are exposed to the dining environment, a bar printer will typically be a thermal printer for silent operation.
Local Receipt Printer
Any printer selected here will override the global receipt printer for the user of this specific iPad. You might, for example, have a patio or events room with a printer local to that room. The wait staff can be given an iPad with the local receipt printer configured to print to the local printer.
Local Drink Printer
Similar to the local receipt printer, if your patio or events room has a local bar printer, you can configure a specific iPad to print to that local printer.
Chapter 4. Printer Status
When a printer isn’t working properly, TouchBistro will provide you with one of the following error messages designed to help you get your printer back up and running.
|
Error Message
|
Resolution
|
|
Printer Cover Open
|
Ensure that the cover of the printer is securely closed.
|
|
Printer Disconnected
|
Ensure that the printer is properly connected to your network via Ethernet, USB, or Bluetooth.
|
|
Printer Paper Low
|
Printer is running out of paper, and more paper will be required soon.
|
|
Printer Paper Empty
|
Replace the paper in the printer.
|
|
Printer Power Disconnected
|
Ensure that your printer is plugged-in to power.
|
|
Printer Paper Feed In Progress
|
The Feed button on the printer is being held down, and needs to be released before the printer can function.
|
|
Printer Cutter Error
|
The printer’s cutting mechanism is malfunctioning ‚Äì check for jammed paper or other obstructions.
|
|
Printer Drawer Open
|
The printer’s drawer is open, and must be closed.
|
|
Printer Mechanical Error
|
Check the printer for paper jams or other anomalies.
|
|
Printer Buffer Overflow
|
Turn the printer on and off again.
|
|
Printer Unknown Error
|
Check the printer for paper jams or other anomalies.
|


 Email
Support
 Frequently
Asked Questions
