Working with Orders
Table Of Contents
Section 2. Adding a Take-Out Order
Section 3. Editing a Take-Out Order
Section 4. Editing Individual Items on the Takeout Order
Section 5. Custom Take-Out Orders
Section 2. Adding a Delivery Order
Section 3. Editing a Delivery Order
Chapter 1. Orders Option
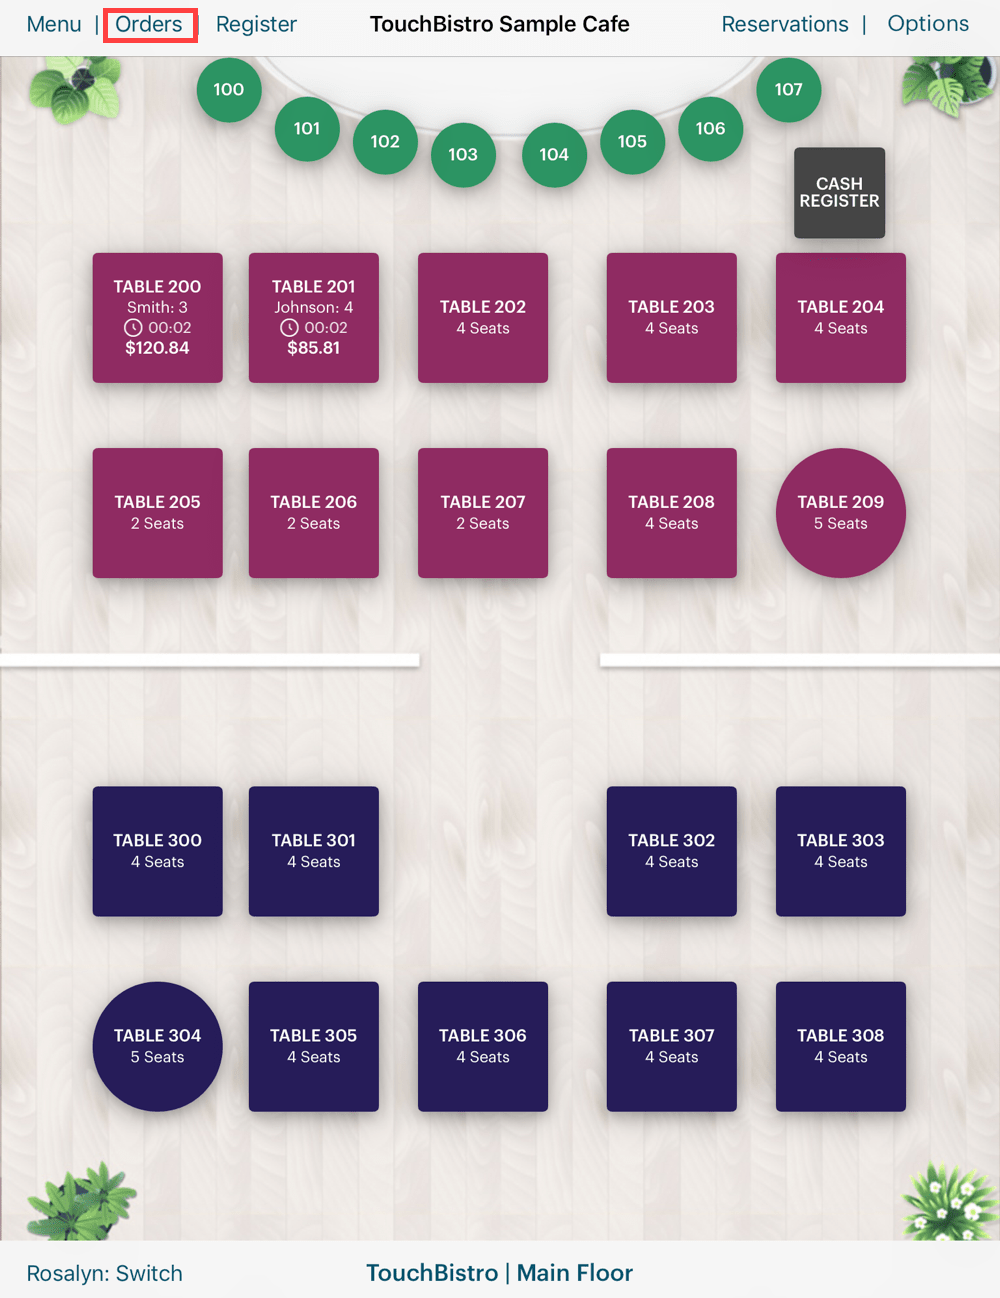
The Orders option, available from your floor plan, lets you create and process take out and delivery orders and bar tabs. Unlike tableside or cash register orders, each of these kinds of orders requires different kinds of information and handling. If you have open orders, you will see a number next to the Orders option. In the example above, the server had 3 open orders.
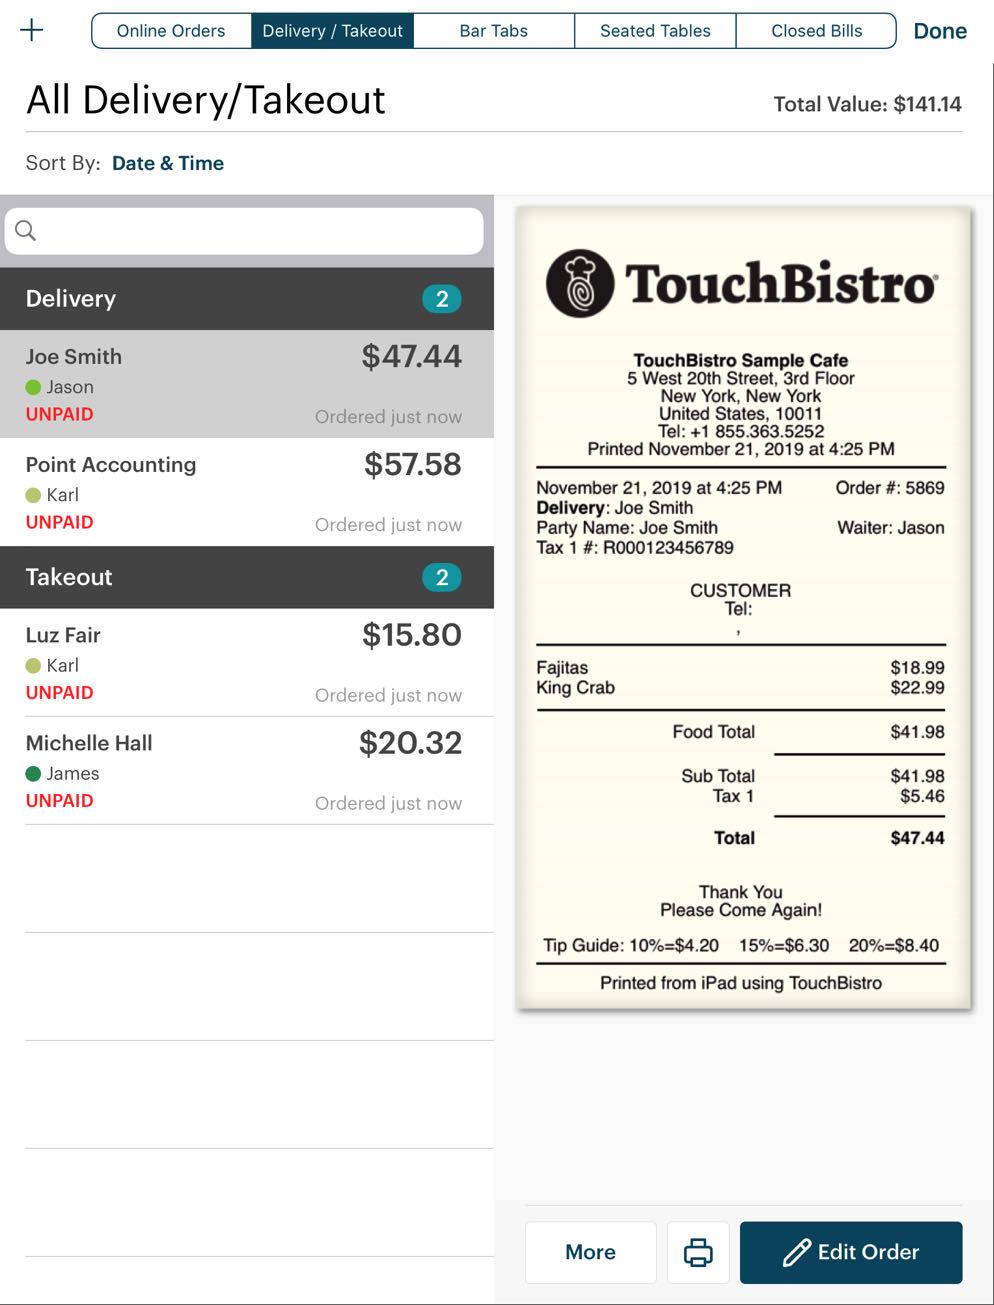
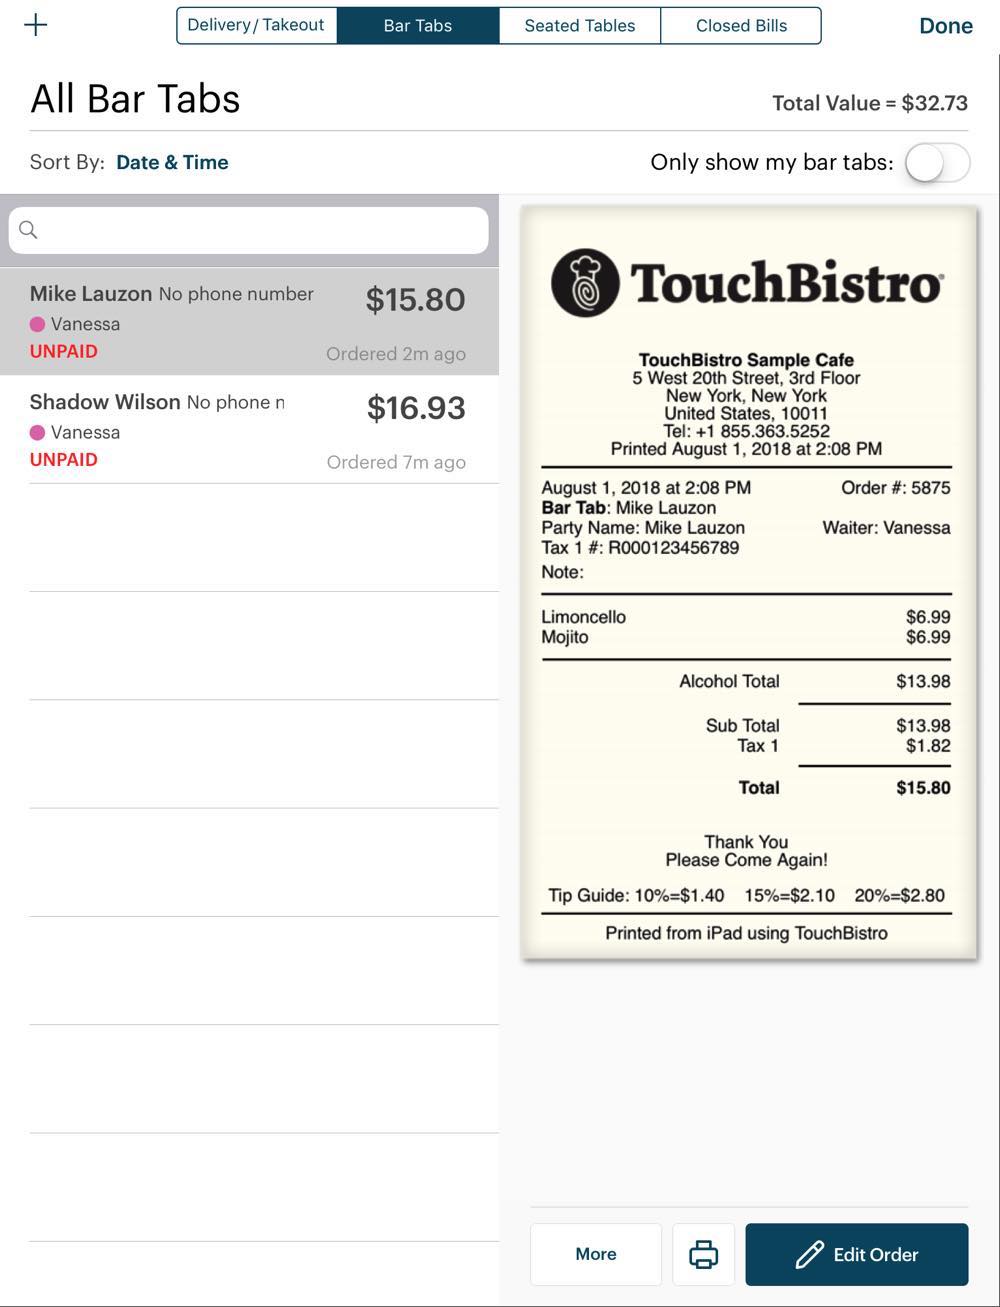
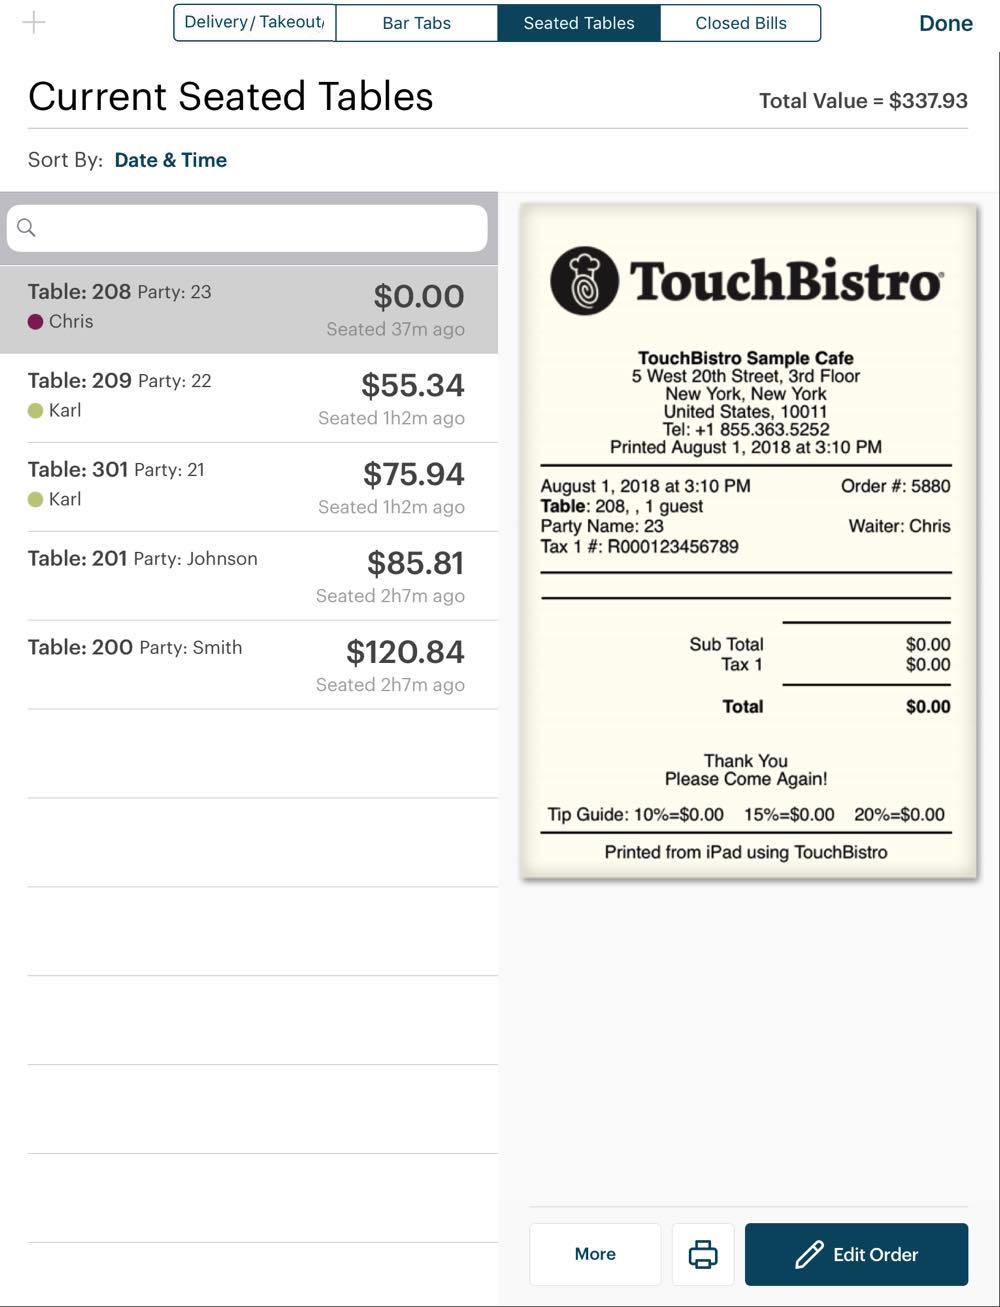
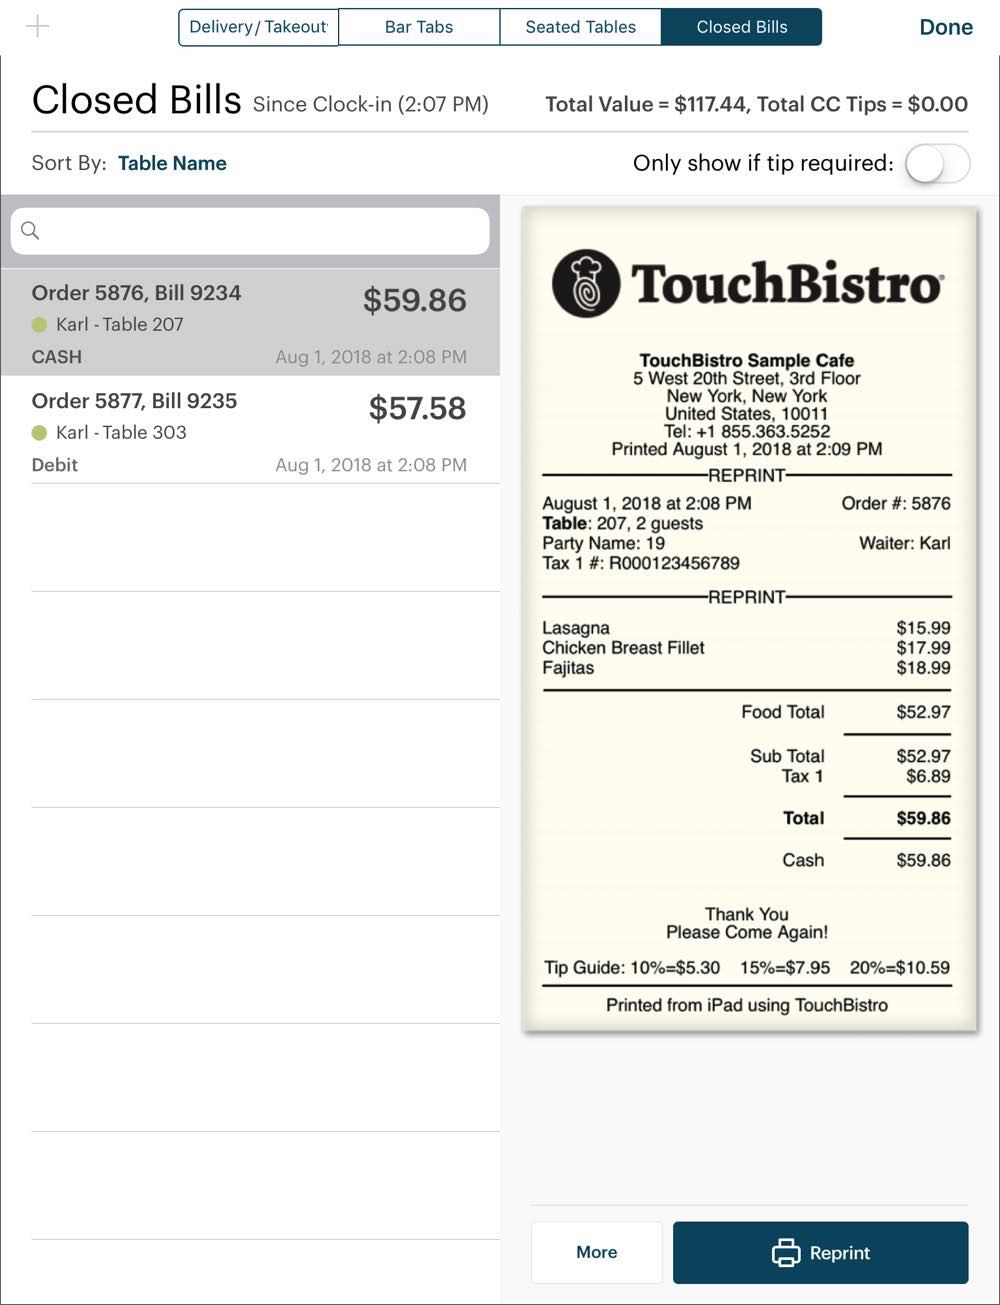
When you tap Orders, you’re taken to the Orders screen. Across the top are four tabs:
|
Option
|
Description
|
|
Delivery/Takeout
|
Tap to add or edit a take-out or delivery order. Depending on your access level, you may see other staff member orders (identified by their unique color code). Or you may be restricted to seeing only those you’ve created.
|
|
Bar Tabs
|
Tap to add a bar tab. Depending on your access level, you may see other staff member bar tabs. Or you may be restricted to seeing only those you’ve created. If you see other bar tabs, slide Only show my bar tabs to the green position to filter for only your bar tabs.
|
|
Seated Tables
|
If you’re a table service venue, tap to view and access seated tables. Tap a seated table and tap the More button for table options. Tap the printer button to quickly print the guest check.
|
|
Closed Bills
|
Tap to view and edit closed bills. If you need to reconcile tips written on bills with the charged credit card (a “pre-auth”), tap this tab as well. Tap a closed bill and tap Reprint if you need to reprint the bill or email the bill.
|
Note: if you see an Online Orders tab, see this guide.
Chapter 2. Take-Out Orders
A take-out order is typically one where the customer calls in the order or makes the order via some other remote means and you’re required to capture information about the customer and order.
Section 1. Video Tutorial
Section 2. Adding a Take-Out Order
1. When a take-out order comes in, tap All Take-Out/Delivery.
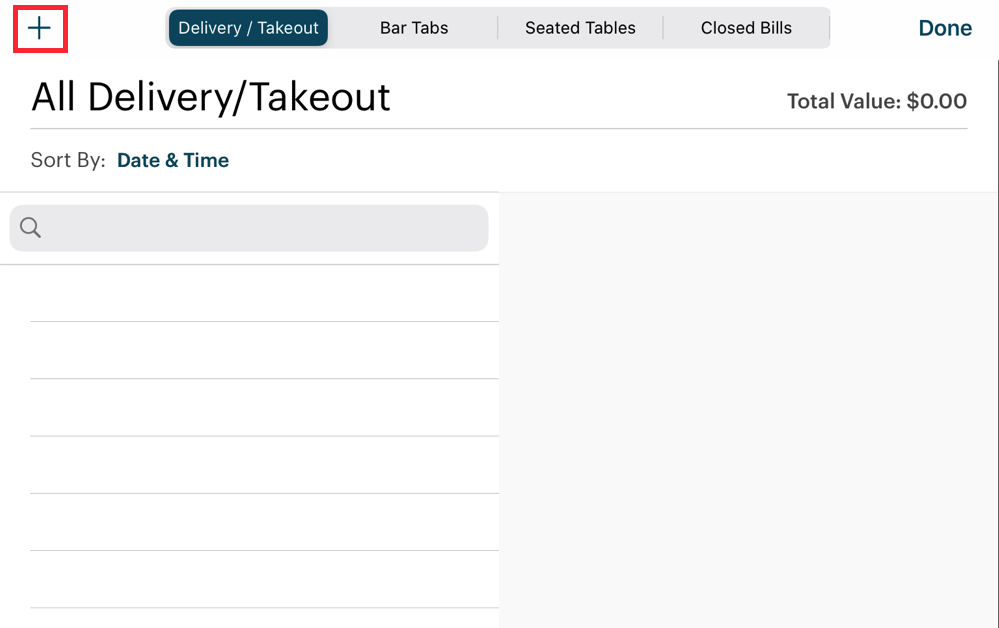
2. Tap the Add + button.
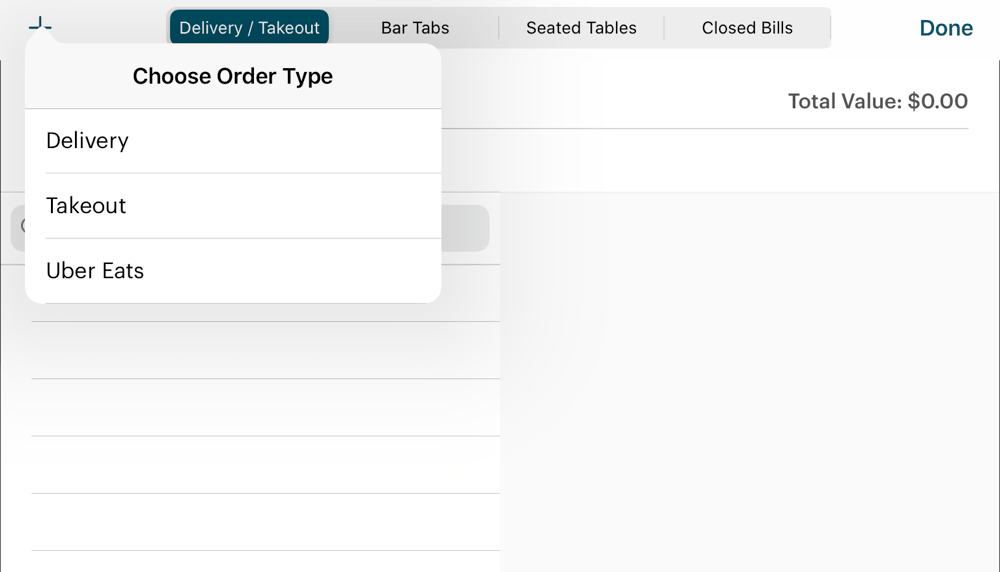
3. Tap Takeout. If you see additional options here, it’s because your TouchBistro administrator has added some custom take-out types.
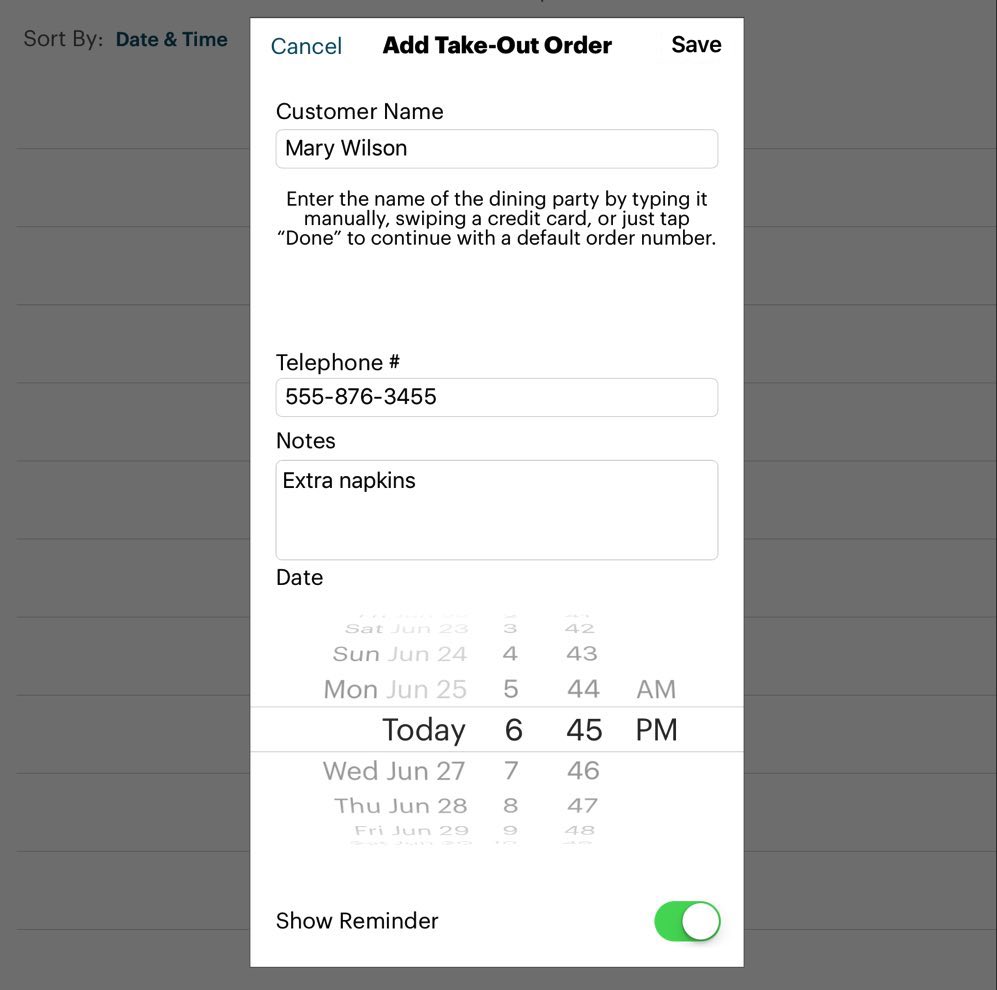
4. Complete the Add Take-Out Order screen.
5. Enter details like the customer name and phone number.
6. Add any important notes (e.g., “extra napkins”). Remember, notes will appear on the receipt. Make sure your notes are public-facing.
7. The date defaults to the time of order creation.
8. If you would like to set up a reminder about this take-out order, slide Show Reminder to the green position.
9. Use the time/date wheels to set the time you want the reminder. For example, if you told the customer he/she can pick up the order “any time after 7 pm”, and you want a reminder to get the order ready 15 minutes before 7 pm, set the time wheel to 6:45 pm. If you are using the multi iPad version (with pro server), you will get a TouchBistro message as a reminder. If you’re using the single iPad (standard) version you will get a pop-up alert and an iPad notification.
10. Tap Save when you’ve completed the Take-Out Order details screen.
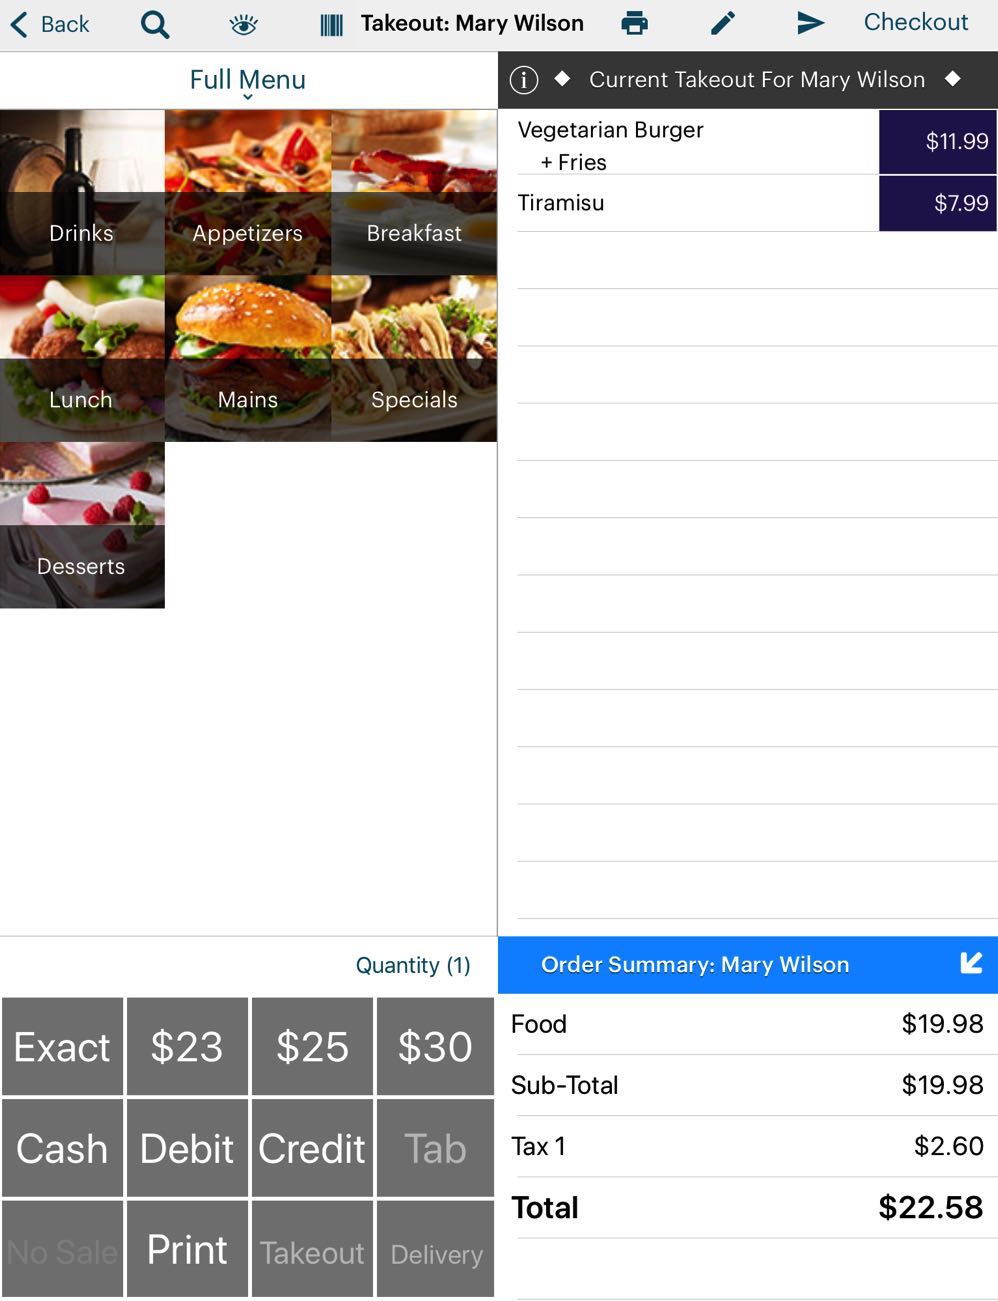
11. You’re taken to the Order screen, which is similar to the register screen. Enter the order. (Note, multi/pro server users are not taken automatically to the Order screen. You will first see your $0 order on the Orders screen. Open it to begin adding items.)
12. Tap Back to return to the Orders screen.
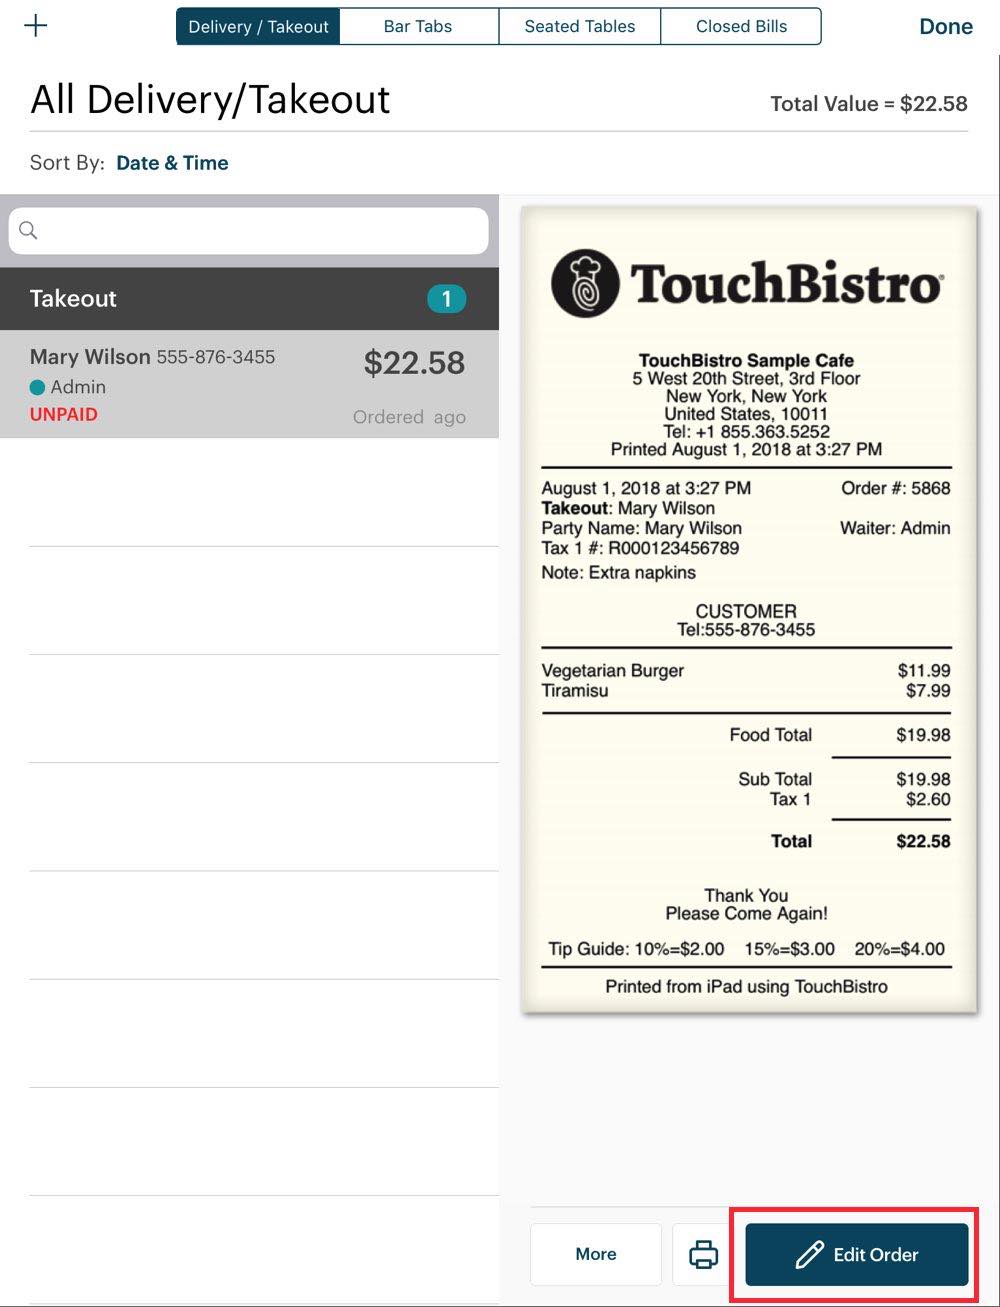
13. When the customer comes to pick up the order, return to the Orders screen and tap the order and tap Edit Order.
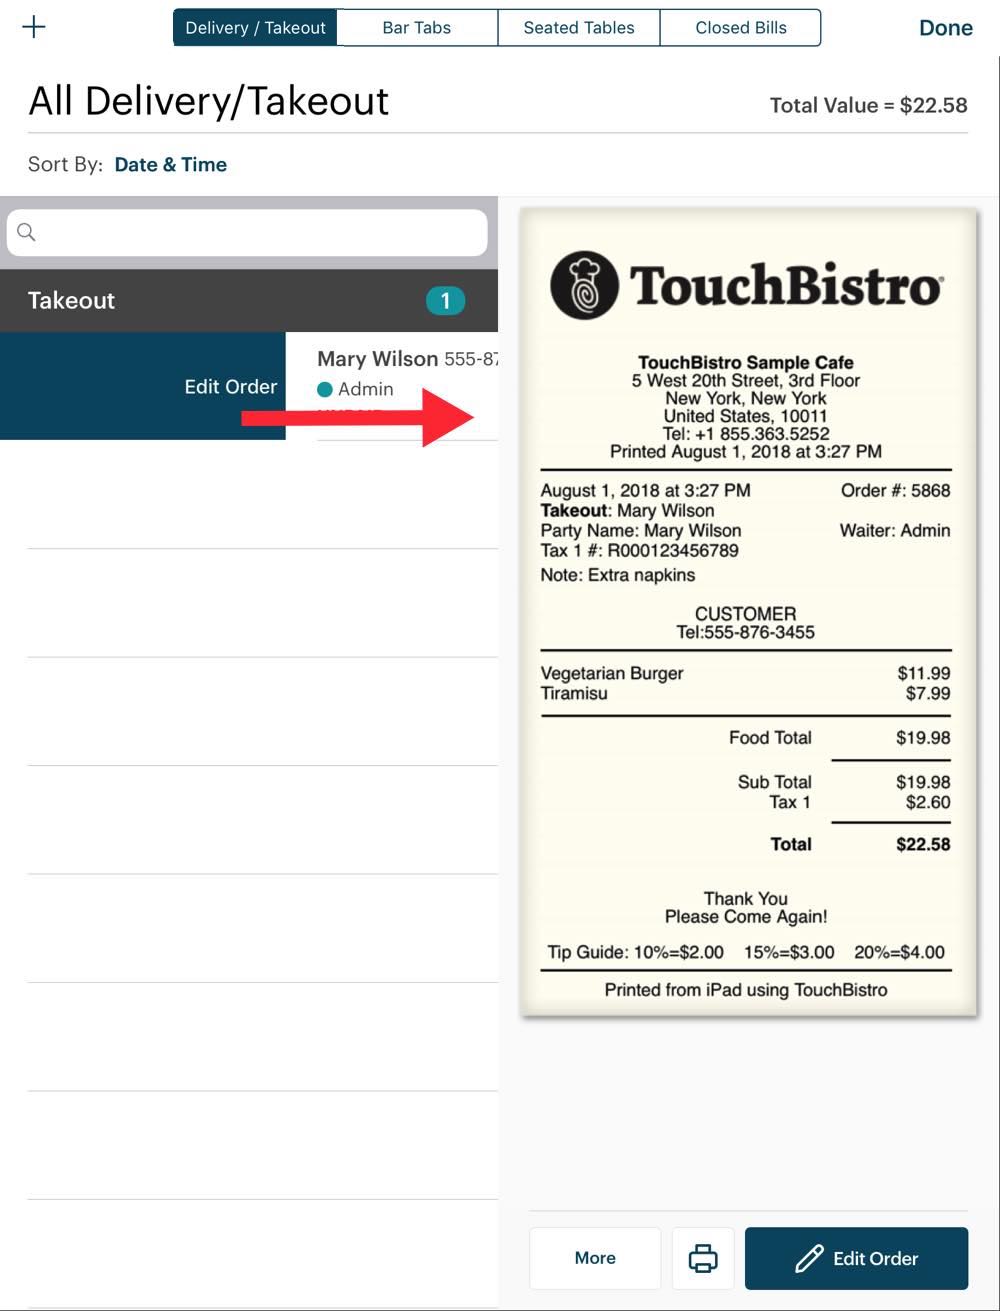
14. Alternatively, fully right swipe on the order until it opens (you must be using iOS11 and above).

15. Tap Checkout or tap a fast pay button to process the payment similar to a cash register order.
See Also
Section 3. Editing a Take-Out Order
1. If you need to edit or change a take-out order, open the Orders screen and tap All Take-Out/Delivery.
2. Find the order you wish to edit.
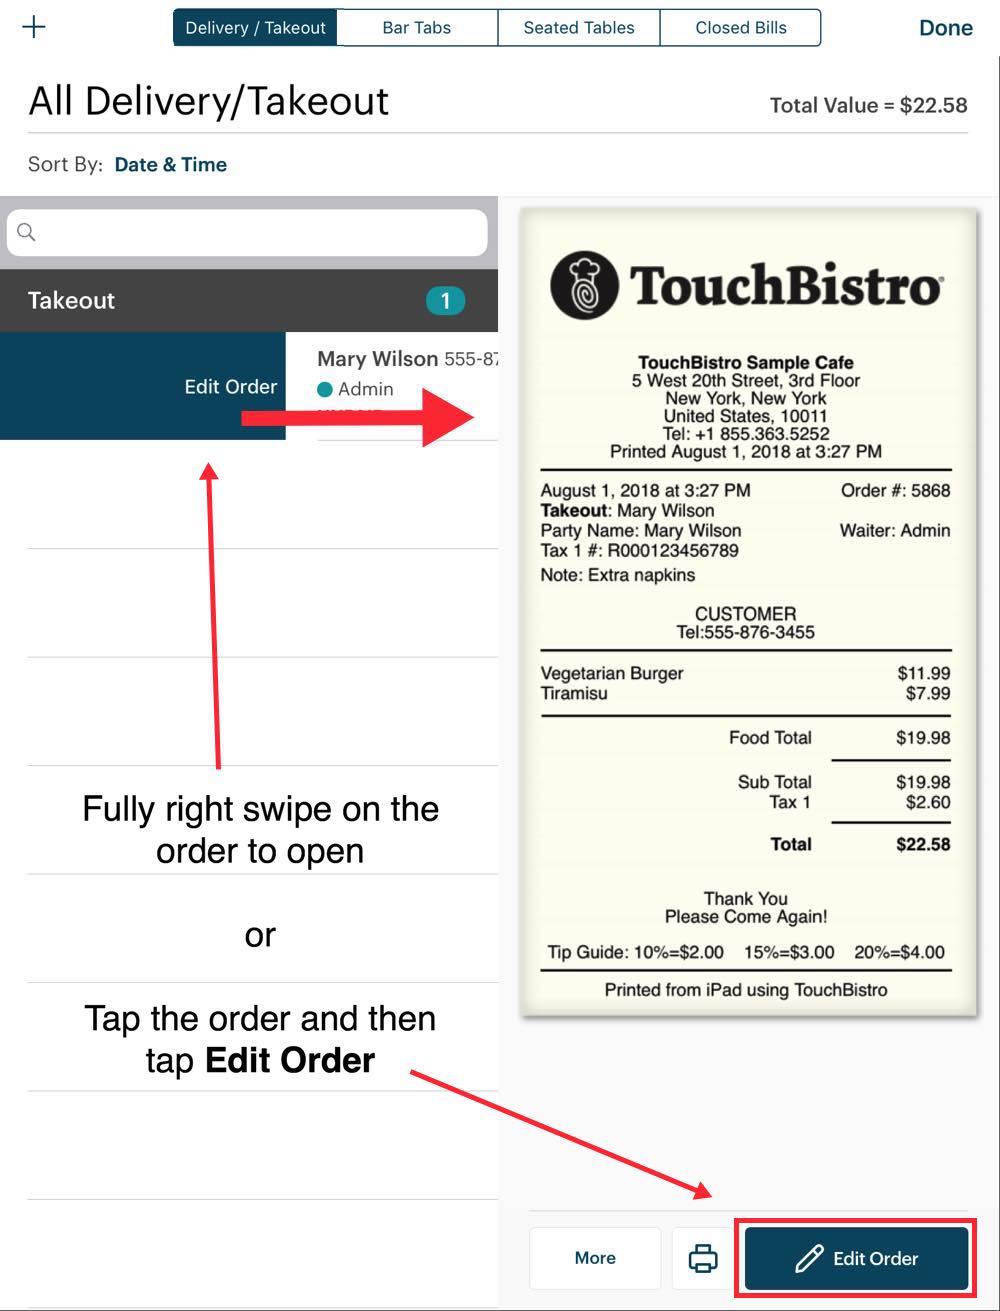
3. If you need to add or remove items from the order, simply tap the order name and either tap the Edit Order button or fully right swipe on the order.
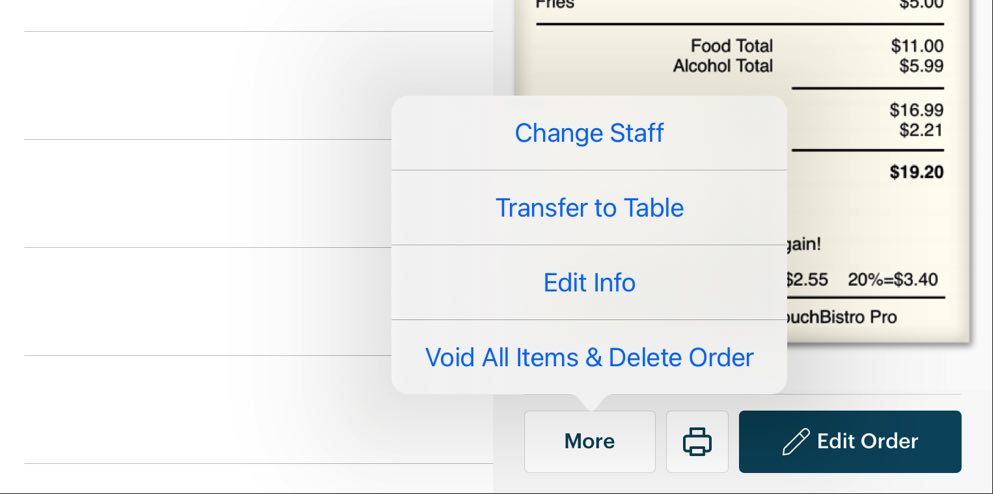
4. If you tap the order and tap the More button, you will get other editing options:
|
Option
|
Description
|
|
Change Staff
|
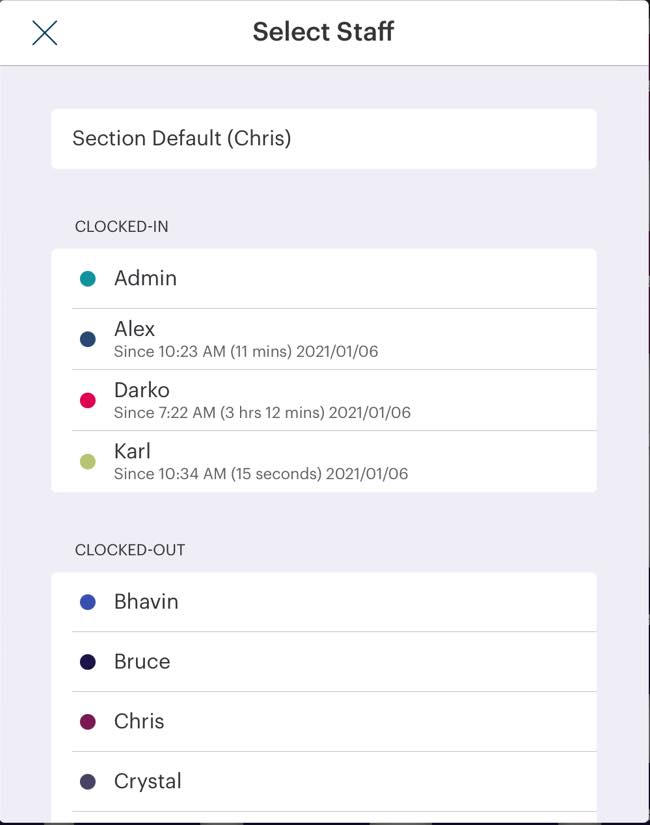
If you need to assign this order to another server, tap Change Staff.
Tap the new server from the list of servers. Clocked in servers can be found at the top.
|
|
Transfer to Table
|
If the customer comes in for the order and then decides to dine in, tap Transfer to Table to move the order to a table. Select the target table from the floor plan screen.
|
|
Merge Takeout
|
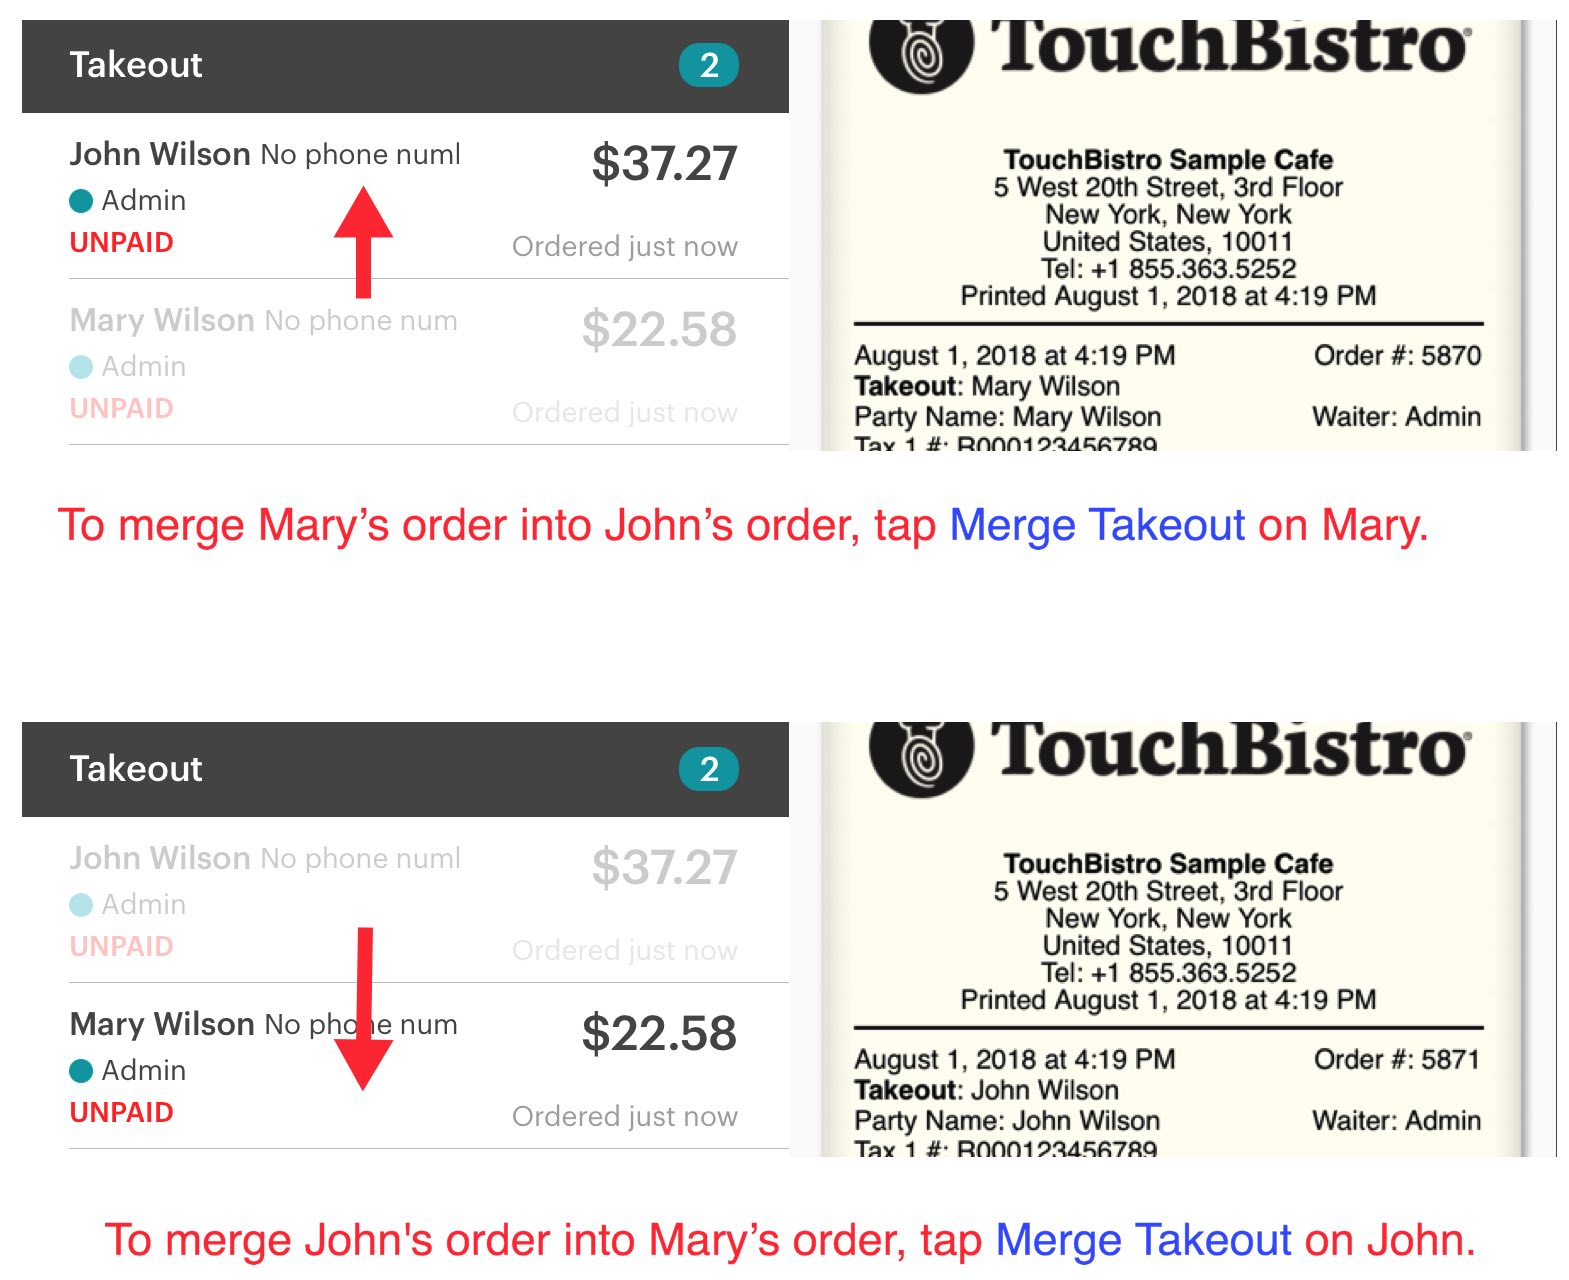
If you need to merge this order into another existing takeout order, tap Merge Takeout.
Tap the takeout order this order should be merged into.
|
|
Edit Info
|
To edit the details of this order (for example, name or add additional notes), tap Edit Info.
|
|
Delete Order/ Void All Items & Delete Order
|
To quickly delete this order, tap Delete Order.
You will be prompted for a manager approval. If items have been sent to a kitchen printer, this option changes to Void All Items & Delete Order.
|
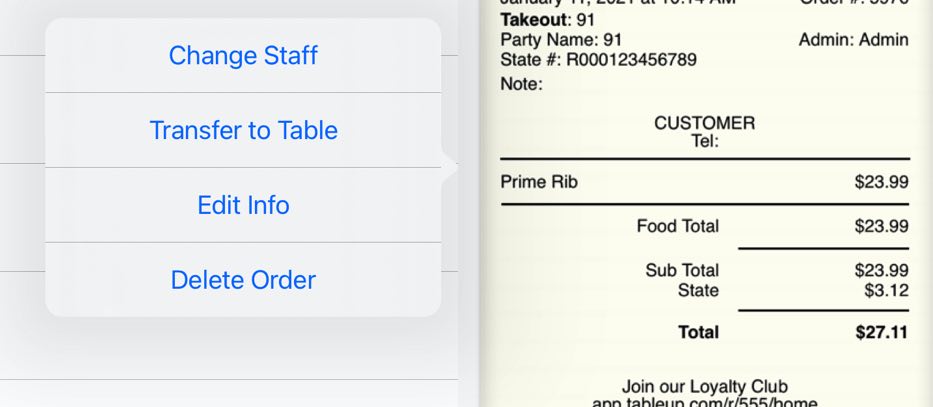
5. Note you can also display these options by tapping the order and then tapping the bill preview.
Section 4. Editing Individual Items on the Takeout Order
The options for menu items added to the takeout’s Order screen are similar to the item Options for the cash register. However, you can tap an item and transfer it from the takeout order to a table.
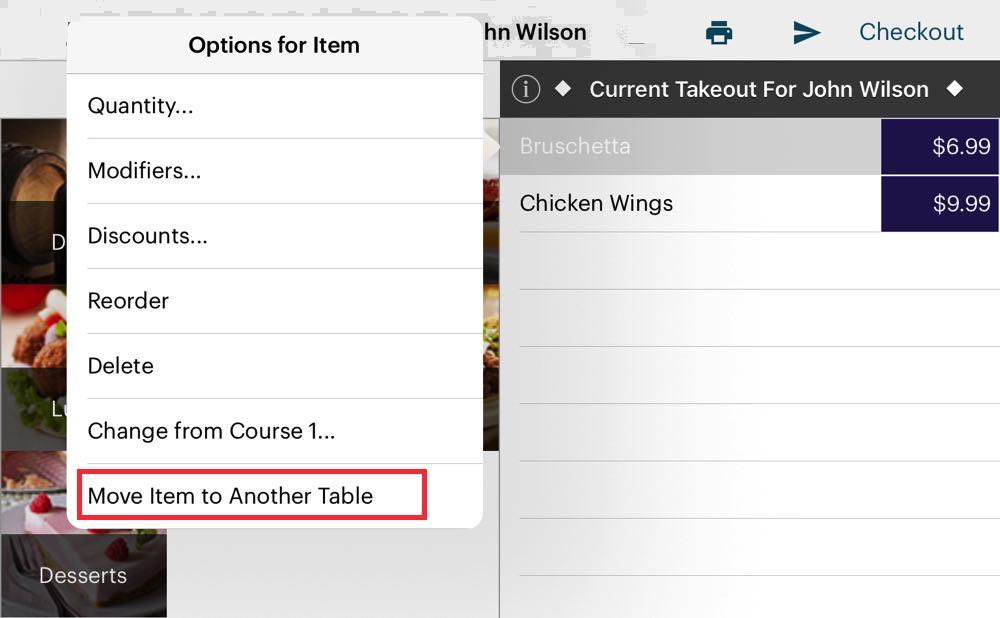
1. Tap the menu item and tap Move Item to Another Table.
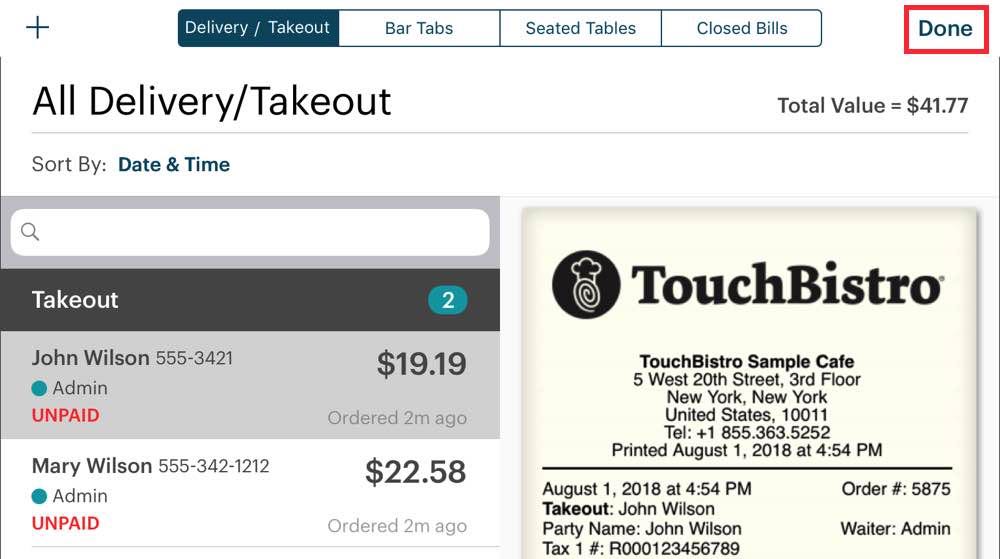
2. Tap Done to return to the floor plan.
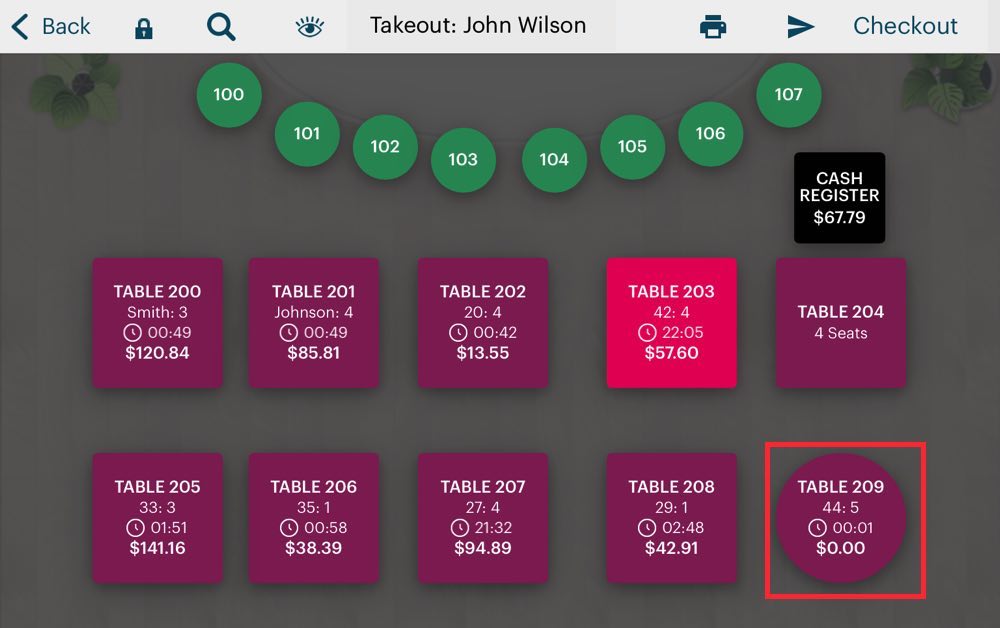
3. From the floor plan tap the target table.
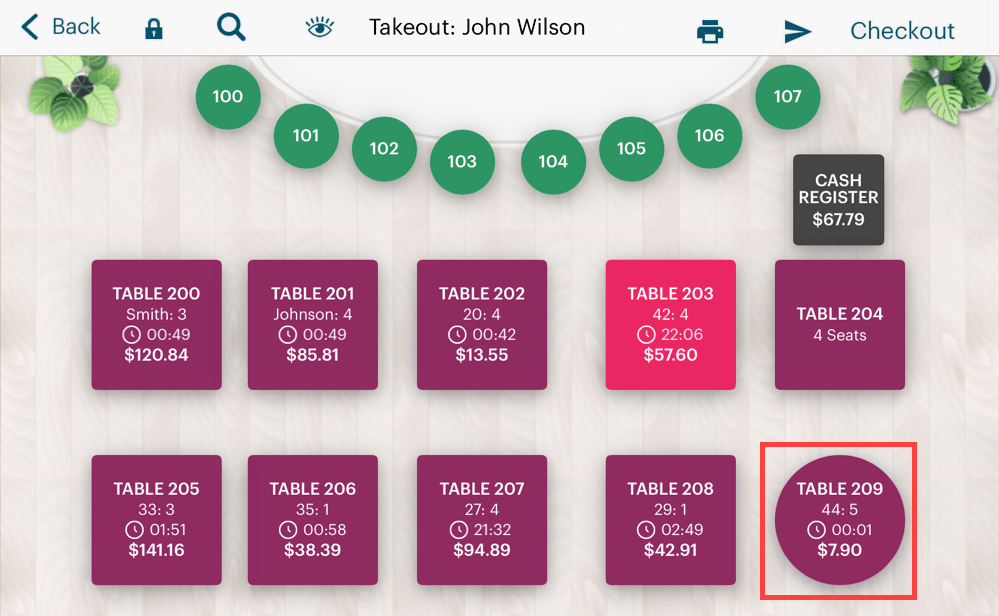
4. Open the table.
5. The item, by default, is a shared order.
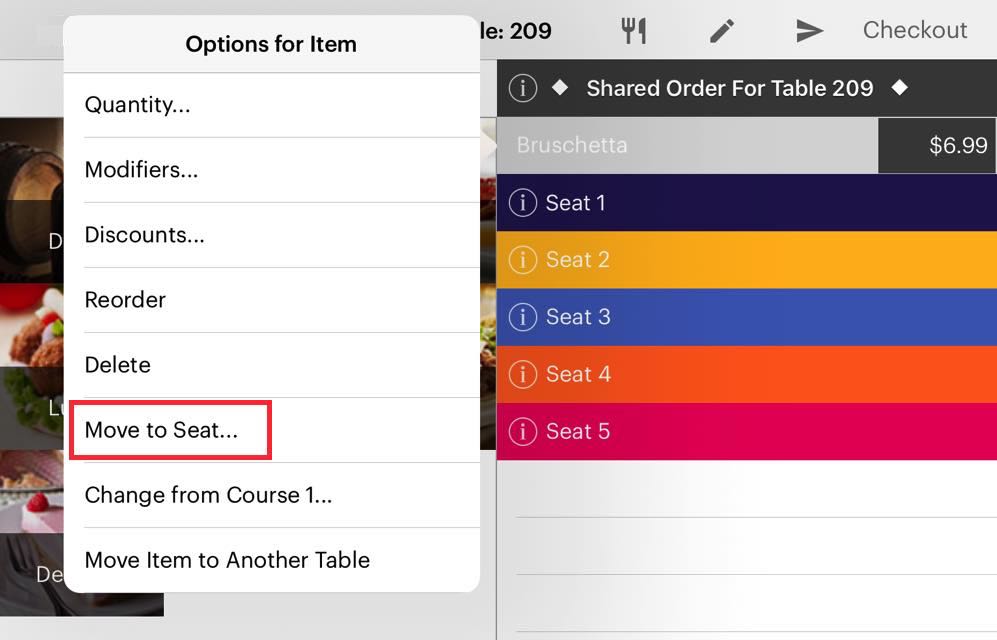
6. Tap the item and tap Move to Seat to move it to a proper seat.
Section 5. Custom Take-Out Orders
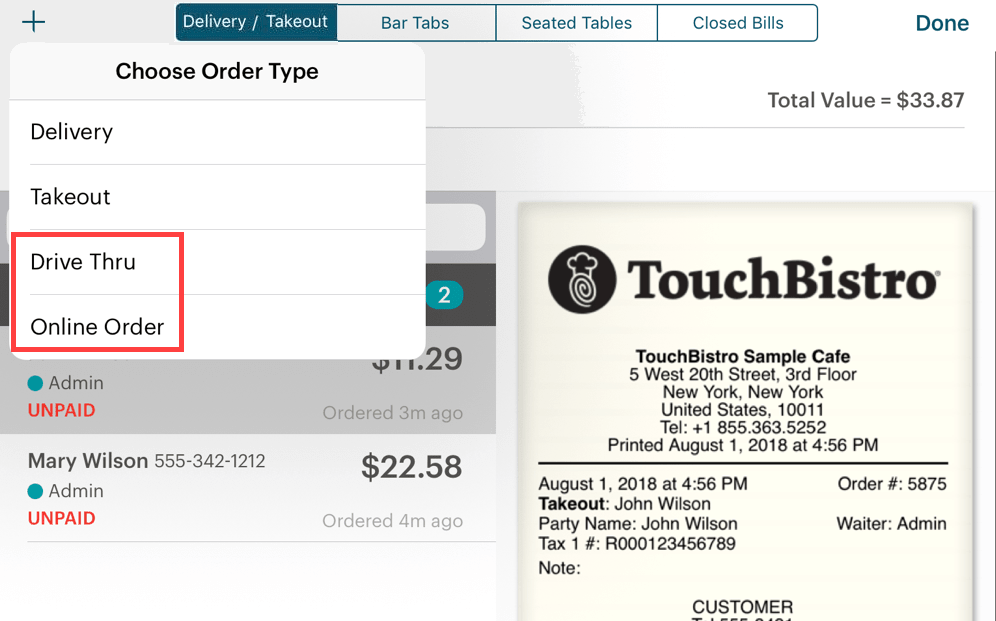
TouchBistro may have been set up to have additional order takeout order types. In the example above, the TouchBistro admin has set up some additional takeout types, for example a takeout type indicating the takeout is destined for the drive-through or for an online order pickup. These custom takeout types can be selected to help alert the kitchen staff that the order might need to be prepared or packed slightly differently depending on takeout type.
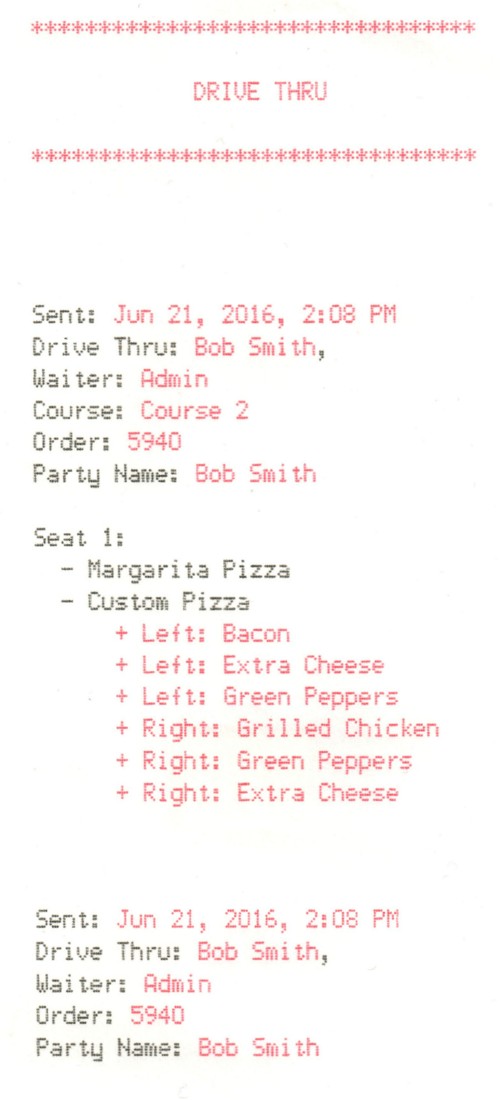
If selected and the admin has enabled takeout headers to be printed on kitchen tickets, the ticket sent to the printer will show the selected takeout type.
Chapter 3. Delivery Orders
A delivery order is typically one where the customer calls in the order or makes the order via some other remote means and you’re required to capture delivery information about the customer and order.
Section 1. Video Tutorial
Section 2. Adding a Delivery Order
1. When a delivery order comes in, tap All Take-Out/Delivery.

2. Tap the Add + button.

3. Tap Delivery.
4. Complete the Delivery screen.
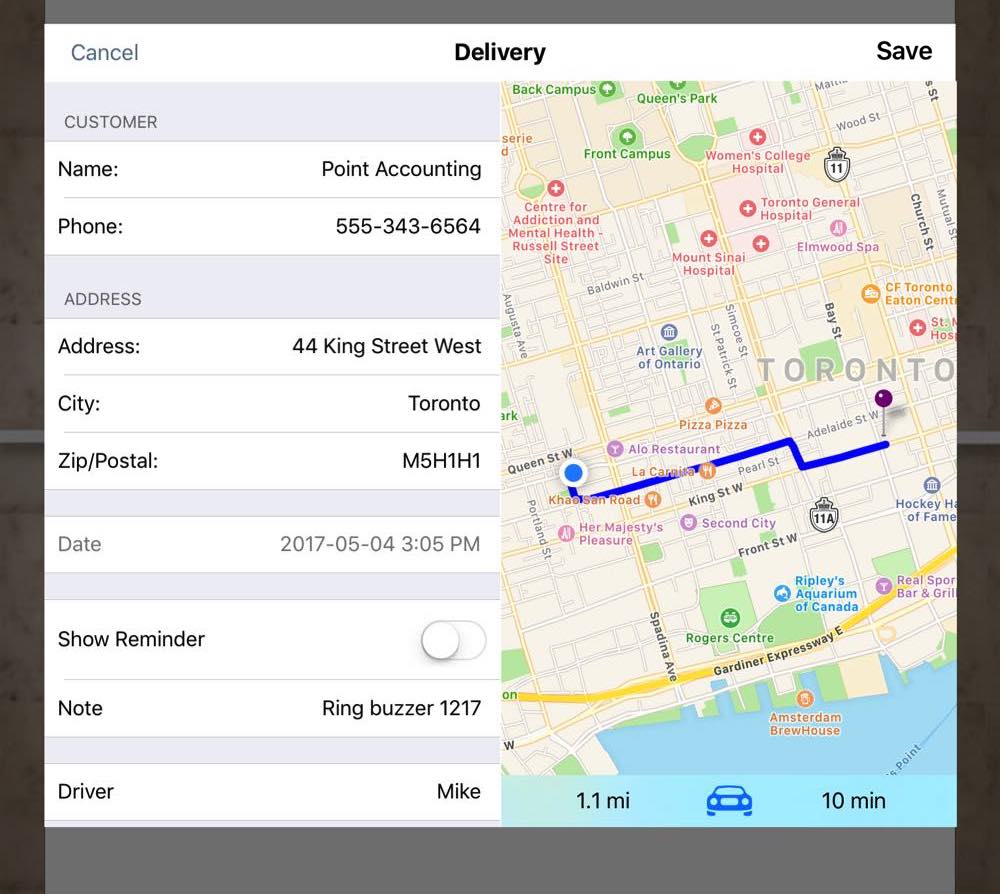
5. Enter details like the customer name and phone number.
6. Enter the address. When you enter the address, TouchBistro will display the delivery route on the map. If your iPad is not generating a delivery route, ensure TouchBistro has permission to access your location services. Tap Add to Contacts if you would like to add this to your iPad’s contact app.
7. Add any important notes to help the driver (e.g., “Ring buzzer 1217”). Remember, notes will appear on the receipt. Make sure your notes are public facing.
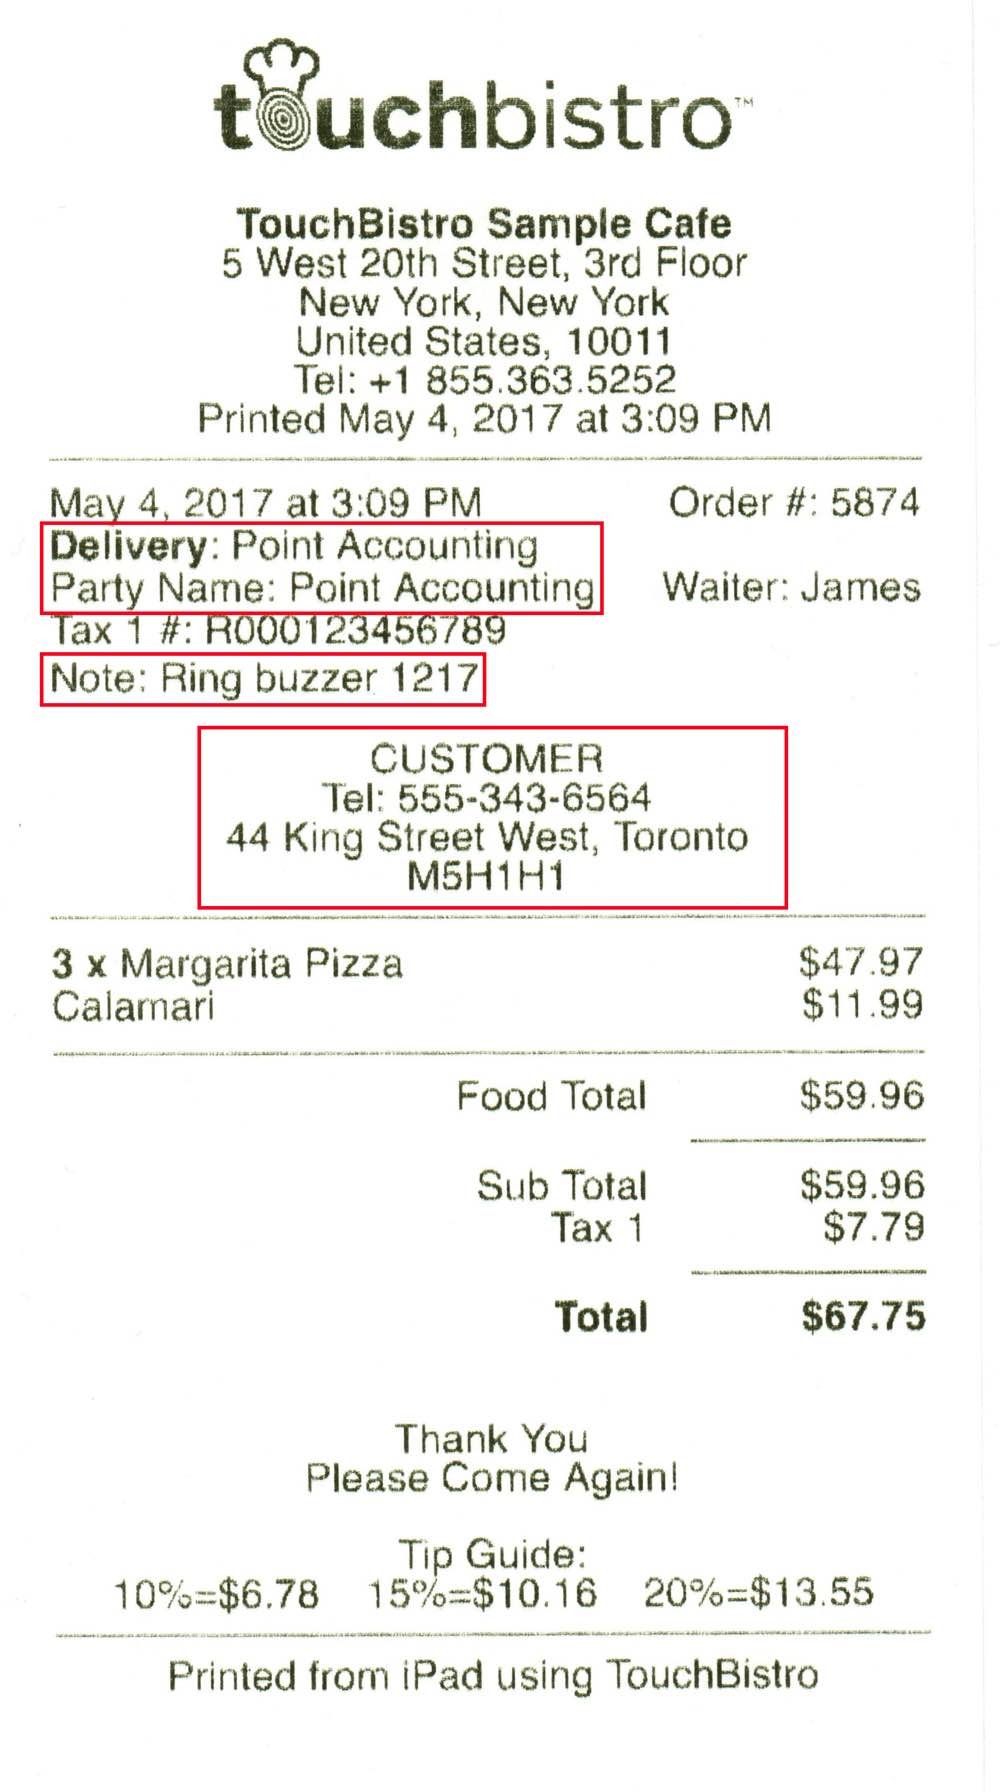
8. These items (address, phone, note) will appear on the receipt and help the driver with the order.
9. Enter the name of the driver assigned.
10. The date defaults to the time of order creation.
11. If you would like to set up a reminder about this delivery order, slide Show Reminder to the green position.
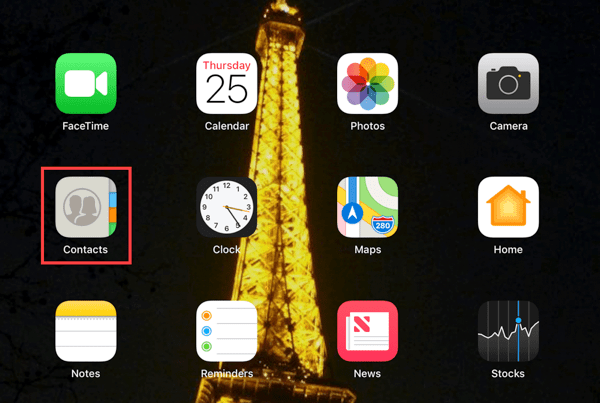
12. Tap Add to Contacts to add this name and address to your iPads Contacts app database. Next time you start a delivery, TouchBistro will auto suggest this customer.
13. Use the time/date wheels to set the time you want the reminder. For example, if the customer wants the order delivery by 7 pm, and you want a reminder to begin working on an hour before the target delivery time, set the time wheel to 6:00 pm. If you are using the multi iPad version (with pro server), you will get a TouchBistro message as a reminder. If you’re using the single iPad (standard) version you will get a pop-up alert and an iPad notification.
14. Tap Save when you’ve completed the Delivery details screen.
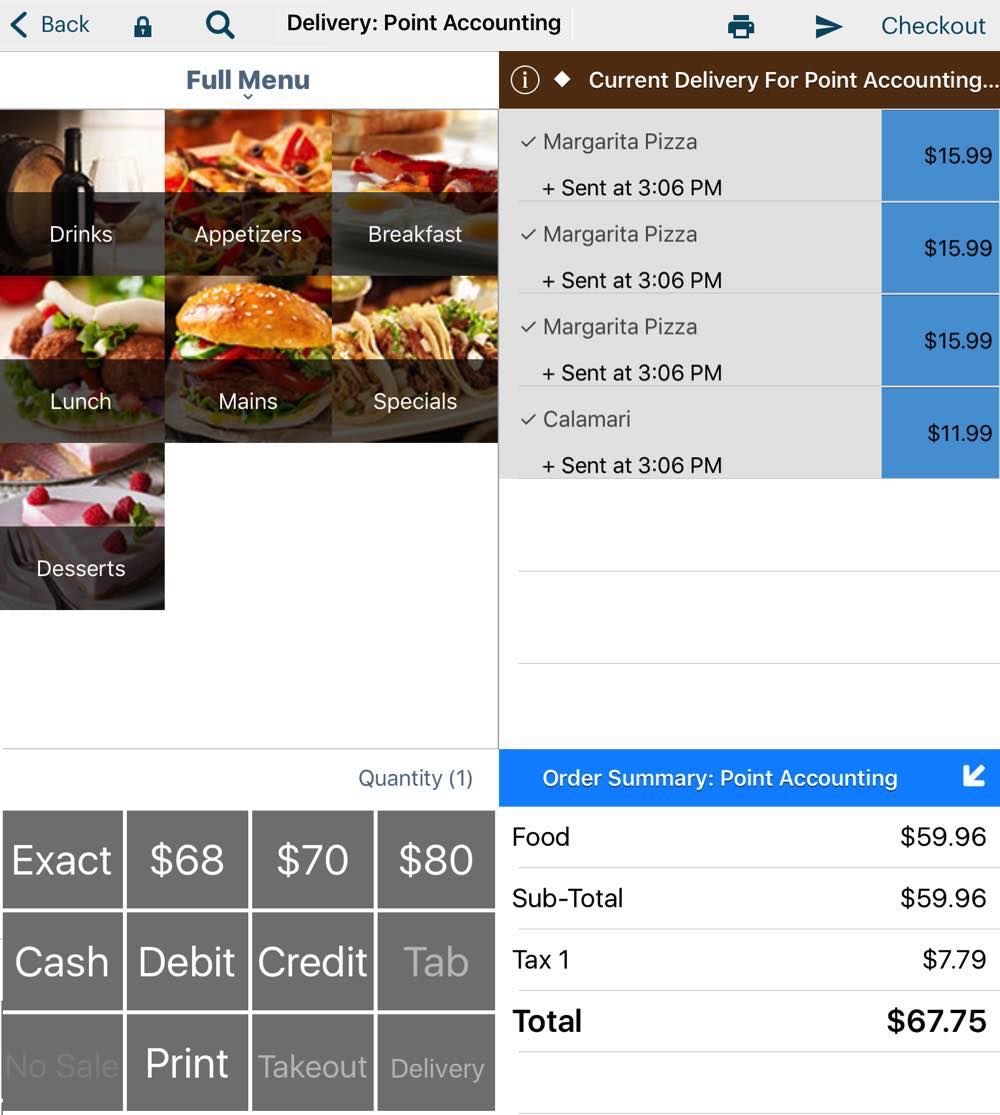
15. You’re taken to the Order screen, which is similar to the register screen. Enter the order. (Note, multi/pro server users are not taken automatically to the Order screen. You will first see your $0 order on the Orders screen. Open it to begin adding items.)
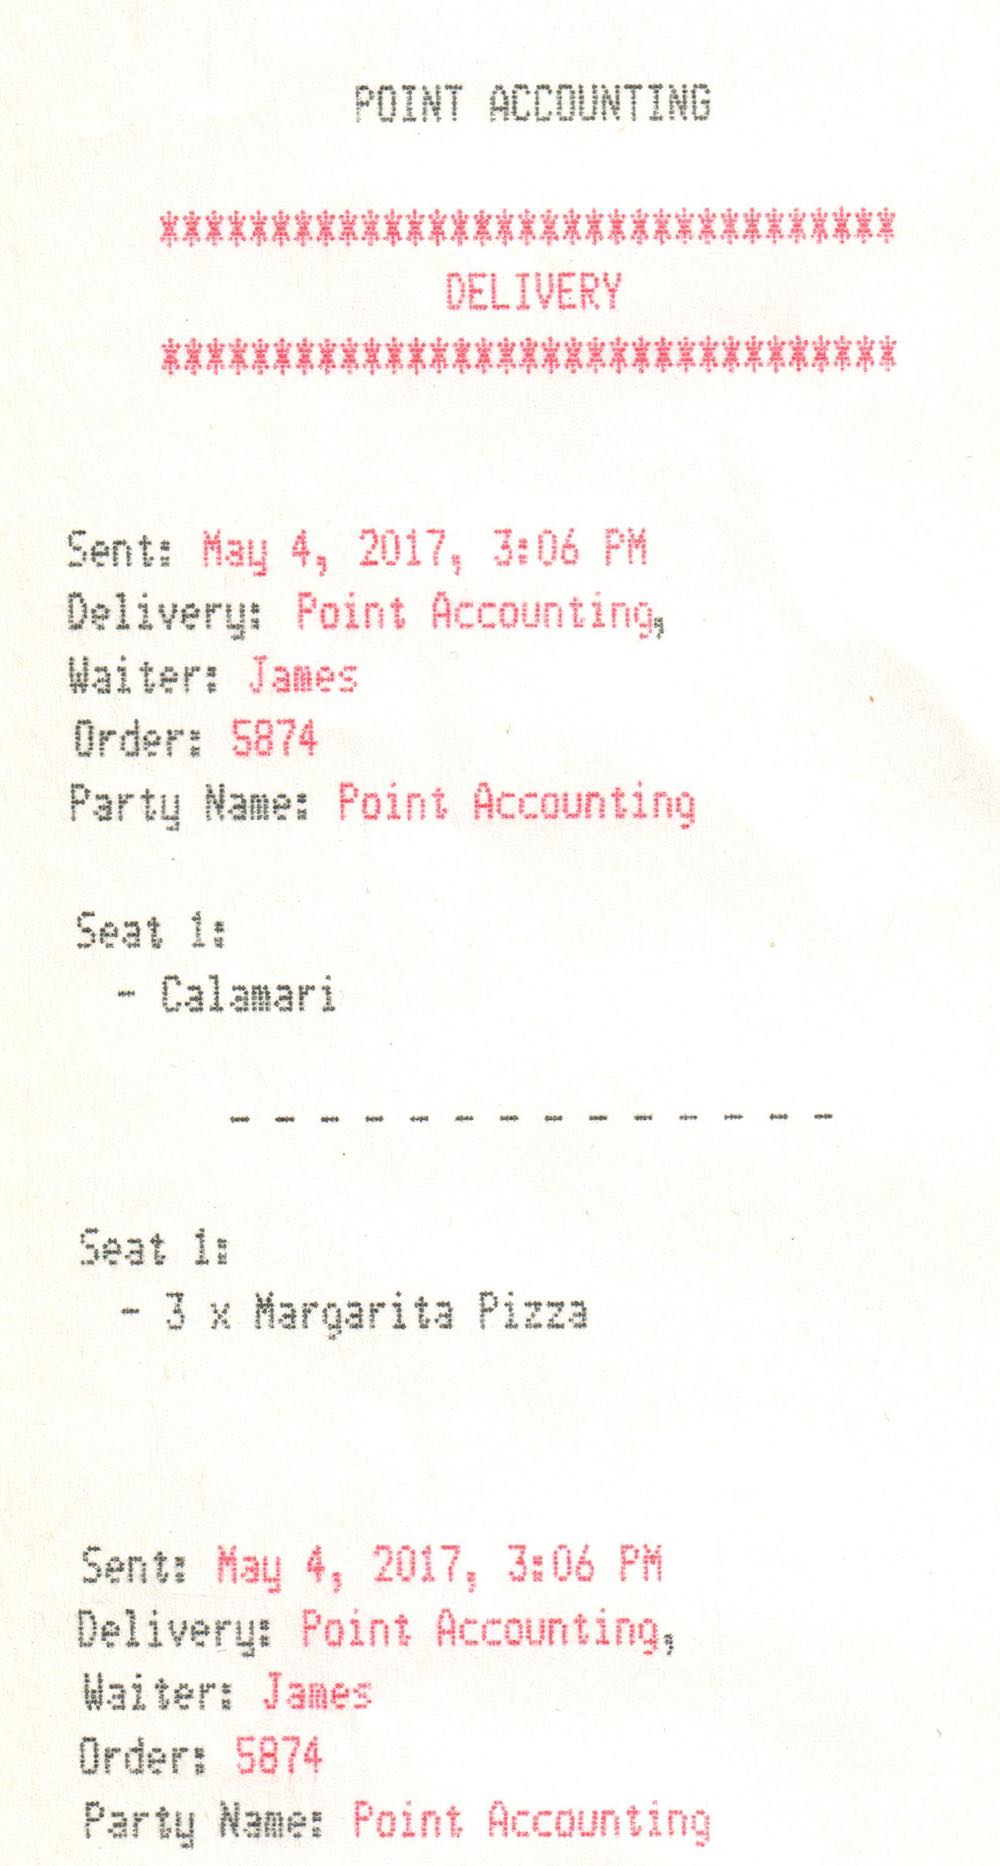
16. If sent to the kitchen, the kitchen ticket is pictured above.
17. Tap Back to return to the Orders screen.
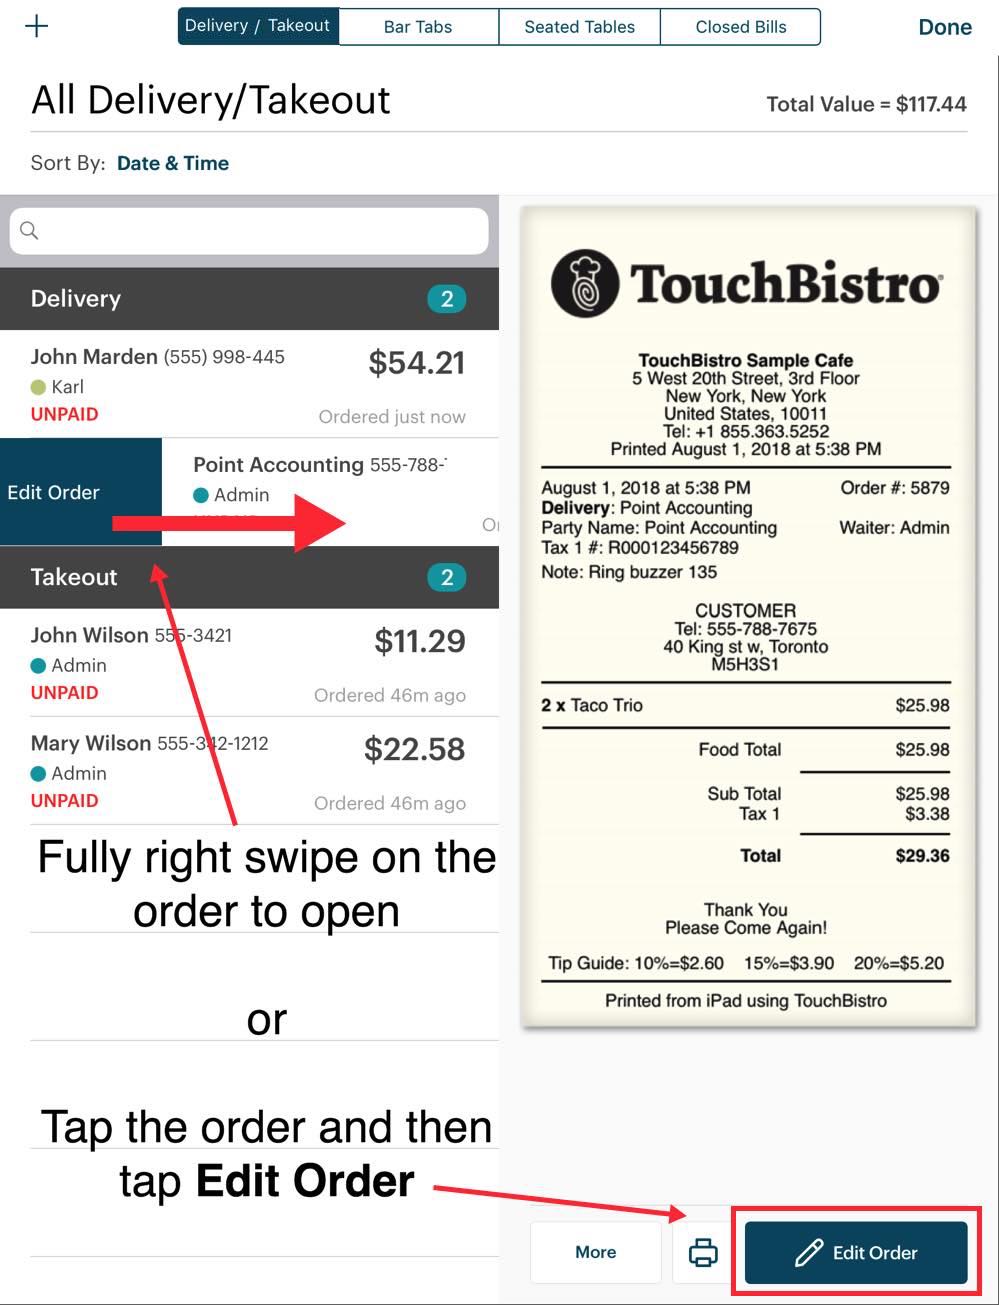
18. When the driver returns with payment, return to the Orders screen and tap the order. You can either full right swipe on the delivery order to open it or tap Edit Order to open it.
19. Process the payment similar to a cash register order.
See Also
Section 3. Editing a Delivery Order
1. If you need to edit or change a delivery order, open the Orders screen and tap All Take-Out/Delivery.
2. Tap the order you wish to edit.

3. If you need to add or remove items from the order, simply tap the order name. Either fully right swipe on the order or tap Edit Order.

4. If you tap the order and tap the More button will, you get other editing options::
|
Option
|
Description
|
|
Change Staff
|
If you need to assign this order to another server, tap Change Staff.
Tap the new server from the list of servers. Clocked in servers can be found at the top.
|
|
Transfer to Table
|
If the customer comes in for the order and then decides to dine in, tap Transfer to Table to move the order to a table. Select the target table from the floor plan screen.
|
|
Merge Delivery
|
If you need to merge this order into another existing delivery order, tap Merge Delivery. Tap the delivery order this order should be merged into.
|
|
Edit Info
|
To edit the details of this order (for example, name, address, or add additional notes), tap Edit Info.
|
|
Delete Order/ Void All Items & Delete Order
|
To quickly delete this order, tap Delete Order.
You will be prompted for a manager approval. If items have been sent to a kitchen printer, this option changes to Void All Items & Delete Order.
|
Section 4. Editing Individual Items on the Delivery Order
The options for menu items added the takeout’s Order screen are similar to the item Options for the cash register. However, you can tap an item and transfer it from the delivery order to a table.

1. Tap the menu item and tap Move Item to Another Table.

2. Tap Done to return to the floor plan.

3. From the floor plan tap the target table.

4. Open the table.
5. The item, by default, is a shared order.

6. Tap the item and tap Move to Seat to move it to a proper seat.
Chapter 4. Bar Tabs
A bar tab is typically one where the customer sits at a bar and requests an open tab, onto which all drink/food orders go and is eventually settled up when the patron is ready to leave (versus the patron pays for each drink/food item at order time).
Section 1. Video Tutorial
Section 2. Adding a Bar Tab
1. When bar tab is requested, tap All Bar Tabs.
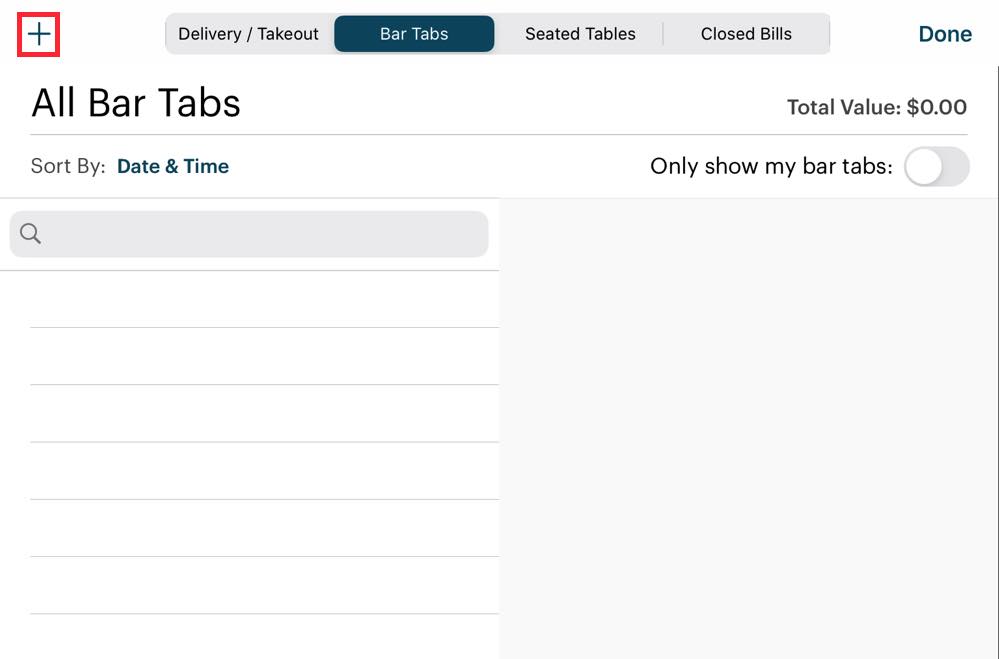
2. Tap the Add + button.
3. Complete the Bar Tab details screen.
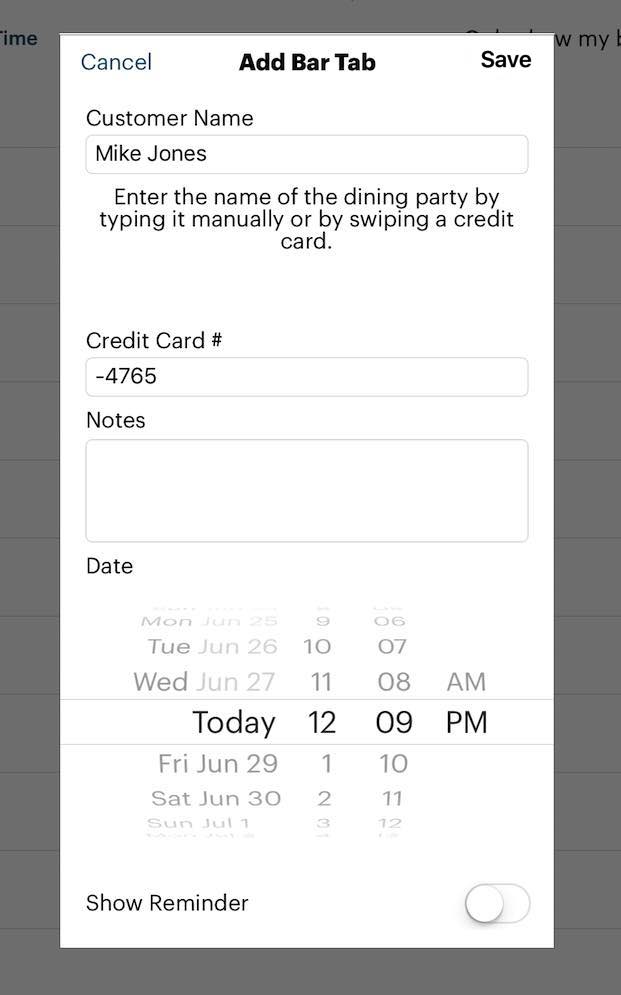
4. Many venues require the patron to leave a credit card to secure the bar tab. In this screen you can enter the customer name. In the Credit Card # field, we recommend entering the last four digits of the credit card, so you can match the tab’s name to the credit card held at the bar. We do not advise entering the full credit card #/expiry date, as TouchBistro is not PCI compliant for card storage.
5. Add any important notes to help the driver (e.g., “May move to a table”). Remember, notes will appear on the receipt. Make sure your notes are public facing.
6. The date defaults to the time of order creation.
7. If you would like to set up a reminder about this bar tab, slide Show Reminder to the green position.
8. Use the time/date wheels to set the time you want the reminder. For example, if the customer wants the order delivery by 7 pm, and you want a reminder to begin working on it an hour before the target delivery time, set the time wheel to 6:00 pm. If you are using the multi iPad version (with pro server), you will get a TouchBistro message as a reminder. If you’re using the single iPad (standard) version you will get a pop-up alert and an iPad notification.
9. Tap Save when you’ve completed the Bar Tab details screen.
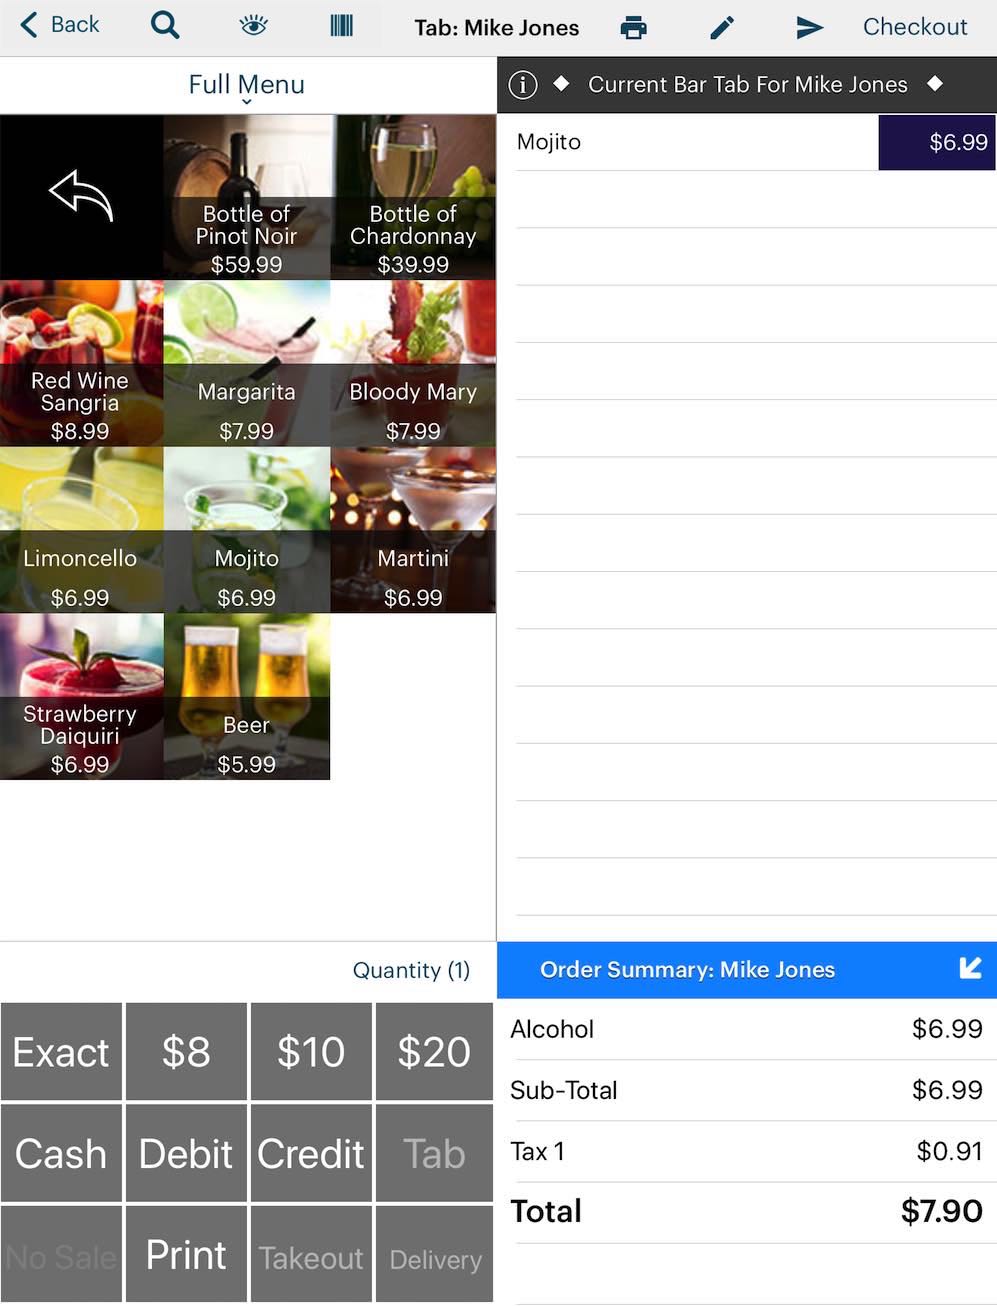
10. You’re taken to the Order screen, which is similar to the register screen. Enter the order. (Note, multi/pro server users are not taken automatically to the Order screen. You will first see your $0 order on the Orders screen. Open it to begin adding items.)
11. Tap Back to return to the Orders screen.
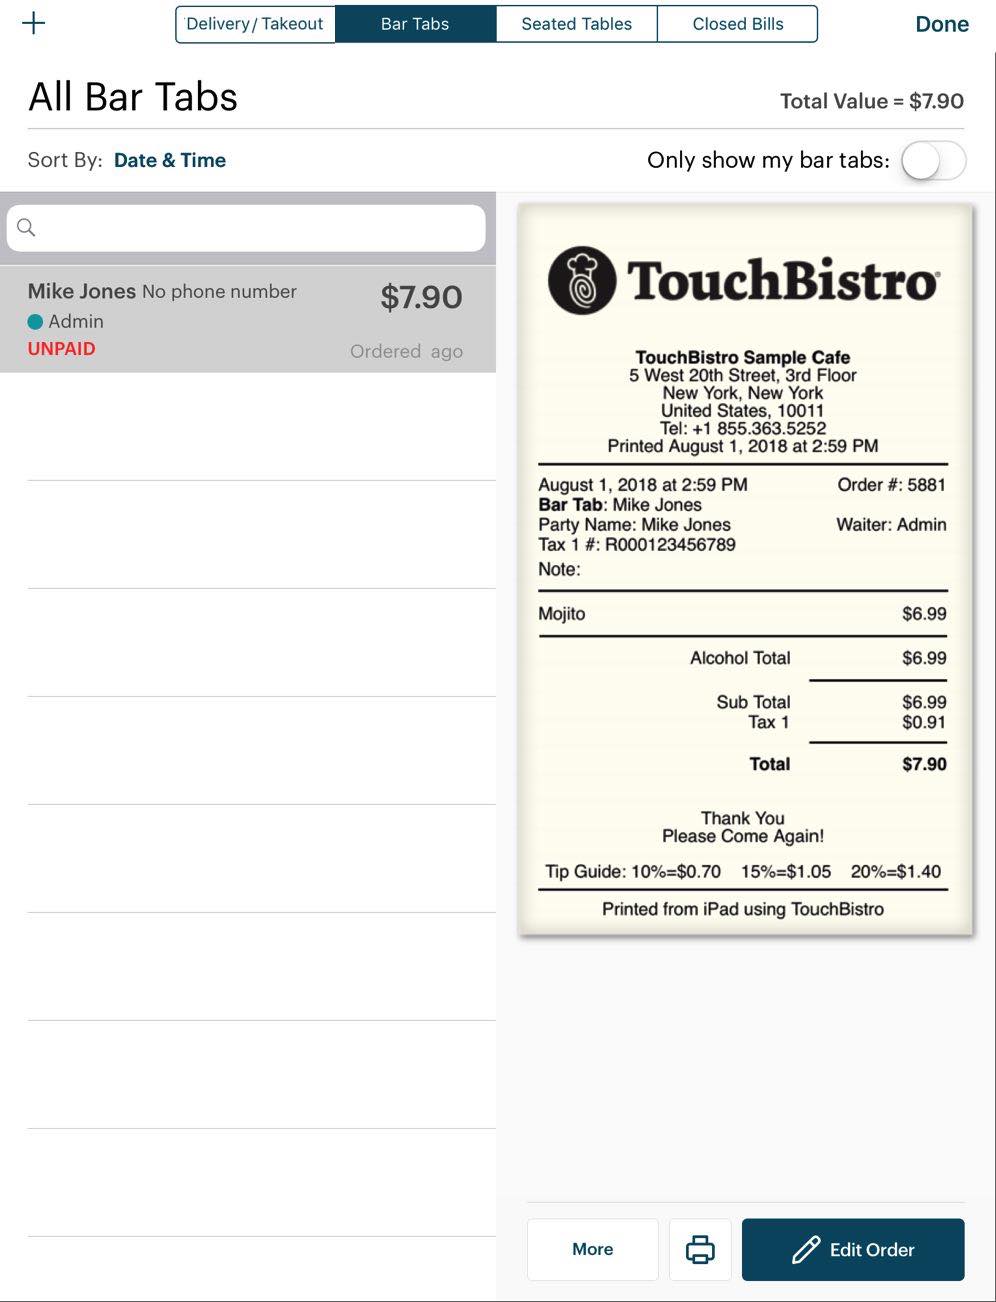
12. If the patron wishes to pay the tab or order additional items, return to the Orders screen.
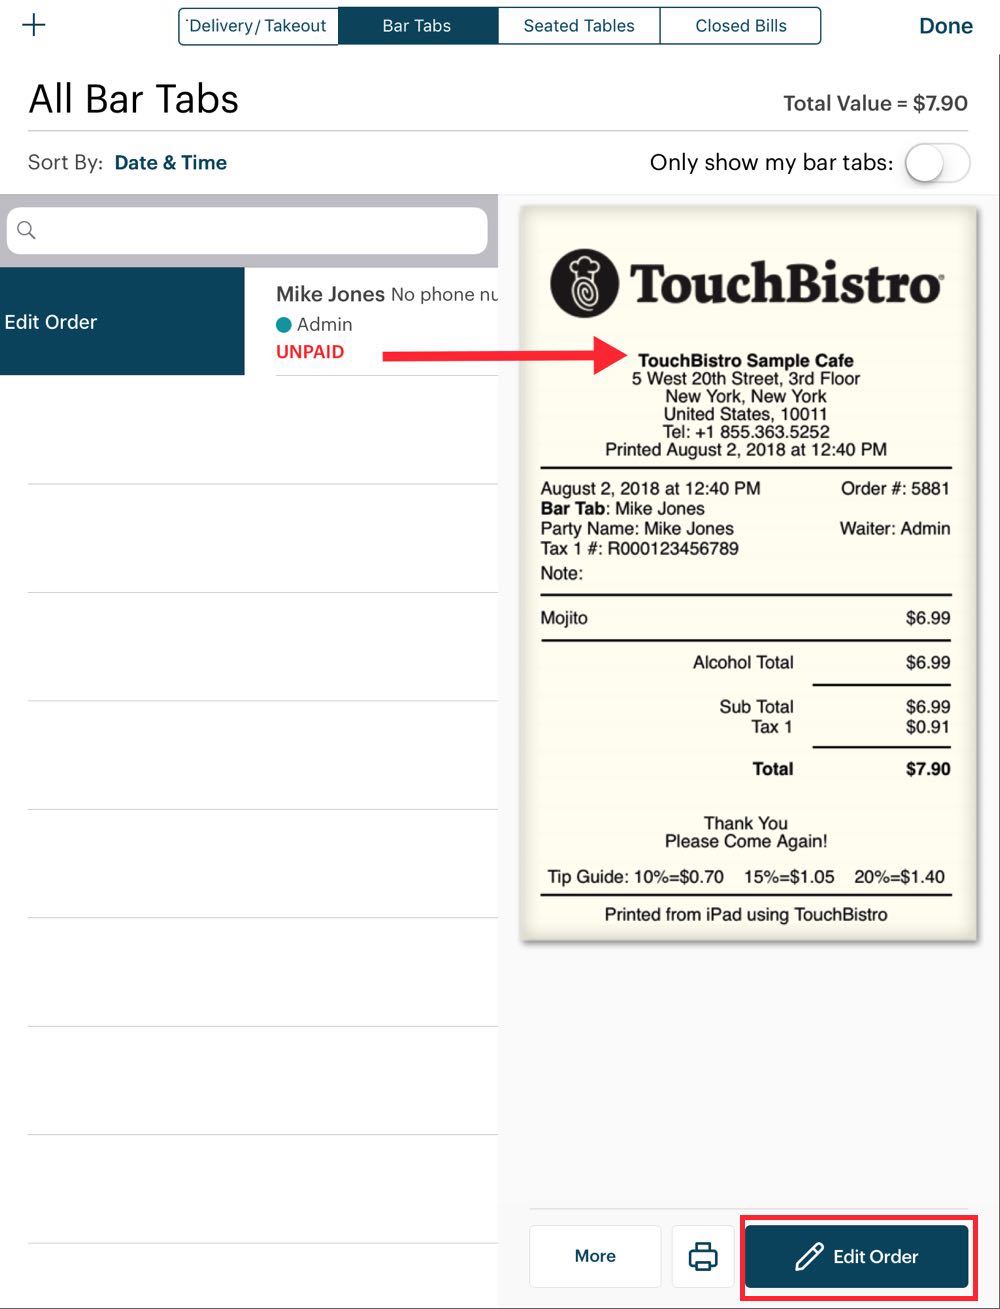
13. Tap the bar tab. Either fully right swipe on the order or tap Edit Order.
14. Add additional items or process the payment similar to a cash register order.
See Also
Section 3. Editing a Bar tab
1. If you need to edit or change a bar tab, open the Orders screen and tap All Bar Tabs.
2. Find the order you wish to edit.

3. If you need to add or remove items from the bar tab, simply tap the order name. Either fully right swipe on the order or tap Edit Order. You will be taken to the Order screen and you can add/remove items.

4. If you tap the order and tap the More button, you will get other editing options:
|
Option
|
Description
|
|
Change Staff
|
If you need to assign this order to another server, tap Change Staff.
Tap the new server from the list of servers. Clocked in servers can be found at the top.
|
|
Transfer to Table
|
If the customer comes in for the order and then decides to dine in, tap Transfer to Table to move the order to a table. Select the target table from the floor plan screen. If this tab was created with a card swipe, the captured name will transfer to the table.
|
|
Merge Bar Tab
|
If you need to merge this order into another existing Bar tab, tap Merge Bar Tab. Tap the bar tab order this order should be merged into.
|
|
Edit Info
|
To edit the details of this order (for example, name or credit card number), tap Edit Info.
|
|
Set Seat Count
|
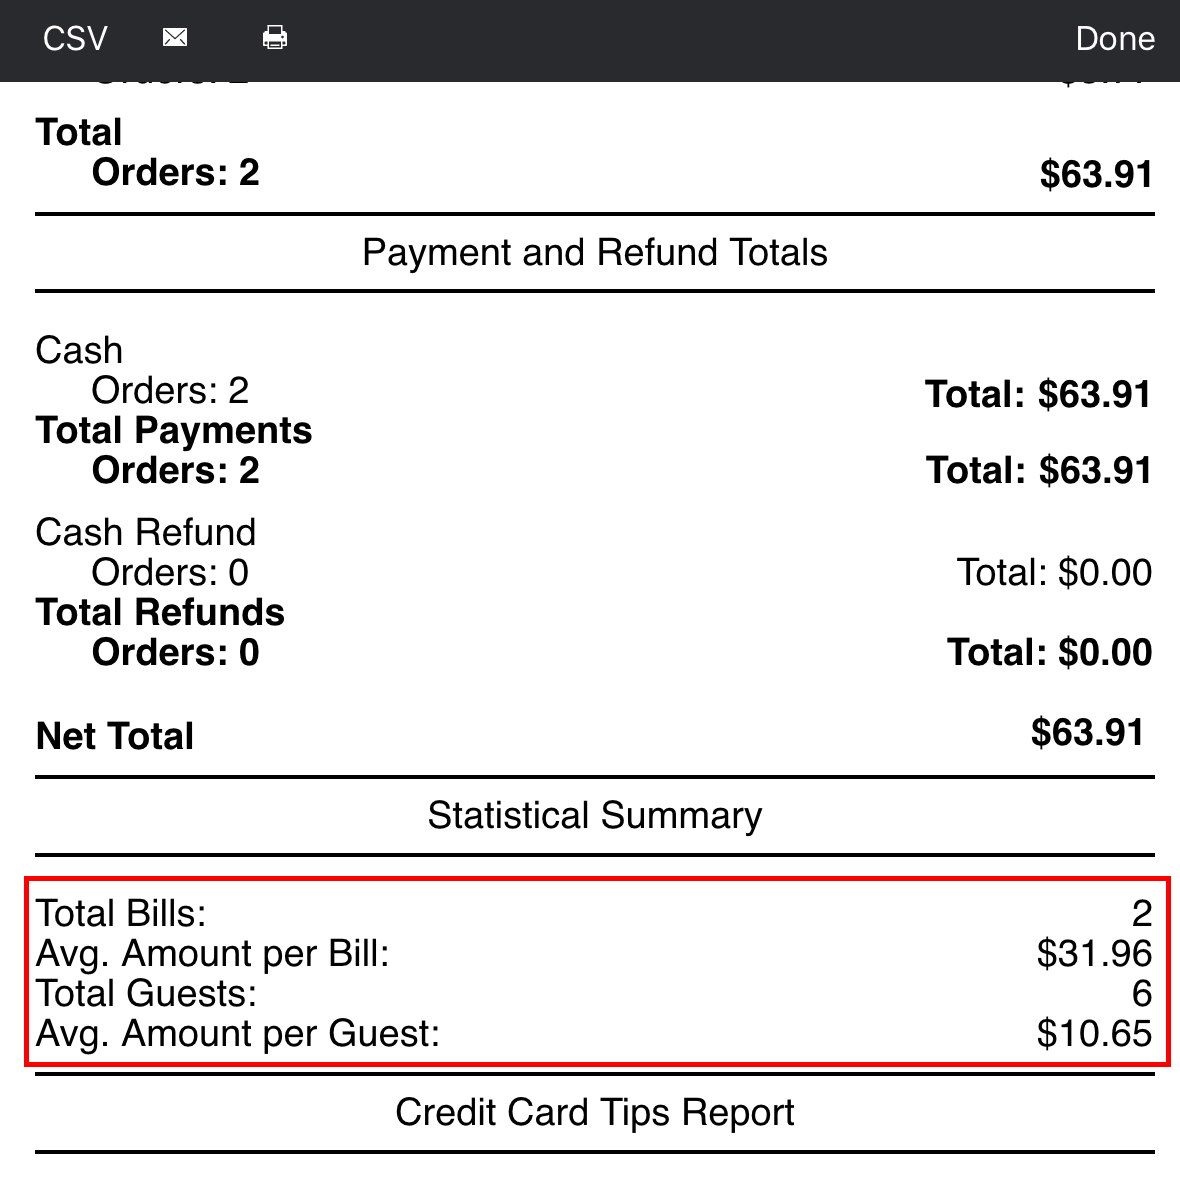
If you’re using this bar tab for more than one patron and you want to maintain per seat order averages in your reports, you can use this option to adjust the seat count to a number greater than one. For example, if you have a large number of bar tabs that represent multiple guests, your end of day report Average Amount Per Guest figure would be highly skewed.
In the pictured example above, our shift had only two bills that day. In reality, each bar tab represented 3 guests. Our venue had 6 guests for that shift. However, if seat count is left as 1, TouchBistro would assume each bar tab represented 2 guests. The Average Amount Per Guest figure would be $31.96 ($63.91 / 2). However, since Set Seat Count was set to account for each guest covered by the 2 bills, TouchBistro correctly calculates the average as $10.65 ($63.91 / 6).
|
|
Delete Order/ Void All Items & Delete Order
|
To quickly delete this order, tap Delete Order.
You will be prompted for a manager approval. If items have been sent to a kitchen printer, this option changes to Void All Items & Delete Order.
|
Section 4. Editing Individual Items on the Bar Tab Order
The options for menu items added the bar tab’s Order screen are similar to the item Options for the cash register. However, you can tap an item and transfer it to another bar tab.
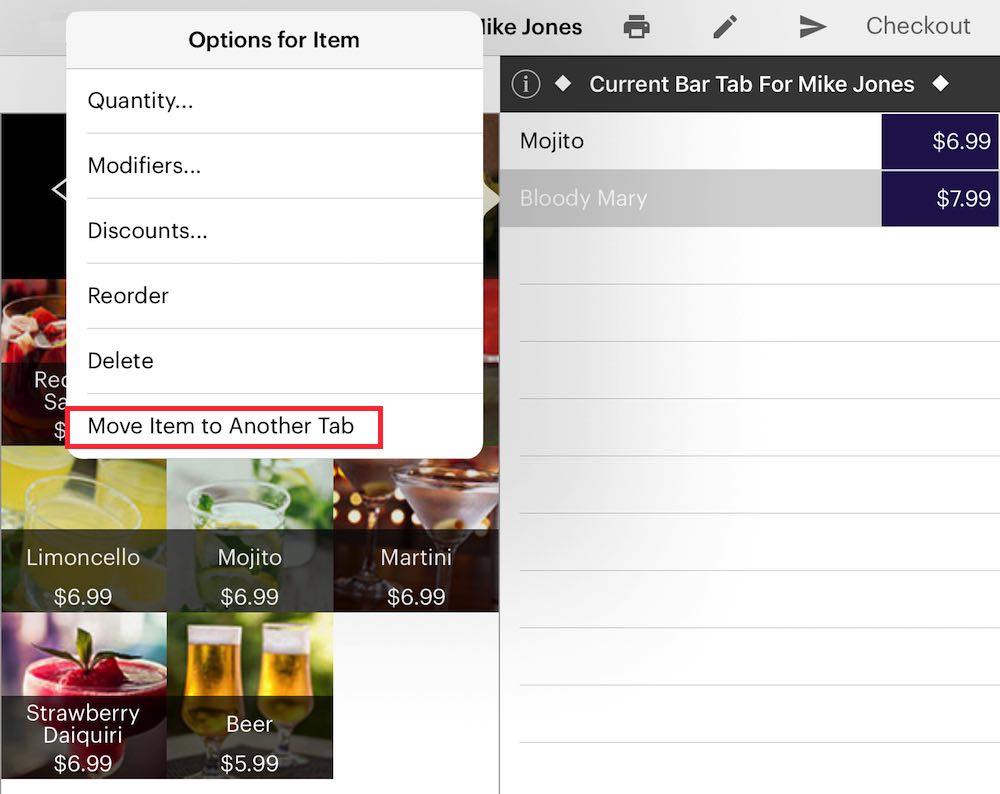
1. Tap the menu item and tap Move Item to Another Tab.
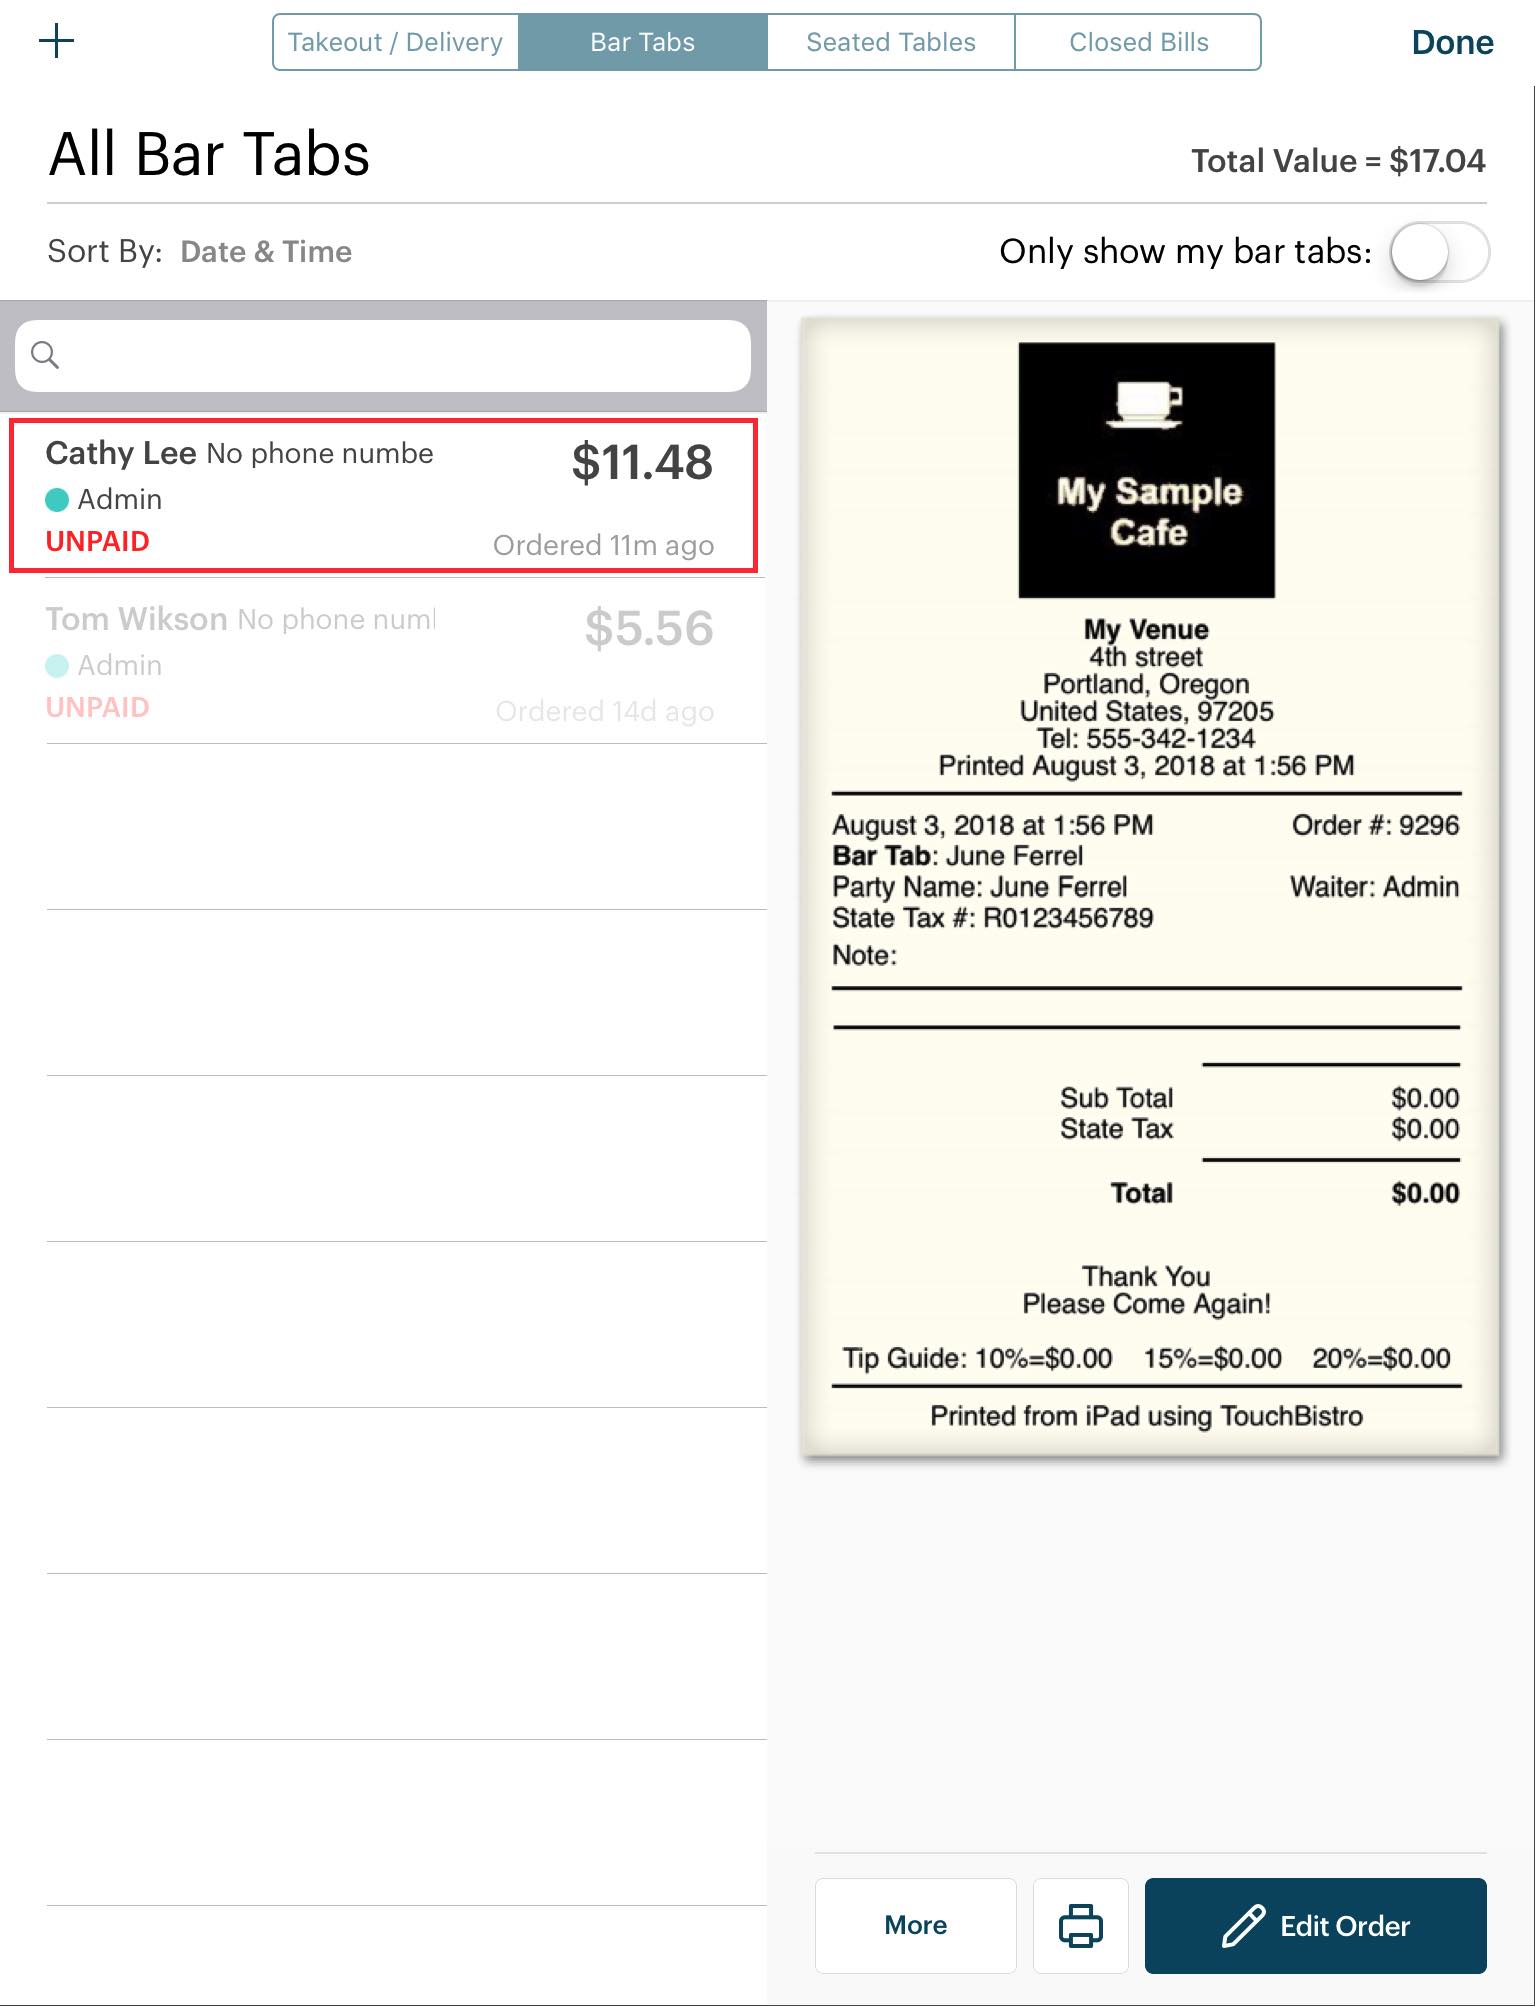
2. Select the target bar tab.


 Email
Support
 Frequently
Asked Questions
