Setting Up and Using Square with TouchBistro
Table Of Contents
Chapter 1. Regions and Devices
Section 2. Integrated Pro Server Limitation
Section 3. Setting Up the Square Contactless Reader
Chapter 3. Setting Up Square on TouchBistro
Chapter 4. Connecting Square with Your Receipt Printer
Section 1. Check Your Wi-Fi Network
Section 2. Note Your Printer Name and Type in TouchBistro
Chapter 5. Setting Up Square for Sign on Screen and Sign on Slip
Section 1. Setting the Square Point of Sale App for Sign on Screen
Section 2. Setting the Square Point of Sale App for Sign on Slip
Chapter 6. Using the Square Integration with a Sign on Screen Set Up
Chapter 7. Using the Square Integration with a Sign on Slip Set Up
Chapter 8. Reconciling Tips Written on Receipts in TouchBistro
Chapter 10. Manual Entry – No Pre Auth
Chapter 11. Manual Entry – With Pre Auth
Chapter 12. Offline Payments (USA/Canada Only)
Section 1. Set the Square Point of Sale App for Offline Mode
Section 2. Processing a Sign on Screen Offline Payment
Section 3. Refreshing Offline Payment Status
Section 4. Doing an Offline Transaction with Square Set for Sign on Slip
Chapter 13. Refreshing a Large Number of Offline Payments
Chapter 14. Performing a Refund
Section 1. Refund Process is Interrupted
Chapter 15. Switching Locations
Chapter 16. Managing Gift Cards in Square
Section 1. Enable Gift Card Sales on your Square Dashboard
Section 2. Selling a Gift Card or Reloading a Card
Section 3. Logging Gift Card Sales in TouchBistro
Section 4. Setting Up Your Menu
Section 5. Logging the Order with Your Gift Card Menu Item
1) Edit Your End of Day Template
Chapter 1. Regions and Devices
|
Country
|
Device Supported
|
|
USA1
|
Square Reader Square Stand Square Contactless Chip Reader
|
|
Canada
|
Square Reader Square Stand Square Contactless Chip Reader
|
|
UK
|
Square Reader Square Stand Square Contactless Chip Reader
|
|
Australia
|
Square Reader Square Stand Square Contactless Chip Reader
|
1Square is not available in U.S. territories such as Puerto Rico, Guam, the U.S. Virgin Islands, American Samoa, and Nothern Mariana Islands.
Section 1. Printers
If you intend to use a thermal (receipt) printer or impact (kitchen) printer with both TouchBistro and Square, you need the following printers supported by both TouchBistro and Square:
1. Star Micronics TSP143LAN or TSP143IIILAN (Thermal)
2. Star Micronics SP742ML/ME (Impact)
These are the LAN/Ethernet models. You can use a USB printer with your Square Stand. However, you cannot print from TouchBistro to your USB printer.
Note: Square does not support Epson printers. TouchBistro does not support the Star SM-T300 mobile (Bluetooth or Wi-Fi) printer.
Chapter 2. Before You Begin
Section 1. Checklist
Ensure:
1. You have downloaded the Square Point of Sale app.
2. You have an account with Square.
3. You are logged into your Square Point of Sale app.
Section 2. Integrated Pro Server Limitation
If you are set up for Integrated Pro Server (one of your iPads acts as the Main Device), you should not use this device with the iPad designated as the Main Device. The payment devices invoke the Square payment app and if invoked on the iPad designated as the Main Device, all other iPads connected to the Main Device iPad will be disconnected.
Section 3. Setting Up the Square Contactless Reader
If you are going to use the Square EMV-read Contactless Reader, you should enable it in your Square app.
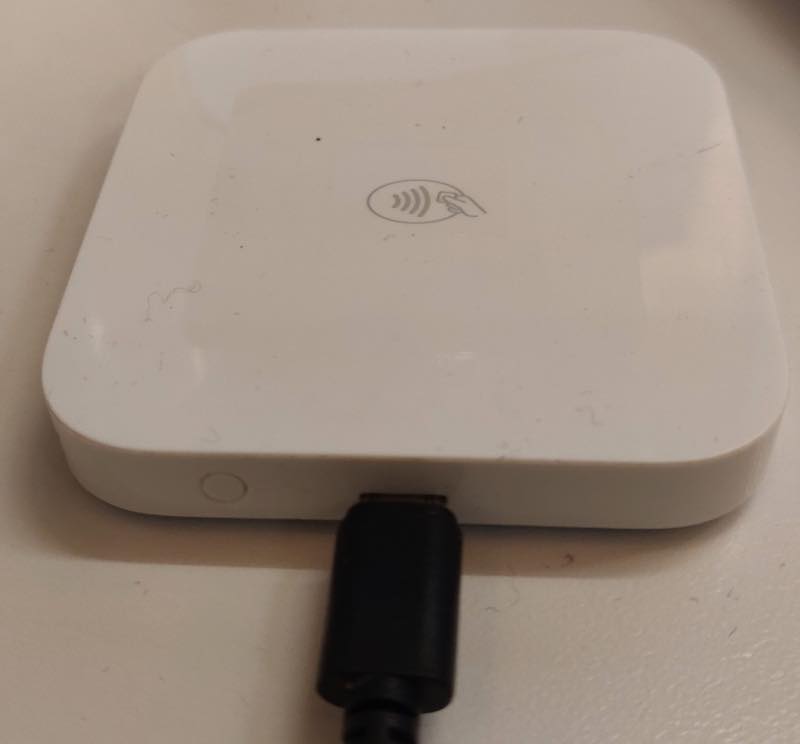
1. Plug a standard Android USB charging cable into your Square reader. Plug the USB cable into a power source and charge your reader for several hours.
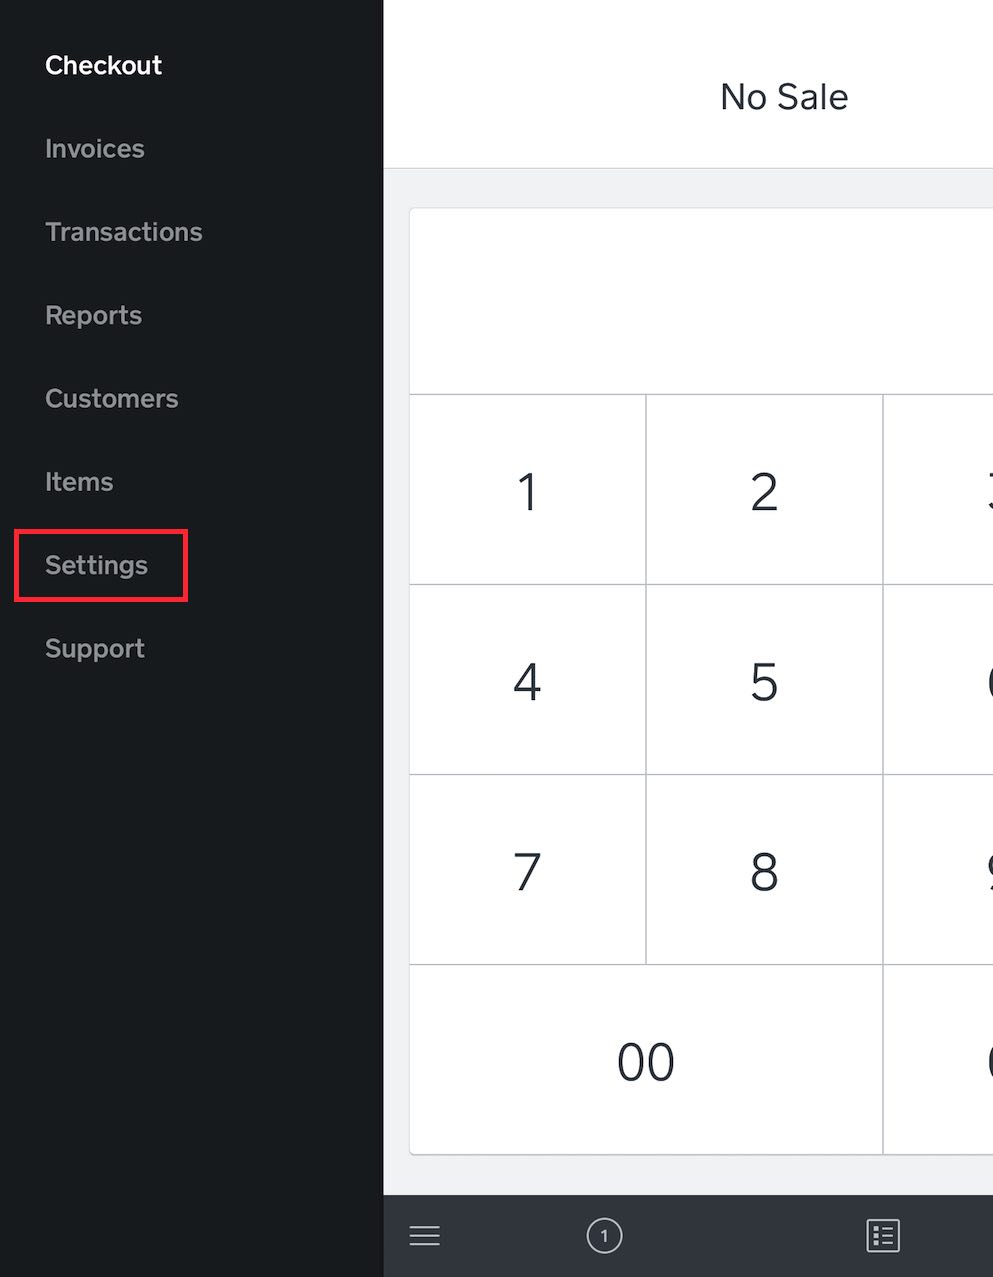
2. Launch your Square app and tap Settings.
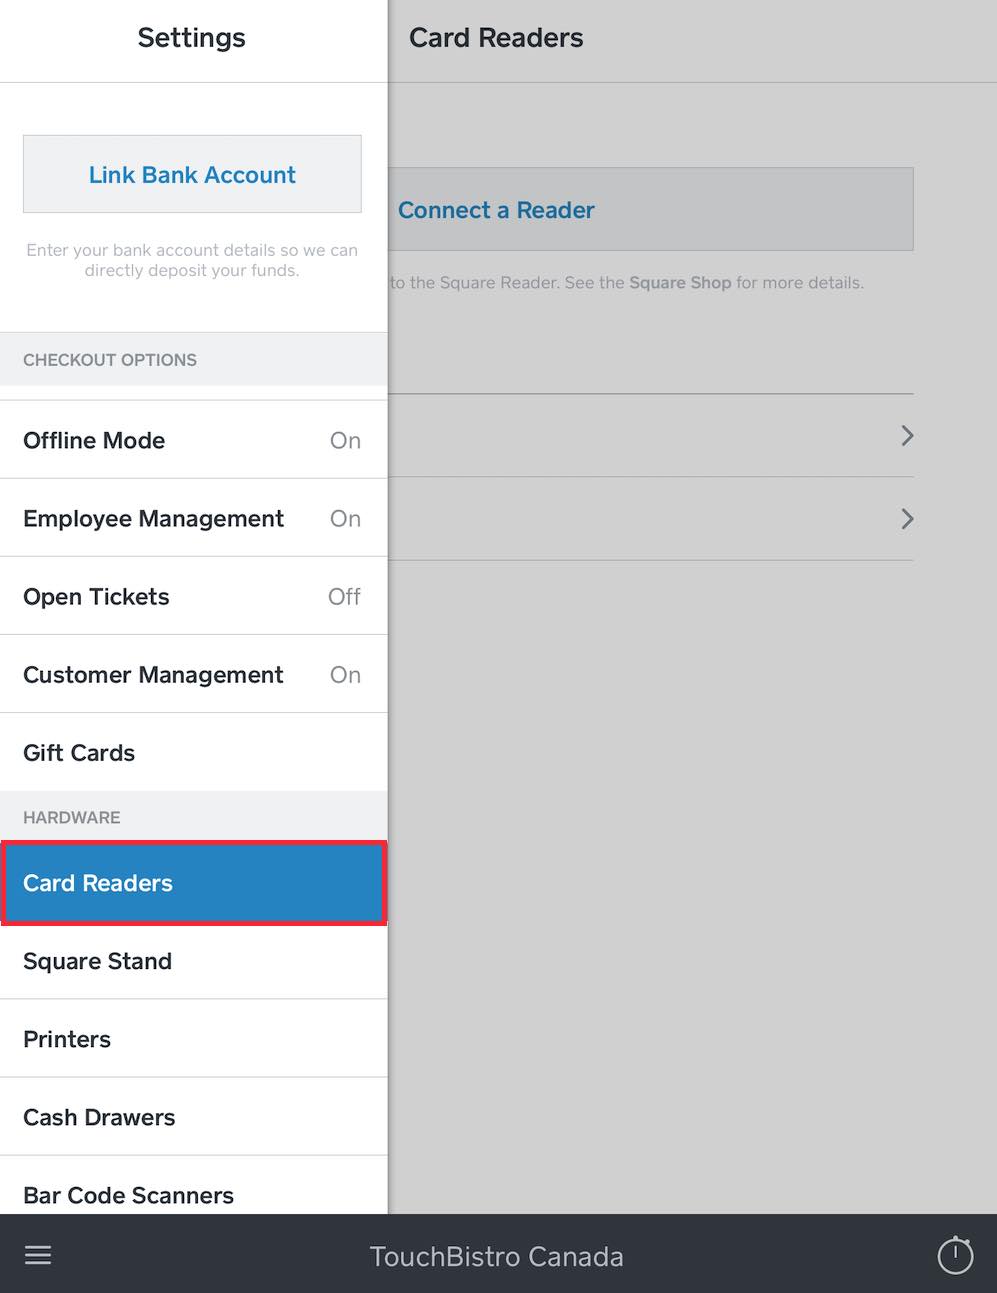
3. Under Hardware tap Card Readers.
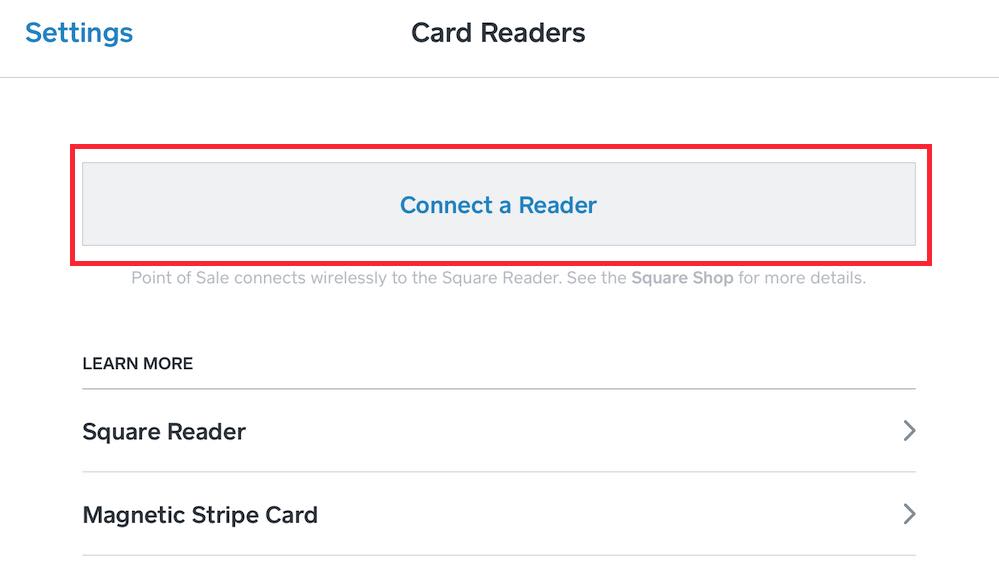
4. Tap Connect a Reader.
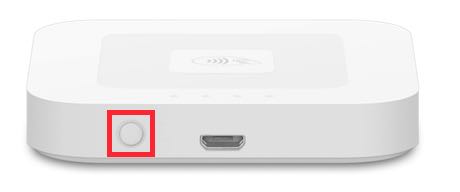
5. Press and hold the power button until you see your reader’s four LED lights blink orange.

6. Tap Pair.
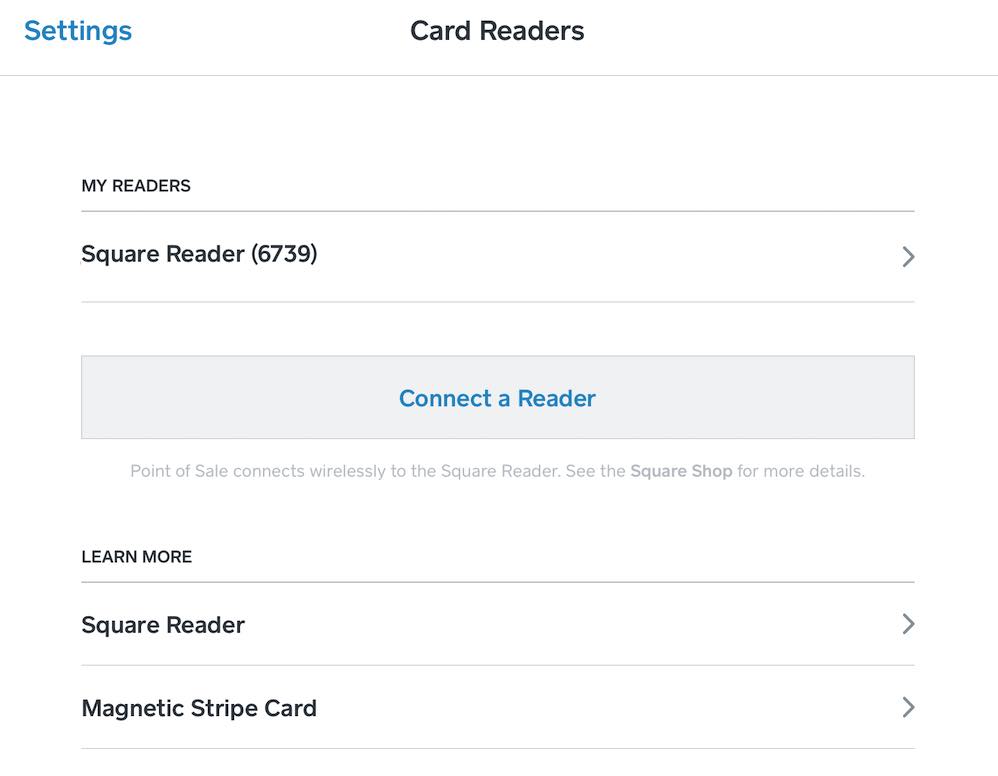
7. Your card reader is now available for use.
Chapter 3. Setting Up Square on TouchBistro
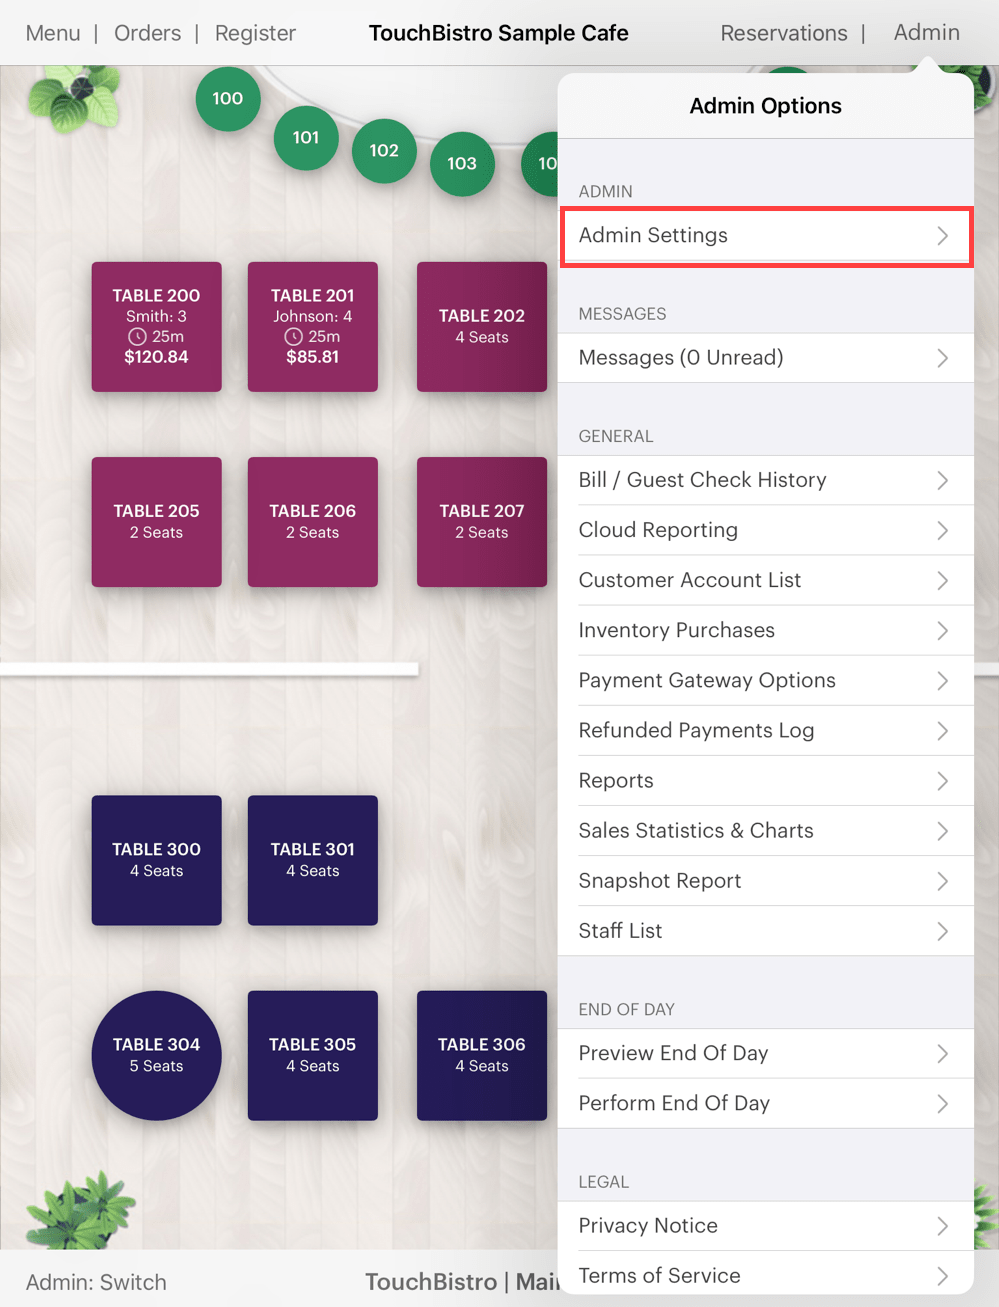
1. Login as Admin and tap Admin | Admin Settings.

2. Tap Payment Gateways and tap Square Payments.
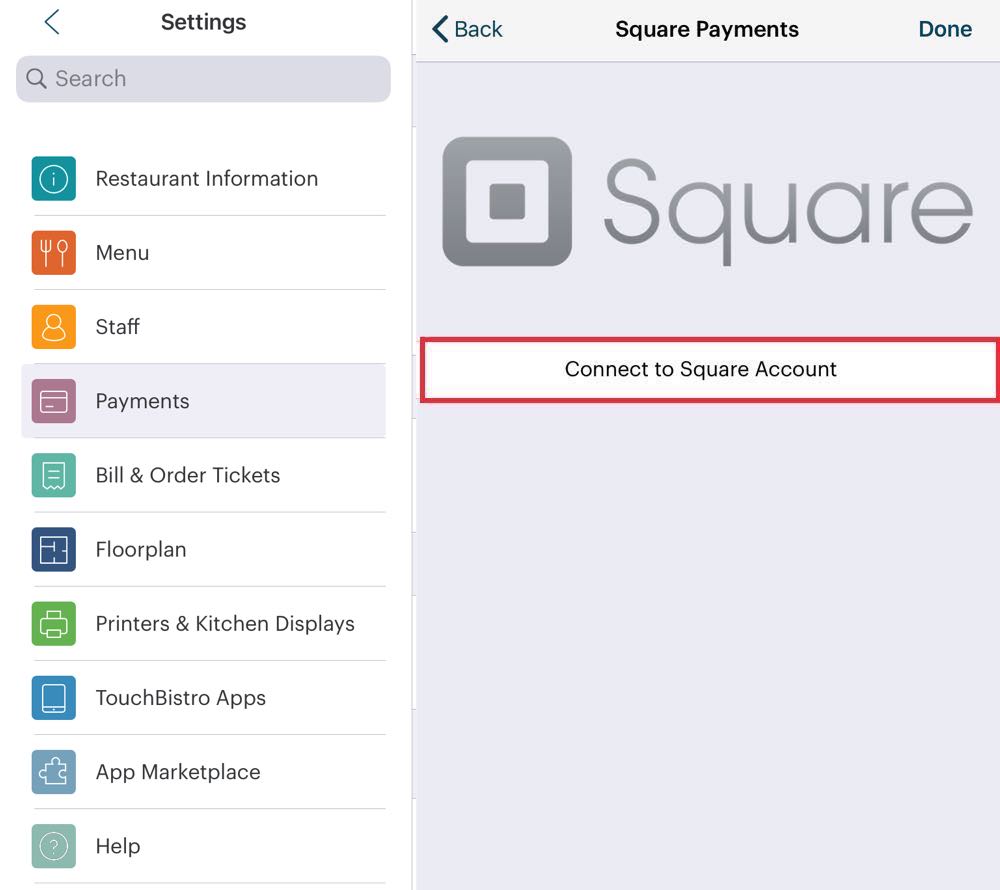
3. Tap Connect to Square Account.
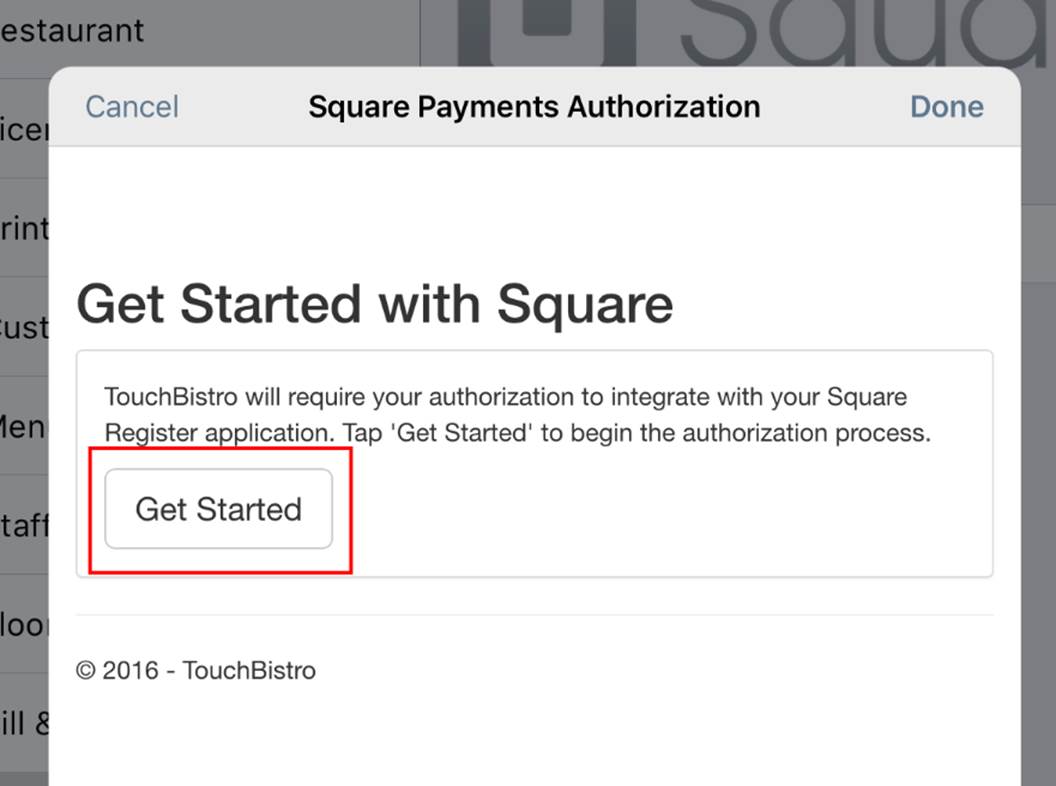
4. Tap Get Started.
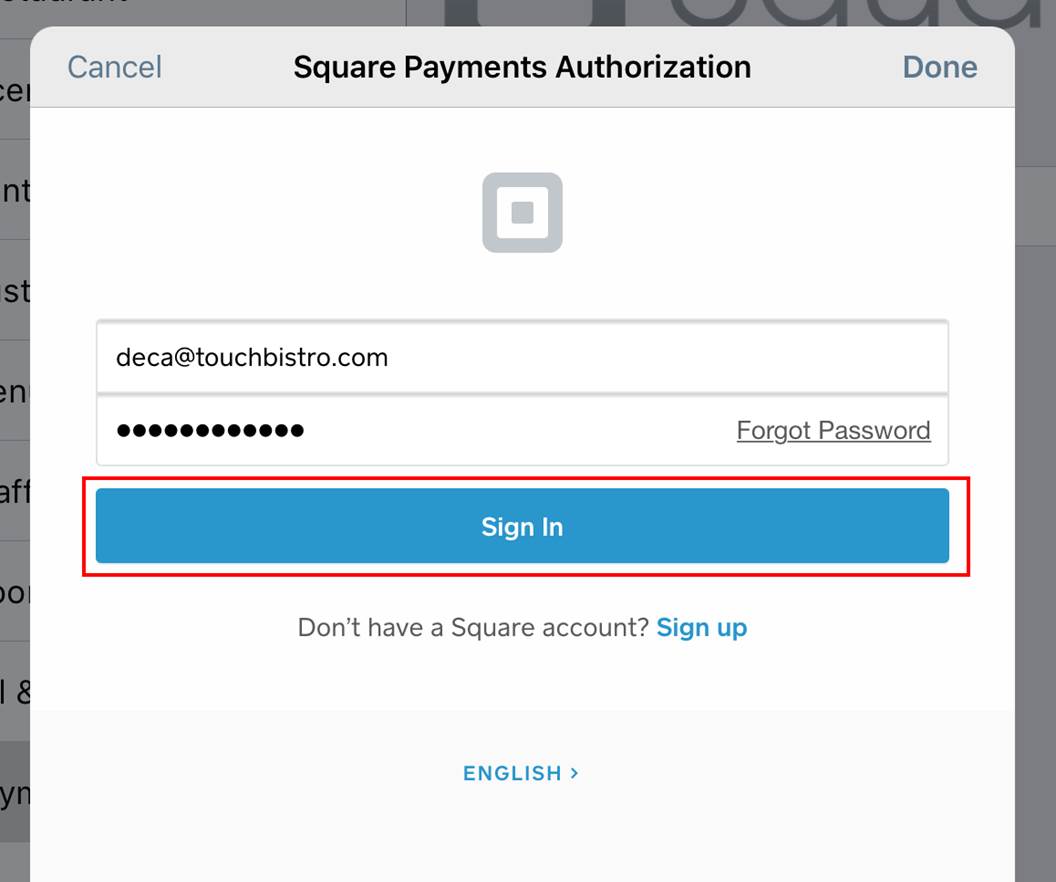
5. Enter your email and password you used to login to your Square Point of Sale app and then tap Sign In.
Note: It’s very important not to share your Square login and password with employees.
6. Follow the on-screen prompts. If you’re prompted to allow TouchBistro to access to Square details, tap Allow.
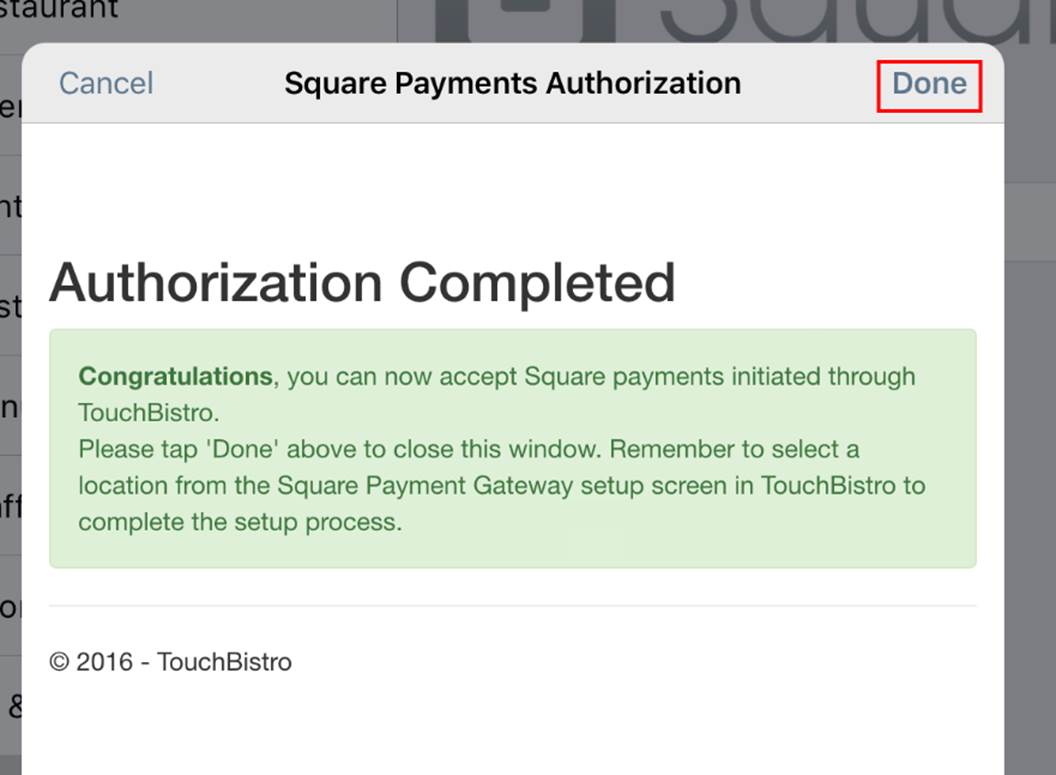
7. Tap Done when you see the Authorization Complete screen.
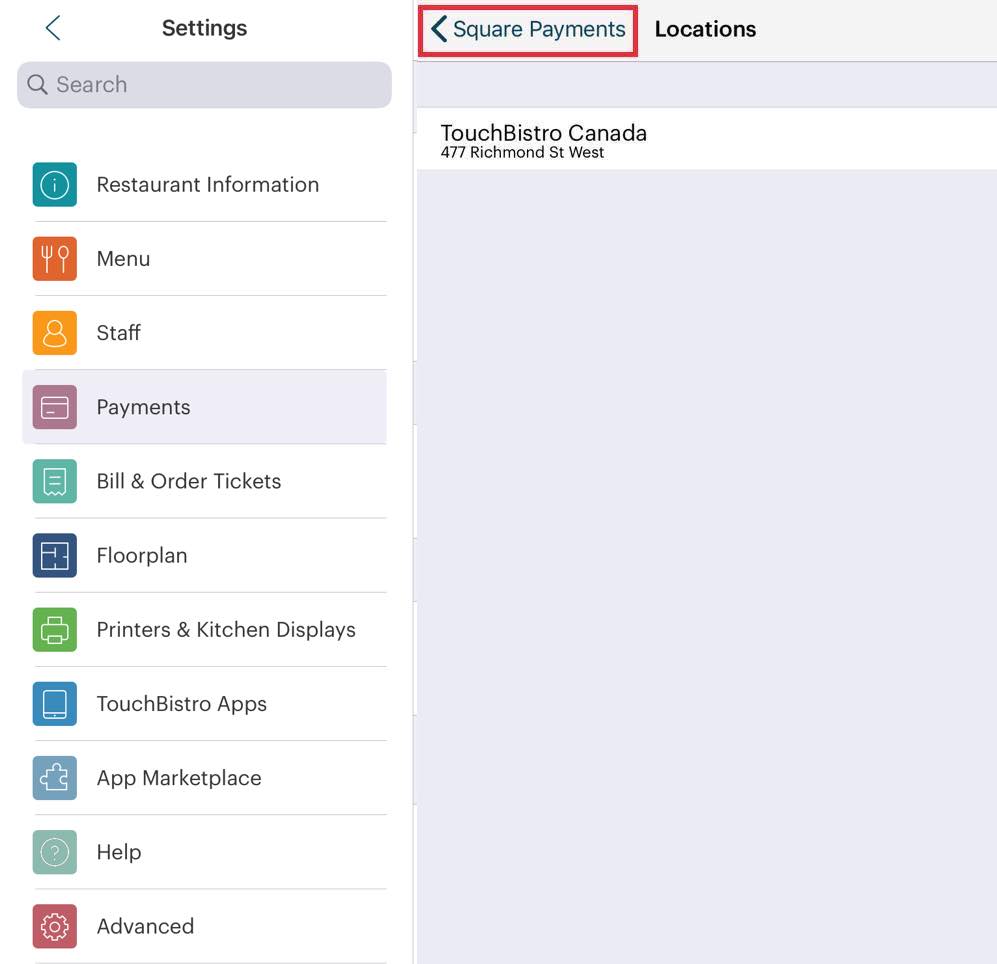
8. TouchBistro will show the location. Double check and then tap < Square Payments to return to the setup screen. If you have multiple locations set up in the Square Point of Sale app, tap the location appropriate for this iPad.
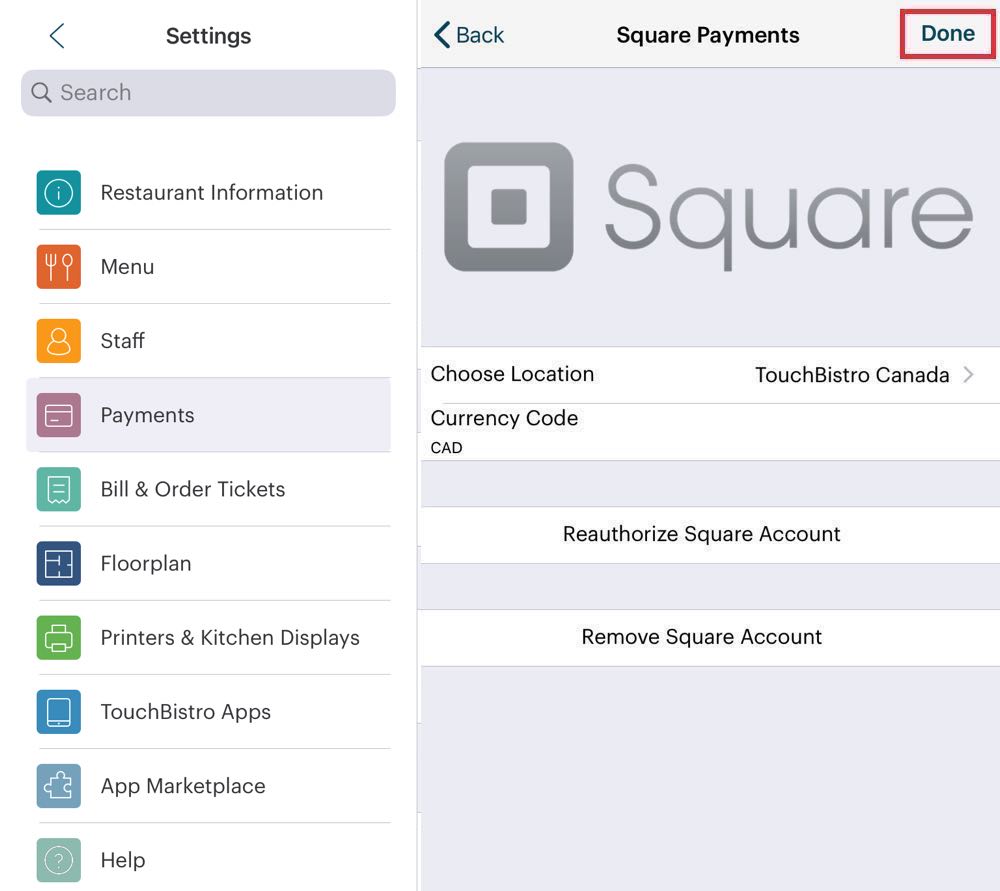
9. Ensure your Currency Code is correct. If not, set your iPad’s location settings to your correct nation. Tap Done if location and currency code are correct.
Chapter 4. Connecting Square with Your Receipt Printer
You will probably want TouchBistro and Square to output to the same receipt printer. Follow these steps.
Section 1. Check Your Wi-Fi Network
Before you start, ensure the iPad running the Square Point of Sale app is connected to the same Wi-Fi network as your TouchBistro app.
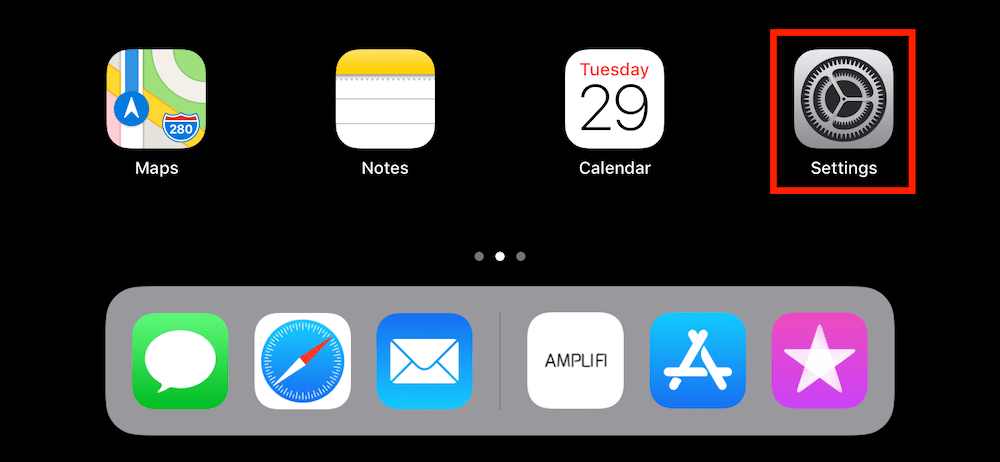
1. Tap Settings.
2. Double check the iPad is connected to your TouchBistro network. If not tap, Wi-Fi and select your TouchBistro network from the list.
Section 2. Note Your Printer Name and Type in TouchBistro

1. Login as Admin and tap Admin | Admin Settings.
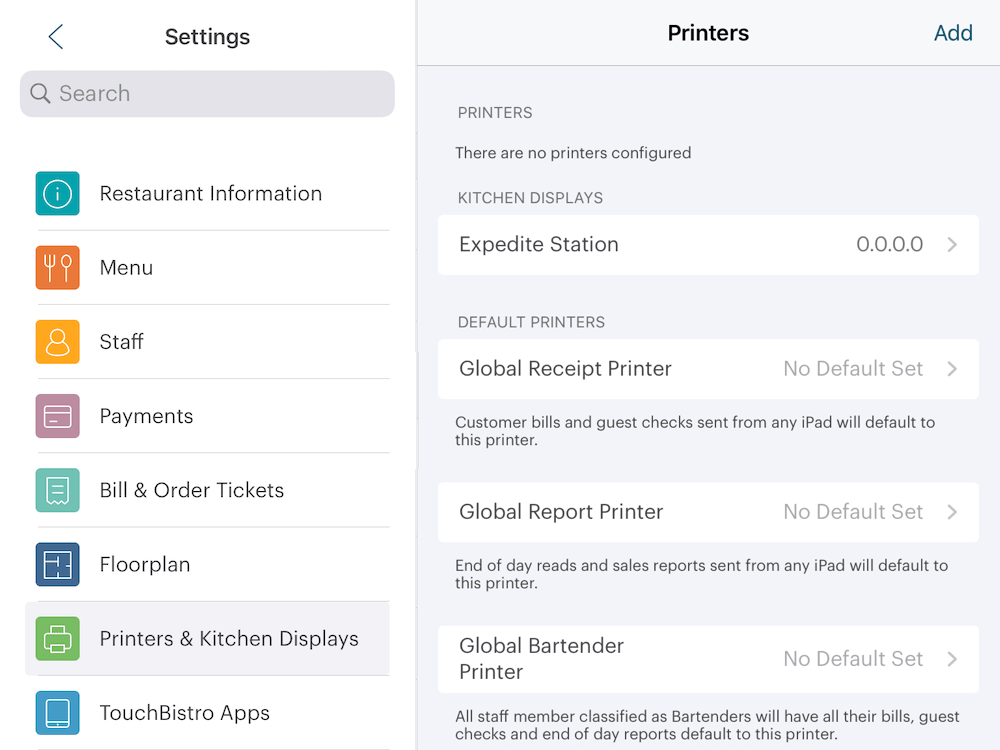
2. In TouchBistro tap Printers & KDS.
3. Tap the printer you want the Square Point of Sale app to print to. For example tap Receipt.
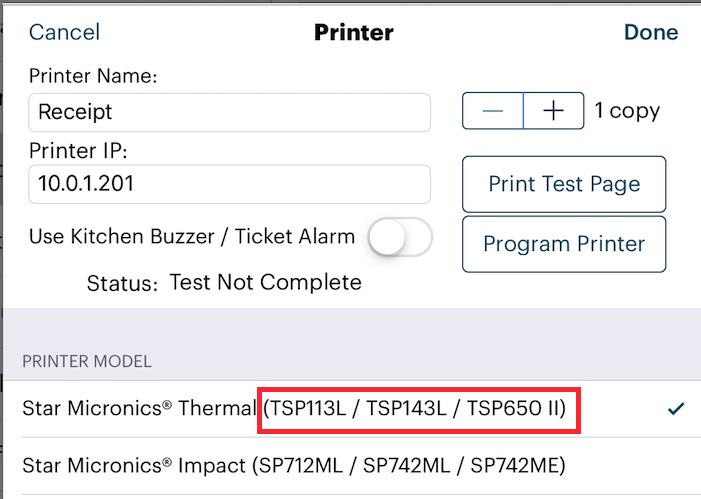
4. Note the name you gave this printer (for example, Receipt). Also note the printer models.
5. After noting both name and model numbers, open the Square Point of Sale app.
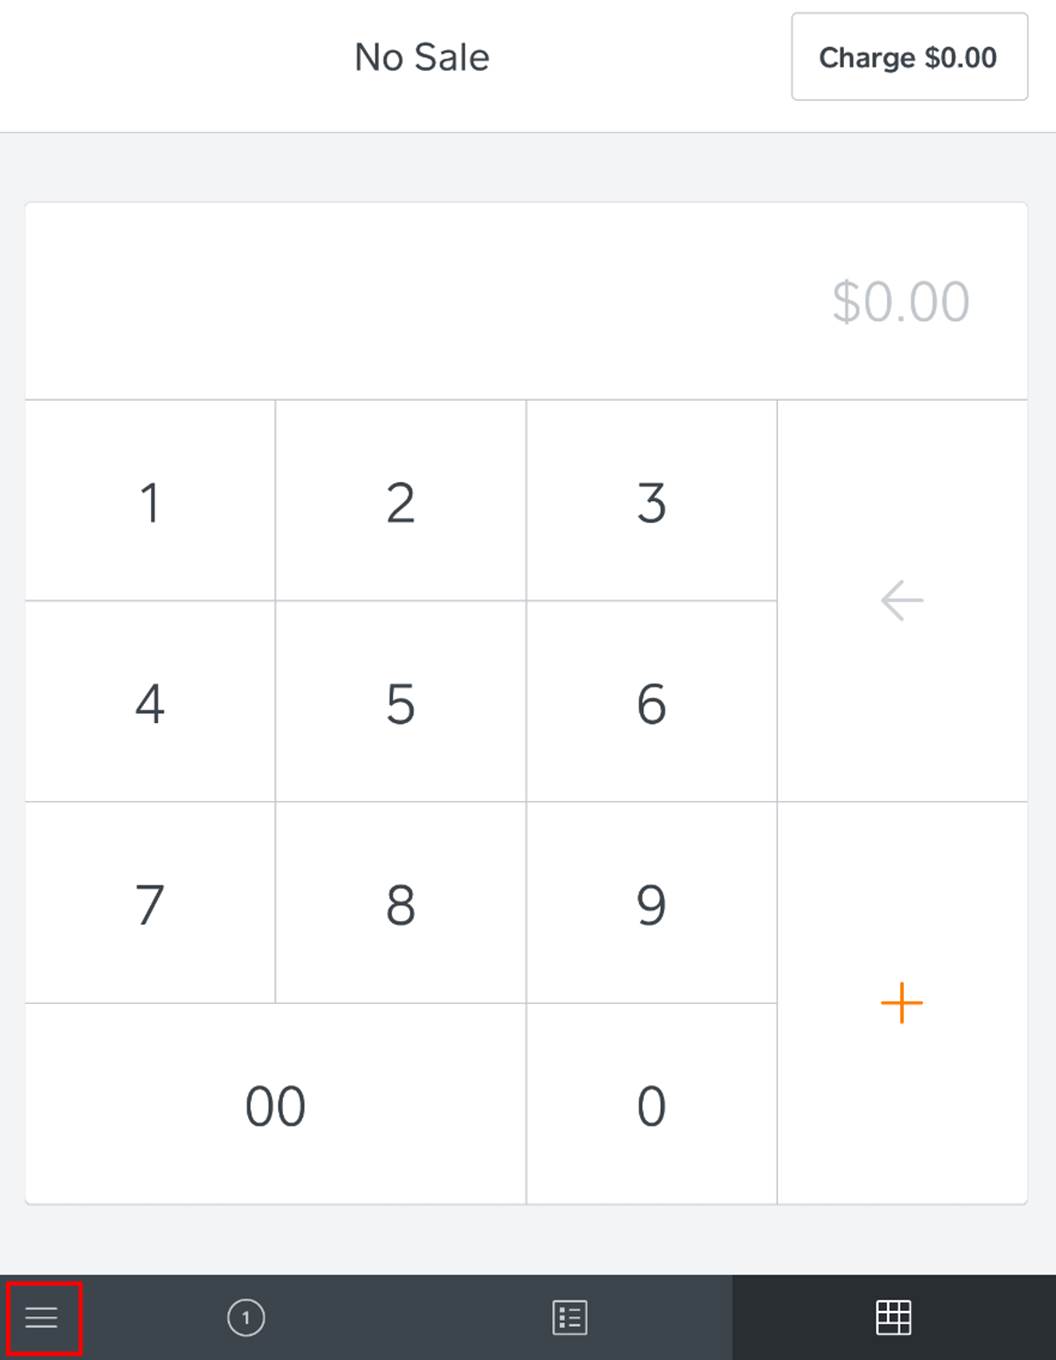
6. Tap the Options ![]() icon at the bottom of the screen.
icon at the bottom of the screen.
 x
x
7. Tap Settings.
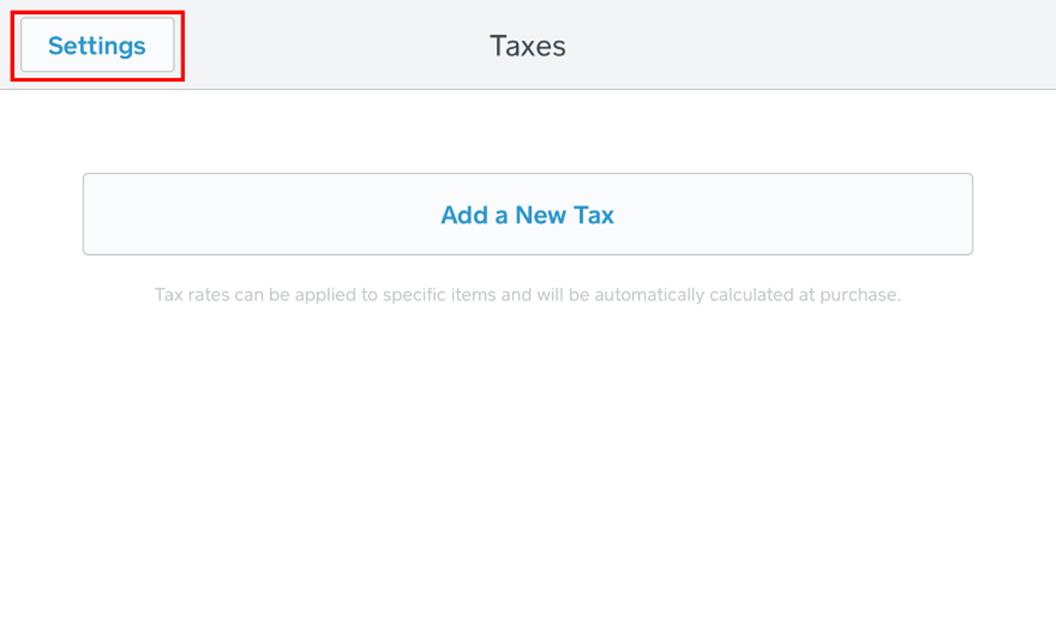
8. Tap Settings if you’re not on the Printers screen or do not see the Settings menu.

9. Tap Printers.
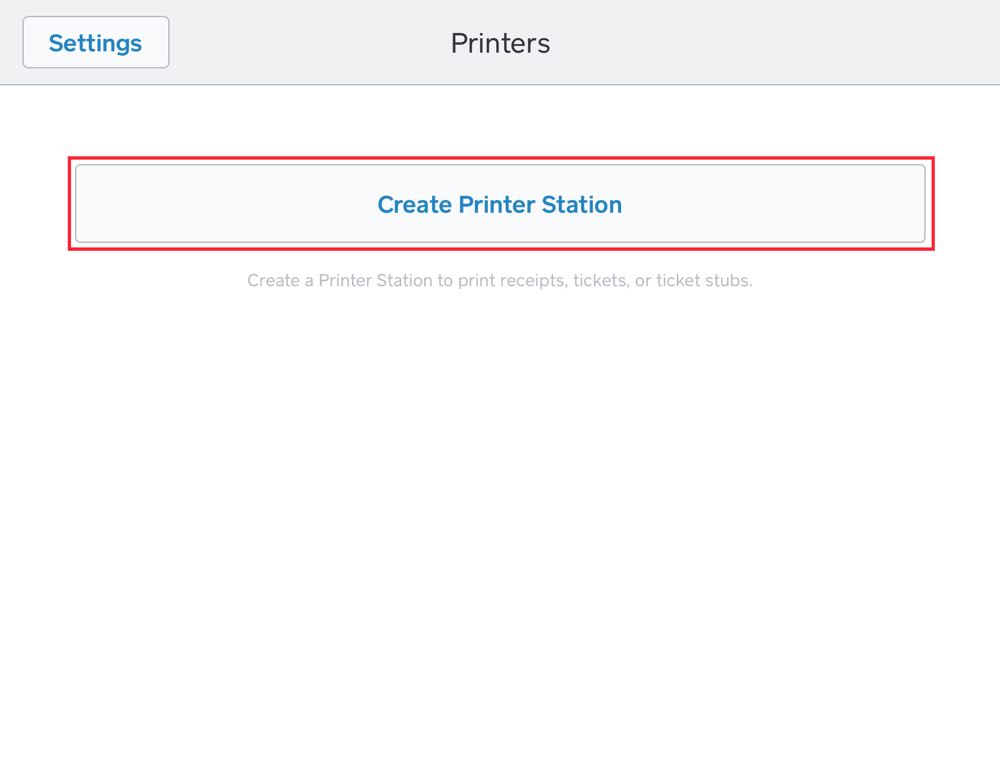
10. Tap Create Printer Station.
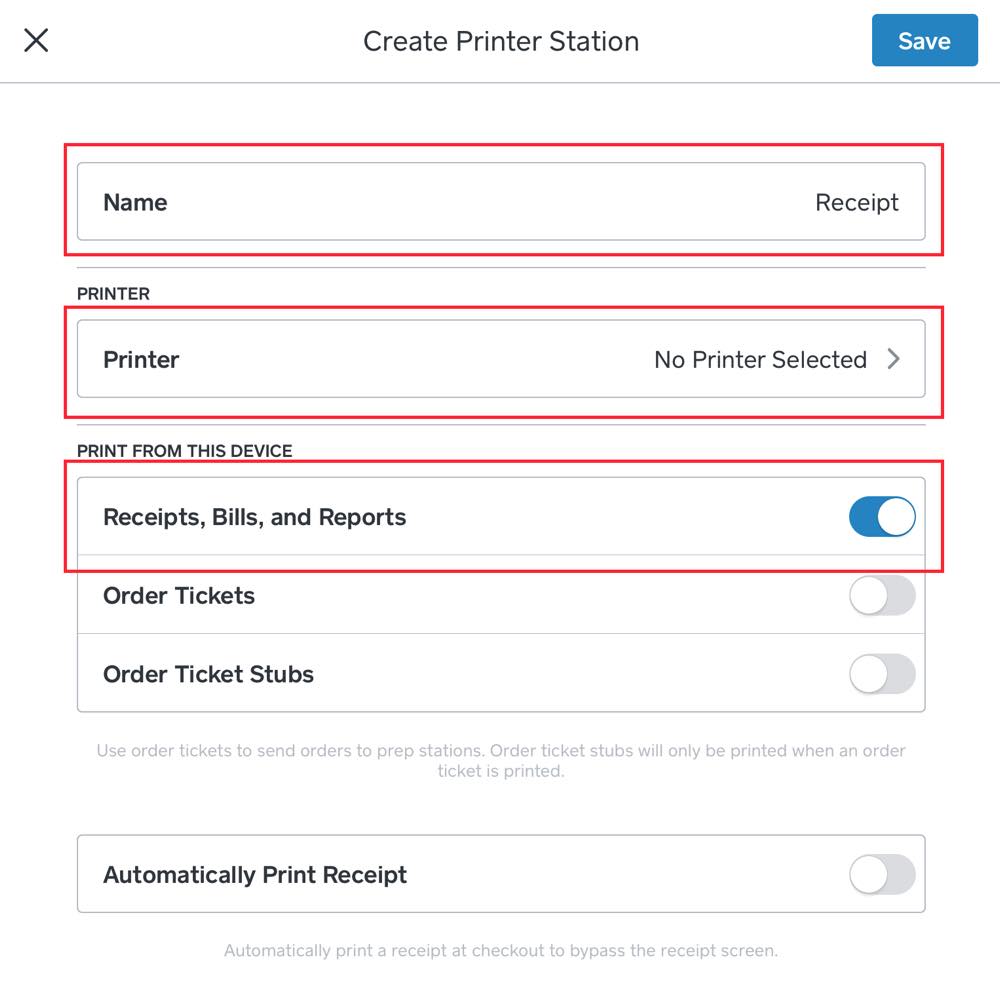
11. Give this printer the same name as your corresponding printer in TouchBistro, like Receipt printer or Bar printer. Enable Receipts, Bills, and Reports. Tap Printer to select which printer Square credit card receipts should go to.
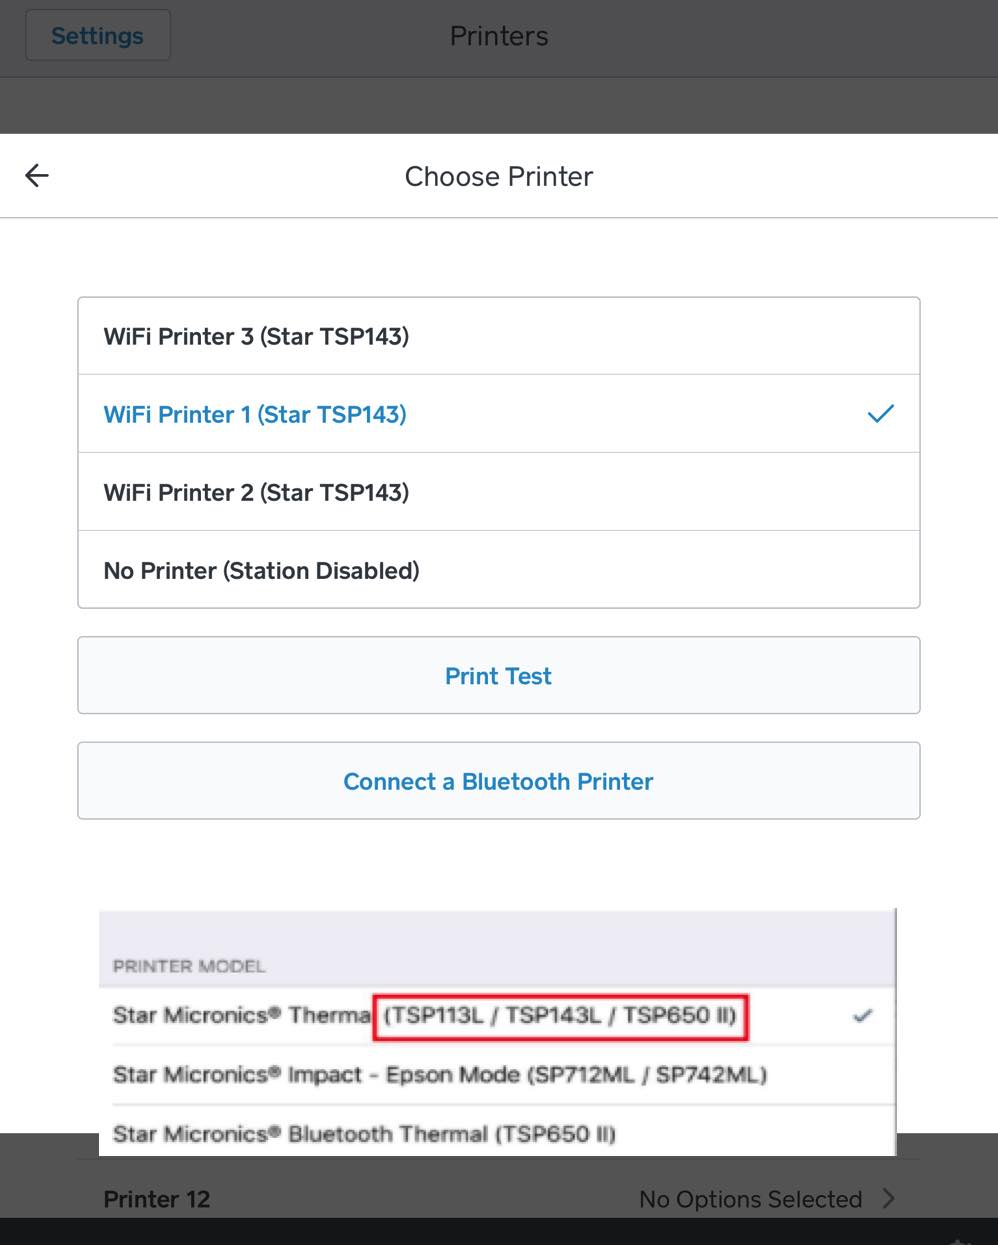
12. Square will auto detect printers connected to your TouchBistro router. You can use the model number in the TouchBistro printer setup screen to help you determine which printer is the receipt printer. If you have multiple printers of the same type (for example, a receipt printer, a patio printer, and a bar printer), you will have to select each one and tap Print Test. Based on which printer prints the test print out, you can determine which is your desired receipt printer.
13. Tap the back ![]() arrow
arrow
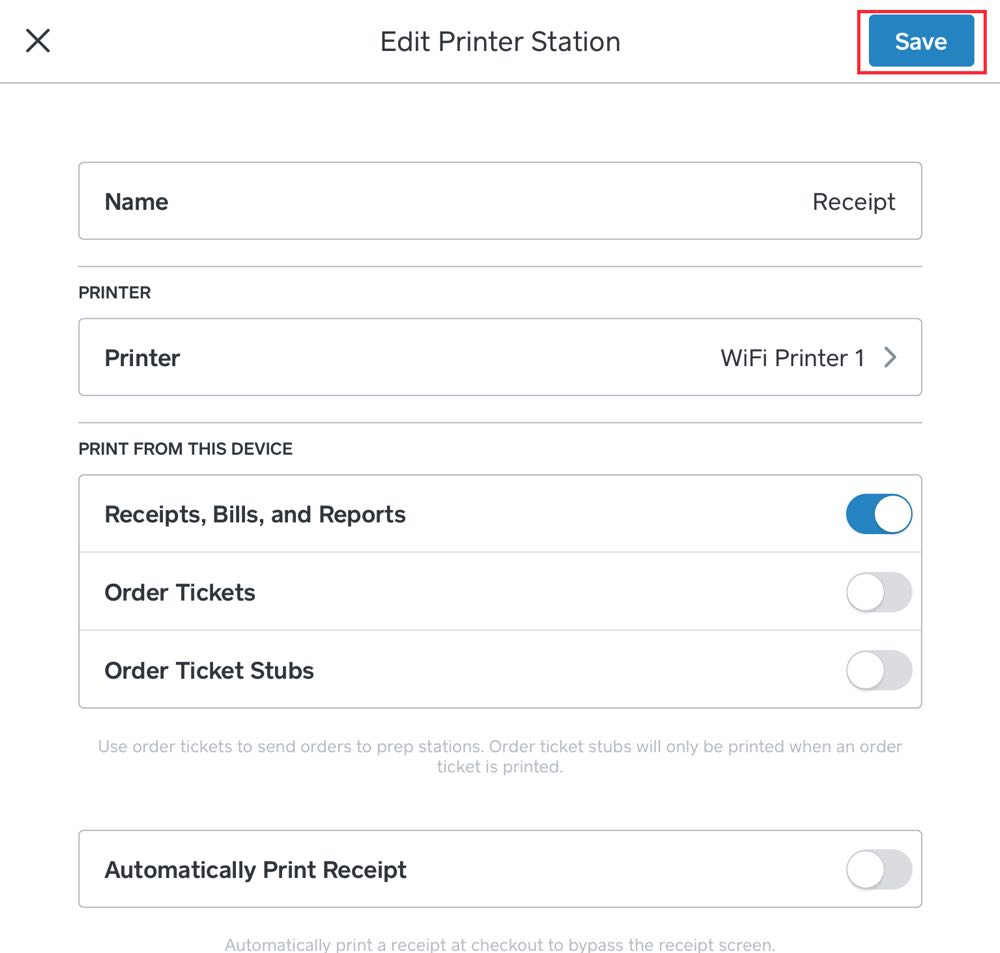
14. Tap Save.
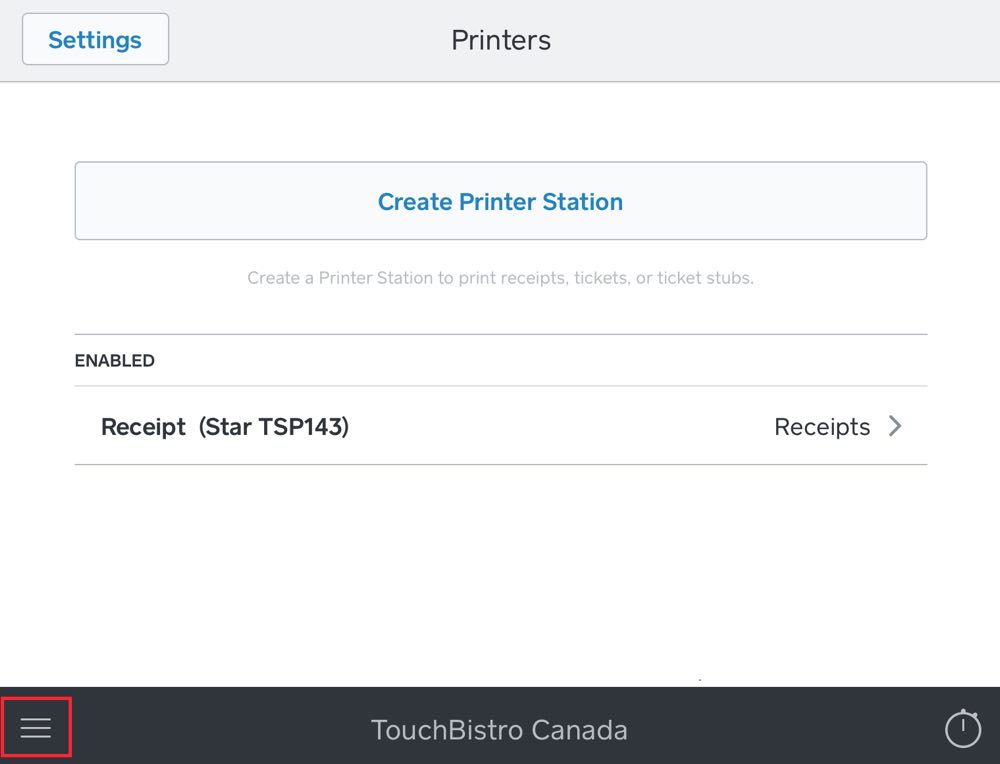
15. You will now see your properly linked printer. Tap the Options ![]() icon at the bottom of the screen and return to your checkout screen.
icon at the bottom of the screen and return to your checkout screen.
Chapter 5. Setting Up Square for Sign on Screen and Sign on Slip
 x
x
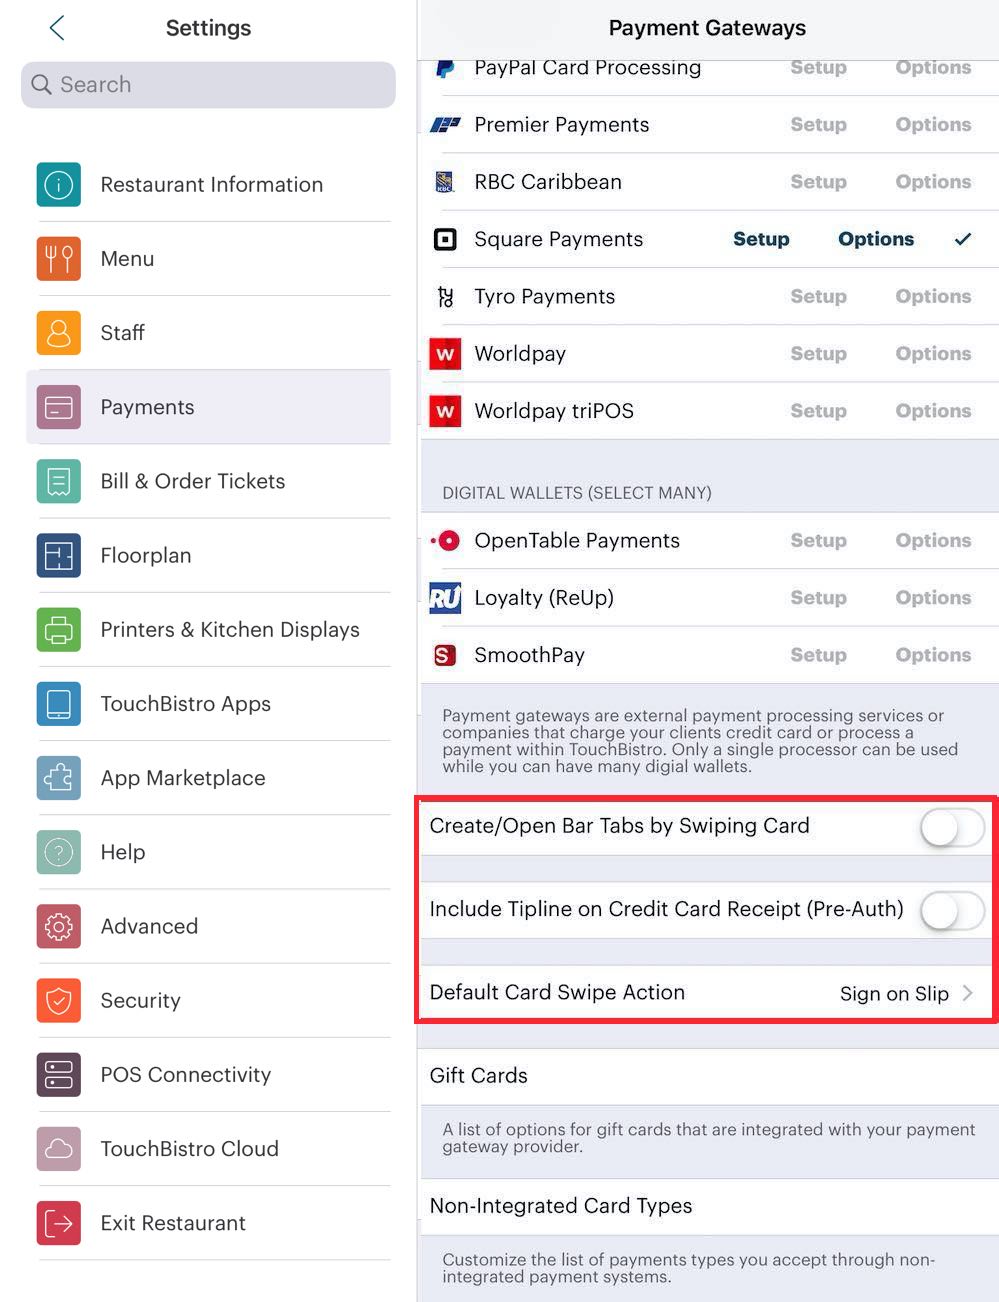
Setting up a sign on screen (i.e., authorization/tipping done via the iPad screen) or a sign on slip (i.e., authorization/tipping done via a credit card receipt) workflow is done via the Square Point of Sale app. If you are not using another payment integration, you can leave these items disabled on TouchBistro.
Section 1. Setting the Square Point of Sale App for Sign on Screen

1. Tap the Options ![]() icon at the bottom of the screen.
icon at the bottom of the screen.

2. Tap Settings.

3. Tap Settings if you do not see the Settings menu.
 x
x
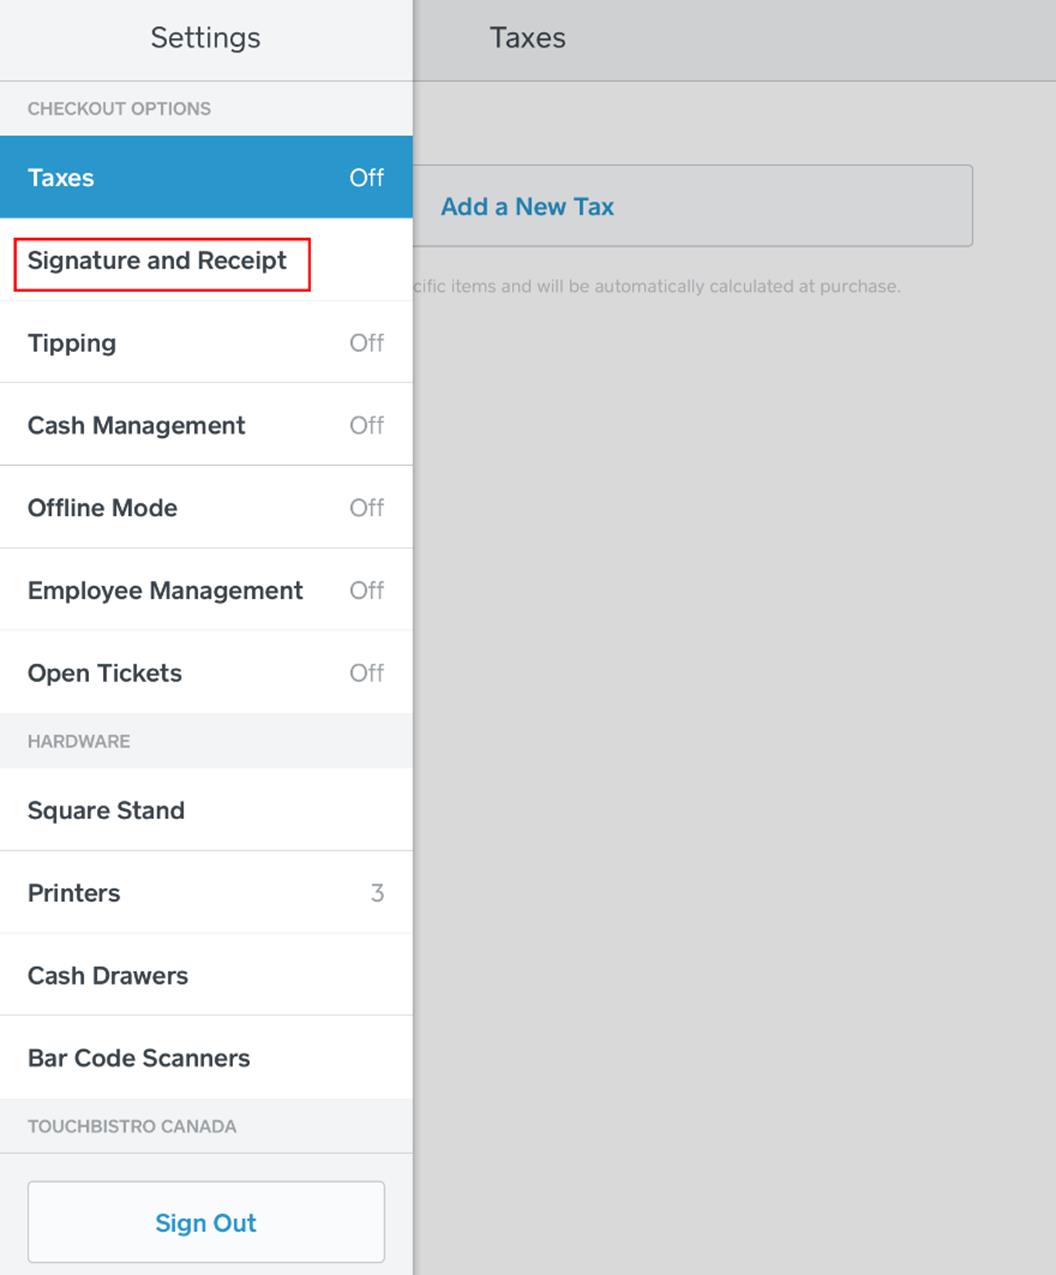
4. Tap Signature and Receipt.
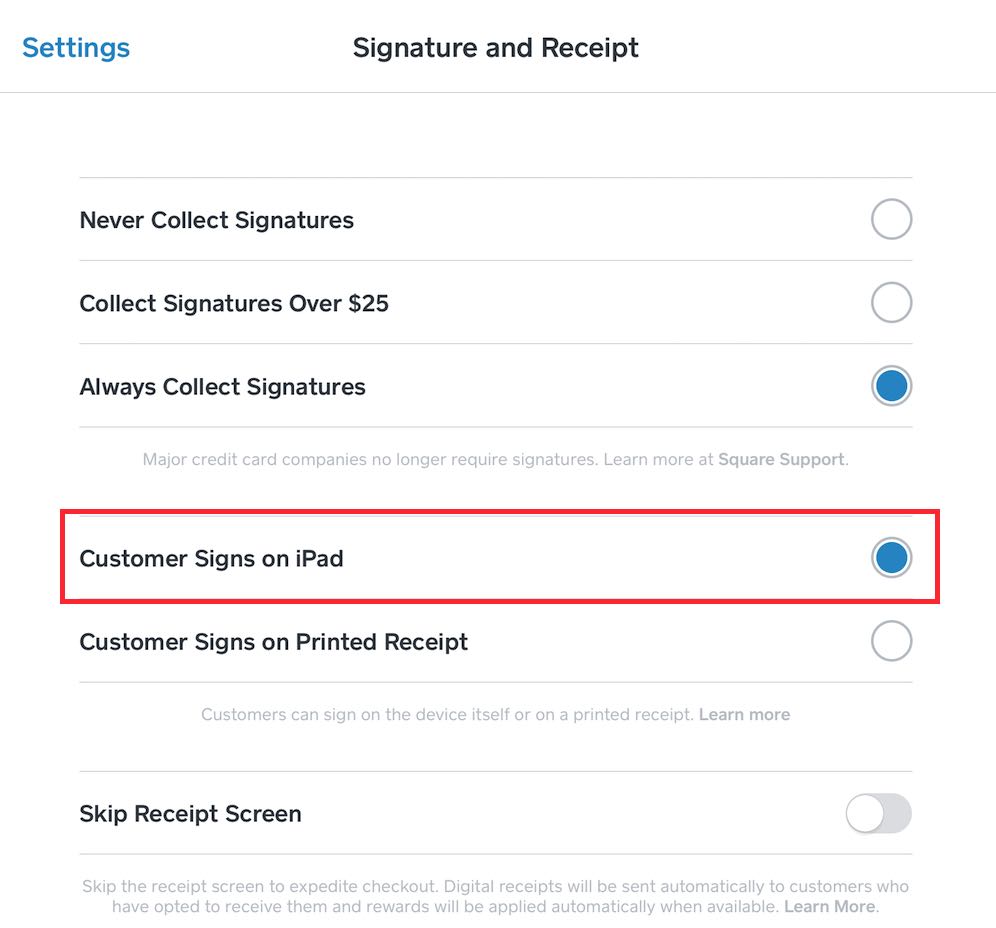
5. Tap Customer Signs on iPad.
6. If tipping is appropriate for your venue, you can set up tipping. Tap Settings.
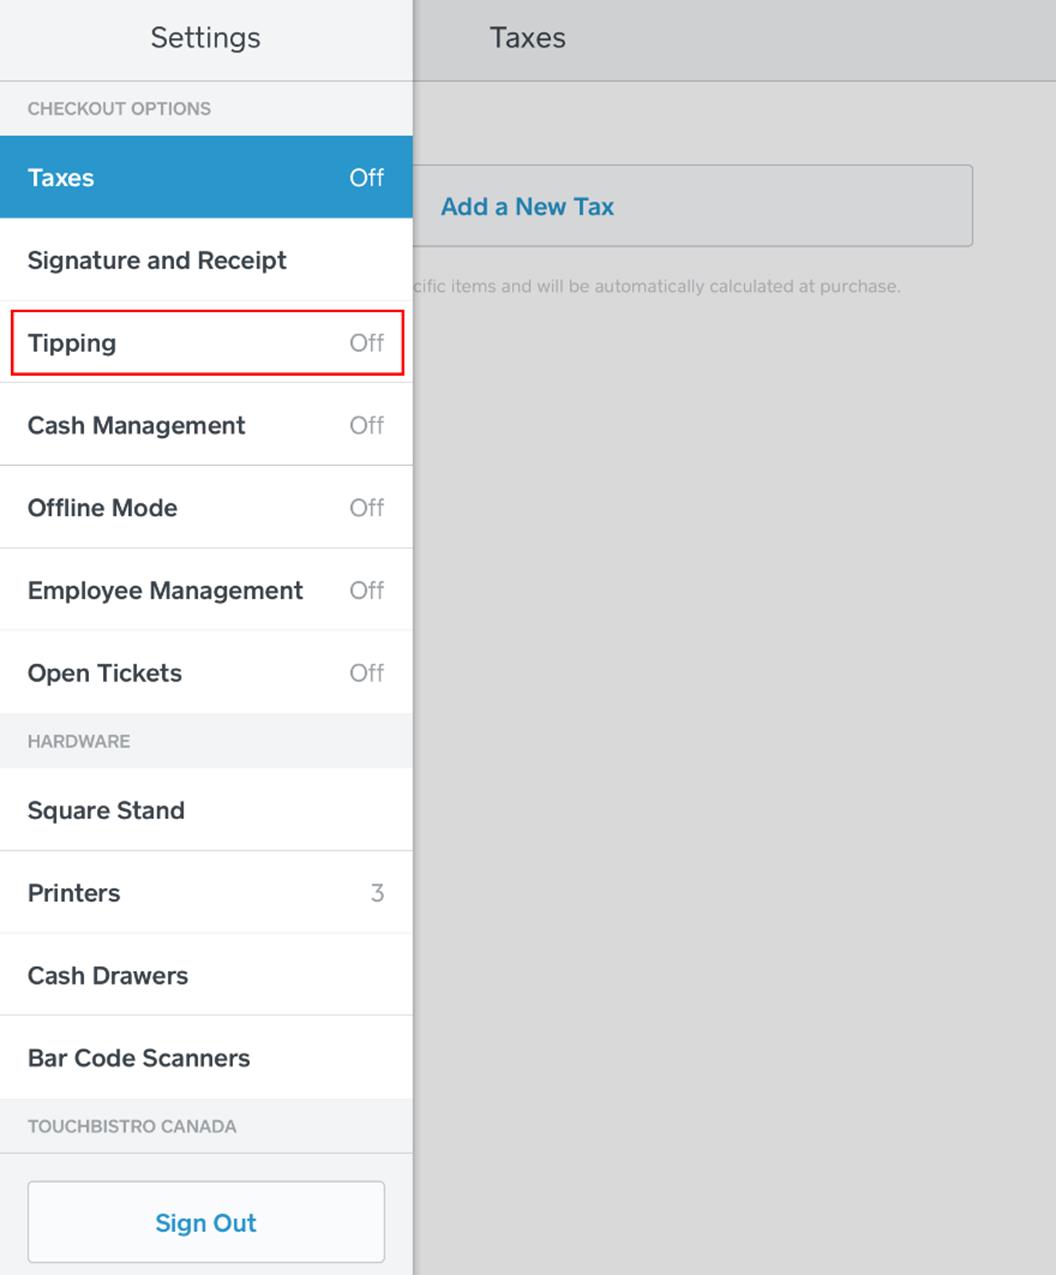
7. Tap Tipping.
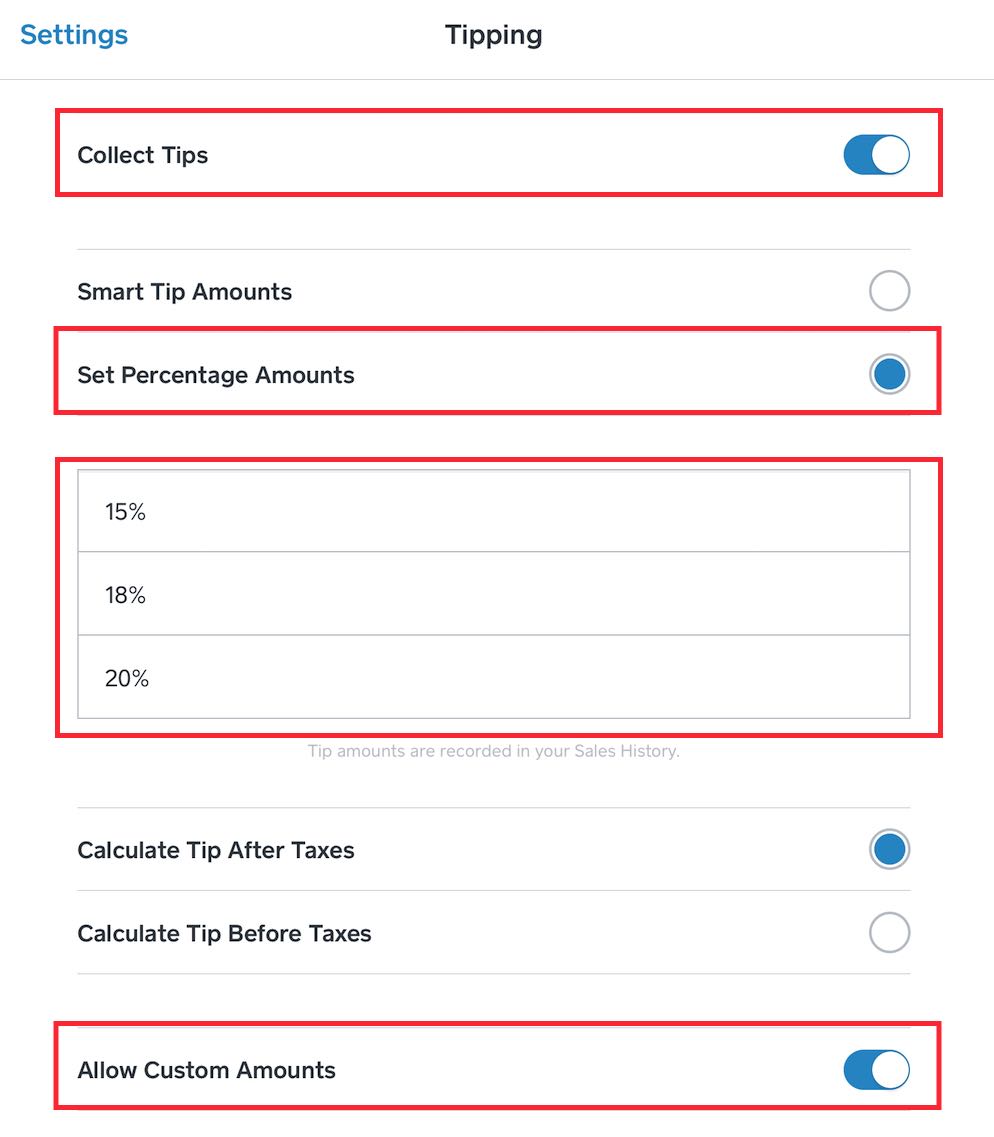
8. Enable Collect Tips.
9. Tap Set Percentage Amounts.
10. Set appropriate percentage suggestions. With the TouchBistro integration, tips will be calculated on the bill total (including tax) regardless of the Calculate Tip After Taxes/Calculate Tip Before Taxes setting here. The reason for this is TouchBistro sends the Square payment app the bill total (sub total plus tax). TouchBistro makes no distinction for Square between the sub total and the tax portion.
11. Enable Allow Custom Amounts if you want customers to leave tips different from the suggested percentages.
12. Tap the Options ![]() icon at the bottom of the screen and return to your checkout.
icon at the bottom of the screen and return to your checkout.
13. Return to TouchBistro.
Section 2. Setting the Square Point of Sale App for Sign on Slip

1. Tap the Options ![]() icon at the bottom of the screen.
icon at the bottom of the screen.

2. Tap Settings.

3. Tap Settings if you do not see the Settings menu.

4. Tap Signature and Receipt.
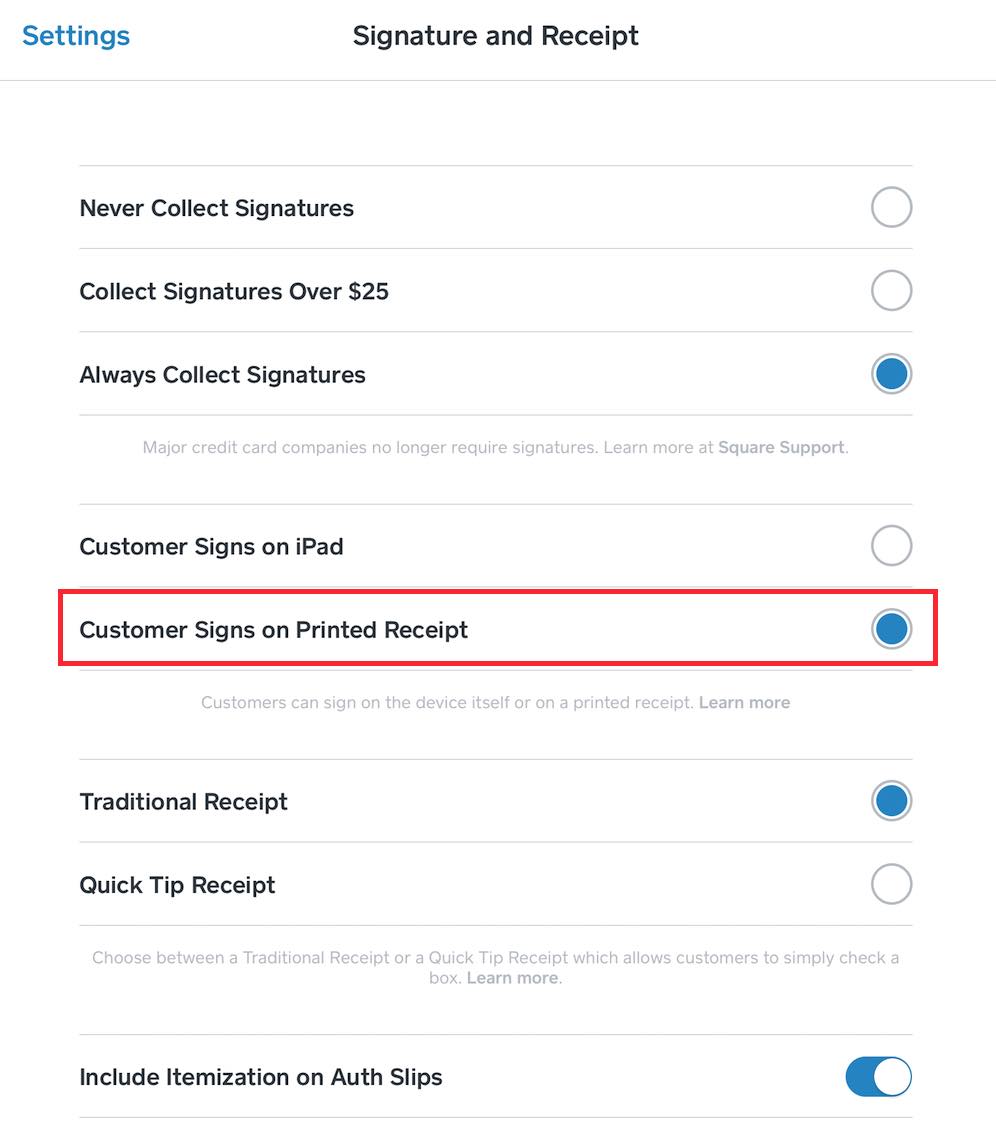
5. Tap Customer Signs on Printed Receipt.
6. Tap Settings.
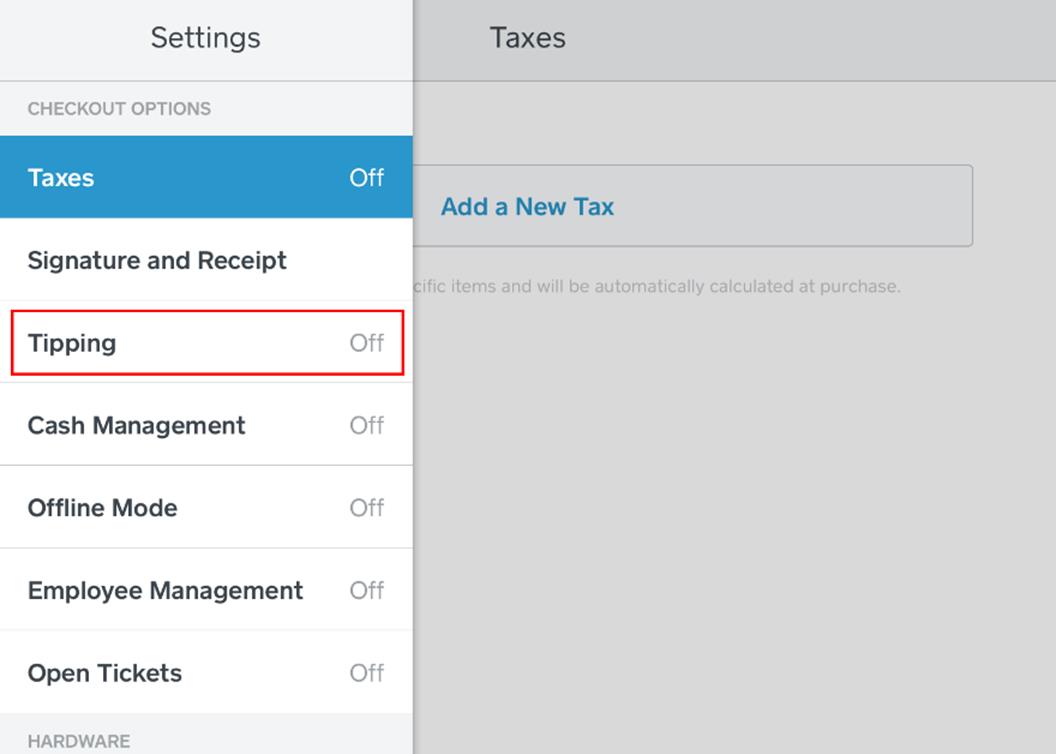
7. Tap Tipping.
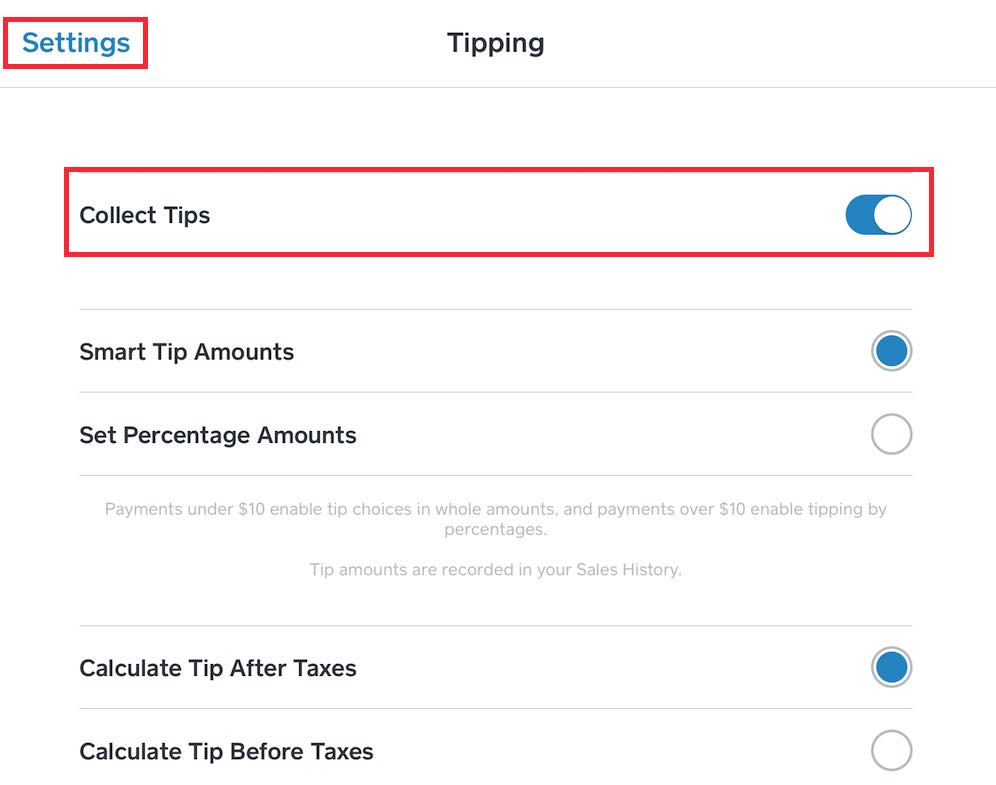
8. Enable Collect Tips.
9. Ignore the rest of the settings on this screen.
10. Tap the Options ![]() icon at the bottom of the screen and return to your checkout.
icon at the bottom of the screen and return to your checkout.
11. Return to TouchBistro.
Chapter 6. Using the Square Integration with a Sign on Screen Set Up

1. On the Order screen, tap the Checkout.
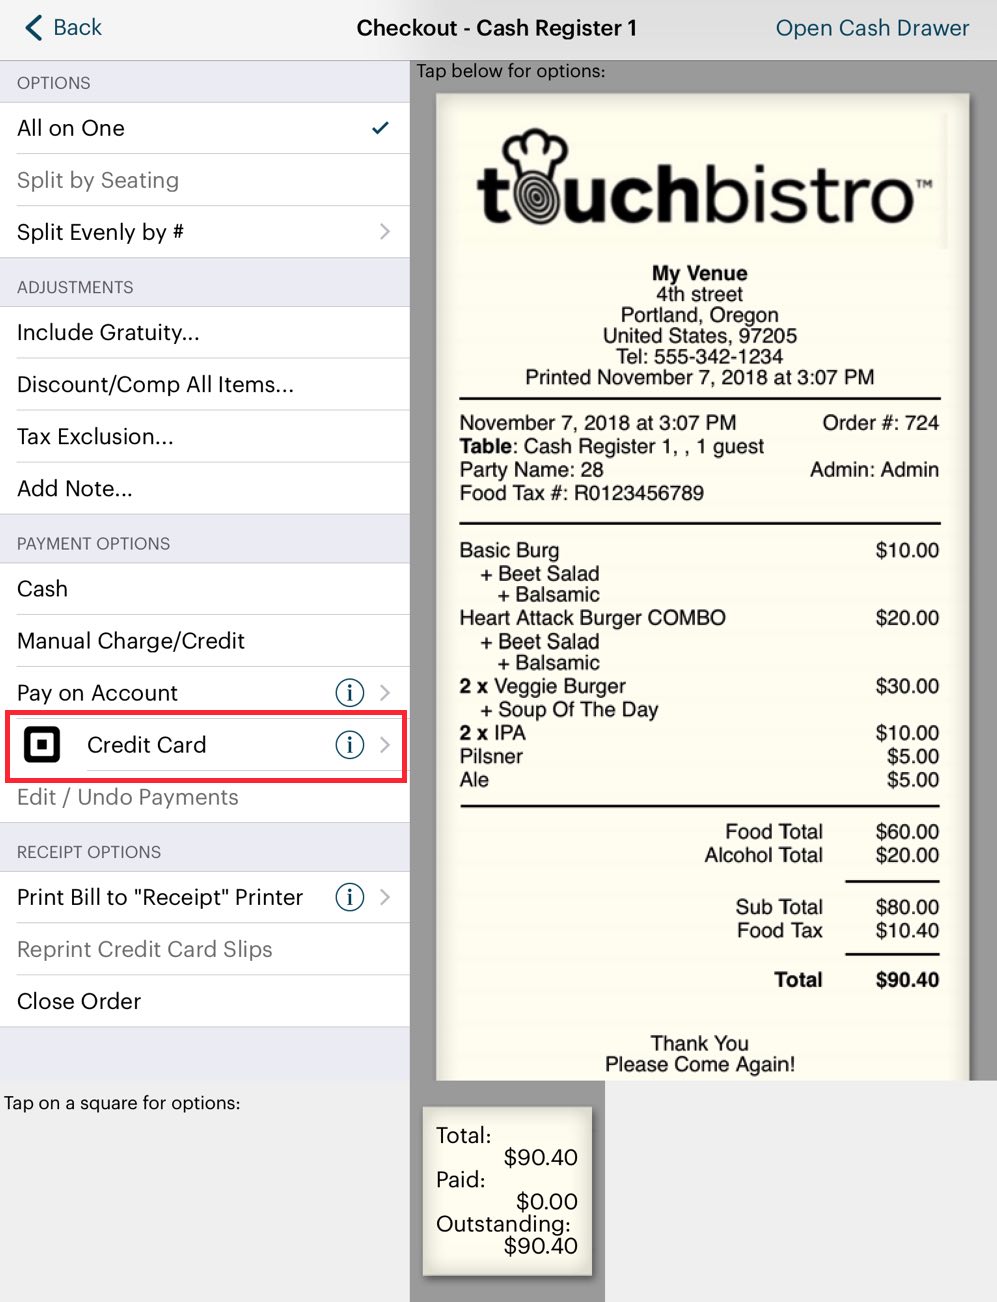
2. Tap Credit Card.
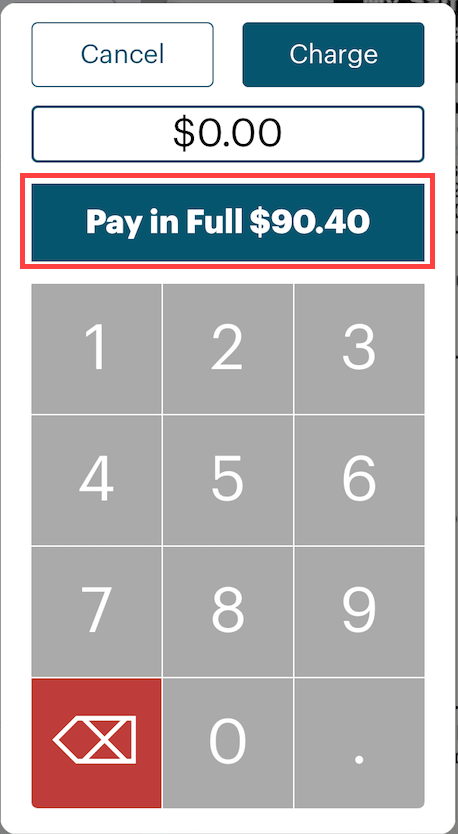
3. Tap Pay in Full (enter a lesser amount if the customer wishes to make a partial payment).
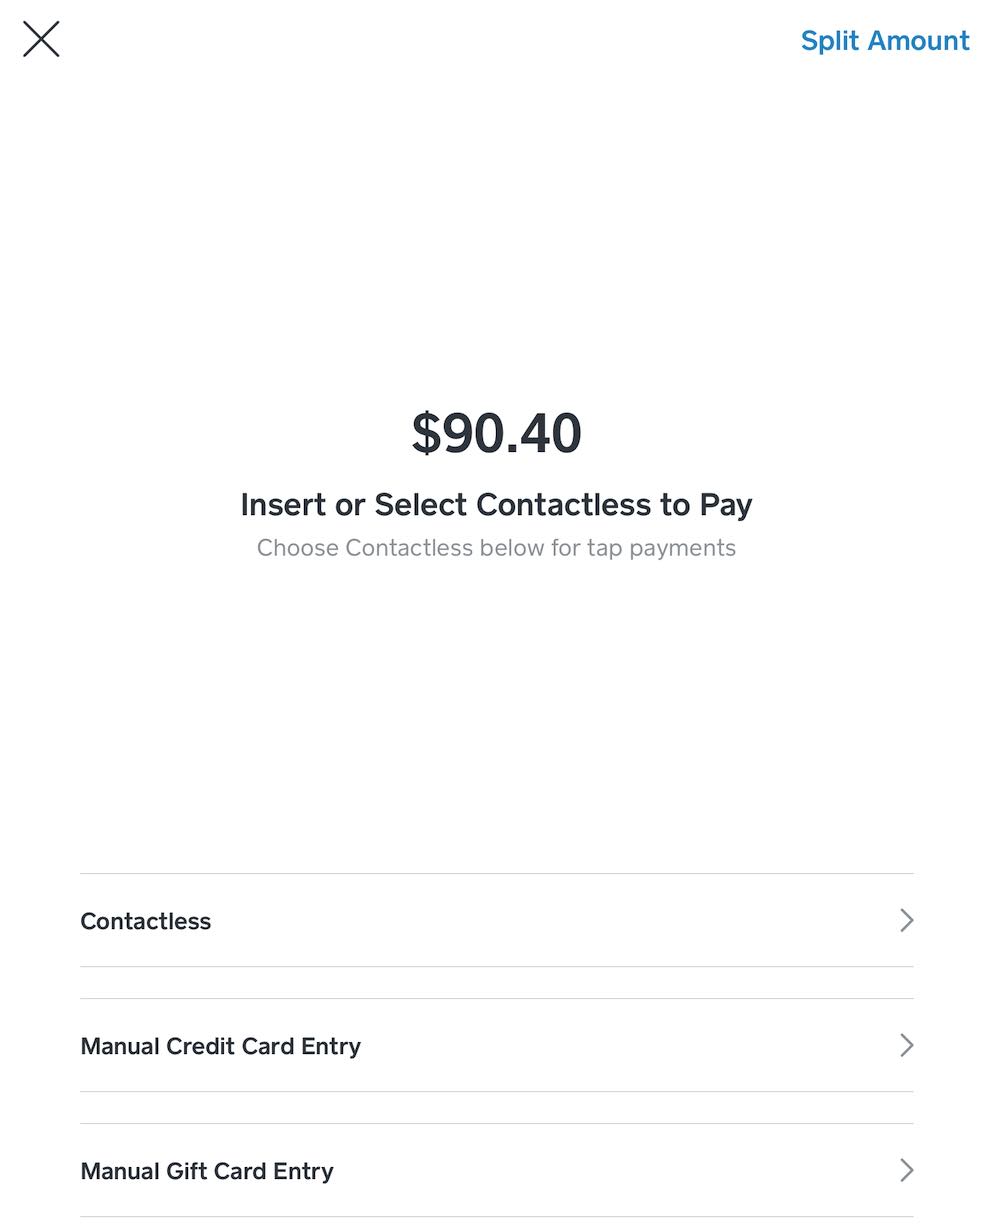
4. You will be switched over to the Square Point of Sale app. Swipe, insert or tap the offered card (insert/tap are not available with the Square swiper or Square stand).
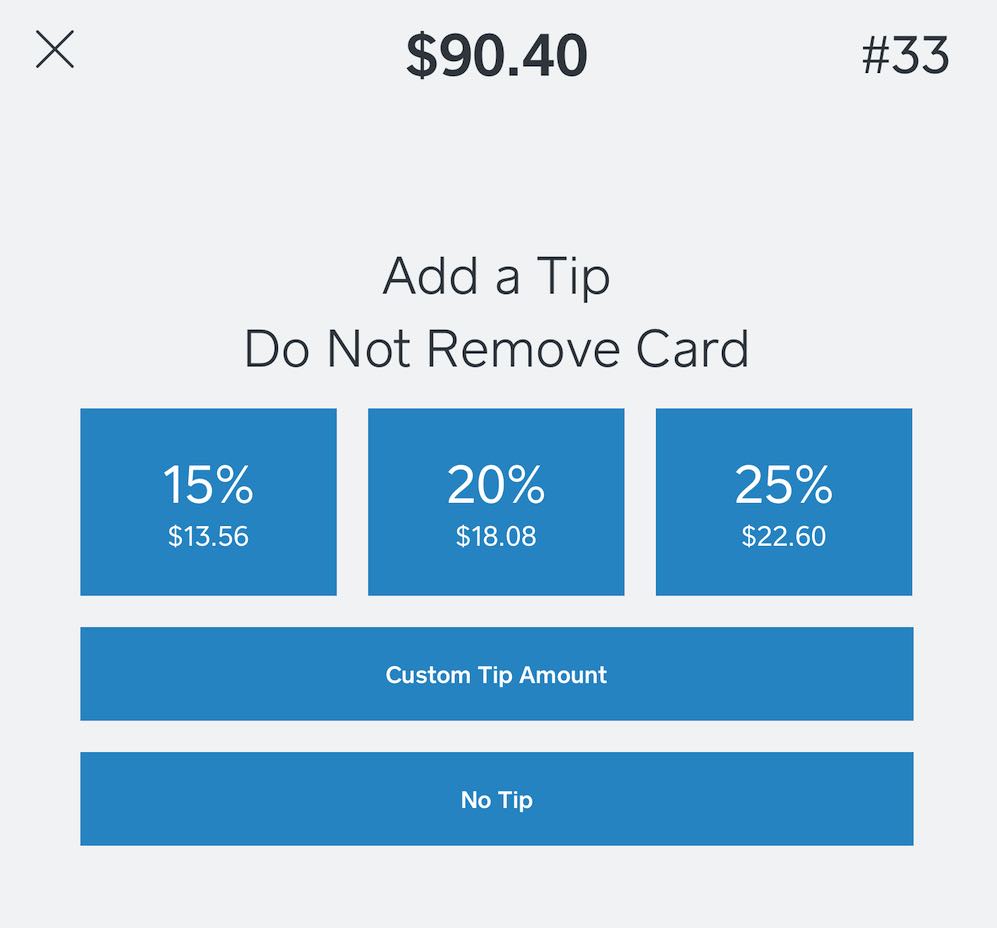
5. Have the customer enter a tip. If the card requires a signature or a PIN you will be prompted.

6. Have the customer select a receipt option.
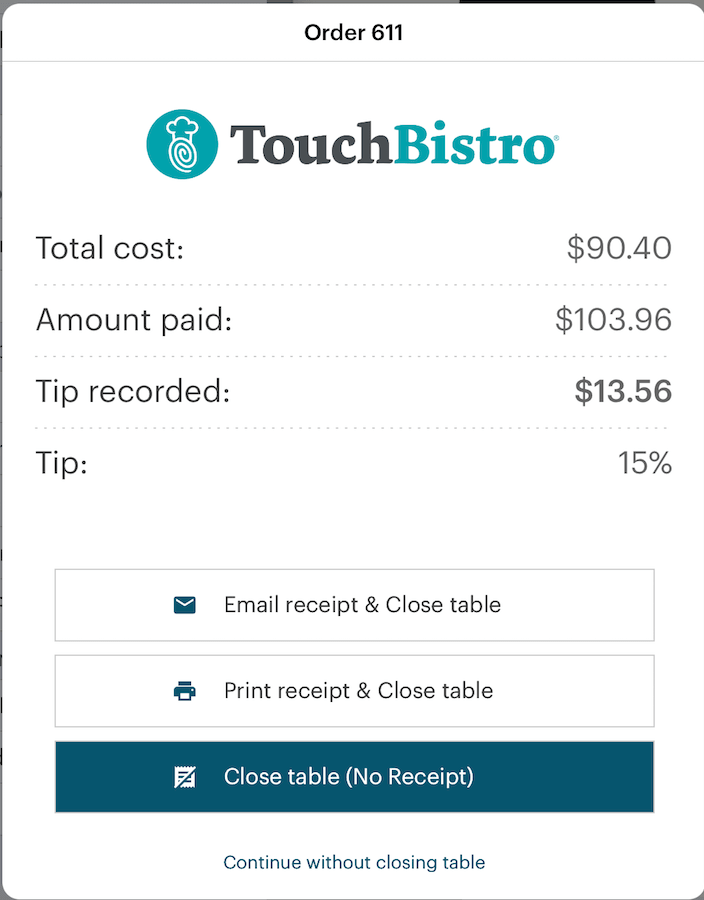
7. After the customer selects a receipt option, you will be returned to the TouchBistro. Close the order.
Note: tips entered on the Square Point of Sale app will get logged in TouchBistro and reported on your end of day for refunding tips to servers.
Chapter 7. Using the Square Integration with a Sign on Slip Set Up

1. On the Order screen, tap the Checkout.
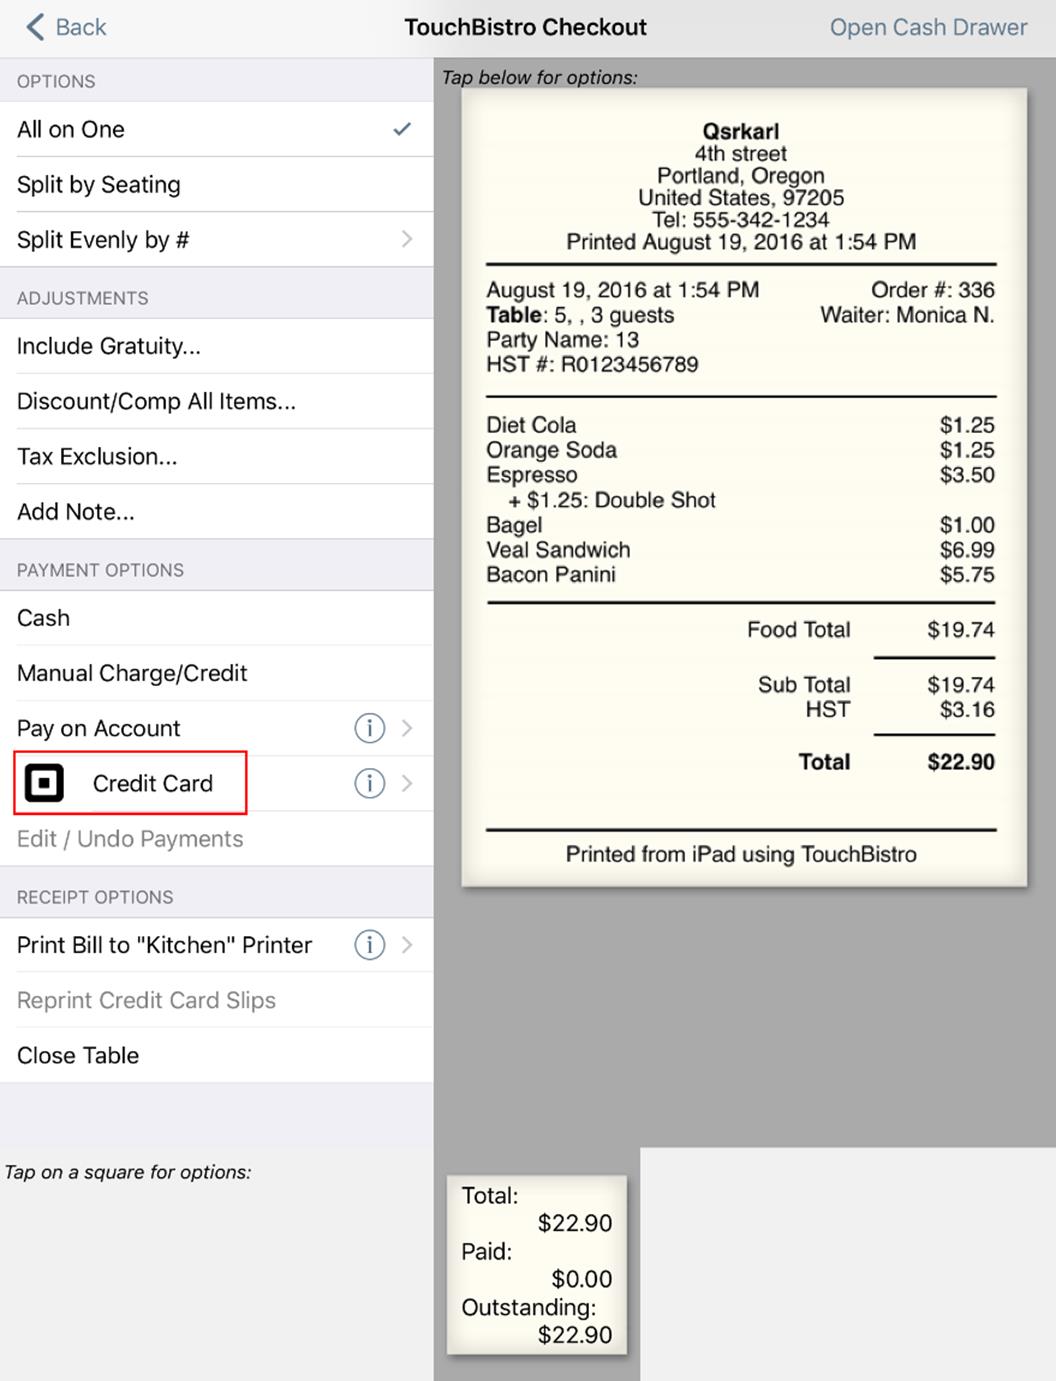
2. Tap Credit Card.
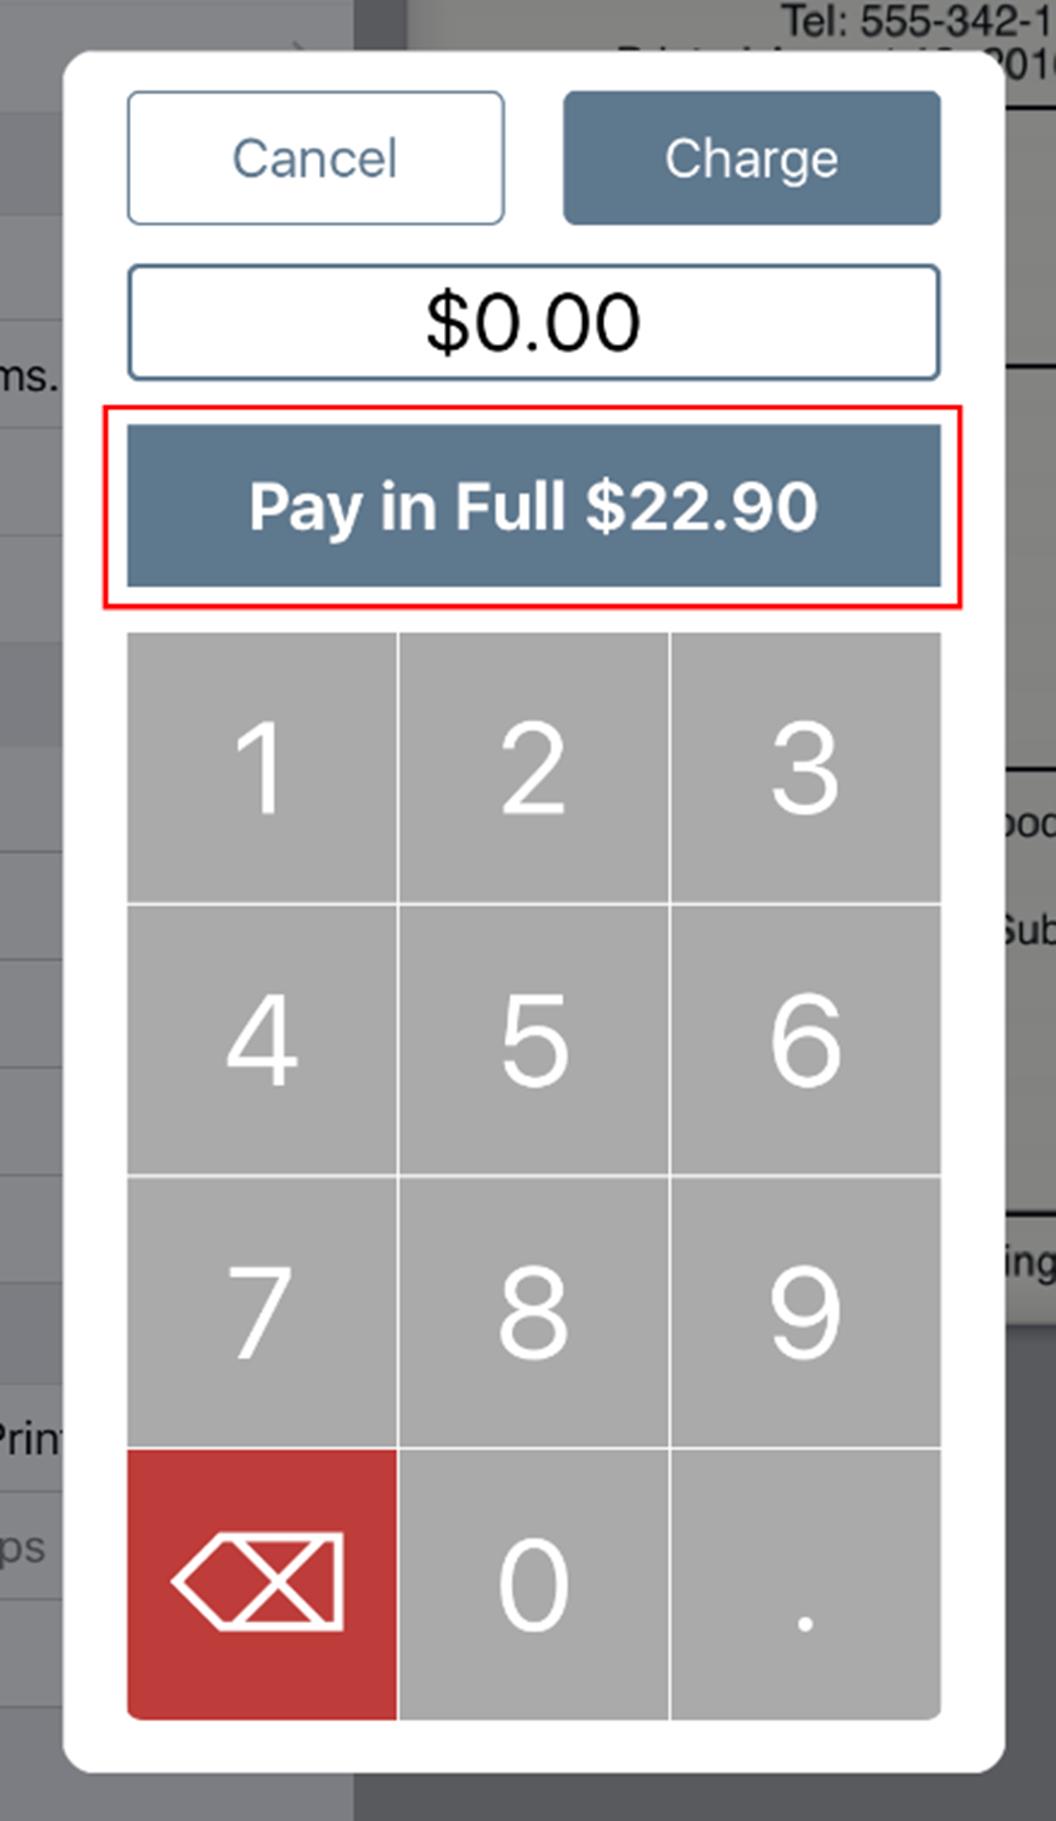
3. Tap Pay in Full (enter a lesser amount if the customer wishes to make a partial payment).

4. You will be switched over to the Square Point of Sale app. Swipe the offered card.
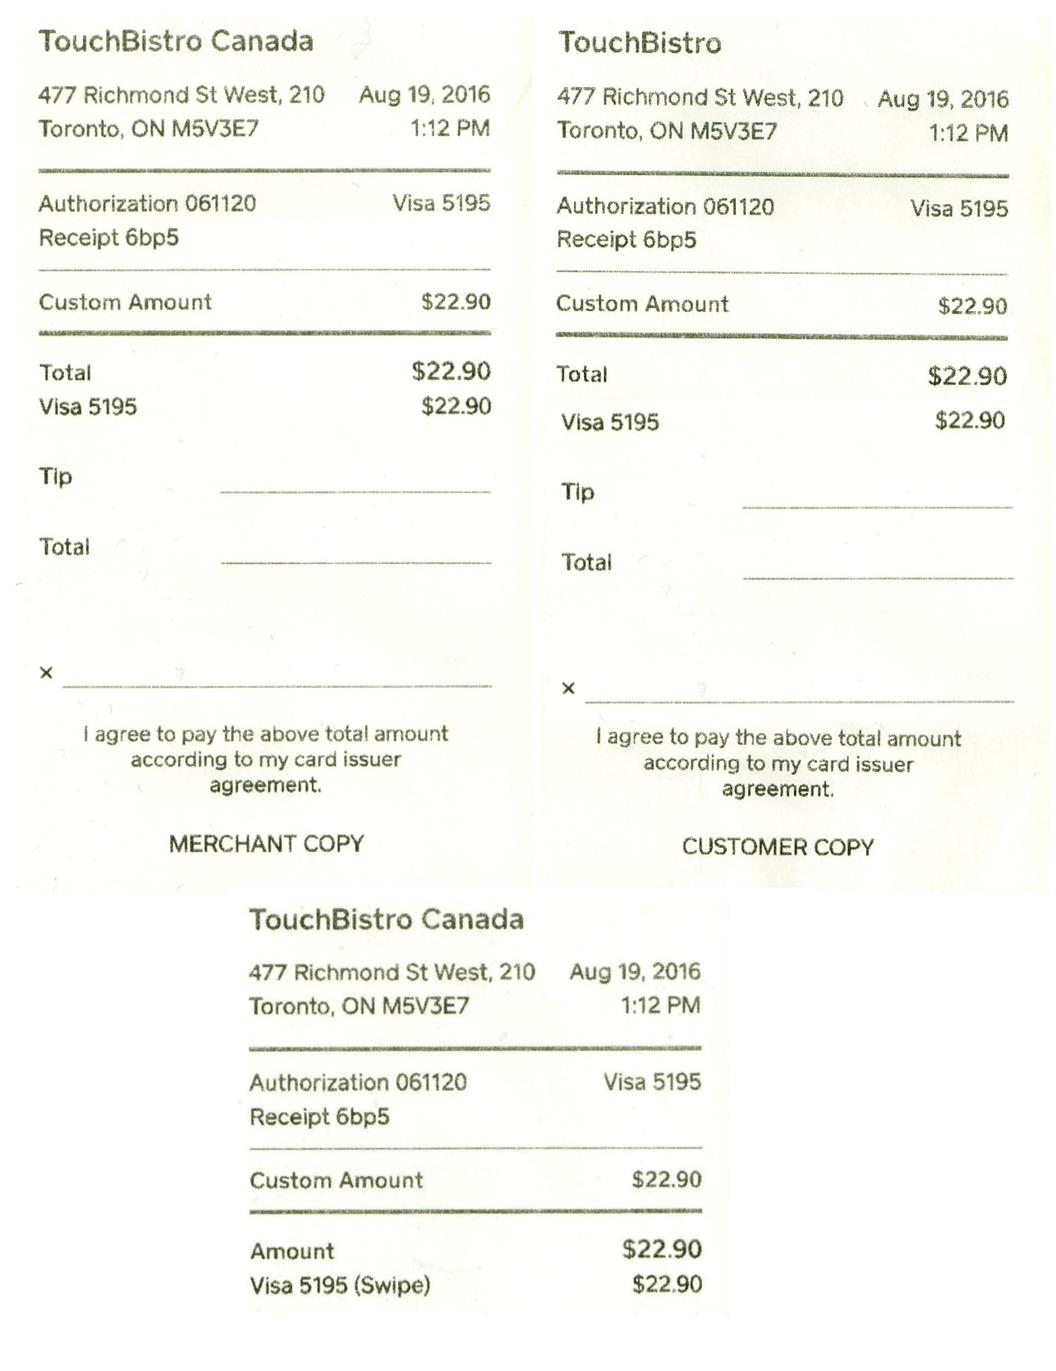
5. The Square Point of Sale app will approve the transaction and then generate three receipts: a customer copy, a merchant copy, and an authorization receipt.
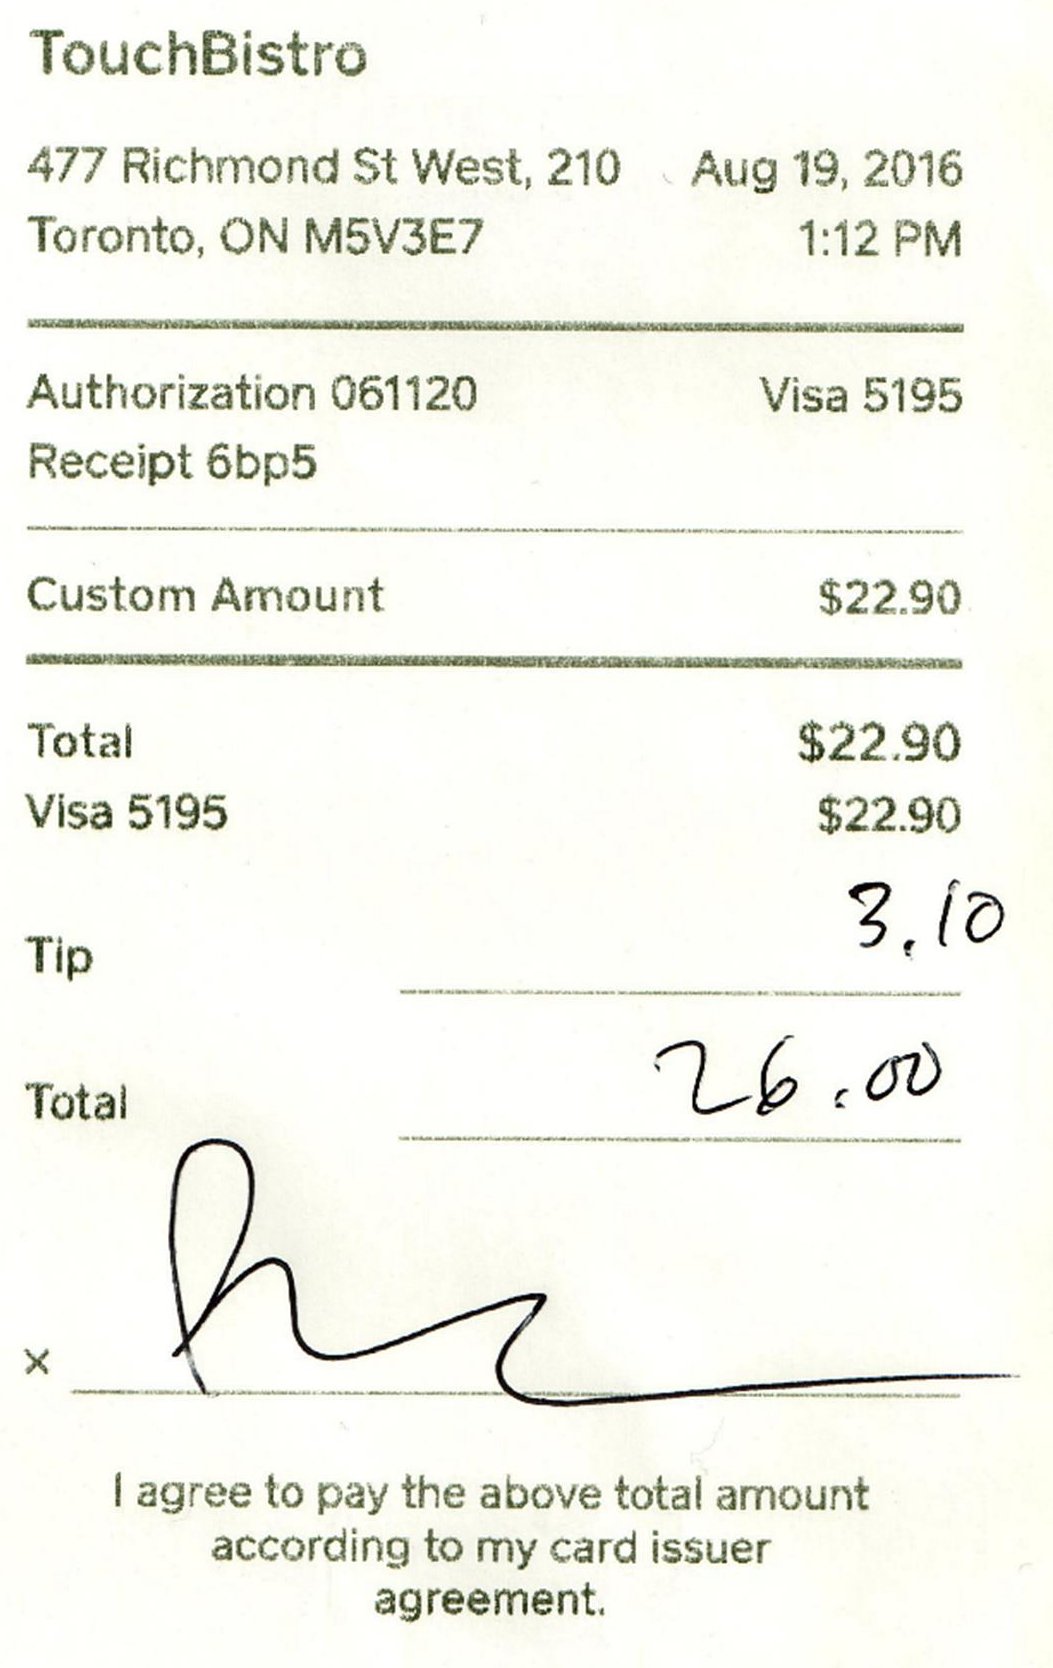
6. Have the customer sign the merchant copy and enter a tip on the tip line.
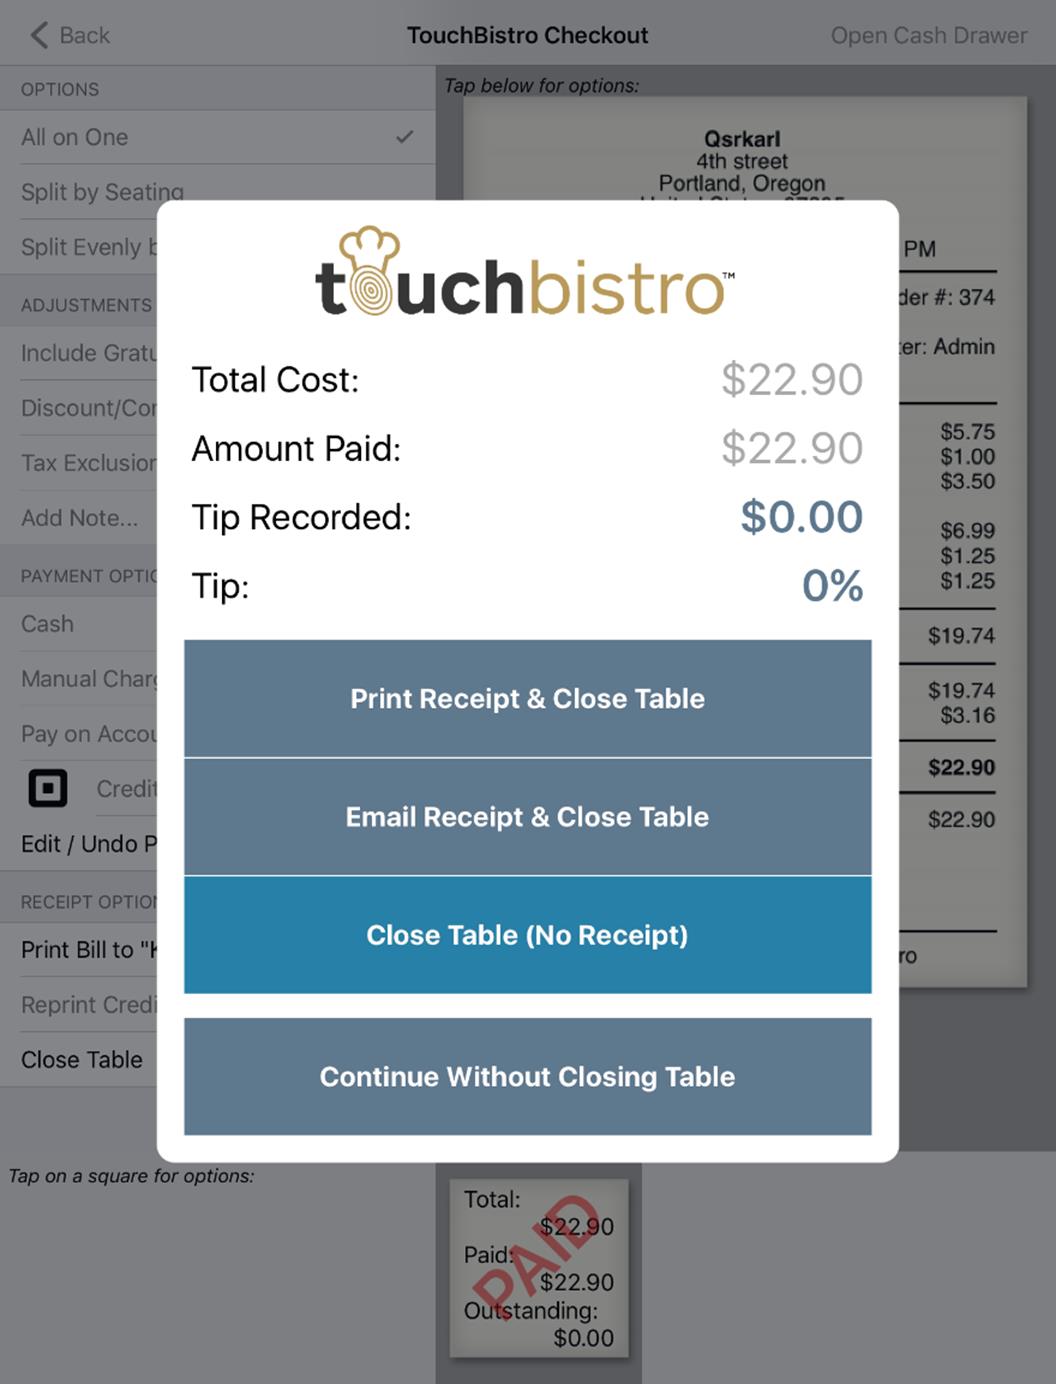
7. You will be returned to the TouchBistro Checkout screen with the order marked paid. Close the order.
8. Switch to the Square Point of Sale app.

9. Tap the Options ![]() icon at the bottom of the screen.
icon at the bottom of the screen.
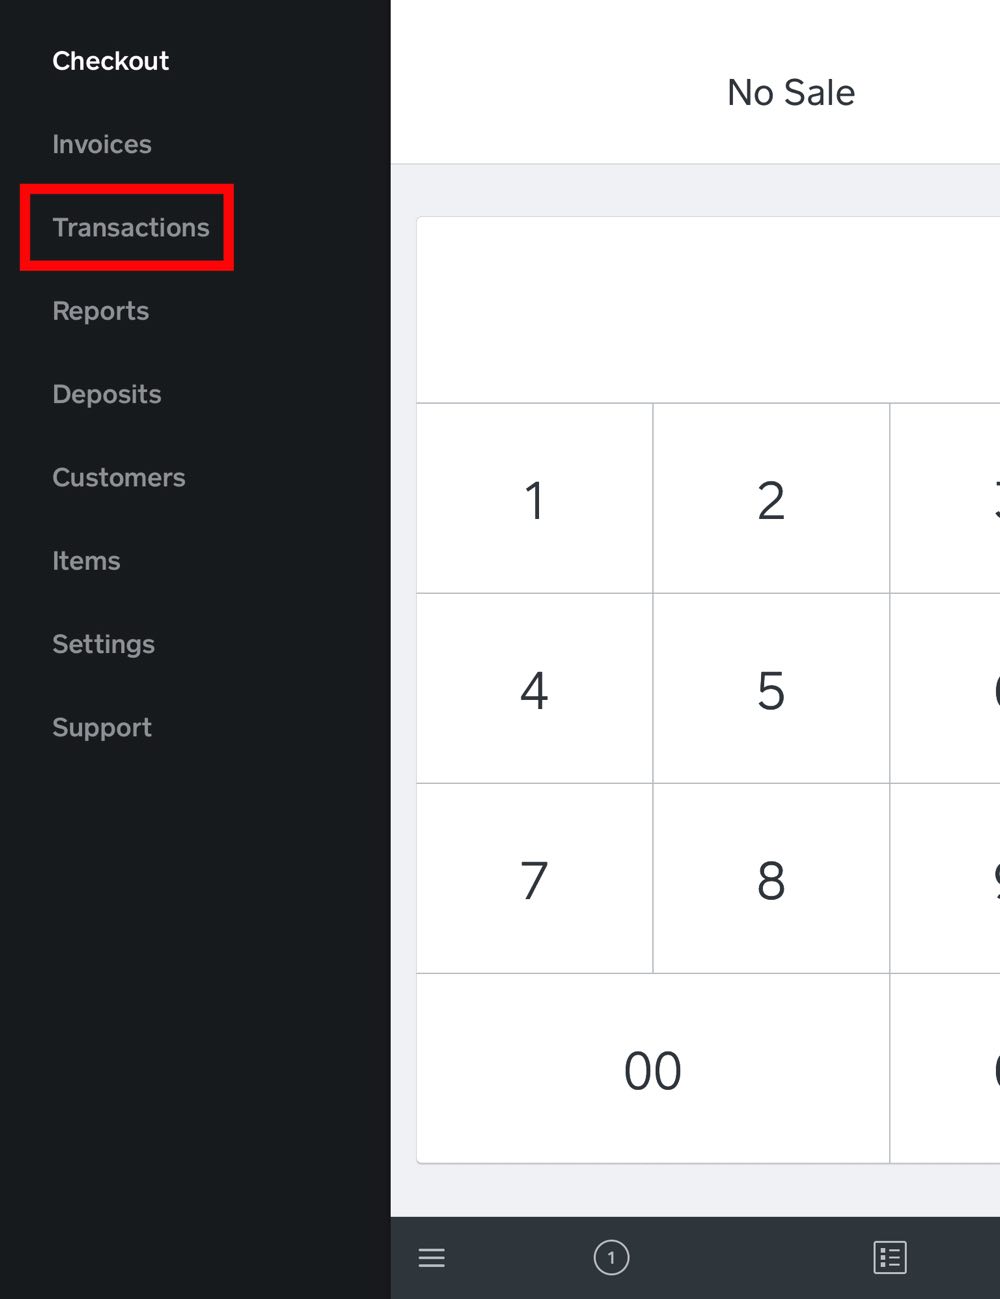
10. Tap Transactions.
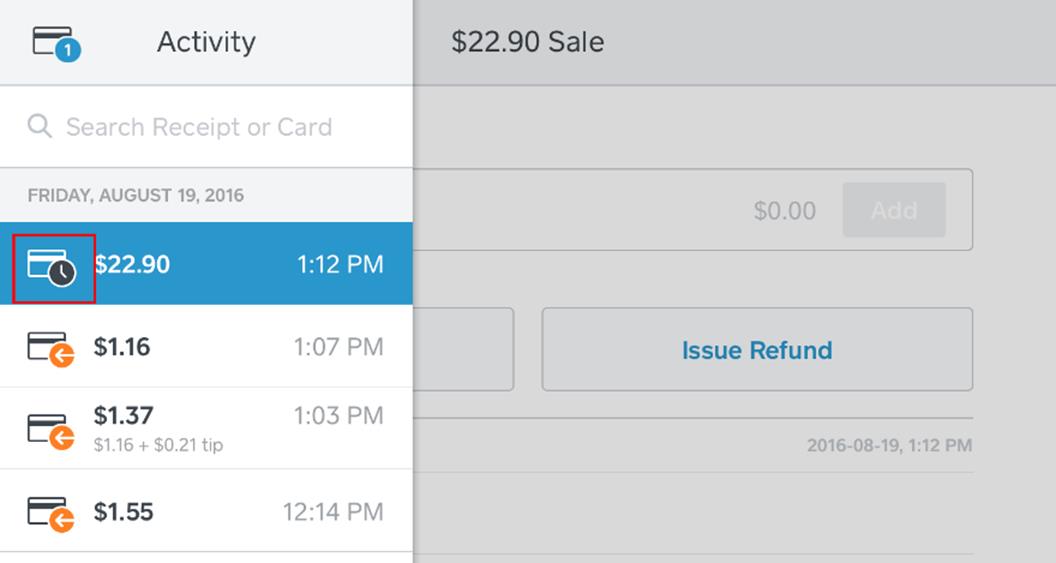
11. Locate and tap the payment with the small clock icon, indicating you need to complete the tip pre-auth.

12. Enter the tip written on the customer copy.
13. Tap Add.
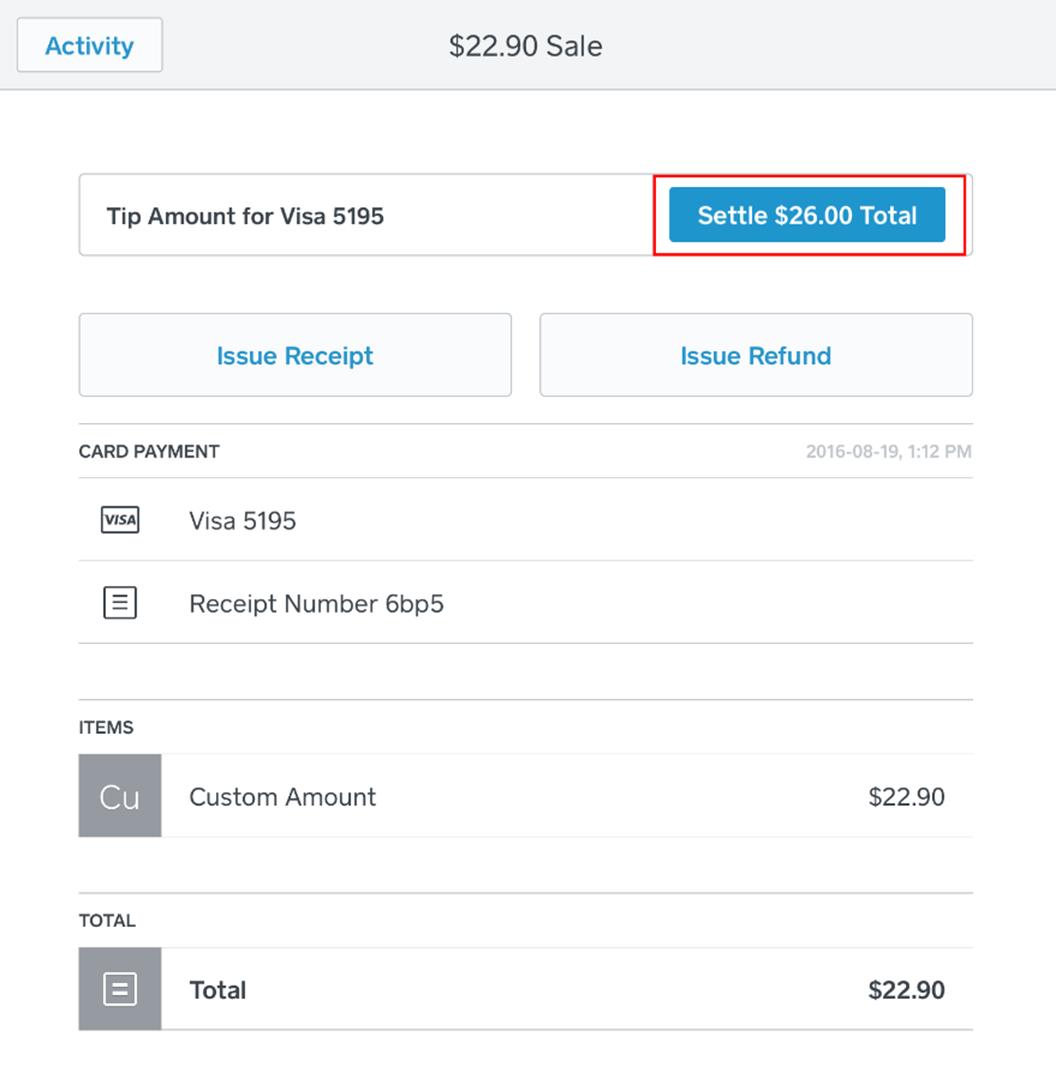
14. Verify the final settlement total and tap Settle.
Chapter 8. Reconciling Tips Written on Receipts in TouchBistro
Pre-auths entered into the Square Point of Sale app need to be reconciled in TouchBistro for your reporting. You can do this after every bill is closed or at the end of the day. You must be logged in as either an Admin or a Manager type profile.
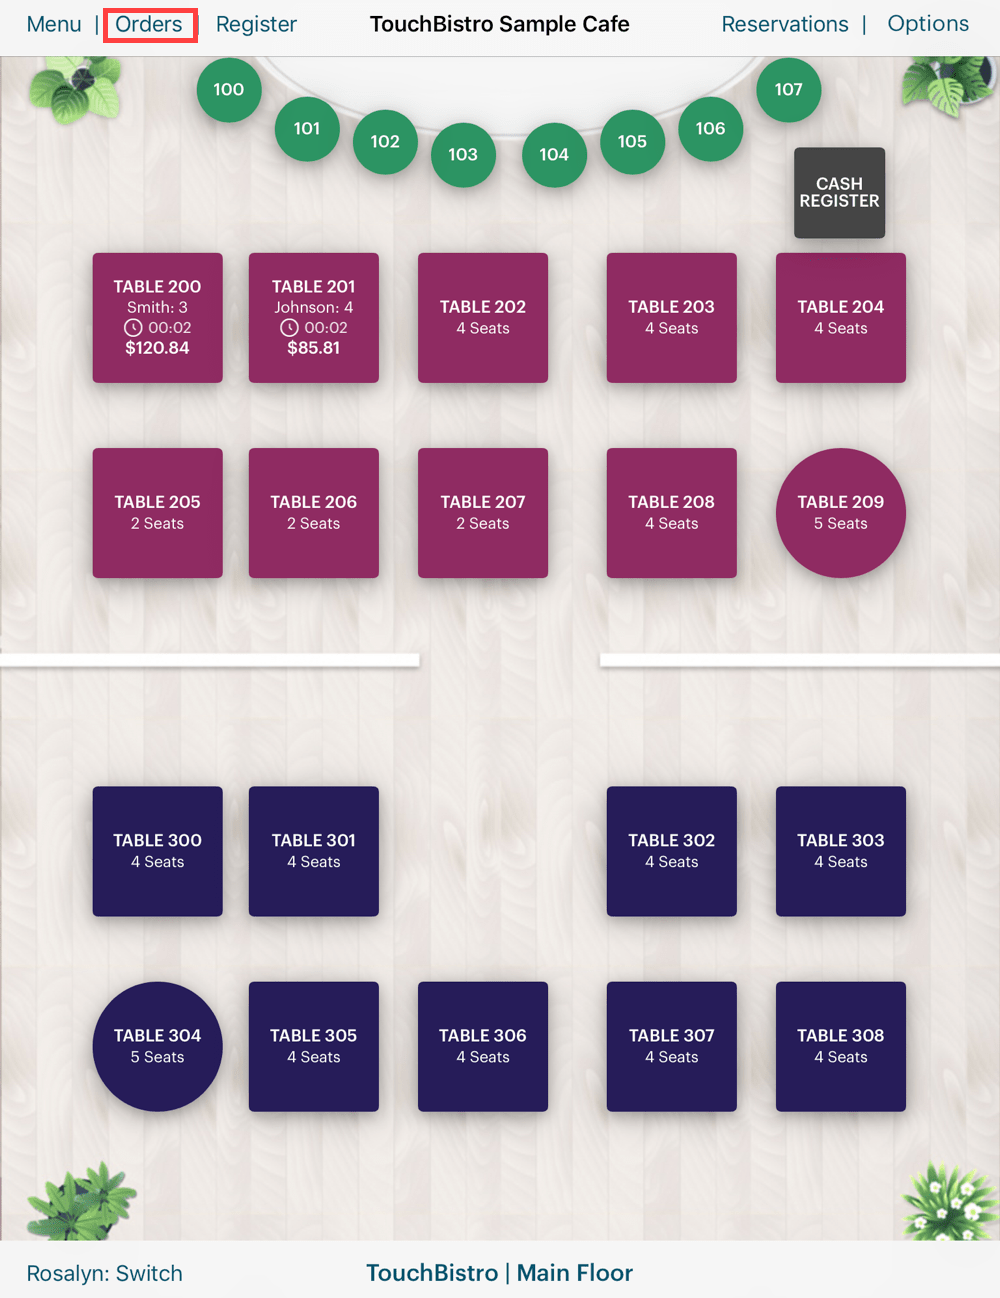
1. Tap Orders.
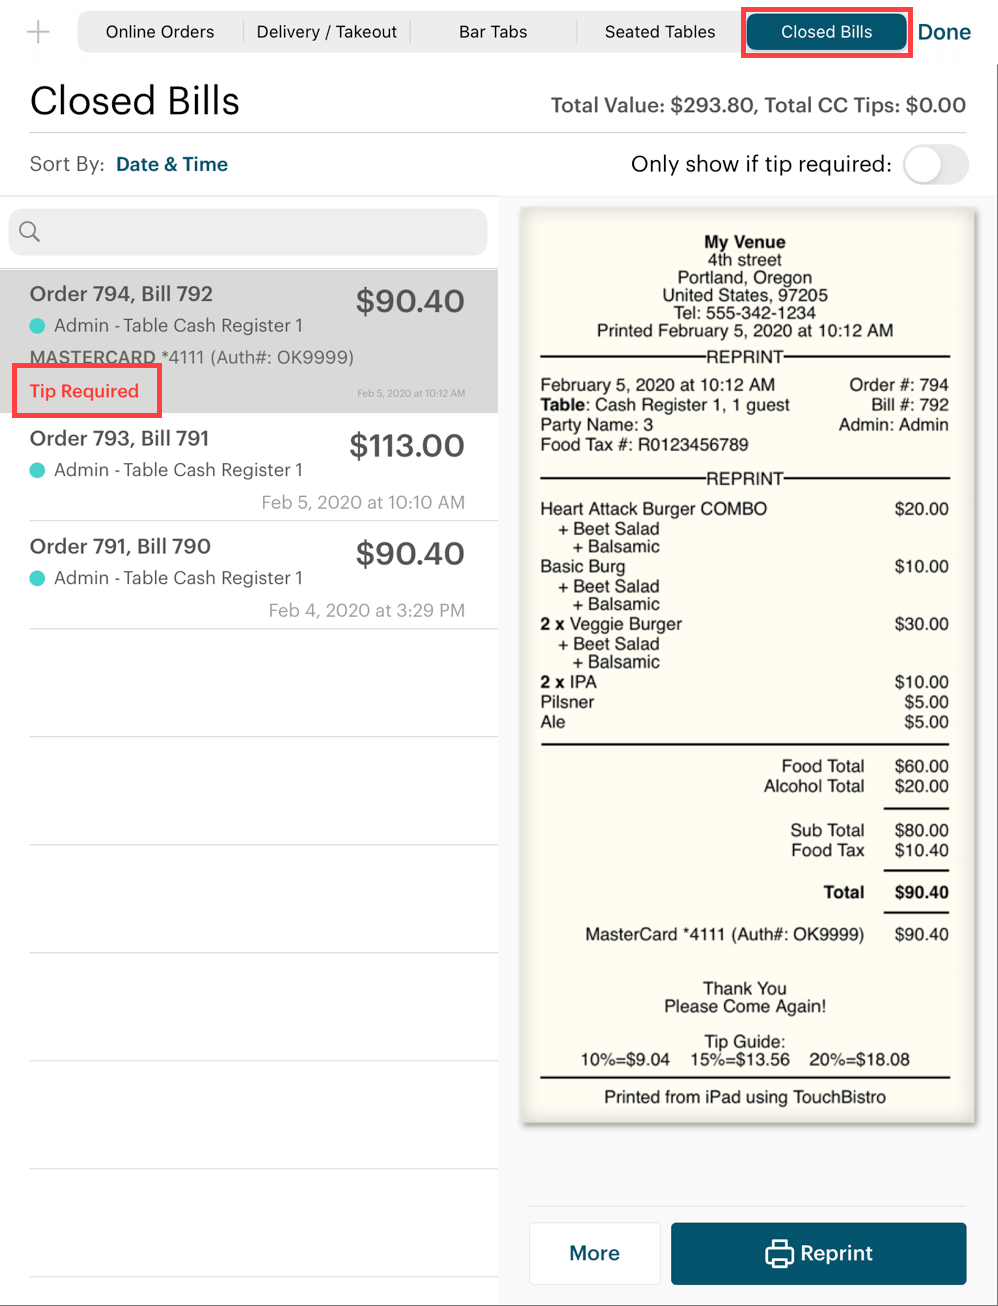
2. Tap the Closed Bills tab.
3. Locate the orders with Tip Required next to it. If you have a lot of closed bills, slide Only show if tip required to the green position to filter out bills not requiring tip reconciliation.
4. Tap the order.

5. Tap the Information ![]() icon associated with the bill.
icon associated with the bill.
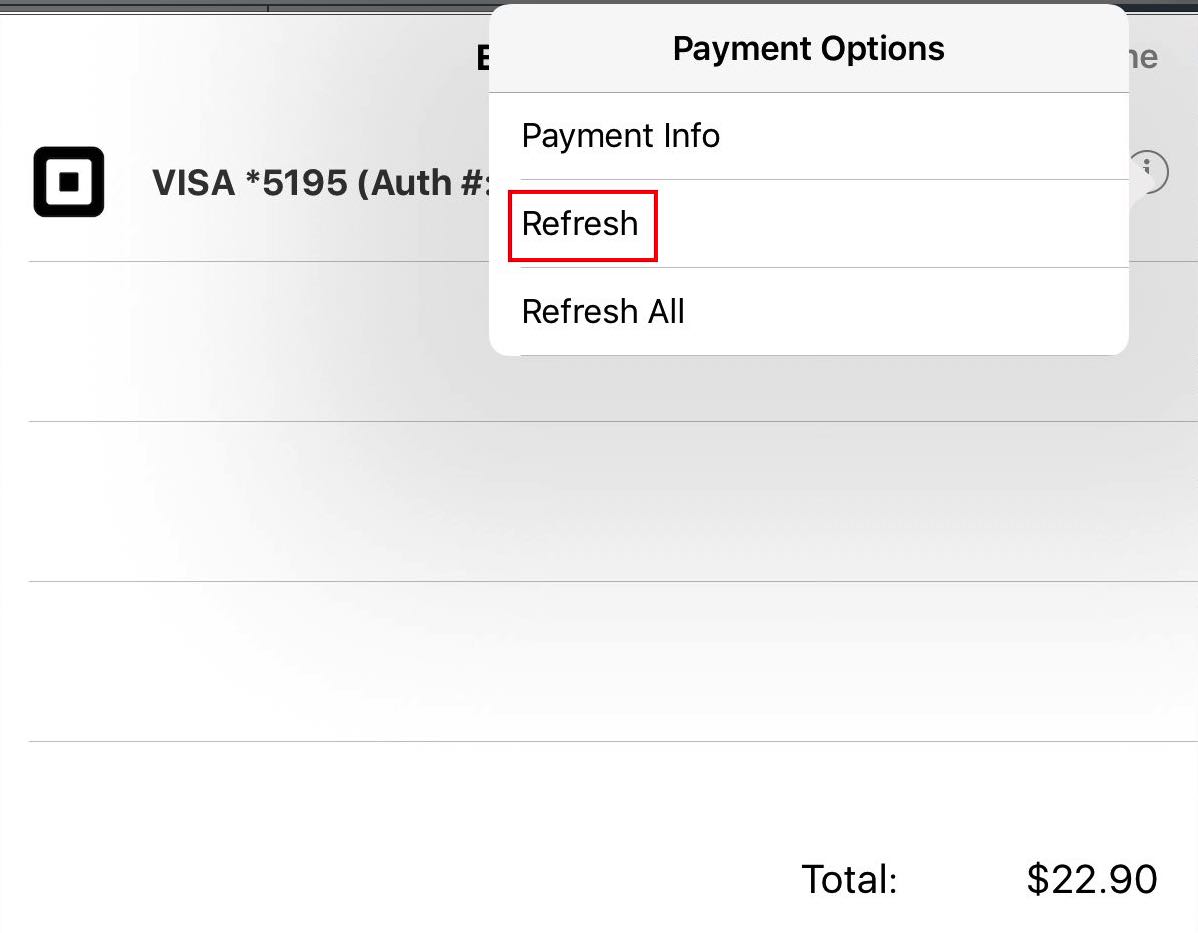
6. Tap Refresh. If you have many payments that need reconciliation, tap Refresh All.

7. TouchBistro will report it’s contacting the Square Point of Sale app for the tip information.
Chapter 9. Split by Seats
If customers prefer to split by seat and offer different methods of payment, follow these steps.
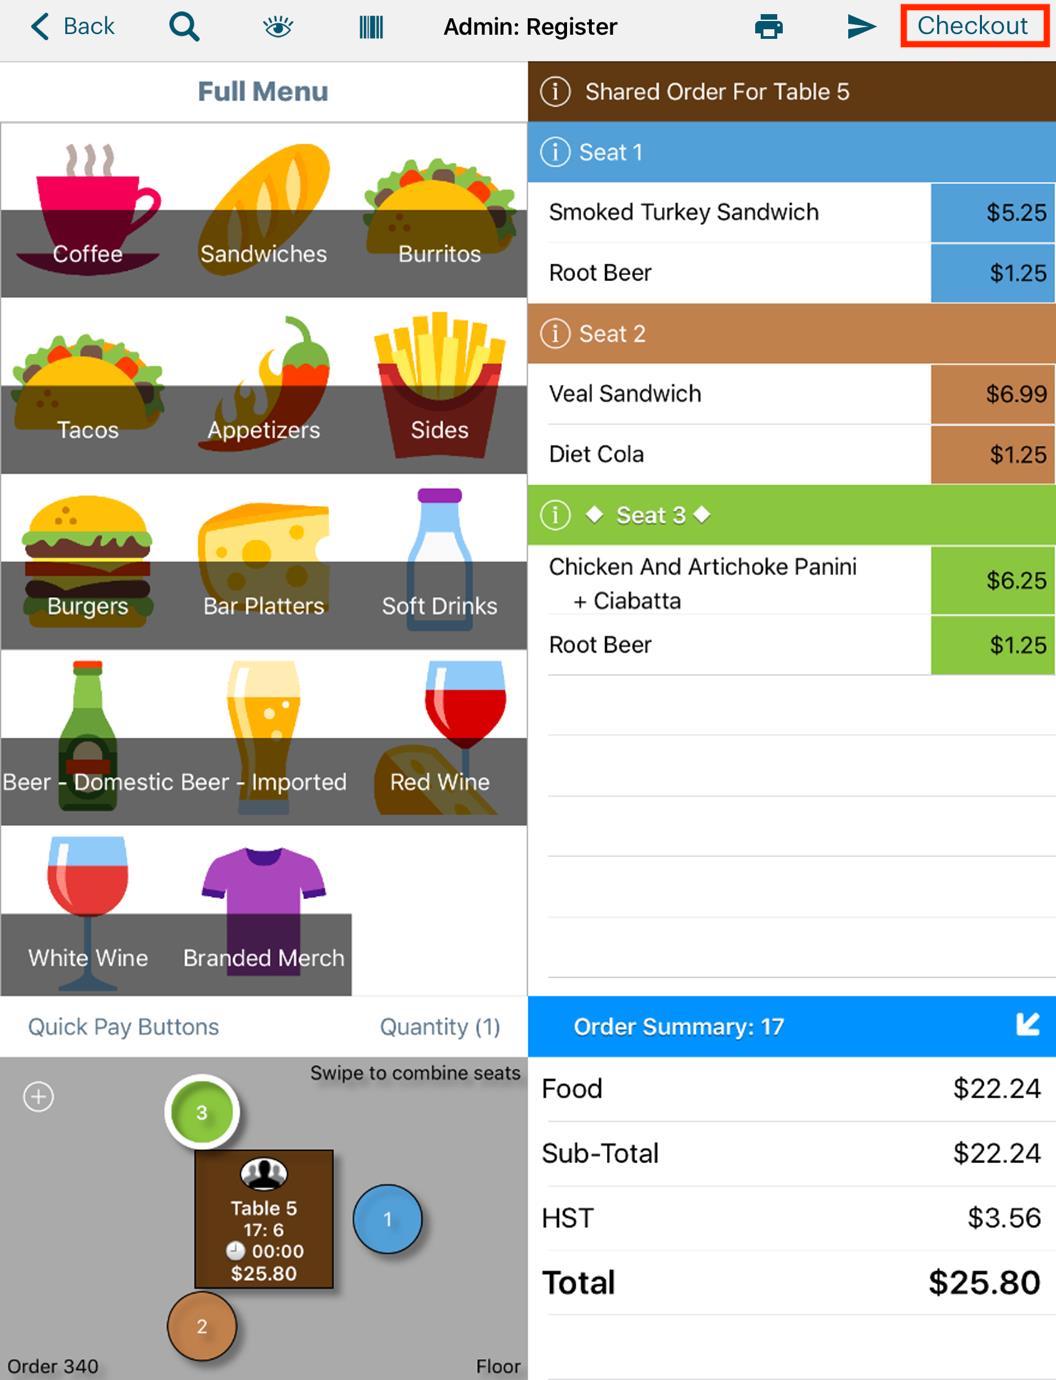
1. Tap the Checkout ![]() icon.
icon.
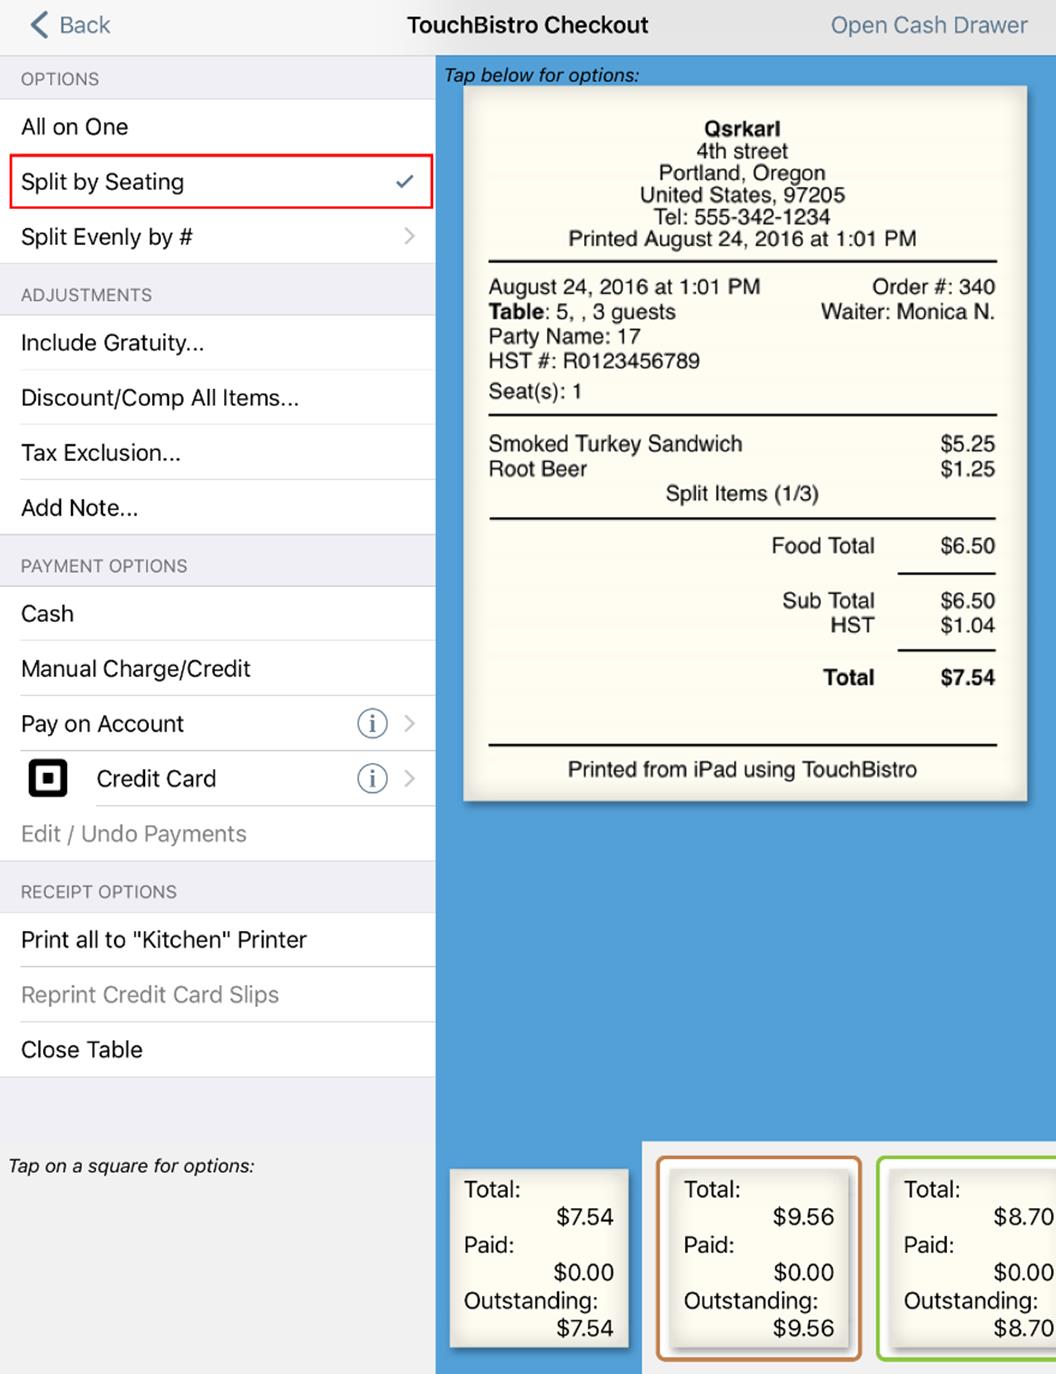
2. Tap Split by Seating. Seats are split out at the bottom of the screen.
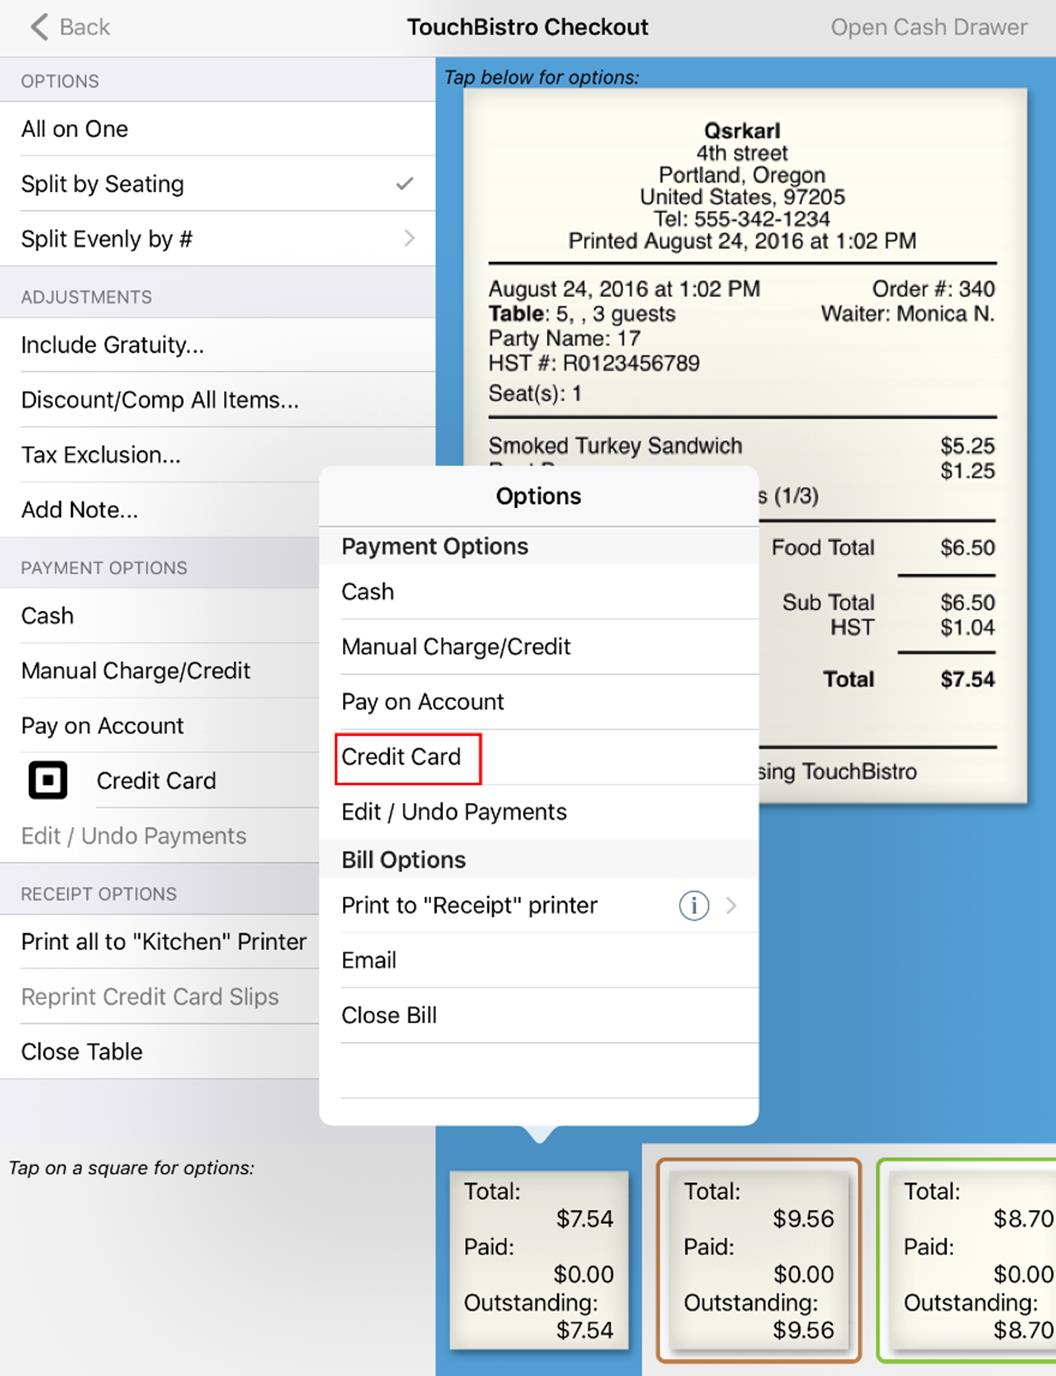
3. Tap the first seat that wants to pay. In this example, the seat wants to pay with a credit card. So tap Credit Card.
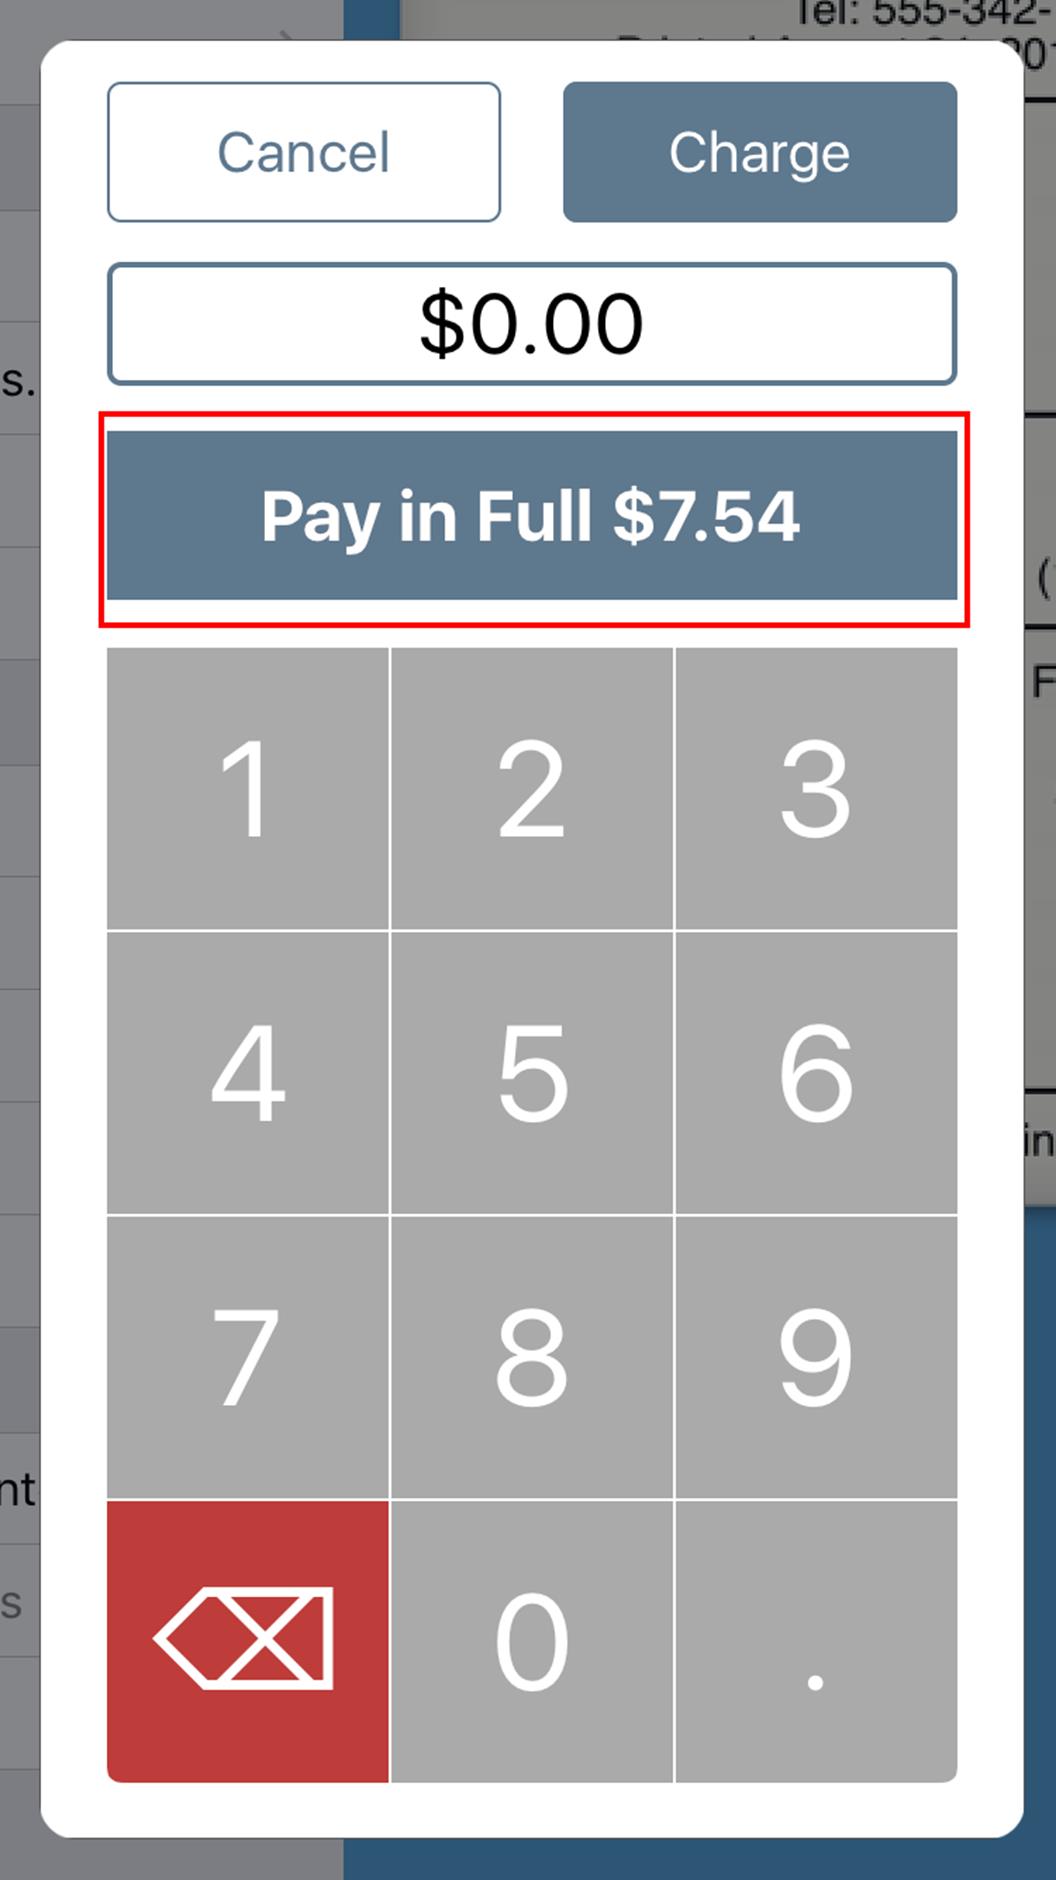
4. Tap Pay in Full.

5. You will be taken to Square Point of Sale app. Swipe the card and complete the transaction as normal.
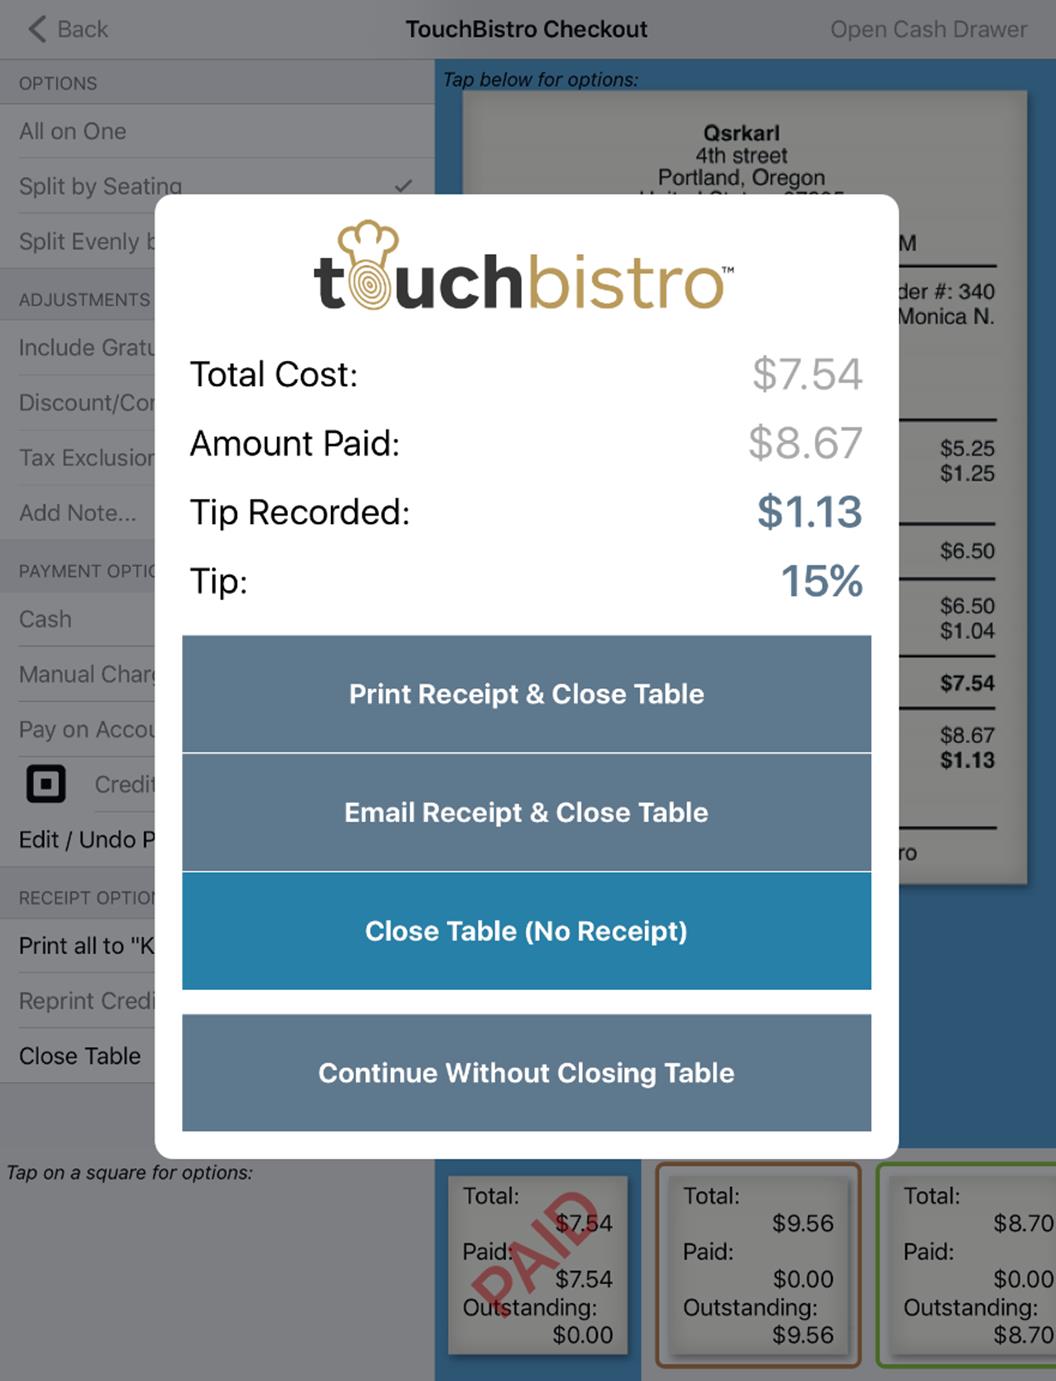
6. You are returned to TouchBistro. Close the seat.
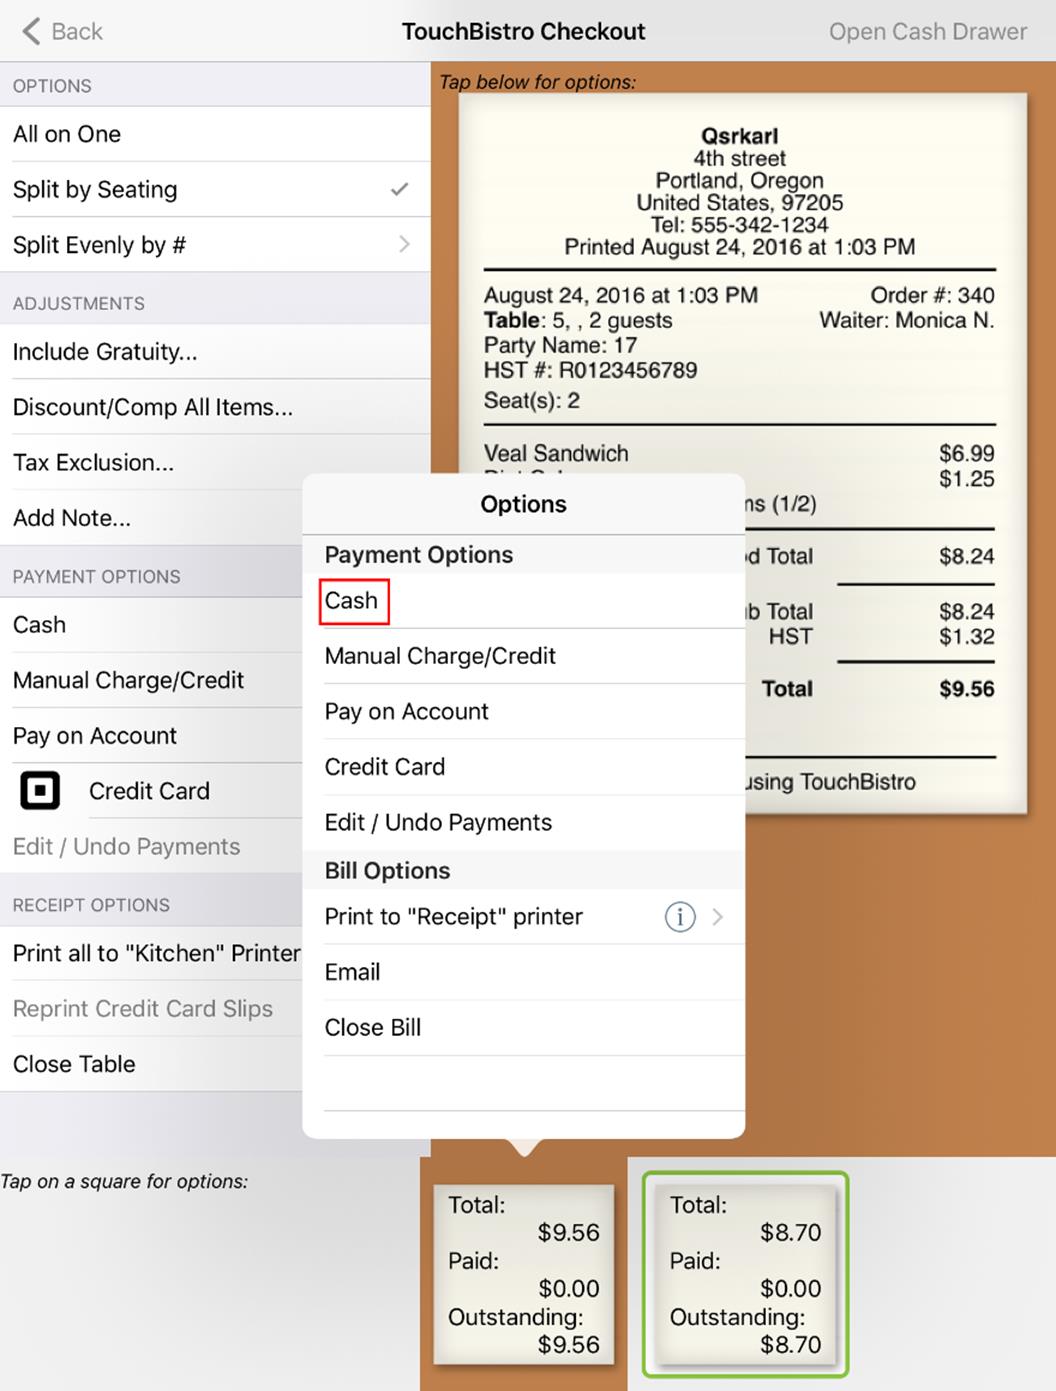
7. Tap the next seat that wants to pay. In this example, the next seat pays with cash.
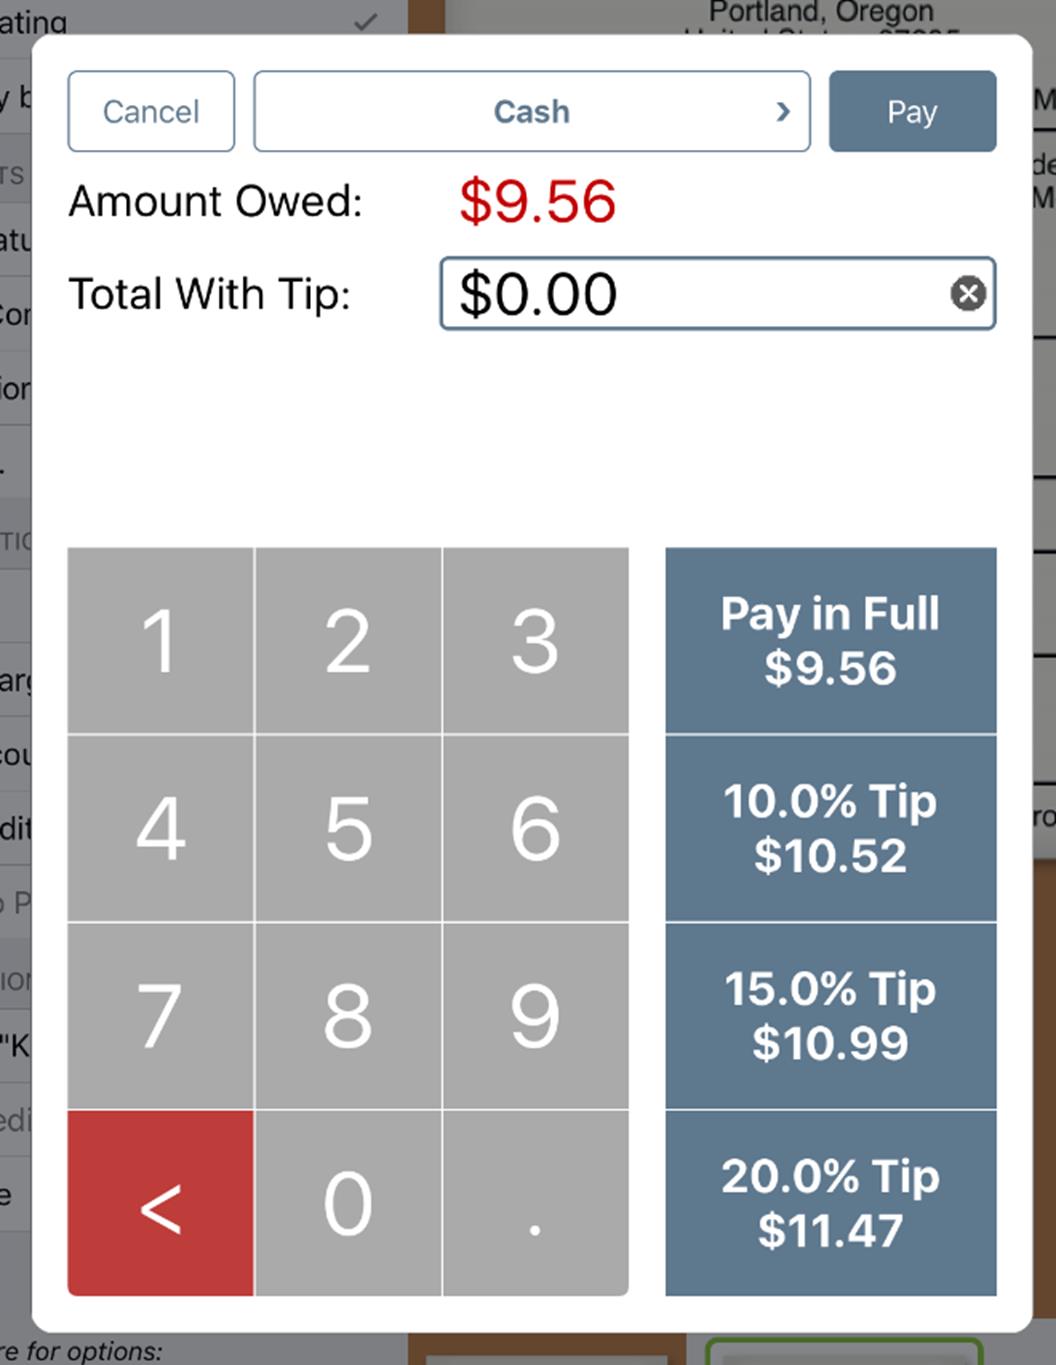
8. Enter the amount paid in cash and any cash tip added.
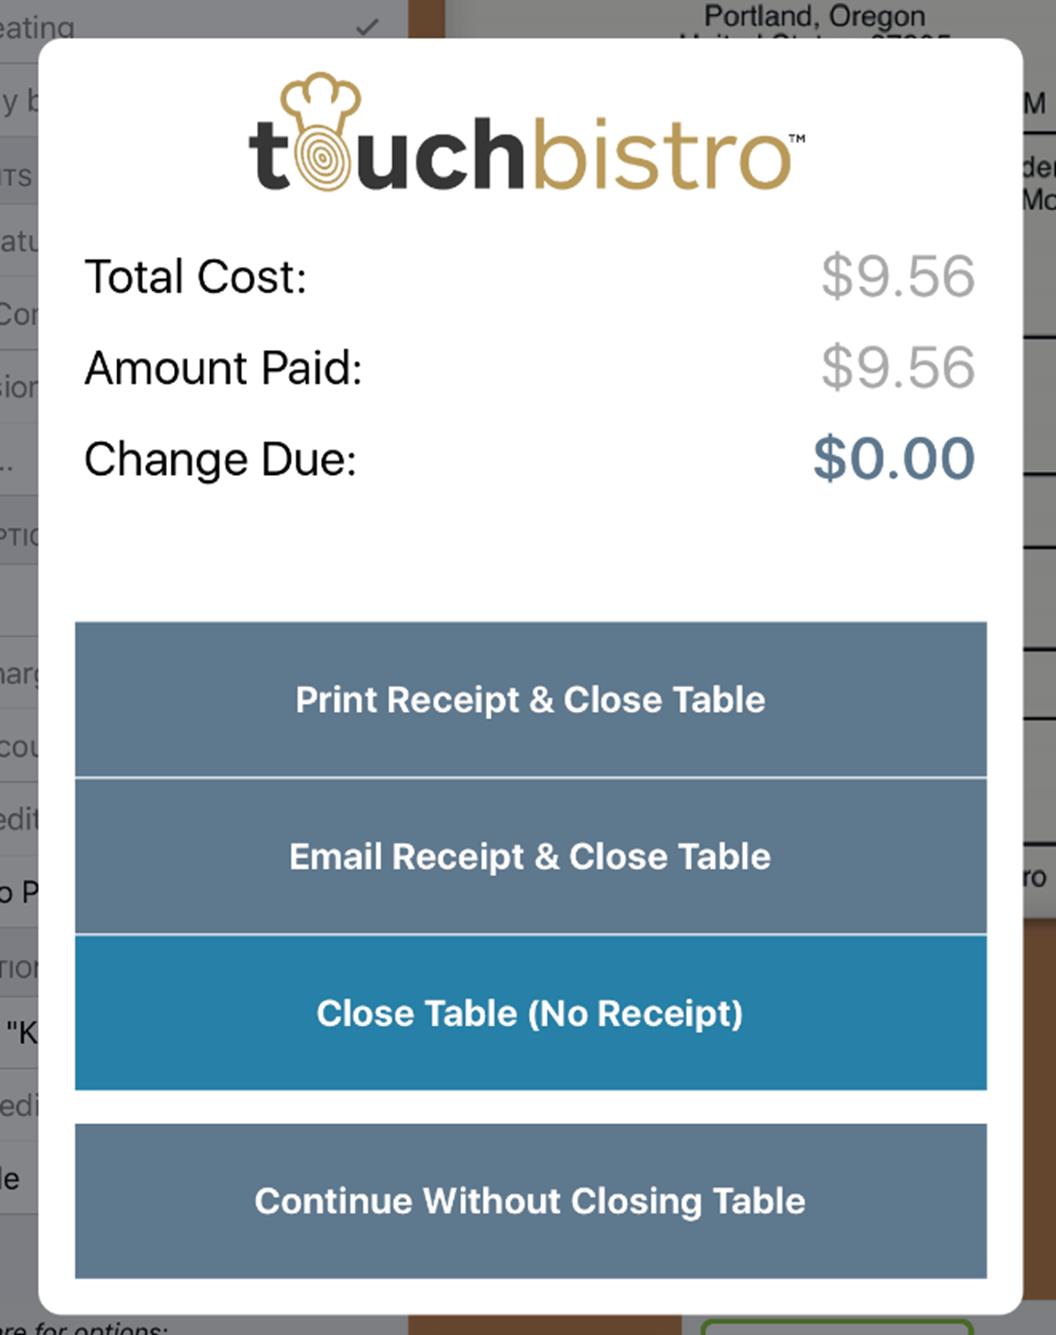
9. Close the seat. Note, closing a seat to cash, cash payments are not recorded in the Square Point of Sale app.

10. Tap on the next (or last) seat that needs to be closed. We’ll assume this last seat pays via credit card.

11. You will be taken to Square Point of Sale app. Swipe the card and complete the transaction as normal.
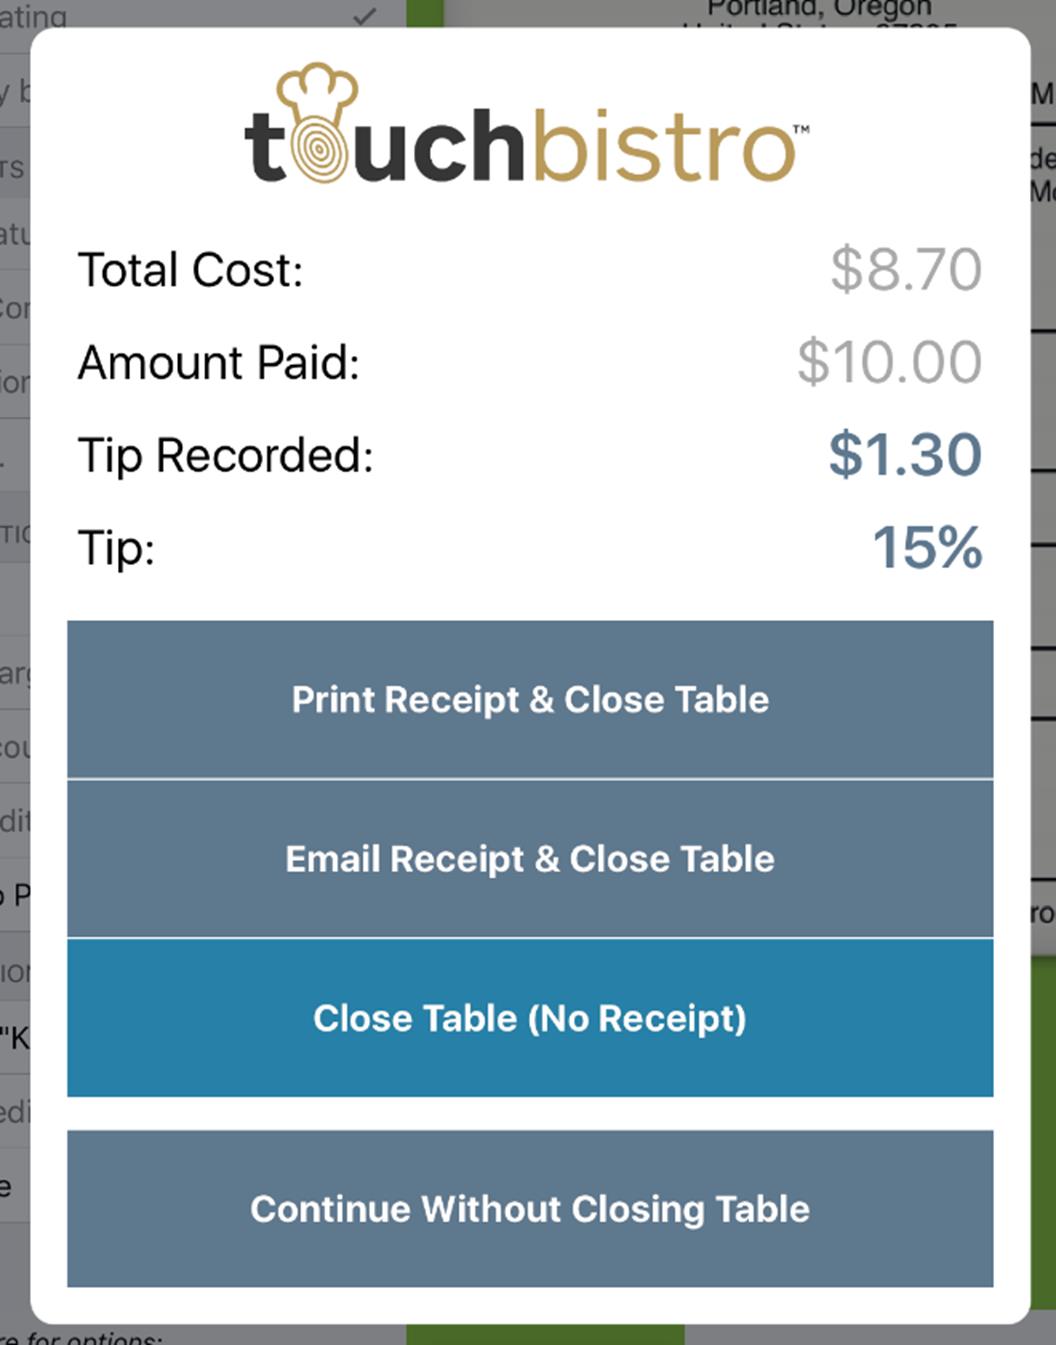
12. You are returned to TouchBistro. Close the seat. If this is the last seat, it also closes the table.
Chapter 10. Manual Entry – No Pre Auth
You use Square’s manual entry method if, for example, a customer’s card can’t be read by the card reader. However, it’s also useful for accepting phone payments for delivery orders or call ahead pick ups. Below are example steps on how to do a phone order for a delivery where the customers pays for the complete order ahead of time. That is, the customer does not charge a tip at time of delivery.
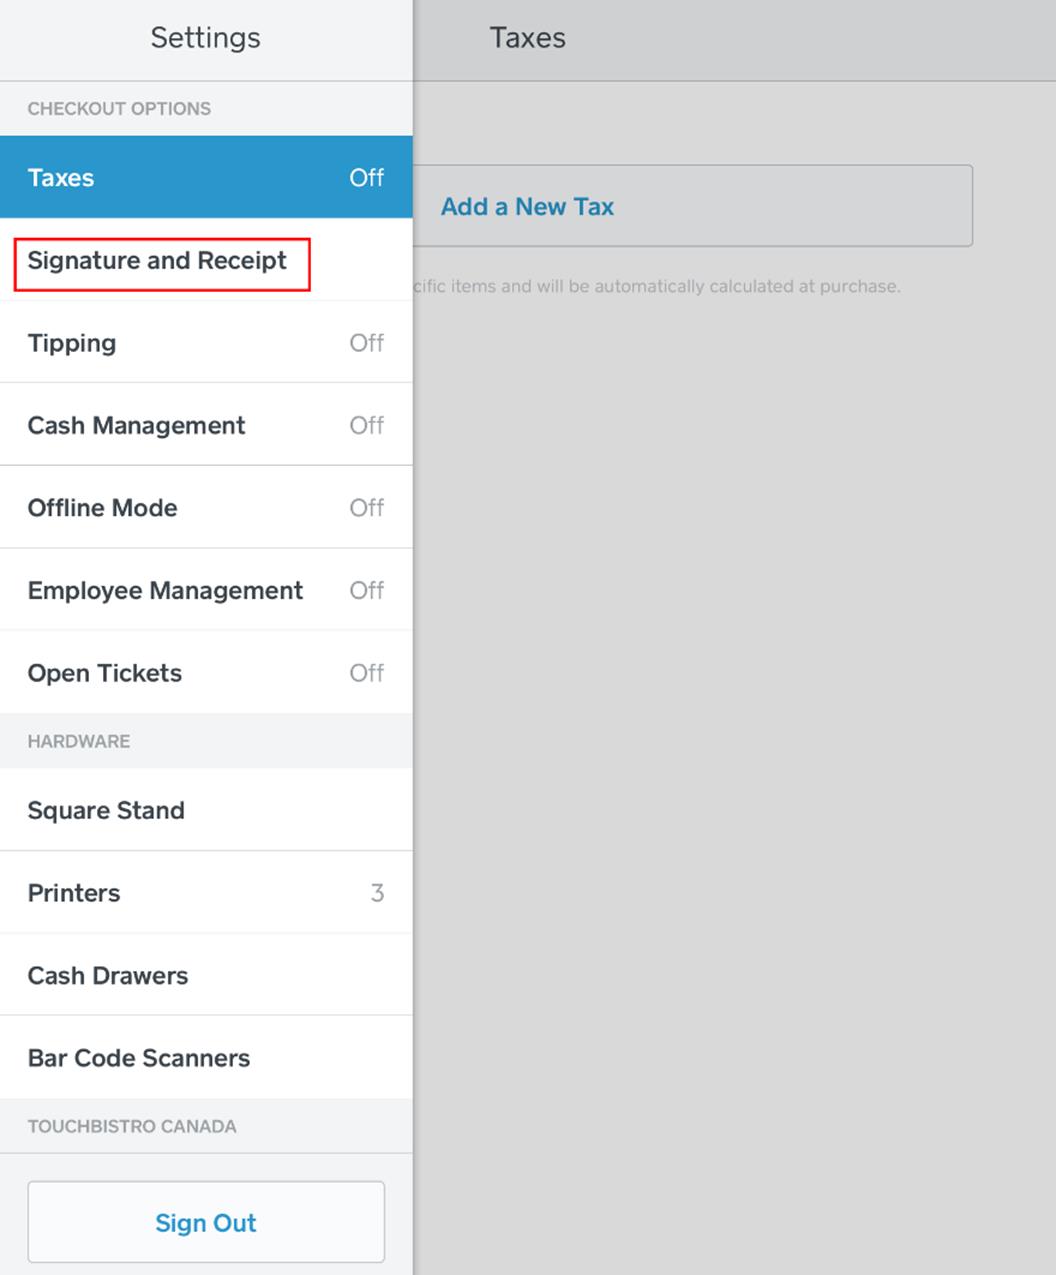
1. First, open the Square Point of Sale app and tap Settings | Signature and Receipt.
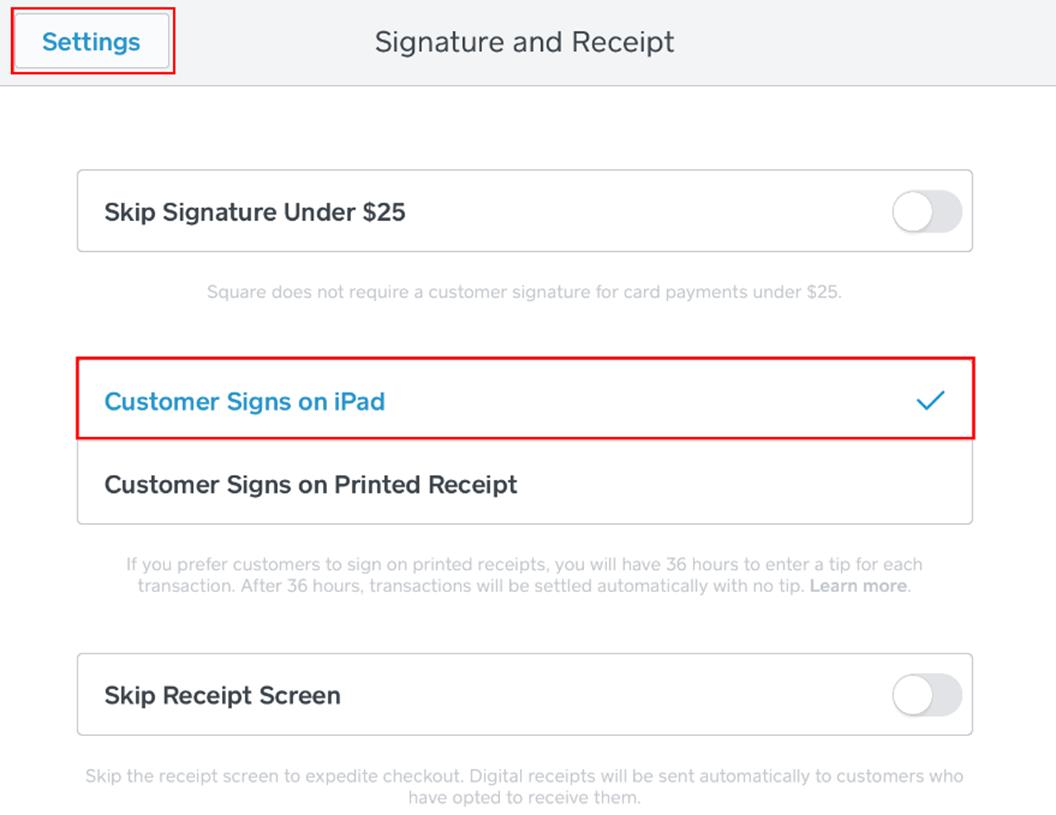
2. Verify Customer Signs on iPad is selected.

3. Tap Orders.
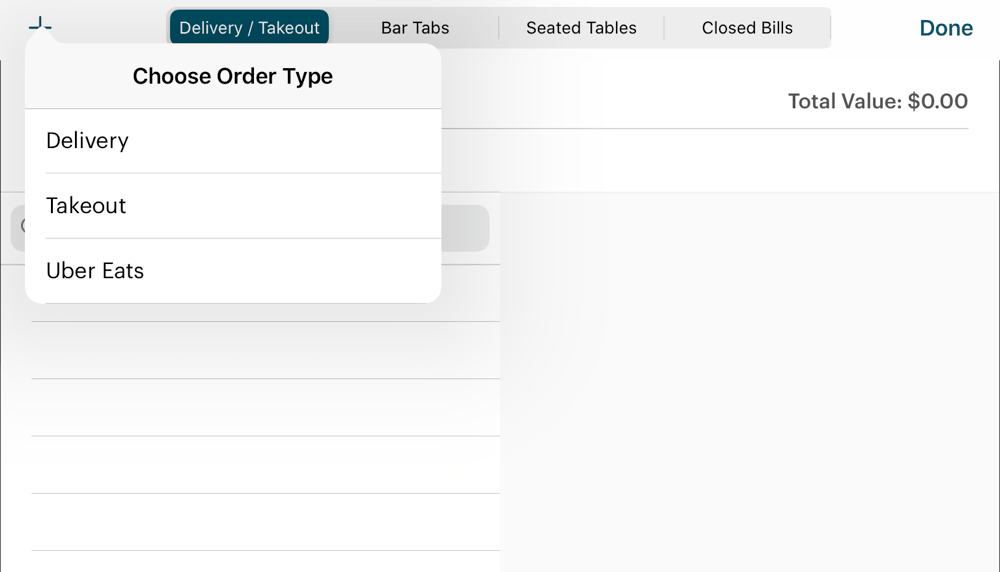
4. Tap the Take-Out/Delivery tab and tap the Add ![]() icon. Tap Delivery.
icon. Tap Delivery.
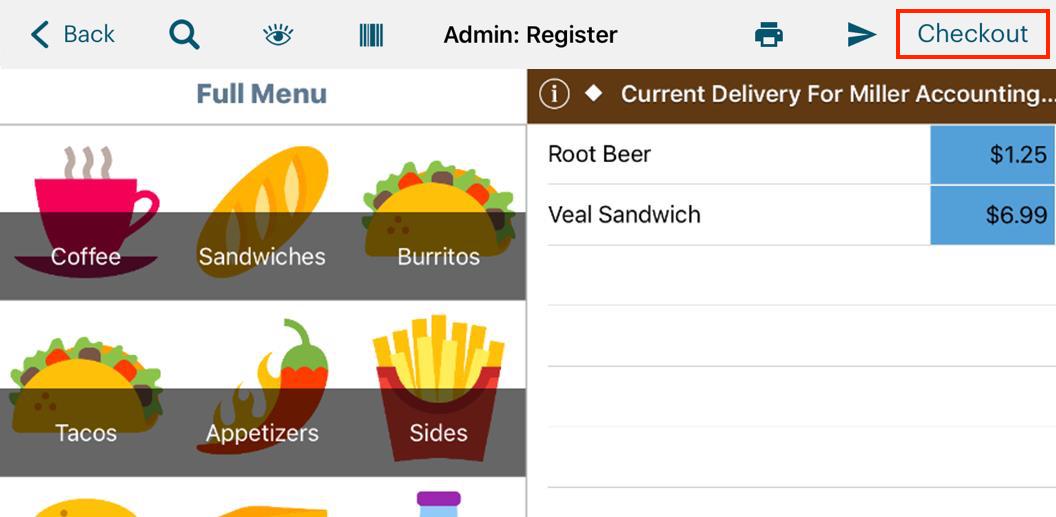
5. Tap Checkout.
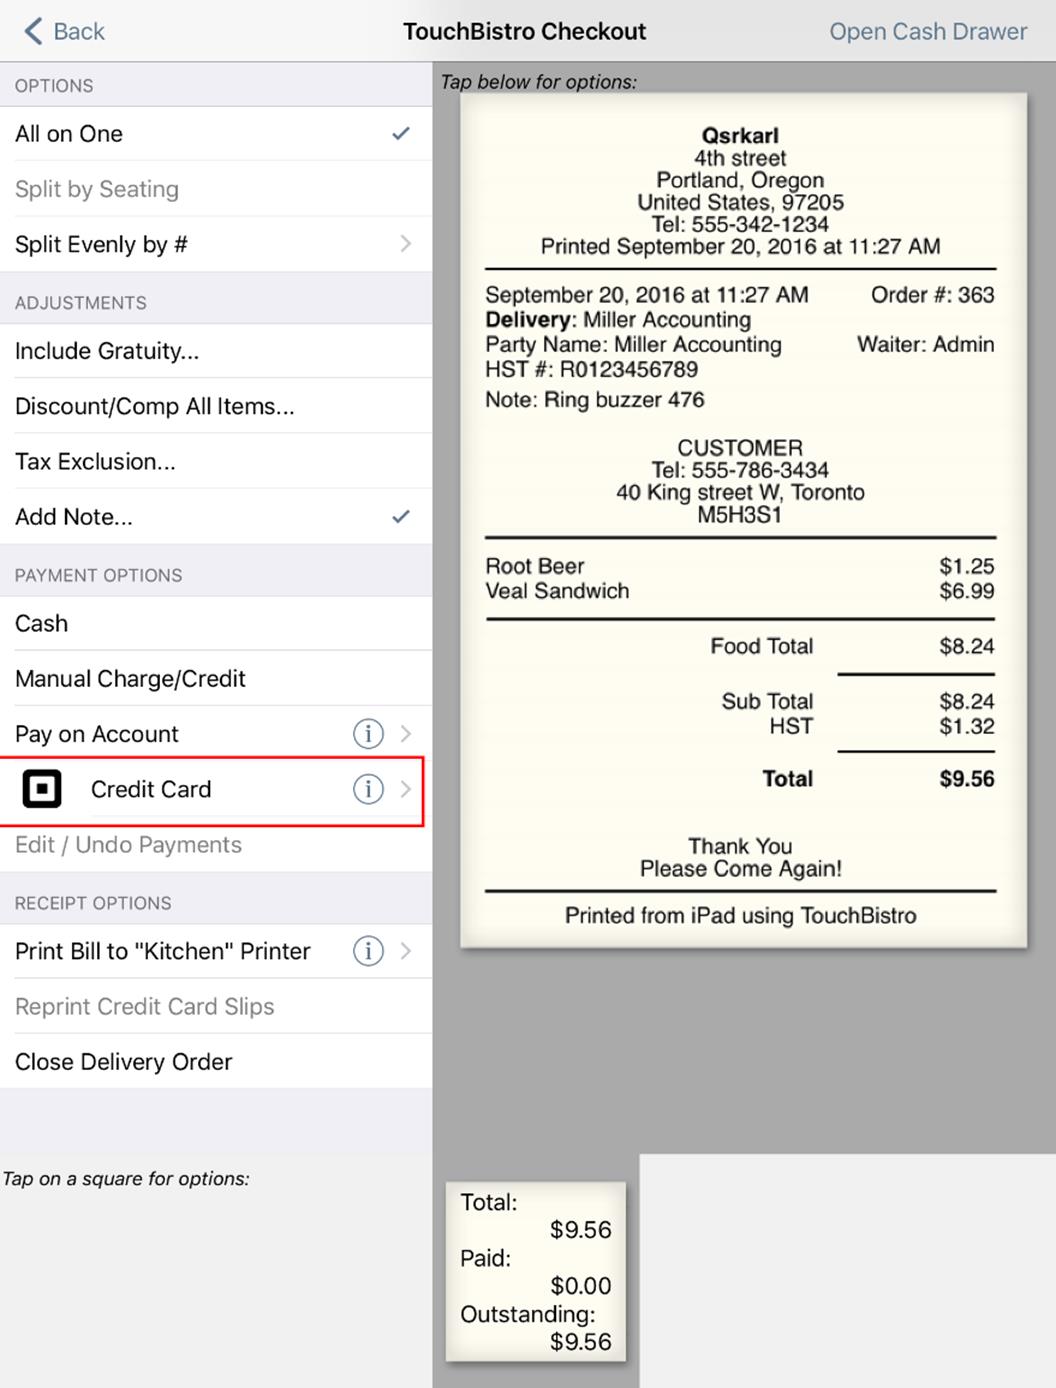
6. Tap Credit Card.

7. Tap Pay in Full.
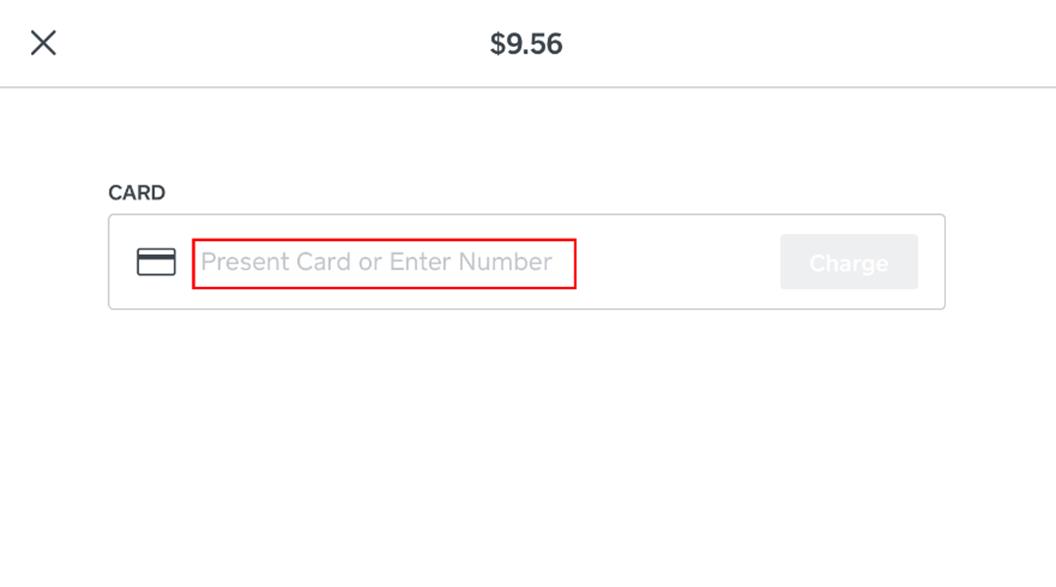
8. You will be switched over to the Square Point of Sale app. Instead of swiping, tap on Present Card or Enter Number.
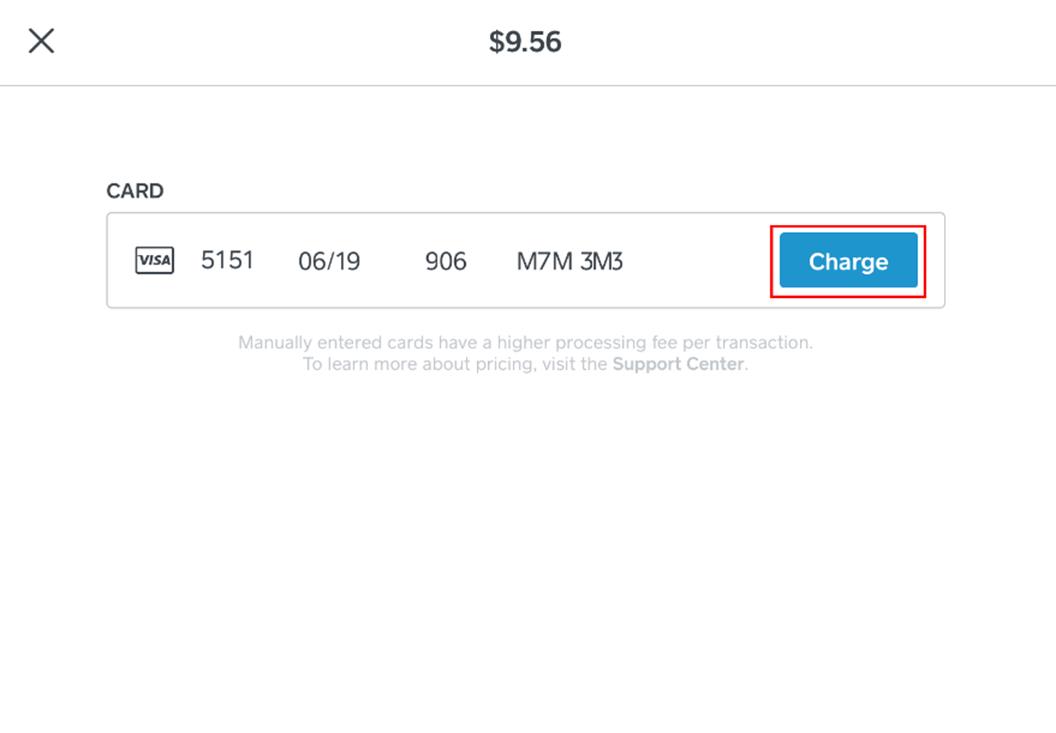
9. Request the customer card number, expiry date, CCV, and postal or zip code. The Square Point of Sale app will prompt you through entry of each of all required details. Tap Charge.

10. Complete any offer if tip or tap No Tip.
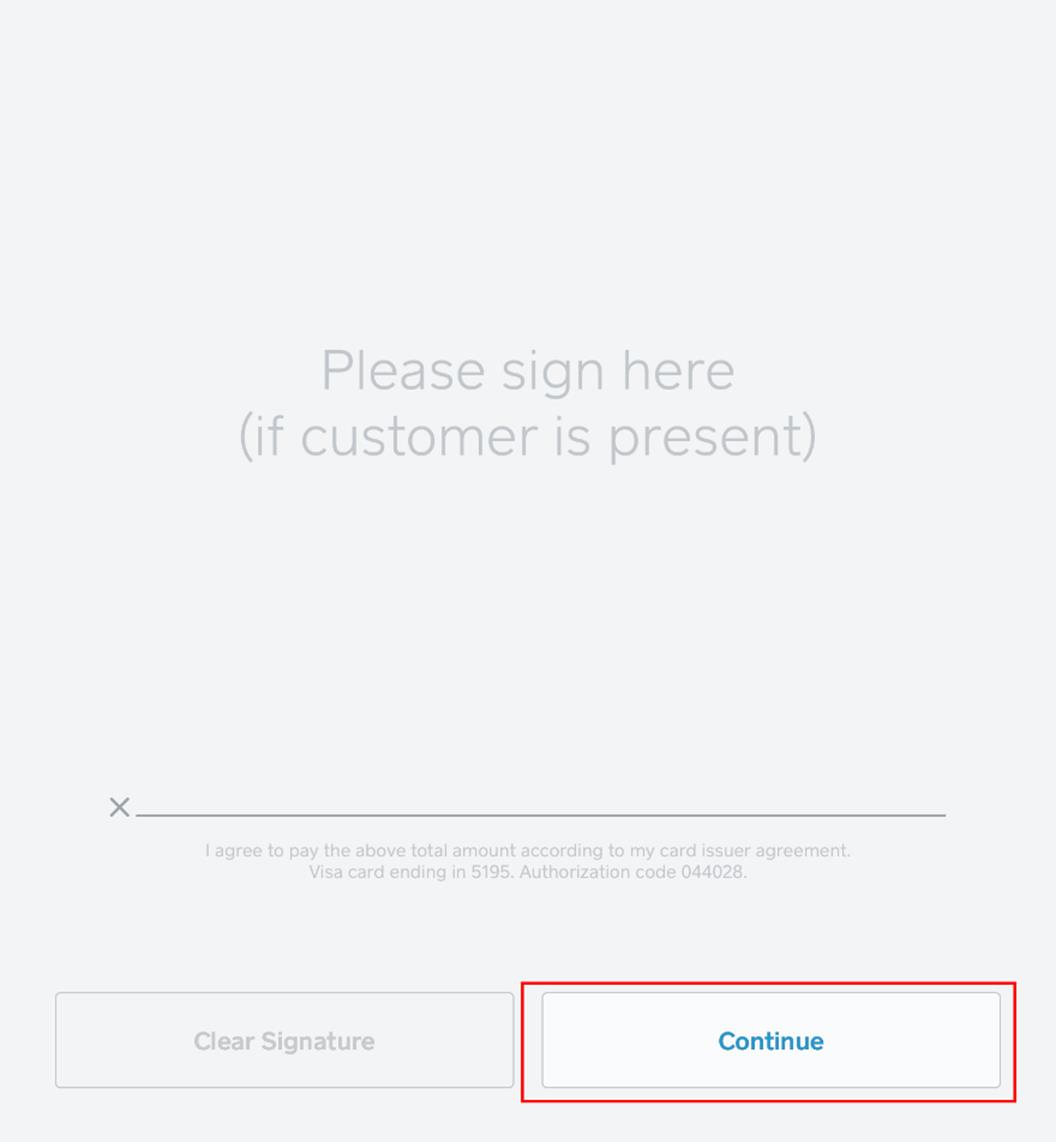
11. Tap Continue.
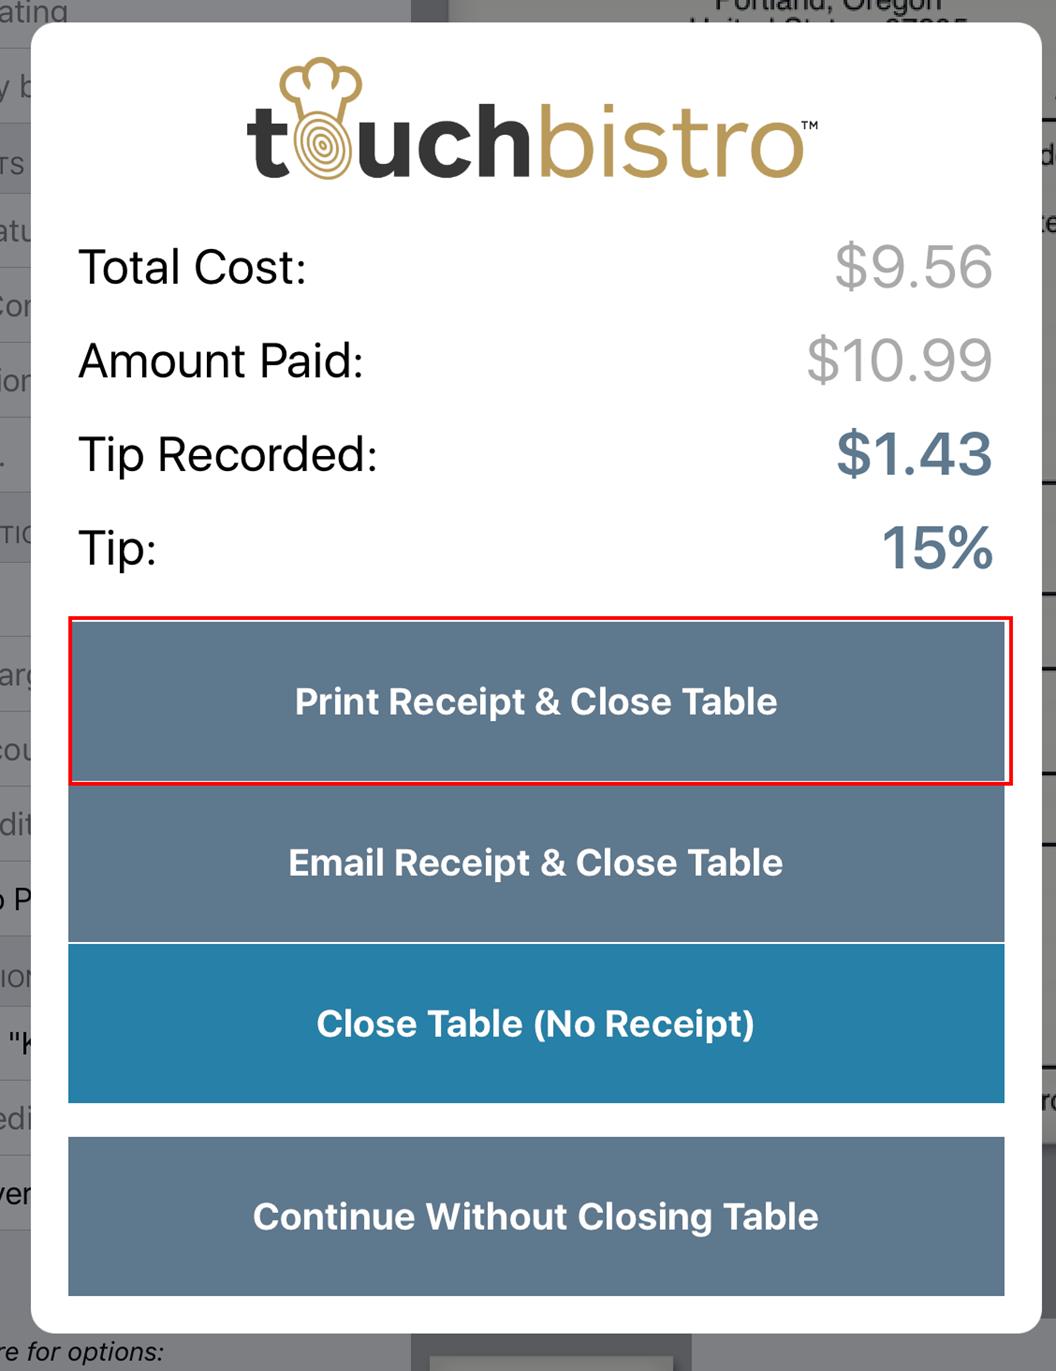
12. You are returned to TouchBistro. Print a receipt to give to the delivery person and close the order.
Chapter 11. Manual Entry – With Pre Auth
If you take phone-in delivery orders and would rather have customers enter a tip on a printed receipt, you can use the pre-auth method.

1. First, open the Square Point of Sale app and tap Settings | Signature and Receipt.

2. Verify Customer Signs on Printed Receipt was selected.

3. Tap Orders.

4. Tap the Take-Out/Delivery tab and tap the Add ![]() icon. Tap Delivery.
icon. Tap Delivery.

5. Tap Checkout.

6. Tap Credit Card.

7. Tap Pay in Full.

8. You will be switched over to the Square Point of Sale app. Instead of swiping, tap on Present Card or Enter Number.

9. Request the customer card number, expiry date, CCV, and postal or zip code. The Square Point of Sale app will prompt you through entry of each of all required details. Tap Charge.
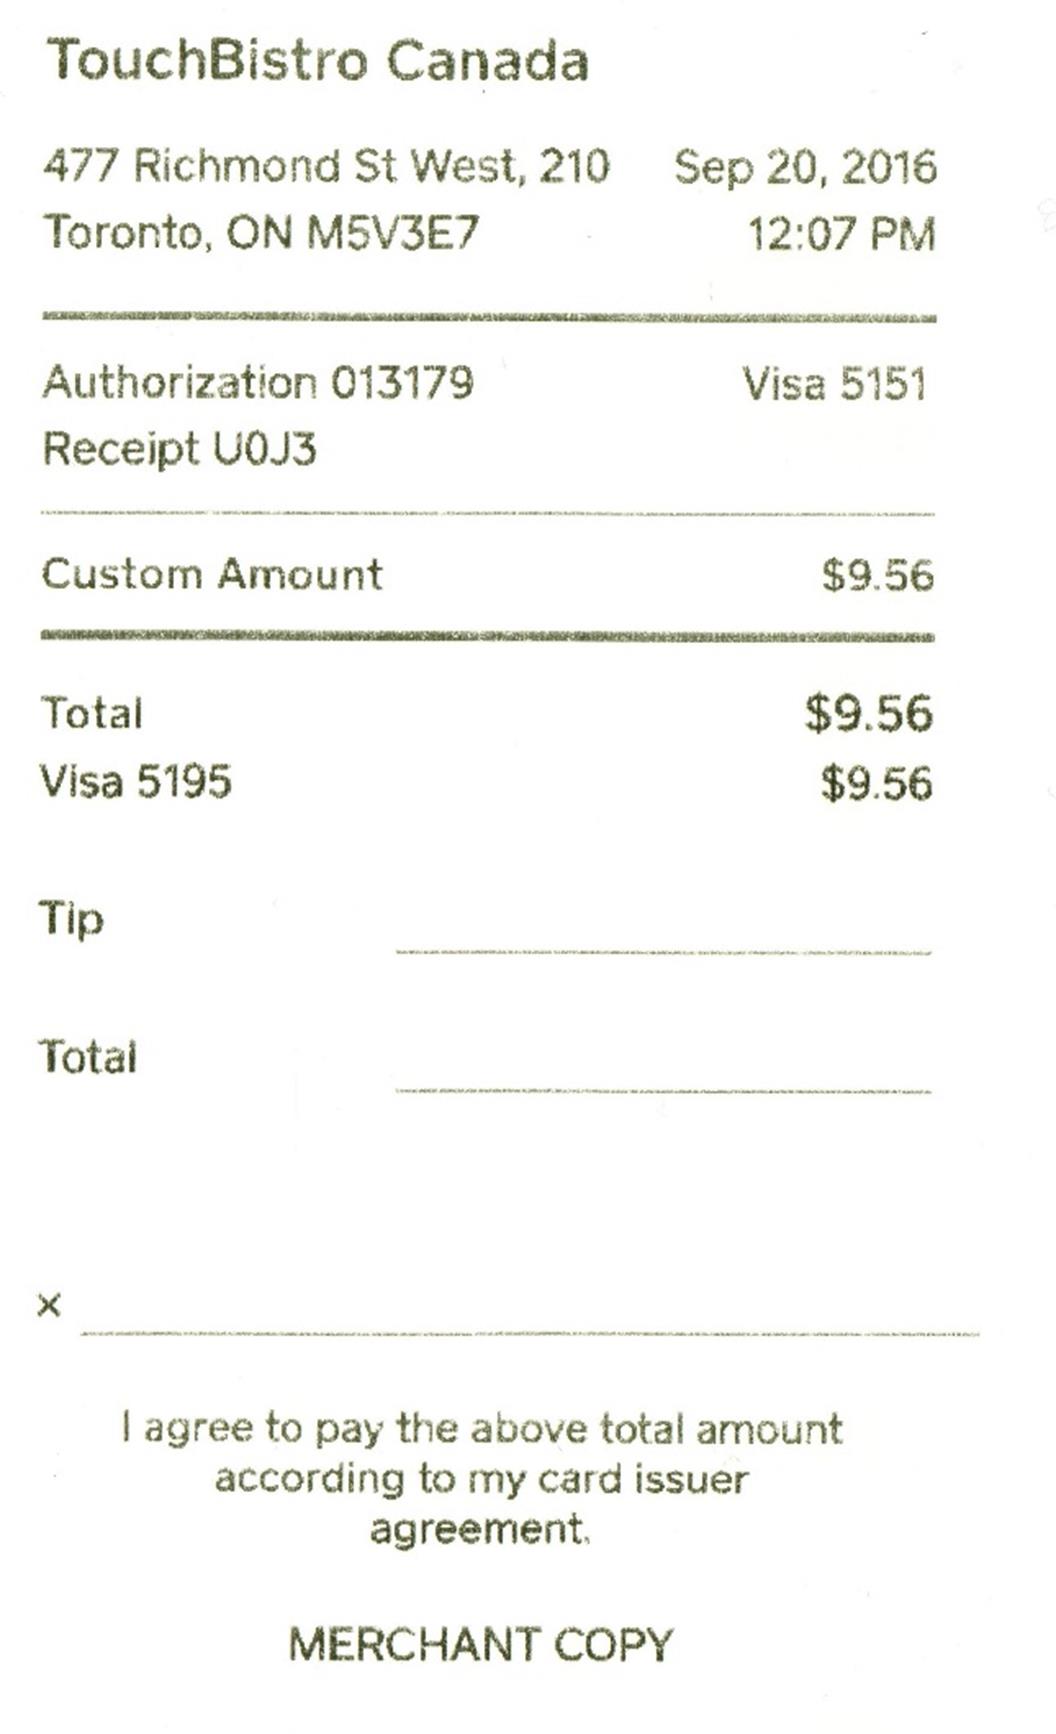
10. Square will print a merchant copy for the customer to sign. Retrieve that from the printer and give it to the delivery person.
11. You are returned to TouchBistro. Print a receipt to give to the delivery person and close the order.
12. When the delivery person returns, you now need to complete the pre-auth.
13. Retrieve the merchant copy from the delivery person with the entered tip and signature.
14. Switch to the Square Point of Sale app.

15. Tap the Options ![]() icon at the bottom of the screen.
icon at the bottom of the screen.

16. Tap Transactions.

17. Locate and tap the payment with the small clock icon, indicating you need to complete the tip pre-auth.
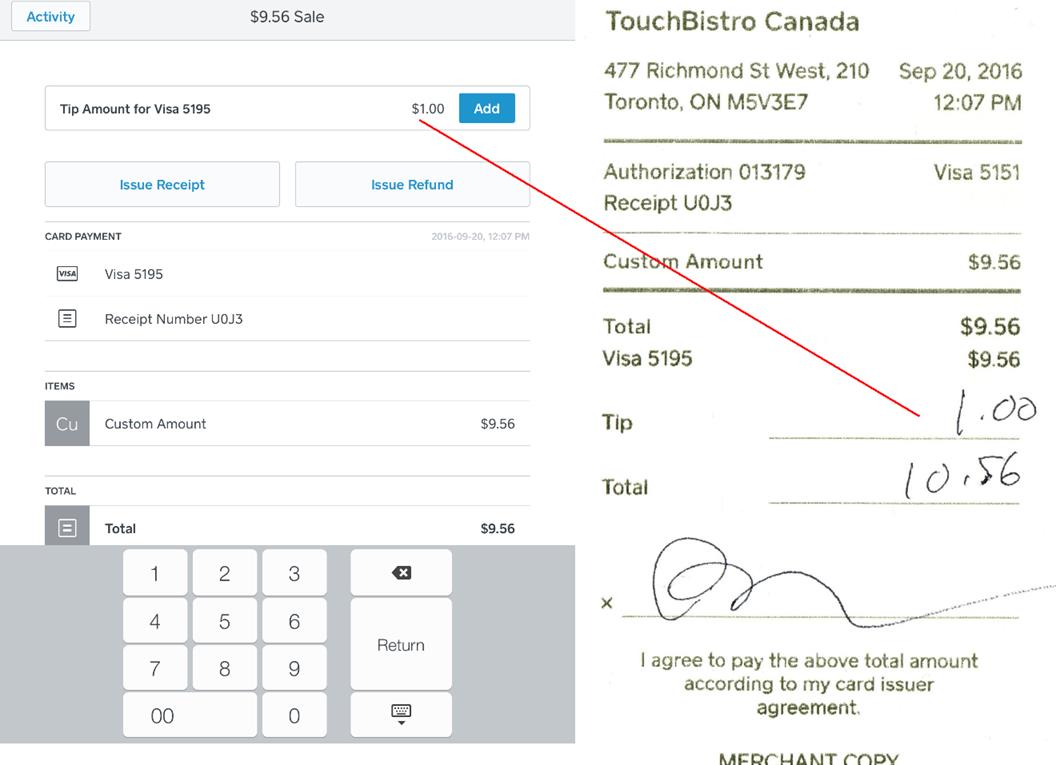
18. Enter the tip written on the customer copy.
19. Tap Add.
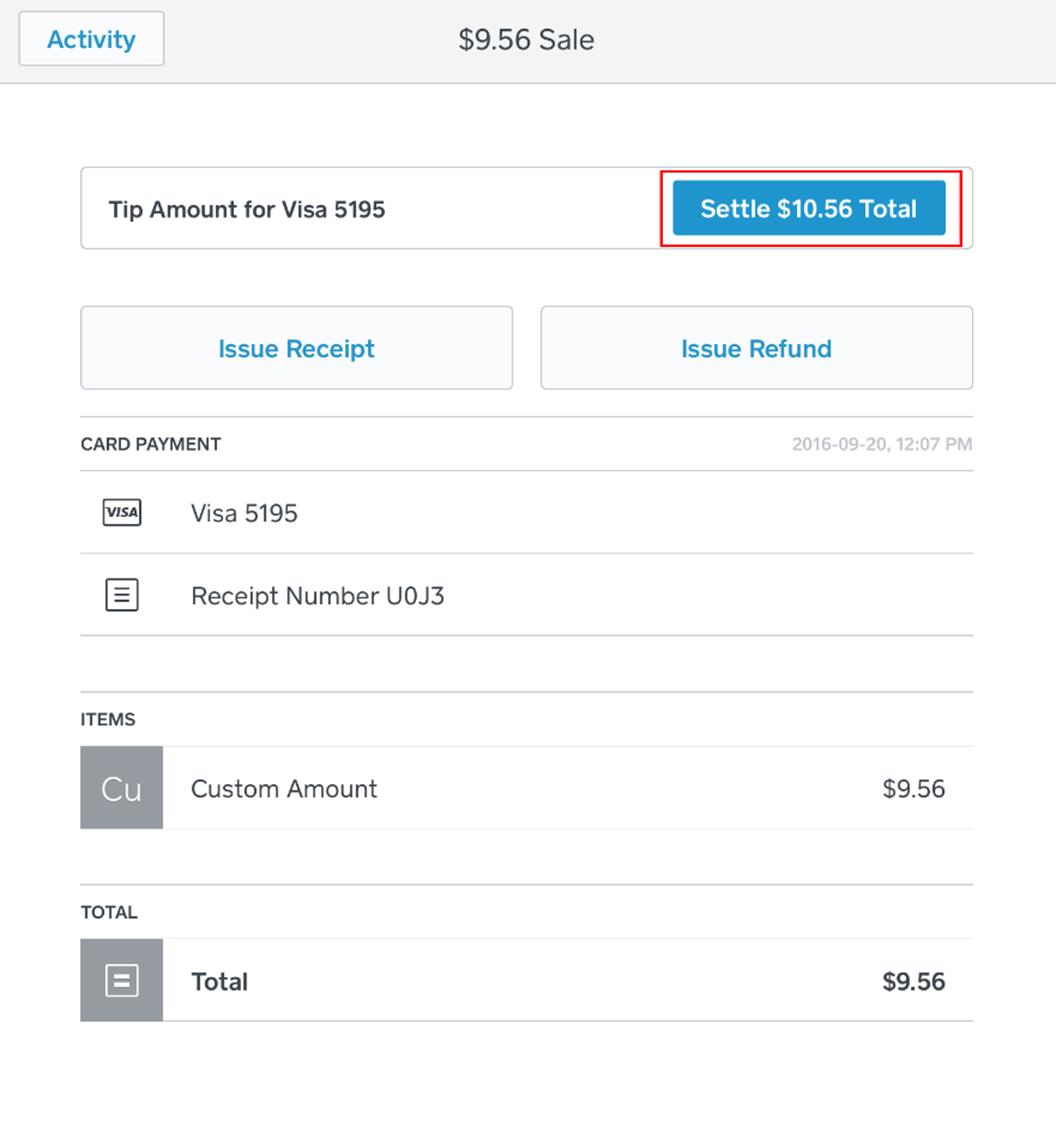
20. Verify the final settlement total and tap Settle.
21. Open TouchBistro.

22. Tap Orders.
23. Tap the All Closed Bills tab and locate the orders with Tip Required next to it.

24. Tap the order.

25. Tap the order again.
26. TouchBistro will report its contacting the Square Point of Sale app for the tip information.

27. After a moment, TouchBistro will update the bill with the tip.
Chapter 12. Offline Payments (USA/Canada Only)
If you lose Internet connectivity, TouchBistro and Square can still work together in an offline mode.
Section 1. Set the Square Point of Sale App for Offline Mode

1. On the Square Point of Sale app tap the Options ![]() icon at the bottom of the screen.
icon at the bottom of the screen.

2. Tap Settings.
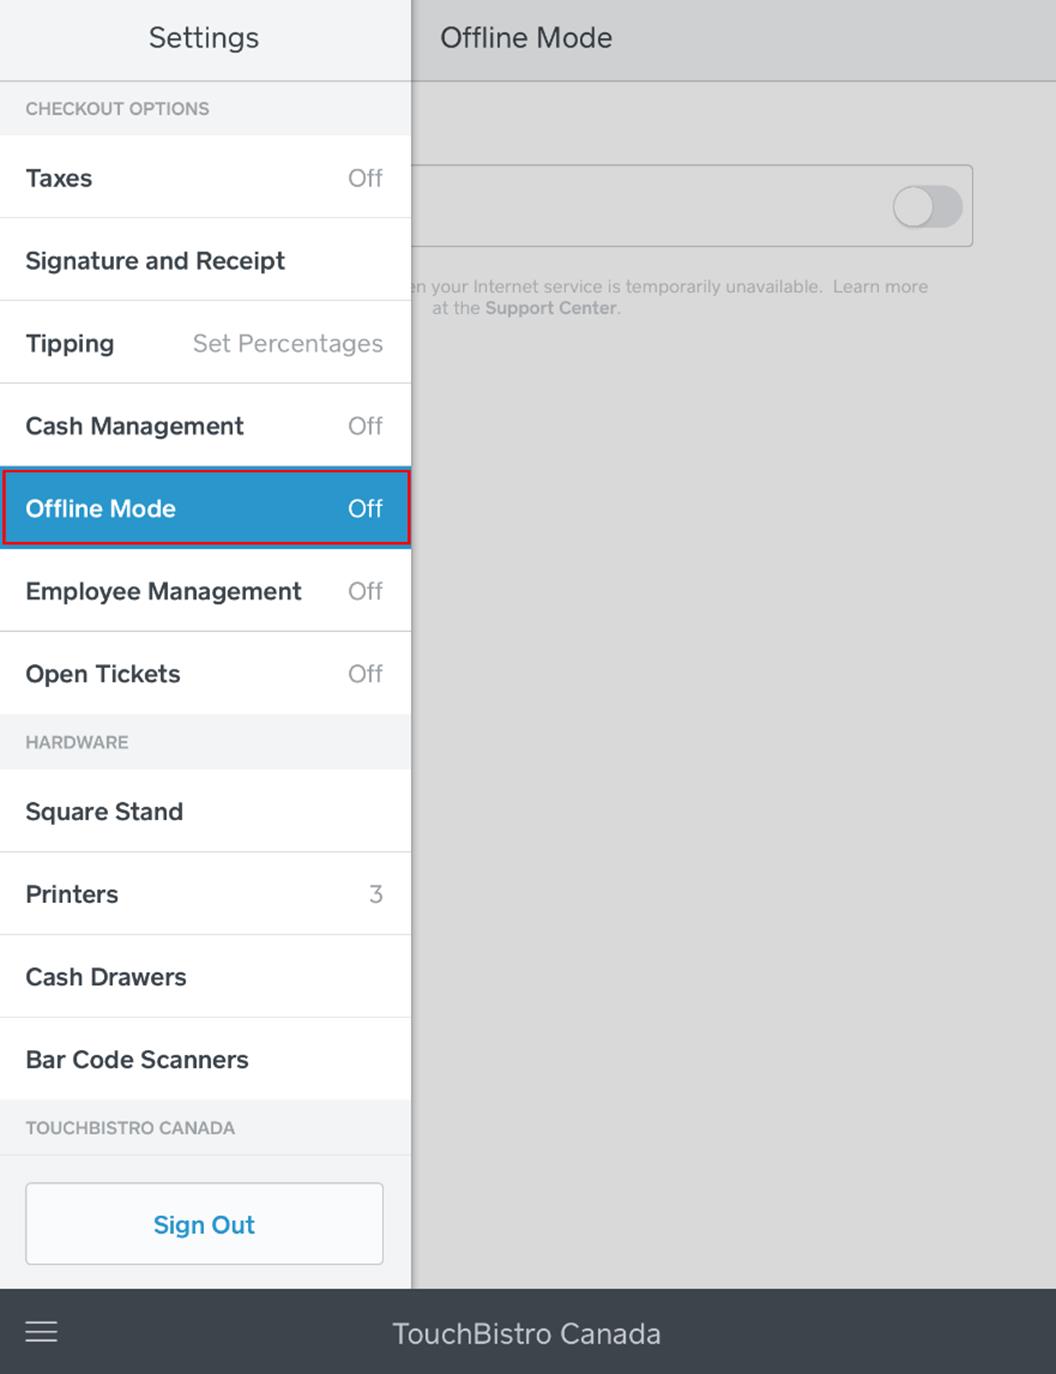
3. Tap Offline Mode.
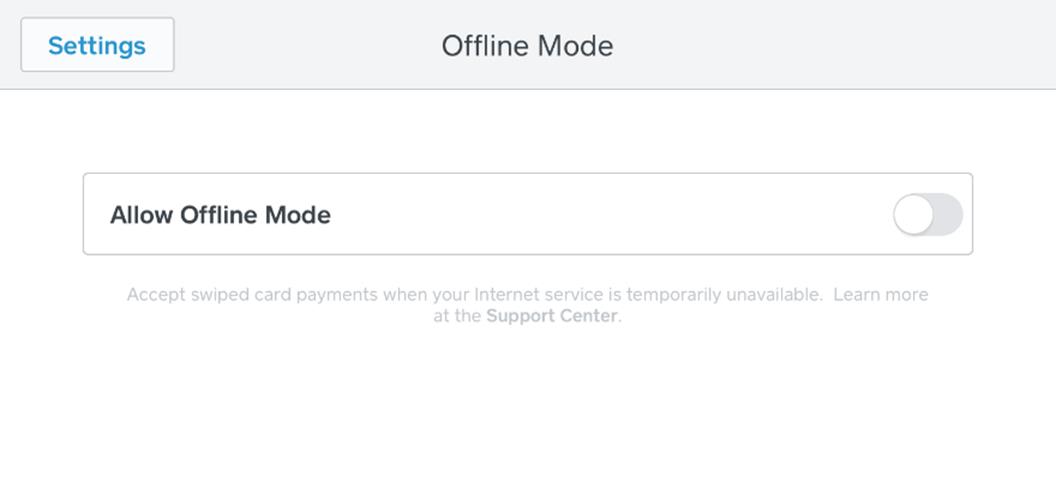
4. Slide Allow Offline Mode to the enabled position.
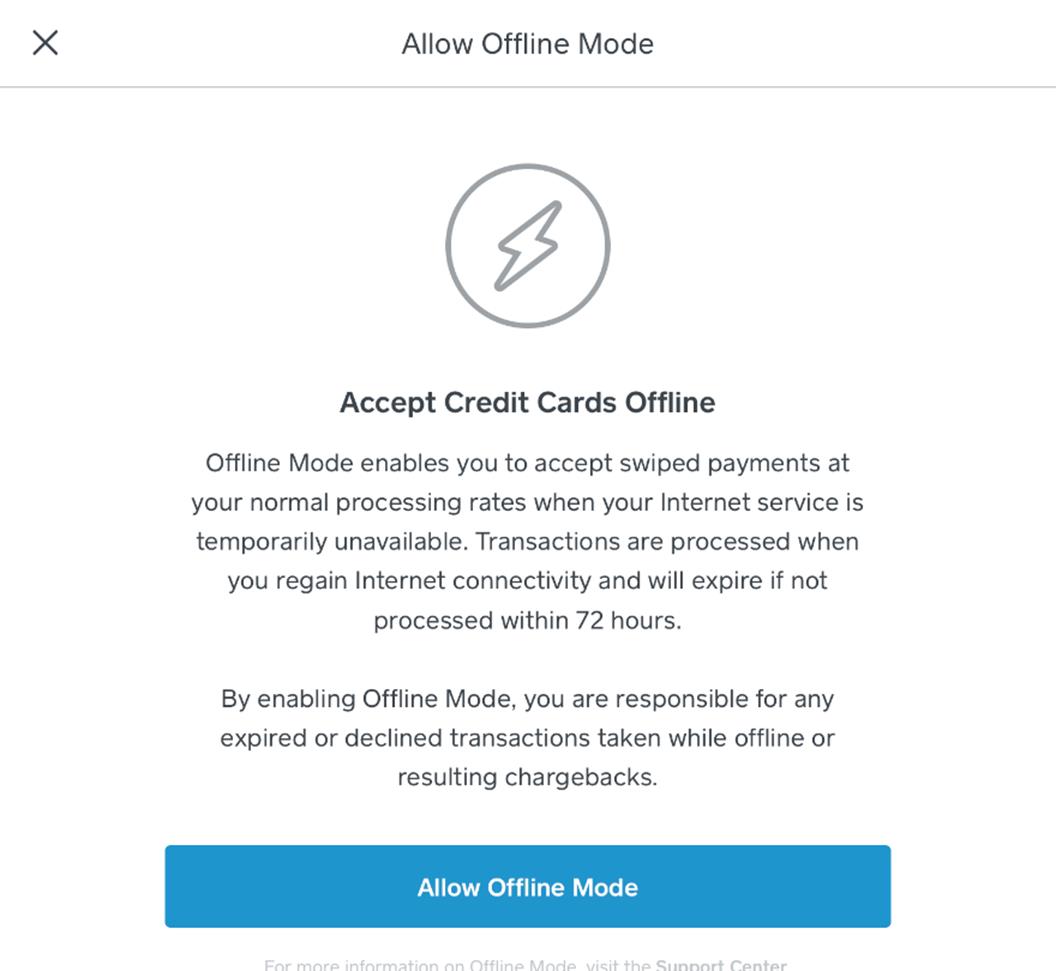
5. Note the risks and tap Allow Offline Mode.
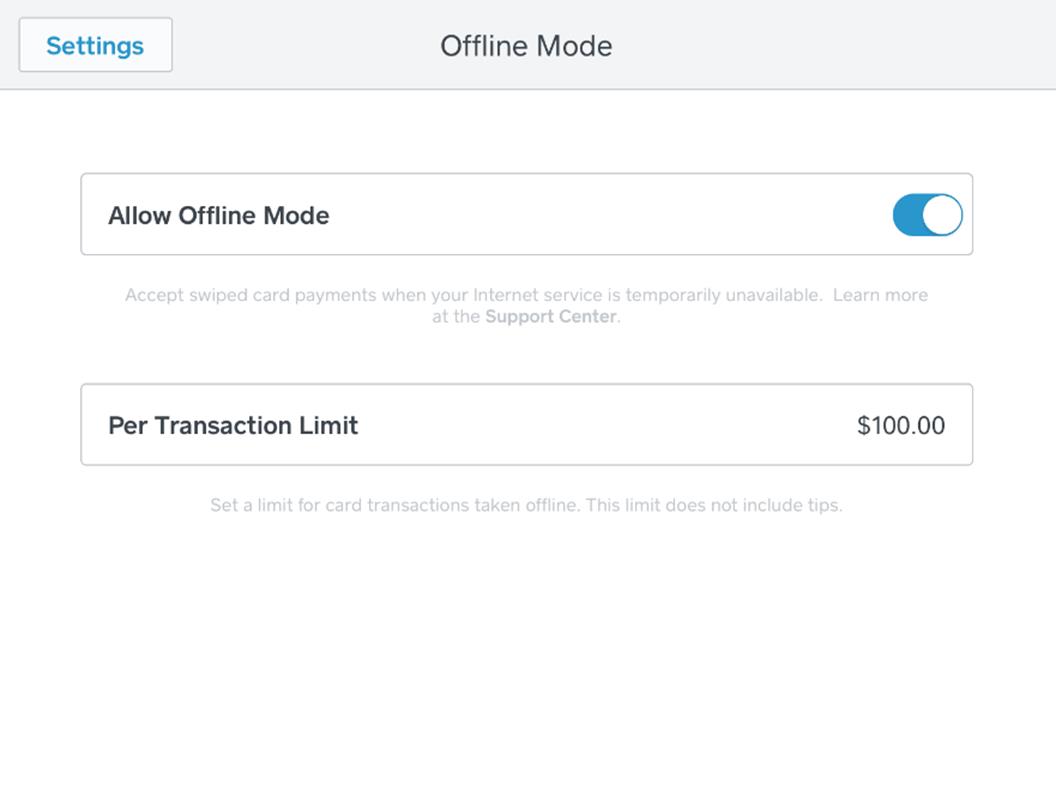
6. Adjust the transaction limit if desired.
Section 2. Processing a Sign on Screen Offline Payment
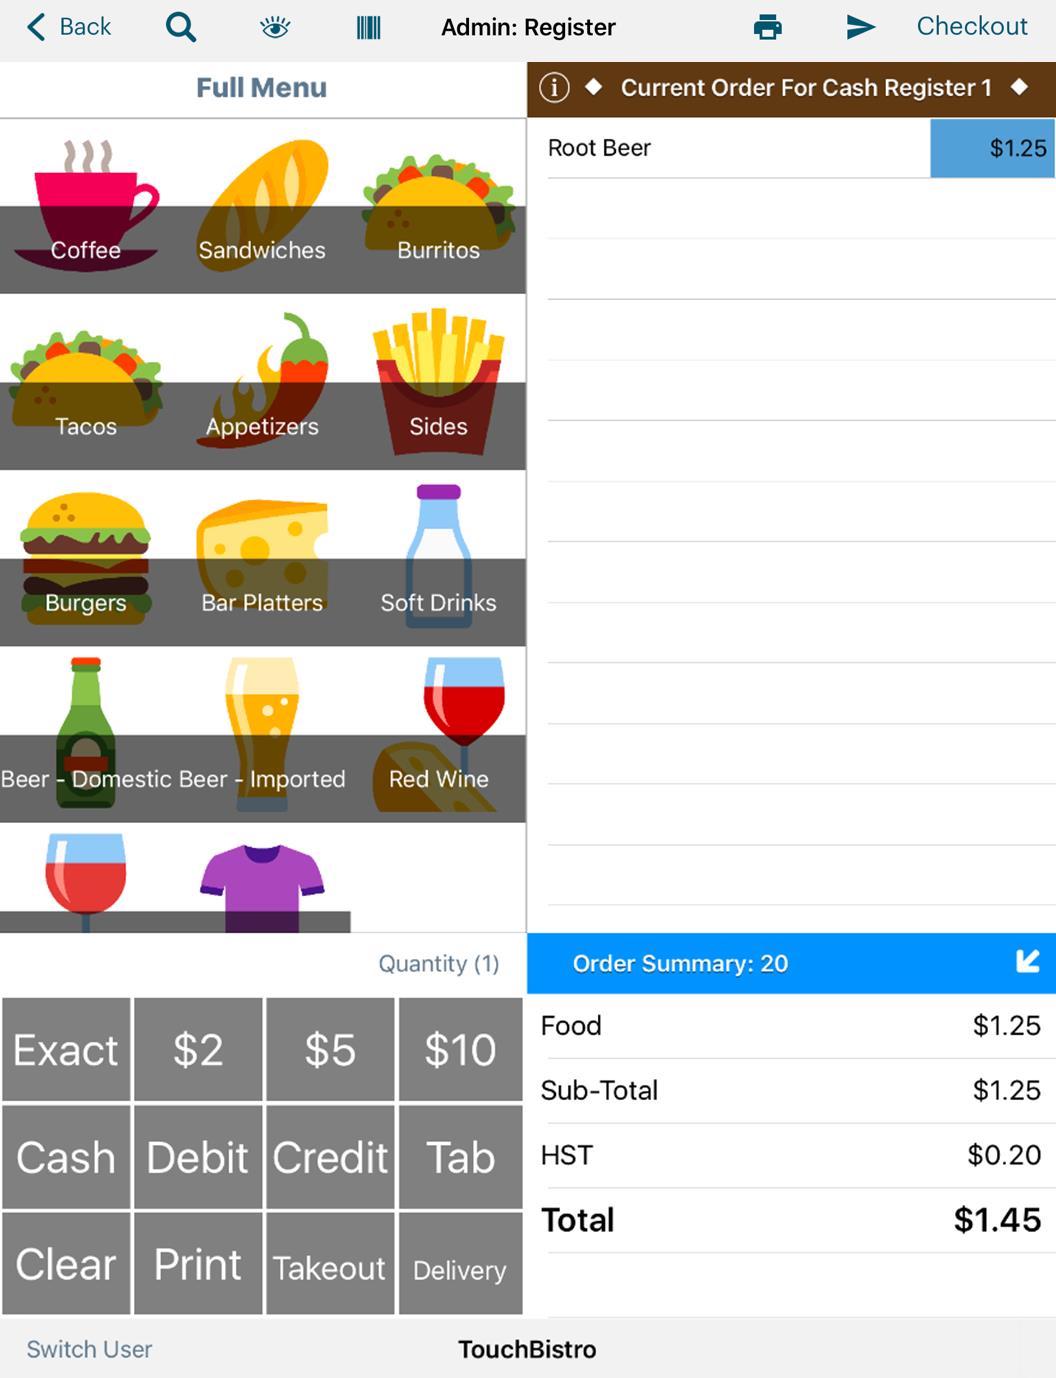
1. Tap the Checkout ![]() icon.
icon.

2. Tap Credit Card.
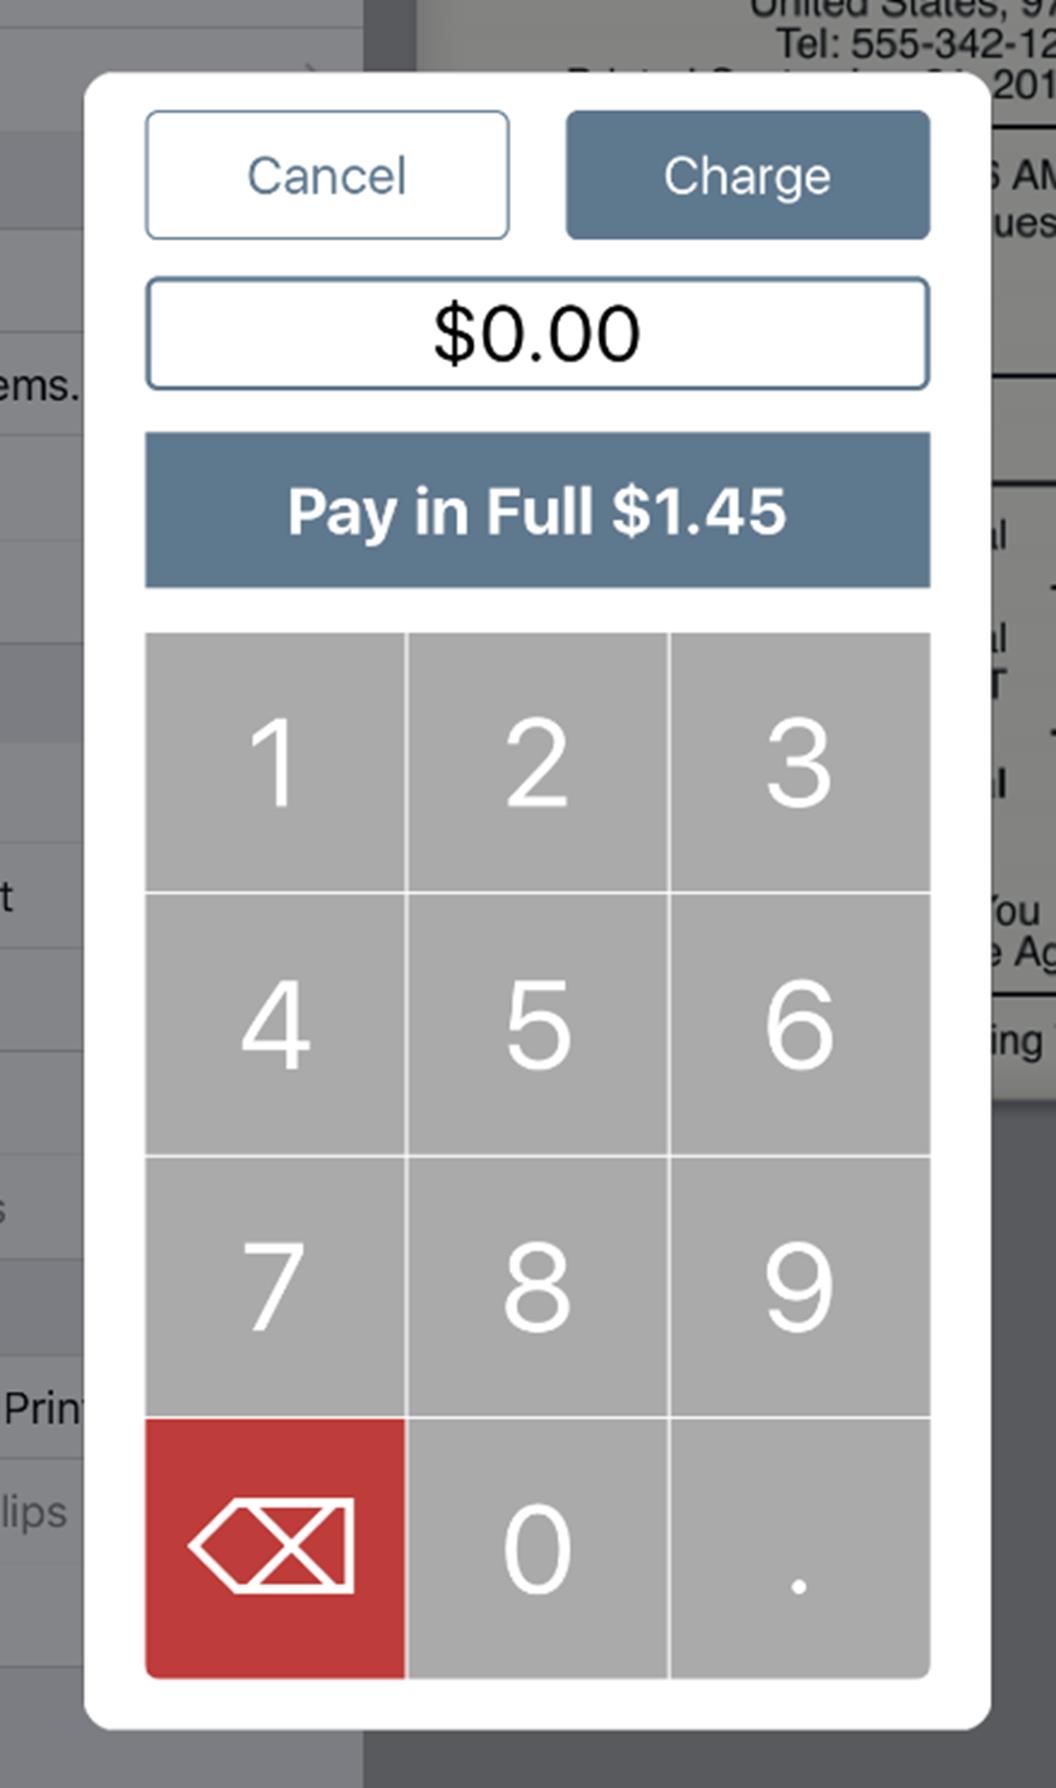
3. Tap Pay in Full.

4. You will be switched over to the Square Point of Sale app. Swipe the offered card.
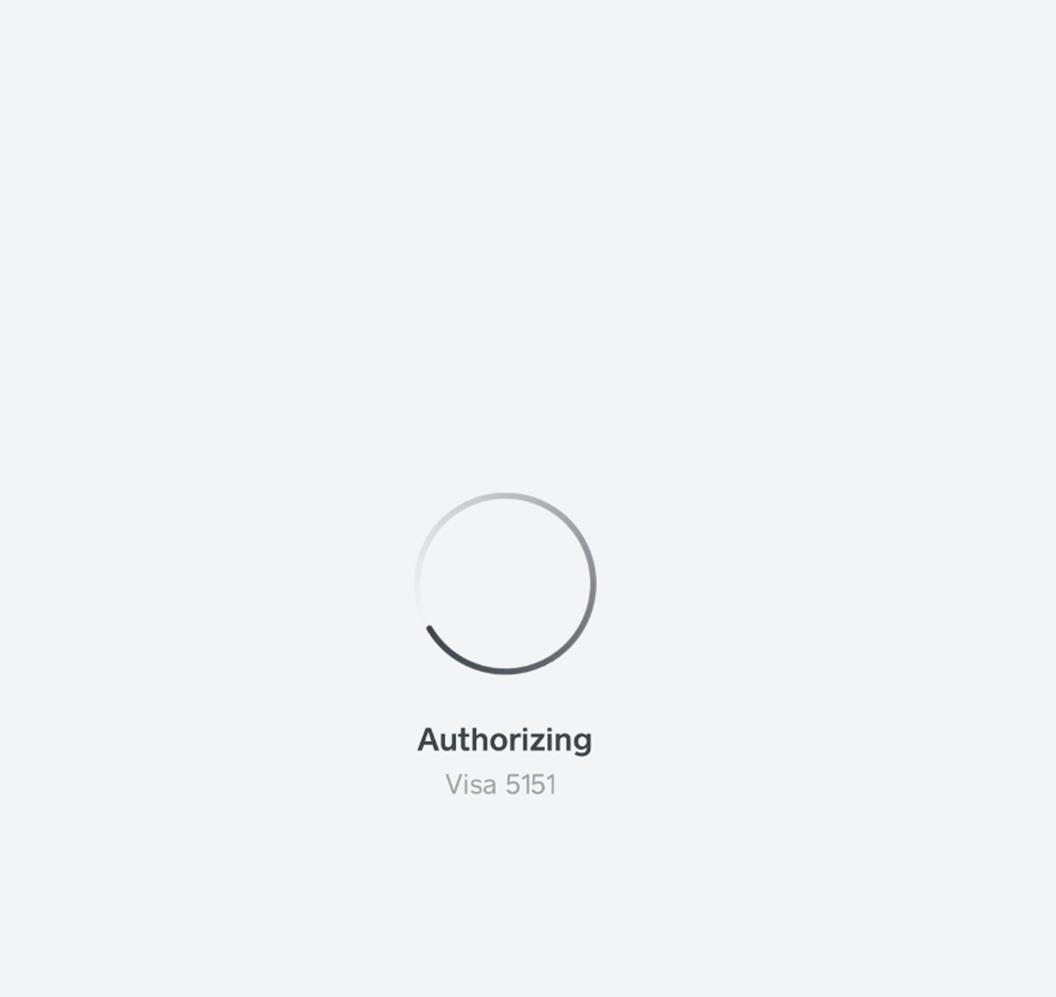
5. The Square Point of Sale app will attempt to access the Internet.
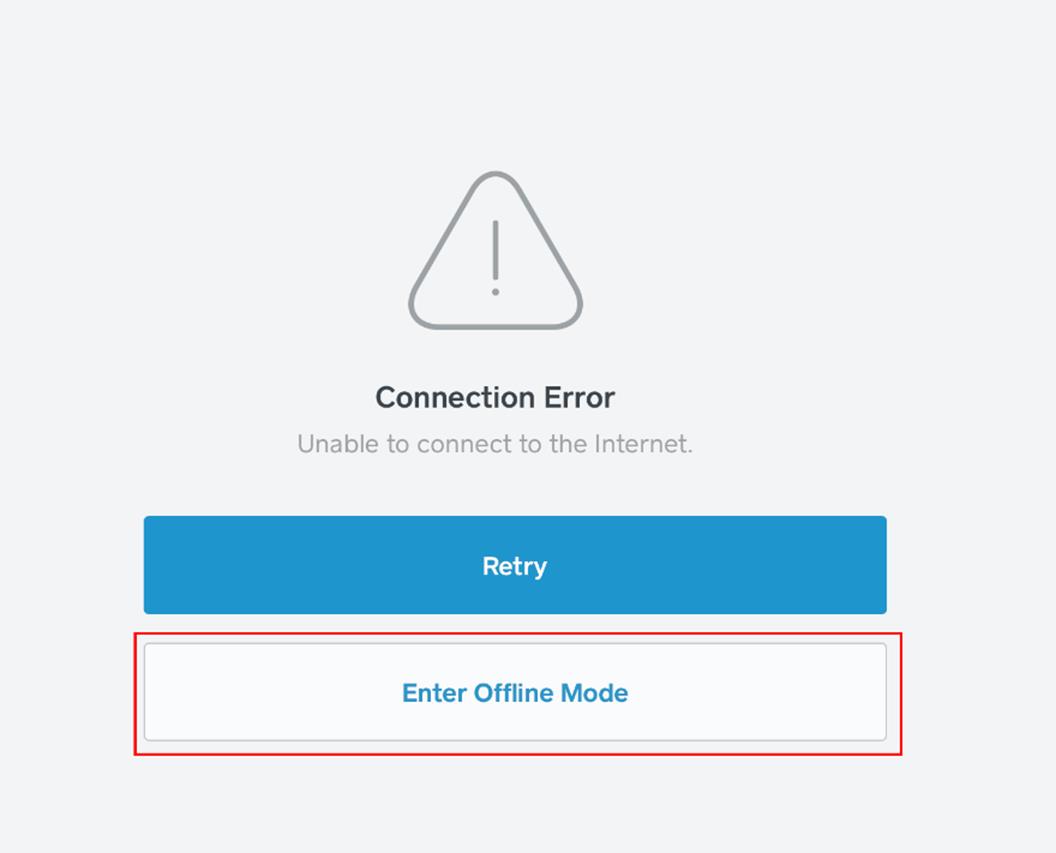
6. After a brief time of trying to access the Internet, the Square Point of Sale app will offer to enter into Offline Mode. Tap Enter Offline Mode.

7. Have the customer enter a tip.

8. Have the customer sign on screen. Tap Done Signing.
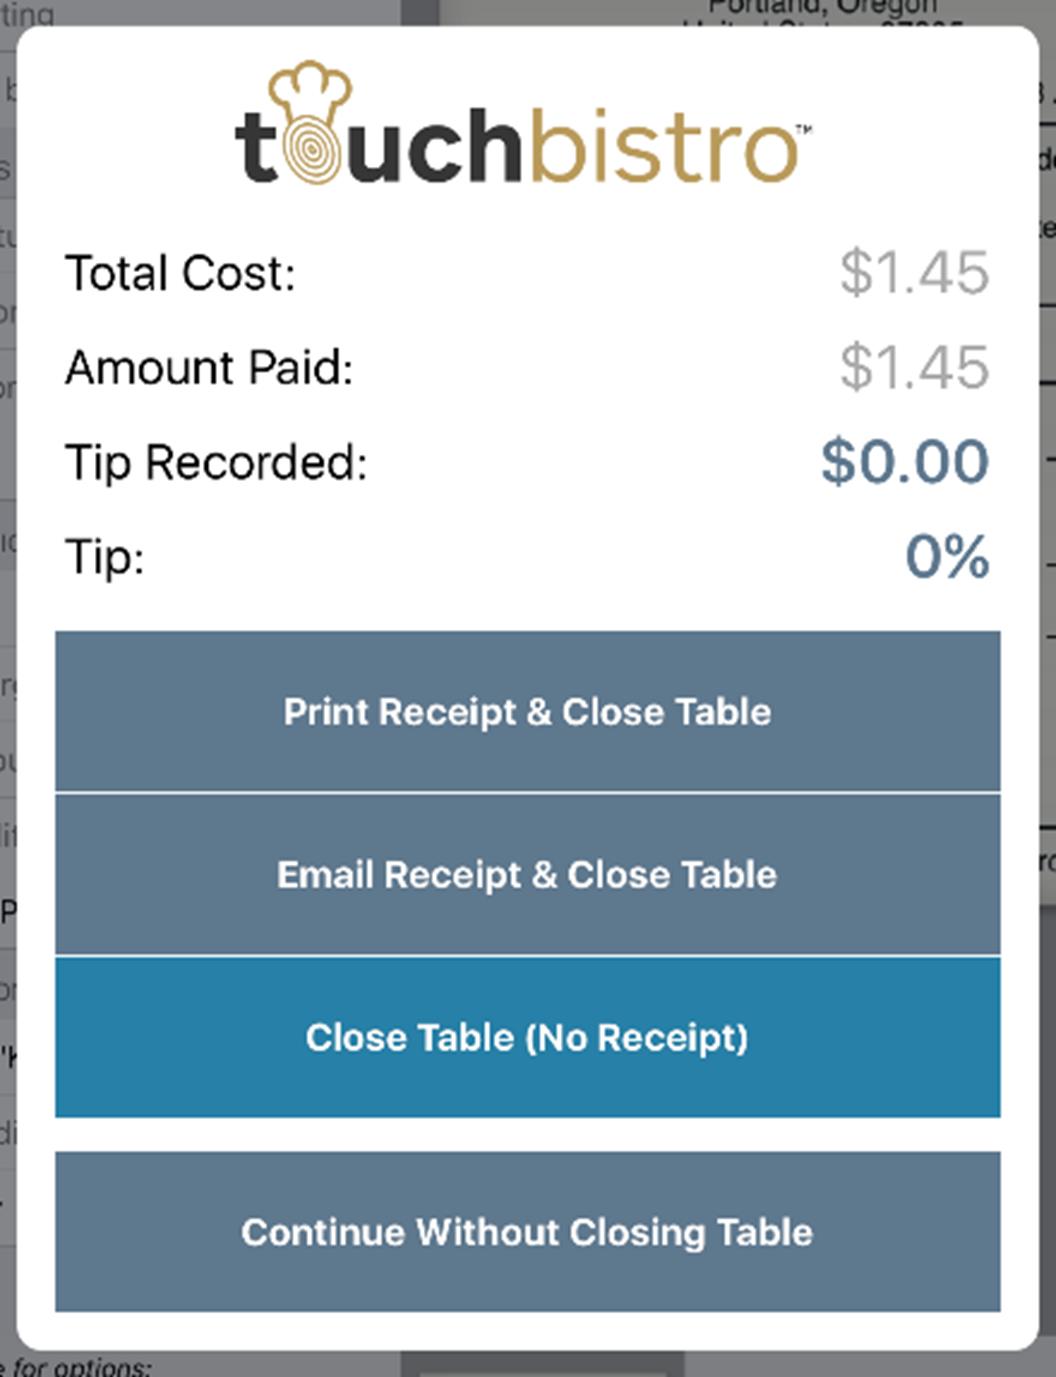
9. You will be returned to TouchBistro. Close the order.
Section 3. Refreshing Offline Payment Status
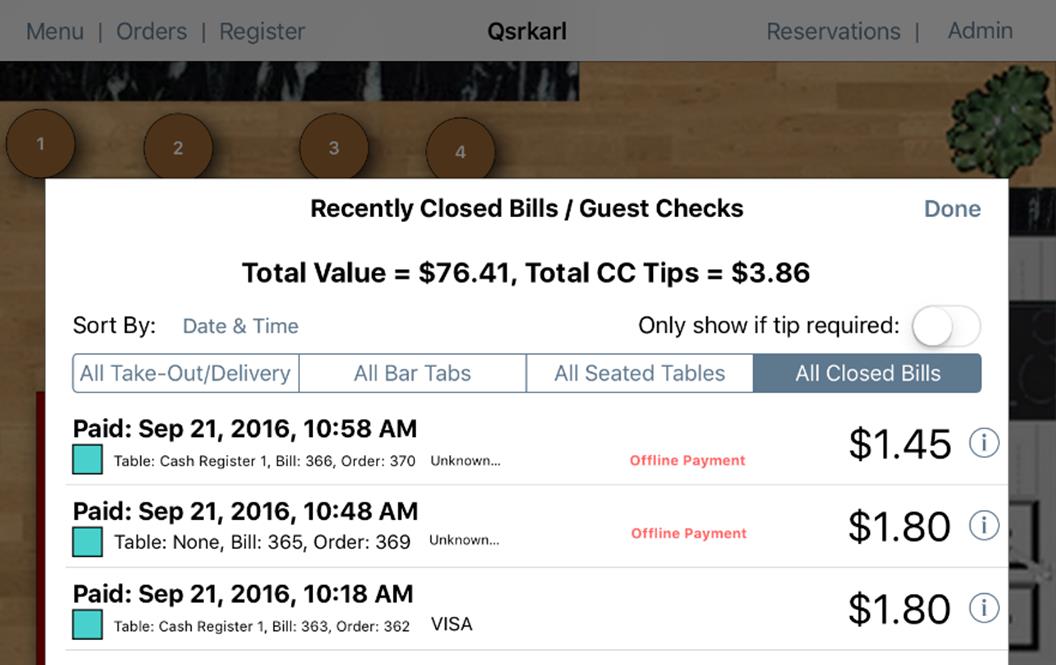
If you access Orders | All Closed Bills, you will see any payments taken during offline mode will be flagged as Offline Payment. If you see closed bills marked as offline payment, you need to verify the Square Point of Sale app has processed those payments and then refresh their payment status in TouchBistro. You may want to do this only at the end of your business day, before you do your end of day. Unless you have more than 200 offline payments, there’s no need to do this refresh step more than once before your end of day.
To do this:
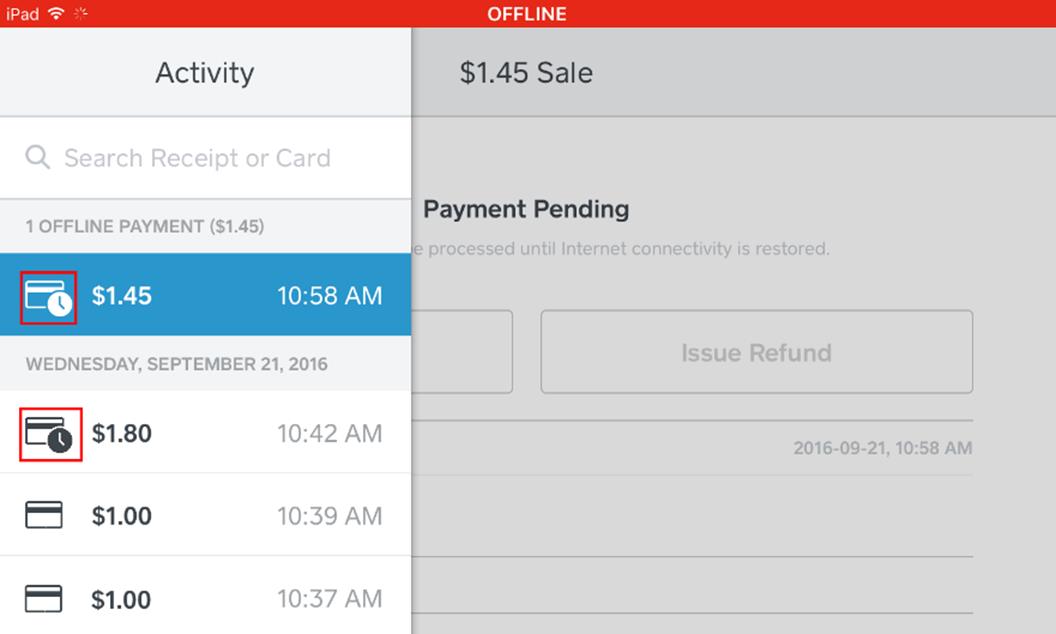
1. Return to the Square Point of Sale app. If you see it is still in offline mode, return when you have verified your Wi-Fi network has Internet access. Payments made during offline mode will be flagged with an icon that has a clock symbol ![]() . This indicates these payments are waiting for the Square Point of Sale app to detect an Internet connection and process offline payments.
. This indicates these payments are waiting for the Square Point of Sale app to detect an Internet connection and process offline payments.

2. When you no longer see the red warning about offline mode, tap the Options ![]() icon at the bottom of the screen.
icon at the bottom of the screen.

3. Tap Transactions.
4. When the Square Point of Sale app detects Internet access again, it will automatically submit and process offline charges. Verify the payment has been made if the payment icon is a simple ![]() card icon. If the icon has a clock symbol
card icon. If the icon has a clock symbol ![]() the payment has yet to be submitted and processed. Wait until the payment has gone through.
the payment has yet to be submitted and processed. Wait until the payment has gone through.
5. If you see no payments with clock symbols, return to TouchBistro.
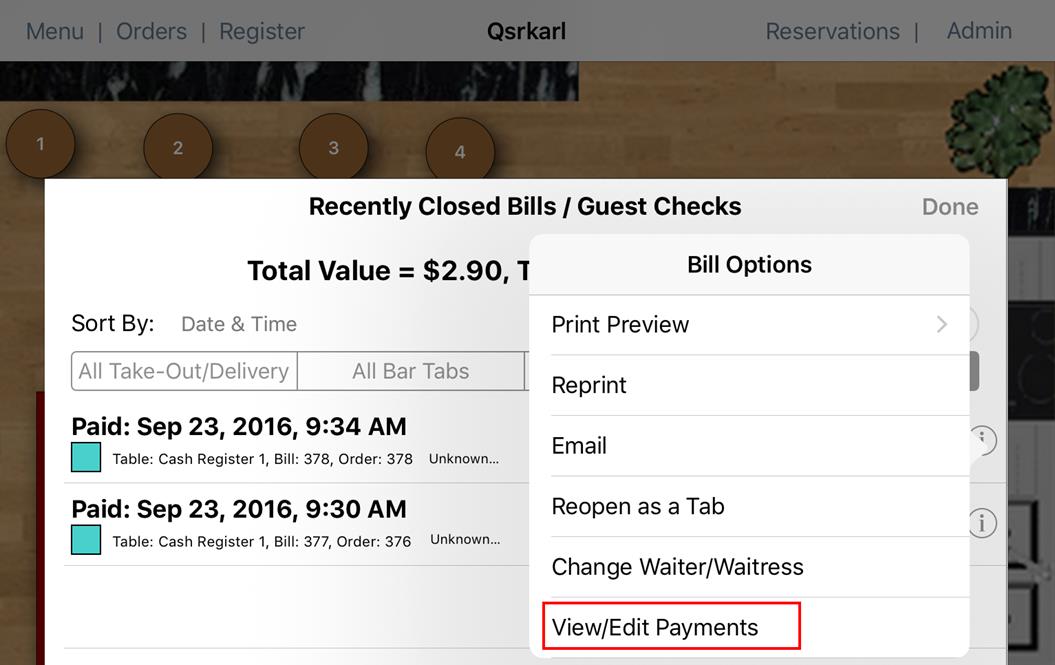
6. Return to the All Closed Bills tab and tap the Information ![]() icon associated with one of the payments flagged as an offline payment. Tap View/Edit Payments.
icon associated with one of the payments flagged as an offline payment. Tap View/Edit Payments.
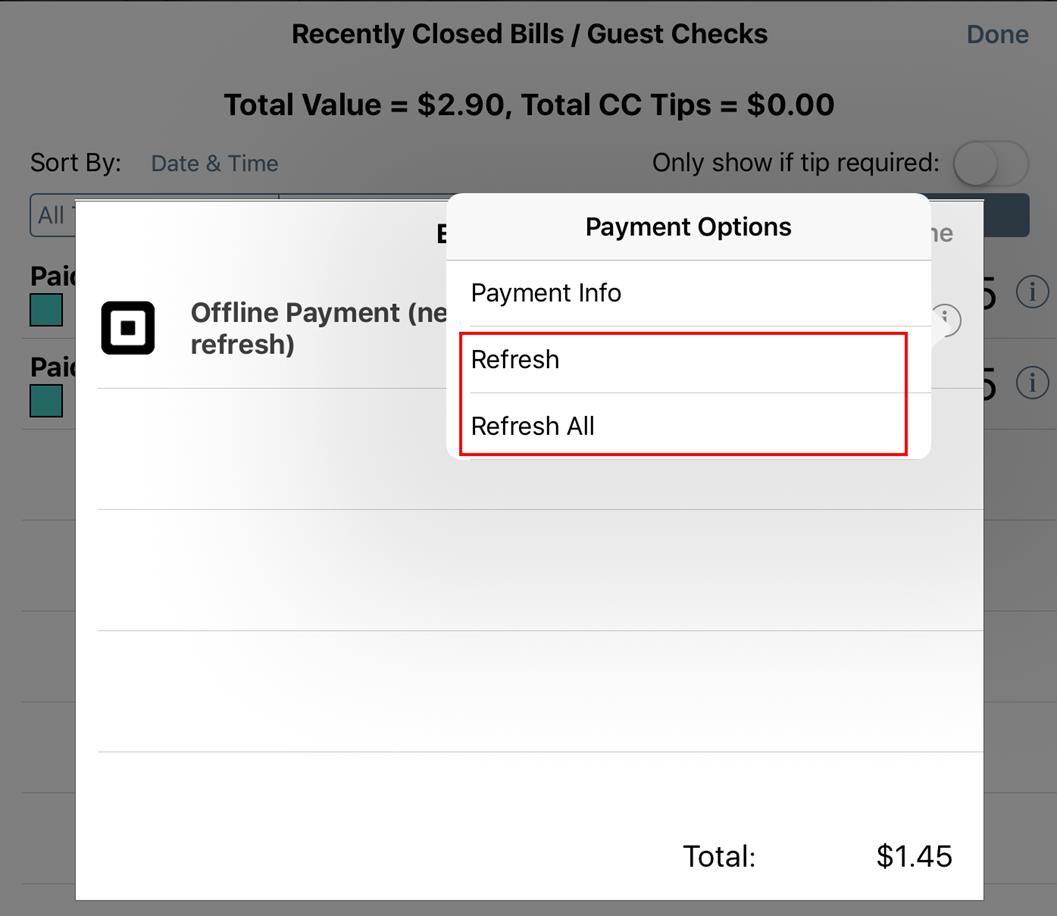
7. Tap Refresh or Refresh All. Refresh will update the payment status on the selected bill. Refresh All will update the payment status on all offline bills found under the All Closed Bills tab.

8. If you look at your closed bills again, you will see they have been properly refreshed.
Note: If you have more than 200 offline payments, you need to use the refresh option under Admin | Admin Settings | Payment Gateways | Options. See below for further details.
Section 4. Doing an Offline Transaction with Square Set for Sign on Slip

1. On the Order screen, tap Checkout.

2. Tap Credit Card.

3. Tap Pay in Full (enter a lesser amount if the customer wishes to make a partial payment).

4. You will be switched over to the Square Point of Sale app. Swipe the offered card.

5. The Square Point of Sale app will attempt to access the Internet.

6. After a brief time of trying to access the Internet, the Square Point of Sale app will offer to enter into Offline Mode. Tap Enter Offline Mode.

7. The Square Point of Sale app will approve the transaction and then generate three receipts: a customer copy, a merchant copy, and an authorization receipt.

8. Have the customer sign the customer copy and enter a tip on the tip line.

9. You will be returned to the TouchBistro Checkout screen with the order marked paid. Close the order.
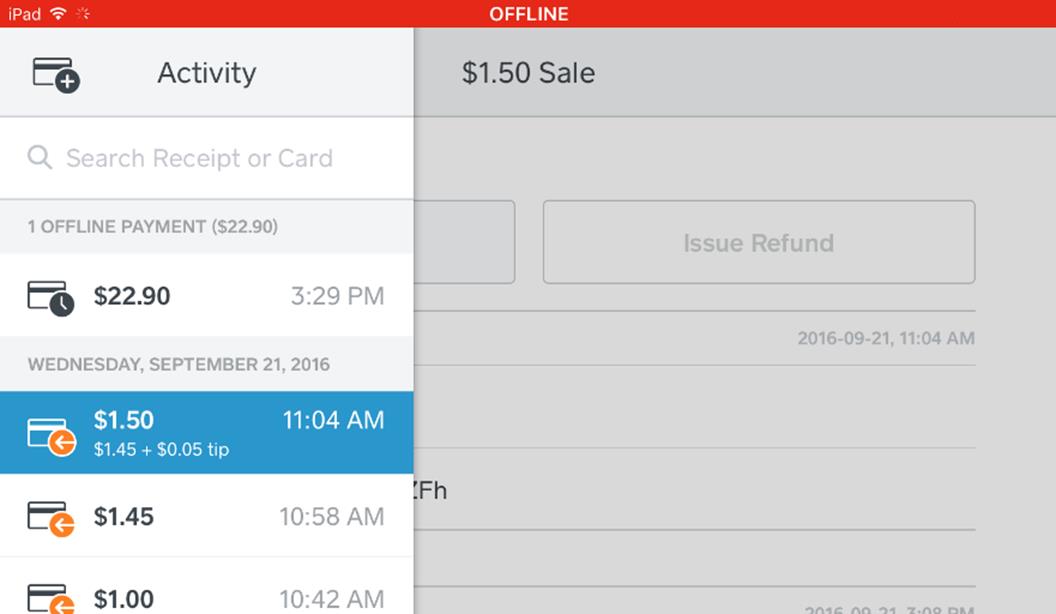
10. Return to the Square Point of Sale app. Check to see if it’s still offline. Payments made during offline mode will be flagged with an icon that has a clock symbol ![]() . This indicates these payments are waiting for the Square Point of Sale app to detect an Internet connection and process offline payments.
. This indicates these payments are waiting for the Square Point of Sale app to detect an Internet connection and process offline payments.
11. When you no longer see the red warning about offline mode, tap the Options ![]() icon at the bottom of the screen.
icon at the bottom of the screen.

12. Tap Transactions.
13. You now need to reconcile. Return to the Square Point of Sale app. If you see it is still in offline mode, return when you have verified your Wi-Fi network has Internet access. Payments made during offline mode will be flagged with an icon that has a clock symbol ![]() . This indicates these payments are waiting for the Square Point of Sale app to detect an Internet connection and process offline payments.
. This indicates these payments are waiting for the Square Point of Sale app to detect an Internet connection and process offline payments.
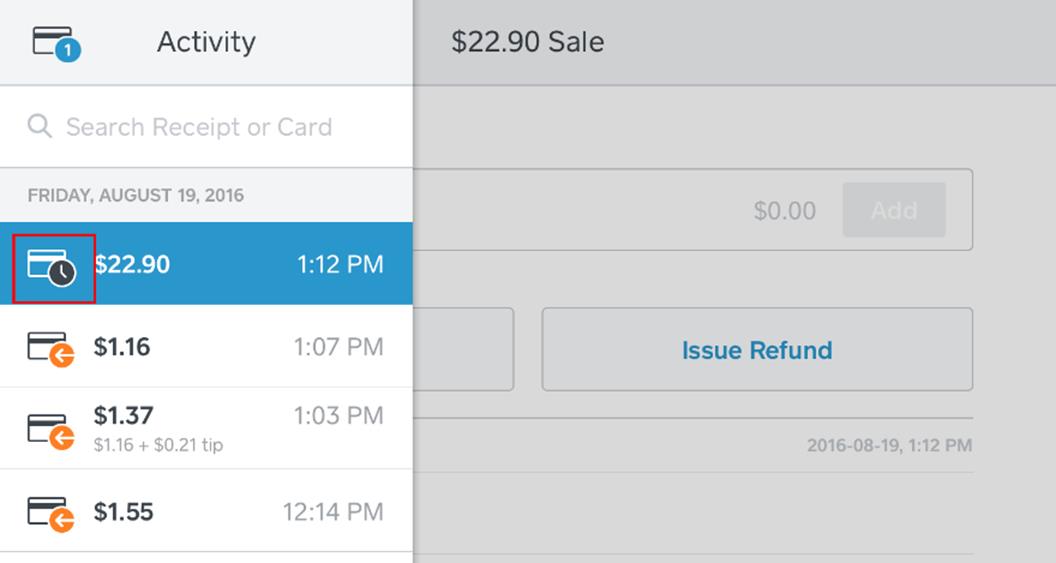
14. Locate and tap the payment with the small clock icon, indicating you need to complete the tip pre-auth.

15. Enter the tip written on the customer copy.
16. Tap Add.

17. Verify the final settlement total and tap Settle.
18. Return to TouchBistro and tap Orders | All Closed Bills.
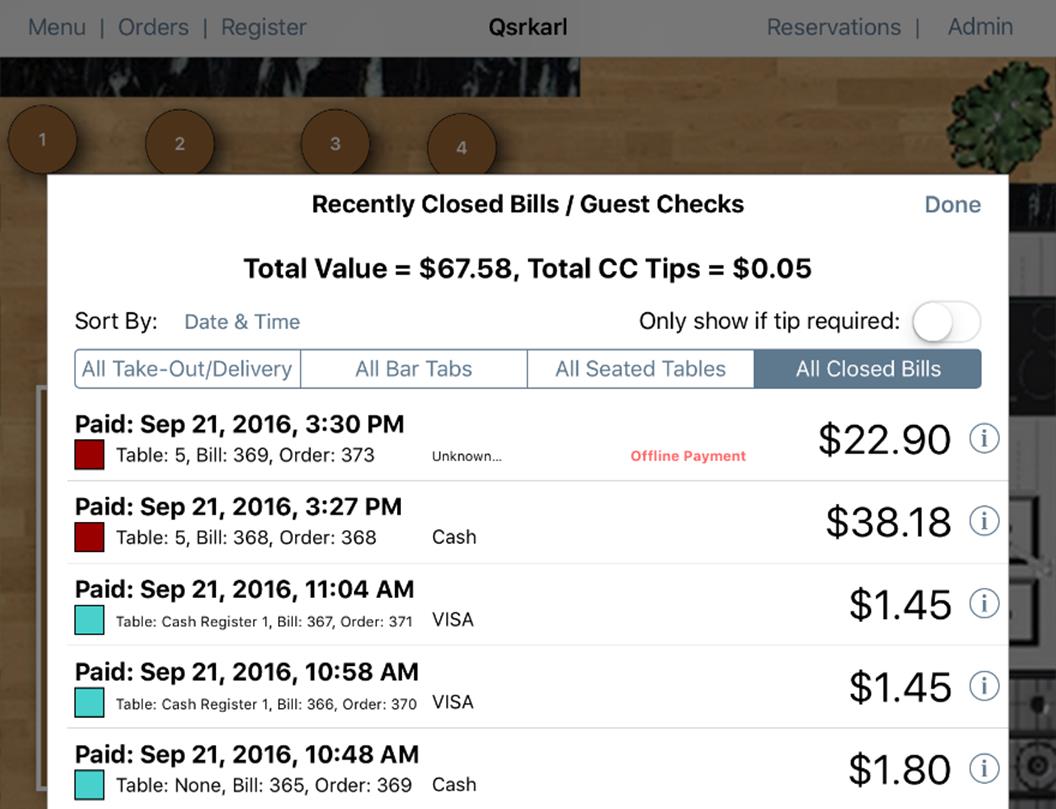
19. Unlike the reconciliation steps for online transactions, payments won’t have the Tip Required flab but be still marked as Offline Payment.
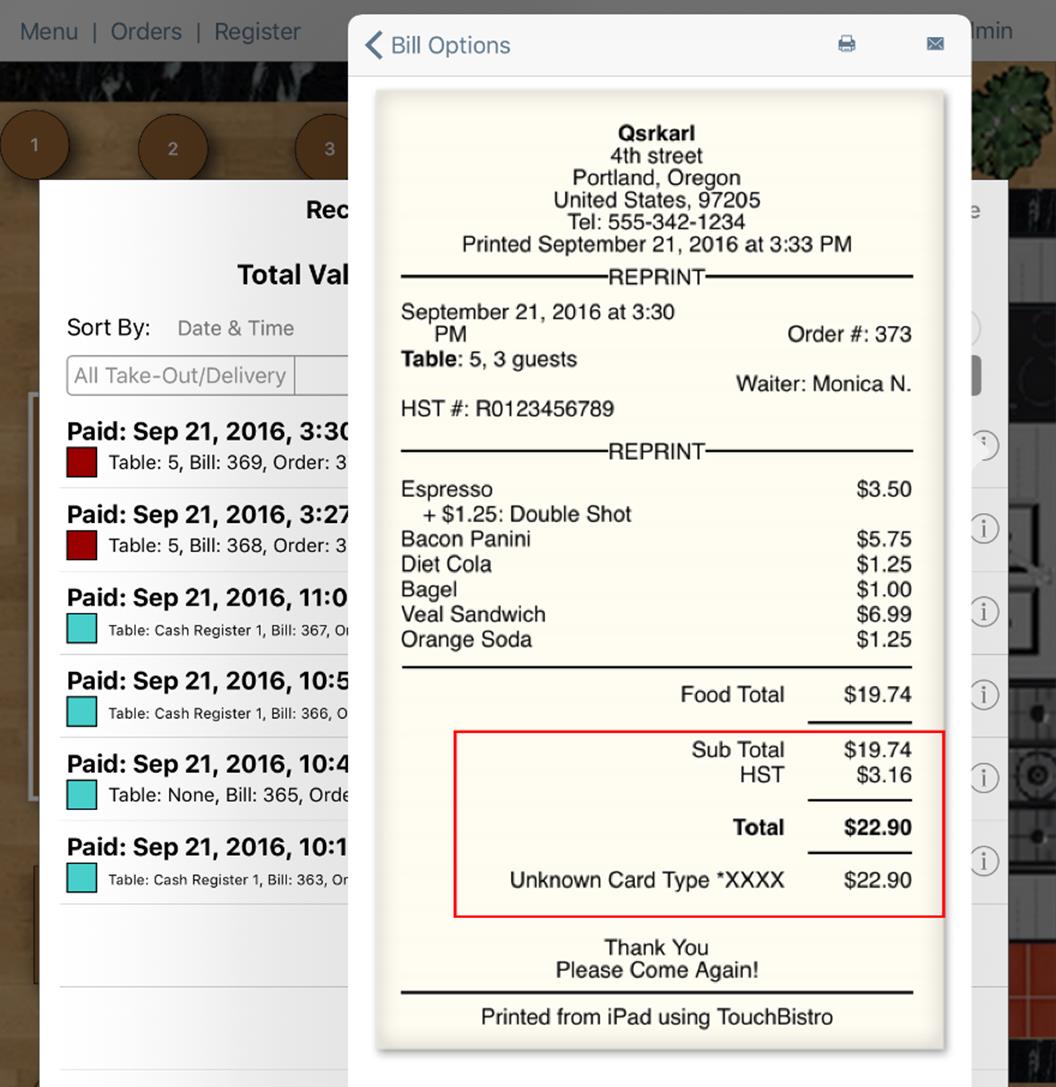
20. If you open the bill you will see the tip entered into the Square Point of Sale app has not been updated. As well, the card type is marked as unknown.
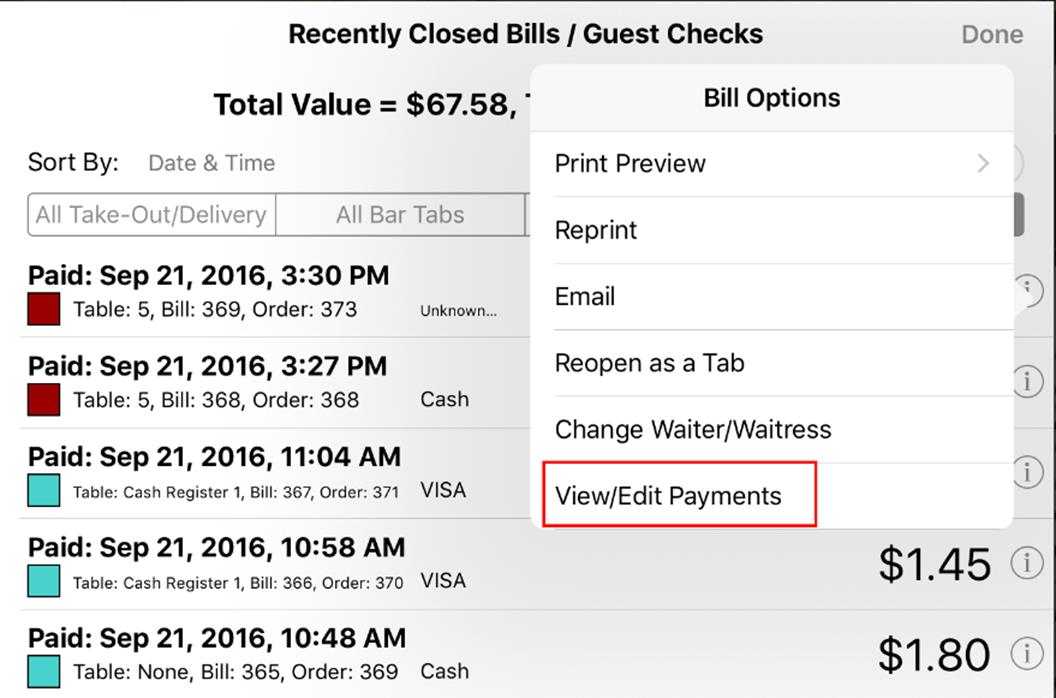
21. Tap the Information ![]() icon associated with the offline payment and tap View/Edit Payments.
icon associated with the offline payment and tap View/Edit Payments.
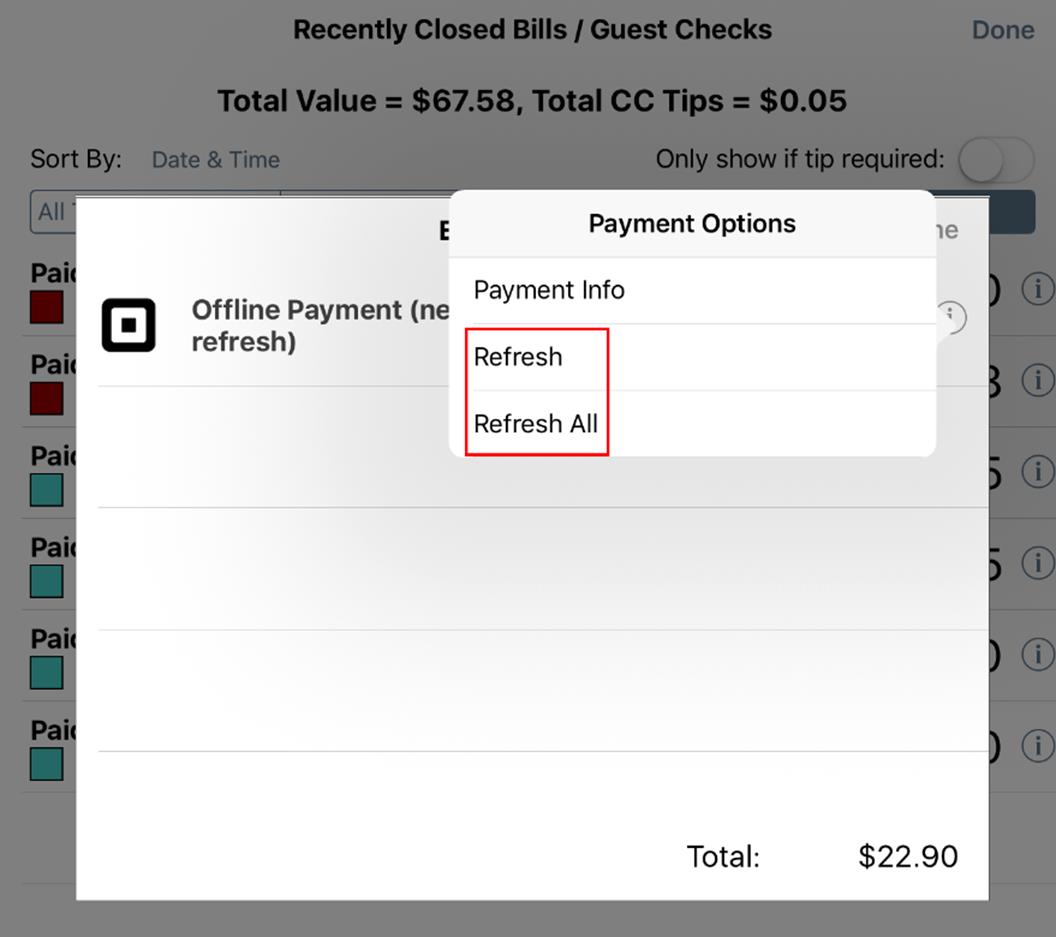
22. Tap the Information ![]() icon associated with the payment and tap Refresh or Refresh All. Refresh All will cause all offline payments to refresh.
icon associated with the payment and tap Refresh or Refresh All. Refresh All will cause all offline payments to refresh.
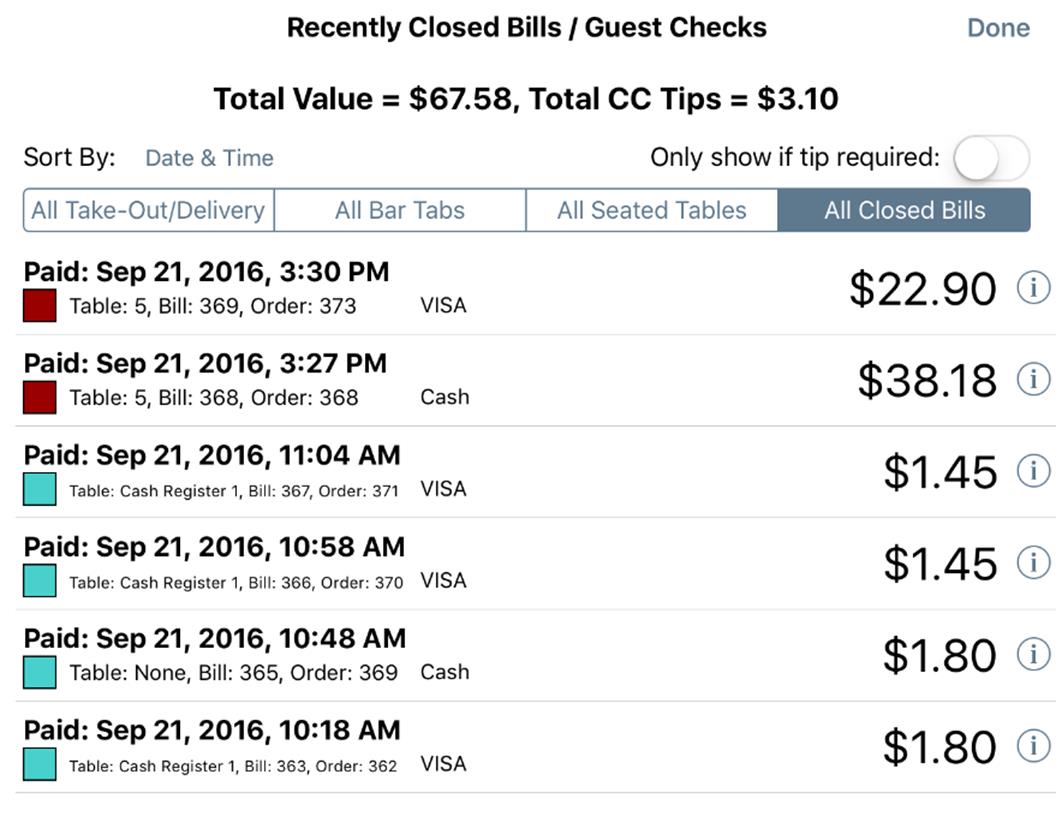
23. Exit from the payment screen and you will see the bill has updated both its payment status and with the tip amount entered into the Square Point of Sale app.
Chapter 13. Refreshing a Large Number of Offline Payments
If you have done more than 200 offline payments, you need to use the refresh option under Payment Gateways.

1. Tap Admin | Admin Settings.
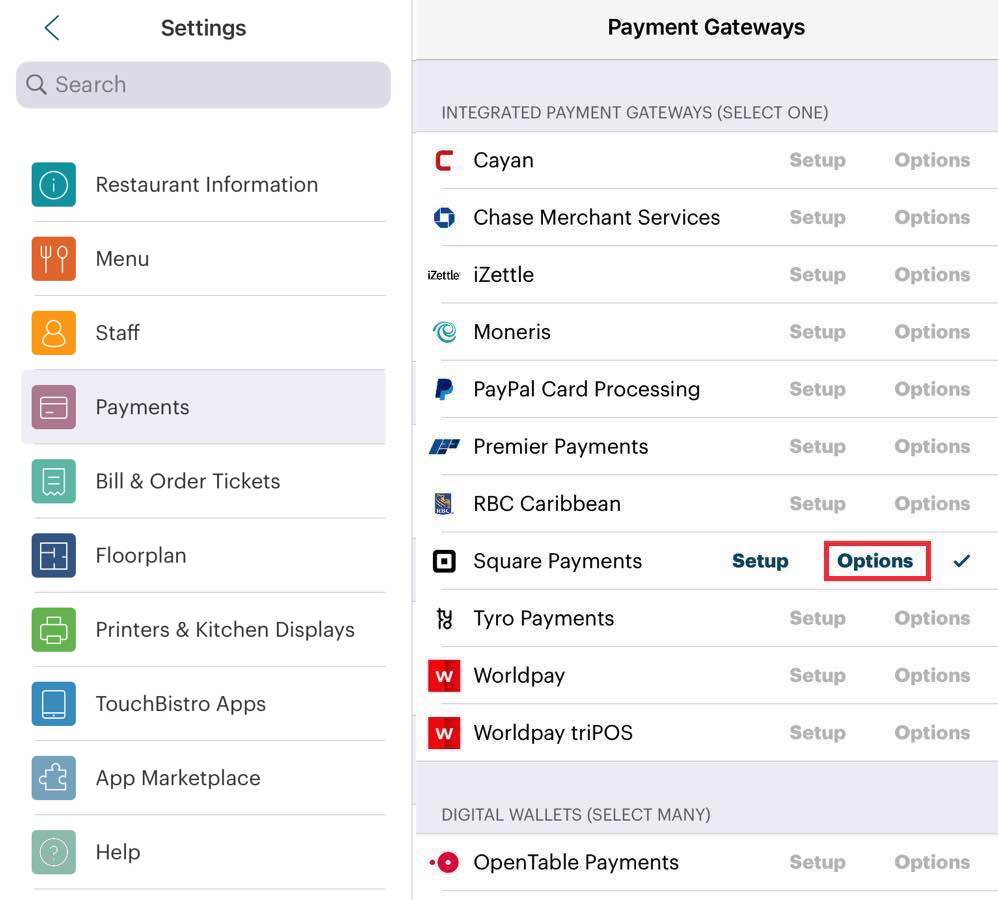
2. Tap Payment Gateways and Options.
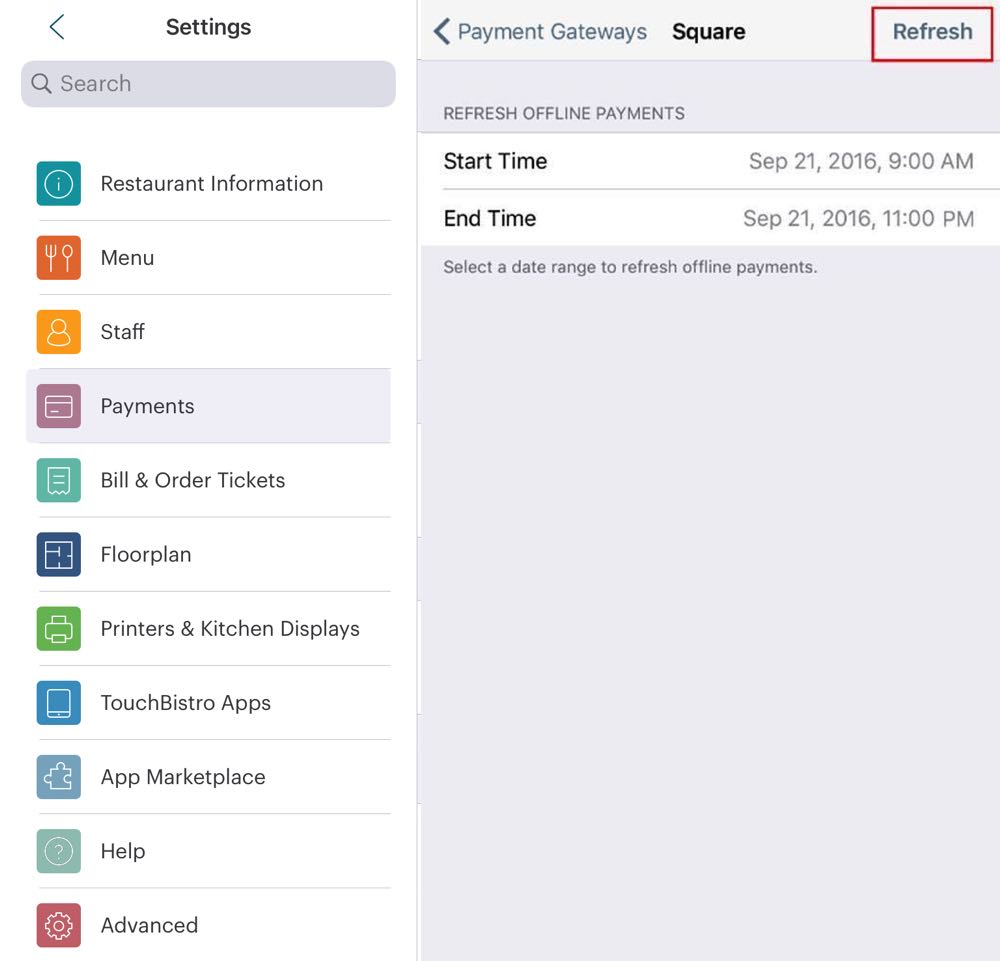
3. Use the date/time wheels to set a time period for the Internet outage or you could just set it for your whole service time. Tap Refresh. If you have more than 200 offline payments, break up the refresh period into two or more periods.
Chapter 14. Performing a Refund

1. Tap the Options ![]() icon at the bottom of the screen.
icon at the bottom of the screen.

2. Tap Transactions.
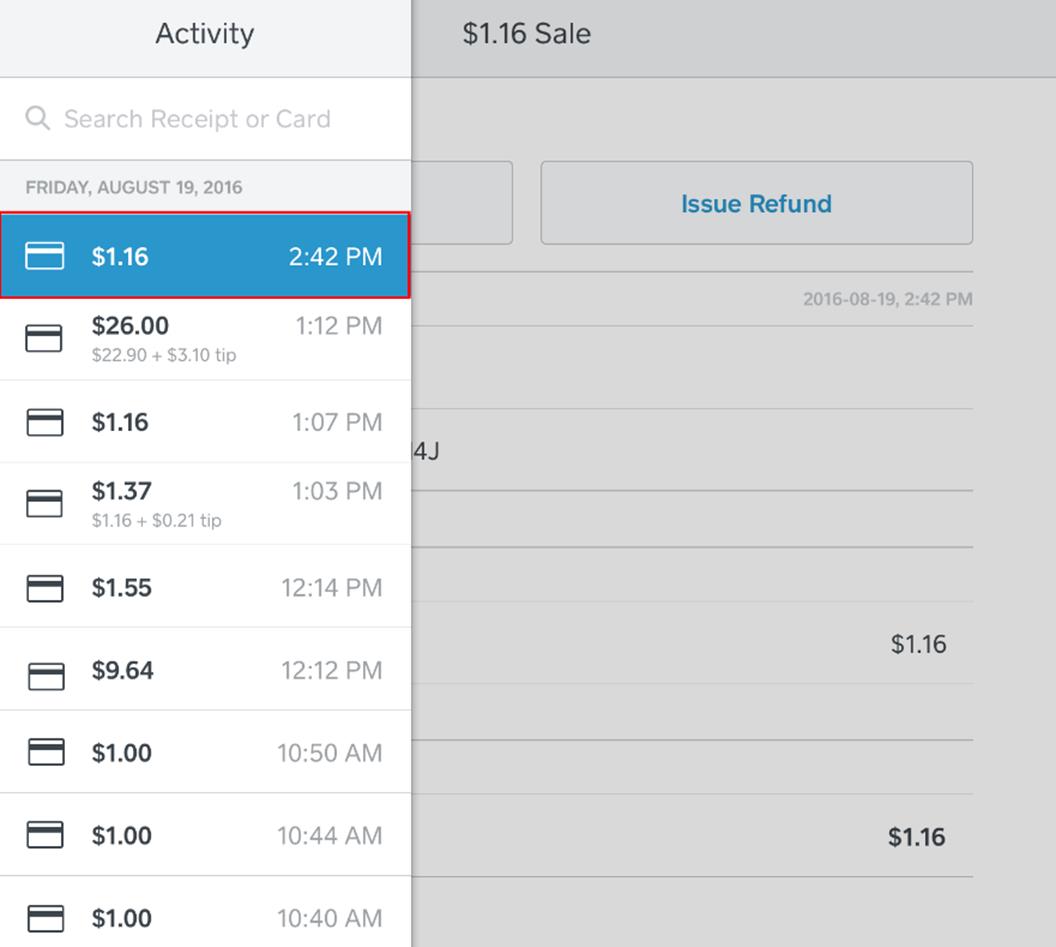
3. Locate payment you wish to refund and tap it.

4. Tap Issue Refund.
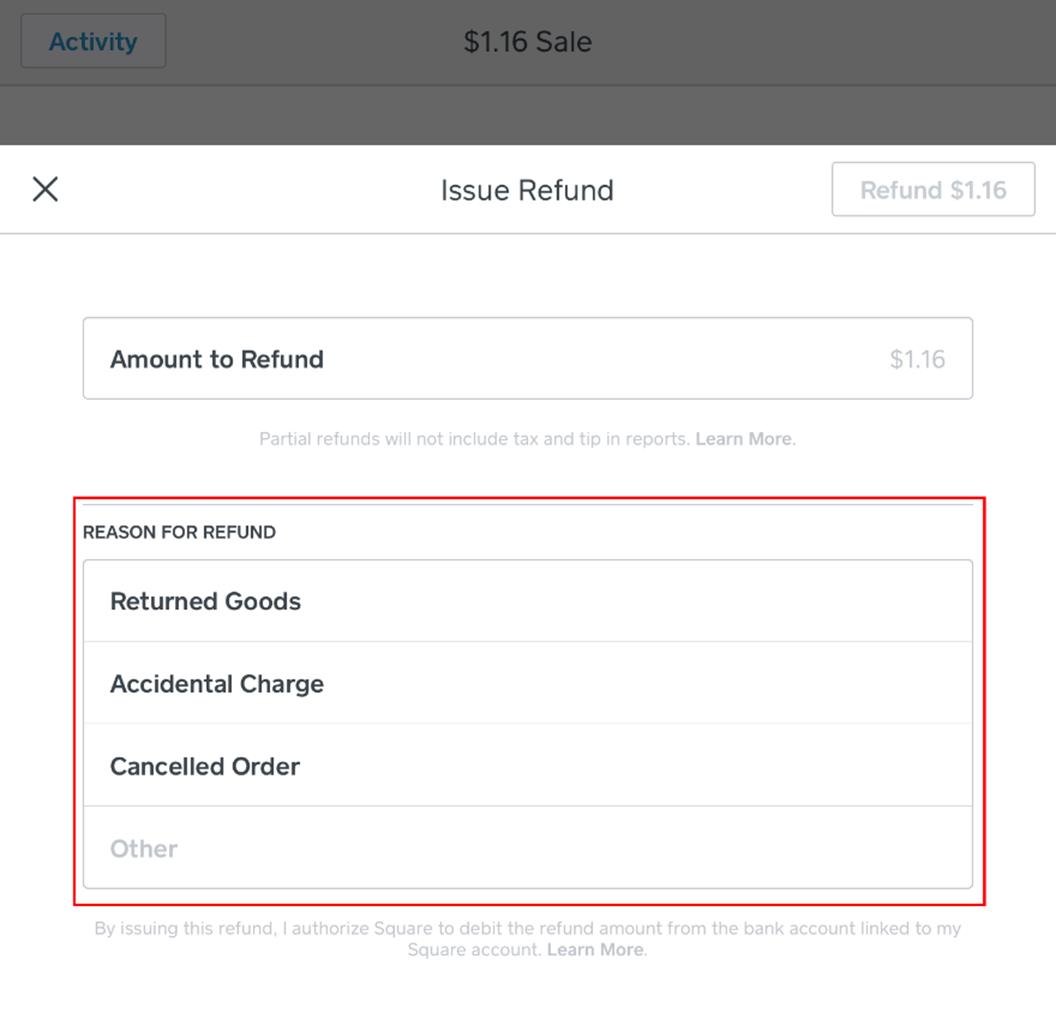
5. If you want to issue a partial refund, enter the amount to refund in the Amount to Refund field. If not, leave the default amount.
6. Select a reason for the refund.
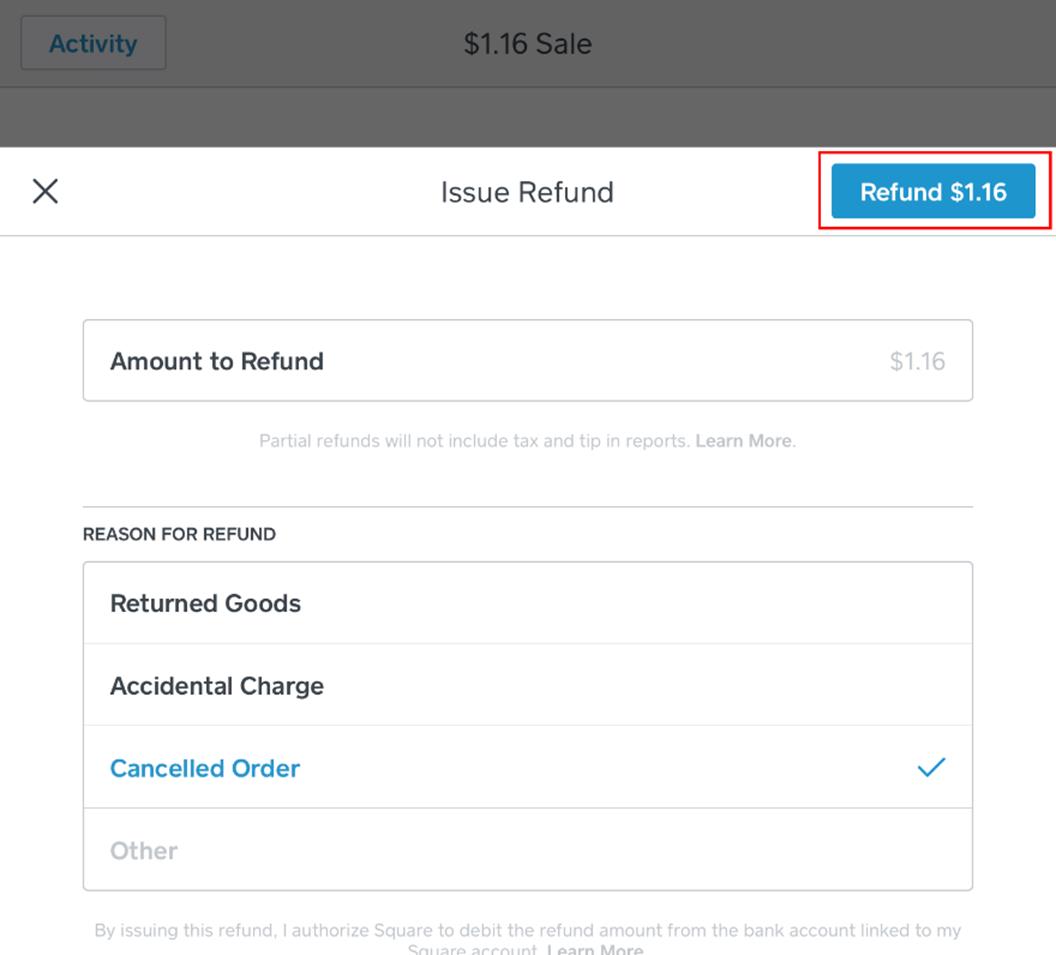
7. Tap Refund.
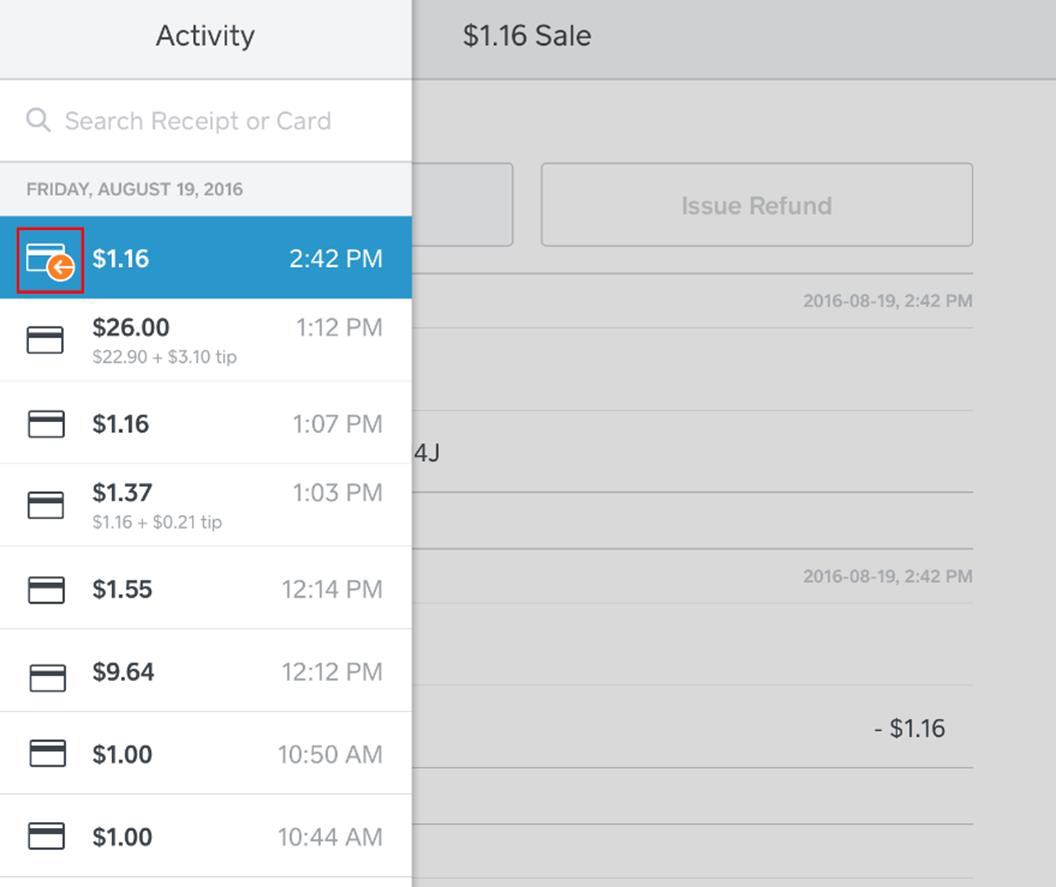
8. You will see a refund icon next to the payment you just refunded.

9. From your floor plan, tap Orders.
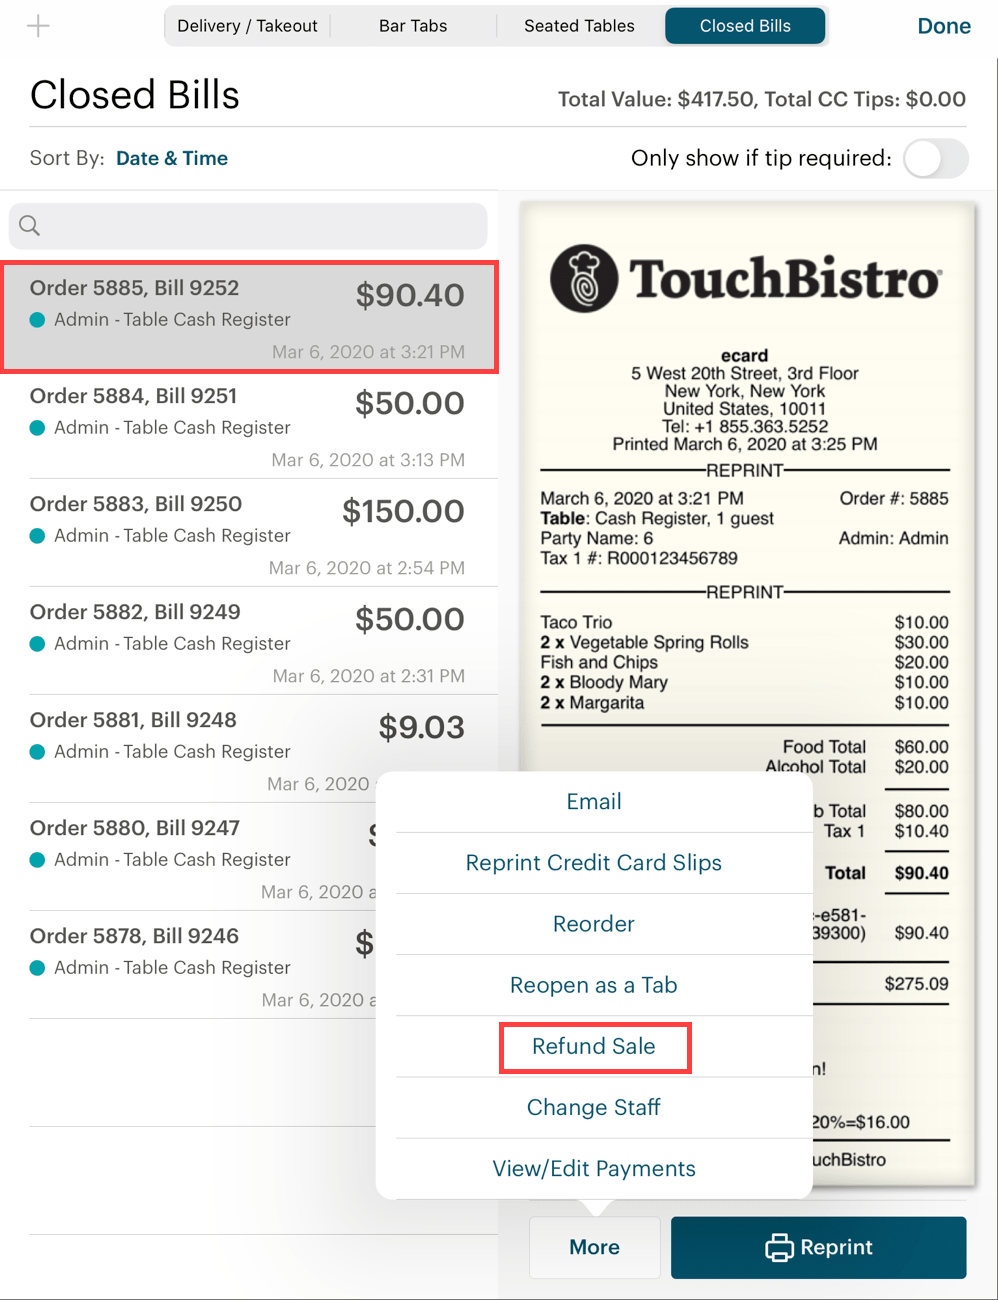
10. Tap the bill you wish to refund and tap the More button. Tap Refund Sale.
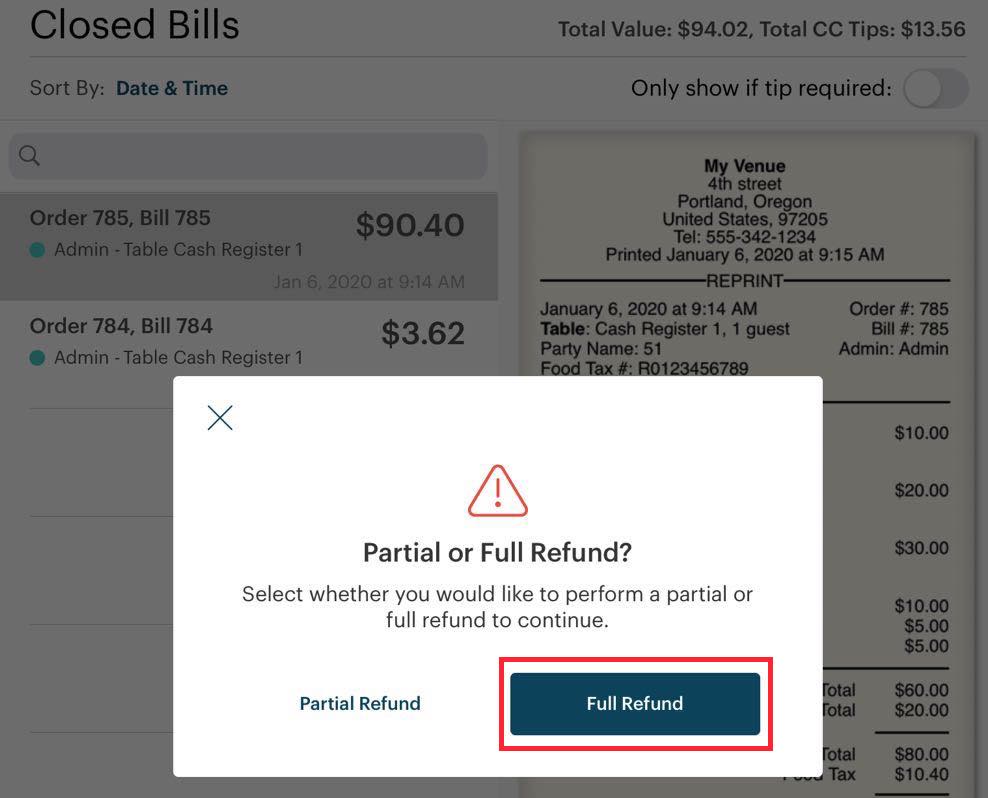
11. Tap Full Refund.
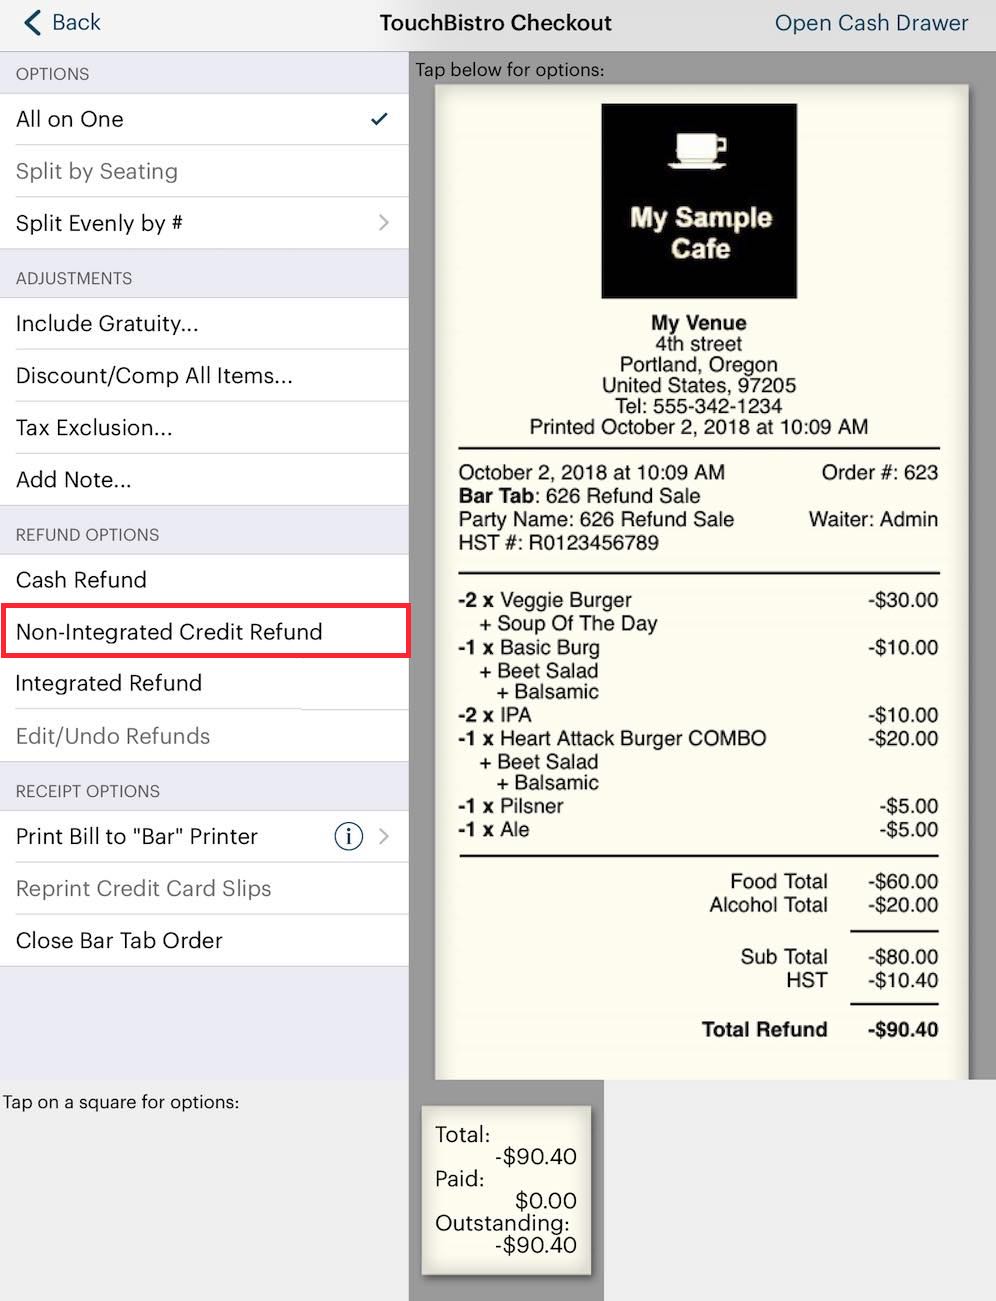
12. Tap Non-Integrated Credit Refund.
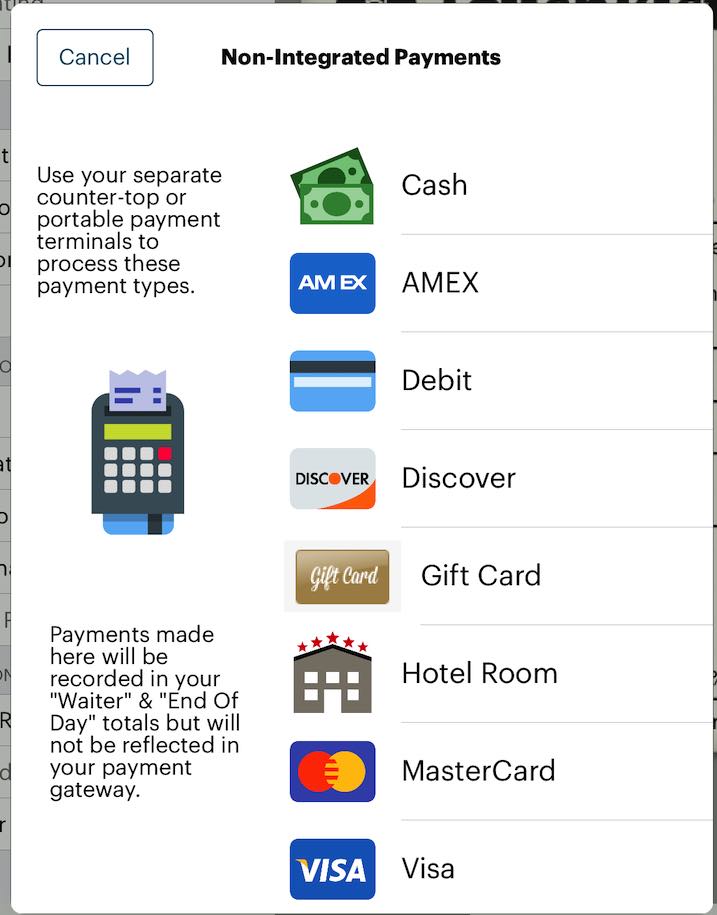
13. Tap the card that was offered. For example, Visa.
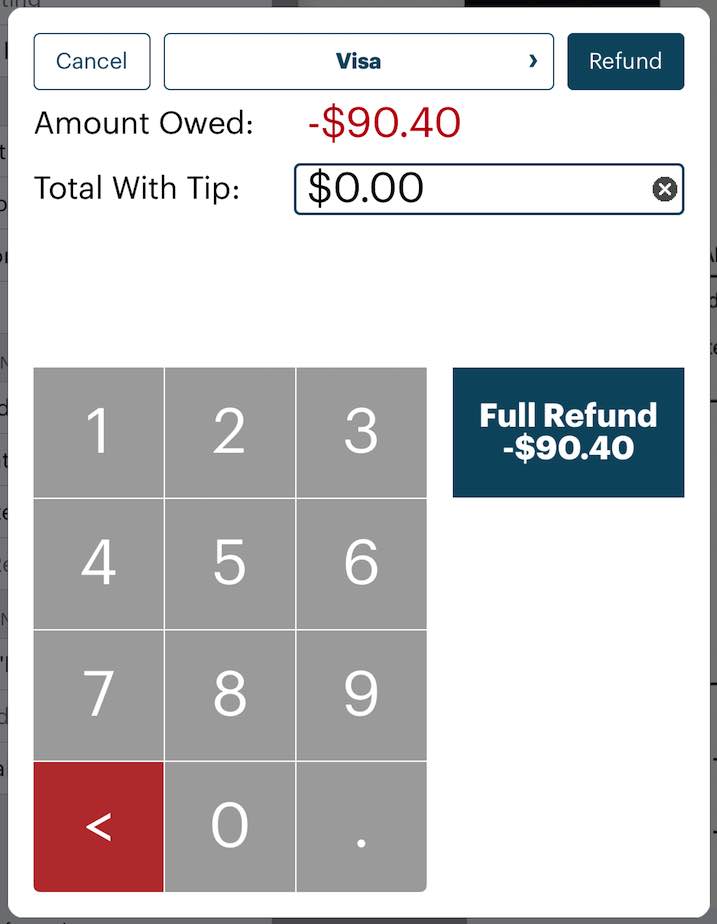
14. Tap Full Refund.
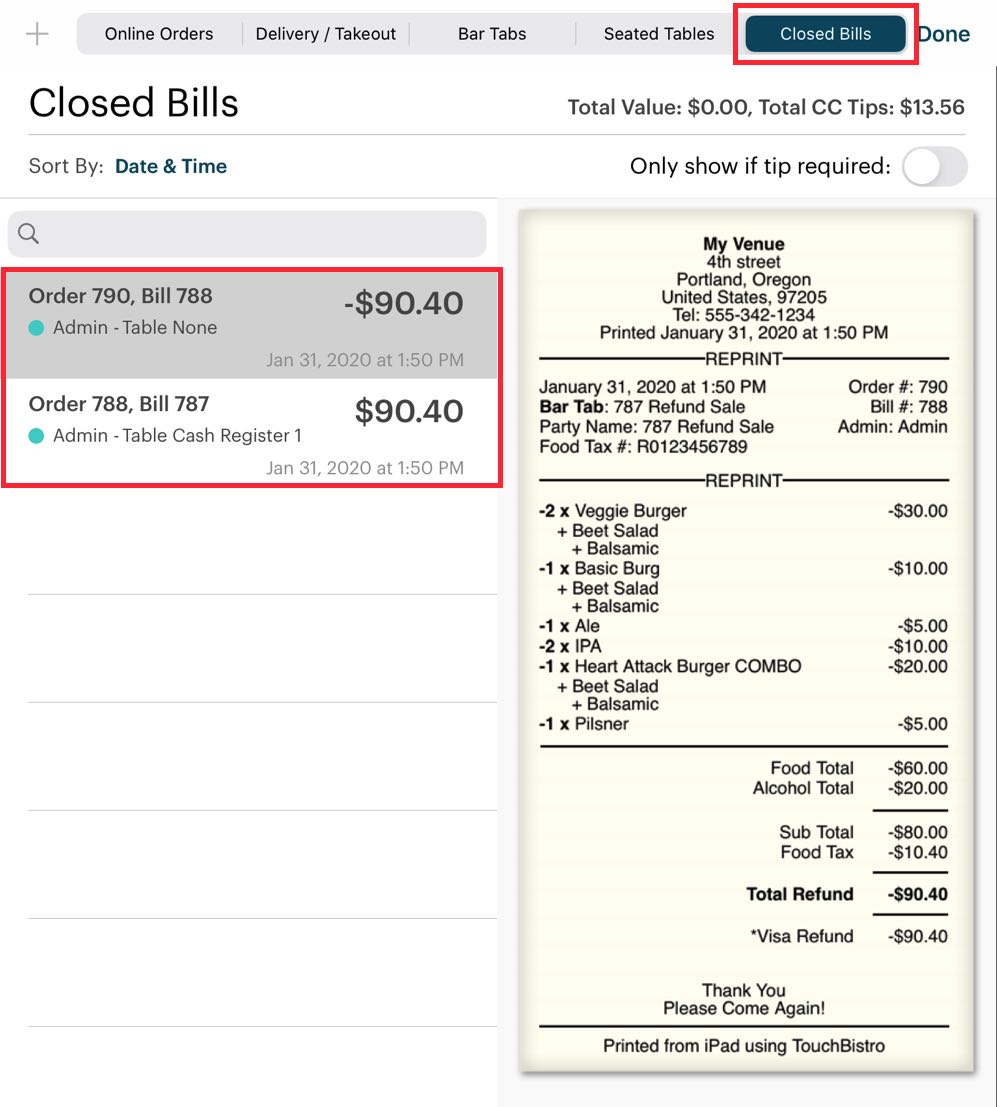
15. You are returned to the Closed Bills tab. We can now see our original bill we refunded via Square and the matching refund invoice that will balance out the refunded bill for sale reporting purposes.
Section 1. Refund Process is Interrupted
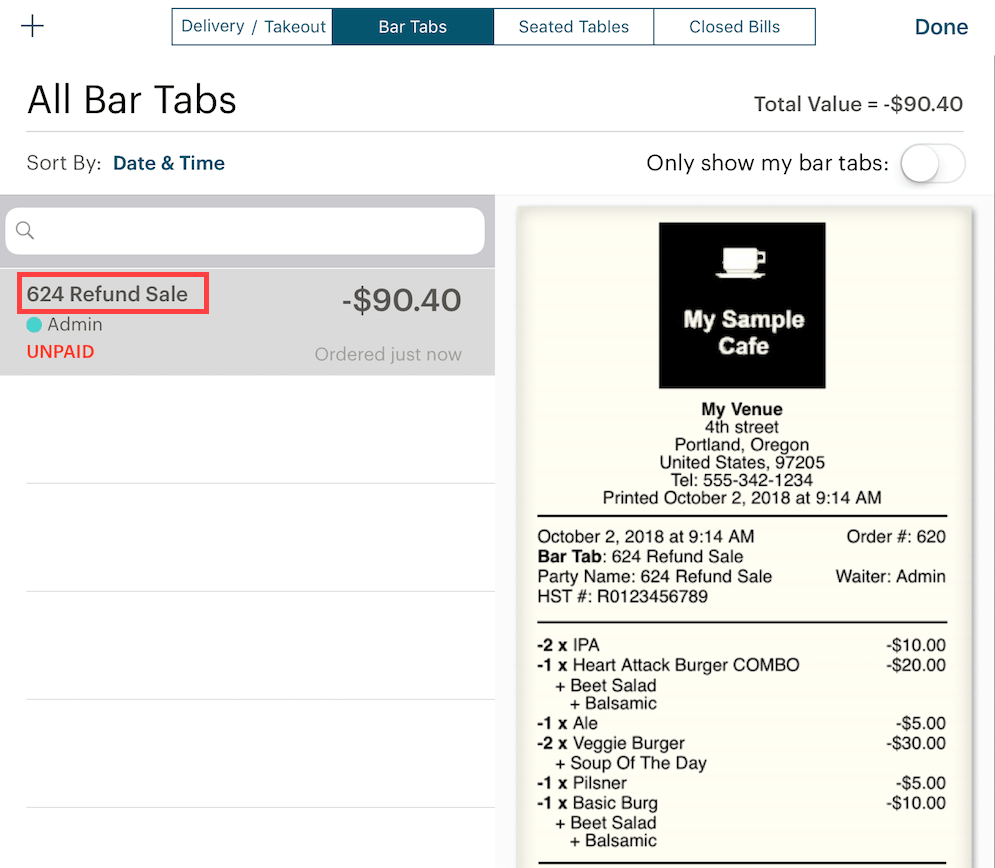
If for some reason you are interrupted and you did not complete the refund process, you can access Bar Tabs and find your negative refund invoice under bar tabs. The refund sale invoice is automatically named after the bill number of the refunded bill. Tap it and tap Edit Order to open it (or right swipe on the order).
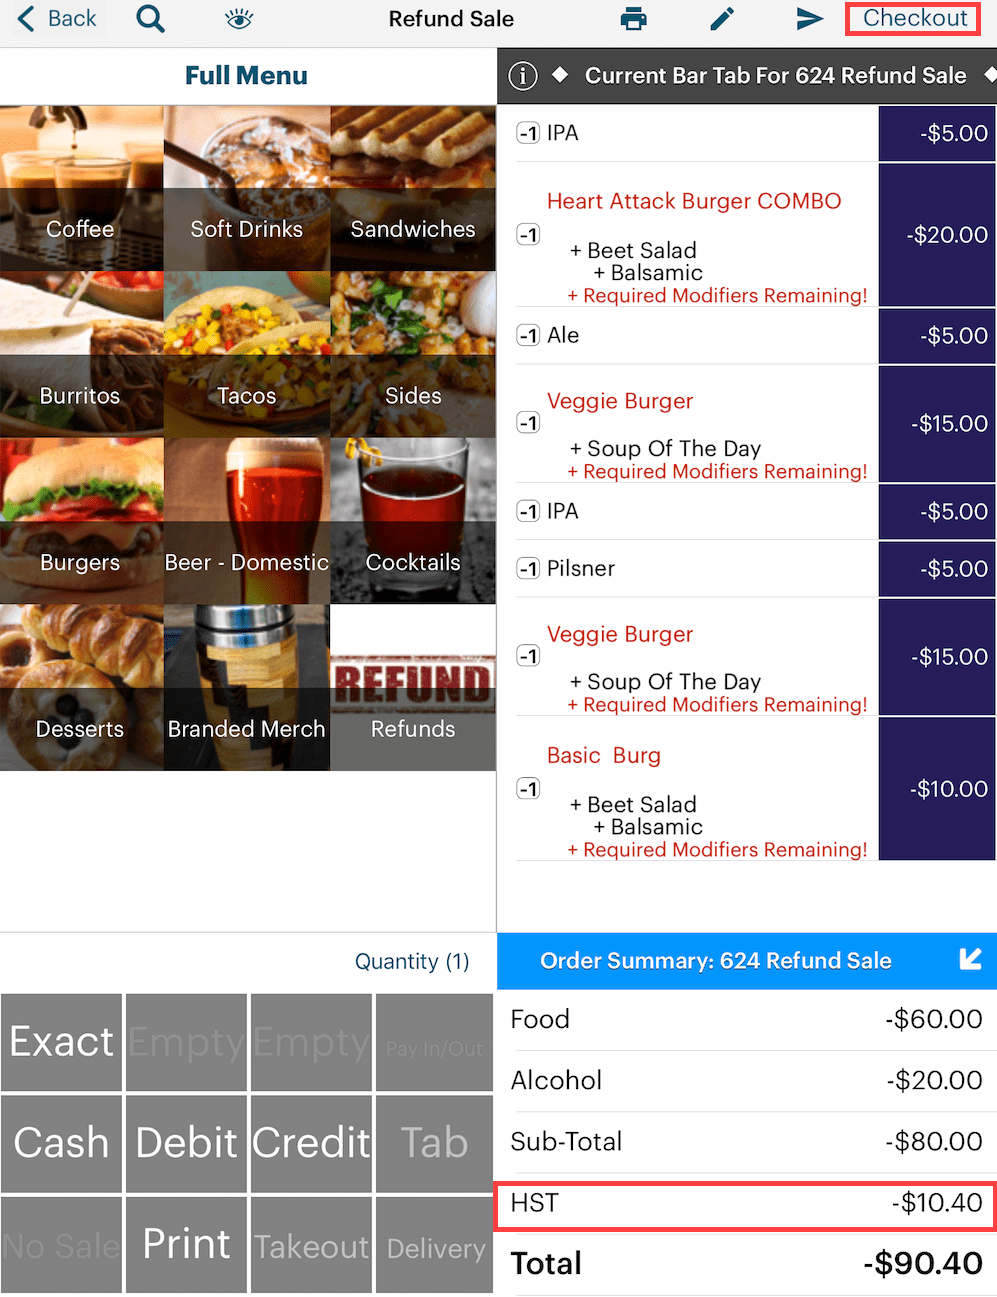
When you open the refund sale invoice, you will notice all items in the refunded bill are negative quantities. If the items have programmed mandatory modifiers, ignore the warning. If the refunded items are inventoried, TouchBistro returns the inventory count. As well TouchBistro correctly calculates the refunded tax. Tap Checkout to close out this refund invoice.
Chapter 15. Switching Locations
If you have setup your Square Point of Sale app to support multiple locations, and you’ve changed locations on your Square Point of Sale app, you need to change the location set in TouchBistro.
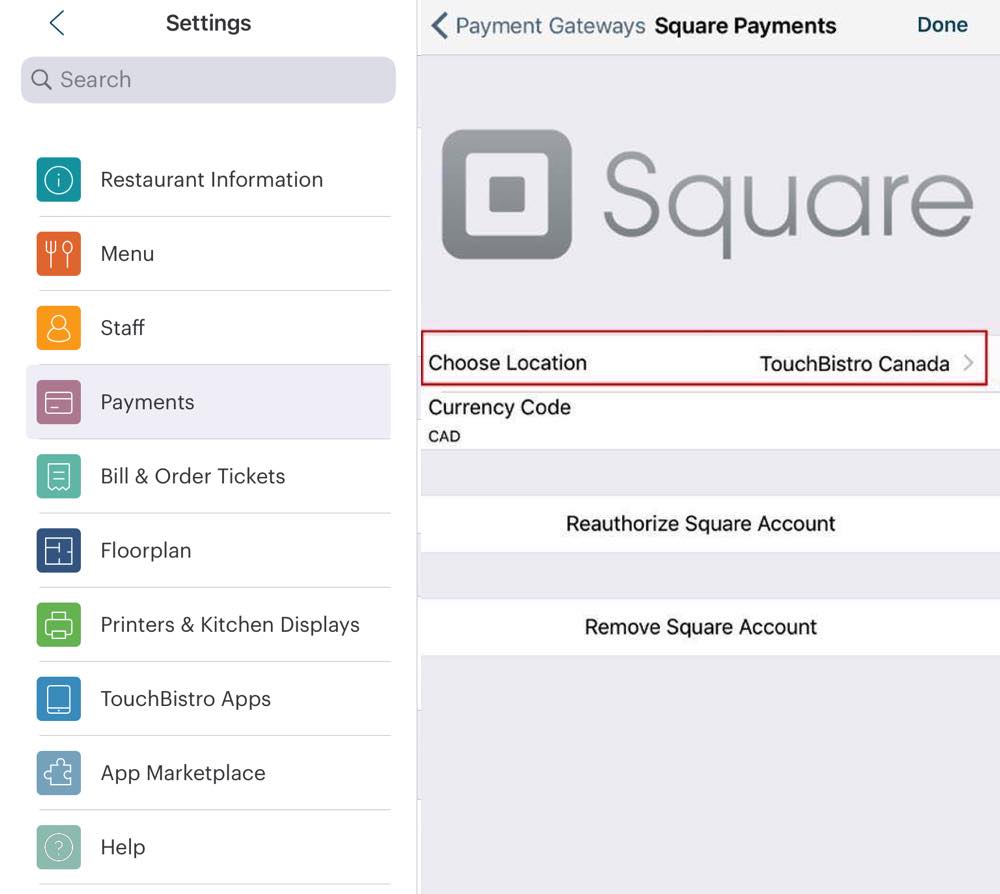
From the Square Payments screen, simply tap Choose Location and tap the location set in the Square Point of Sale app.
Chapter 16. Managing Gift Cards in Square
Gift cards are sold, enabled, and managed via the Square Point of Sale App and your Square Dashboard. Before you begin setting up gift cards, ensure you’ve ordered Square-compatible gift cards from Square. If you have gift cards from a previous integration they will not be compatible with the Square integration.
Section 1. Enable Gift Card Sales on your Square Dashboard
In this step, you set up what kind of gift cards will be available for sale. For example, do you only want to sell gift cards in fixed amounts ($20, $50, $100)? Or do you want to offer cards that can be loaded with any amount desired?
1. Log onto your Square Dashboard.
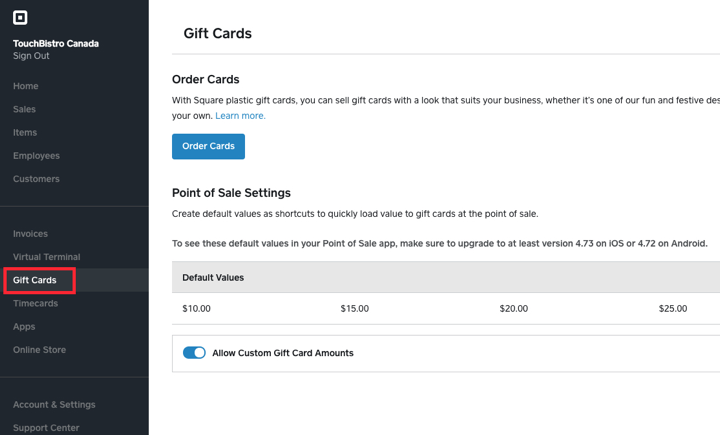
2. Click Gift Cards.

3. If you’ve not ordered your gift cards yet, click Order Cards.

4. When you get your card return to this screen. Square offers some default amounts for more rapid value addition. Tap Edit if you wish to customize these amounts.
5. If you want to be able to add custom values (e.g., $26) to gift cards, enable Allow Custom Gift Card Amounts.
Section 2. Selling a Gift Card or Reloading a Card
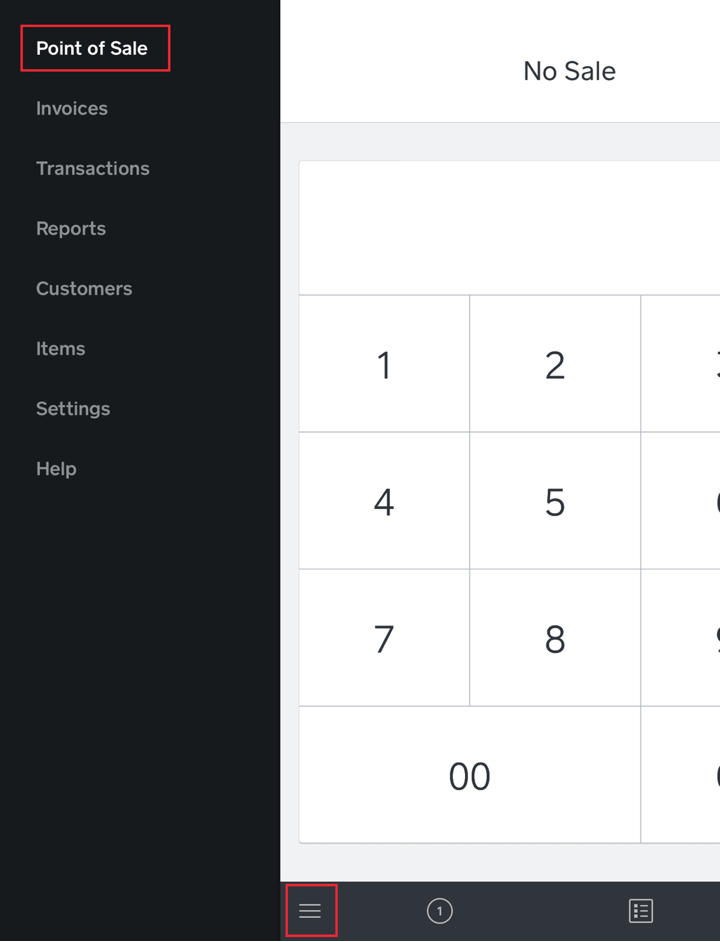
1. If you’re not on your checkout screen, tap the Options  icon at the bottom of the screen and tap Point of Sale.
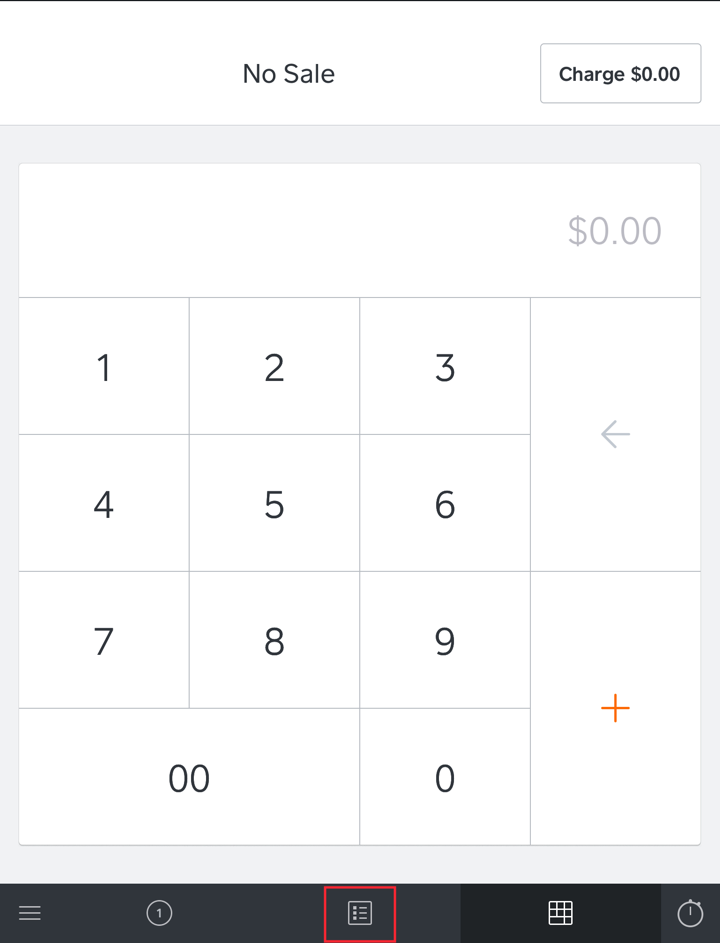
2. Tap the Library icon at the bottom.
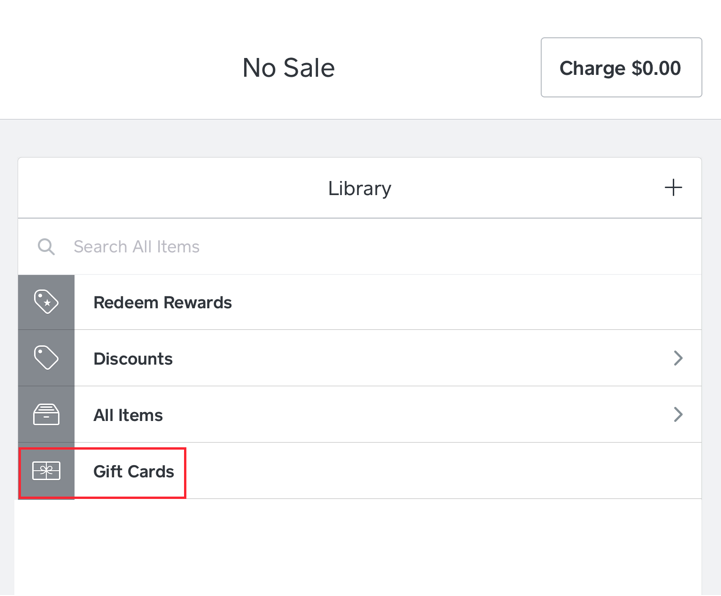
3. Tap Gift Cards.

4. Enter the gift card’s number or swipe it to enter it.

5. Select the value you wish to add to the card. If you enabled the Custom Amount option on the dashboard set up screen, enter a dollar value.
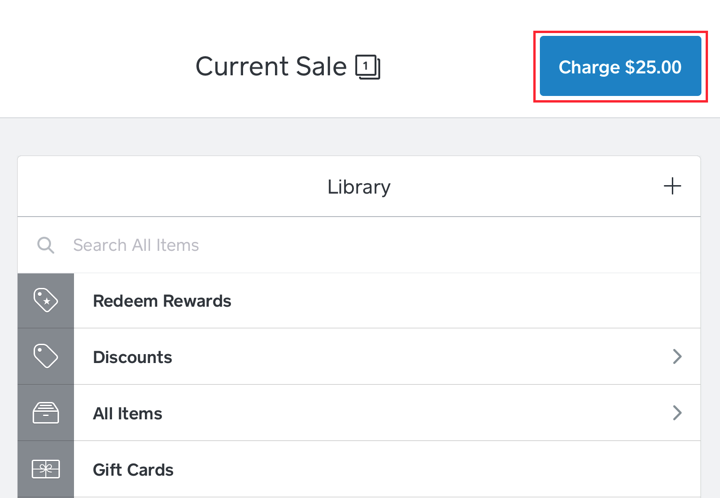
6. Verify the amount and tap Charge.
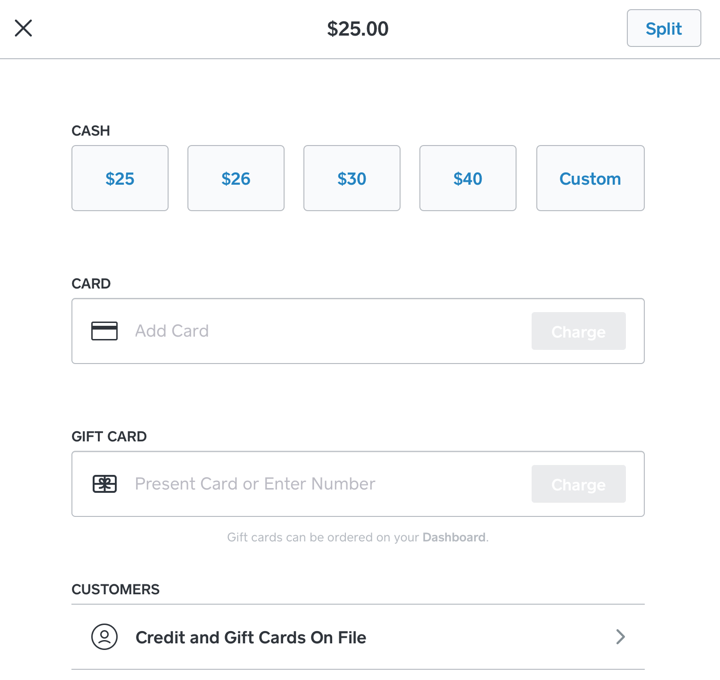
7. Accept payment for the value added.
Section 3. Logging Gift Card Sales in TouchBistro
When you sell a gift card via Square, TouchBistro does not log the sale or the payment in its End of Day report. It’s important to log any value added to a gift card as a menu item sale to help balance out your cash drawer and credit card receipts.
Although it might seem unnecessary to log a gift card value addition as a sale when Square already captures a sale, it only provides half the necessary information. Imagine, for example, a customer topped up a Square gift card for $50 and paid with a $50 bill. Your cash drawer would be $50 over and you could only guess that that $50 represents the $50 gift card top up.
To ensure complete and accurate accounting, follow the following steps:
Section 4. Setting Up Your Menu
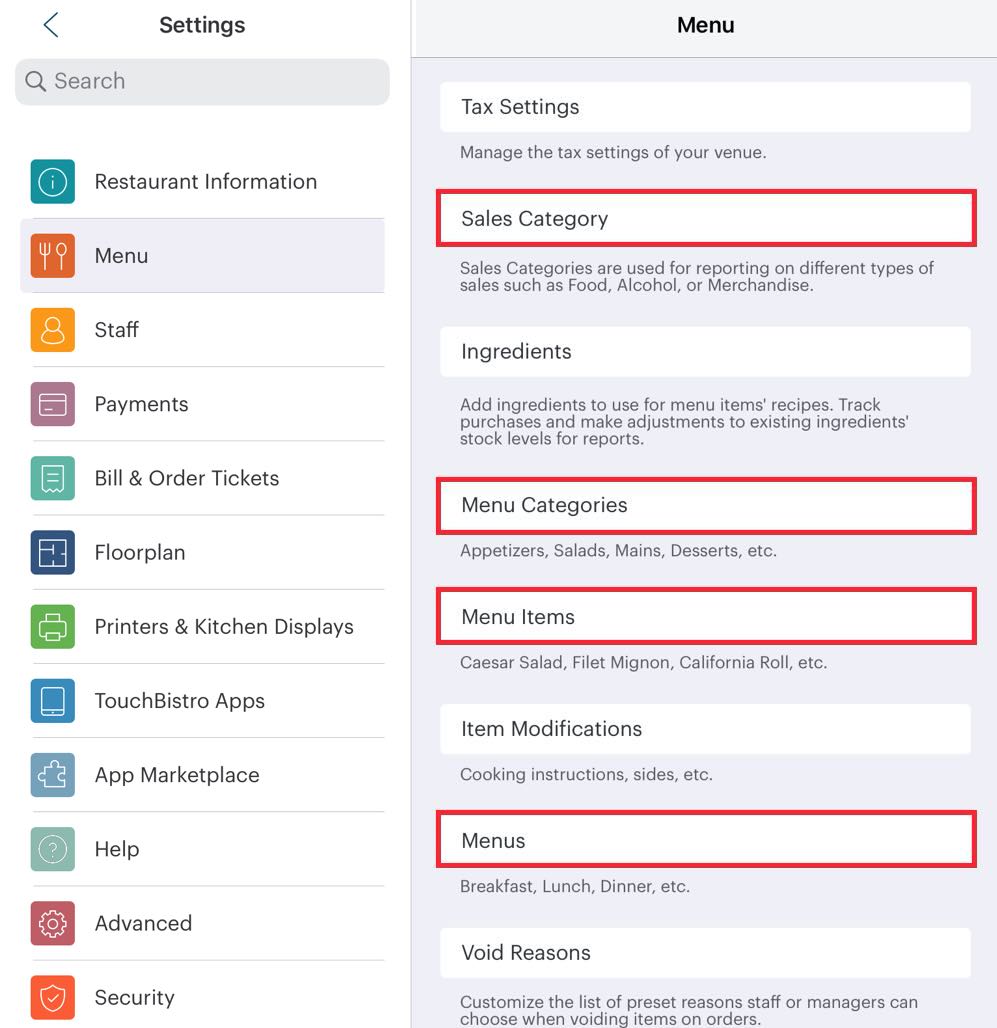
1. Access Menu.
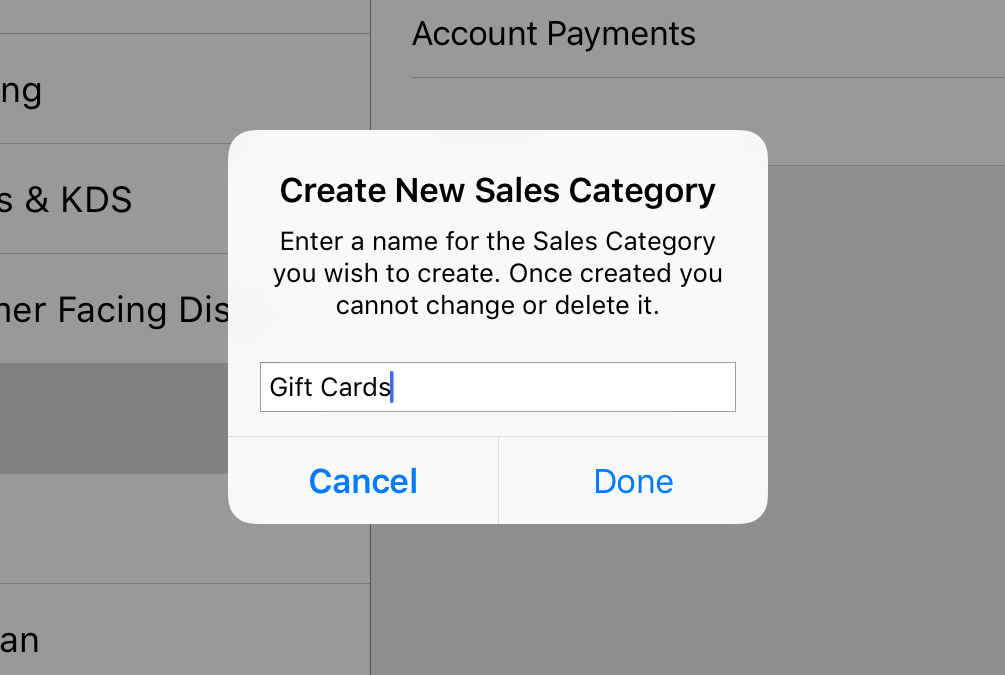
2. Tap Sales Category. Create a Sales Category called Gift Cards or Merchandise (if you want to sell other non food/drink items).
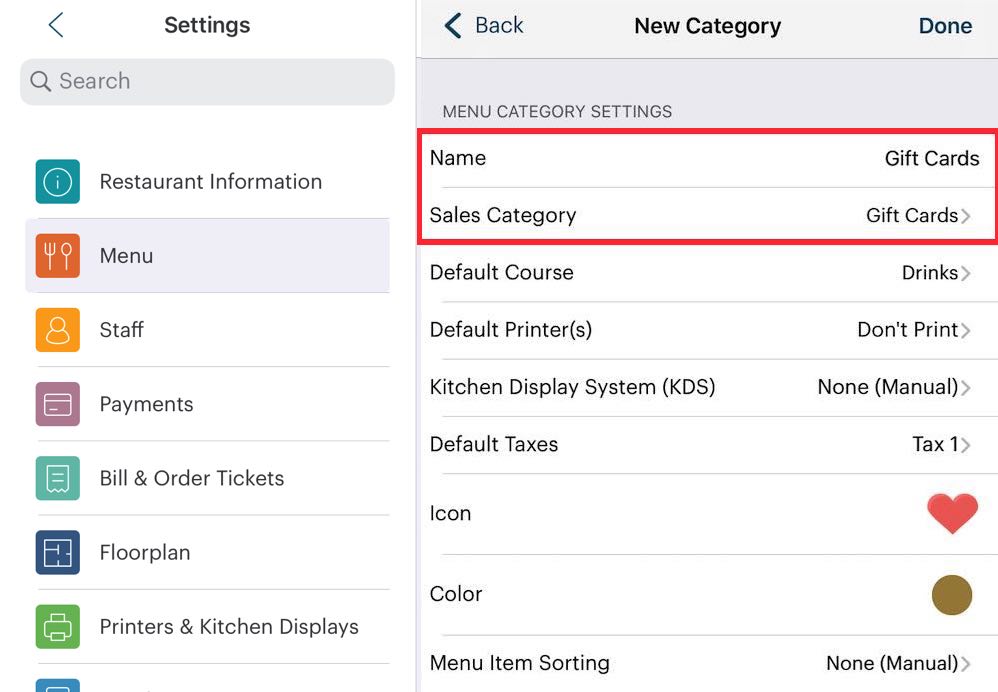
3. Create a Menu Category called Gift Cards. Set the Sales Category for Gift Cards or Merchandise (depending on what you created in step 2).
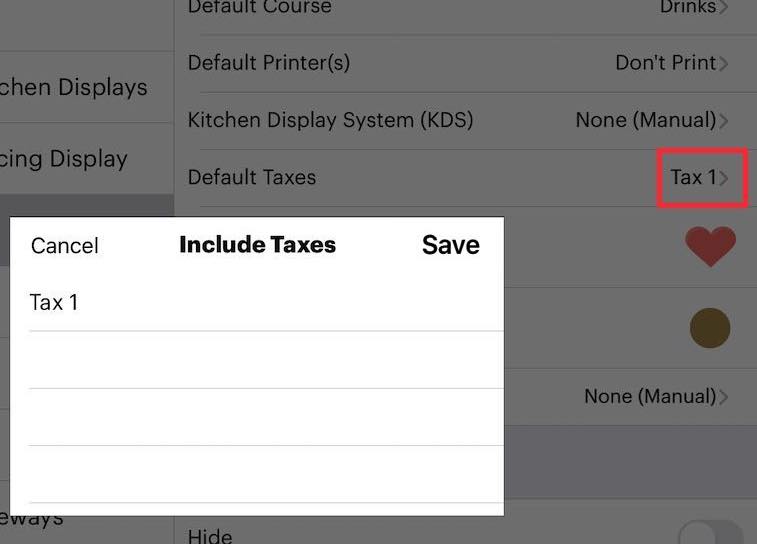
4. Ensure you disable Taxation by removing the checkmark ![]() from the included tax. Tap Done
from the included tax. Tap Done
![]()
5. Tap Icon and set an appropriate icon.
6. Tap Done.
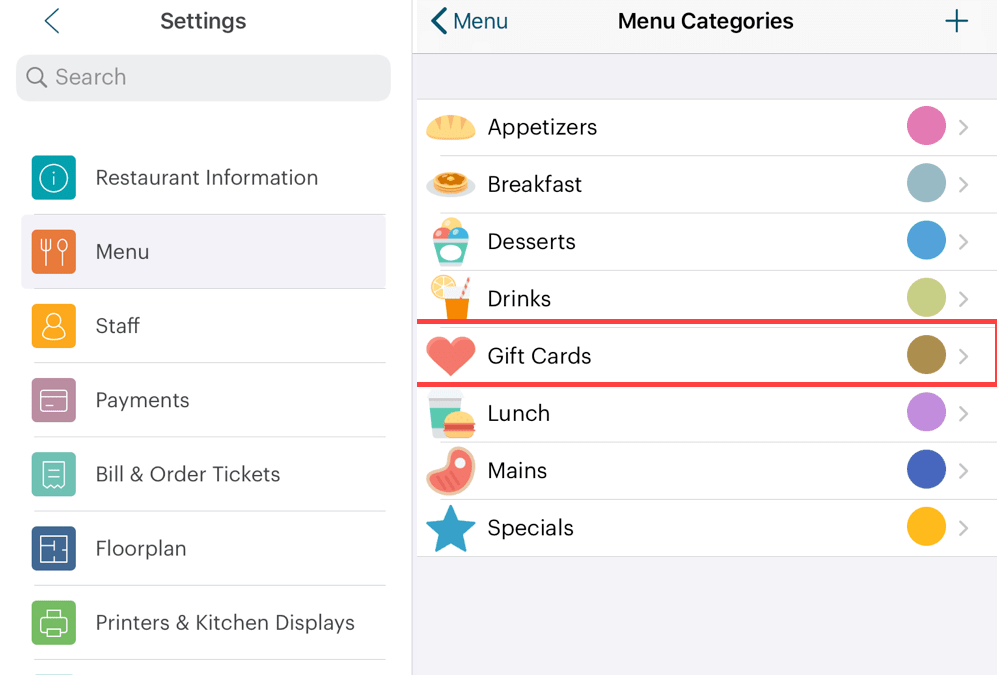
7. Access Menu Items. Tap Gift Cards.
8. Create a Gift Card Value Add menu item under the Gift Cards category.

9. Give the menu item name something like Gift Card Value Add. This will will be used when a new card is purchased and value is added to it or when an existing card is topped up.
10. Set it for an Open Price.
11. Ensure Taxes is set to No Tax.
12. Enable Is a Gift Card. Menu items with this enabled will be flagged as gift card sales in your Gift Card Activity report. We’ll see more about this report below.
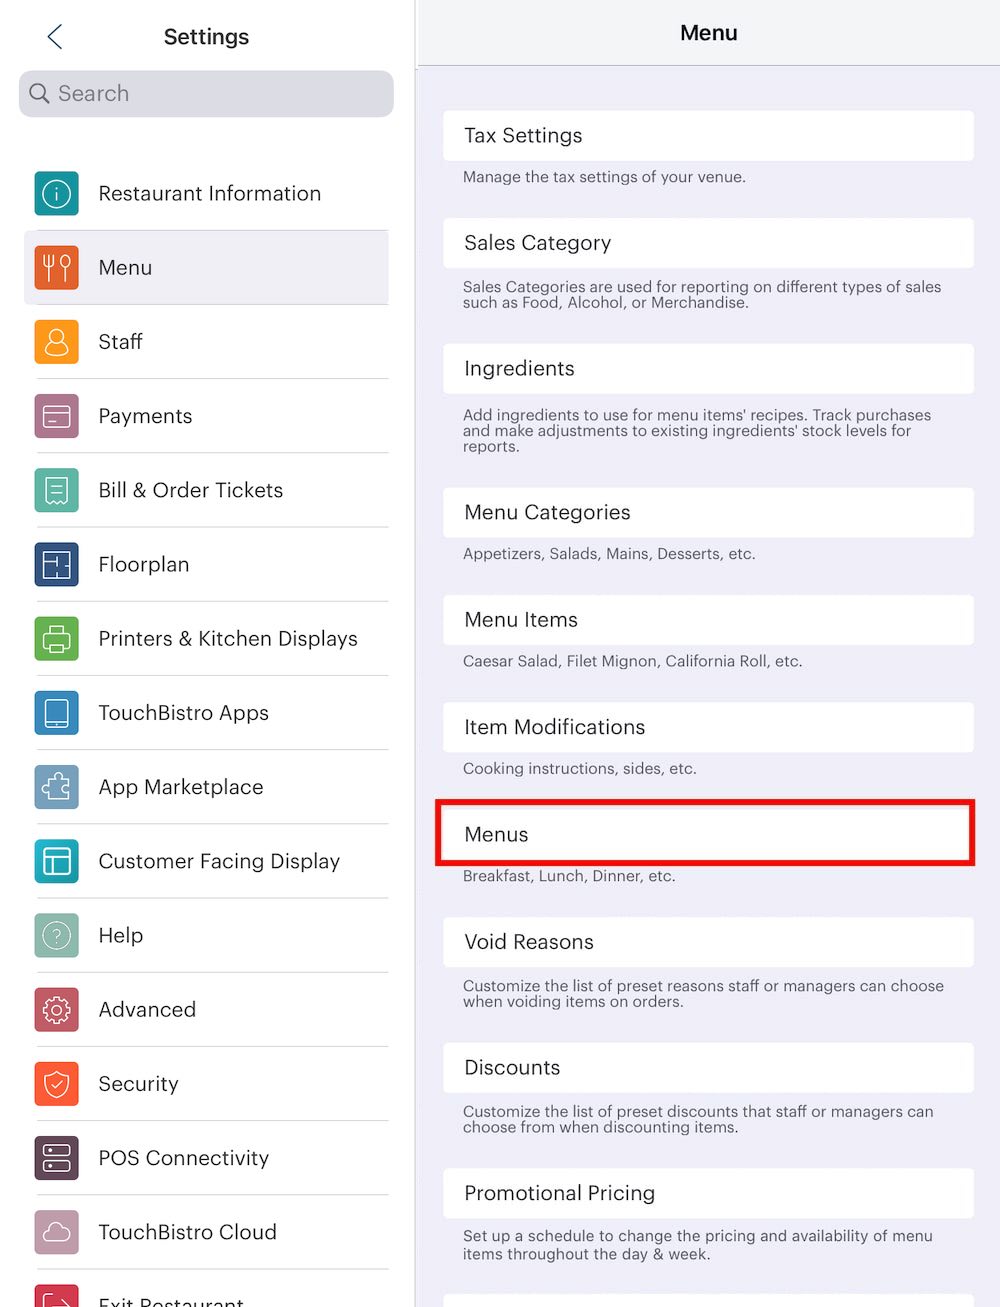
13. Return to the Menu setting screen and tap Menus.
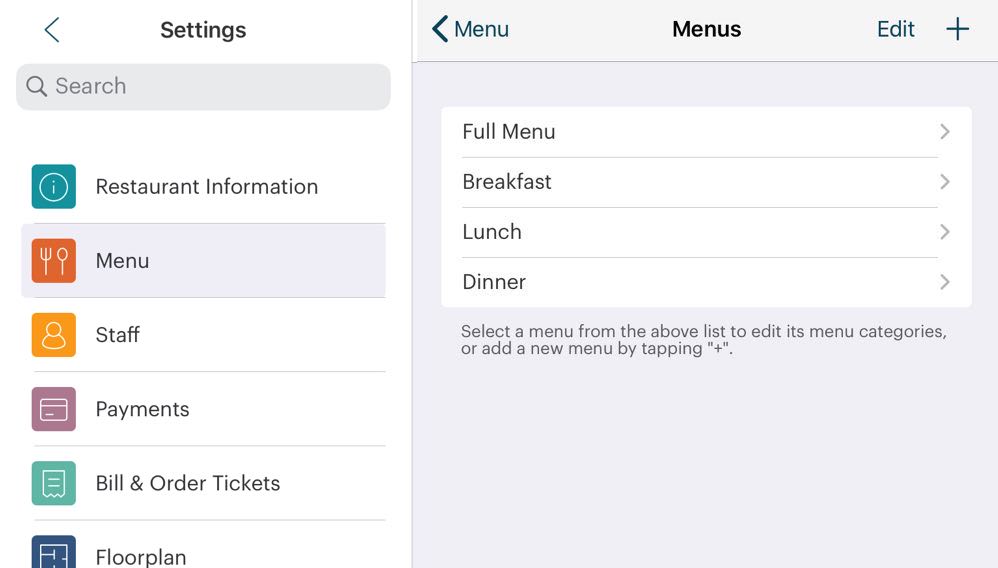
14. Tap a menu category (for example Full Menu).
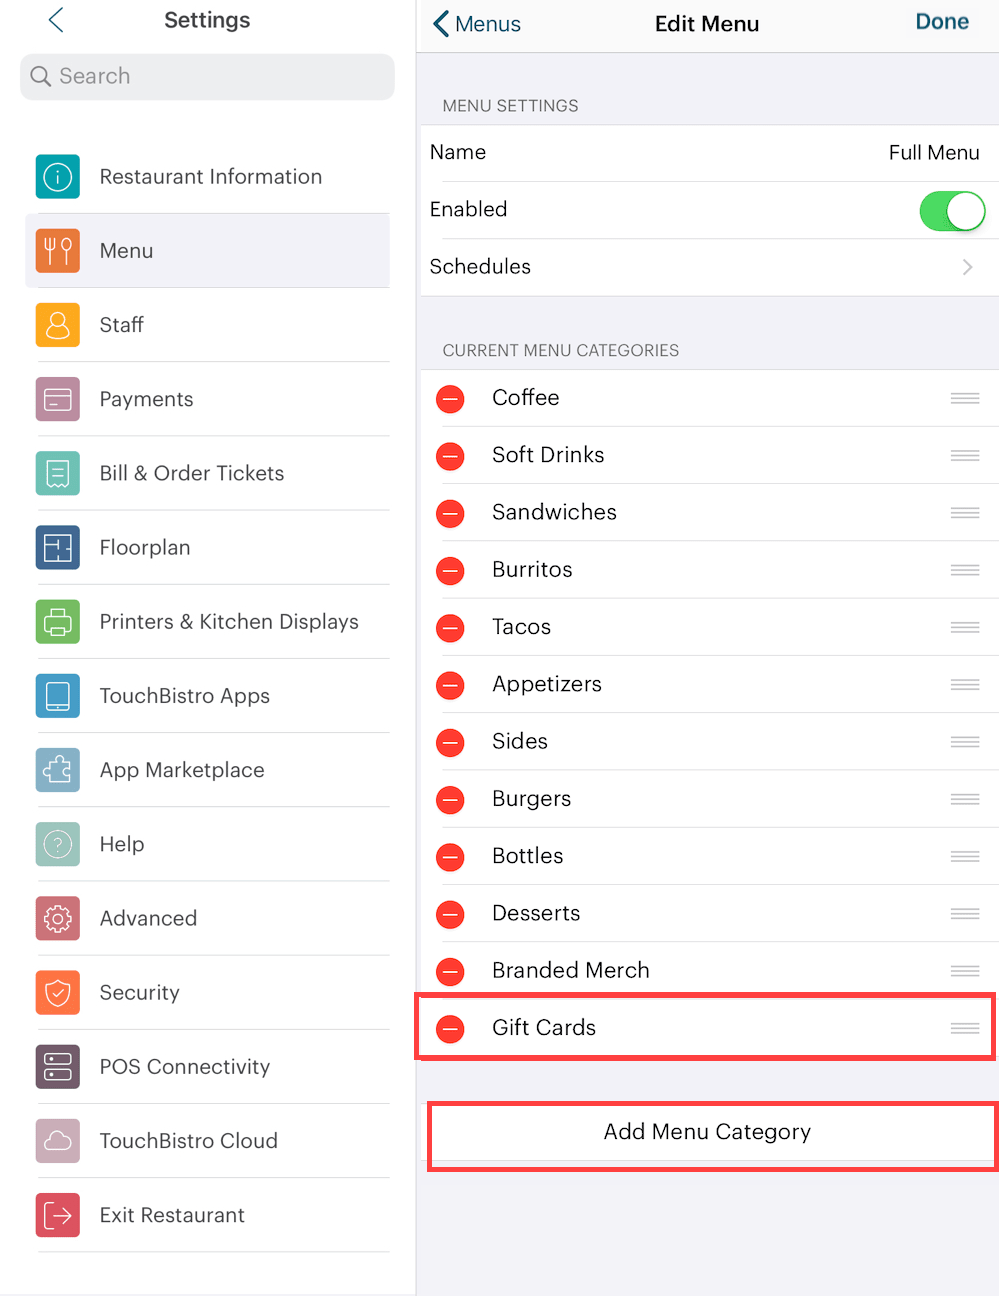
15. Tap Add Menu Category and add our Gift Cards menu category.
16. Tap Done and then add the Gift Cards menu category to additional Menus as necessary.
Section 5. Logging the Order with Your Gift Card Menu Item
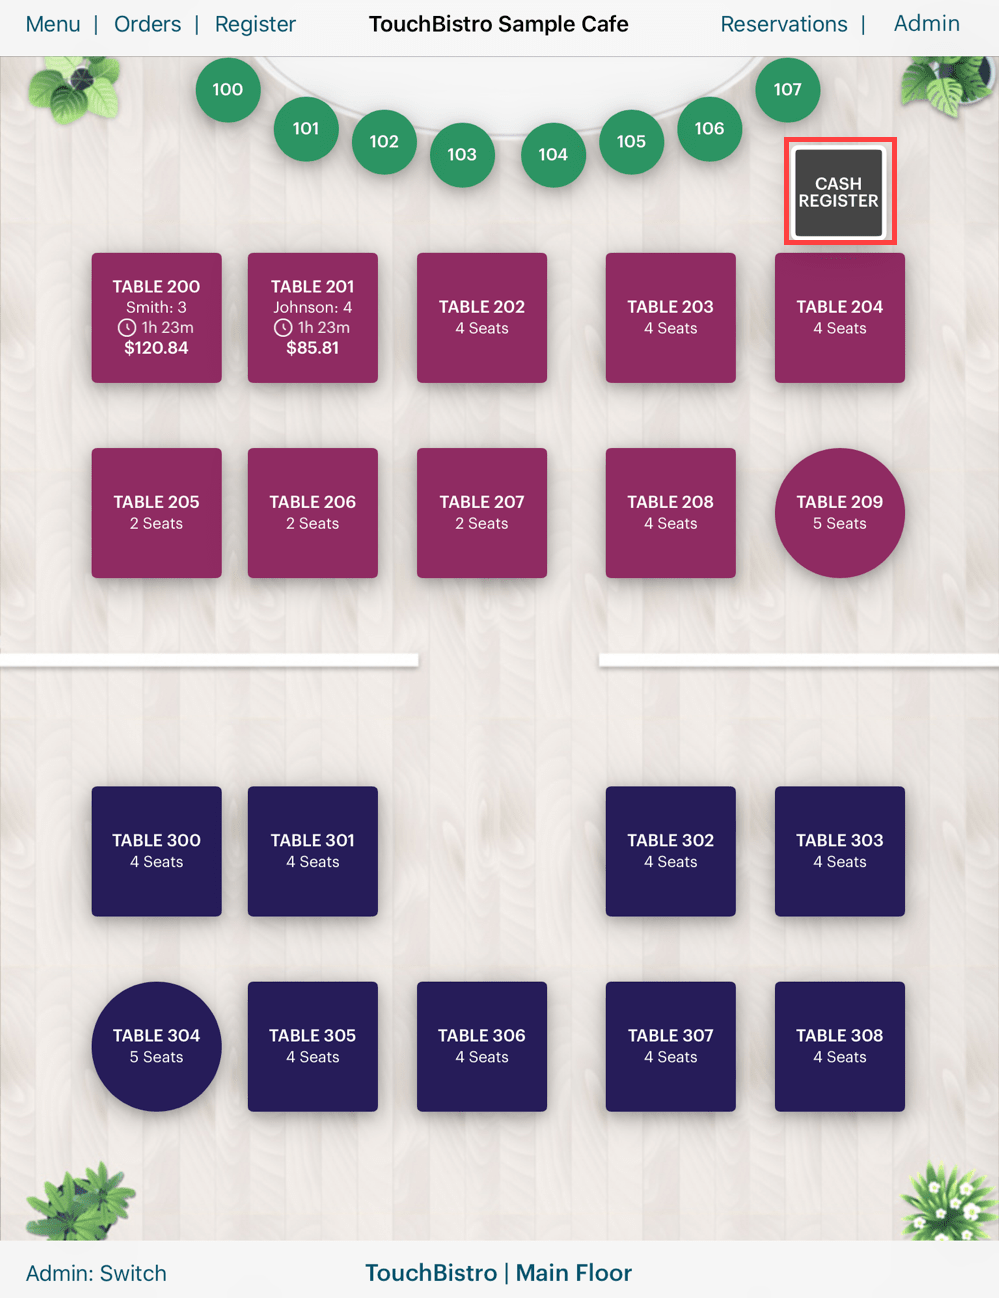
1. Open your cash register.

2. Tap your Gift Card menu category.
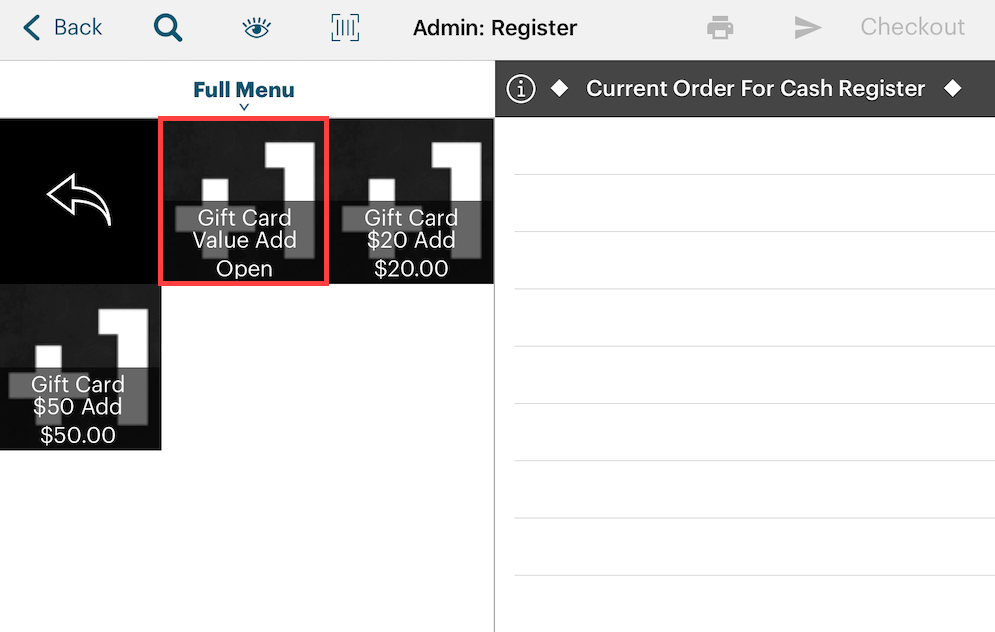
3. Tap your Gift Card Value Add menu item.
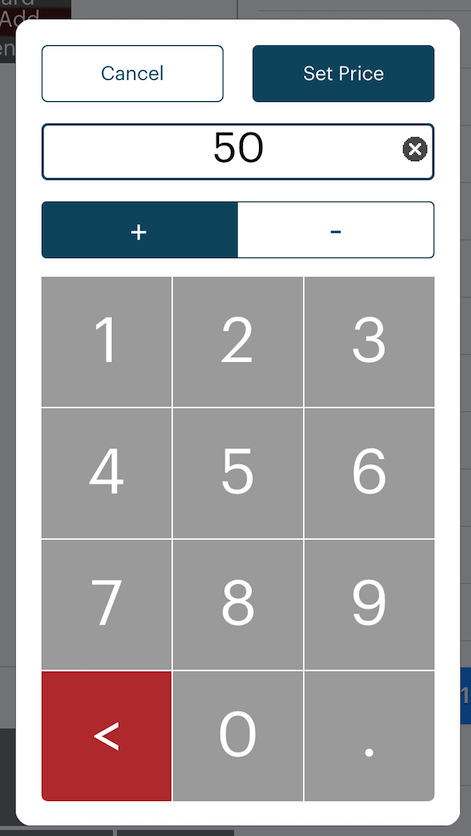
4. Enter the value you wish to add to the card and then tap Set Price.
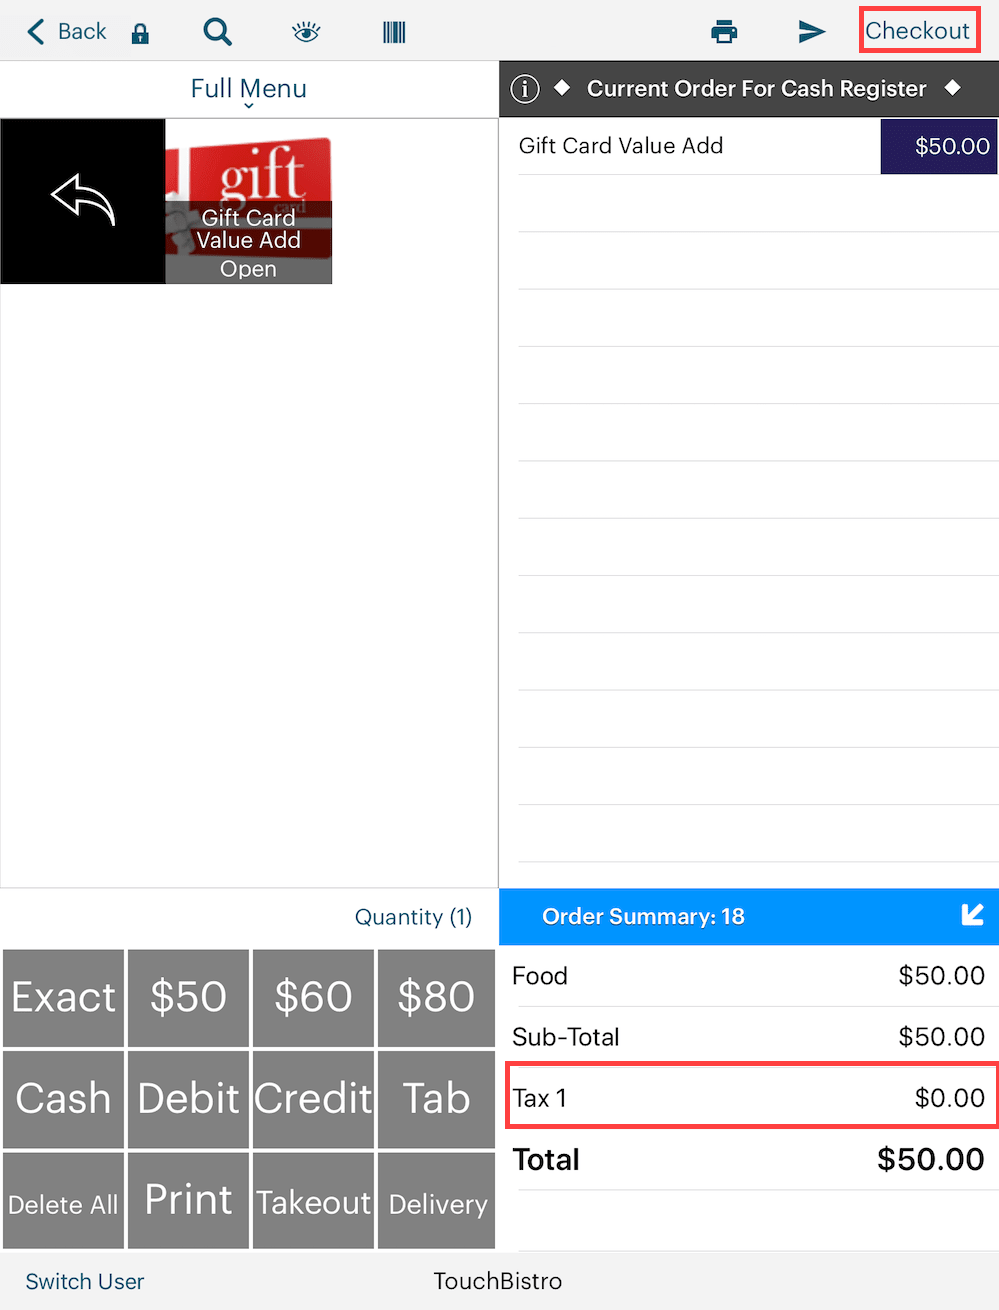
5. Double check you set this menu item up not to charge tax. In most jurisdictions, you do not charge tax on values added to a gift card, as the tax is paid when the gift card is used to pay for a good or service. Tap the Checkout ![]() icon.
icon.
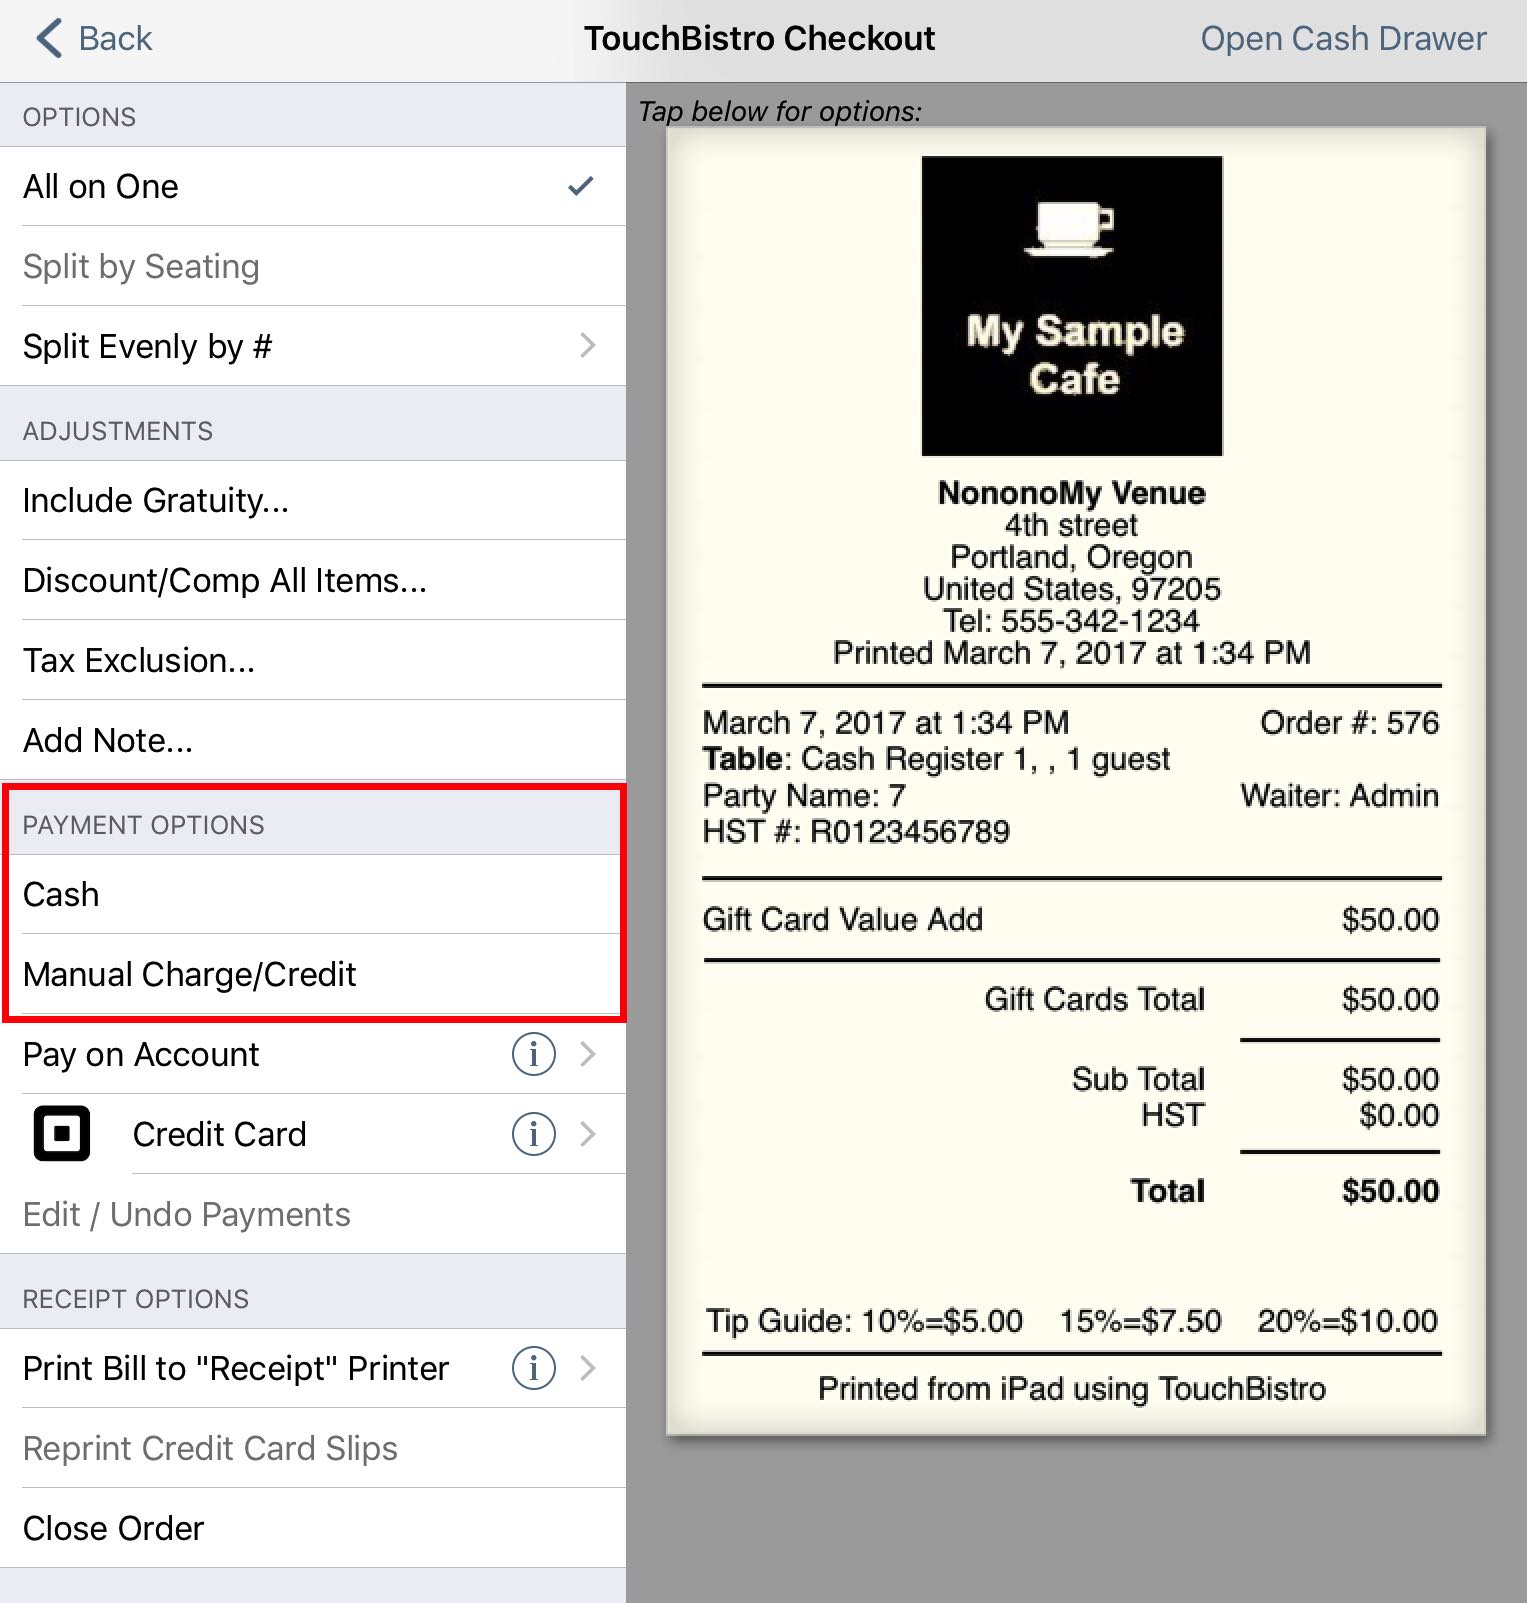
6. Tap one of the non-integrated payment options to log the payment. If the gift card value add was paid with cash, tap Cash. If the gift card value add was paid with a credit card, tap the Manual Charge/Credit
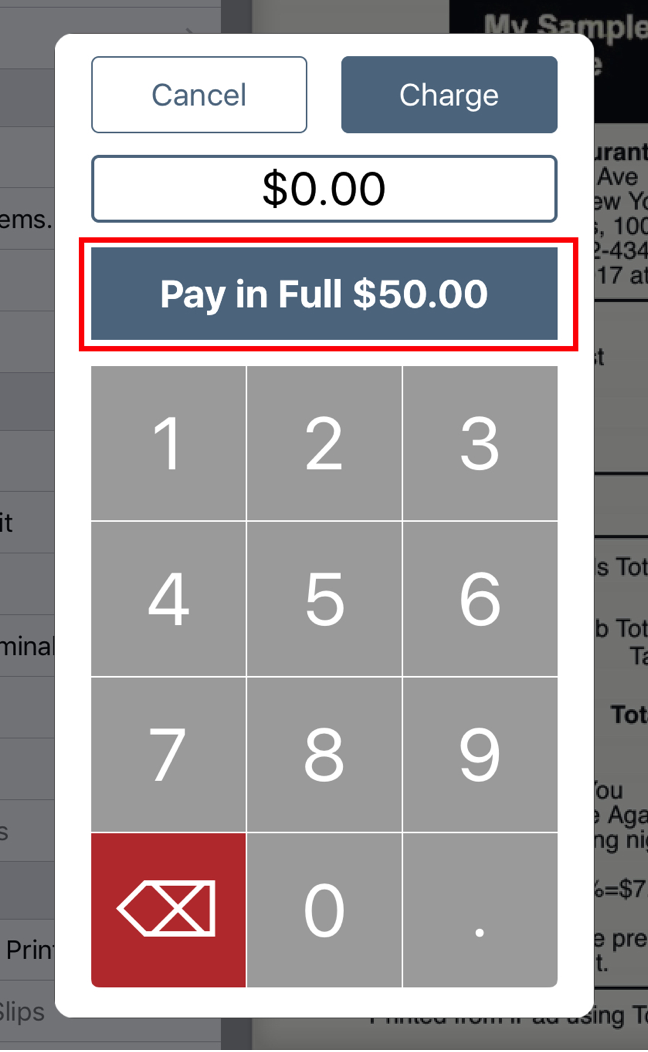
7. After selecting your payment method, tap Pay in Full and complete the sale as you would complete any other menu sale.
Section 6. Reporting
You need to add the Gift Card Activity report to your End of Day template. This report will help you and your accountant to understand how much of the day’s sales can be realized for that day. For example, if you did $1000 in pre-tax sales but sold $200 in gift cards, you can only recognize $800 in pre-tax sales for that day. The money collected for the gift cards will be realized when the customer redeems the gift cards on a later day.
1) Edit Your End of Day Template
To add the Gift Card Activity report:
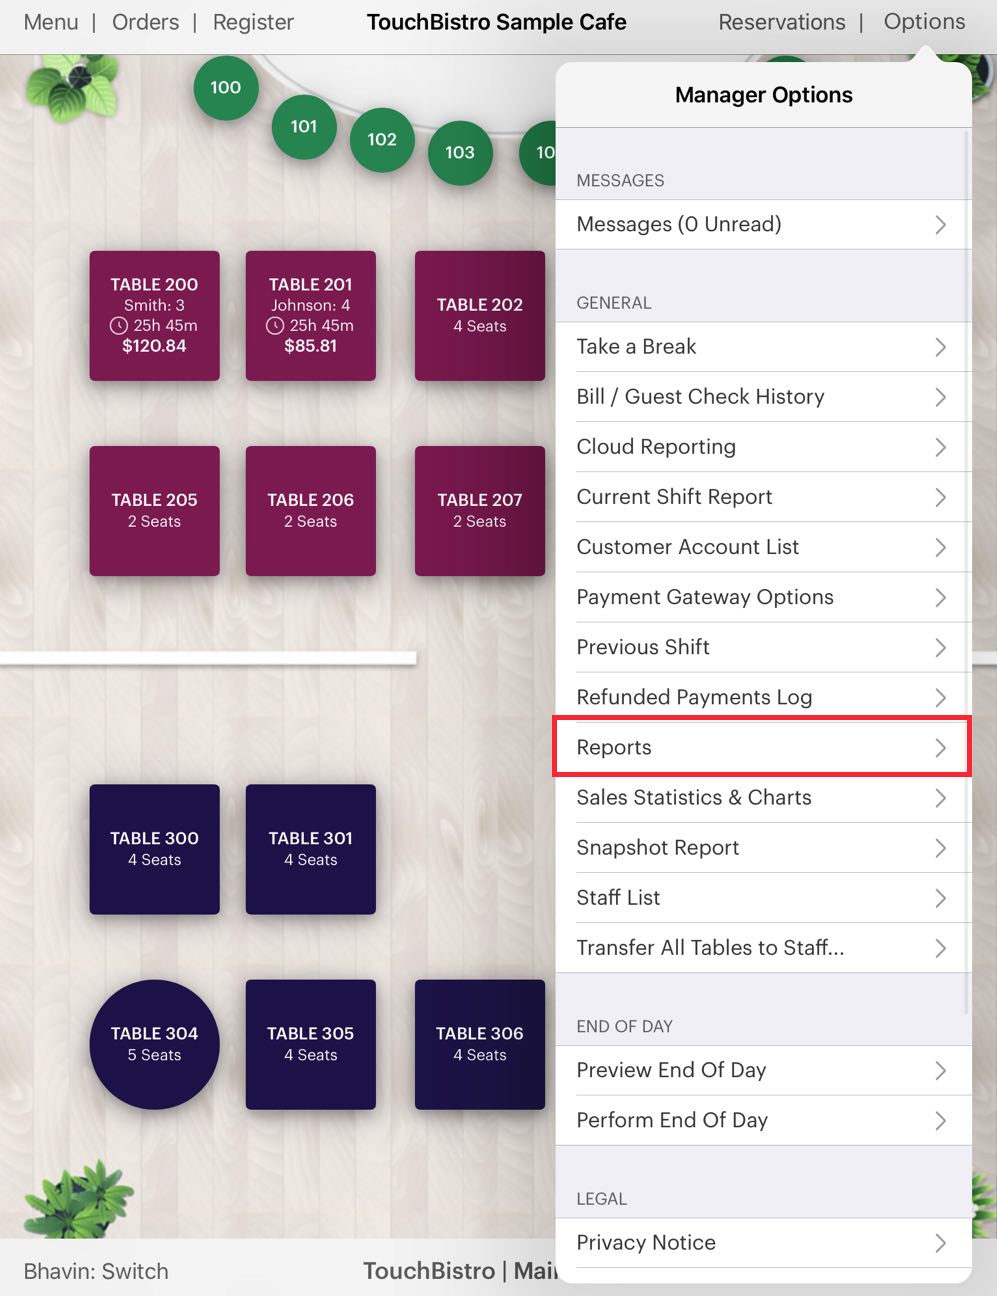
1. Tap Admin | Reports.
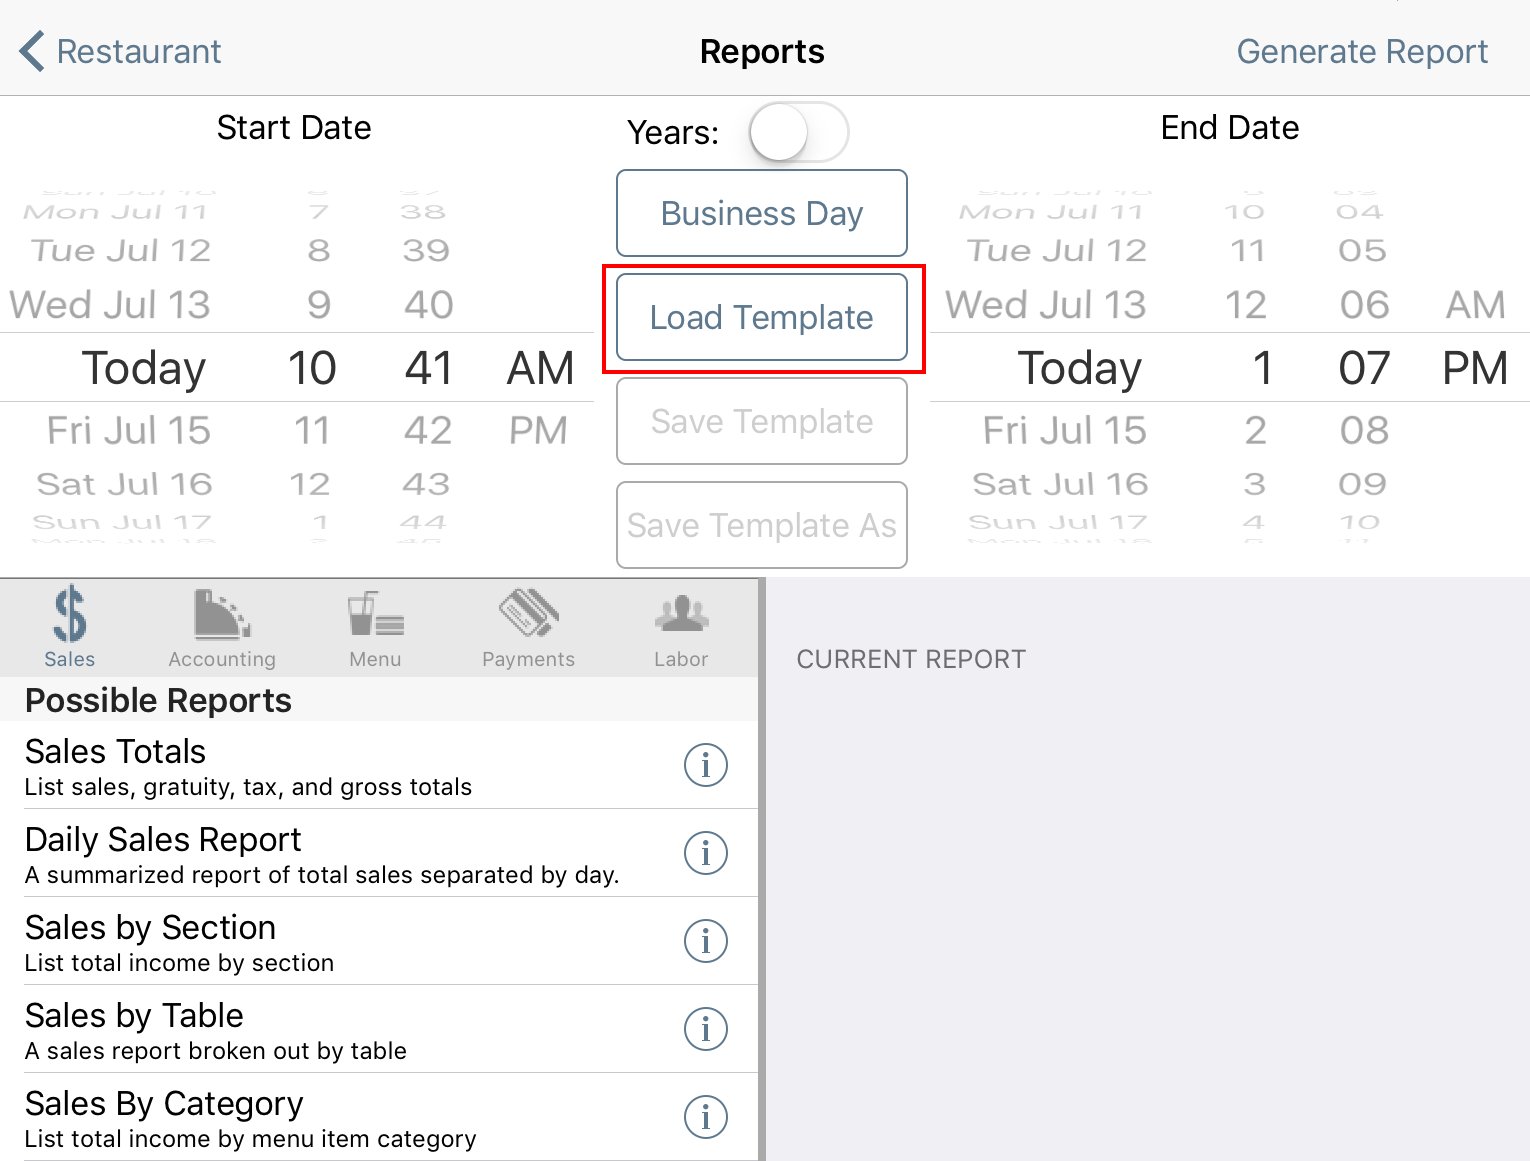
2. Tap Load Template.
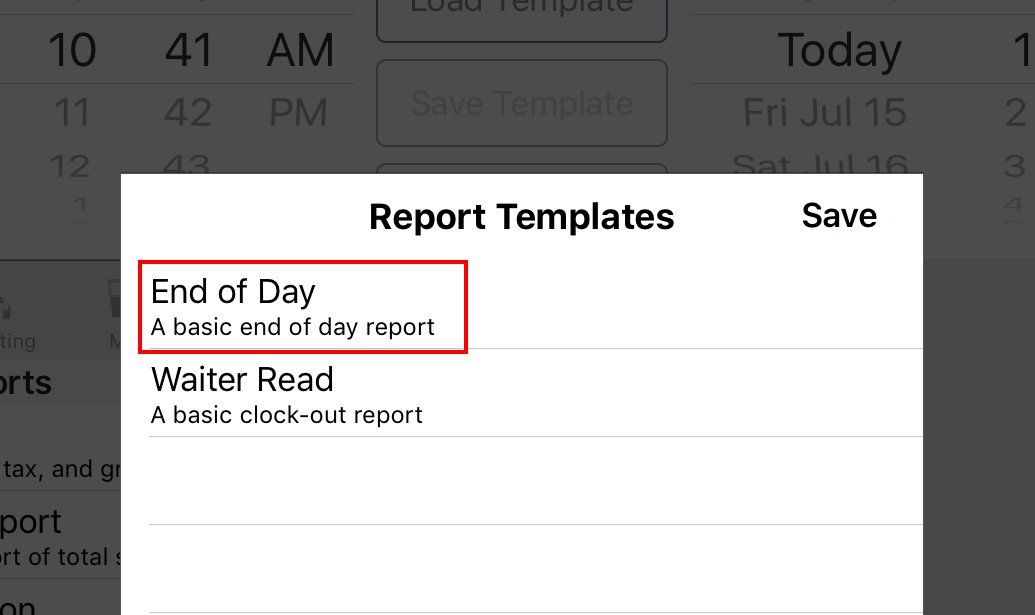
3. Tap End of Day.
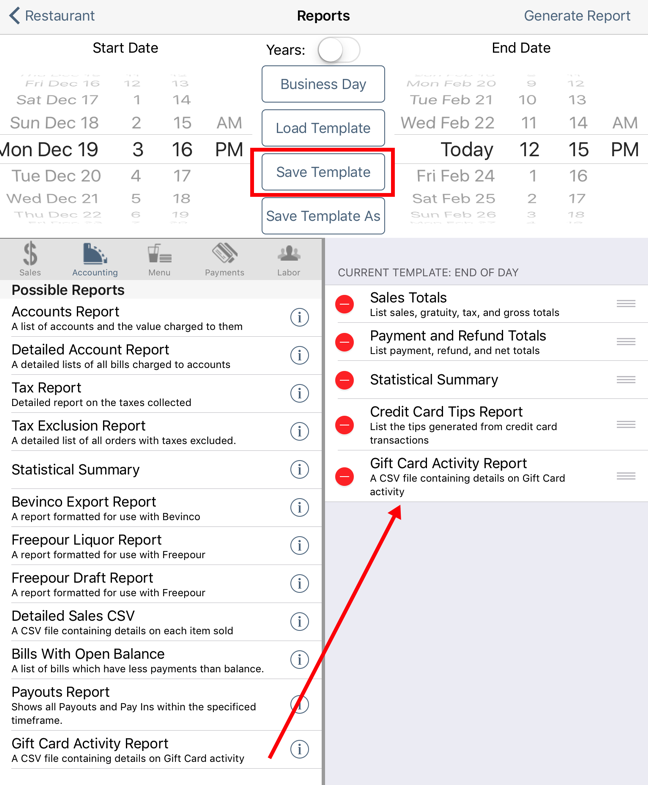
4. Tap Accounting and add the Gift Card Activity report to your list of reports.
5. Tap Save Template.
You will only need to do this once.
2) Perform Your End of Day
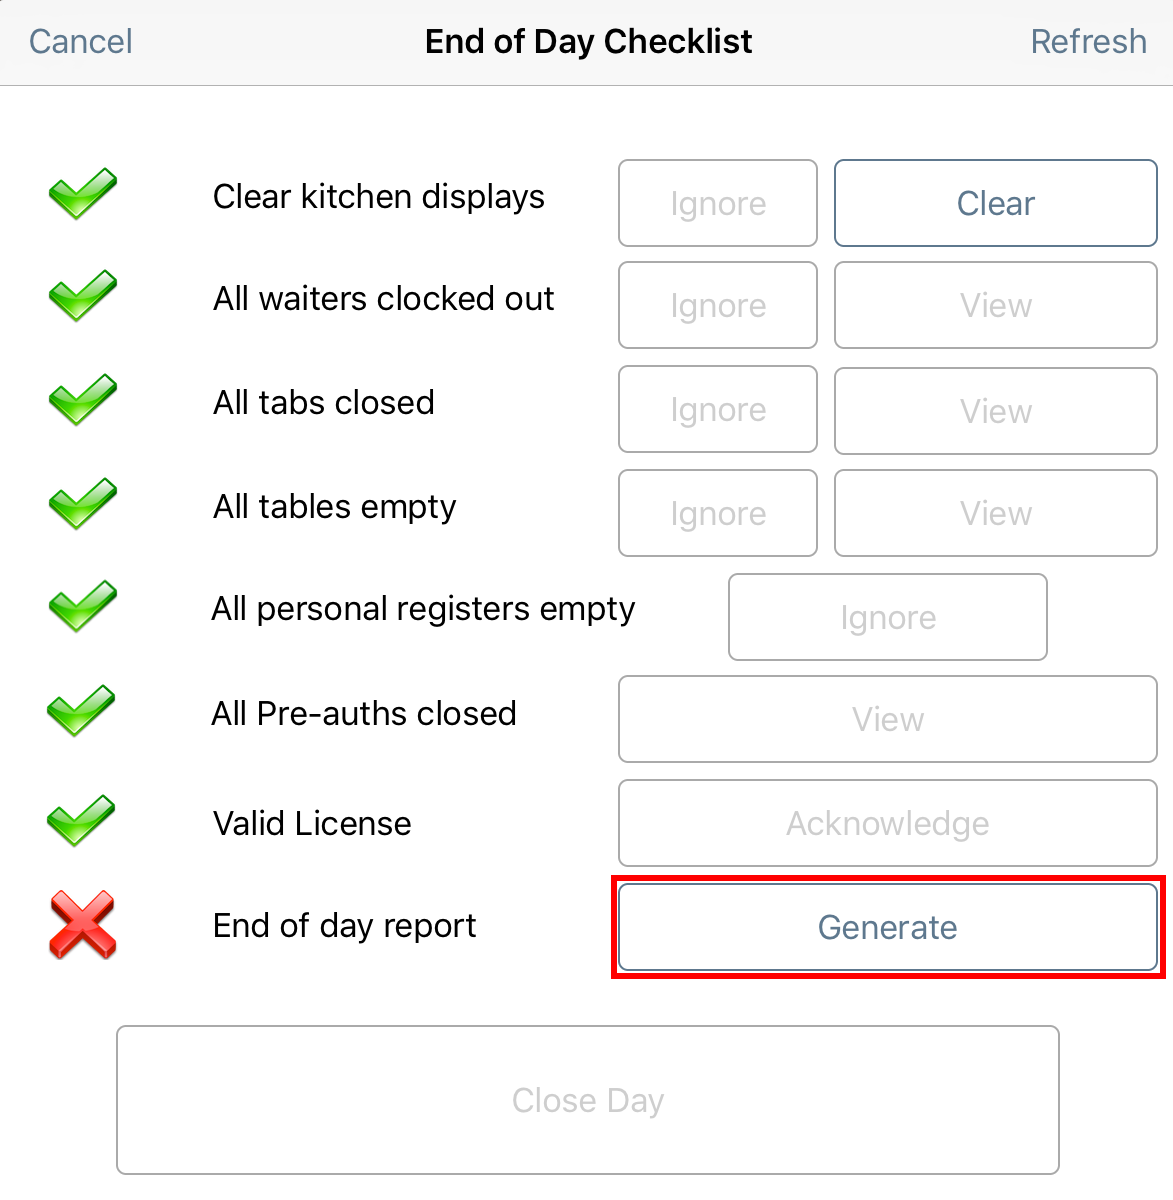
1. Tap Generate to generate your End of Day report.
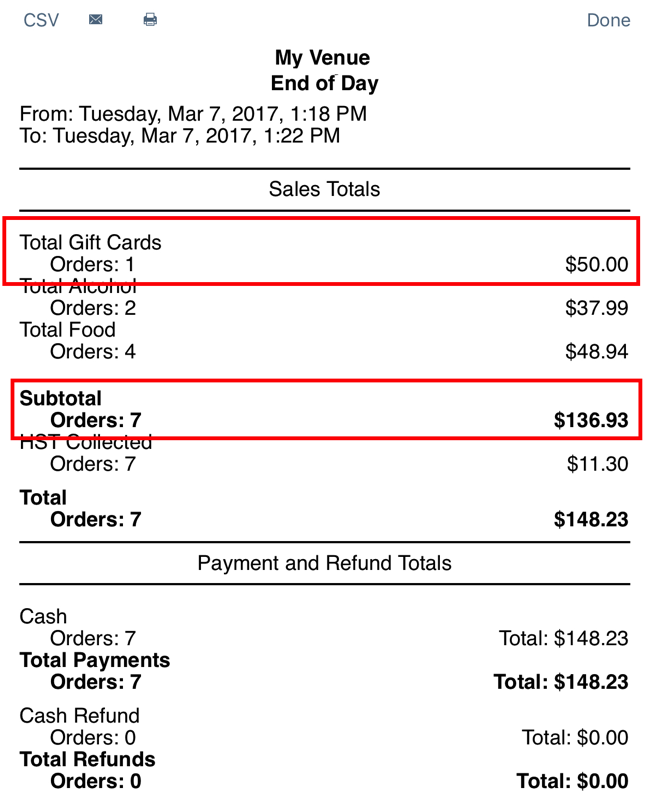
2. When you perform your End of Day, you will see your Gift Card sales category has captured gift card menu item sales. You also see you have $136.93 in pre-tax sales for that day.

3. Reviewing your Gift Card Activity Report, you can see you sold $50 of menu items flagged as a gift card value add. From these reports you or your account can revise the $136.93 in pre-tax sales down by the value of the Gift Card Sales total. So in this example, you can recognize $86.93 in pre-tax sales for the day. The $50 added to a gift card will be realized later when the customer uses the gift card to make payments for other menu items.
Section 7. Checking an Existing Card’s Balance
If a customer comes into your venue and wants to purchase a gift card, follow these steps.

1. If you’re not on your checkout screen, tap the Options  icon at the bottom of the screen and tap Point of Sale.

2. Tap the Library icon at the bottom.

3. Tap Gift Cards.

4. Enter the gift card’s number or swipe it to enter it.

5. The card’s current balance is show at the top of the screen. For example, the card has $3 remaining.
Section 8. Correcting Errors
If you have added a balance to a gift card incorrectly and need to correct the error, follow these steps.
1. Take the card with the incorrect balance.

2. If you’re not on your checkout screen, tap the Options  icon at the bottom of the screen and tap Point of Sale.

3. Tap the Library icon at the bottom.

4. Tap Gift Cards.

5. Enter the gift card’s number or swipe it to enter it.

6. Tap Clear Balance.
7. After clearing the balance, you need to refund the customer or cancel the payment if done by credit card.
8. Tap the Options ![]() icon at the bottom of the screen.
icon at the bottom of the screen.

9. Tap Transactions.
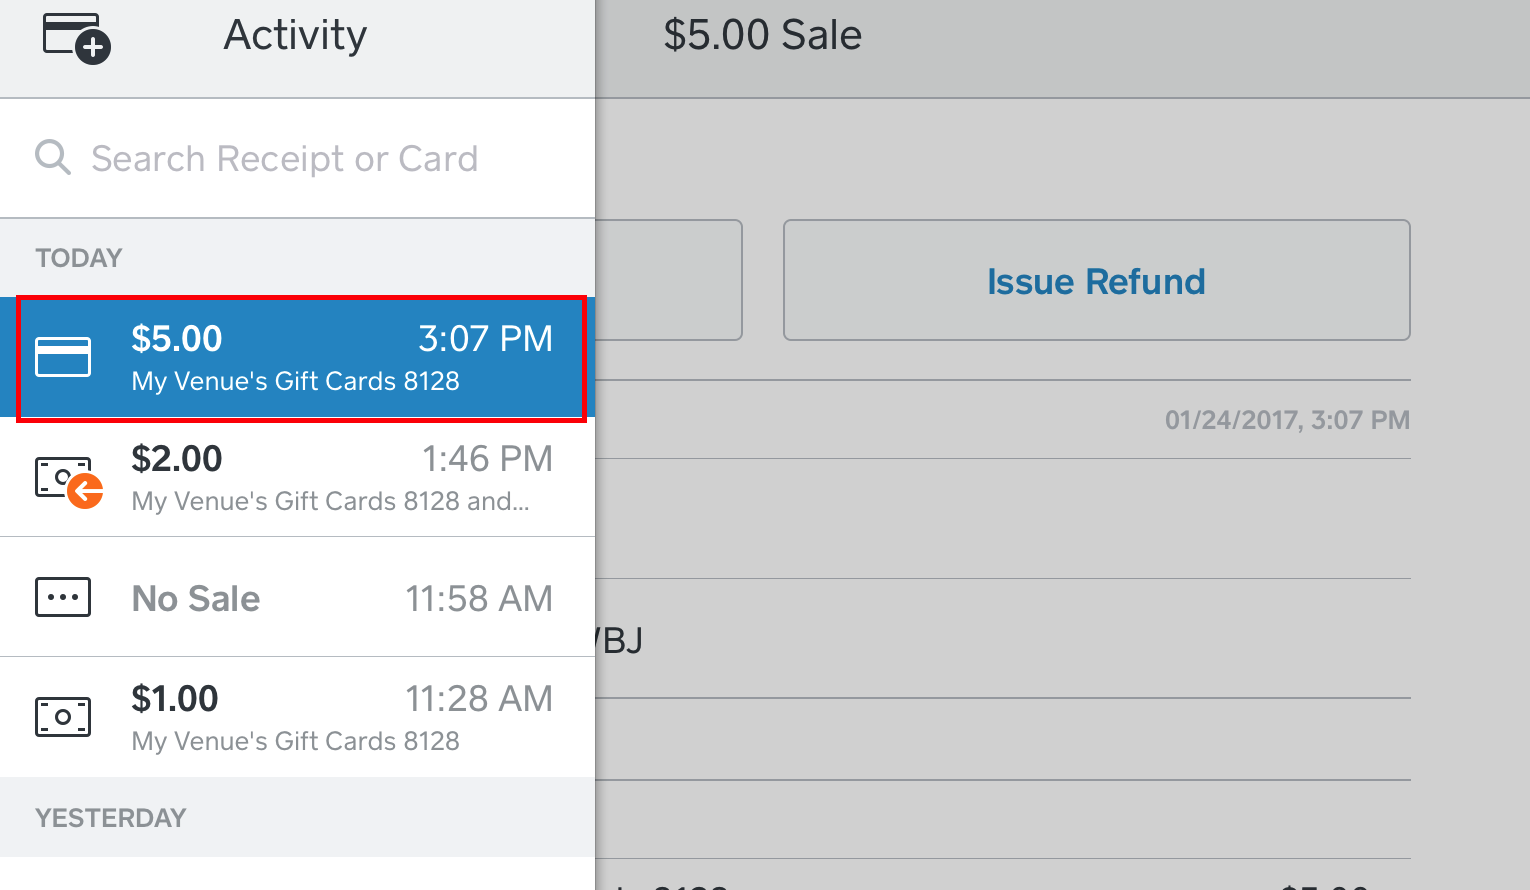
10. Locate the payment and tap it.
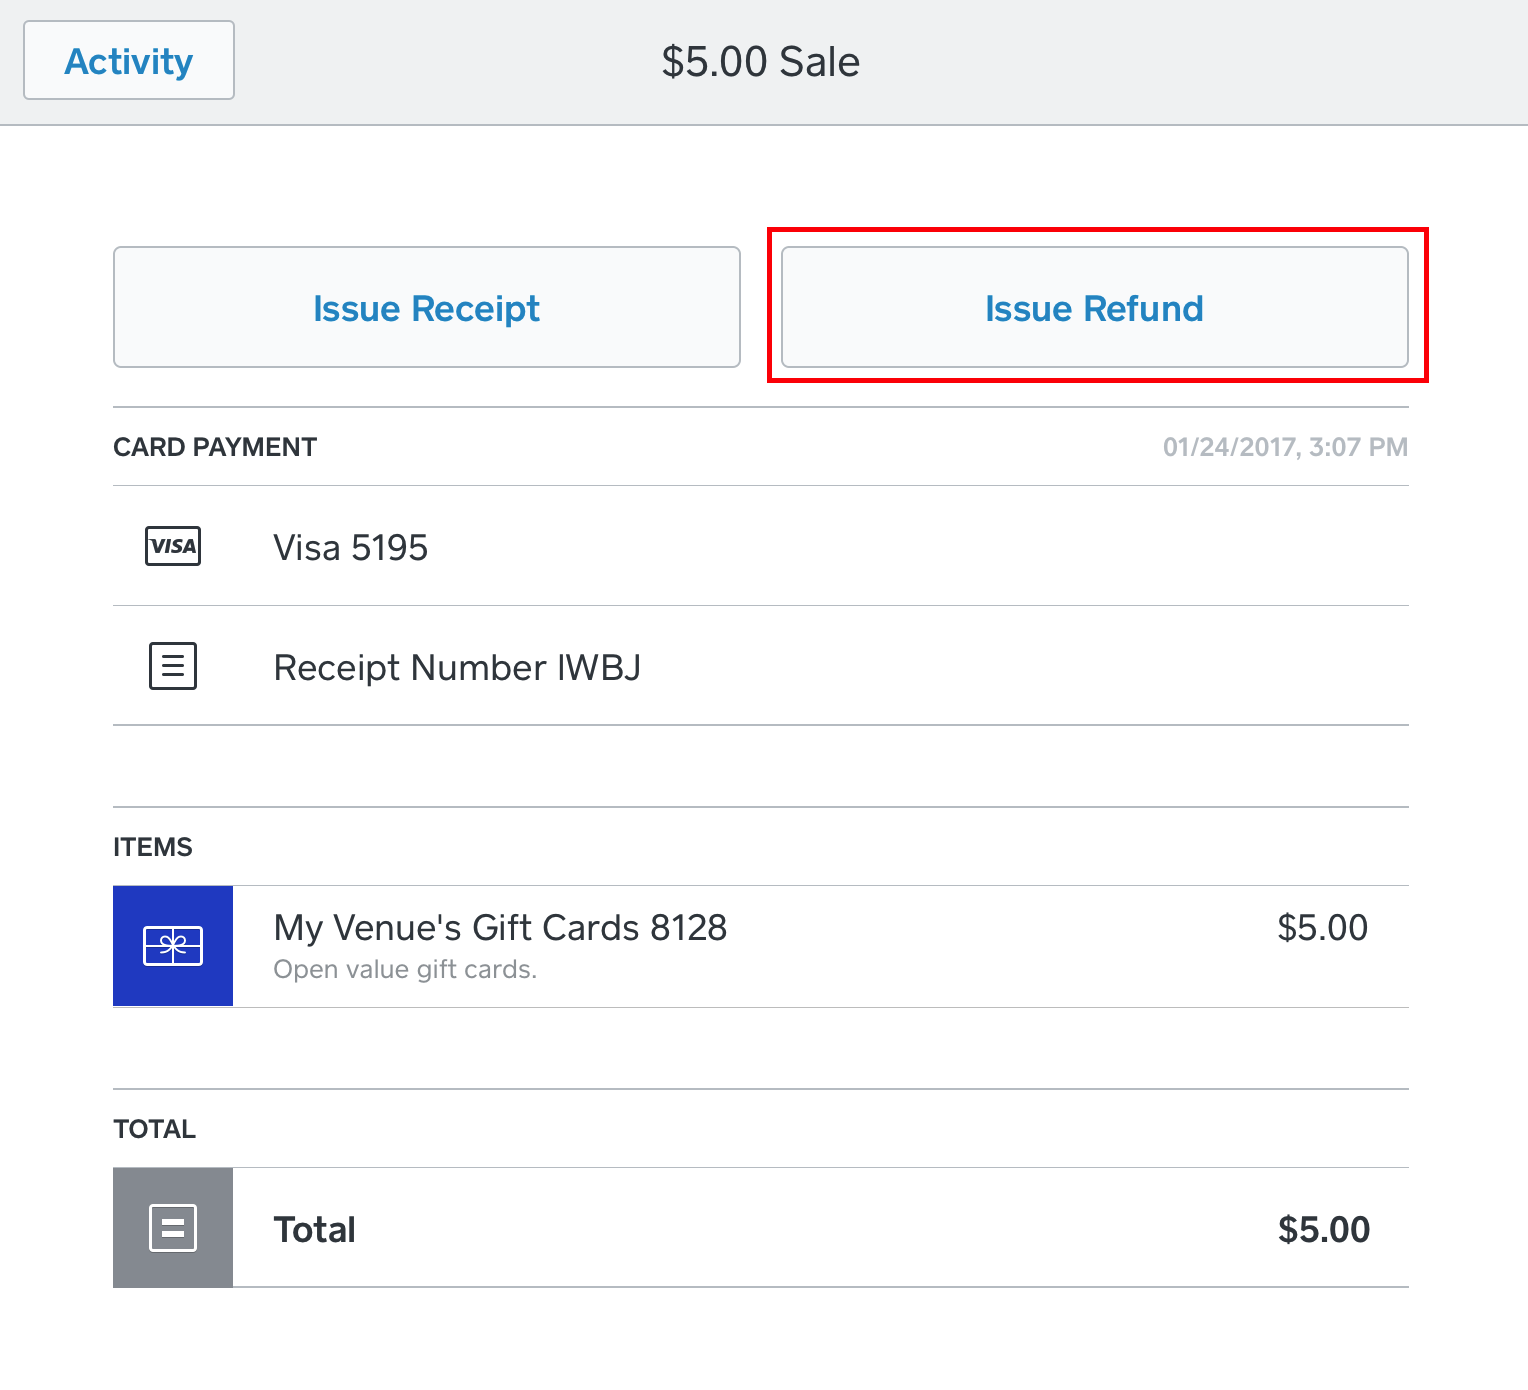
11. Tap Issue Refund.
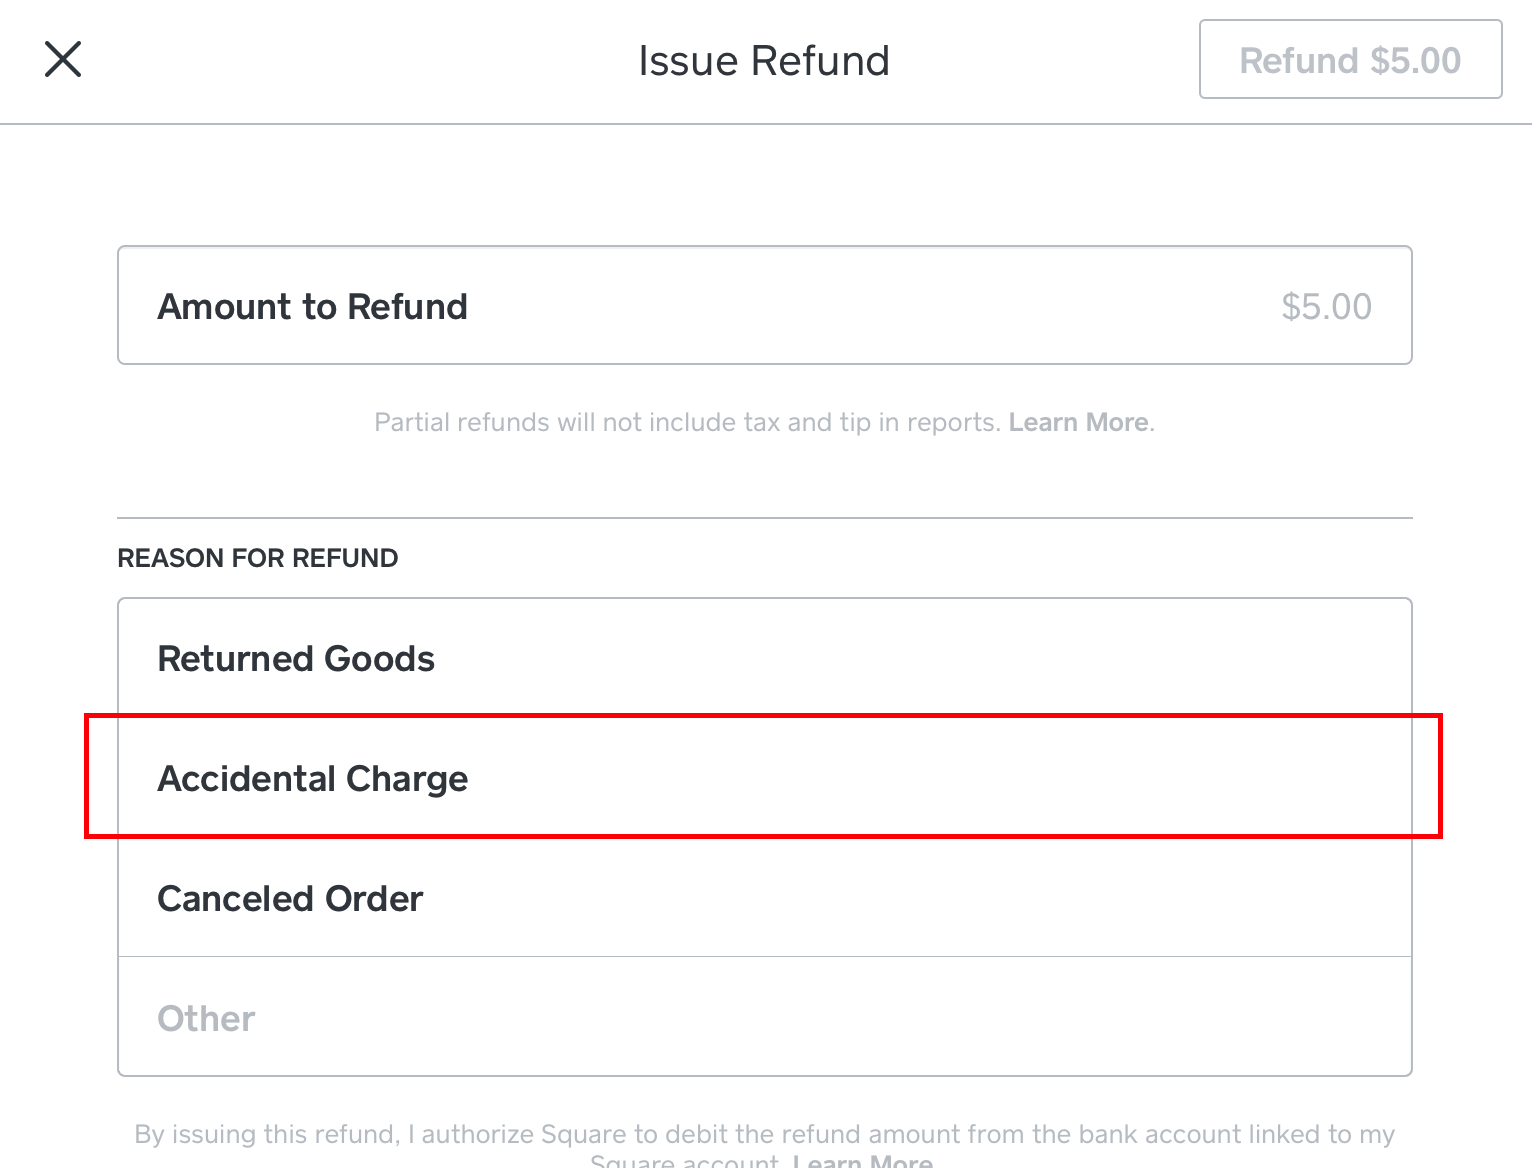
12. Tap a reason for the refund, for example Accidental Charge.
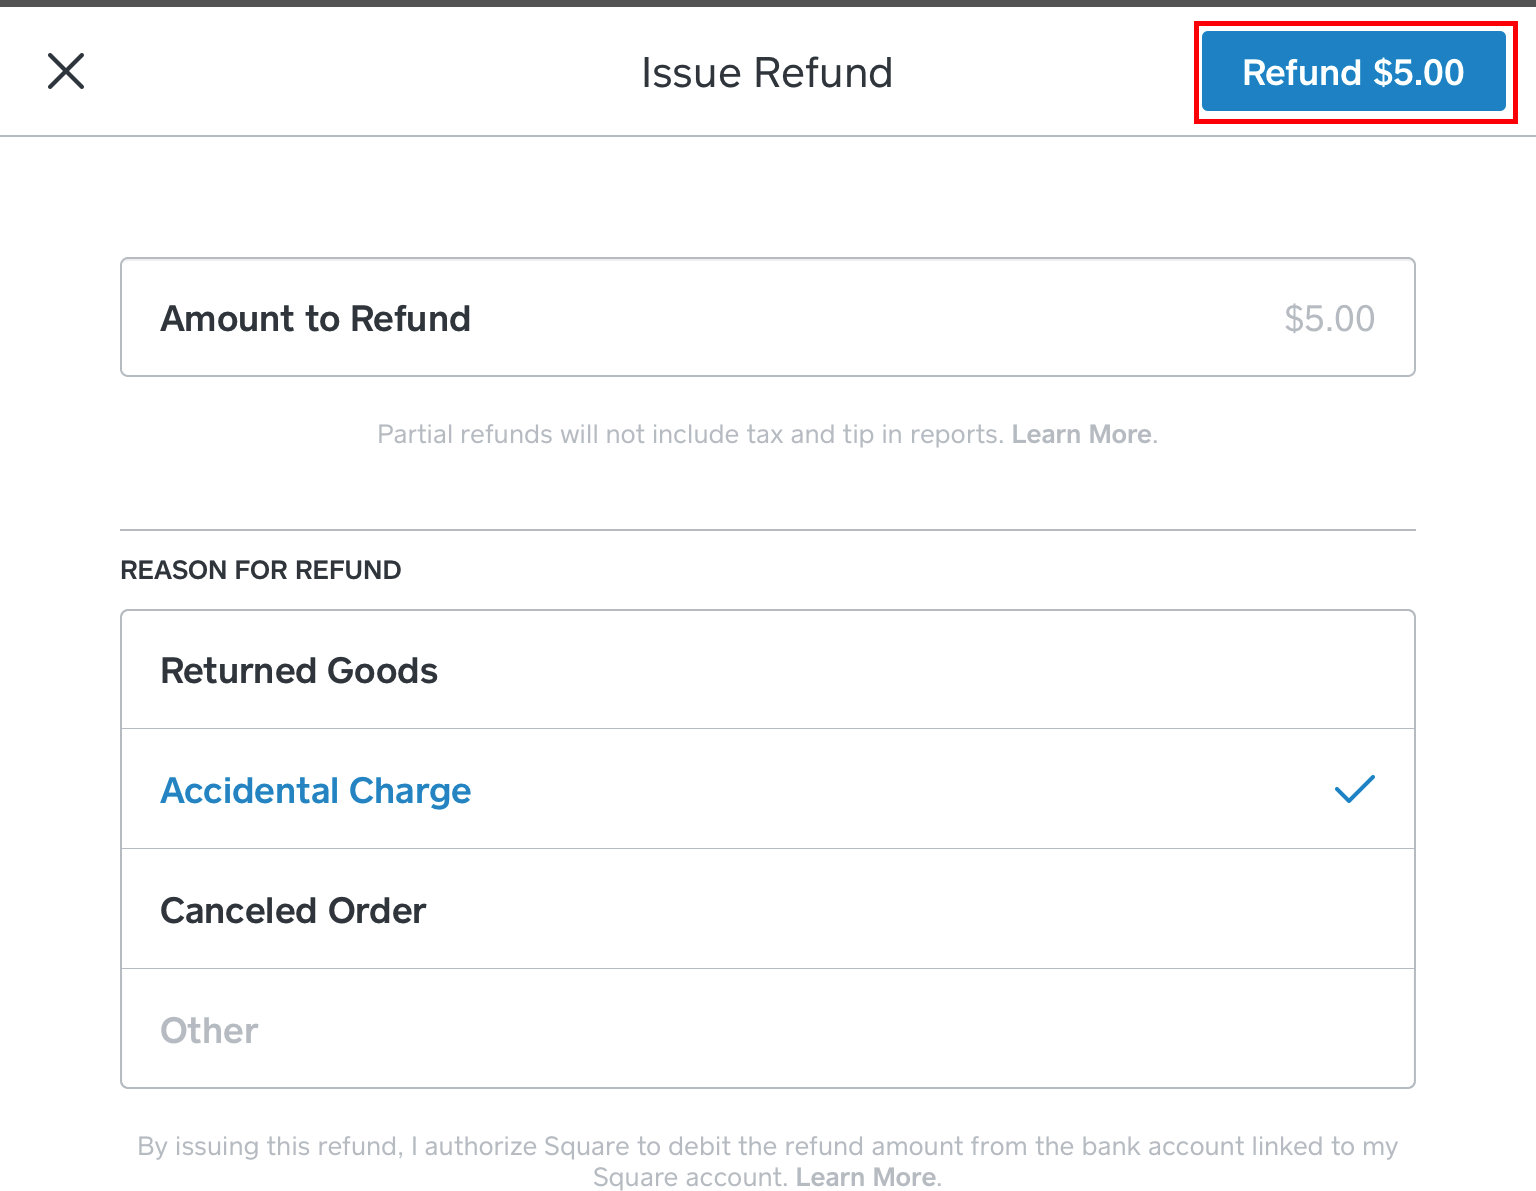
13. Tap Refund.
14. If you have already logged the sale in TouchBistro, you will need to do a non-integrated refund in TouchBistro to ensure you’re not reporting the money refunded.
Chapter 17. PCI Data Security
For more information on TouchBistro and PCI Data Security see Credit Card Data/PCI Data Security Standard.


 Email
Support
 Frequently
Asked Questions