TouchBistro Online Ordering: Merchant Settings
Table Of Contents
Section 1. Browser Recommendation
Section 1. Update TouchBistro POS to the Latest Version of TouchBistro
Chapter 7. Delivery Boundaries
Chapter 1. Introduction
This guide will walk you through how to configure your online ordering site via your Cloud Portal Account.
Section 1. Browser Recommendation
We recommend using either Google Chrome or Firebox for your Cloud Portal as well as creating your TouchBistro Online Ordering page via your Cloud Portal.
Chapter 2. Before You Begin
Section 1. Update TouchBistro POS to the Latest Version of TouchBistro
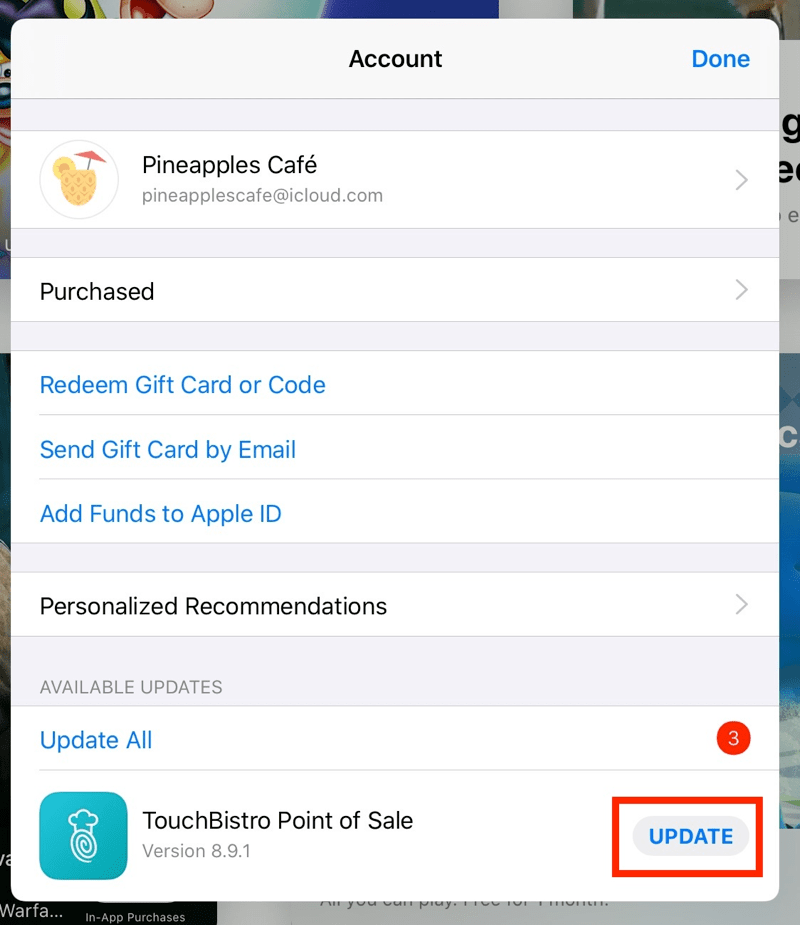
Before you enable Online Ordering on your cloud portal, you must update TouchBistro to the latest version. To find the latest version check your iPad’s App Store and see if an update is available. (Note: if you are using a Mac computer as your Pro Server, ensure you also update your Pro Server after. updating your iPads.)
Section 2. Set Your Time Zone
1. Login to your TouchBistro cloud portal.
2. Click Settings.
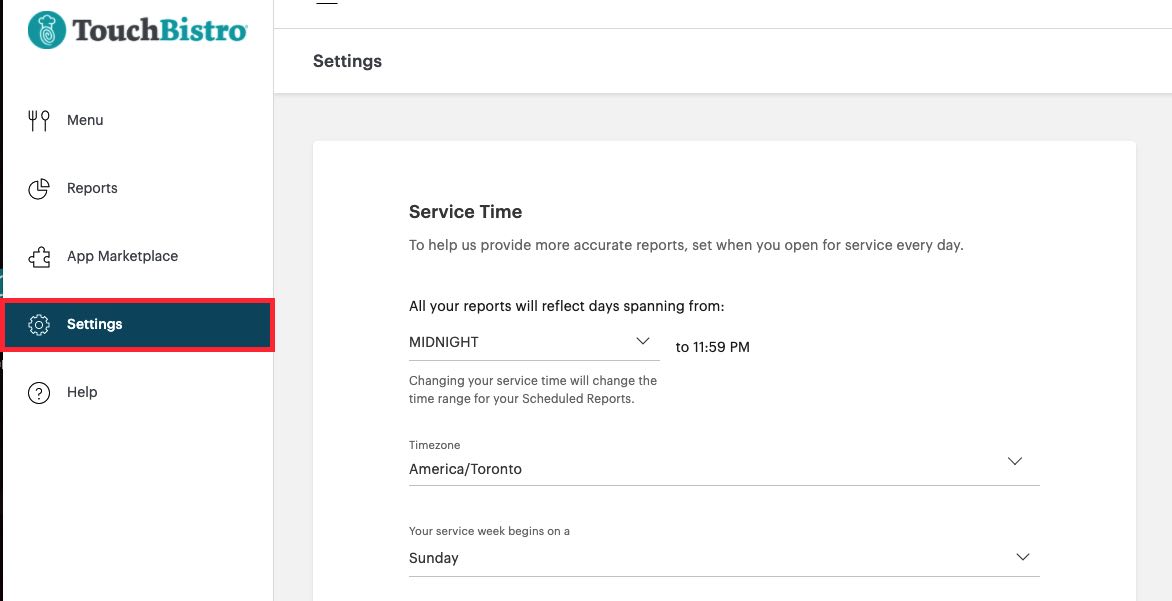
3. Verify you have a timezone set under the Service Time area.
4. If you have not, set your appropriate time zone (for example America/New York for EST).
5. Click Save.
Chapter 3. Enable in Cloud
1. Login to your TouchBistro cloud portal.
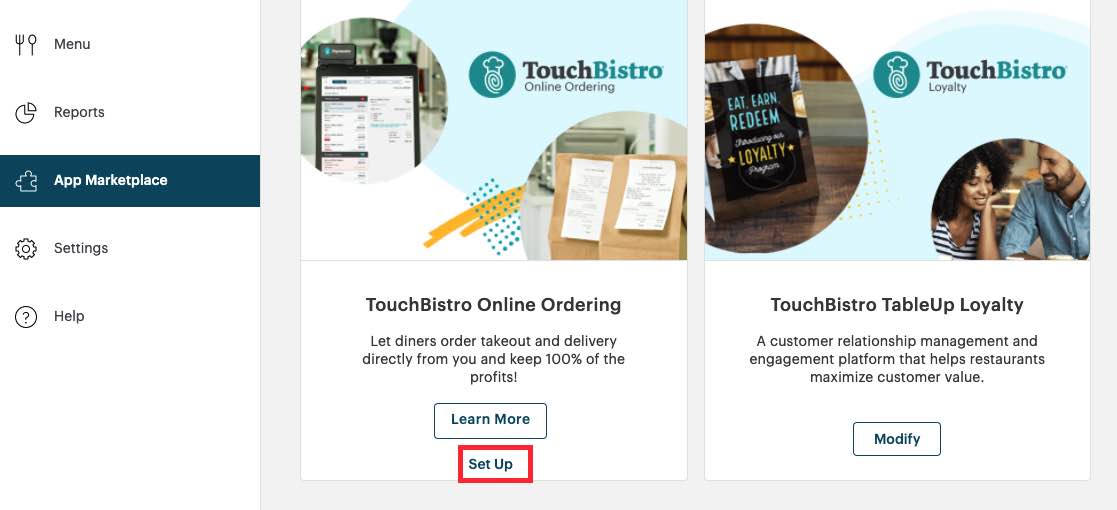
2. Locate your TouchBistro Online Ordering “chicklet” under App Marketplace and click Set Up.

3. Use the drop-down box to select Enable and click Save. You’ll have to exit out of your Online Ordering setup page and then return to it.
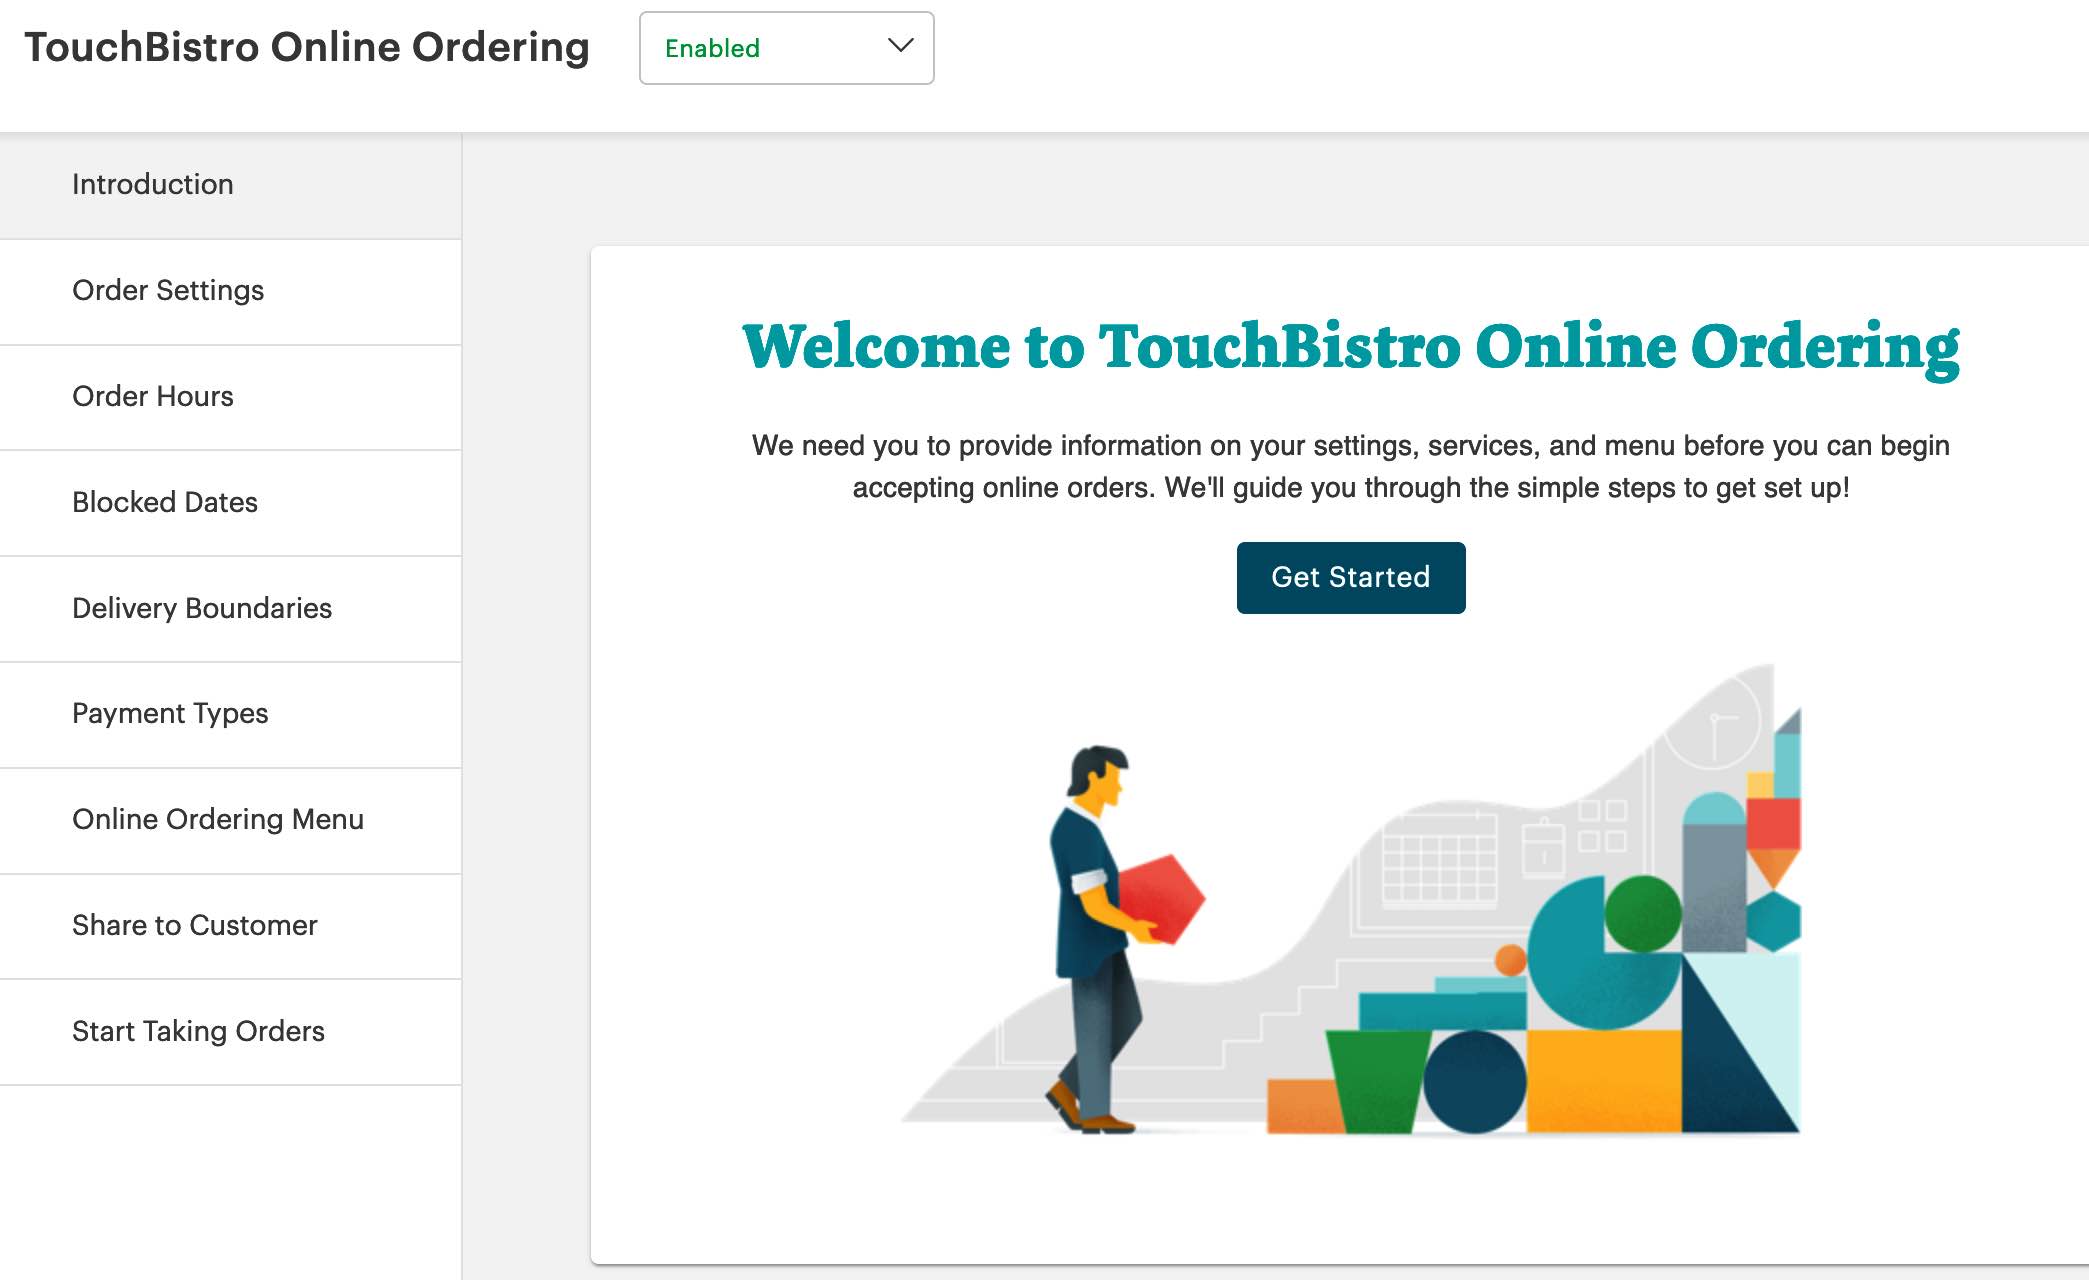
Once you return, you’re ready to start setting up your online ordering page. Click either Get Started or Order Settings and work down the options on the side panel to complete your TouchBistro Online Ordering page.
Note: You should not disable and re-enable TouchBistro Online Ordering unless directed by a TouchBistro support representative. If you do ever re-enable, ensure all the settings you make below have been retained after the re-enable. In particular, ensure your Payment Types are properly set.
Chapter 4. Order Settings
Before you can offer online ordering, you need to configure settings on this page.
Section 1. Enable Ordering
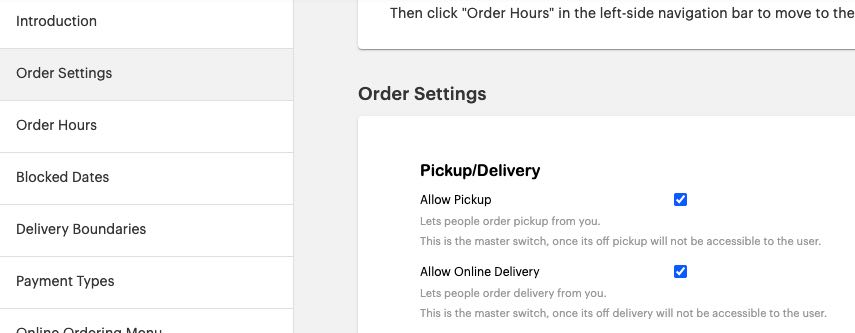
Enable or disable the following options:
|
Option
|
Description
|
|
Allow Pickup
|
If enabled, this option enables the pickup option on your customer-facing online ordering page.
When enabled, your online ordering page will feature an option for the customer to start a pickup order.
|
|
Allow Online Delivery
|
If enabled, this option enables the delivery option for on your customer-facing online ordering page.
When enabled, your online ordering page will feature an option for the customer to start a delivery order.
|
Note: You must have at least Allow Pickup or Allow Online Delivery enabled to fully enable online ordering.
Section 2. Ordering Settings
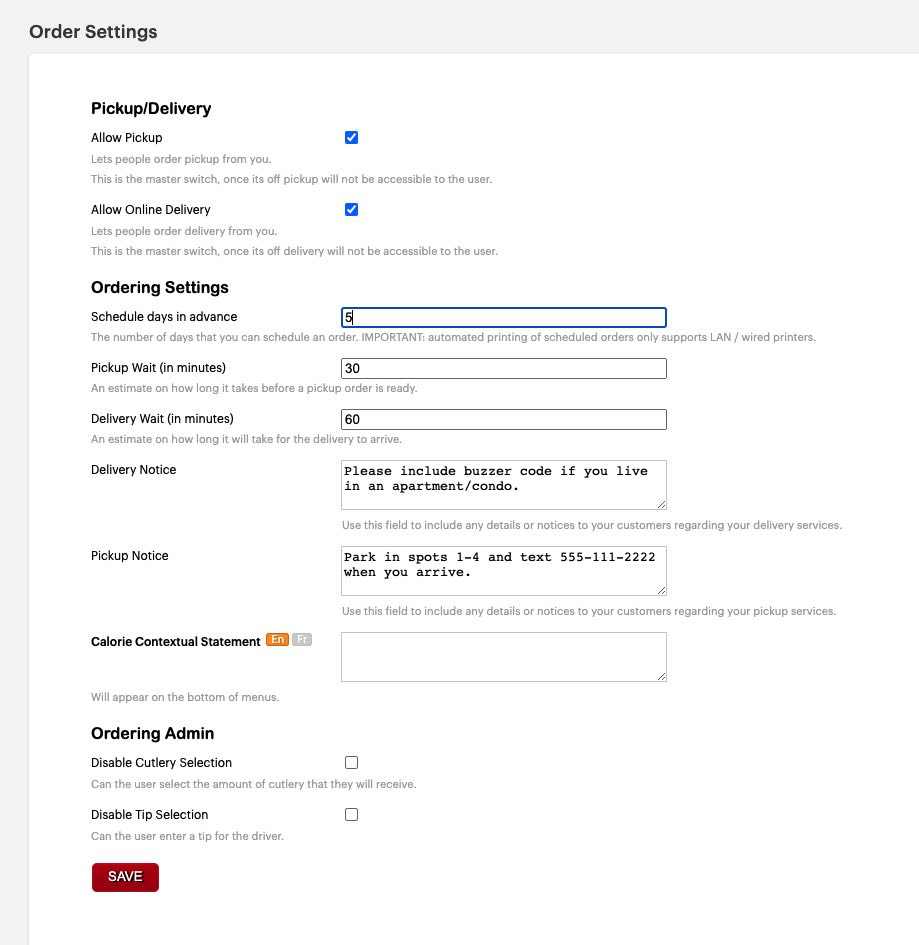
After you’ve enabled online ordering and the available methods of ordering, you will need to configure options in the Order Settings section. Remember to click Save at the bottom of the screen once you’ve set all your preferences.
|
Option
|
Description
|
|
Schedule days in advance
|
If you have online payments enabled, you can allow diners to schedule orders for future pickup. A number entered in this field will limit how many days into the future a diner can order. For example, 5 would indicate the diner can pre-order for the current date plus 4 days into the future. Enter a 0 if you don’t want customers to be able to schedule orders.
|
|
Pickup Wait (in minutes)
|
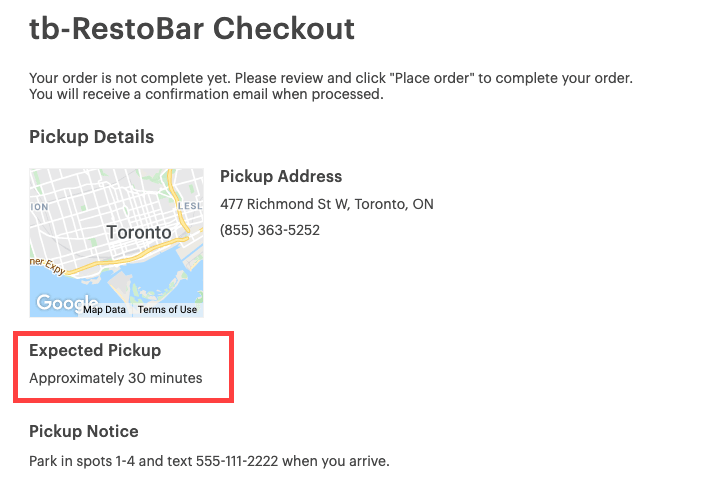
If you enabled Pickup, enter the average time in minutes it takes the kitchen to receive, prepare, and pack an order for pickup.
The time will be calculated from when a consumer places an order online and will be used to estimate when they should arrive at the restaurant to pickup their order. You can always return to this page and reset the pickup time to reflect the current wait times. If you are using scheduled orders, pickup will limit available timeslots a customer can schedule pickup. The customer will not be able to schedule a pickup time less than the pickup wait time. As well, a customer will not be able to schedule pickup if the wait time would put the desired pickup time after closing hours. |
|
Delivery Wait (in minutes)
|
If you enabled Delivery, enter the average time in minutes it takes the kitchen to receive, prepare, pack, and deliver an order to the consumer’s location.
This time will be calculated when a consumer places an order online and will be used to estimate how long an order will take to be delivered to their location upon checkout. You can always return to this page and reset the pickup time to reflect the current wait times. If you are using scheduled orders, delivery will limit available timeslots a customer can schedule delivery. The customer will not be able to schedule a pickup time less than the pickup wait time. As well, a customer will not be able to schedule delivery if the wait time would put the desired delivery time after closing hours. |
|
Pickup and Delivery Notices
|
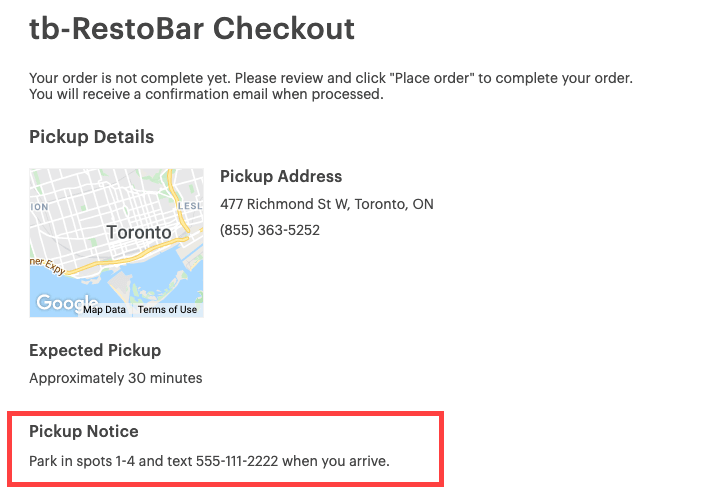
Enter a custom notice message relating to pickup or delivery.
This notice will be displayed on the customer’s checkout screen.
|
|
Calorie Contextual Statement
|
This field allows you to enter a customized message relating to their calorie display requirements.
|
|
Disable Cutlery Selection
|
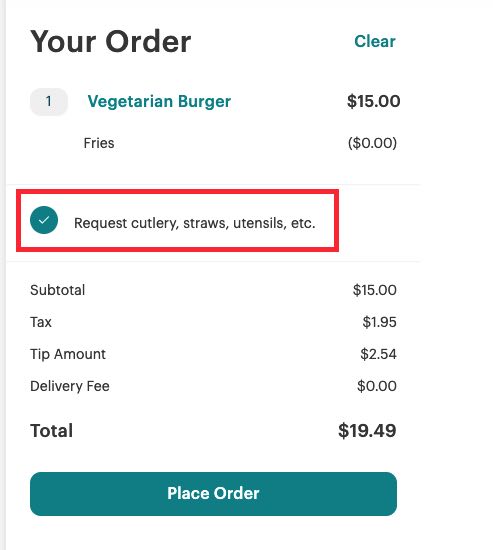
If unchecked, the diners will be prompted to indicate if they wish to have napkins sets included with their order. If checked, the customer will not be prompted.
|
|
Disable Tip Selection
|
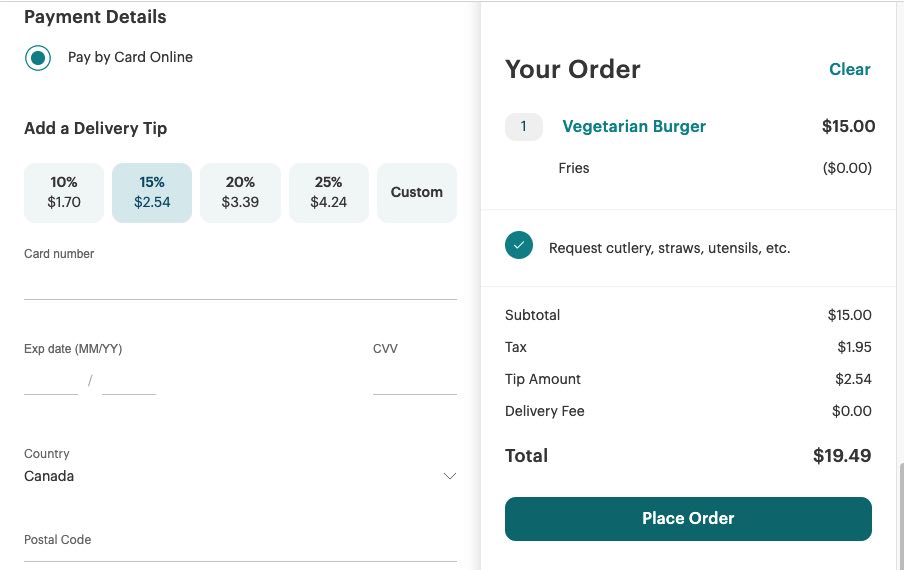
If unchecked and you are approved for online payments, the customer will be prompted to indicate if they want to leave a tip. Note: tip suggestion amounts are fixed by the system and cannot be modified.
|
Chapter 5. Order Hours
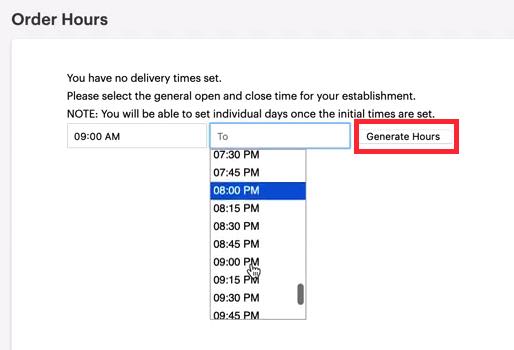
Click Order Hours and set your pickup and/or delivery hours for each day of the week. First, input your typical hours and click Generate Hours. If your hours are different day-to-day, you will be able to tailor them in the next step.
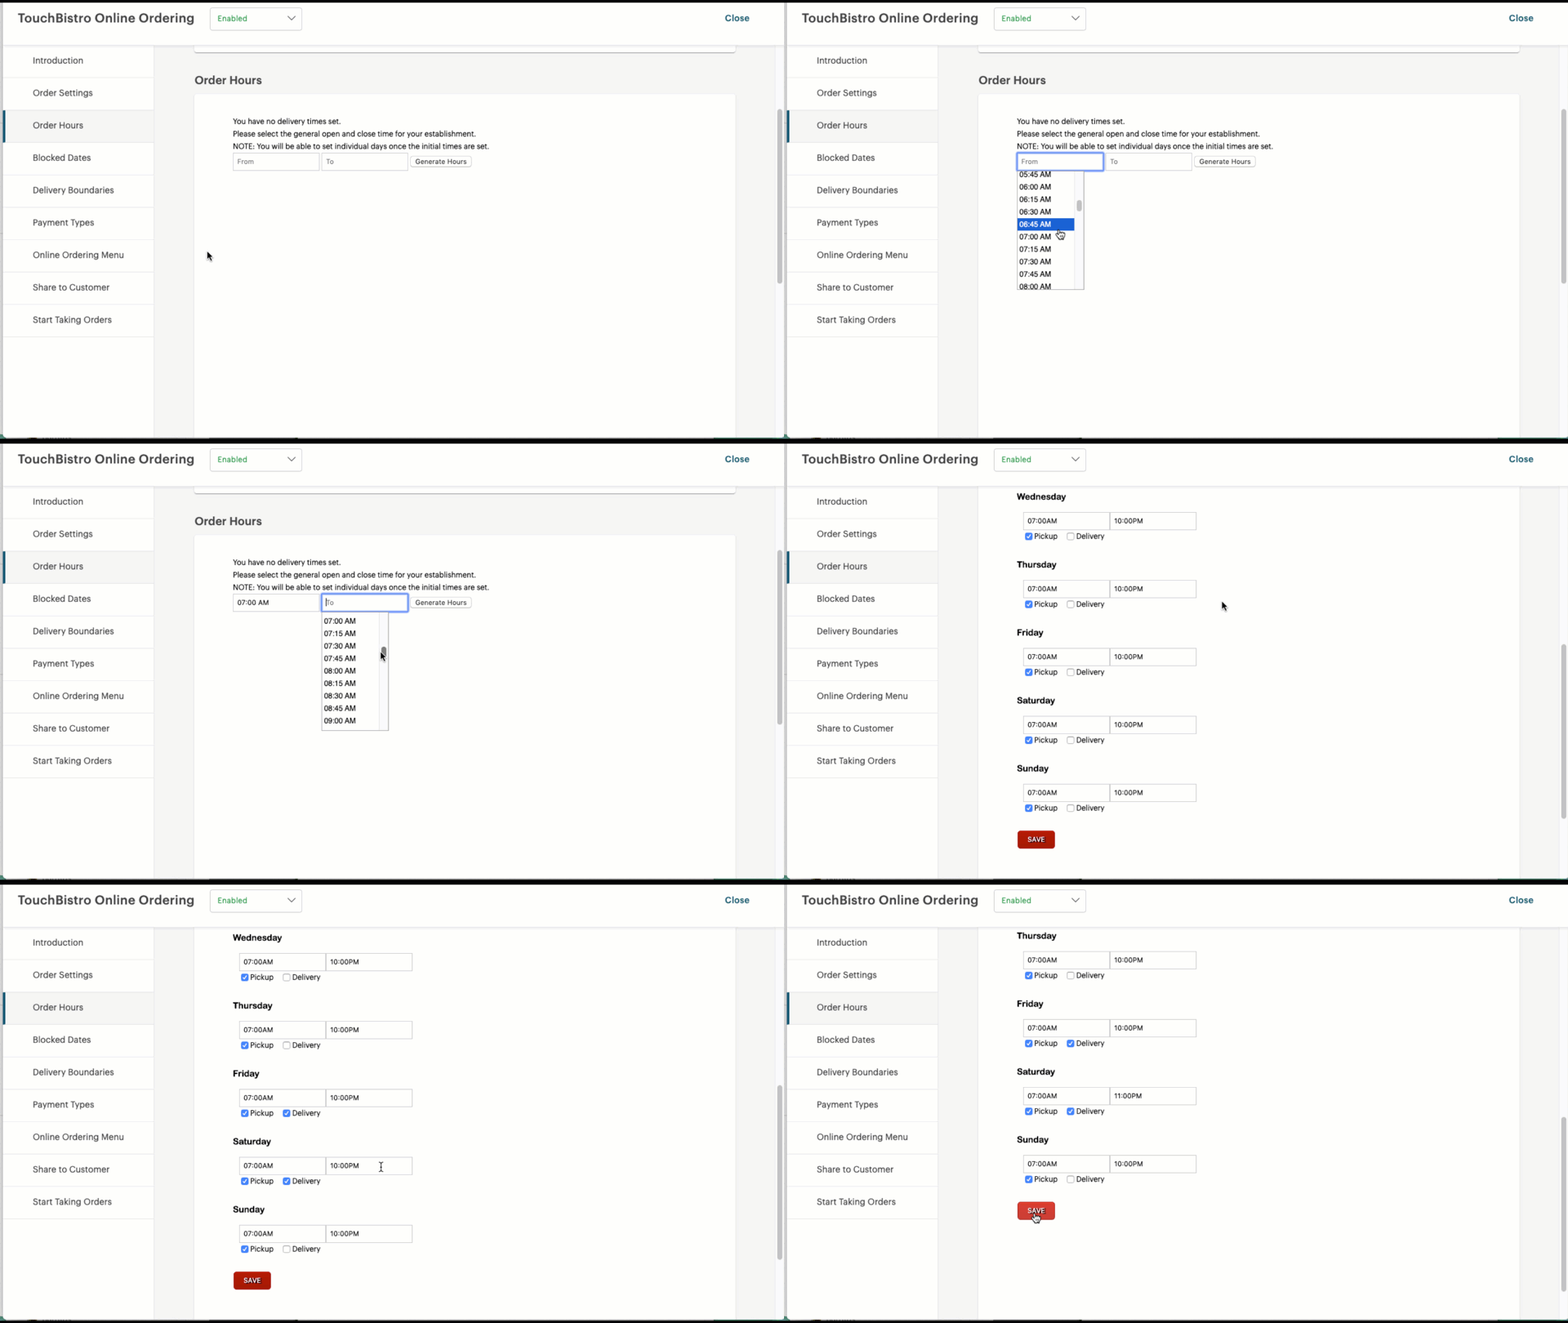
After clicking Generate Hours, you will get your default Monday – Sunday hours. If you are closed Sunday or Monday, disable Pickup/Delivery. Note you may not see Pickup or Delivery if you did not enable that order type under Order Settings.
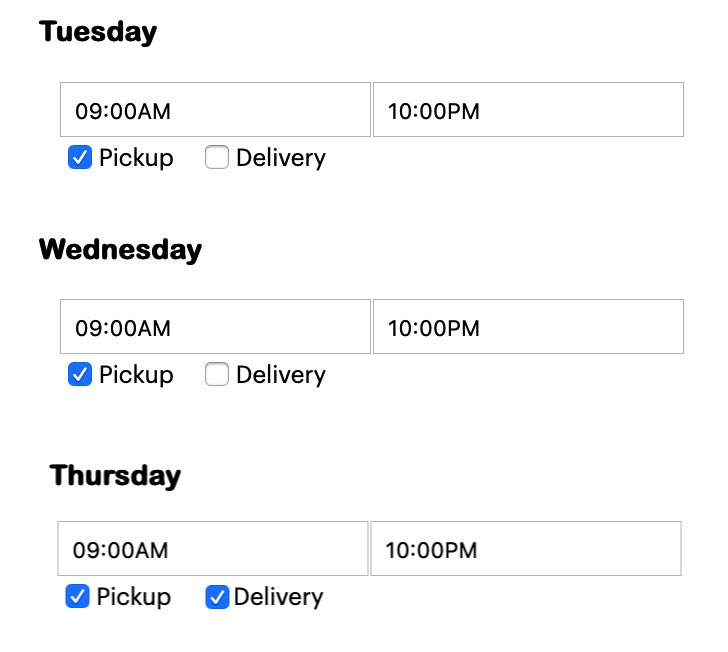
Review your hours for each day and available order types. In the pictured example, a customer will not see the Delivery option offered Tuesday and Wednesday. However, on Thursday the Delivery option will be made available. No options will be offered outside of these set times. If you are offering diners the ability to schedule orders, available timeslots for pickup or delivery will be bounded by these times. For example, scheduled pickup will not offer a time slot earlier than opening time + pickup wait time. No time slot will be offered after closing time – pickup wait time.
Chapter 6. Blocked Dates

You can use this screen to set up specific calendar dates to disable online ordering. No “ASAP” orders will be allowed on these days. However, diners will still be able to view your menu. If you offer scheduled orders, diners will still be able to order ahead for a date after your blocked date.
Chapter 7. Delivery Boundaries
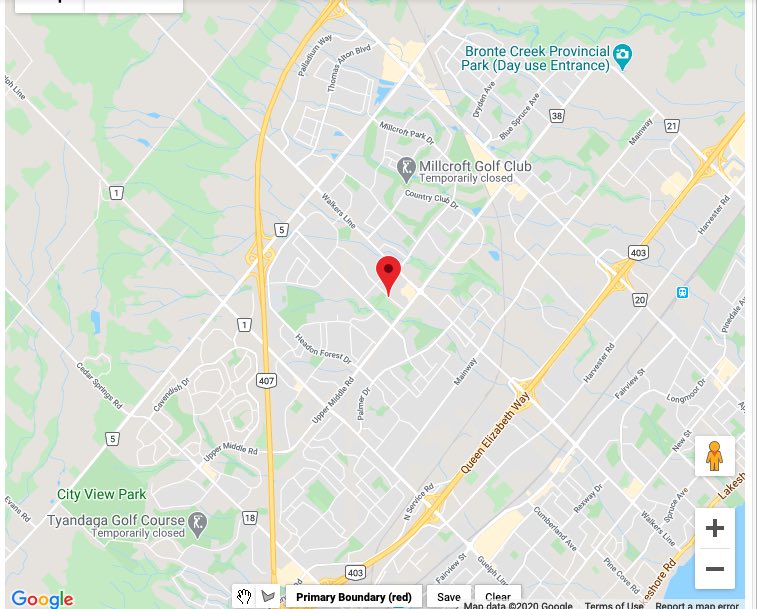
Use the map to select your delivery boundary. Your map will center on your restaurant’s address based on what you configured when you enabled your TouchBistro license. Contact support if this address has changed.
Click the + button to zoom the map.
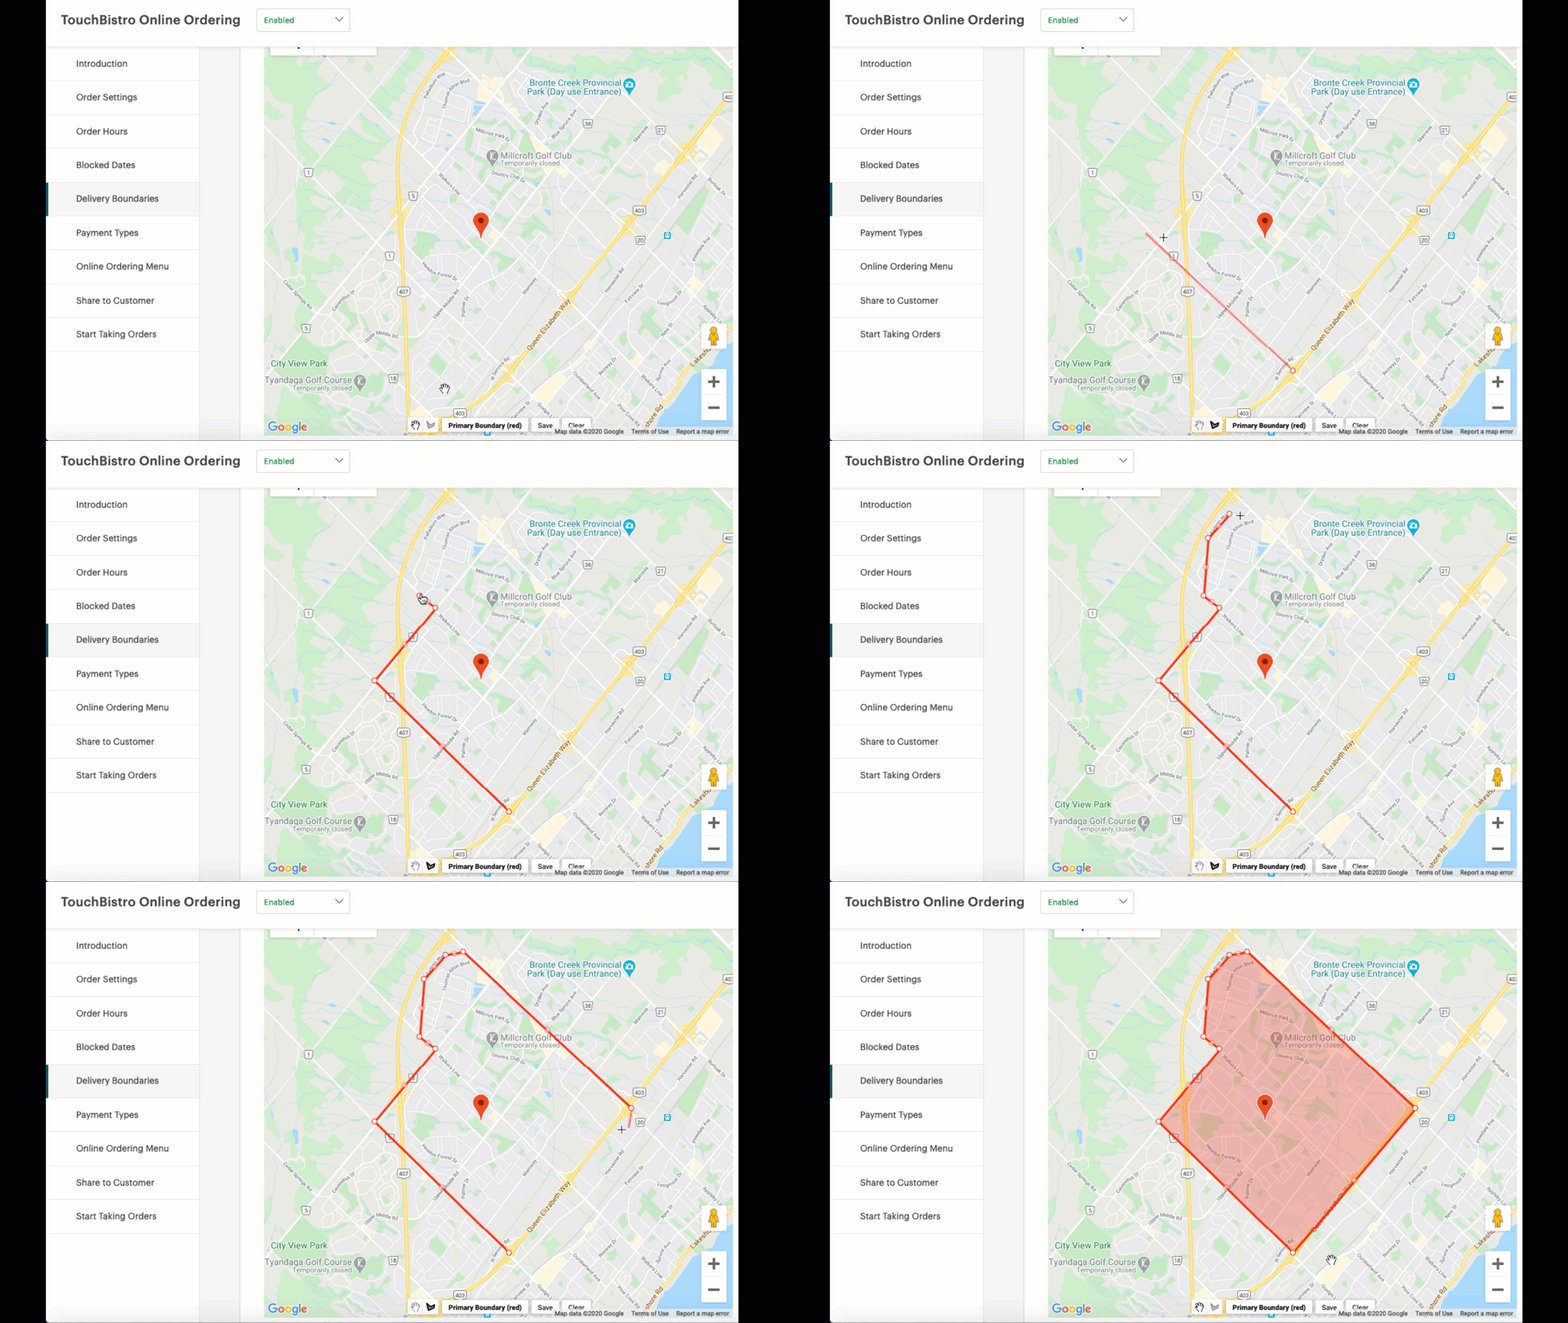
Click the Boundary tool ![]() to set up your boundary. Click your mouse button to start a new vector. You can follow major streets to help define your boundary. Click Save if you are satisfied with your boundary. If you make an error click the Clear button.
to set up your boundary. Click your mouse button to start a new vector. You can follow major streets to help define your boundary. Click Save if you are satisfied with your boundary. If you make an error click the Clear button.
If a customer’s address is outside the boundary, the customer will not be able to complete the delivery order.
Chapter 8. Payment Types
Use this screen to inform the customer the valid forms of payment for each order type.
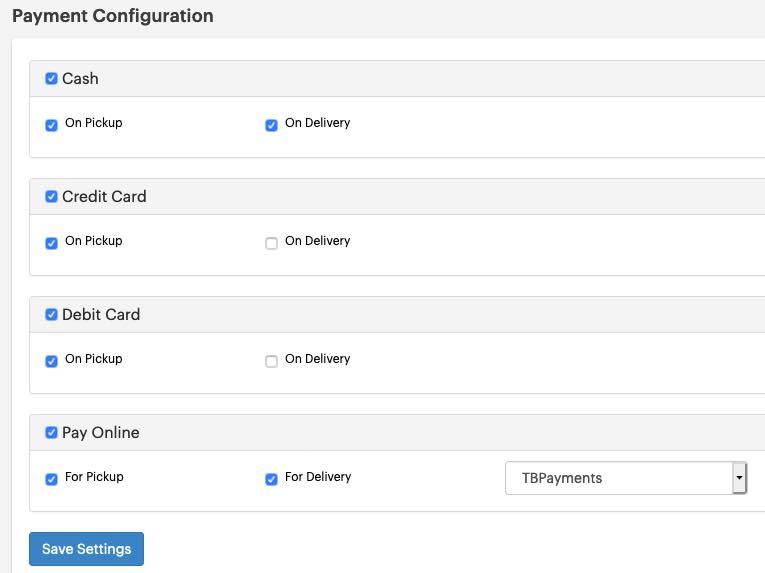
In the pictured example above, a customer placing a delivery order will be informed deliveries are cash only. If you are approved for online payments you will see a Pay Online section. Note: You must enable Pay Online if you want to offer scheduled orders.
Chapter 9. Online Ordering Menu
Click this option for a tutorial on how to use either Remote Menu Management or your TouchBistro POS Menu screen to configure what menu items you wish to be made available for online order. Complete this before you ultimately proceed to the Start Taking Orders section and complete the activation of your online ordering site.
Chapter 10. Share to Customer
After configuring your online ordering system, you can click Share to Customer. Here you will be given some HTML (and button preview) you can plug into your restaurant’s website to offer online ordering.
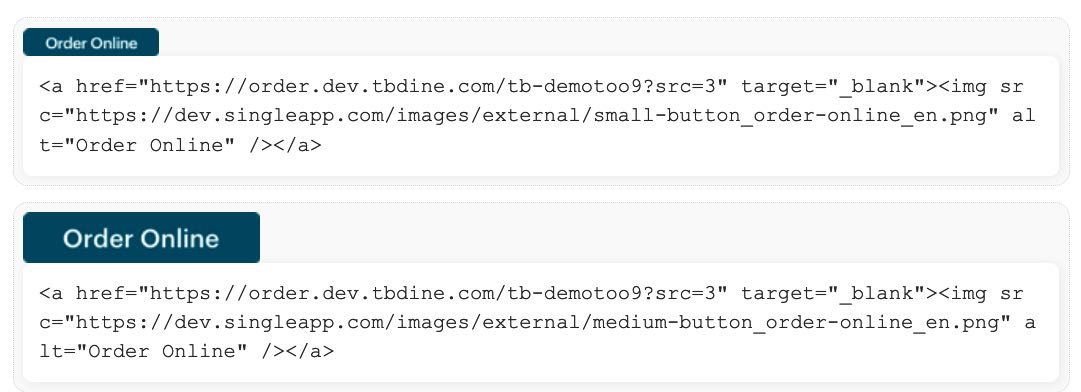
Select a button type and then click on the HTML code below the button type. Copy that code and paste it into your website.

You can also give users a direct link by copying the URL at the bottom of the page. You can, for example, post this in your restaurant’s Facebook page. As well, if the provided button code does not work well with your web site, you can use the direct link for your website. Some website editors let you create a button and associate an external URL. You can use the direct URL for your site’s button editor.
Click Preview to see the customer-facing version of your online ordering page.
Chapter 11. Start Taking Orders
After everything is configured, click Start Taking Orders.

Enable Active and click Save. This will officially “turn on” your online ordering page and make it live to your customers.
See Also


 Email
Support
 Frequently
Asked Questions


