What’s New in TouchBistro 8.9.1?
Table Of Contents
Chapter 2. Update your iPad(s) OS
Chapter 3. TouchBistro Reservations
Chapter 4. Unsent Items Handling
Section 1. Send After Checkout
Section 2. Unsent Items Warning
Chapter 5. Payment Integrations
Section 1. Starting Bar Tabs with TouchBistro Payments
2) Barclaycard Payment Status Indicators
Section 3. Manually Unlock Table with Paymentsense
Chapter 6. TouchBistro Option Text Changes
Section 2. Save Option is now Done
Section 3. Menu Options with “Waiter” Renamed “Staff”
Chapter 7. Floor Plan Table Detail Improvements
Section 1. Floor Plan Time Format Change
Chapter 8. Break Types Display Paid/Unpaid Status
Chapter 1. Introduction
Version 8.9.1 no longer supports iOS10. If you have an iPad that is still on iOS10, you will need to update its OS before updating to TouchBistro 8.9.1.
Version 8.9.1 helps automate sending tickets to the kitchen printer. We’ve made some changes in-app navigation. The format for the time stamp on the floor plan tables is now more readable. Tables in Pro Server now display the check amount.
TouchBistro Reservations is now available in the app store.
If you are using Online Ordering, new menu items added have Show in Online Ordering Menu enabled.
When you start a bar tab with TouchBistro Payments, TouchBistro now captures the card holder name and last four digits automatically.
Consult these releases note for further details about these changes and more.
Chapter 2. Update your iPad(s) OS
We are ending support for iOS10. This means you will need your iPad to be running iOS11 or higher. If your iPad is running iOS10, please update it to iPad OS13 before attempting to update to TouchBistro 8.9.1.
As noted in the 8.9 Release Notes, if you are using an iPad 4th Generation, you will not be able to update past iOS10 and you will not be able to update your iPad to TouchBistro 8.9.1.
If you’re unsure which iPad model you’re using, see this page for details:
https://www.touchbistro.com/ipad-4-%284th-generation%29-user-notice/
Chapter 3. TouchBistro Reservations
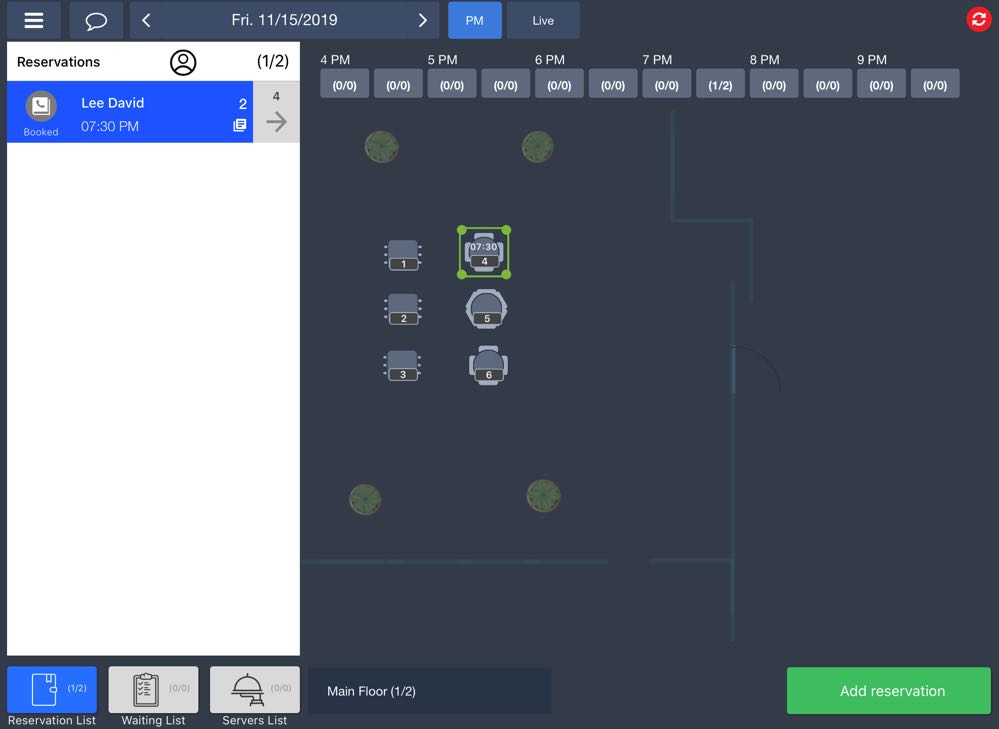
TouchBistro has recently launched TouchBistro Reservations. TouchBistro Reservations is a complete reservation and guest management platform that integrates with your TouchBistro POS app. See this link for more details: https://www.touchbistro.com/reservations
Chapter 4. Unsent Items Handling
We’ve improved how TouchBistro handles cases where a staff member proceeds to the Checkout screen or floor plan without sending menu items to a ticket printer.
1. The Cash Register order screen can be set to automatically send the ticket when the cashier proceeds to the Checkout screen.
2. On tables, if TouchBistro is set to warn the server that he/she is trying to exit the order screen with unsent items, the warning dialog will now give the server an option to send the tickets and continue to the Checkout screen.
Section 1. Send After Checkout
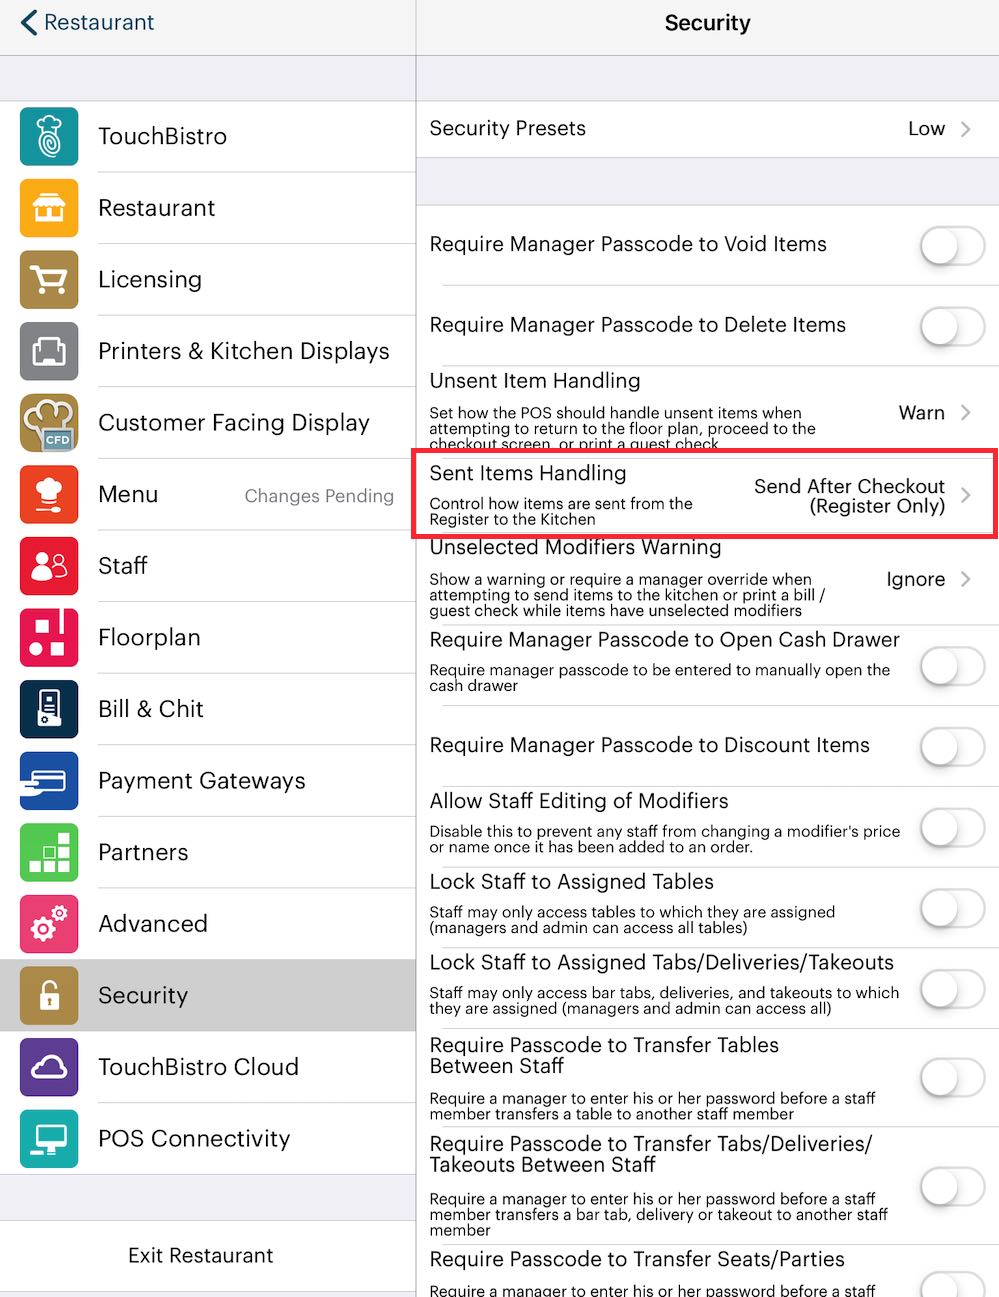
We’ve added a new Security setting (Admin | Admin Settings | Security) called Sent Item Handling. If set for Send After Checkout (Register Only), TouchBistro will automatically send your tickets to your configured kitchen printer after you tap Checkout.

If enabled, the manual send options are removed. Tap Checkout to send.
TouchBistro Reservations

You will see the printer confirmation indicator on the Checkout screen.
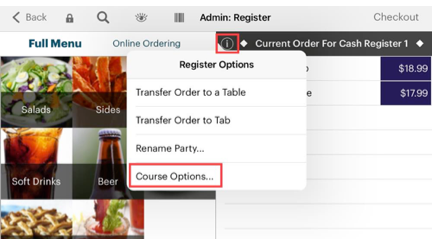
If you wish to send a ticket to the kitchen printer without going to the Checkout screen, tap the Information ![]() icon at the top of the Order panel. Tap Course Options.
icon at the top of the Order panel. Tap Course Options.
Note: Tickets are not automatically sent if the server proceeds from a takeout/delivery/bar tab order.
Section 2. Unsent Items Warning
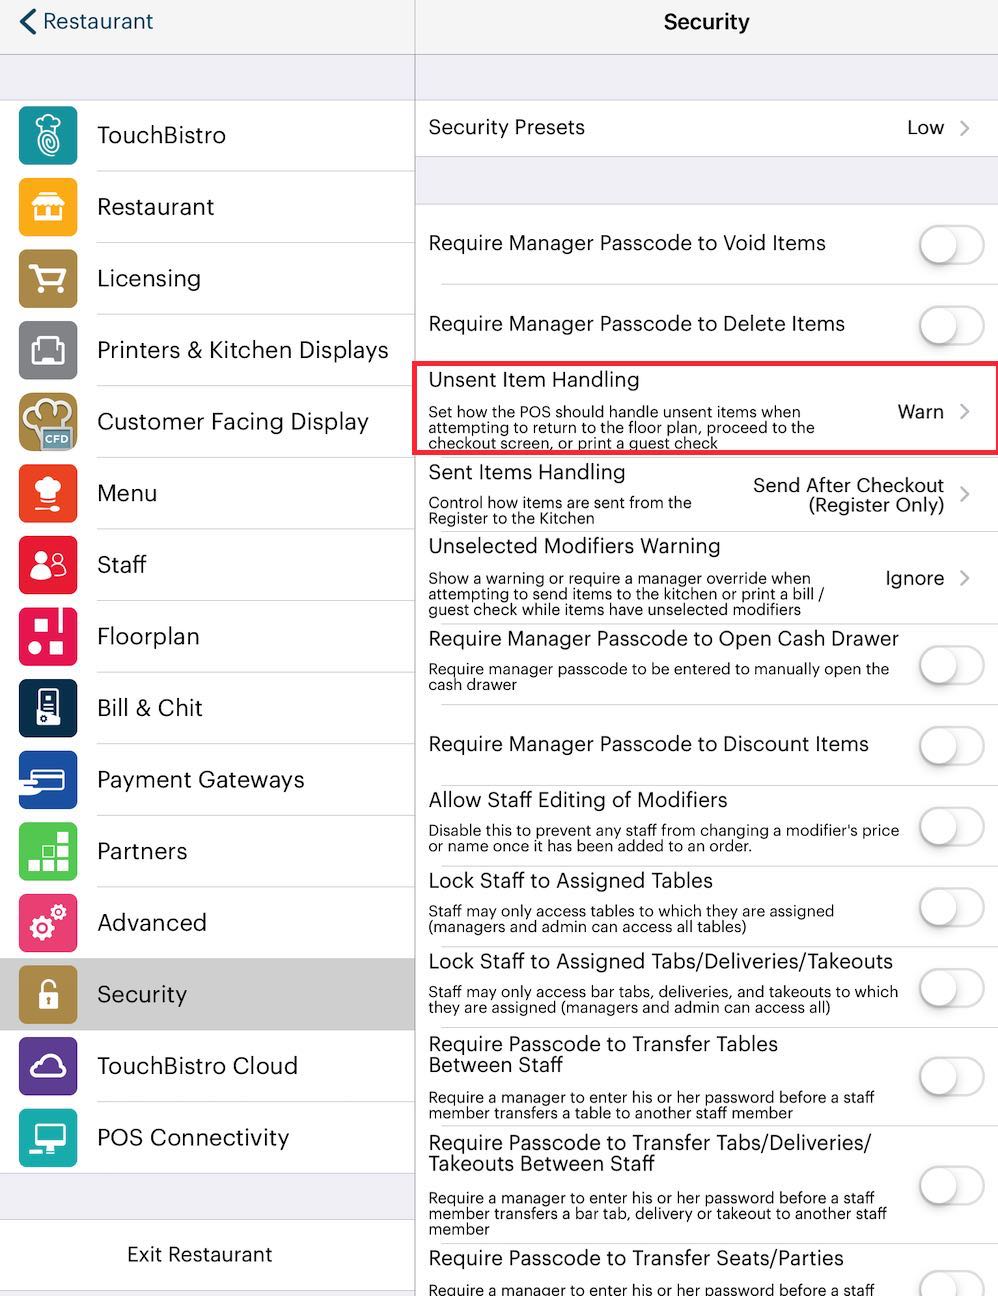
Under Security (Admin | Admin Settings | Security) you can set TouchBistro to warn a server he/she is trying to exit a table or proceed to the Checkout screen that there are unsent items on the Order screen.
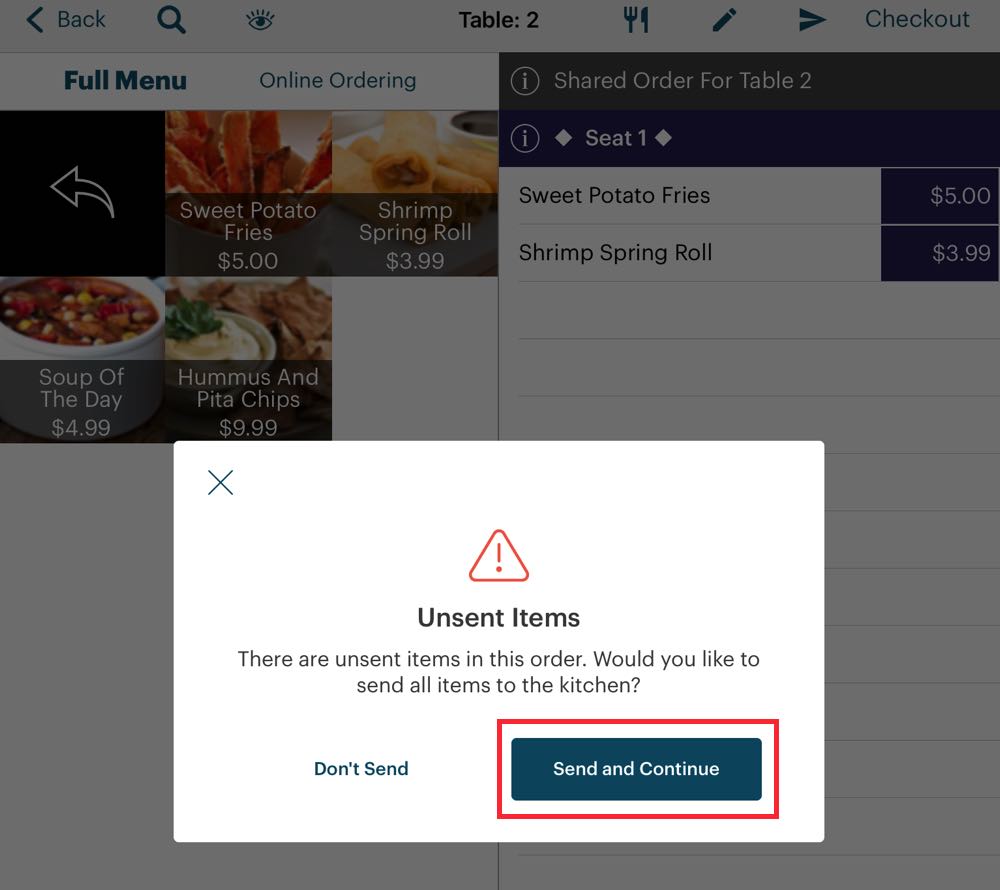
In 9.0, if Unsent Items Warning is set to Warn, TouchBistro will give the server the option to send the items to their appropriate ticket printer before exiting the table or proceeding to the Checkout screen.
Chapter 5. Payment Integrations
Section 1. Starting Bar Tabs with TouchBistro Payments
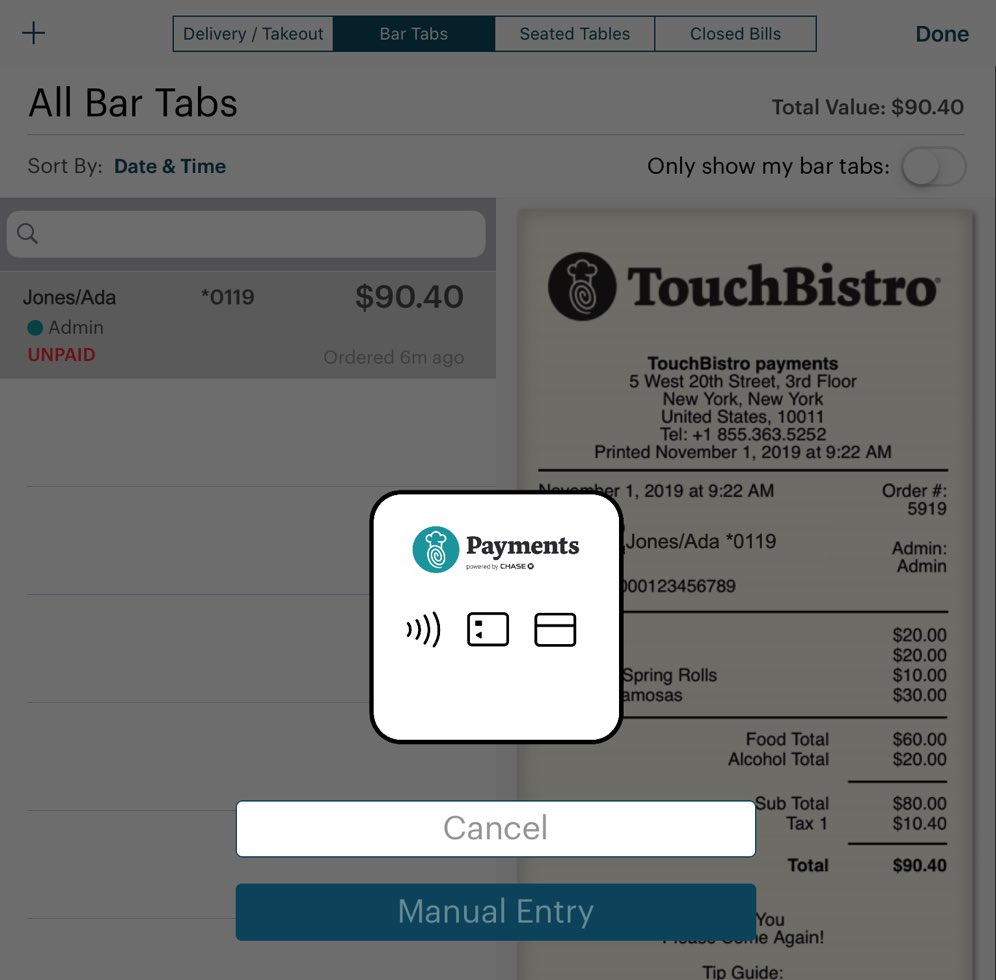
TouchBistro Payments lets you start a bar tab by swiping or dipping the credit card you intend to keep at the bar.
In previous version, TouchBistro only captured the last four digits of the card. In 8.9.1, TouchBistro will now capture the card holder name as well as the last four digits of the card.
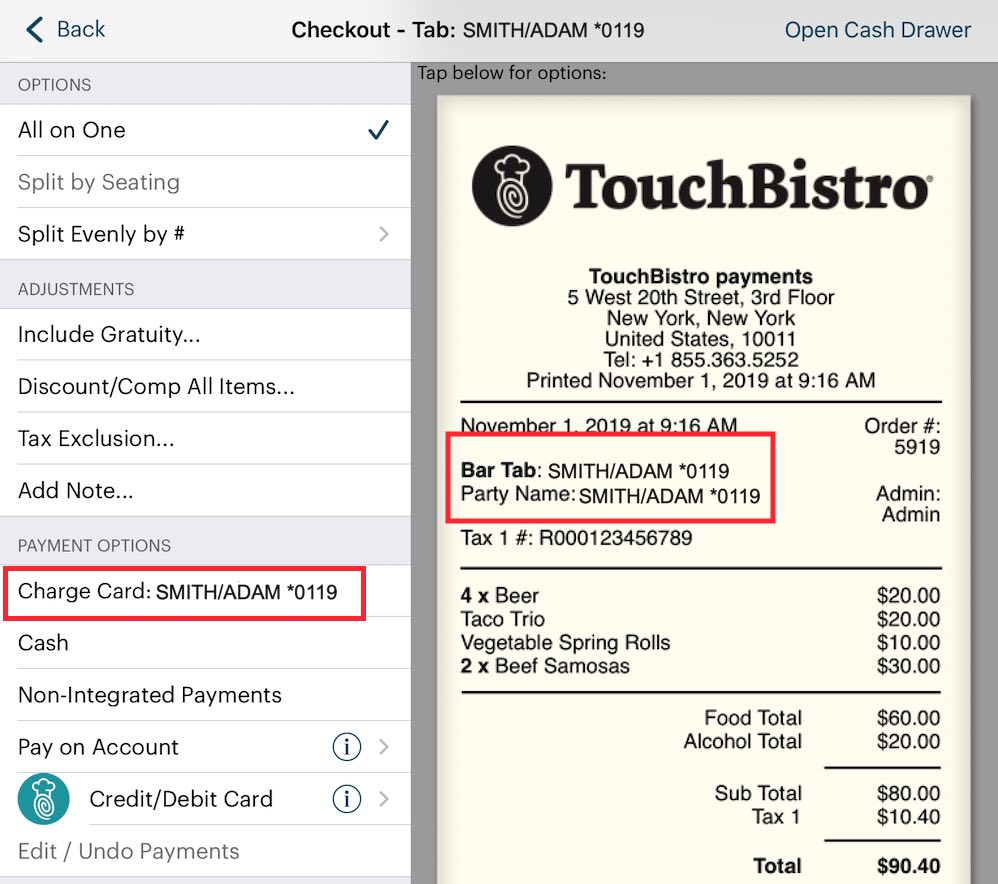
The captured name/card number appears on the guest check as both the bar tab name and the party name. As well, it appears for the Zero Auth payment option.
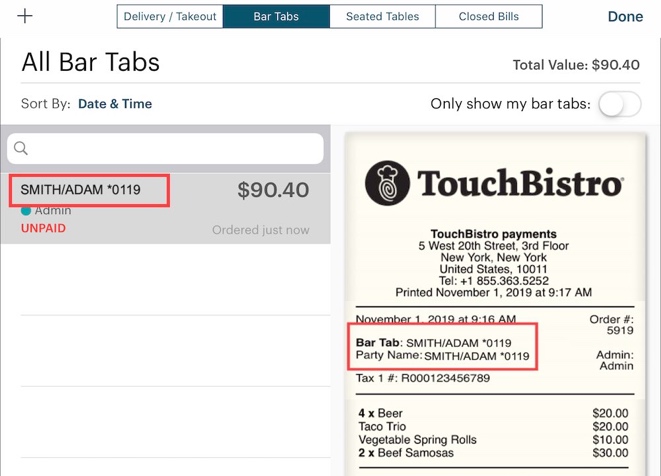
On your list of open bar tabs, you will also see the name/card number combination. This can help you connect the held card to the patron requesting you close his/her tab.
Note: TouchBistro never stores full credit card numbers.
Section 2. Barclaycard
1) Manual Entry Refund
If you need to process a refund but the customer cannot be present with the card, you can now do a card not present refund using the new Manual Entry Refund option.

On the Closed Bills tab, initiate a Refund Sale process as normal.

Open the negative invoice on the Bar Tabs tab and proceed to the Checkout screen. Tap the new Manual Entry Refund option.
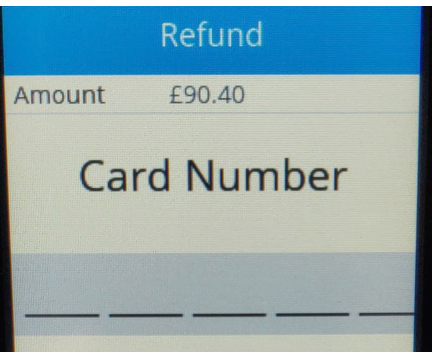
On the V200c or V240m PINpad, enter the customer’s card number and expiry date. Follow the remaining on-screen prompts.
2) Barclaycard Payment Status Indicators
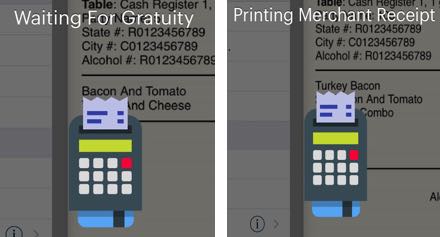
When you initiate a payment, the TouchBistro checkout screen will now mirror what screen the customer sees via the payment device (waiting for gratuity, waiting card, printing the receipt, paper out error, etc.). The cashier or server can use these on-screen notifications to better understand where the customer is in the payment process or what errors the customer may be seeing.
Section 3. Manually Unlock Table with Paymentsense
When a server is taking a payment for a table with Paymentsense, TouchBistro will lock the table and prevent it from being opened by another staff member.
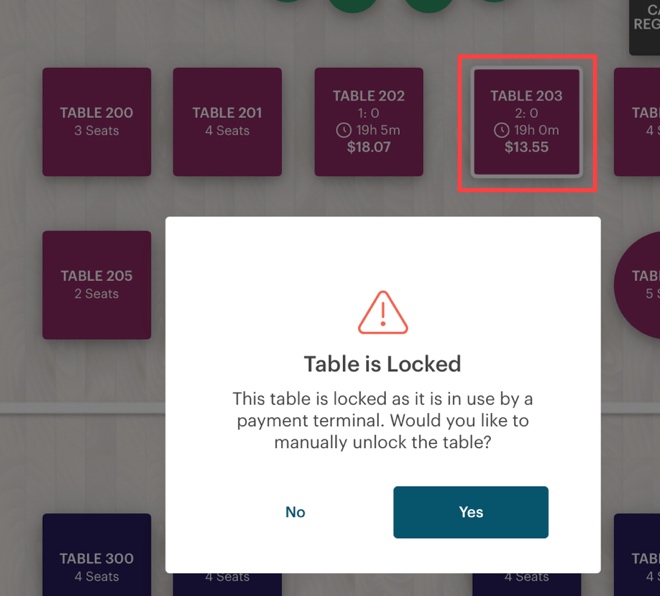
There can be some rare times when Paymentsense fails to release the lock. A manager or Admin can now tap on a locked table and unlock the table if needed.
Chapter 6. TouchBistro Option Text Changes
We have made changes to the text of various TouchBistro options.
Section 1. Home Icon Removed
In previous version, to return to the floor plan from an order screen or from the Admin Settings screen you tapped the Home ![]() icon.
icon.

You now tap < Back from an Order screen.
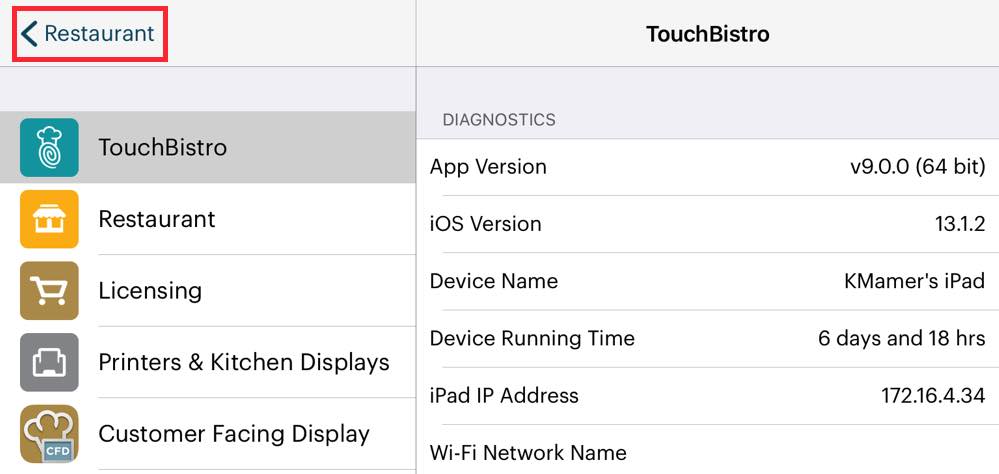
Or you tap < Restaurant from an Admin Settings screen.
Section 2. Save Option is now Done
In various places in TouchBistro, Admin Setting screens are exited via a Done, Save, or Done/Save option.
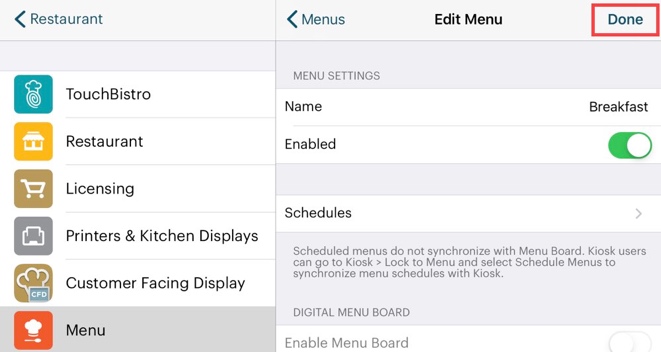
We’ve now standardized on Done for all screens. Below is the full list of all screens affected under Admin Settings:
1. Menu | Tax Settings
2. Customer Facing Display | Brand Color
3. Menu | Ingredients |Manage Ingredients
4. Menu | Menu Categories
5. Menu | Menus
6. Menu | Void Reasons
7. Menu | Discount
8. Menu | Takeout Types
9. Menu | Payout Reason
10. Payment Gateways
11. Menu | Gratuity Settings
Section 3. Menu Options with “Waiter” Renamed “Staff”
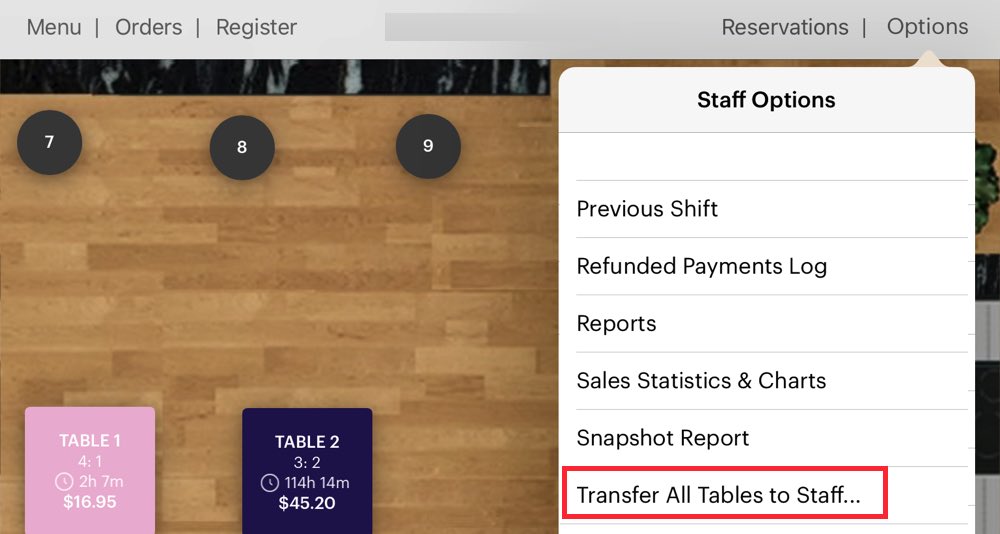
Menu options that use the term “Waiter” previous to 8.9.1 now use the term “Staff”.
Chapter 7. Floor Plan Table Detail Improvements
Section 1. Floor Plan Time Format Change
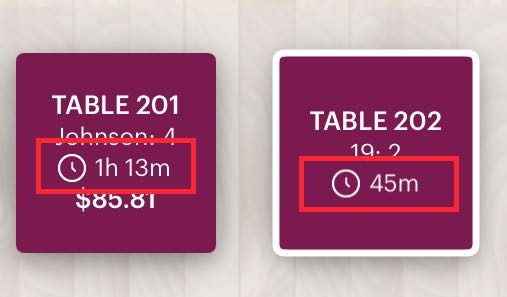
Table times on the floor plan now display in ##h ##m format, offering increased readability. Previously they displayed in ##:## format.
Section 2. Pro Server
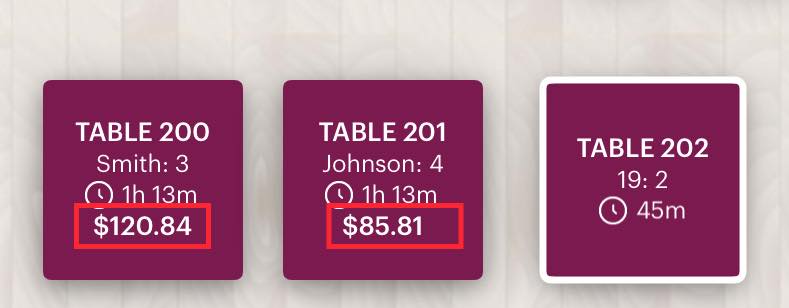
Restaurants running on Pro Server now display table spend amounts. In previous versions they only displayed party details and sitting times.
Chapter 8. Break Types Display Paid/Unpaid Status
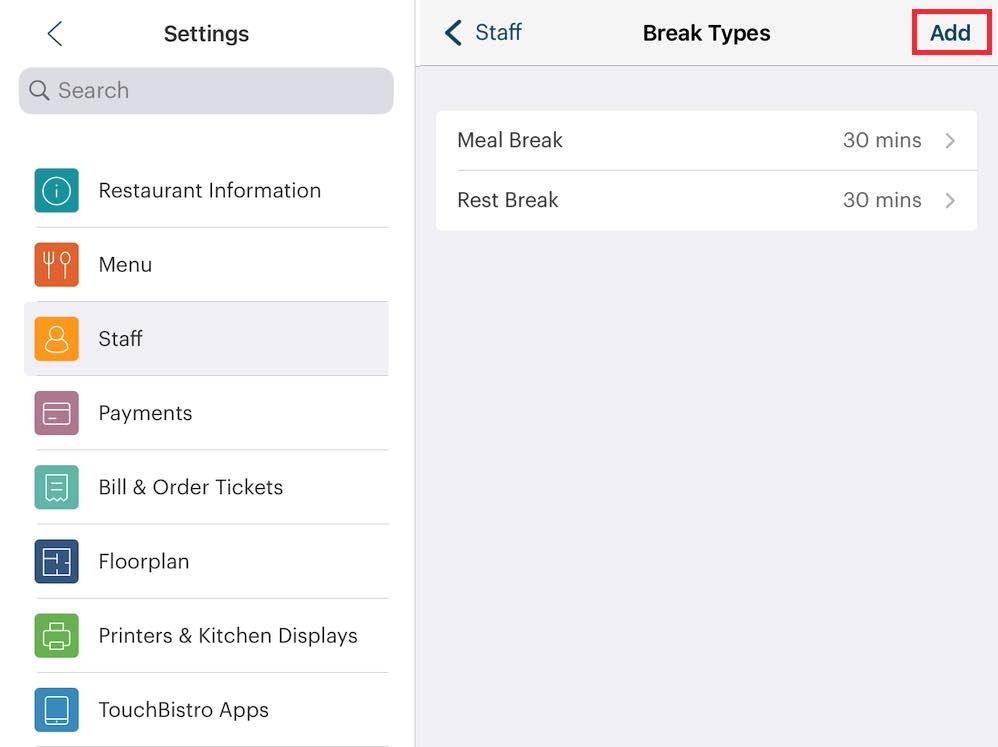
On the Breaks screen (Admin | Admin Settings | Staff | Breaks), configured breaks will display their paid/unpaid status setting.
Chapter 9. Adding a New Menu Item for Online Ordering
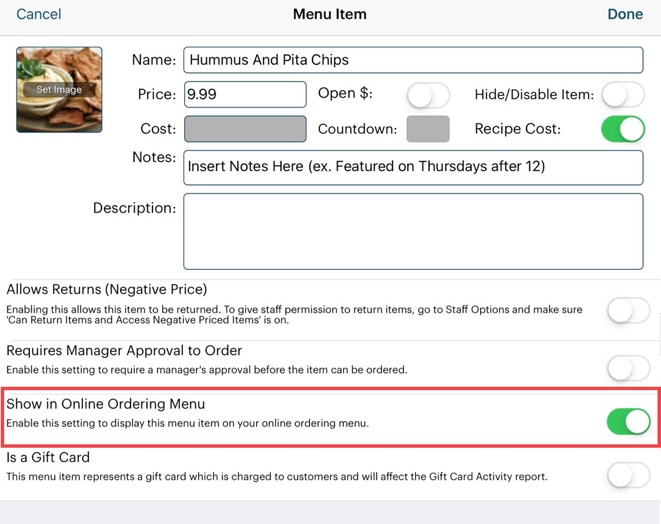
If you are adding a new menu item to a menu category that is included in your online ordering menu, the Show in Online Ordering Menu setting will now be automatically set to On.
It’s important to remember if you’re accustomed to adding new menu items to a category but not enabling the item for online ordering until trialed it in-venue only, you should now make sure you disable Show in Online Ordering Menu for the menu item until you’re ready to offer it for online ordering.
Chapter 10. Barcode Scanning on Tables
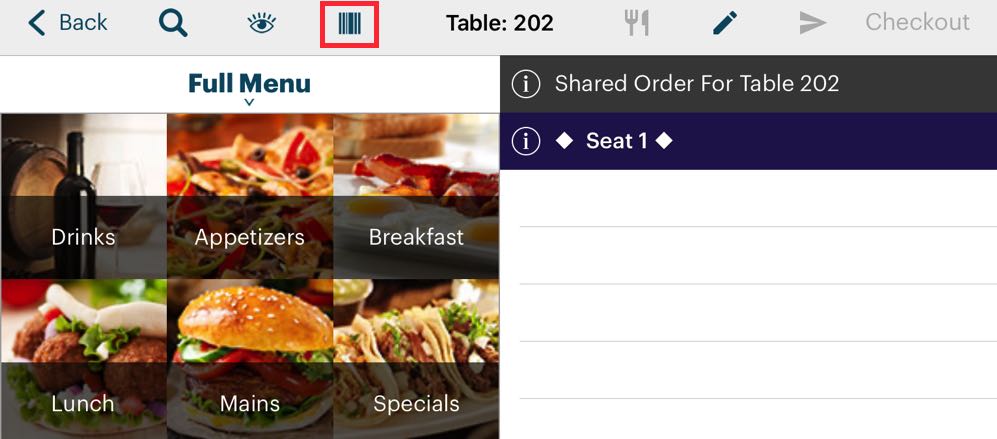
If you are on a table, you can now use your iPad camera to scan barcodes and add items to the order screen. Previously this feature was available only on the Cash Register screen.


 Email
Support
 Frequently
Asked Questions