
 Email
Support
Email
Support Frequently
Asked Questions
Frequently
Asked Questions
Working with Menu Modifiers
Table Of Contents
Chapter 1. Text Modifiers vs Menu Item Modifiers
Section 2. Menu Item Modifiers
Chapter 2. Setting Up a Menu Item Modifier
Chapter 4. Where Do the Menu Items Used as Modifiers Get Printed?
Chapter 6. Tax-Free Menu Item Used as Menu Item Modifiers
Section 1. Creating a Hidden Category for Tax-Free Items Used as Modifiers
Chapter 7. Menu Category Setting Quick Reference Guide
Chapter 8. Setting Modifiers to Deduct from Inventory
Section 1. Set Up Your Modifier Items in Inventory
Section 2. Set Up a Hidden Menu Category
Section 3. Set Up Your Modifiers as Menu Items
Chapter 1. Text Modifiers vs Menu Item Modifiers
There are two principal ways to modify a menu item in TouchBistro. There are Text Modifiers and Menu Item Modifiers.
Section 1. Text Modifiers
Text Modifiers tend to be things like cooking instructions. A steak offers a classic example:
These Text Modifiers simply tell the kitchen how the customer prefers his/her food prepared.
You should not use Text Modifiers for items you want to keep accurate track of in your inventory and/or are critical in food cost calculations. There is no way to set Text Modifiers to deduct from your inventory (either the simplified inventory count or the detailed ingredient inventory system) or figure into TouchBistro’s food/alcohol cost calculations.
Section 2. Menu Item Modifiers
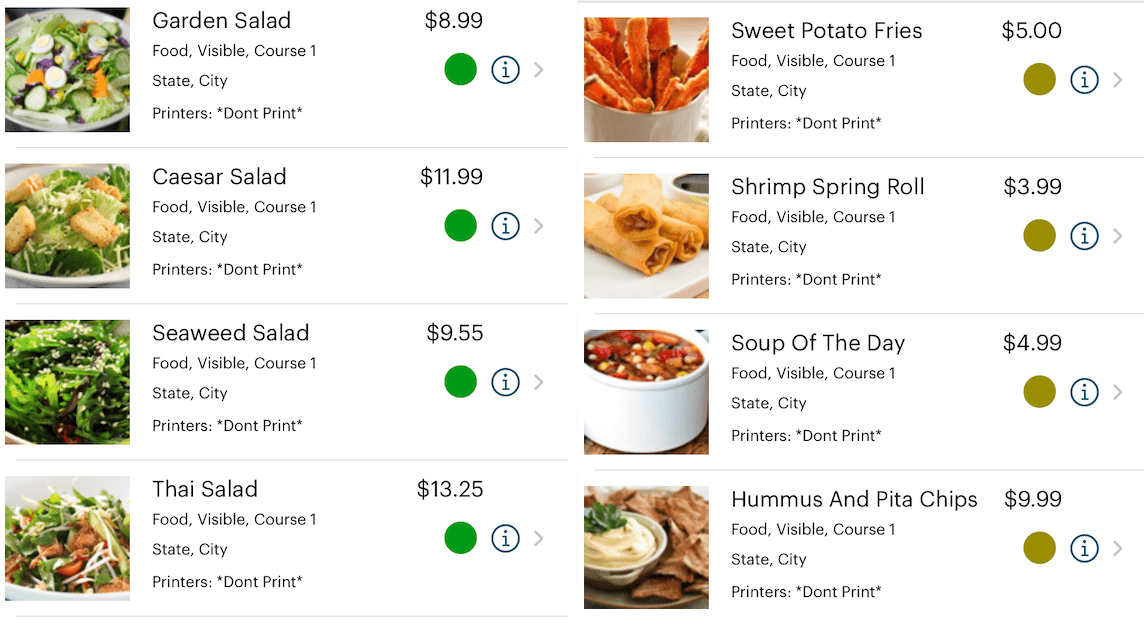
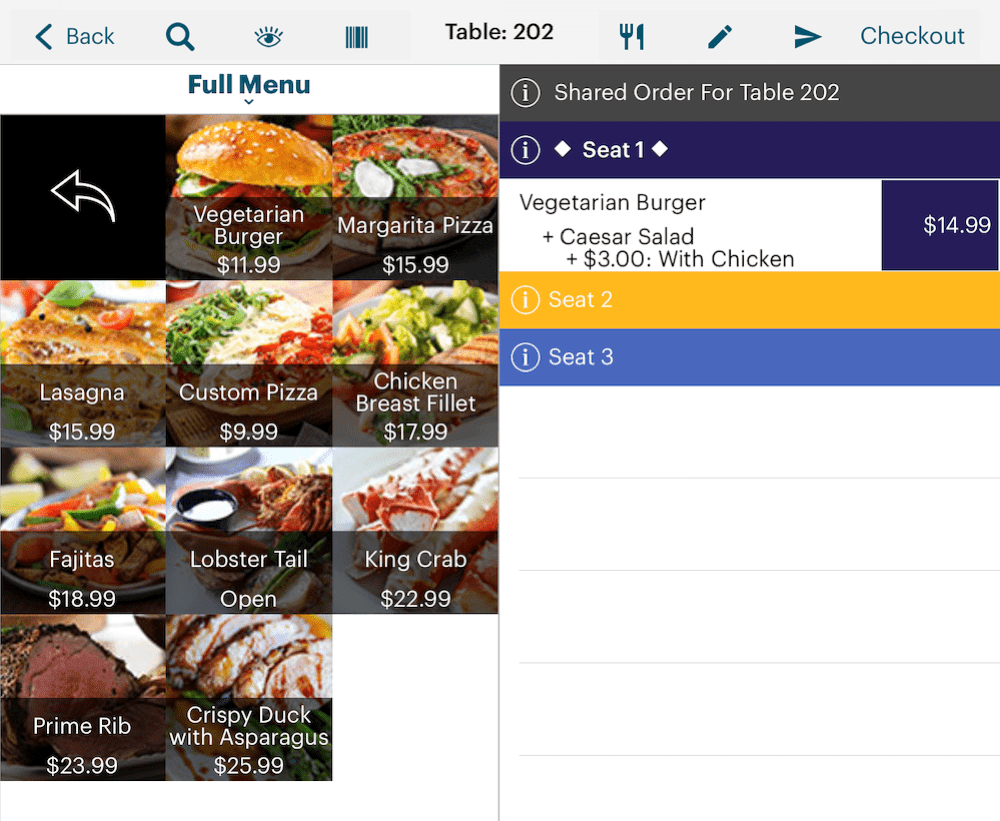
Menu Item Modifiers allow you to use menu items as modifiers. For example, you have a Salad menu category and a Sides menu category. Customers can order these items a la carte. For example, they can order a Garden Salad a la carte for $8.99 or Sweet Potatoe Fries for $5.00. However, you may also want to offer these as part of a Main menu category. If a customer orders a Main, he/she may pick a salad or side as part of the Main’s price (or with a small additional upcharge).
For example, if the customer orders a sandwich main, TouchBistro can be set up to offer salads or side menu items included in the price of the main or for a small additional upcharge.
Chapter 2. Setting Up a Menu Item Modifier
To use a menu item as a modifier, do the following.
1. Ensure you’ve set up your menu items, notably the menu item(s) you want to use as a modifier(s).
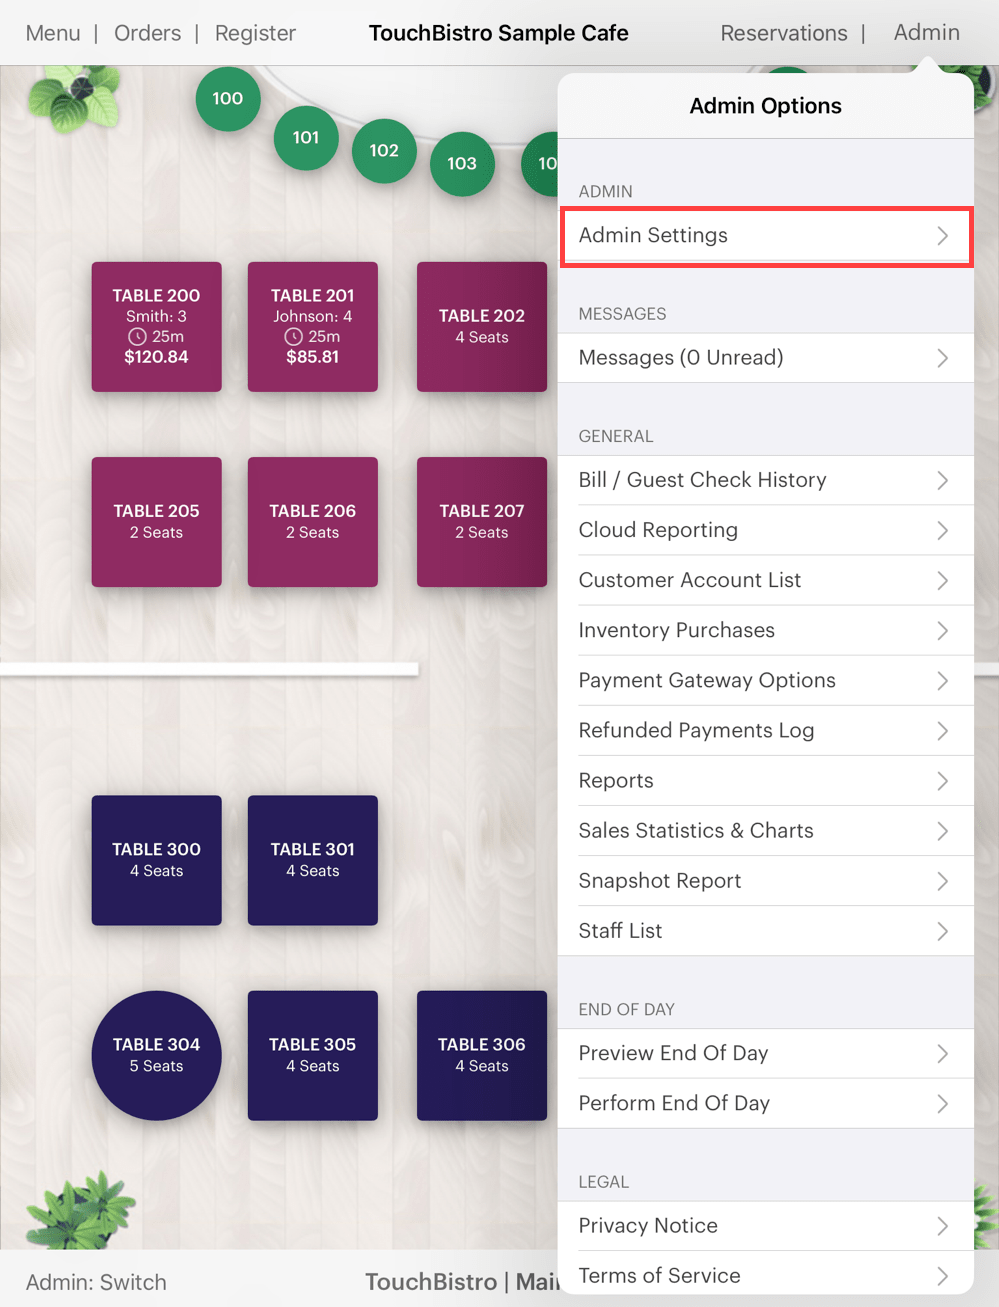
2. Tap Admin | Admin Settings.
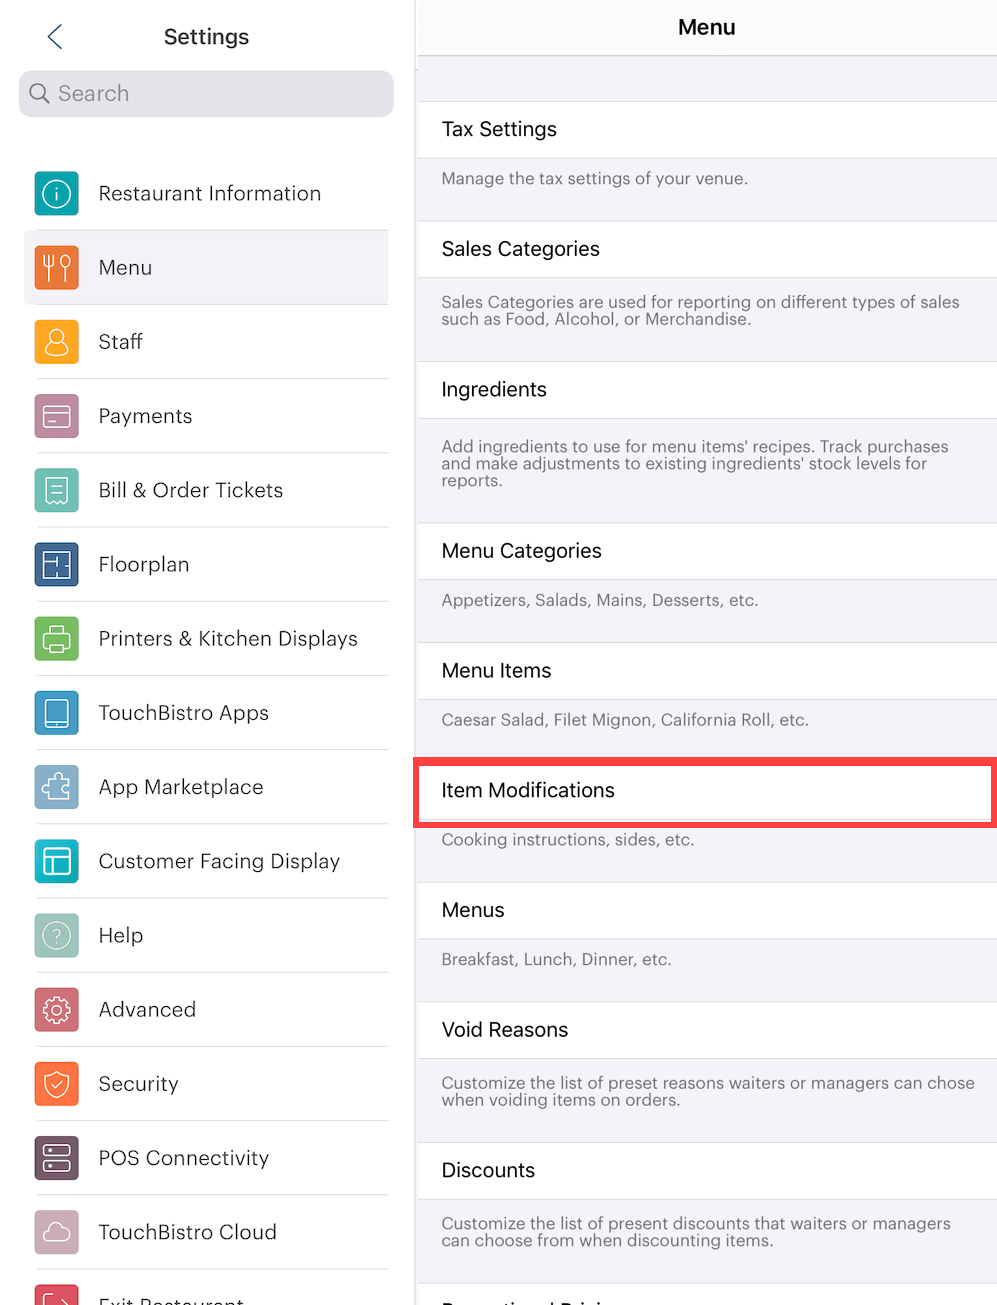
3. Tap Menu and then Item Modifications.

4. Tap the Add to add a new Modifier Group.
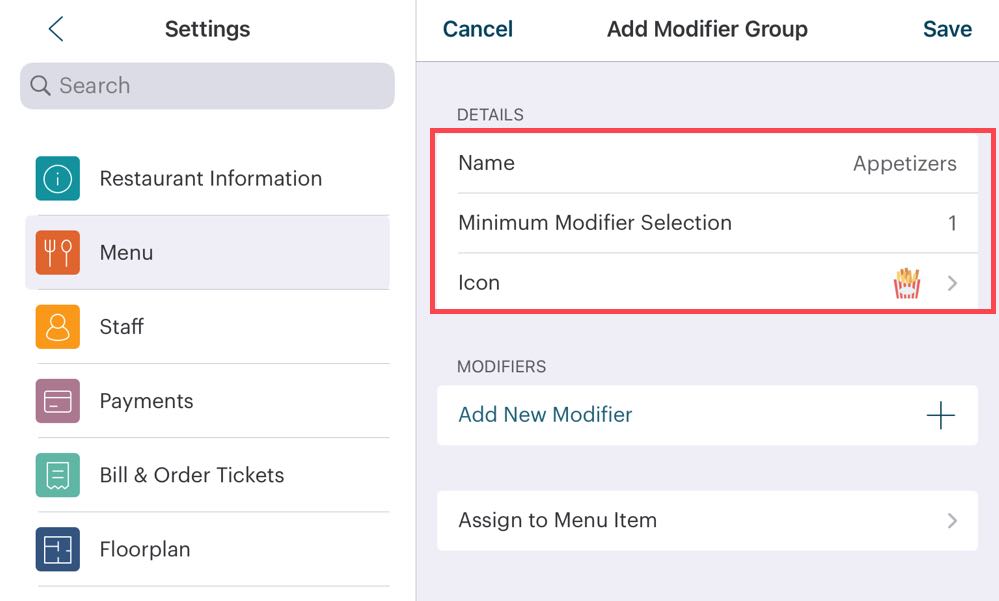
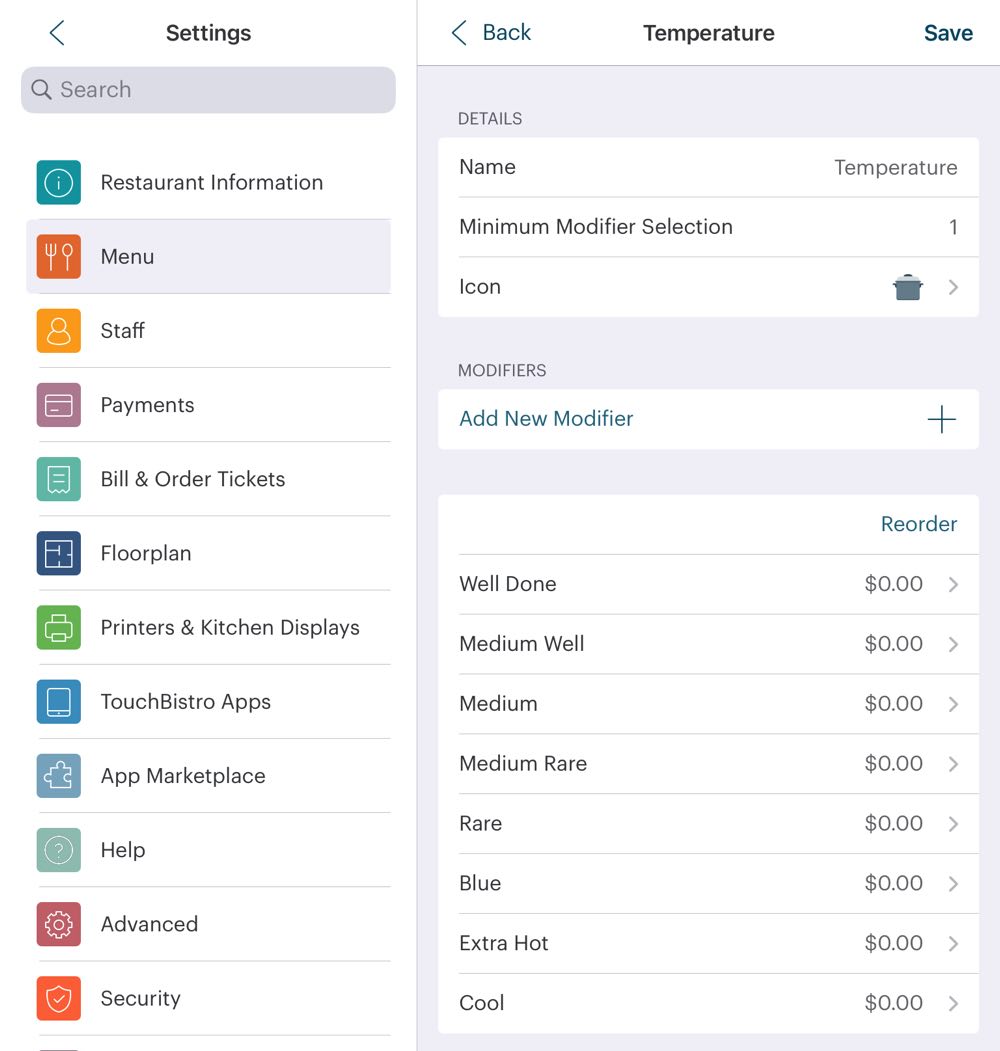
5. Give this Modifier Group a name. For example, “Appetizers”. Enter a 1 next to the Minimum number of selections field if the server should be required to ask the customer for the desired modifier.
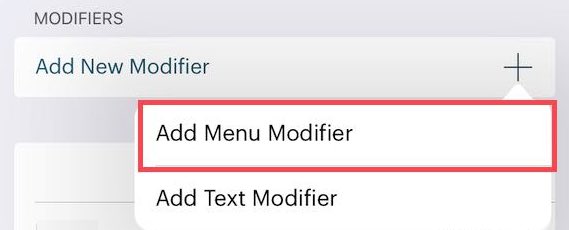
6. Tap the Add + icon and then tap Add Menu Item.
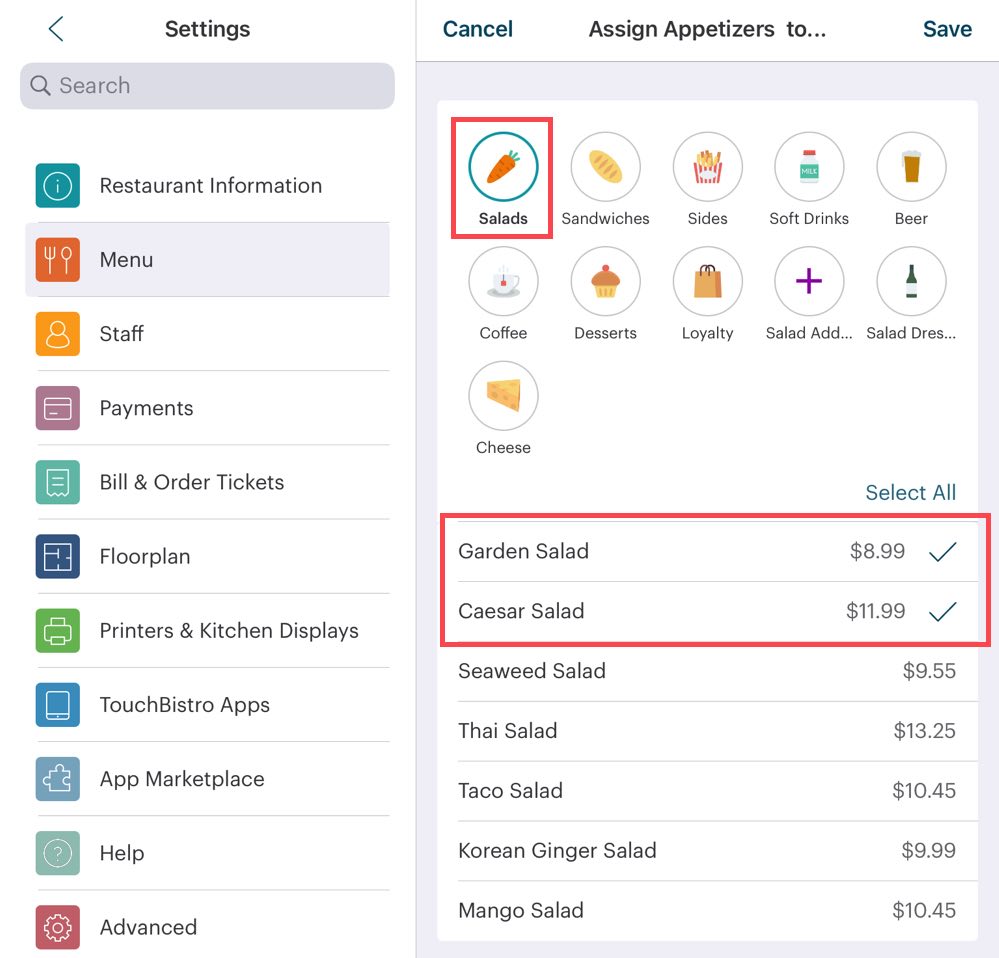
7. Tap a Menu Category at the top and then select which salads you want to offer as side choices. For example, tap Salads and then select Garden and Caesar. But we’ll exclude premium salads, leaving those as only a la carte options.

8. Tap another Menu Category to make additional items available as a side option. For example, tap Sides and then tap items to select. Tap Save.
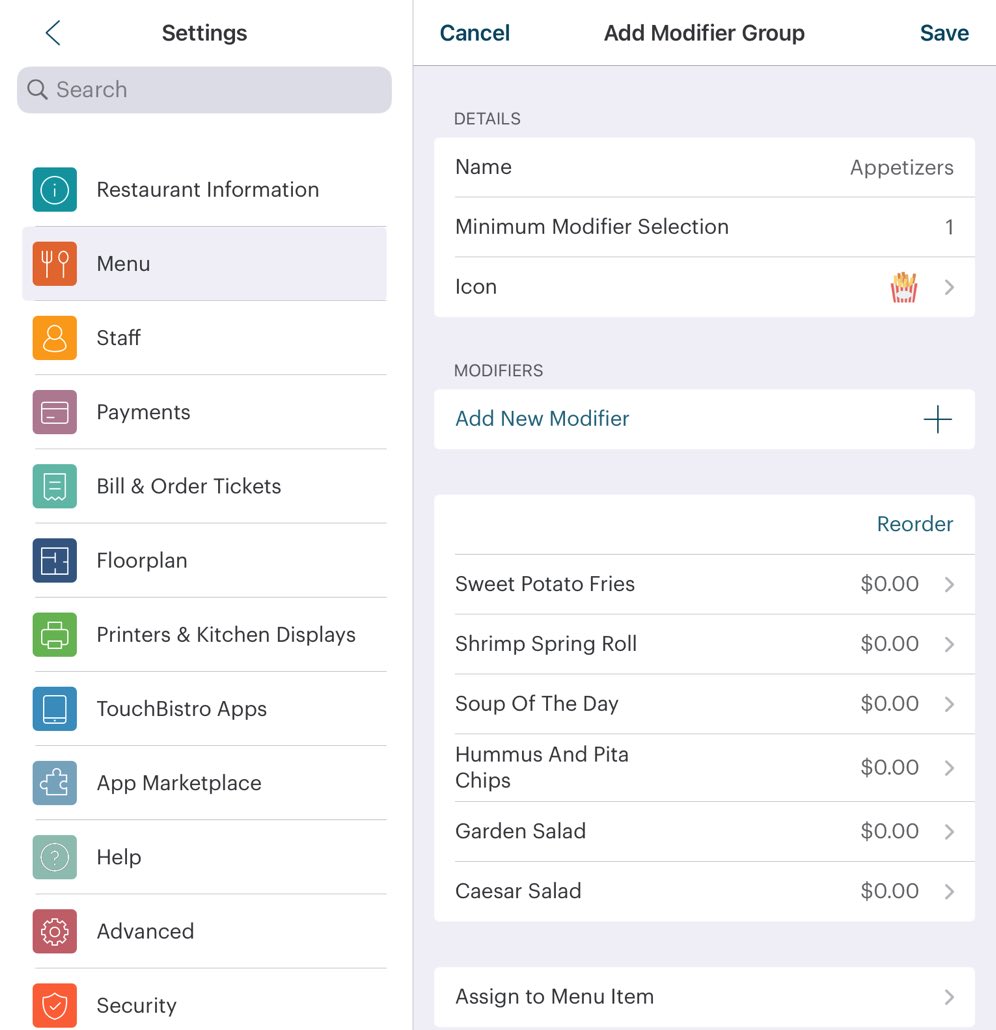
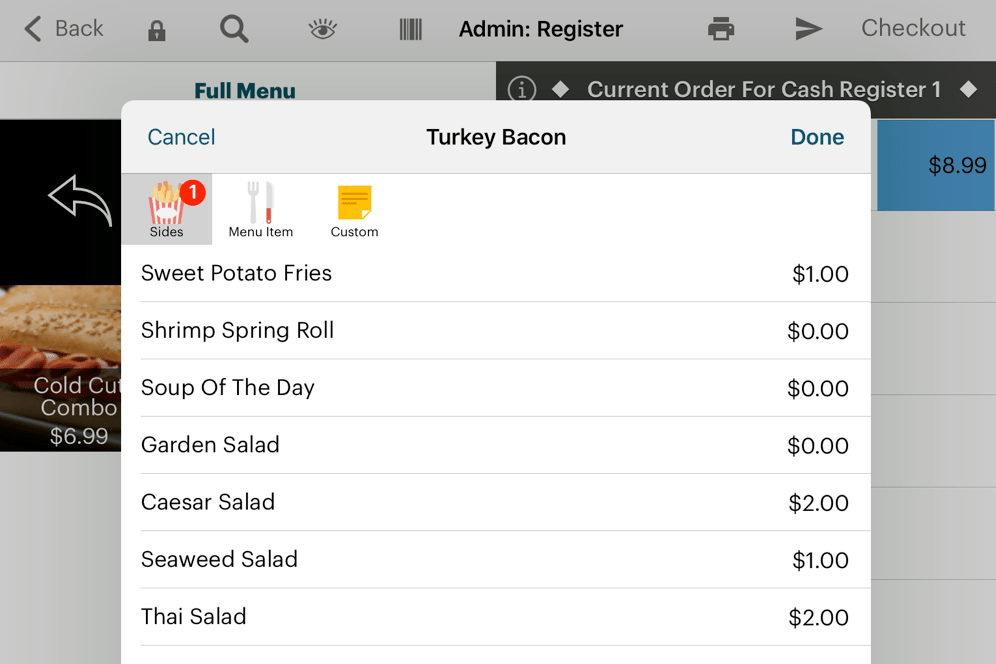
10. Selected Menu Items are now entered as allowable appetizer sides. However, by default, they’re offered without an upcharge. Some you may want to offer as part of the main without an upcharge (for example, House Salad and Fries). Others you may want to offer as a premium side but with an upcharge. Tap the items you want to configure an upcharge.
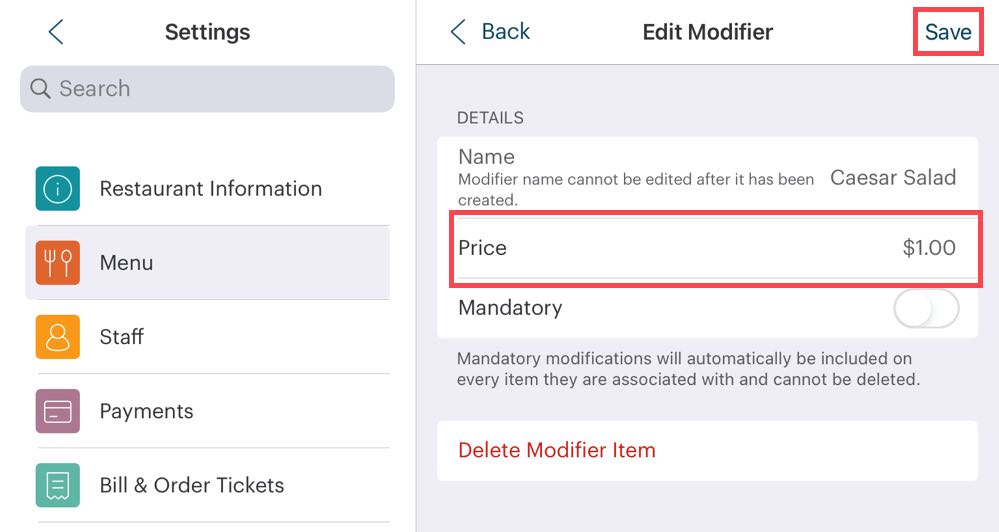
11. In this example, if the customer wants the Caesar Salad with the main, we will charge a $1 upcharge. A la carte the Caesar Salad is $3.70. However, as part of the Main, the customer can have it for only an extra $1. So we enter 1 in the Price field. Do not enable Mandatory.
12. Tap Save.

17. You now have to assign it to actual menu items. That is, when a server adds a menu item to the order screen, TouchBistro pops up the Appetizers modifier options. Tap Assign to Menu Items.
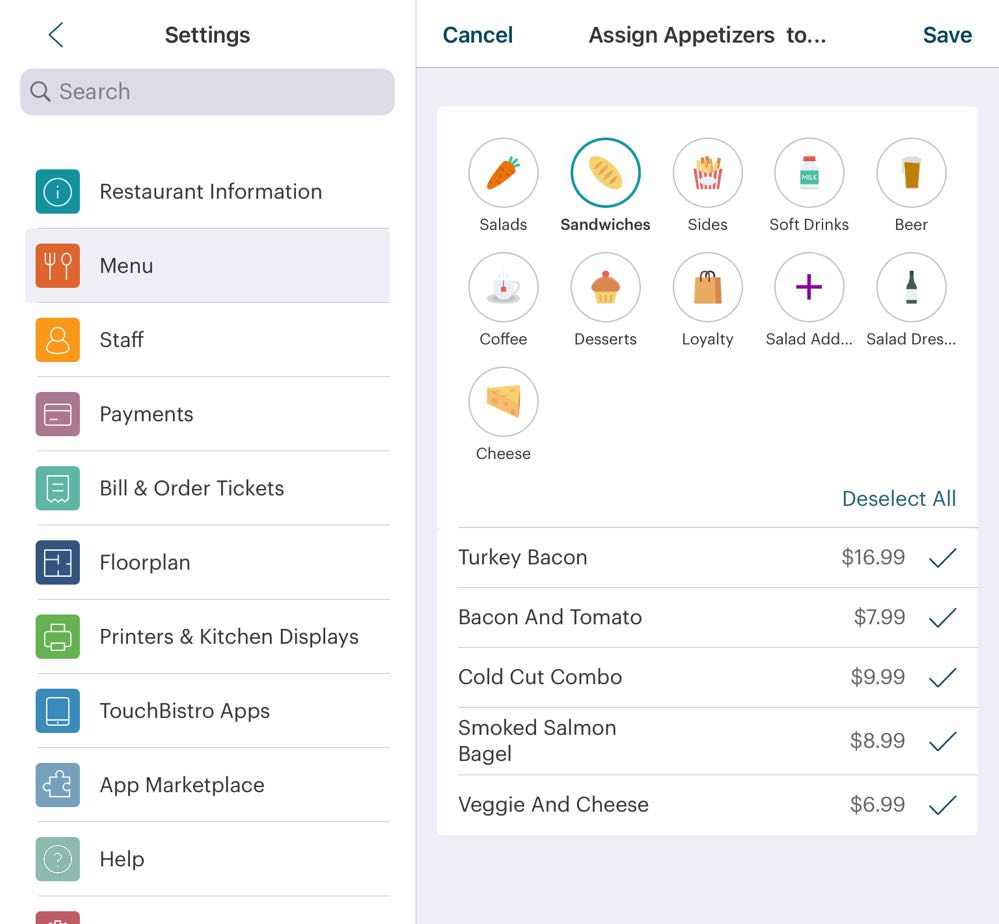
18. Tap a Menu Category at the top and select which menu items you want to modify with this Modifier Group. For example, tap the burgers, steak, lamb chops, etc.
19. Tap another Menu Category and select more items. Tap Done when you’re done assigning this Modifier Group.
Section 1. Using the Modifier
After creating the Modifier Group and assigning it to menu items, it will now be available to a server.
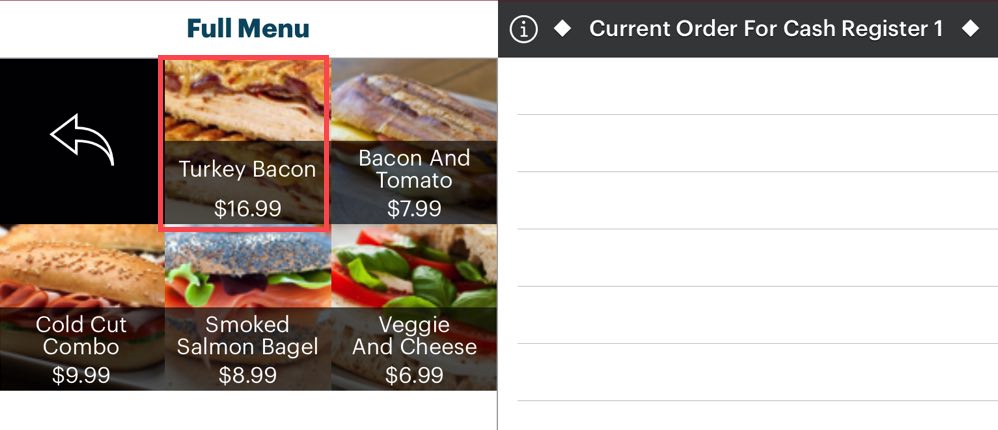
1. Tap an item with the assigned Modifier Group.

2. If the Modifier Group was set to be a forced modifier, the Modifier screen will pop up. Select the modifier.
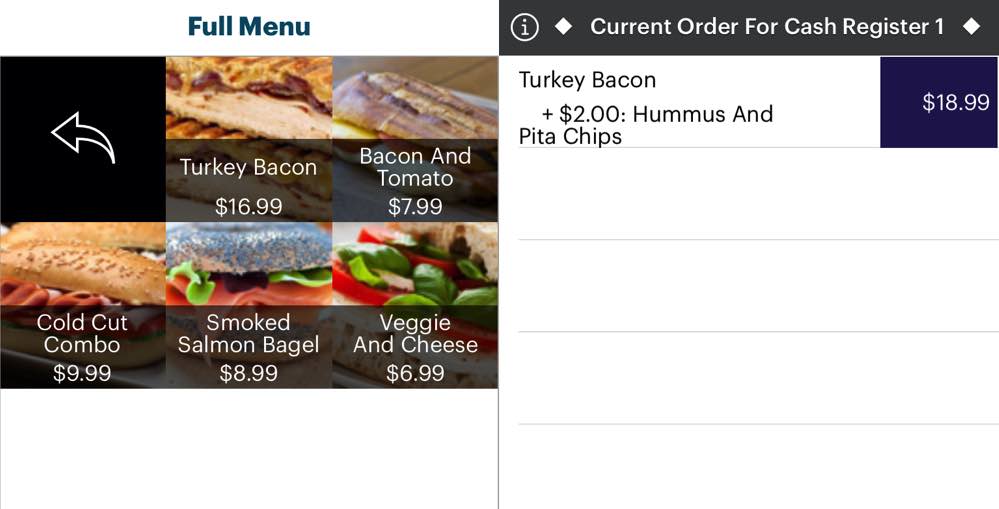
3. The menu item and modifier are added to the order. TouchBistro uses the Menu Item Modifier’s set price as the upcharge, not the a la carte price (for example Onion Rings have a $4 price a la carte but were set with a 50 cent up charge).
4. Note, menu items used as modifiers will print as part of the order item’s course. For example, Onion Rings may be Course 1 if ordered a la carte. However, they will be included as part of the burger’s Course 2 setting.
Chapter 3. Nested Modifiers
Some of your menu items you use as Menu Item Modifiers may have their own modifiers. In the example above, the Caesar Salad menu item was used as a Menu Item Modifier for our mains. Imagine if we want to offer a chicken modifier for the Caesar Salad. So when a customer orders the Caesar Salad either a la carte or as an appetizer side to a main, TouchBistro will further prompt for a chicken option for the salad.
Note: If you are using Online Ordering via Checkmate, Checkmate does not support nested modifiers. If you plan to use Online Ordering in the future, we strongly suggest not making heavy use of nested modifiers.
We would set this up like any other modifier.
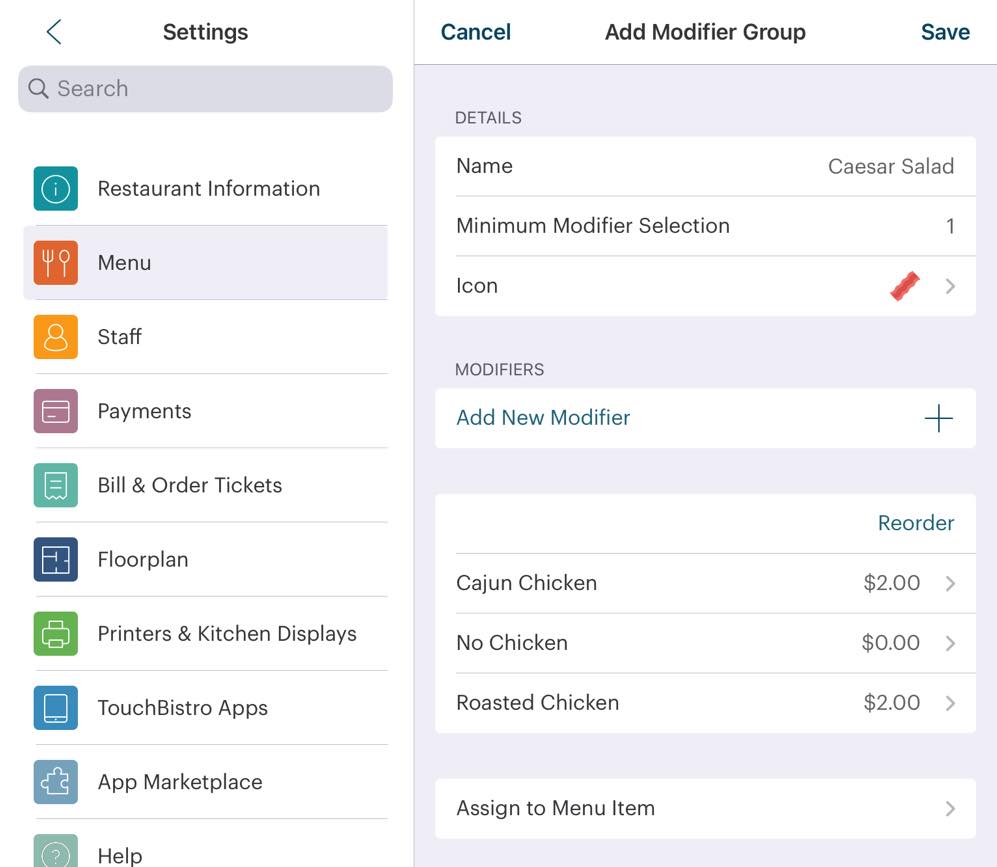
1. Create a Modifier Group called Caesar Salad and add chicken modifier options with up charges. Make sure you add a “No Chicken” option. Make this Modifier Group mandatory.
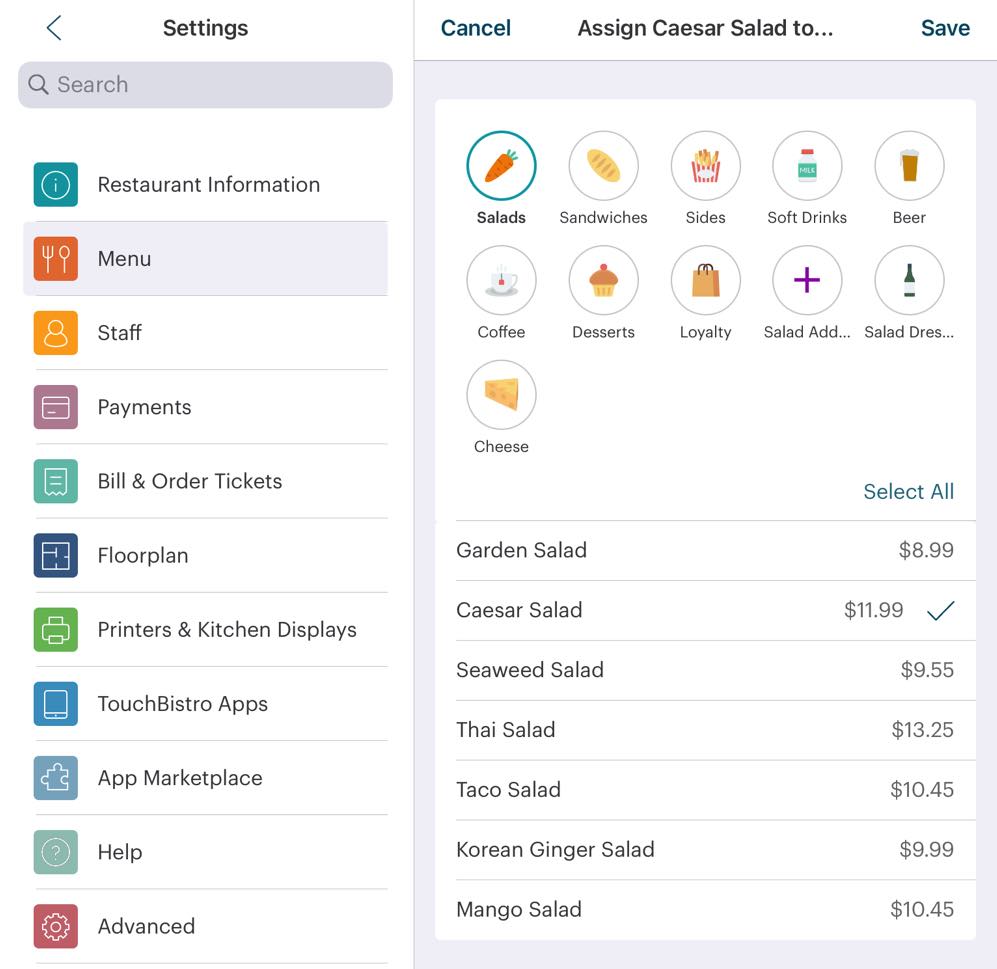
2. Assign the Modifier Group to your Caesar Salad menu item (as well as any other salad you might want to offer a chicken option).
3. Start an order.
4. If the Modifier Group was set to be a forced modifier, the Modifier screen will pop up. Select the Caesar Salad modifier.
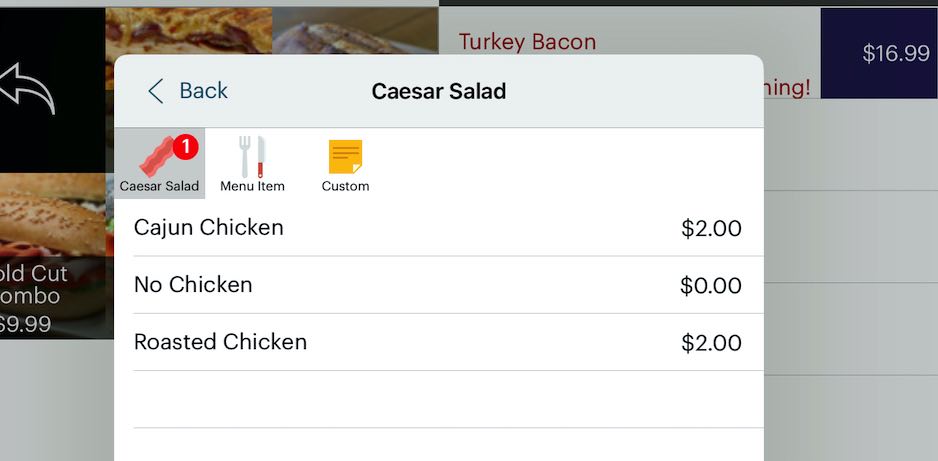
5. Upon selecting the Caesar Salad modifier, you will be prompted with the salad’s chicken modifier. Select a modifier for the Caesar salad.

6. You will now see your chicken modifier nested under your main’s salad modifier.
Chapter 4. Where Do the Menu Items Used as Modifiers Get Printed?
If a menu item is used as a modifier, it will get printed to the ticket printer assigned to the original menu item. It will not get sent to its configured printer.
In the burger/salad example above, if you send this as a ticket, the entire item (burger and salad) gets sent to the ticket printer assigned to the Main category.

If a la carte salad items go to another printer, like a salad station printer, your salad will go to the printer assigned to the Main category (e.g., Kitchen printer) if it’s added to the order as a modifier. TouchBistro will not send it to both printers.
Chapter 5. Tax Implications
Menu items used as modifiers get taxed using the tax rate you set for the menu item used as a modifier.
Imagine your jurisdiction has a state tax for non-alcohol items and a separate, higher alcohol tax for beer, wine, and spirits.
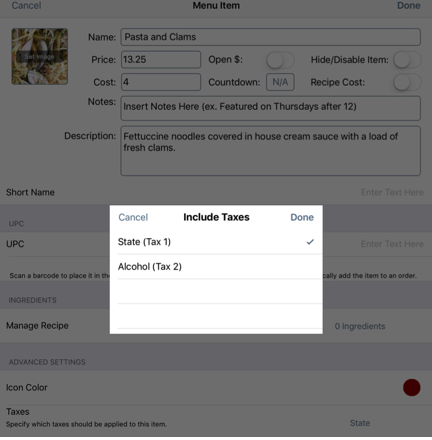
Your non-alcohol items (like a pasta main) get set to charge the state tax (for example purposes 10%).
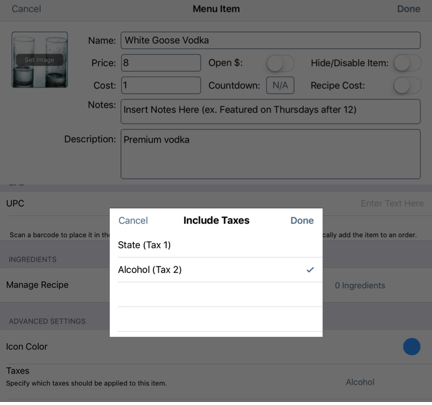
Your alcohol items (like vodka shots) get set to charge the Alcohol tax (for example purposes 20%).
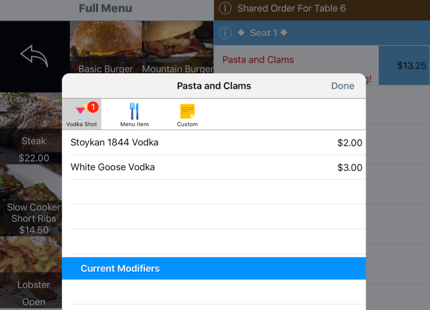
Let’s say for your pasta dish, you have a modifier that lets a customer add a vodka shot to the dish.
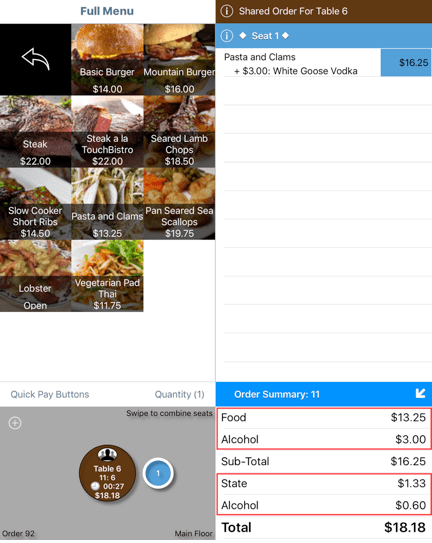
If the customer adds a vodka shot to his/her pasta, TouchBistro will tax the upcharge using the 20% tax rate set for the vodka modifier. The modifier is not taxed at the non-alcohol state tax rate of 10%.
Chapter 6. Tax-Free Menu Item Used as Menu Item Modifiers
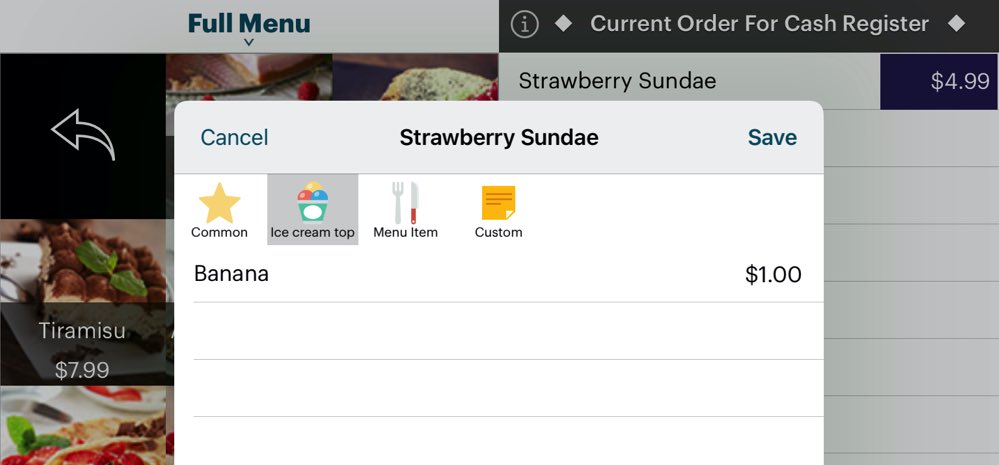
Menu Item Modifiers using their original tax rate should not typically be a problem except for a situation where the menu item, if purchased on its own, is tax-free but when part of a prepared food item has to be taxed. For example, you sell single bananas at the cash register as an impulse buy item. They are tax-free in your jurisdiction as they are defined as a grocery product. However, you also offer a banana modifier as part of a sundae with a $1 up charge.
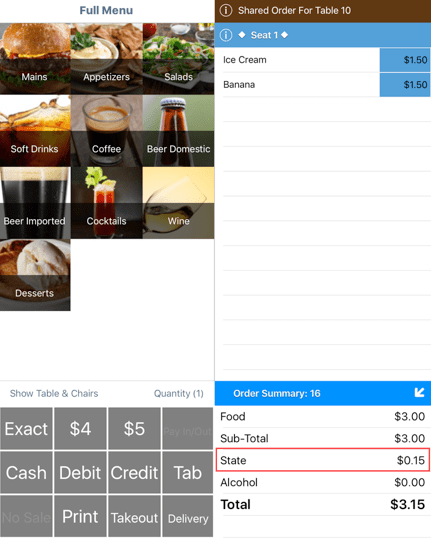
In the example above, ice cream and a banana are both ordered a la carte. The 10% tax is applied to just the ice cream (15 cents) and the banana, as a grocery item, is tax-free. TouchBistro correctly calculates the tax.

However, imagine you’ve used the banana menu item as a Menu Item Modifier. As noted, TouchBistro will apply the modifier’s original category tax setting. In this case, the $1 upcharge for a banana addition to the ice cream order won’t be taxed.
The tax in the pictured example is too low as our jurisdiction requires grocery items that are part of prepared foods be taxed. The example order above should have $0.25 in tax ($2.50 x 10%). However, as we can see, only the ice cream’s unmodified $1.50 price is being taxed at 10%. The banana (set for tax-free) isn’t being taxed as an upcharge.
To avoid under taxing, you should not use your tax-free menu items as modifiers with an upcharge. You can use a Text Modifier with an up charge.
Section 1. Creating a Hidden Category for Tax-Free Items Used as Modifiers
If you need to track inventory then create a separate hidden Menu Category for your identical tax-free menu items. In this case, however, this category will have the tax applied.
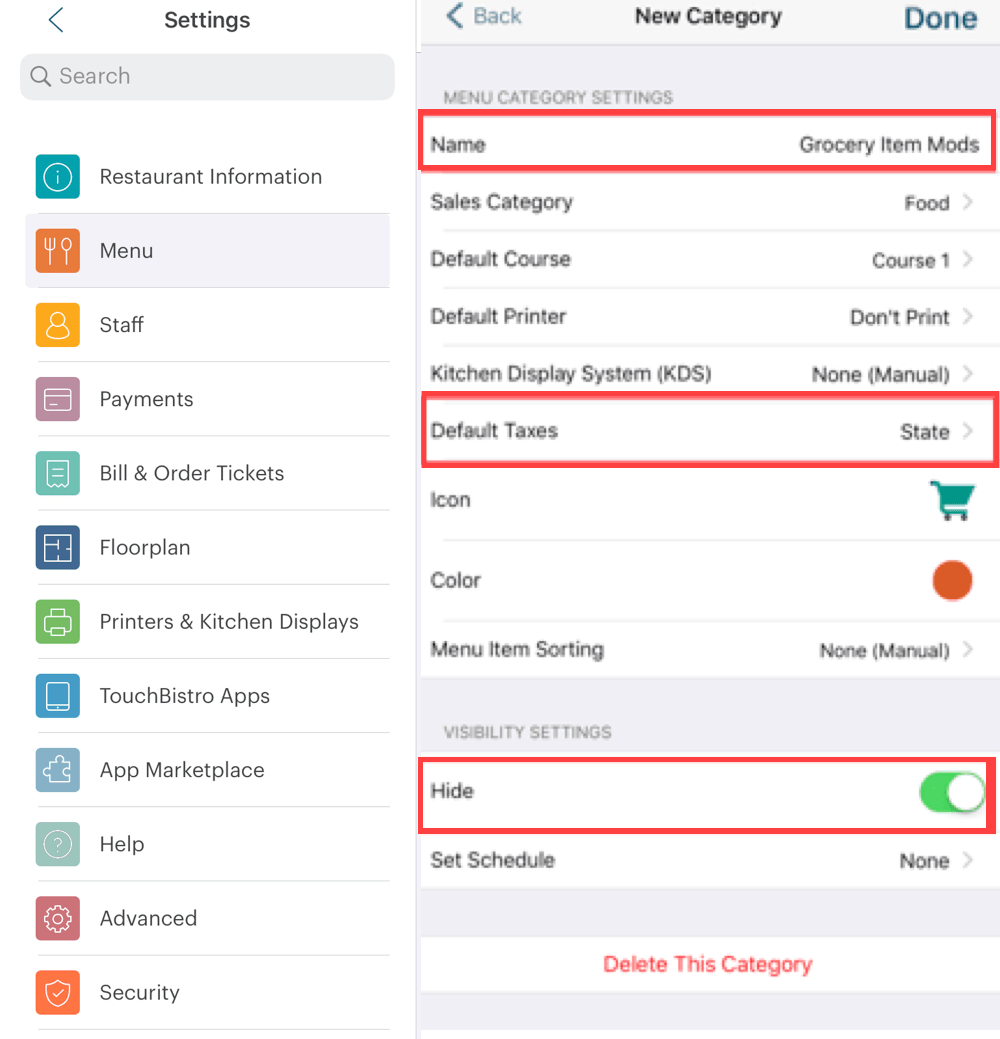
1. For example, create a Menu Category called “Grocery Item Mods”.
2. Ensure the Default Taxes are set to be applied.
3. Enable Hide so this doesn’t actually appear on the server’s menu screen.
4. Tap Done.
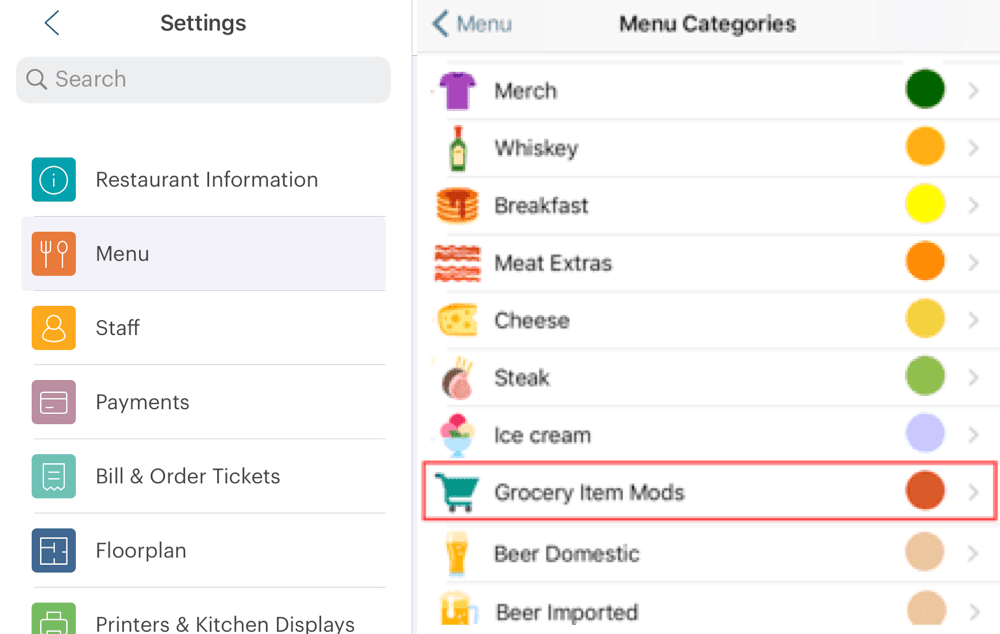
5. Access the Menu Items page and tap your newly created Grocery Item Mods category.
6. Recreate your tax-free menu items under this category (do not delete or attempt to move the tax-free menu items).
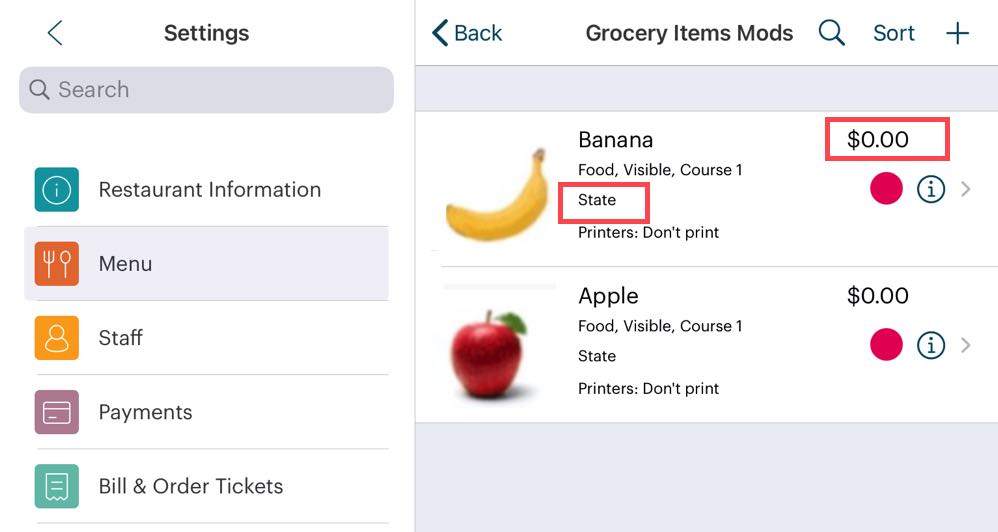
7. Since this category is set to apply tax, these items will inherit the category tax setting. You can also set their price to $0, as this is a hidden category and the server won’t be able to add these items a la carte. The price will be determined by the upcharge.
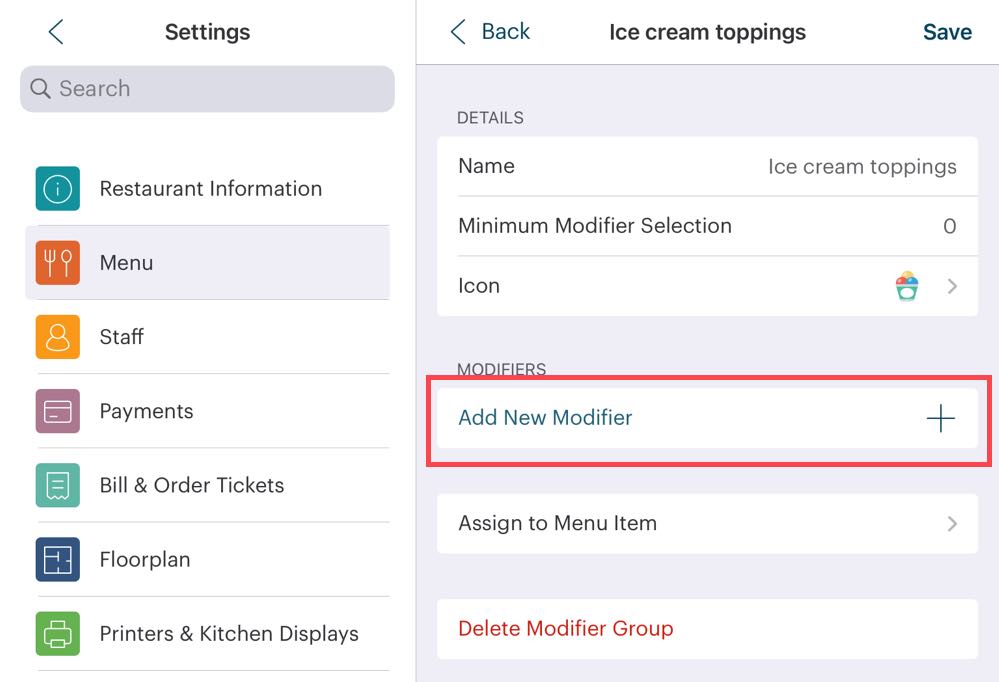
8. Access your Item Modifications screen and edit your Ice Cream Toppings Modifier Group. Tap Add New Modifier and add your banana item as a Menu Item Modifier.
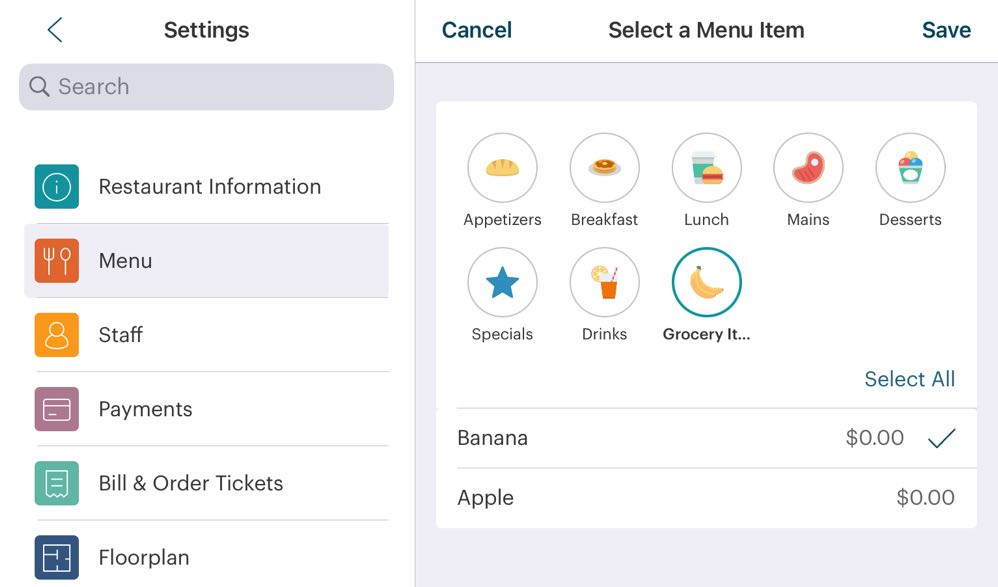
9. Add the banana menu item from the Grocery Item Mods category as the ice cream topping modifier.
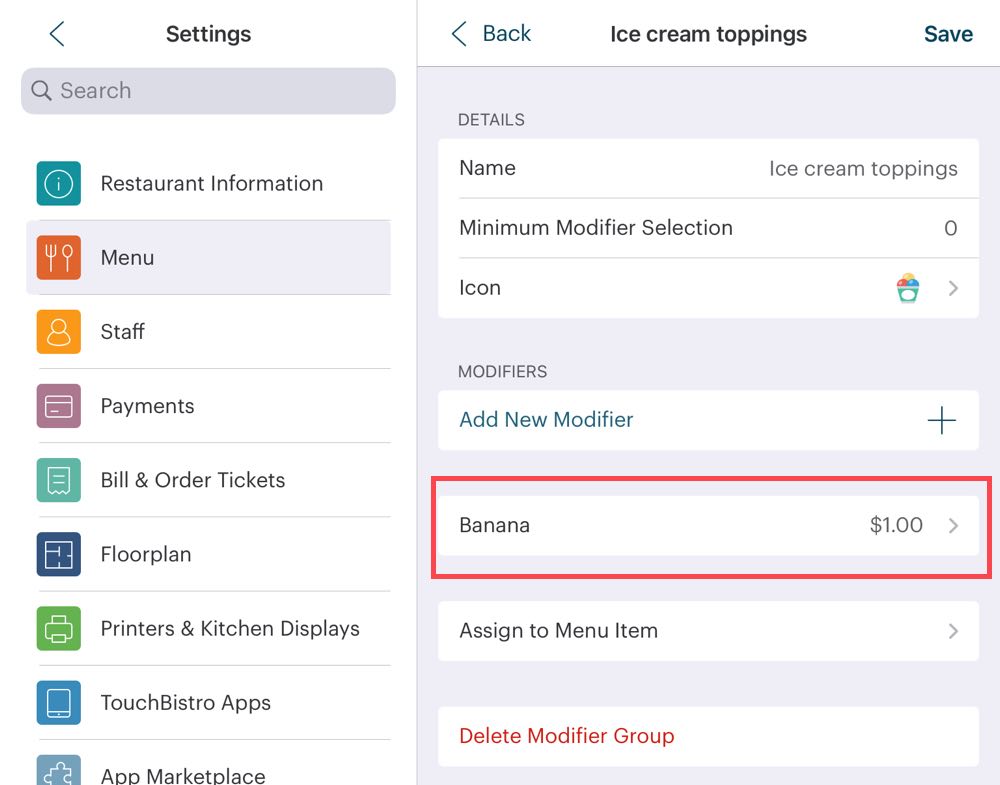
10. After adding it to your modifier group, give it an upcharge (e.g., $1).
11. On the Order screen we can now add it as a modifier.

12. Because the banana Menu Item Modifier is coming from a Menu Category that applies the state tax to all of its items, TouchBistro now properly taxes the $1 upcharge at the state rate of 10%. You’ll notice too because we hid the Grocery Store Mod menu category, it will not be visible to server on the Order screen’s menu.
Chapter 7. Menu Category Setting Quick Reference Guide
This chart below is a summary of which Menu Category (or Menu Item level override) setting your Menu Item Modifier uses:
|
|
Menu Item Mod
|
Menu Item Mod
|
|
Course
|
|
|
|
Taxes
|
|
|
|
Ticket Printer
|
|
Chapter 8. Setting Modifiers to Deduct from Inventory
As we noted at the start of this guide, Text Modifiers do not deduct from inventory (either the simplified inventory count or the detailed ingredient inventory system). If you use Menu Item Modifiers, if the menu item is set to track inventory when you add the item as a modifier will deduct from inventory.
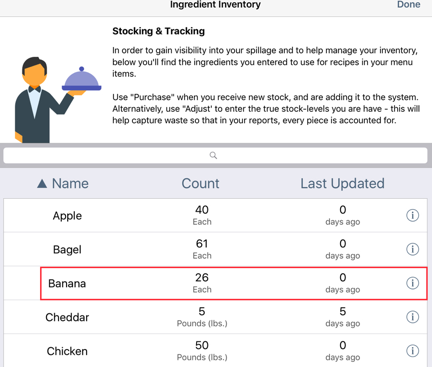
In our ice cream example, the banana menu item is inventoried. Each time a banana is purchased at the cash as an impulse buy item or added as a Menu Item Modifier to an ice cream dish, one banana will be deducted from inventory.
Modifiers like dressing might be better programmed as Text Modifiers. However, you may want to keep track of your salad dressing use. To do this, we’ll create a hidden Salad Dressing Menu Category (similar to the one we set up for grocery items we wanted to tax when used as modifiers) and then add the dressings as Menu Item that will never actually be visible on the front end.
Section 1. Set Up Your Modifier Items in Inventory
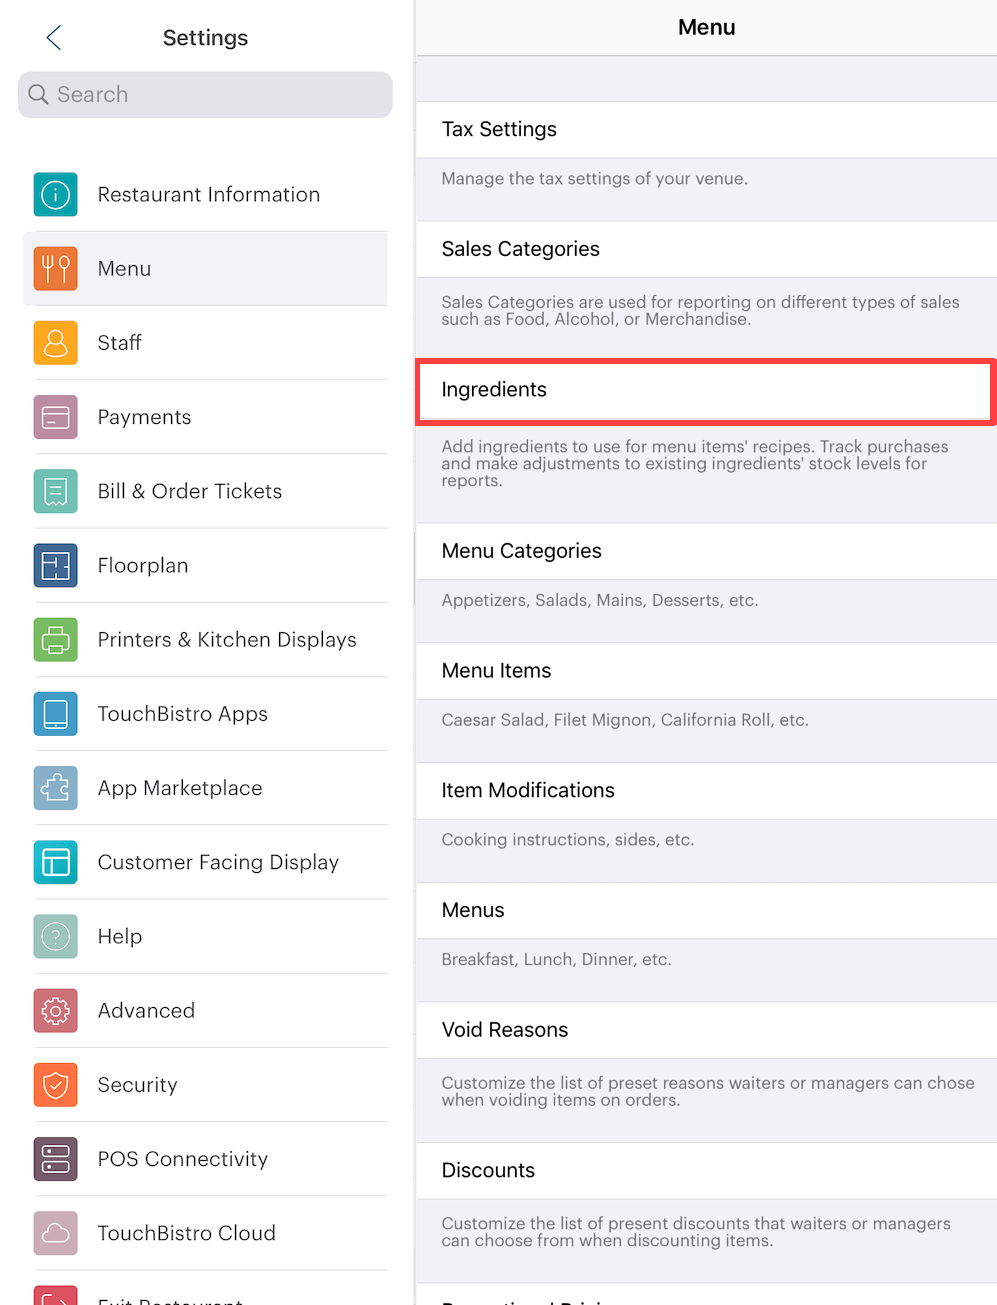
1. First, set up your dressing inventory. Admin | Admin Settings | Menu | Ingredients.
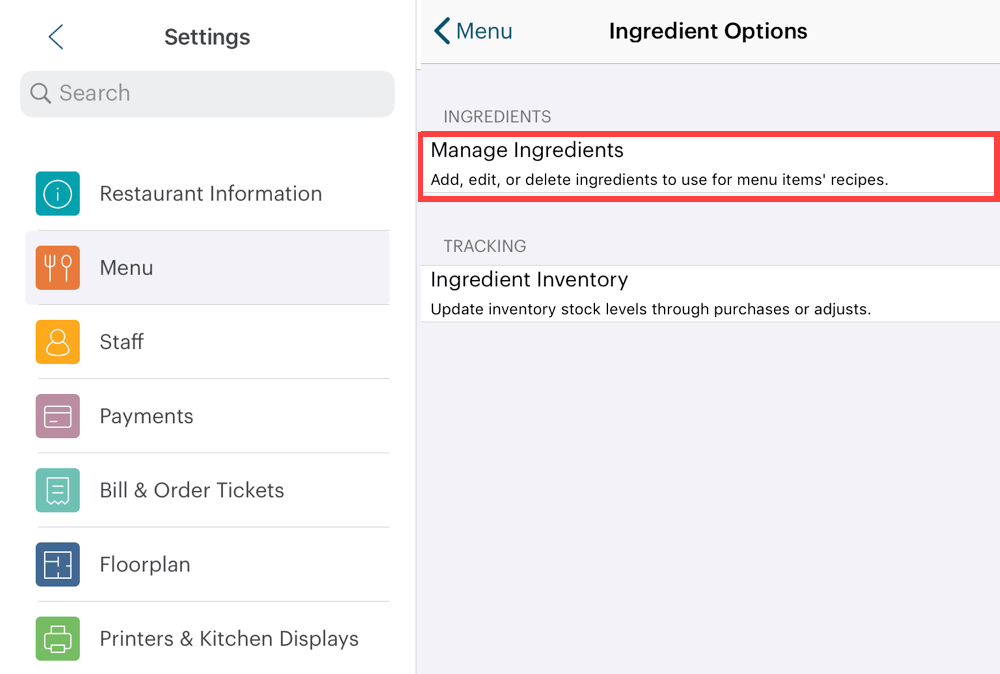
2. Tap Manage Ingredients.
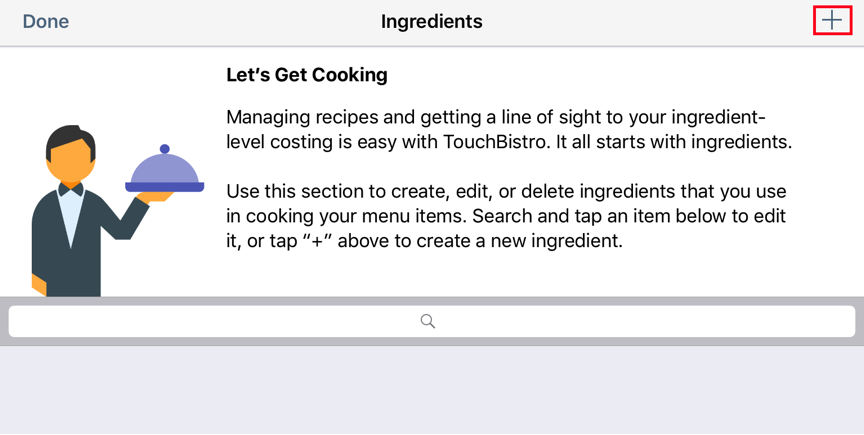
3. Tap the Add + icon at the top right to add your first dressing.
4. Enter the name of your dressing. To group items together in a long inventory list, we recommend entering inventory item names in the format [category], [item name]. For example: Dressing, Blue Cheese. Dressing: Ranch. Etc.
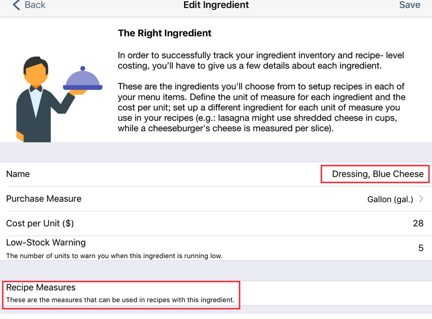
5. Enter the Purchase Measure. For example if you buy your dressing in bulk by the gallon, set it for Gallon. Do not set this with a recipe style measure like teaspoons.
6. Enter a cost per unit and a low stock warning.
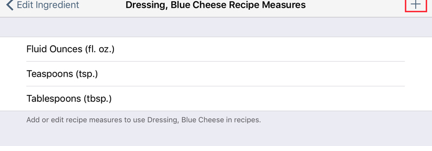
7. Tap Recipe Measure then tap the Add + icon at the top right to set up the actual measures you’ll use for your salads. For example, Fluid Ounces, Teaspoons, and/or Tablespoons.
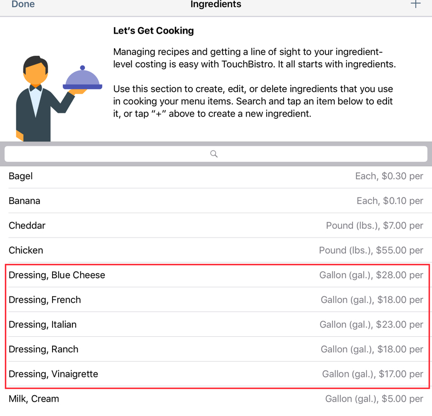
8. Add your remaining dressings. As you can see, by using the [category], [item name], it helps group related ingredients together.
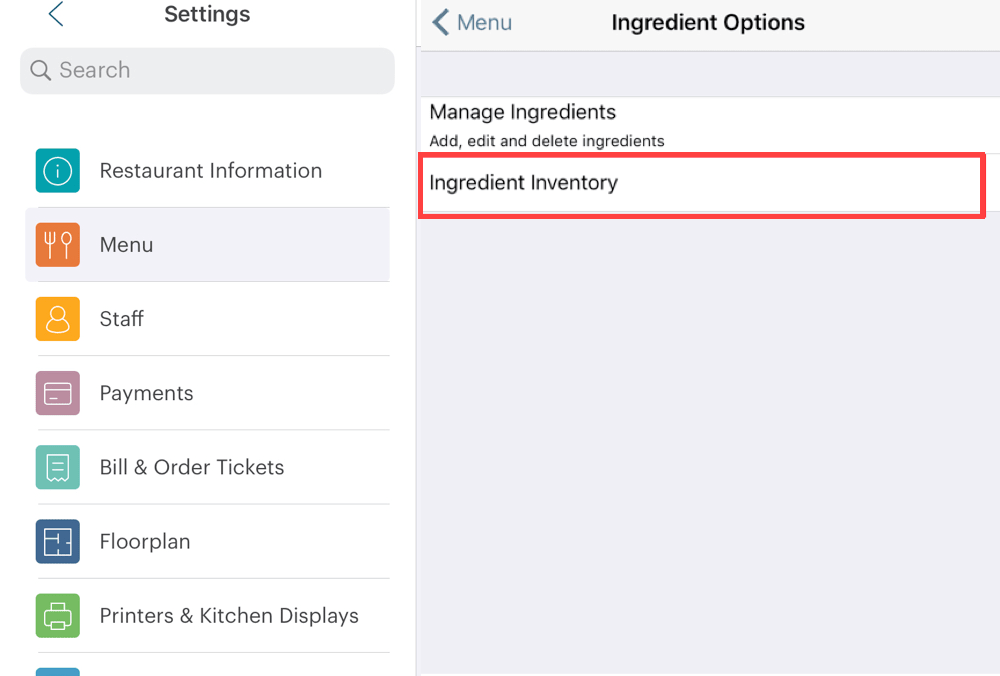
9. Finally, tap Ingredient Inventory.
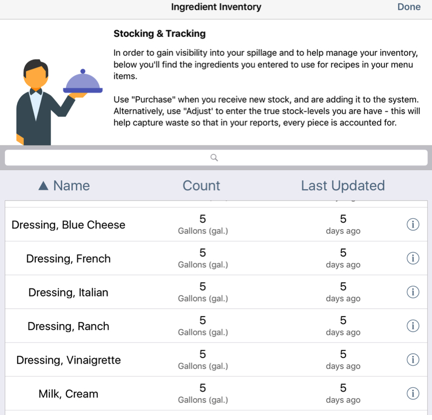
10. Tap each of your dressings and complete how much stock you have (for example 5 gallons).
Section 2. Set Up a Hidden Menu Category
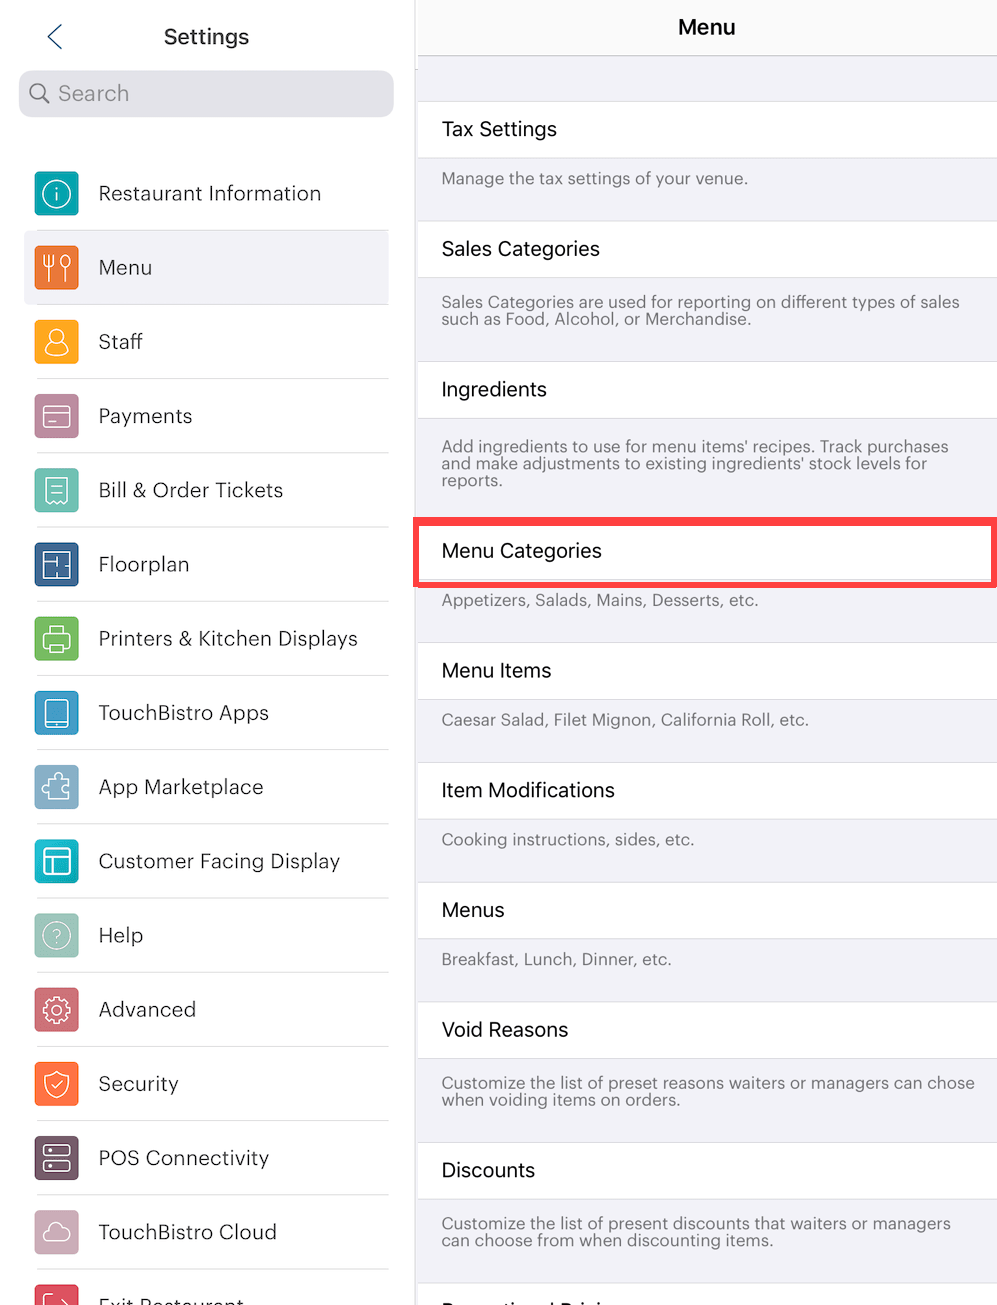
1. Return to the Menu screen and tap Menu Categories.
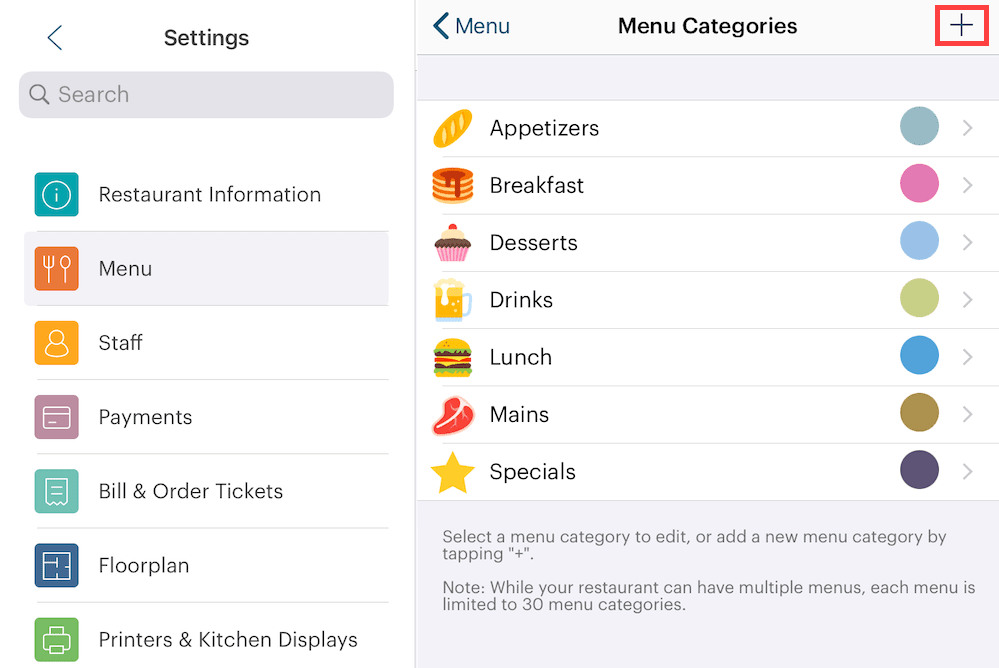
2. Tap the Add + icon at the top right to create a new Menu Category.
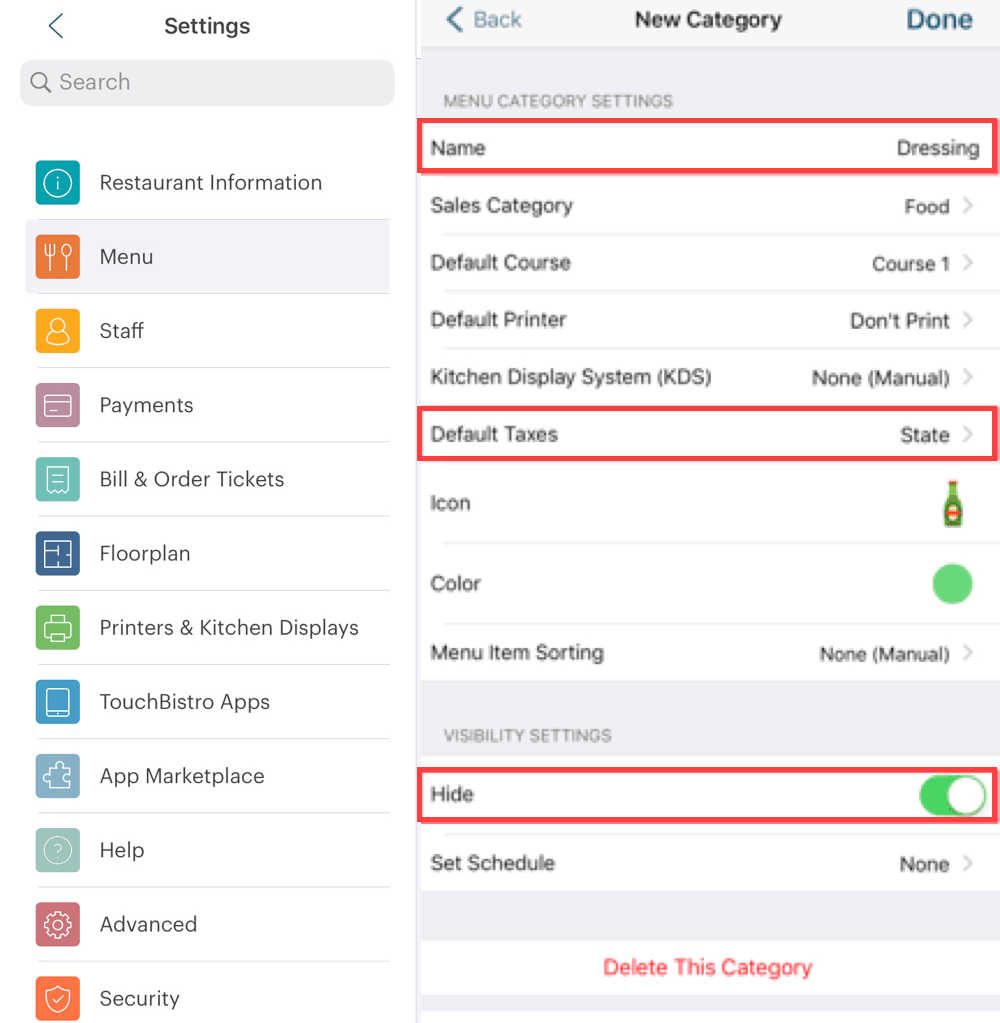
3. Give your Menu Category a name like Dressing.
4. You do not have to set a printer/KDS or course.
5. Set the appropriate food tax, even if your modifiers will all be $0 upcharges. You may at a later date add a premium dressing with an upcharge and you will want the tax to be applied to that.
6. Slide Hide to the green position.
7. Tap Done to save this Menu Category.
Section 3. Set Up Your Modifiers as Menu Items

1. Tap Menu Items.
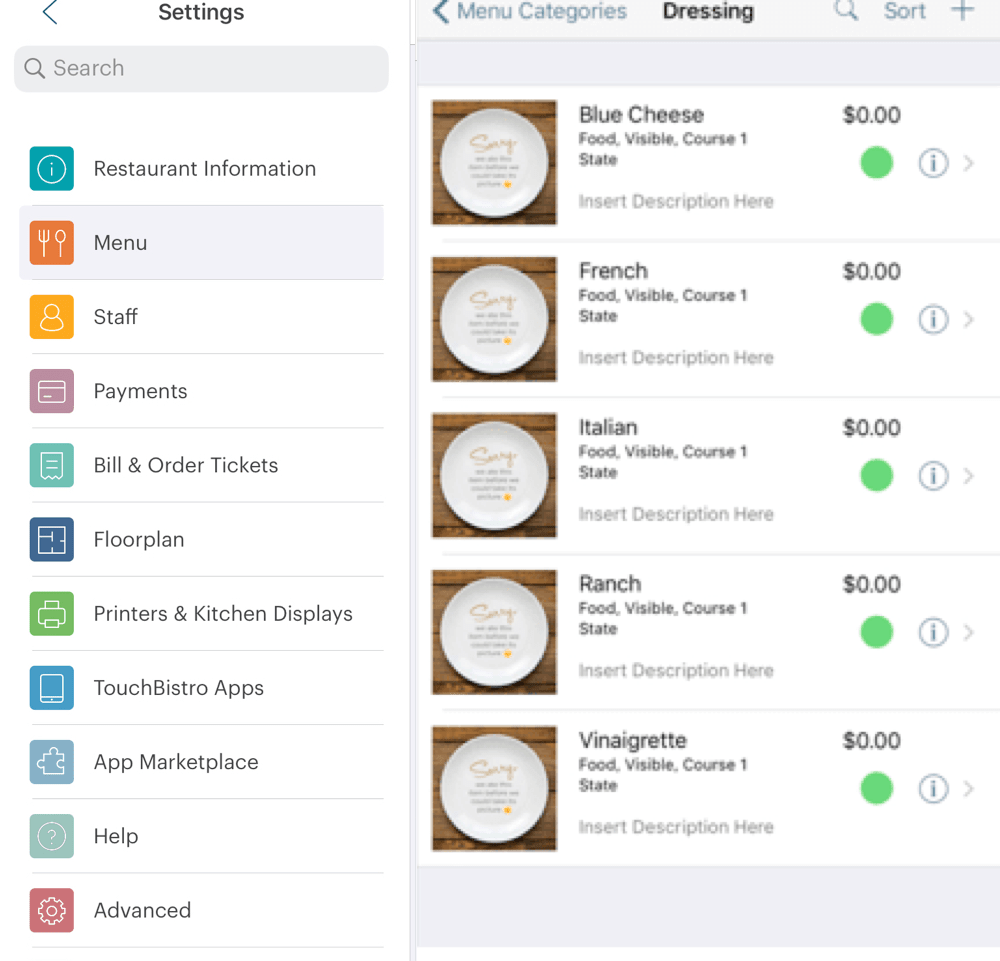
2. Tap your Dressing category.
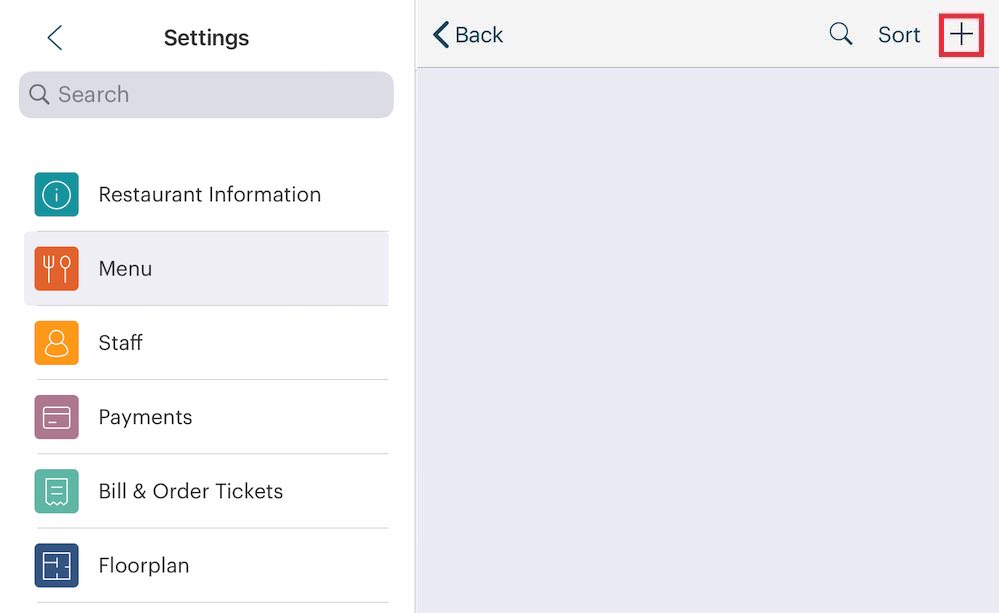
3. Tap the Add + icon at the top right.
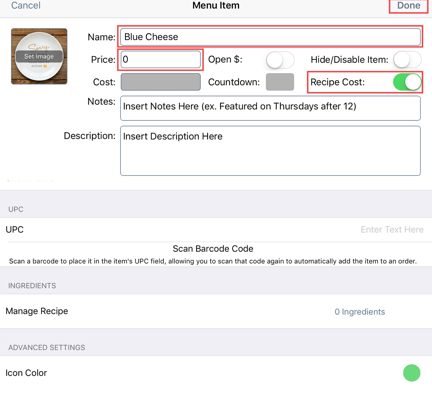
4. Enter the name of your first dressing (“Blue Cheese”).
5. Set the price to $0.
6. Slide Recipe Cost to the green position.
7. You can leave the image unset as this menu item will not be visible to the server.
8. Tap Done to save this item.
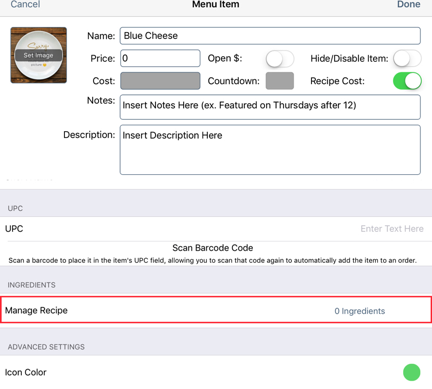
9. Re open it and tap on Manage Recipe. (You can’t manage the recipe until you actually create and save the item.)
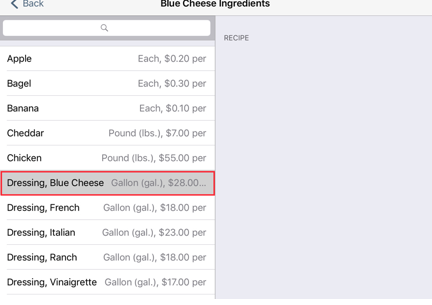
10. Tap your blue cheese ingredient.
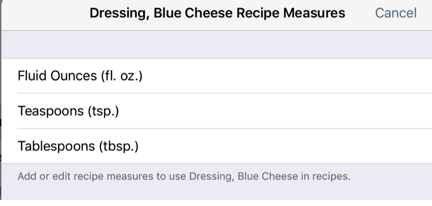
11. Select a Recipe Measure (for example tablespoons).
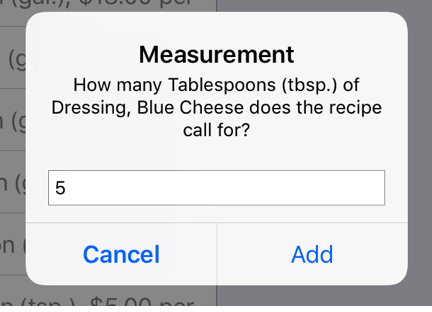
12. Enter how many tablespoons of dressing you use per salad.
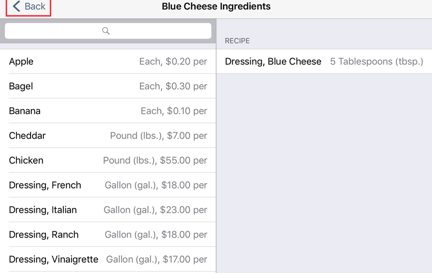
13. Tap Back.
14. Tap Done to save these changes.
15. Add all your other dressings as menu items and complete its Manage Recipe section.
Section 4. Set Up Your Modification
1. Return to the Menu page and page Item Modifications.
2. Tap Add to add a new Modifier Group.
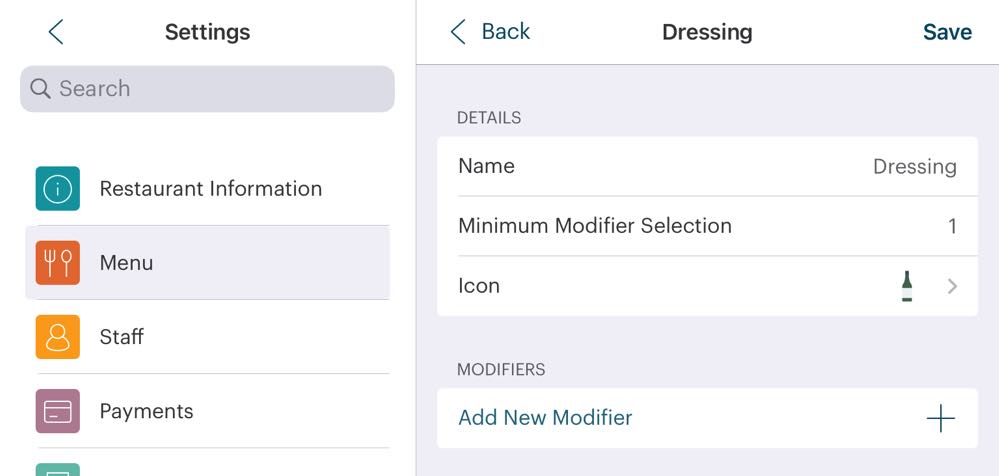
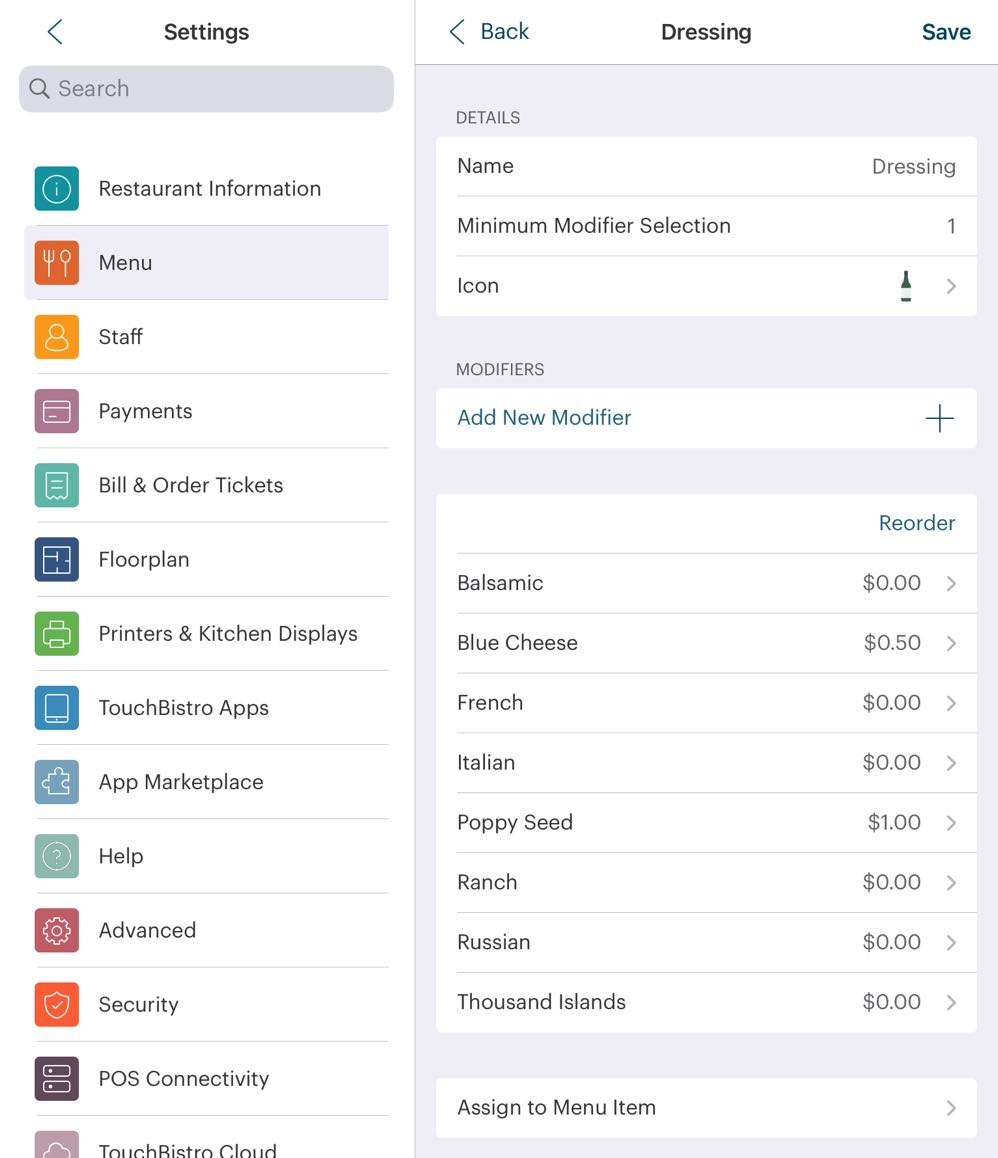
3. Name the Modifier Group “Salad Dressing”.
4. Give it a 1 to make it a forced modifier and tap Icon to select an icon to represent this Modifier Group.
5. Tap the Add + icon and tap Add Menu Modifier.
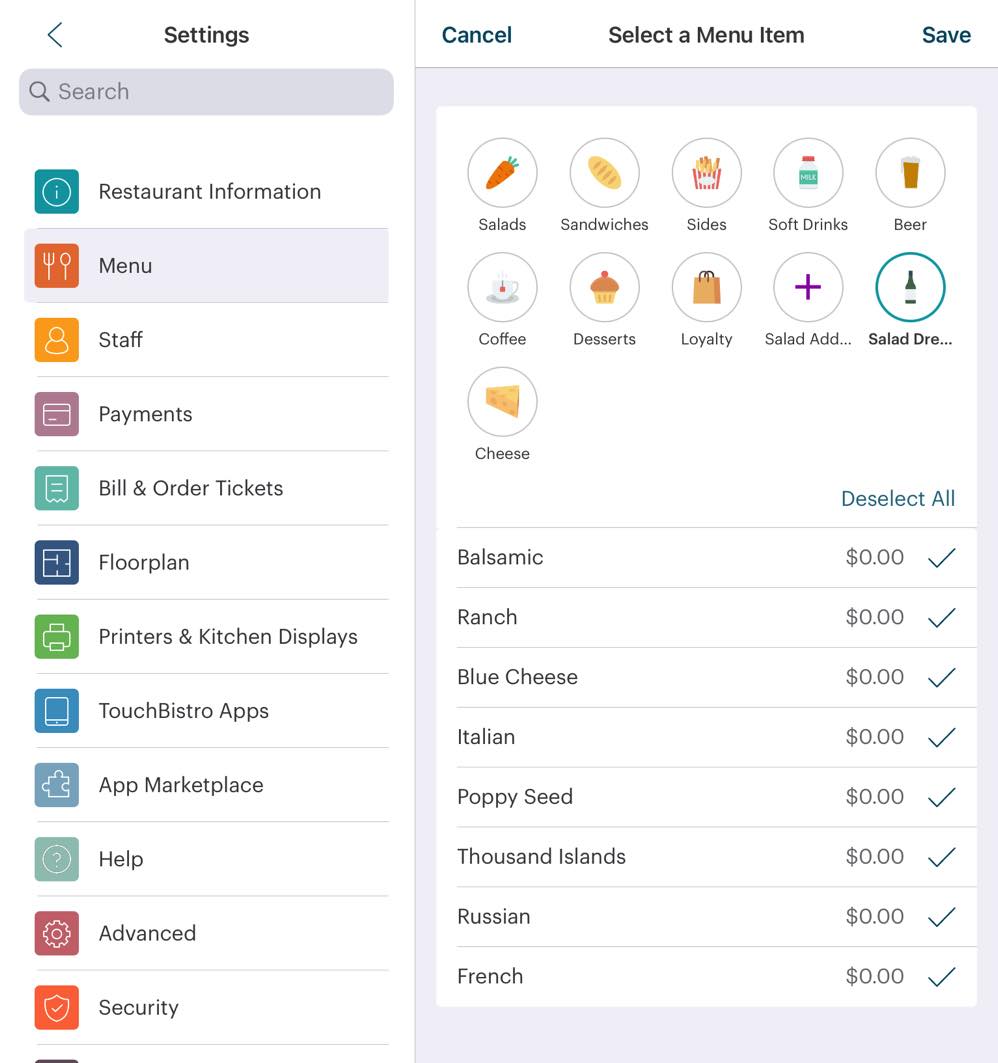
6. Tap the Dressings Menu Category and then select all your dressing menu items. Tap Save.
7. If you need to set any of your dressings for an upcharge, tap it and set the upcharge.
9. Tap Assign to Menu Items.
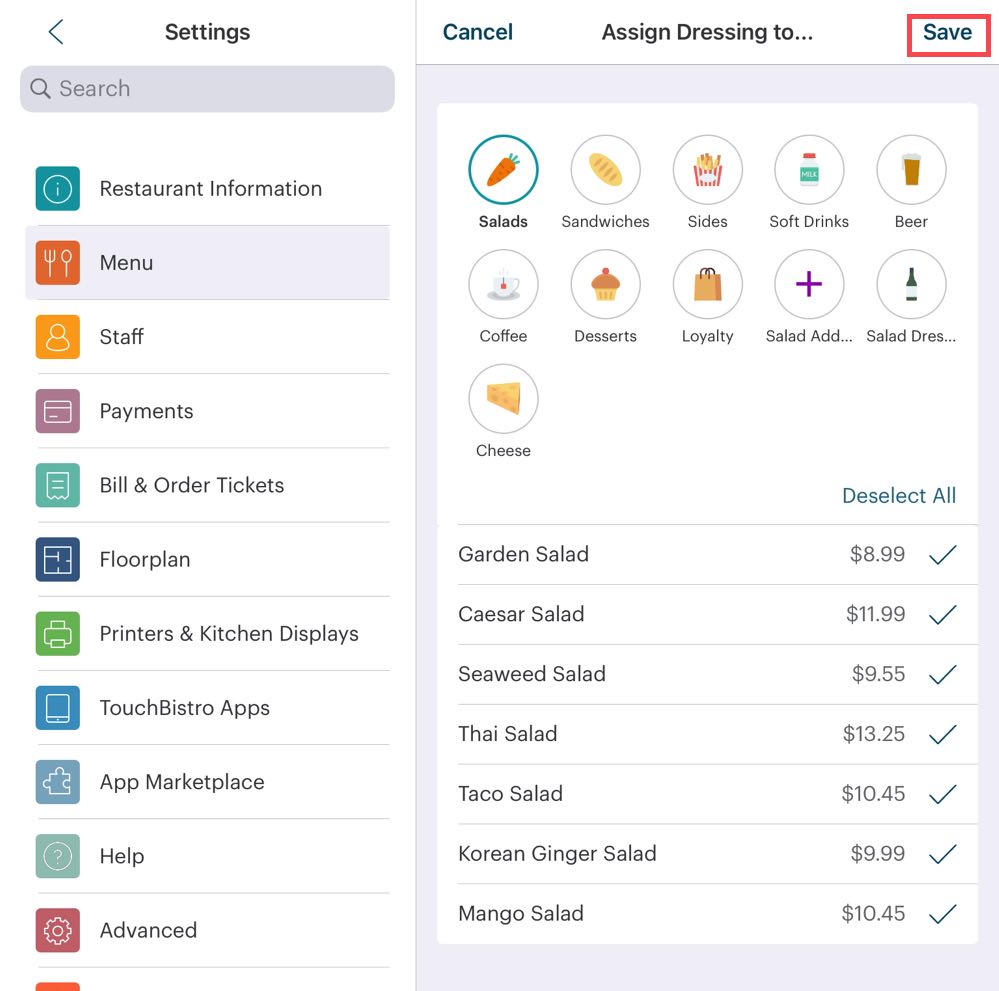
10. Select the menu items this Modifier Group should apply to and then tap Save.
Section 5. Example
Here we’ll see how are hidden dressing menu items are used as modifiers and how it affects inventory.
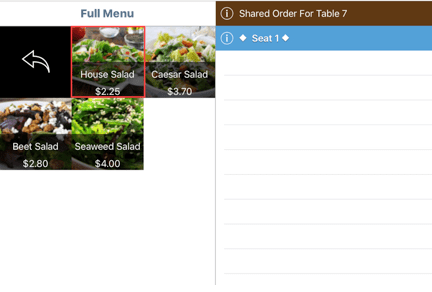
1. Start an order and select a salad.
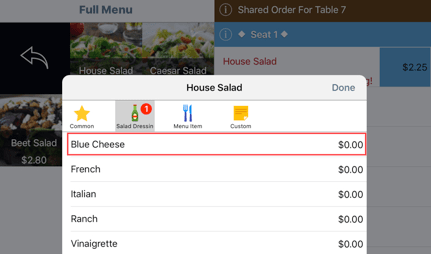
2. Select a dressing modifier, like Blue Cheese.
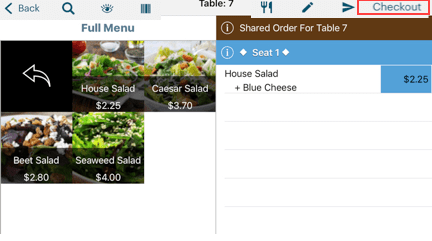
3. Check out and pay for the order.
4. Return to Admin | Admin Settings | Menu | Ingredients.
5. Tap Ingredient Inventory.
6. You will see your Blue Cheese dressing has had inventory deducted. It was previously five gallons. Now it is 5 tablespoons less.