Reservations – Settings
Table Of Contents
Section 1. Create a Configuration
Section 2. Exceptional Schedules
1) Other Examples of Exceptional schedules
Chapter 5. Employee & security
Section 1. Adding a New Employee
Section 1. Predefined notes for bookings
Section 2. Your predefined notes for customers
Section 3. Predefined Answers for customer requests
Section 6. First input field for new booking
Section 8. Table Turn Time Timer
Section 9. Colors and table statuses
Section 1. View your profile and integrate Bookenda to your website
Section 2. Customize your online booking options
2) Allow to find next available
3) Allow customer to be added to the wait list
4) Show this message to the client
Section 3. Message to show customers who book online
Section 4. Choices available for online reservations
Chapter 11. Booking Importation
Chapter 1. Introduction
The Settings tool lets you configure a number of aspects of your venue. You will need to have Admin rights to access this tool.
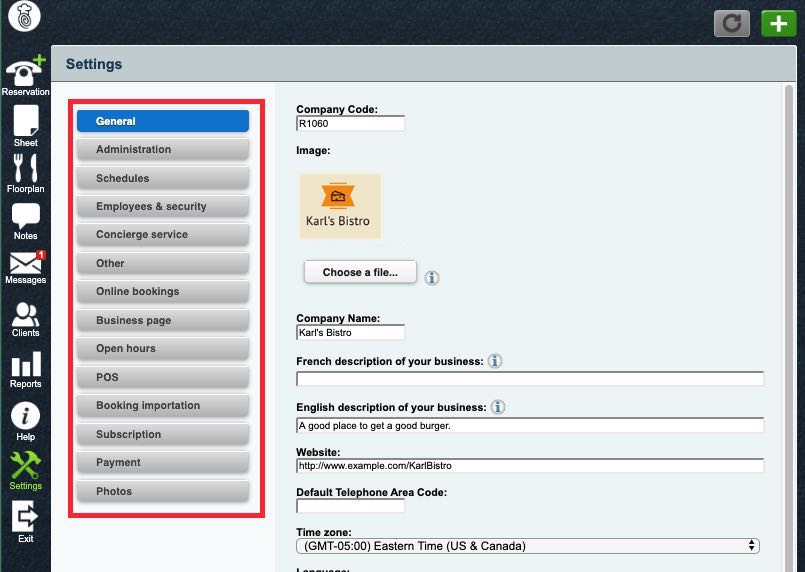
When you click Settings, you have a choice of areas you can configure. Click one.
Note: if you receive the message you cannot access settings because you are not an admin, but you have used your Admin passcode to activate your profile, it is likely TouchBistro Reservations was opened from the sign-in page by an employee given a password. Click Exit, sign out, and then sign back in with your admin user name and password (not passcode).
Chapter 2. General
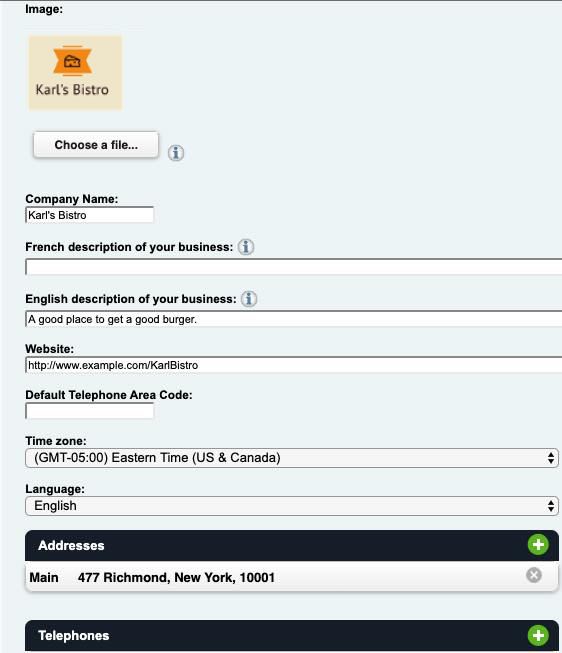
General lets you modify aspects of your venue for your business page and your own reservation page. Many of these items are public facing:
|
Option
|
Description
|
|
Image
|
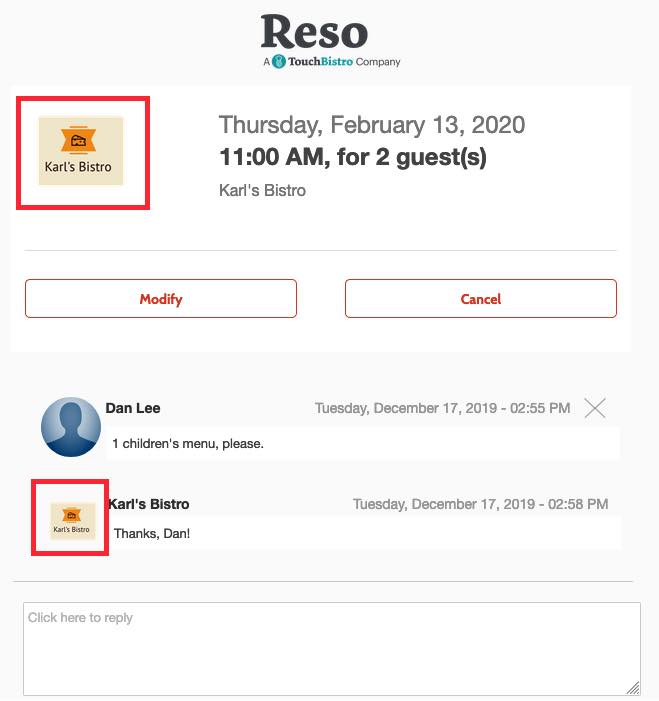
You should upload your venue’s logo.
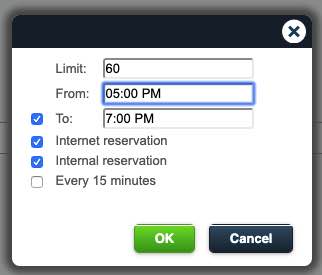
This image is used on your customer’s chat page. Note, the Photos section controls the image on your business page.
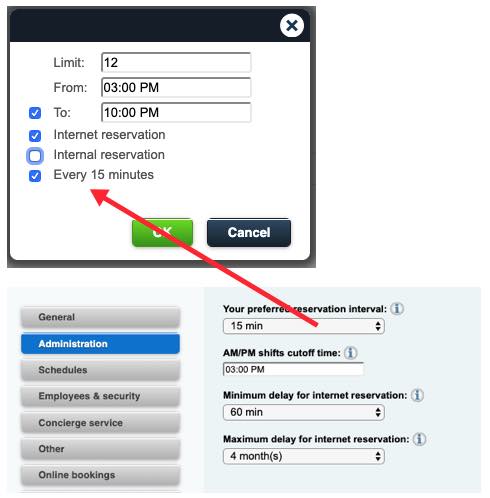
|
|
French/English description of your business
|
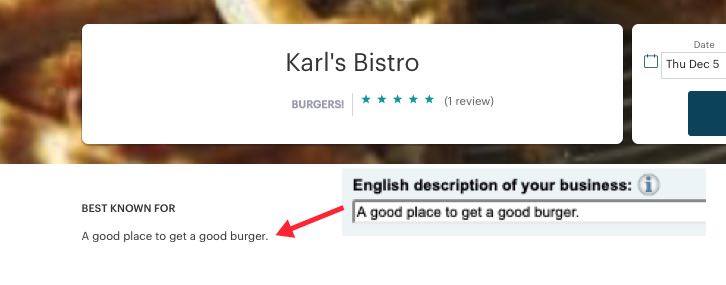
Your description will appear on your business page under BEST KNOWN FOR.
|
|
Website
|
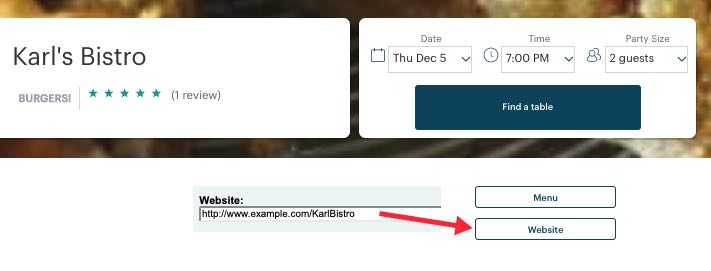
Your URL will be linked to the Website button on your business page.
|
|
Address
|
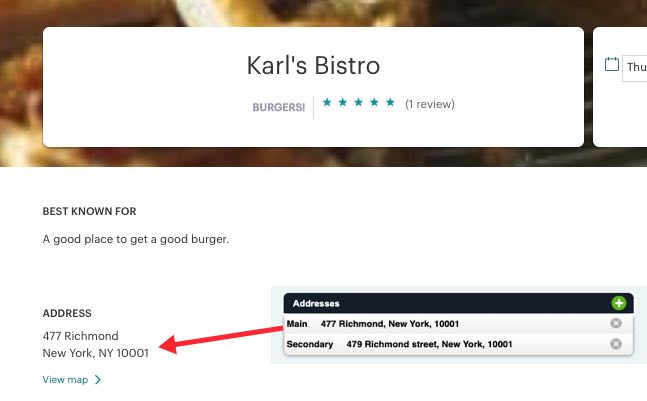
You can enter multiple addresses here but only your Main address will be used on your business page.
|
|
Telephone
|
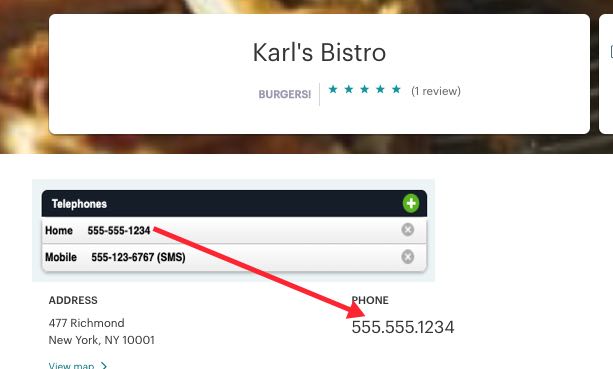
You can enter multiple phone numbers but only the first number on this list will be used on your business page.
|
|
|
This email is used internally by the system to send you alerts about new reservations, cancellations, etc. It is not made public.
|
|
Categories and cuisine types
|
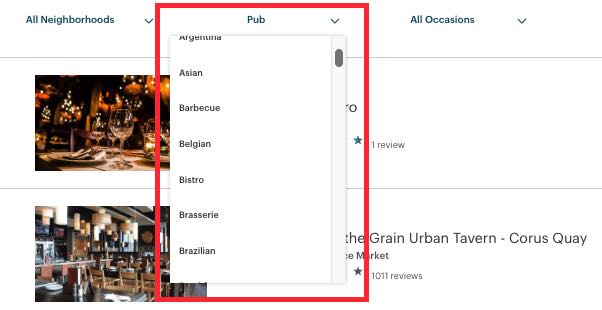
This affects how customers find you when a customer filters by cuisine type on TouchBistro Dine.
|
Chapter 3. Administration
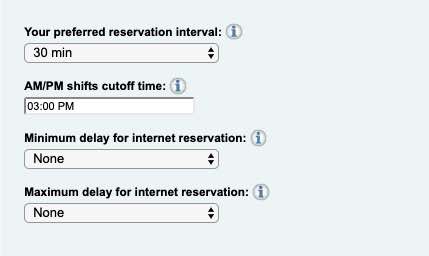
Administration lets you configure the following:
|
Option
|
Description
|
|
Your Preferred Reservation Interval
|
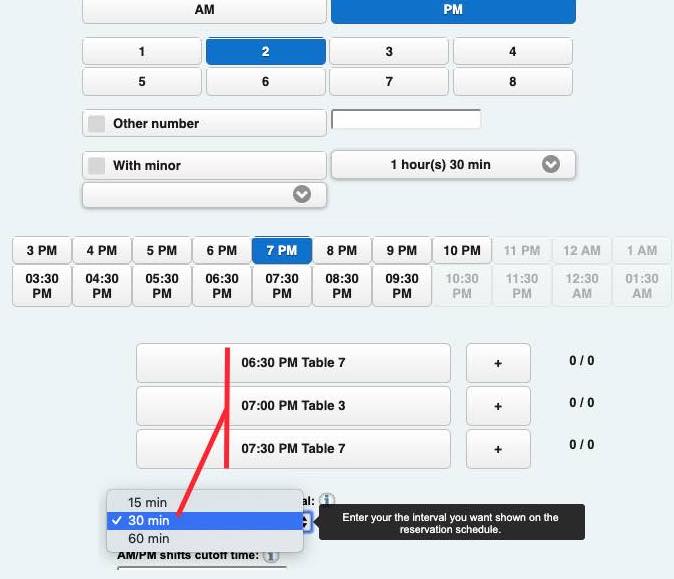
By default, this is set to 30 minutes. That is, a customer can reserve a table at the preferred time but also be offered a table 30 minutes before or 30 minutes after the desired time.
In the pictured example above, the interval is set to 30 minutes. The Reservation tool will suggest reservation alternate table times 30 minutes on either side of the desired 7 pm reservation time. You can change this to a 60-minute interval. This allows a customer to reserve only on the hour (e.g., 7 pm, 8 pm, 9 pm, etc.).
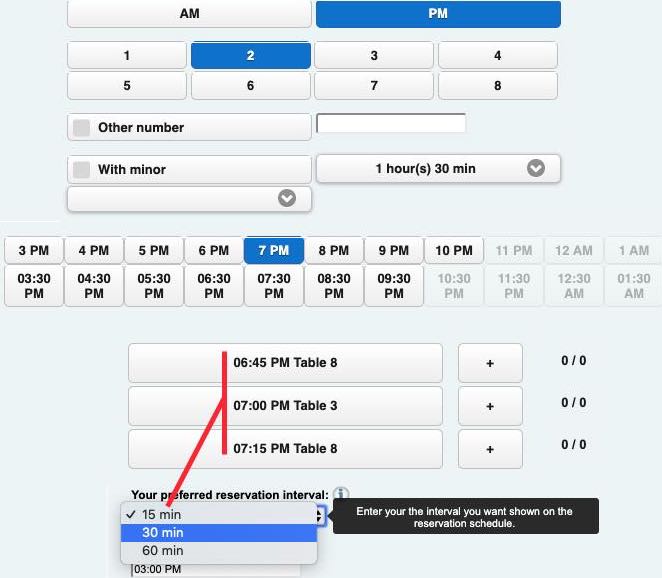
You can also set the reservation interval to a 15-minute interval. That is, a customer can reserve a table 15-minutes on either side of the desired reservation time.
|
|
AM/PM Shifts Cutoff Time
|
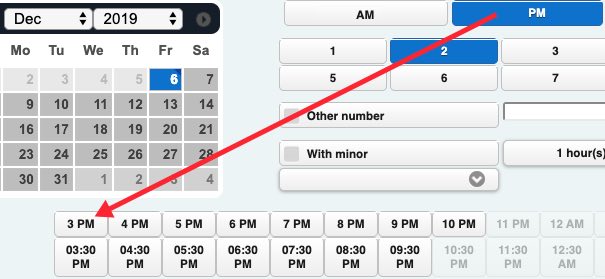
Click to select the hour at which your AM timeslot ends. By default, TouchBistro Reservations sets the cut off at 3 pm. After 3 pm, reservations are grouped under the PM timeslot.
In the pictured example, when making a reservation, if we select the PM timeslot, reservation blocks start at 3 pm.
|
|
Minimum Delay for Internet Reservation
|
Click the drop-down box to select how much in advance a customer can book at a certain date and time using online reservation options. For example, if you set this to 30 minutes, a customer cannot book a 7 pm table at 6:45 pm. The customer would have to book the table at least 30 minutes before the desired time. You can use this if you prefer customers do not make last-minute reservations.
|
|
Maximum Delay for Internet Reservation
|
Click the drop-down box to select a limit to how far in advance a customer can book a table. For example, if you set this to 6 months, a customer cannot book a table for any date more than 6 months into the future. So a customer on, say, Feb 14, 2019 can’t book a table online for Feb 14, 2020.
|
Chapter 4. Schedules
The Schedules section is where you define table availability.
Section 1. Create a Configuration
A Configuration defines what tables are available for reservations. Typically, you might create one for the AM timeslot and one for the PM timeslot. Before creating any specific Configuration, we recommend first creating a Template configuration. The Template is set for common settings. When you create a more specific Configuration, you can then use the Template as the basis.
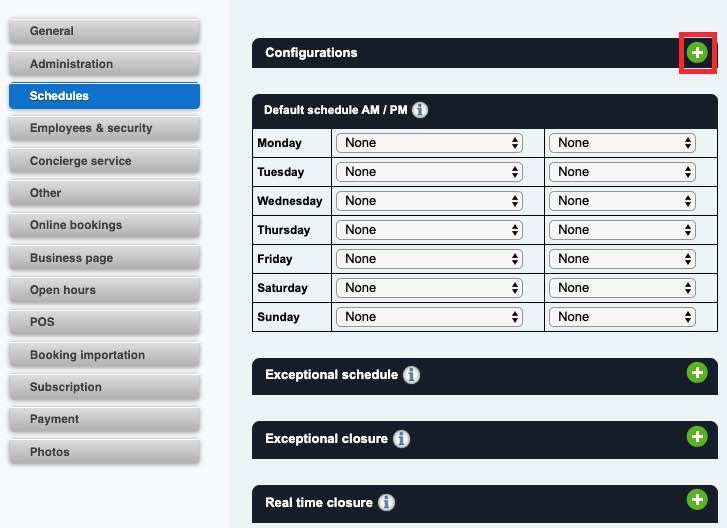
1. Click the Add + icon at the top right.
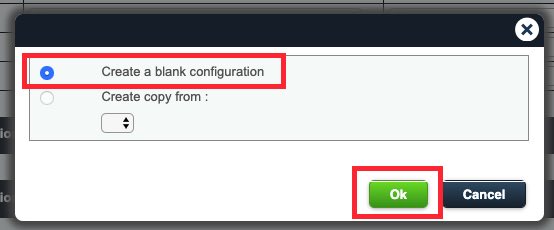
2. Click Create a blank configuration and click Ok.
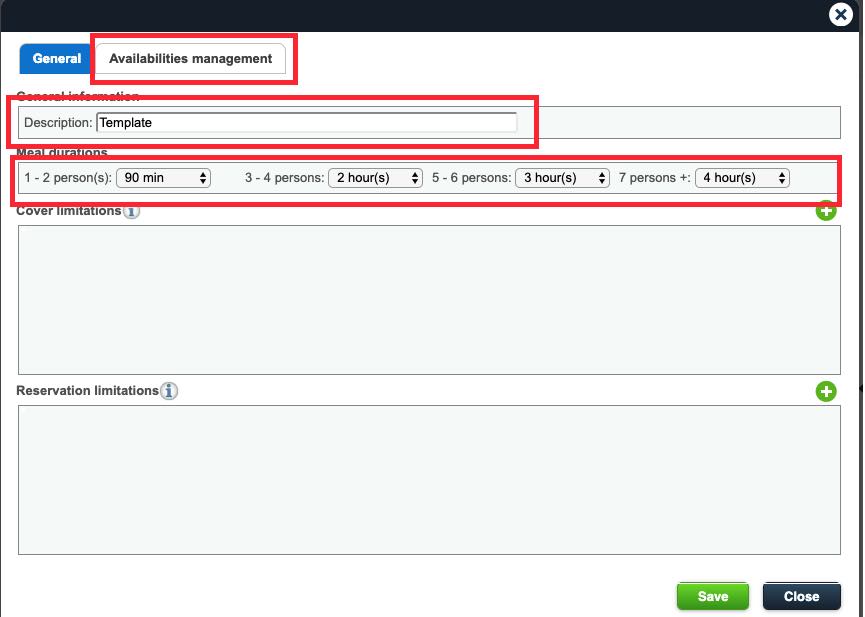
3. In the Description field enter Template.
4. Use the Meal duration drop-down boxes to select the default table turn times based on party size. For example, we expect a party of 2 to occupy the table for 90 minutes. A party of 4 might occupy the table for 2 hours. A party of 6 might occupy the table for 3 hours. Very large parties (7+) could occupy the table for 4 hours.
5. Click the Availability management tab.
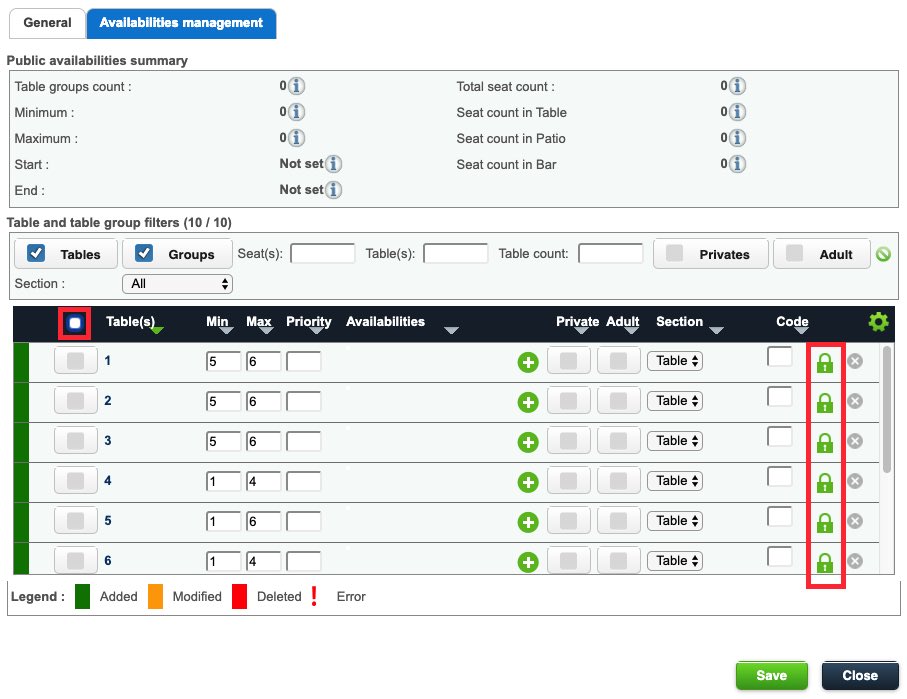
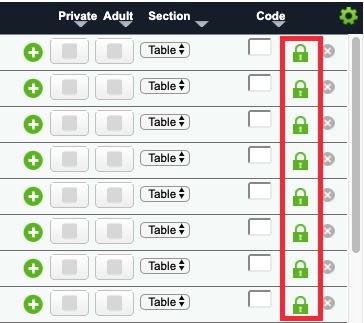
6. By default, all tables start off as locked. If a table is locked, it will not be available for booking (online or over the phone). We’ll unlock all the tables. Click the checkbox above the table numbers.
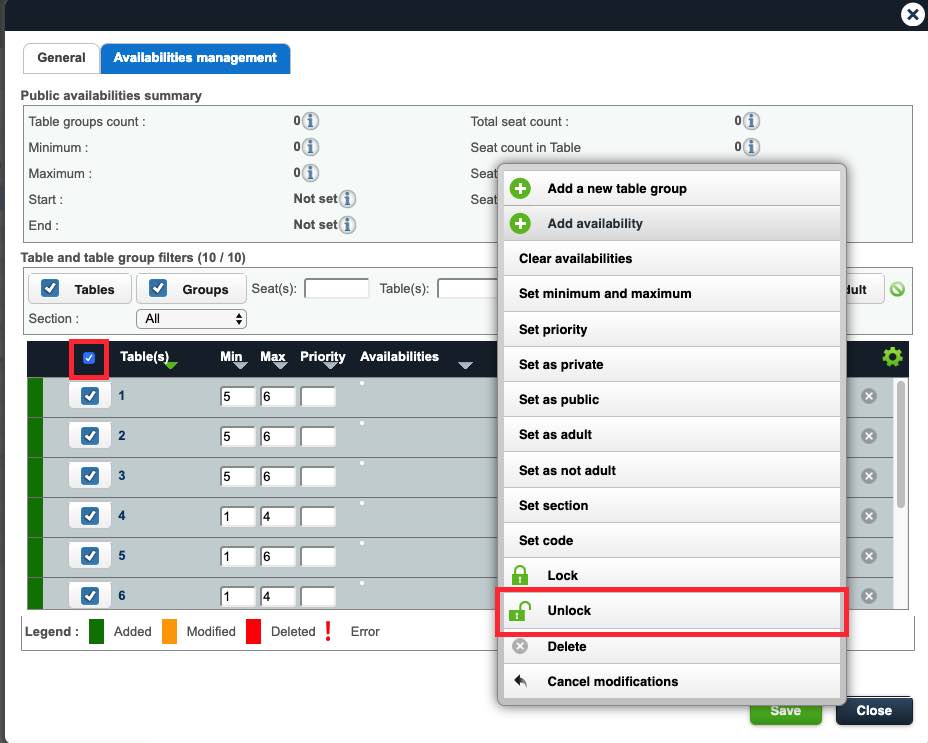
7. Click the Gear icon and then click Unlock.
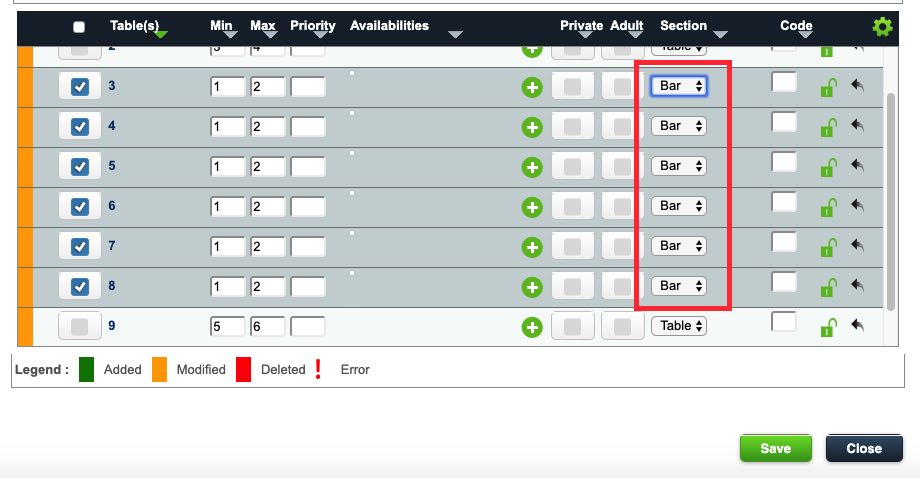
8. If you have sections (a patio area, a bar area, etc.) you can the Section drop-down box and then set tables for their proper section.
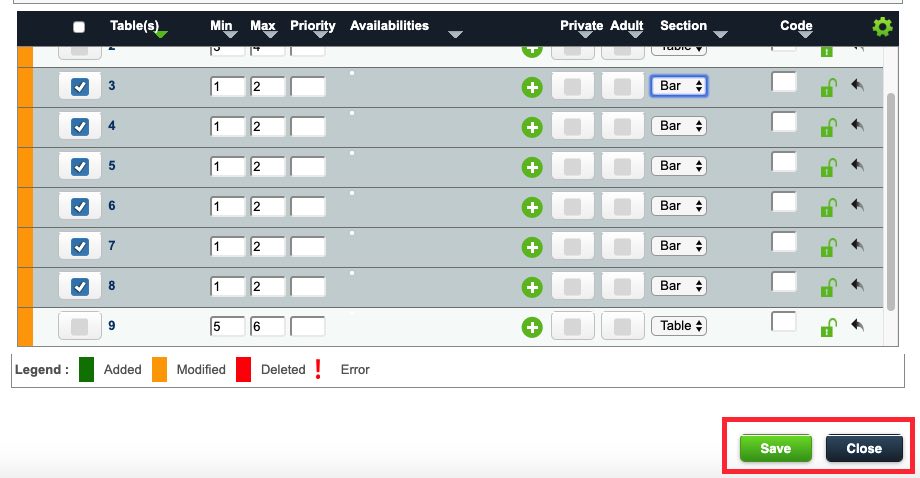
9. Click Save to save your Template configuration and then click Close.
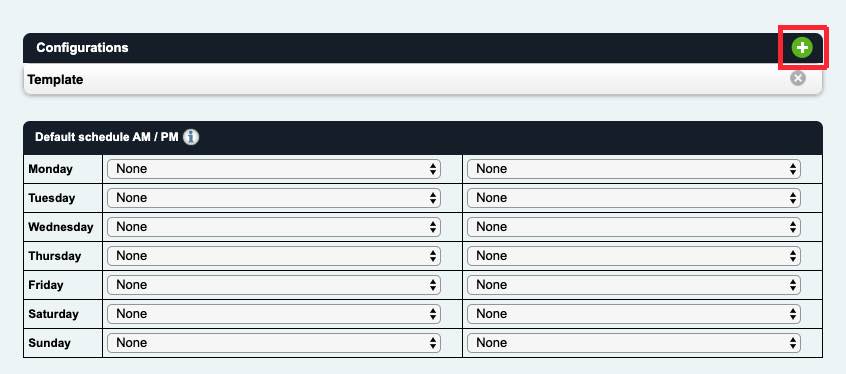
10. Now that your Template configuration is done, you can add your actual configurations. We will create Configurations to represent our AM and PM timeslots. So click the Add + icon at the top right.
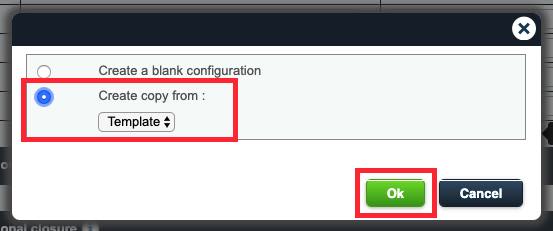
11. Click Create copy from and select Template. Click Ok.
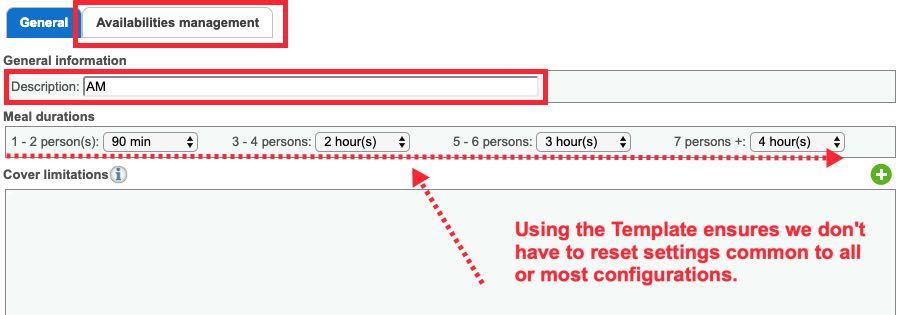
12. Give this template the name AM. You’ll notice since we created from the Template configuration, there is no need to reset Meal durations. Click Availabilities management.
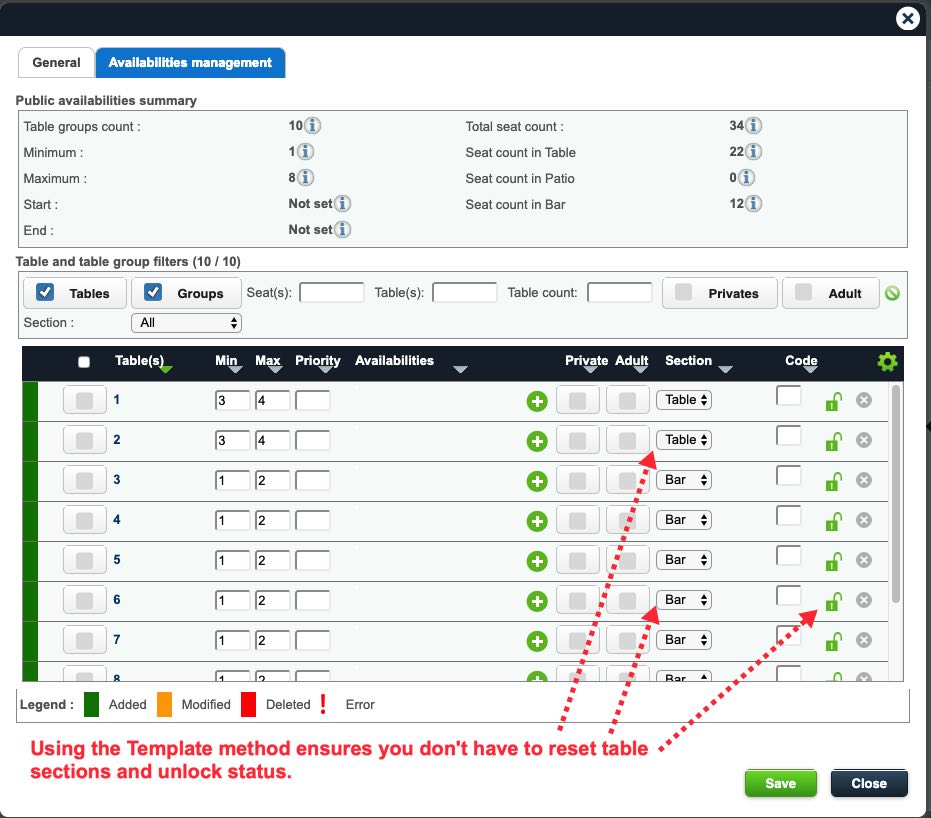
13. Again, we can see by using the template we don’t have to reset tables to unlocked. As well, tables we set for different sections are preset when using the Template configuration. On this screen, we can now tailor presets to the AM configuration.
14. Since this configuration is intended to cover the opening – 3 PM time slot, we need to adjust table availability. Again, select some or all the tables and then click the Gear icon.
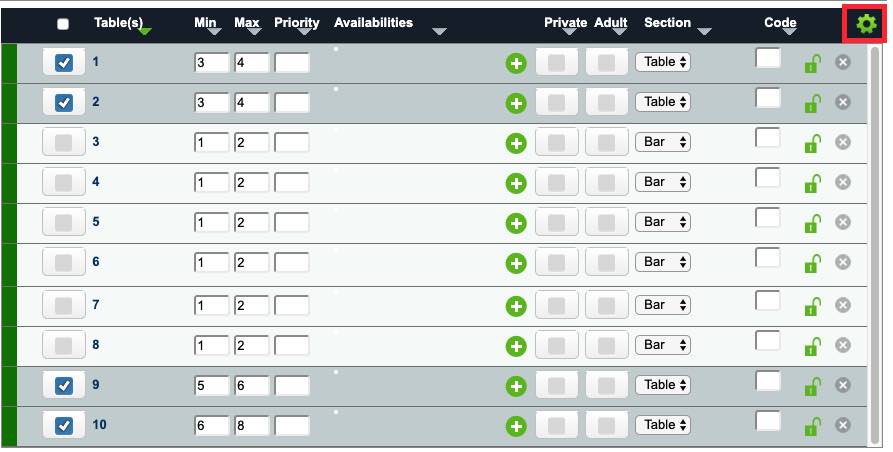
15. In this example, we’re only going to select Table section tables and not the Bar section tables. For our AM timeslot, we do not open the bar area (tables on the second floor). So we’ll only set availability for non-bar tables.
16. Click the Gear icon.
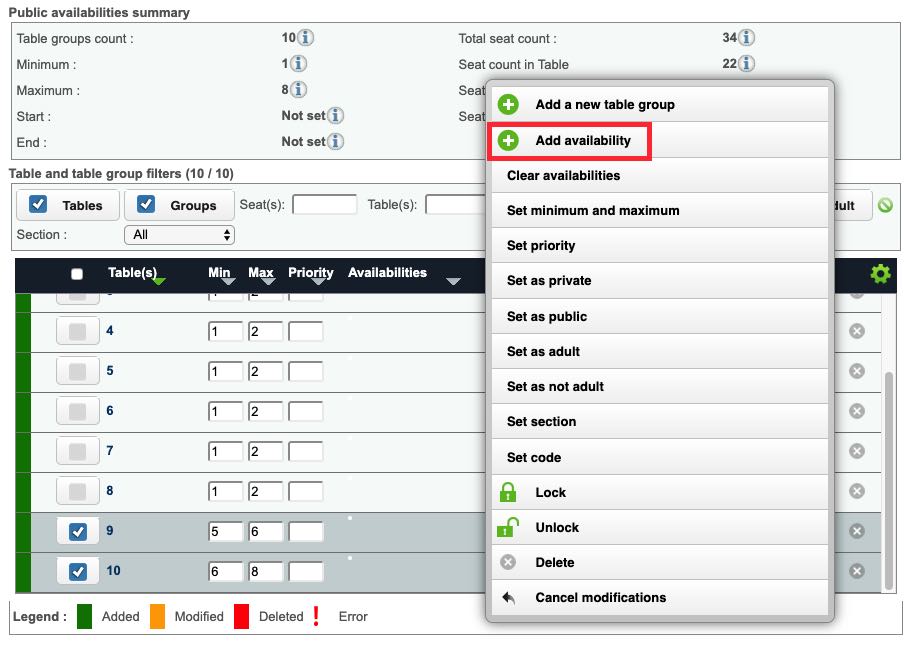
17. Click Add availability.
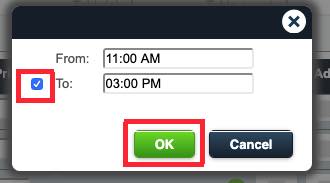
18. Click the From field and enter your start time. For example, your AM timeslot is from 11 am (doors open) until 3 pm. Click the checkbox next to To and then enter the end time of your AM timeslot. For example, enter 3 pm. Click OK.
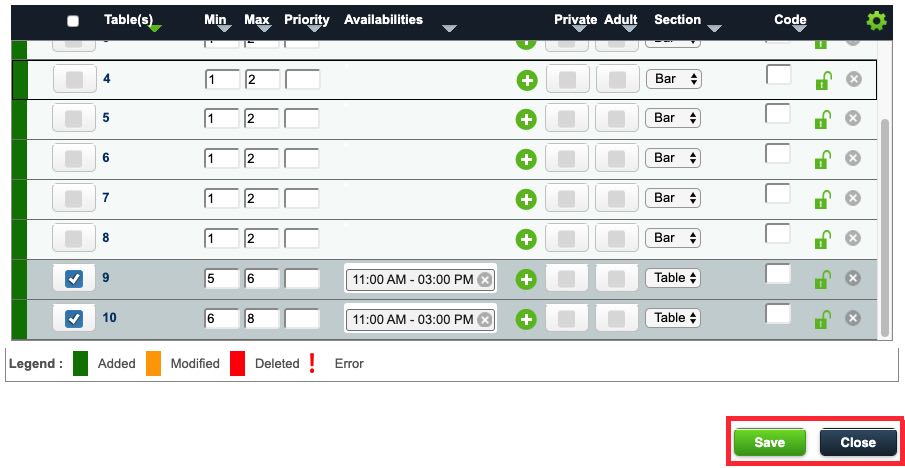
19. Click Save and then Close.
20. You can now repeat this process and create a PM configuration.

21. Click Create copy from and select Template. Click Ok.

22. Give this template the name PM. Click Availabilities management.
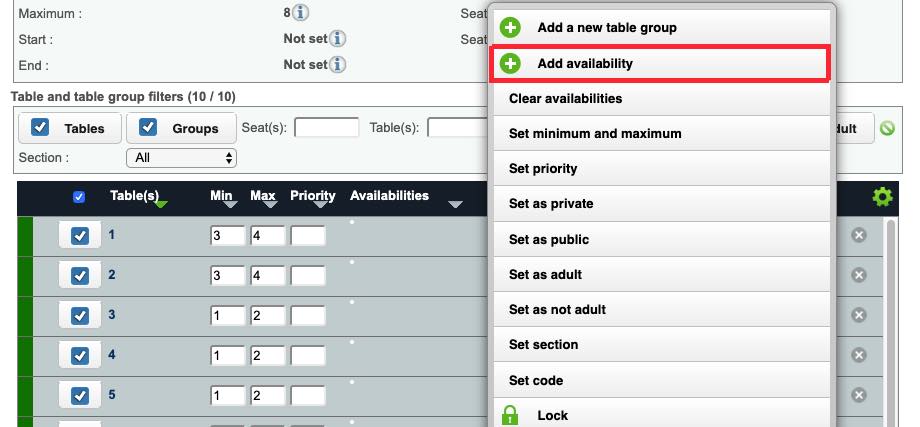
23. Select all the tables, click the Gear icon, and click Add availability.
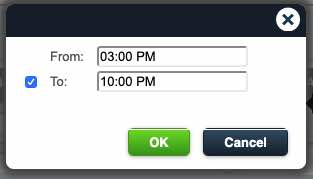
24. Set your PM timeslot from the end of the AM timeslot (i.e., 3 pm) and then select the last time you want to take a reservation. For example, if you close at 11 pm but you won’t book a table after 10 pm, select 10 pm for the To: time. Click OK.
25. For our PM (or even our AM) timeslot, we might want to accommodate larger parties by automatically making two or more tables available for one reservation.
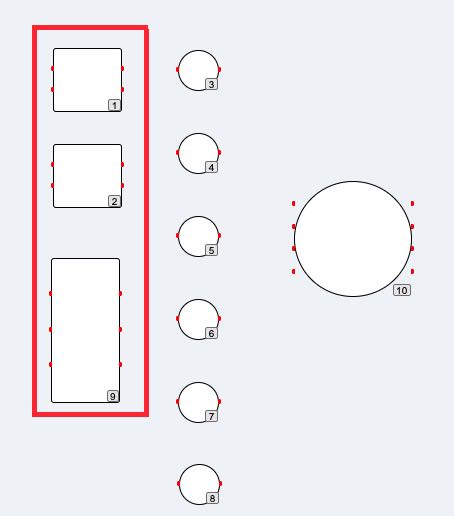
26. If we look at our existing floorplan, we can see tables 1 to 2 could be pushed together to accommodate larger parties. For example, a party of 8 could be accommodated by pushing tables 1 and 2 together. A party of up to 14 could be accommodated by pushing tables 1, 2, and 3 together.
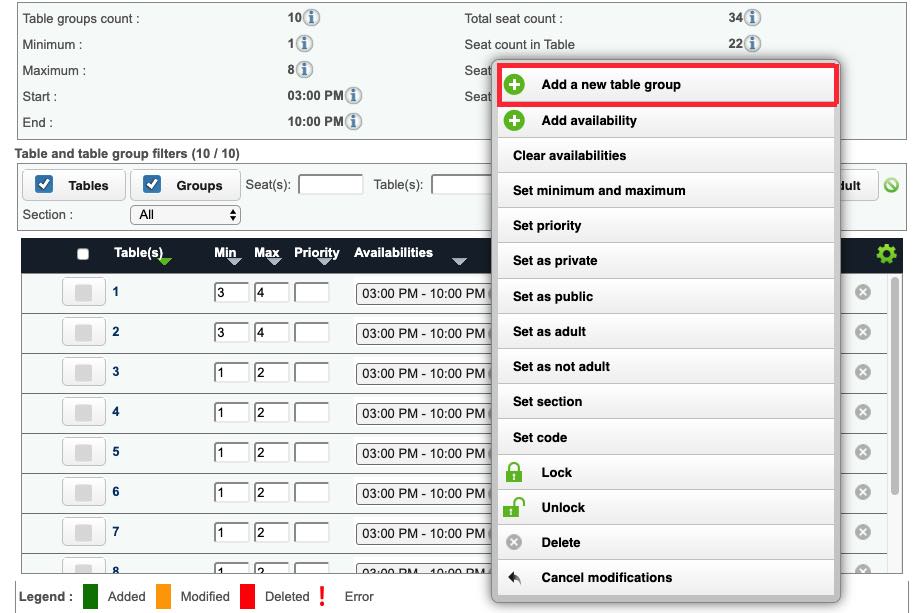
27. To enable TouchBistro Reservations to allow larger party sizes if it finds free tables capable of being pushed together, click the Gear icon and then click Add a new table group.
28. Enter your first group. Check 1 and 2 then click Save.
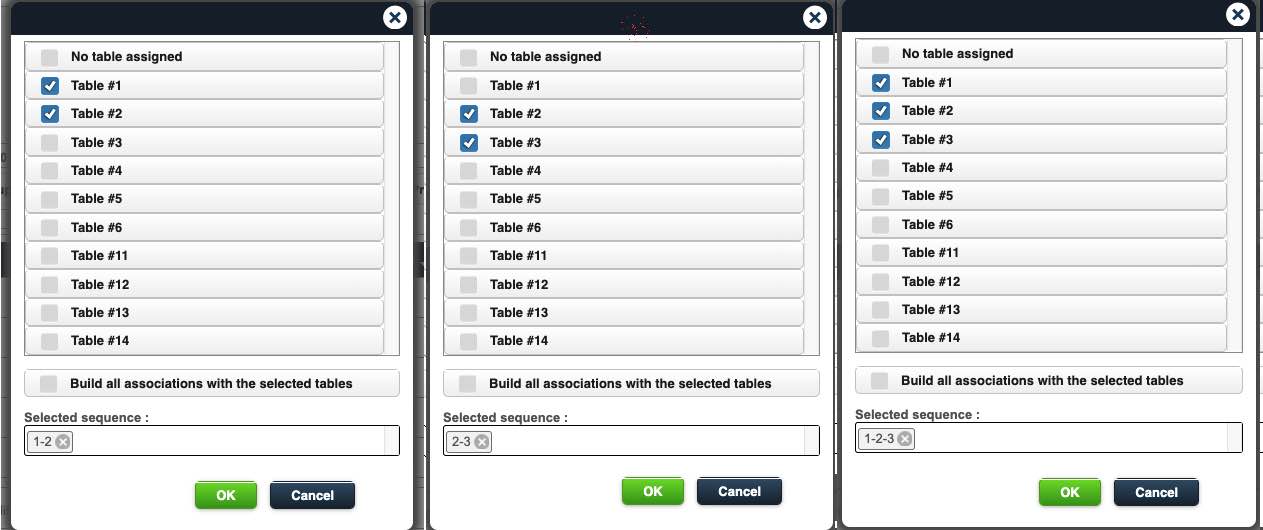
29. Repeat for tables 2 and 3 and then tables 1, 2, and 3.
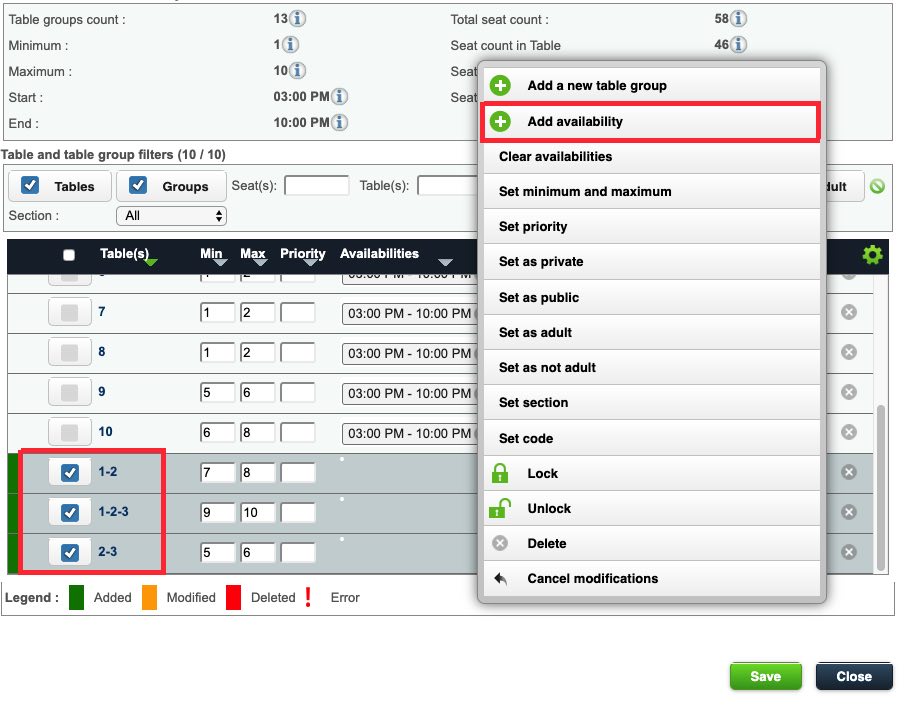
30. Scroll down. You will see your table groups. None yet have Availability set so check each of them and then select Add availability.
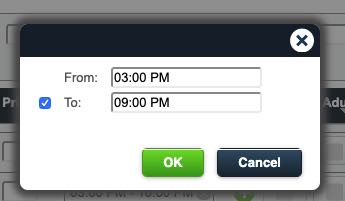
31. Enter your PM timeslot start and the last time you want to take a reservation. Normally, our single tables can be reserved up until 10 pm. However, since these table groups will be reserved necessarily by very large parties, you might want to set the last reservation to a slightly earlier time (e.g., 3 pm to 9 pm).
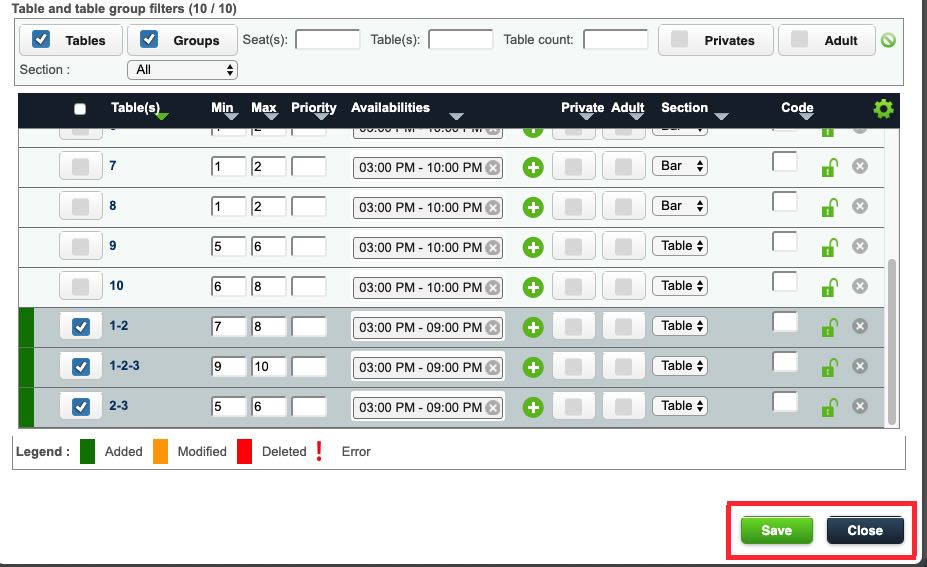
32. Adjust the Min and Max settings as necessary and click Save.
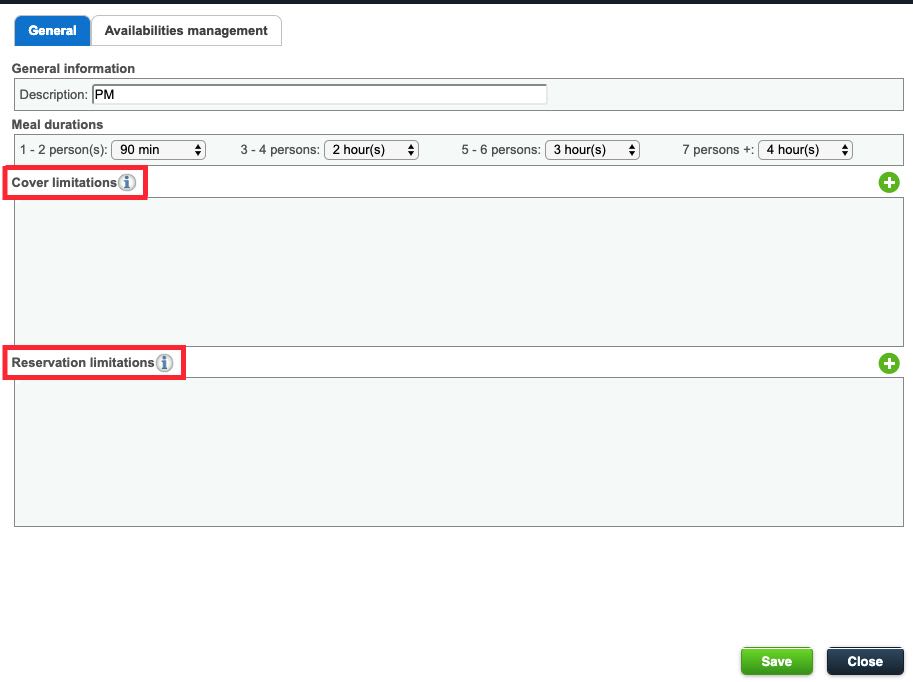
33. After clicking Close, you are returned to the General tab. Here we’ll fine tune our PM timeslot by limiting the number of covers (seats) that can be reserved and or the number of reservations that can be taken.
34. To accomplish this, click the General tab and click the Add + icon at the top right of the Cover limitations section.

35. If we clicked back to our Availabilities management tab, we can see for our PM timeslot up to 90 covers (seats) can be reserved. We may decide we don’t want every seat in our venue to be bookable. We may want to keep one-third of seats available for walk-ins.
36. After clicking the Add + icon at the top right of the Cover limitations section, we can set how many seats can be booked for the timeslot. We can set the limitations time. For example, we want this limitation to apply for only our most popular dinner hours (5-7 pm). Check Internet reservation to apply this limitation to online reservations. If you want to also apply it to phone reservations, check Internal reservations.
37. Alternatively, we limit the number of Internet or internal reservations by seat for each reservation interval between the set times. In the above example, we’ll only allow 12 seats to be reserved for every 15-minute reservation interval. If you set your preferred reservation interval for 30 minutes or 60 minutes, then this option would be Every 30 minutes or Every 60 minutes respectively.
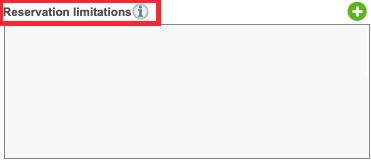
38. As another alternative, you can click the Add + icon at the top right of the Cover limitations section limit books by reservation, irrespective of covers booked.
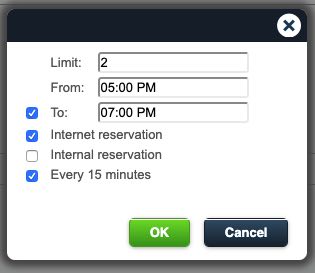
39. In the above example, we have set a limit of 2 online reservations per reservation interval.
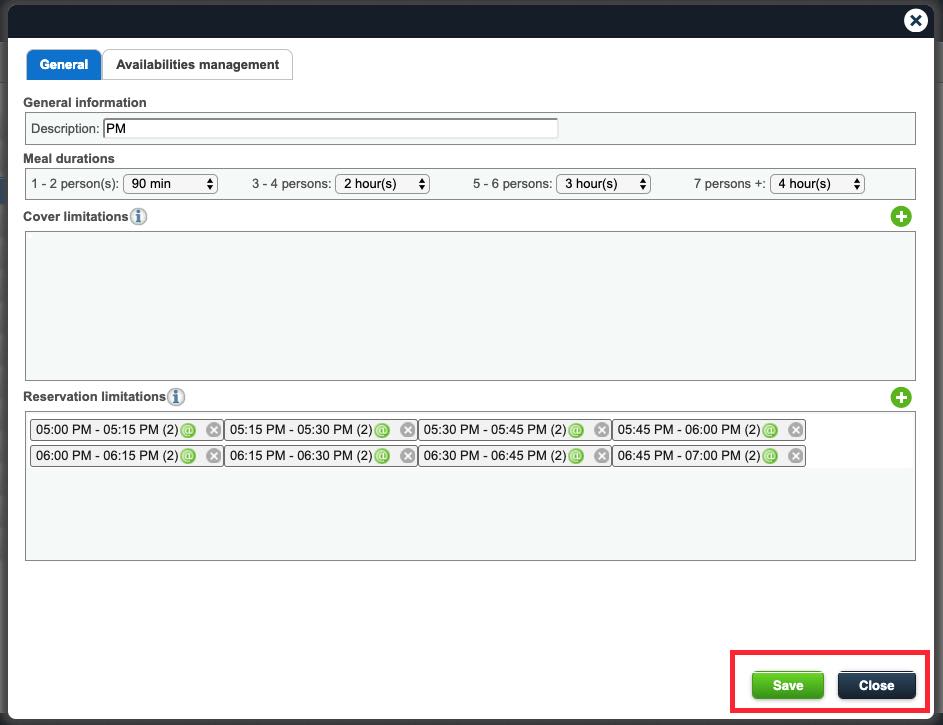
40. Click Save and then Close when you’re done.
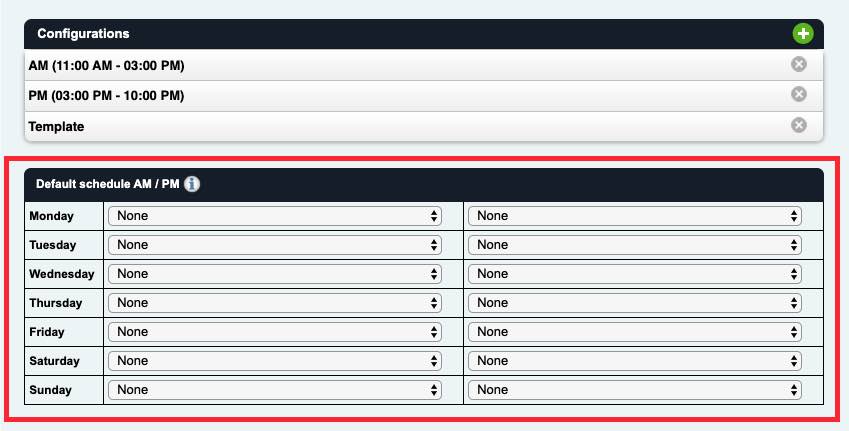
41. After creating your Configurations, you now have to indicate which configuration applies for each timeslot for each day of the week.
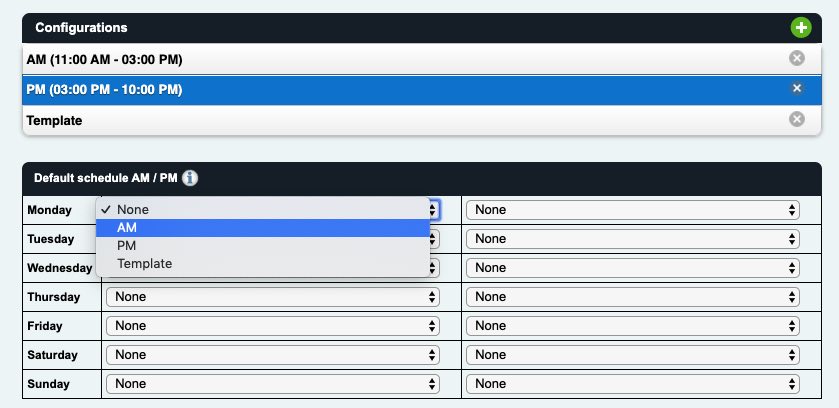
42. Click on each drop-down box and select the appropriate configuration. For example, most days your AM timeslot will be set to your AM configuration.
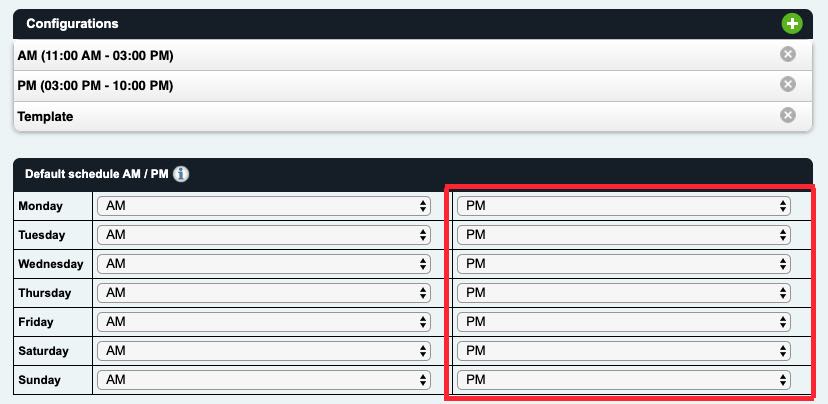
44. Likewise, your PM timeslots will be set to your PM configuration. However, you might have a Sunday brunch configuration you apply for the Sunday AM drop-down box. A Sunday Brunch configuration might, for example, eliminate the ability to reserve grouped tables. Or it might make tables available in the bar area, which are normally not reservable during weekday AM timeslots.
Your floorplan tables are now available for reservation and properly tailored for both online and phone bookings.
Section 2. Exceptional Schedules
There are times when the reservation landscape needs to change for certain days. For example, Valentine’s Day or Mother’s Day are days when you might add additional tables or you want to severely limit a large number of online bookings. To set this up, you can use the Exceptional schedule section.
But before you begin, you need to first create a configuration specific to the date.
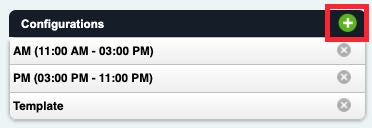
1. Click the Add + icon at the top right of the Configurations section.
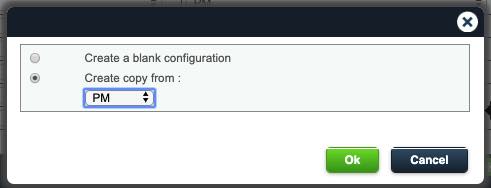
2. In the case of Valentine’s day, we’re going to base this on our PM configuration. We want to use all the PM tables available but make adjustments.

3. Give this configuration a name indicating its special use nature. For example, Valentine’s Day. You might also want to adjust typical table turn times. For example, our normal PM schedule pegs a 1-2 person reservation table turn at 1.5 hours. For Valentine’s Day we might bump this up to 2 hours or 2.5 hours.
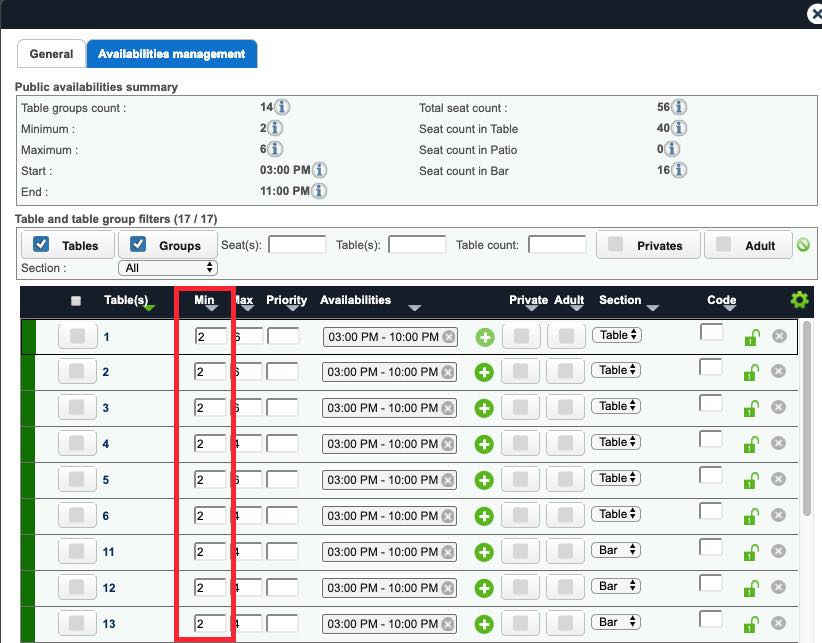
4. Under the Availability management tab, we can make other changes. For example, tables with minimums higher than 2 can be reset for a minimum of 2, to accommodate more couples.

5. Likewise, since it’s rare to have many parties larger than 2 on Valentine’s Day, we can lock table groups and prevent them from being reserved.
6. Save your Valentine’s Day configuration when you’re done making modifications.
![]()
7. Click the Add + icon at the top right of the Exceptional schedule section.
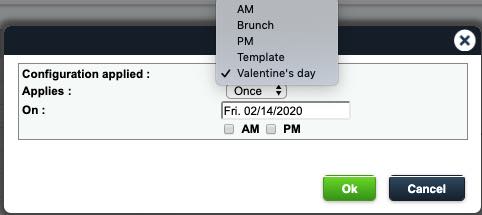
8. Select your Valentines Day configuration. As well set Applies to Once and select Feb 14 for the On field. Finally select this configuration to apply to the PM timeslot on Valentine’s Day.
9. Click Ok.

10. Your Valentine’s Day schedule with associated configuration will be created here. To edit it, click on the schedule’s name. To delete it, click the X button.
1) Other Examples of Exceptional schedules
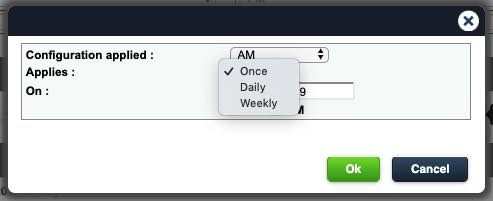
The Applies drop-down box on our Exceptional Schedules setup dialog box gives us the option of creating not just one-time exceptional schedules but recurring exceptional schedules that are daily (every day) or weekly (once particular day of the week).
2) Daily Example
Imagine for the first two weeks in June there’s an international sports competition. Normally your Bar tables are locked during the AM timeslot and you unlock them for the PM timeslot. Because this sports competition is in Europe, you are expecting robust use of the bar floor during the AM hours.
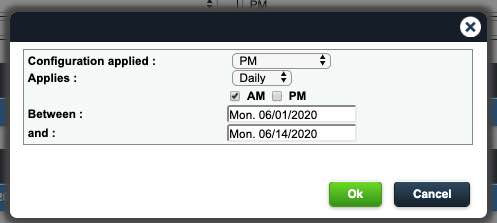
In the pictured example, for two weeks in June, we are applying the PM configuration (which has unlocked bar tables) to the AM timeslot.
3) Weekly Example
Imagine you have a covered patio but you do not normally make patio seats available outside of the summer months. However, for the month of October you open your patio on Saturdays for Octoberfest celebrations.
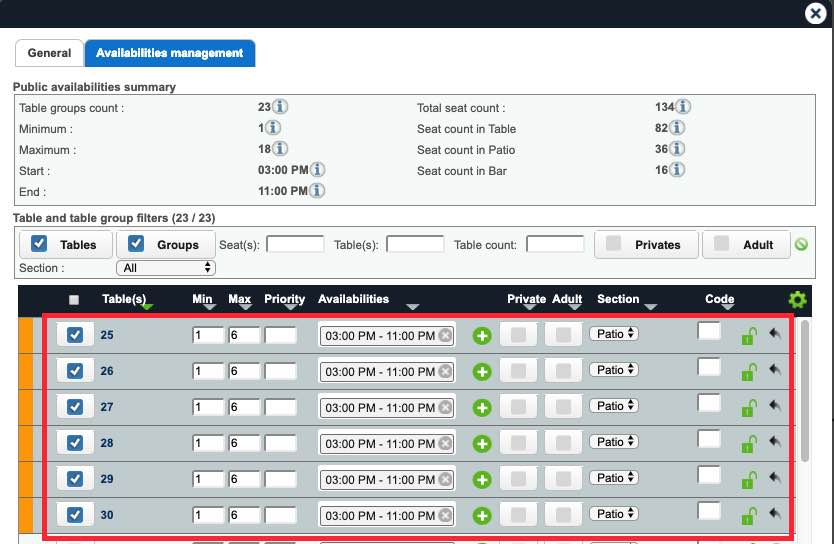
First you would create a special Octoberfest configuration, unlock the patio tables, and then set, say, a PM availability.
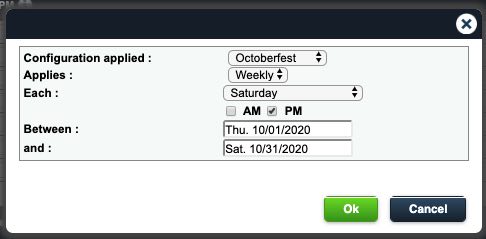
Finally, you would create an exceptional schedule as above. Select your Octoberfest configuration. Set Applies to drop-down box to Weekly. Select your desired day of the week as Saturday. Apply this special configuration to the PM timeslot. Finally, have this exceptional schedule apply for the entire month of October.
4) Exceptional Closures
Exceptional Closures allows you to prevent reservations for a one-off time period. Hypothetically because you are closed or you are hosting a private function.
![]()
1. Click the Add + icon at the top right of the Exceptional Closures section.
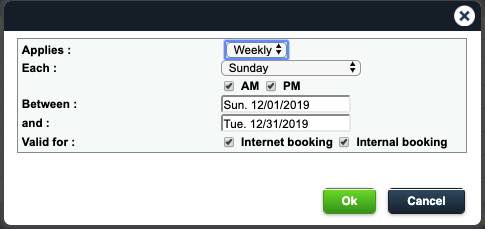
2. Click the Applies drop-down box and select Once, Daily, or Weekly. Complete as follows:
|
Option
|
Description
|
|
Once
|
Enter the calendar date this exceptional closure applies. Select if it applies to the AM, PM, or both timeslots. Select if this date should disable Internet reservations, Internal reservations, or both. For example, on Dec 13, 2020 you are closed for a private holiday party. So use the Once selection and select the date.
|
|
Daily
|
Select Daily if you are closed every day for a date range. For example you are shut down for a week in August for vacation. Enter the calendar date this exceptional closure applies. Select if it applies to the AM, PM, or both timeslots. Select if this date should disable Internet reservations, Internal reservations, or both.
|
|
Weekly
|
Select which day this closure should apply to. Enter the range. For example, you are closed every Sunday during December. Select if it applies to the AM, PM, or both timeslots. Select if this date should disable Internet reservations, Internal reservations, or both.
|
3. Click Ok.
![]()
4. Your exceptional closure will be created here. To edit it, click on the closure’s name. To delete it, click the X button.
5) Real Time Closures
Real Time Closures lets you set more granular closing times. For example, during December you close everyday between 2 pm and 4 pm, a time range that straddles a more simplistic AM/PM closing for a timeslot. Or you have a holiday party and you’re closed for a portion of your PM timeslot. Another key difference is Real Time Closure does not give you a choice between turning off Internet or Internal bookings. This closure assumes you are closed or closed to all bookings.
![]()
1. Click the Add + icon at the top right of the Real Time Closures section.
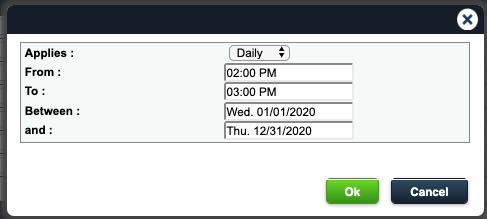
2. Click the Applies drop-down box and select Once, Daily, or Weekly. Complete as follows:
|
Option
|
Description
|
|
Once
|
Enter the calendar date this real-time closure applies. Select the time range this closure applies. For example, on Dec 13, 2020 you are closed for a private holiday party from 7 pm to 11 pm. So use the Once selection, select the date, and select the time range.
|
|
Daily
|
Select Daily if you are closed every day for a time range. For example during December you closed every day between 2 pm and 4 pm.
|
|
Weekly
|
Select which day this closure should apply to. Enter the range. For example, during February you do not have normal extended weekend hours. You closed every Saturday at 10 pm instead of 2 am.
|
3. Click Ok.
![]()
4. Your real time closure will be created here. To edit it, click on the closure’s name. To delete it, click the X button.
Chapter 5. Employee & security
The Employee & security section allows you add employee accounts as well as adding an admin password.
Section 1. Adding a New Employee
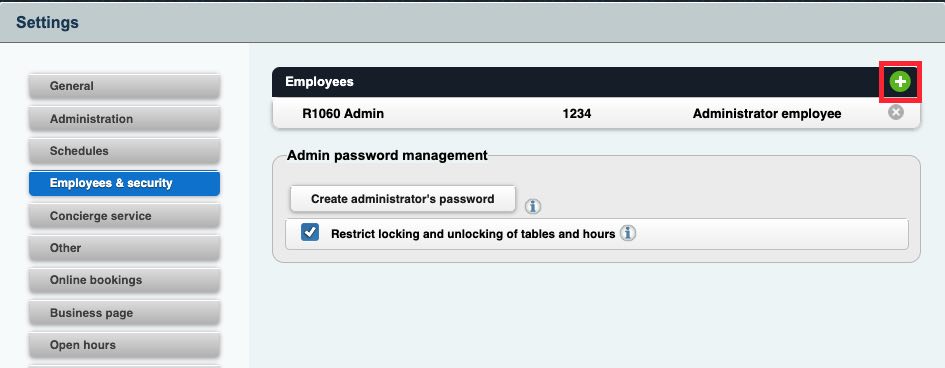
1. Click the Add + icon at the top right of the Employees section.
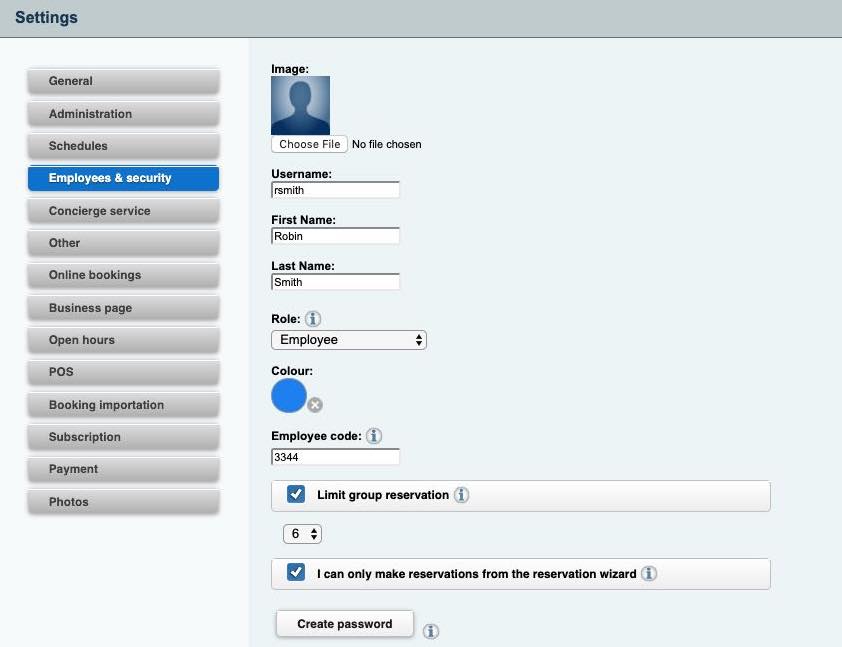
2. Enter a Username. This will be the username the employee can use to open TouchBistro Reservations from the Merchant Sign In page.
3. Enter other details like first name and last name.
4. Click on the Role drop-down box to select whether or not you want this employee to have Admin or Employee rights. Employees with Admin rights can access areas of TouchBistro Reservations like Settings and can edit the floorplan. Employees with Employee rights are locked out of these areas.
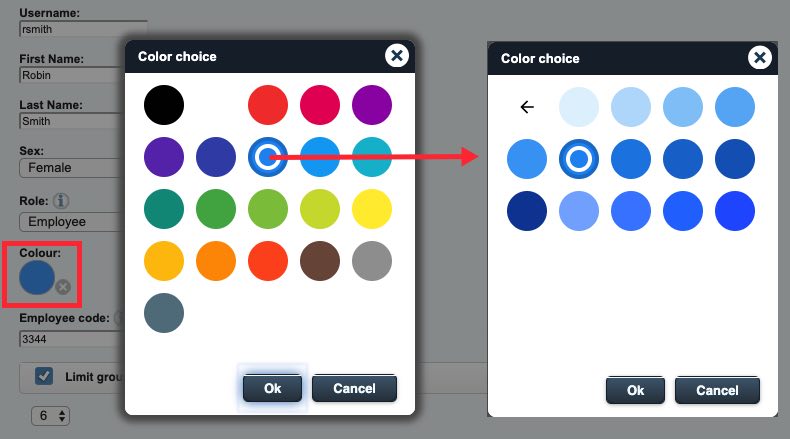
5. Select a color to represent this employee. If the color has a shade option, you will be prompted to select the color’s shade.
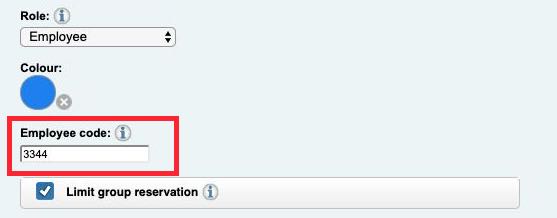
6. Employee codes are used to quickly change who is using TouchBistro Reservations. Enter this employee’s numerical code. We suggest a minimum of 4 digits. A passcode will not allow an employee to open TouchBistro Reservations from the sign-in page. If you wish this employee to be able to sign your venue into TouchBistro Reservations, see below how to set up a password.

7. If you would like to limit the number of covers the employee can book in one reservation, check Limit group reservation and then select the maximum number of covers the employee can book. For example, our largest table seats 6. Although we can accommodate larger parties by pushing tables together, we don’t necessarily want to authorize this employee to book those kinds of reservations.
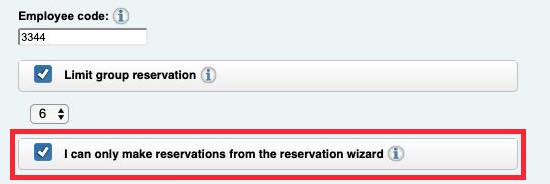
8. Check if you want to limit the methods an employee can use to make a reservation. If enabled, the employee will only be able to make a reservation using the Reservation tool ![]() .
.

9. If you would like an employee to sign your venue into TouchBistro Reservations from the Sign In page, the employee will need a password. Click Create password and then enter a password. It must be a minimum of 8 characters.
10. Click Save when you’re done.
1) Admin Password Management
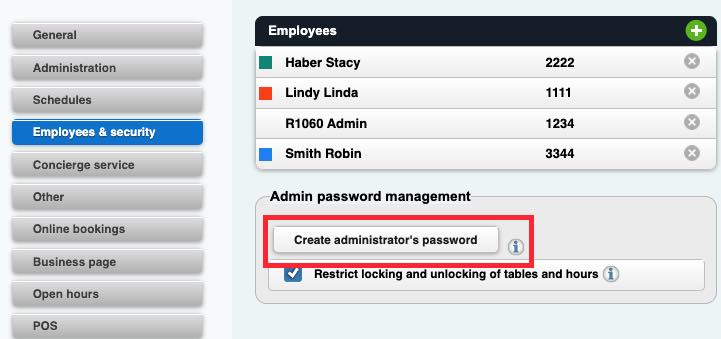
If you would like to add an extra layer of security, you can create an administrator’s password. Even though a person logs in with an Admin account, if you click Create administrator’s password and enable a password, Admin accounts will require this additional password to access certain critical areas of TouchBistro Reservations.
Chapter 6. Concierge service
The Concierge service section lets you add details about hotels and other hospitality venues that aid in reservations. Concierge details entered when you take a reservation will also appear here. If you see an existing concierge, you can also click on it to edit. If you want to add a new concierge, do the following:
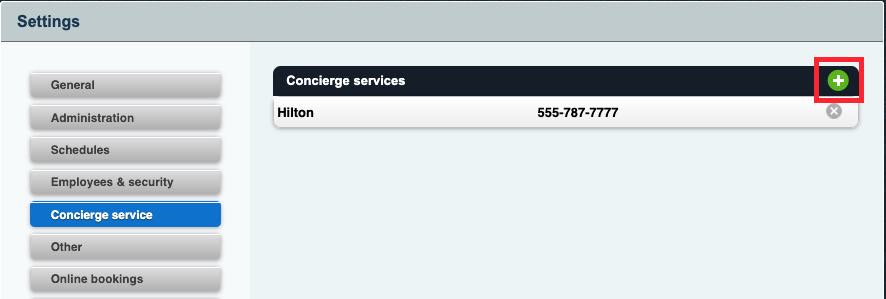
1. Click the Add + icon at the top right of the Concierge services section.
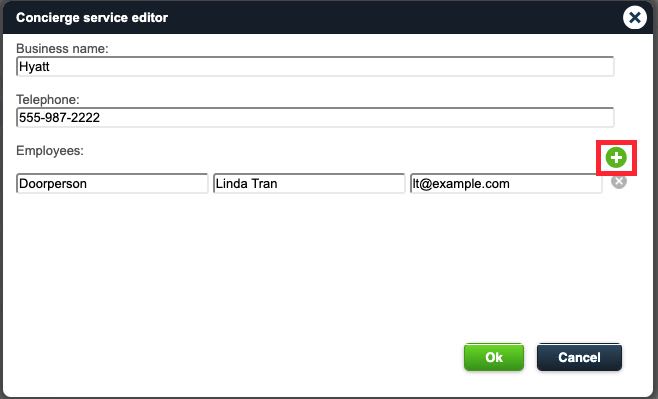
2. Enter the name of the business and add a phone number.
3. Enter any information about individuals that might be responsible for aiding in reservations. You can use the two name fields to enter last name and then first name. Alternatively, you can (as pictured above) use the first field to enter the person’s role and then use the second field to enter the person’s entire name.
4. If you want to add additional employees, click the Add + icon.
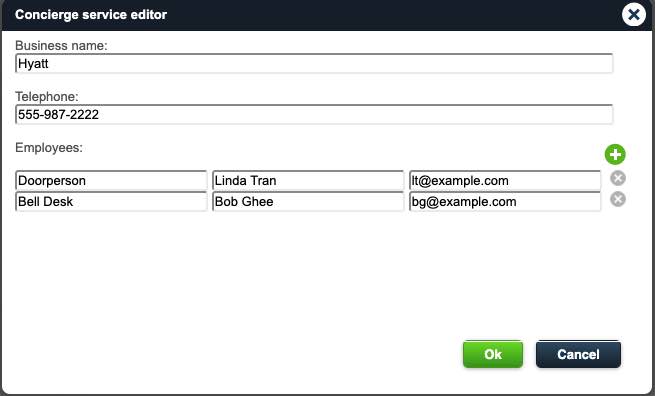
5. Add as many as necessary and then click Ok.
Chapter 7. Other
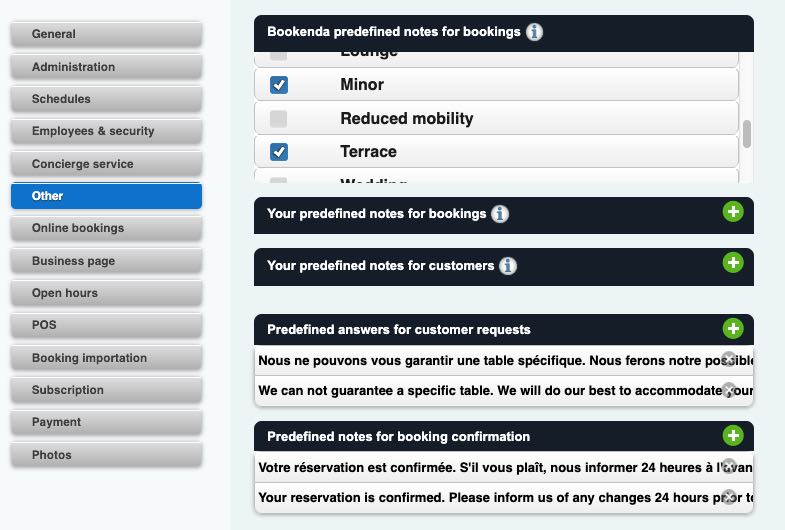
The Other section has a number of settings that let you customize your booking workflow.
Section 1. Predefined notes for bookings
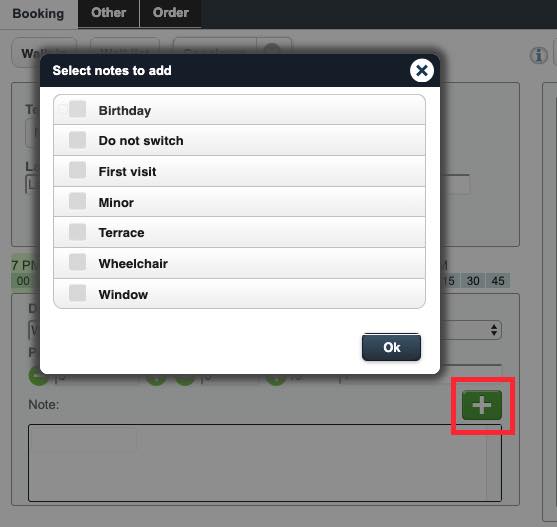
When you take a reservation, you can click the Notes + button and add a predefined note. You can set what predefined notes appear here by checking or unchecking notes under Predefined notes for bookings.
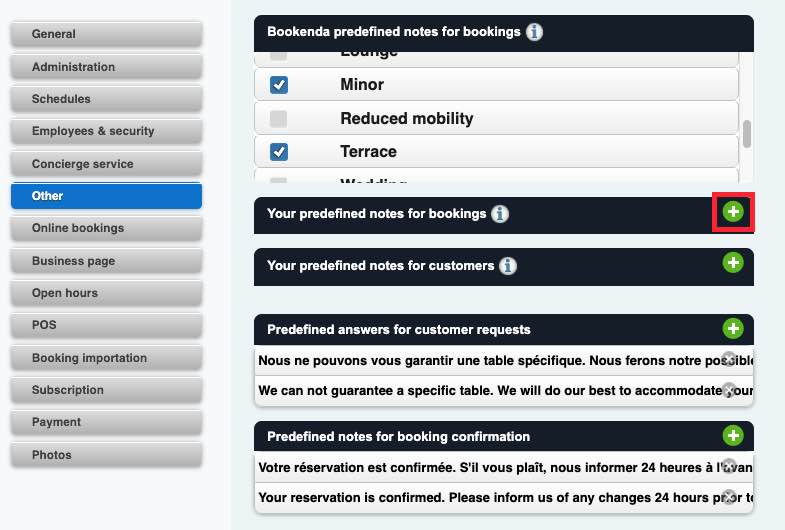
If you would like additional predefined notes, you can create them here under the Your predefined notes for bookings section.
1. Click the Add + icon
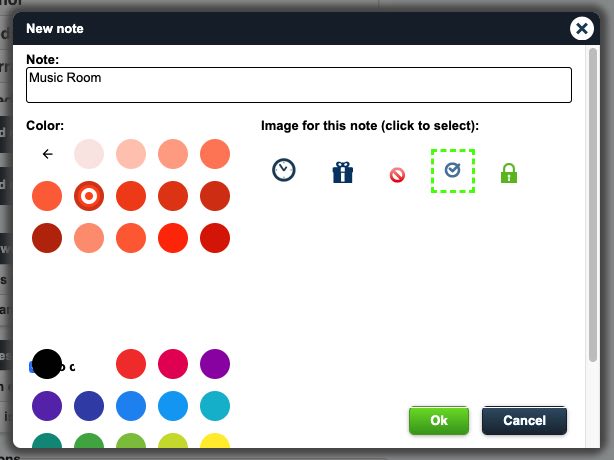
2. In the Note field, enter the desired predefined note.
3. Pick a color and an icon.
4. Click Ok to save.
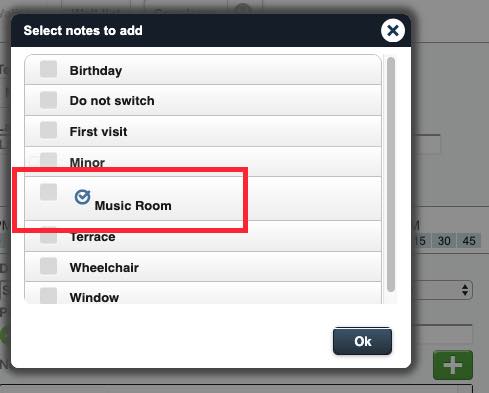
When you create a customized predefined note, it will now be available when you click the Notes + button to add a predefined note
Section 2. Your predefined notes for customers
You can add notes about customers via any tool that lets you open a client record or a client booking. So if you click the Clients tool, the Sheet tool, or the Messages tool, you can locate a client and add a note. These notes are internal only and not customer-facing.
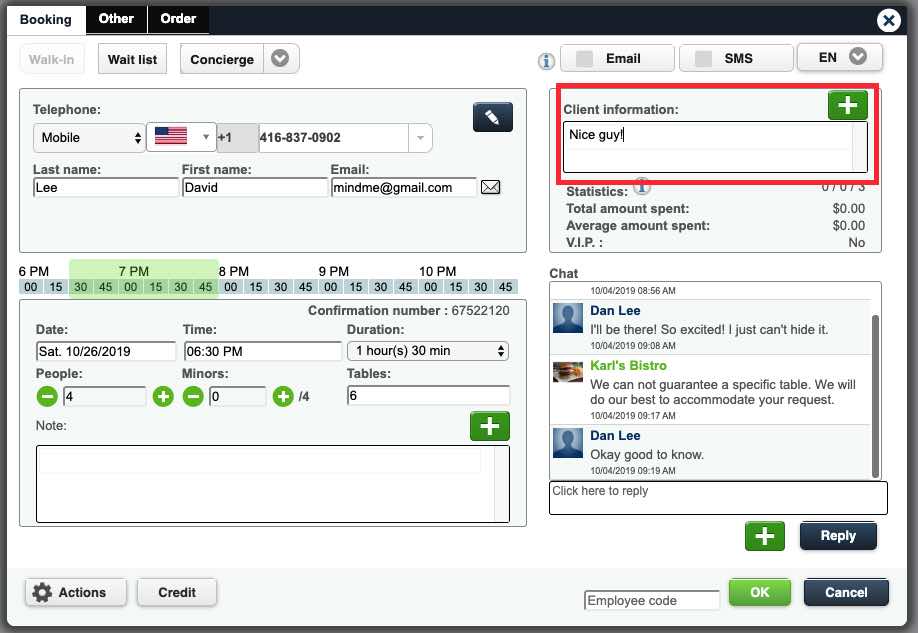
Notes can freeform, as pictured above. However, for reporting purposes, freeform notes can be problematic.
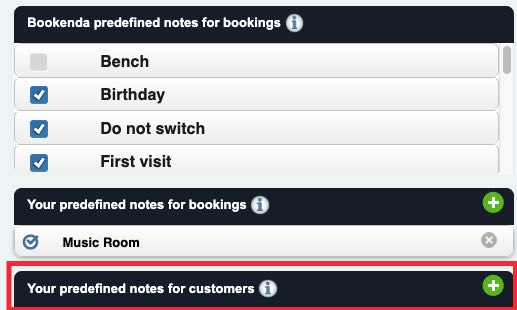
You can create predefined notes that are predictable. To do this:
1. Click the Add + icon at the top right of the Your predefined notes for customers section.
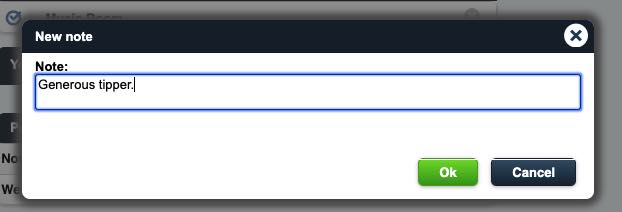
2. Enter your note and click Ok.
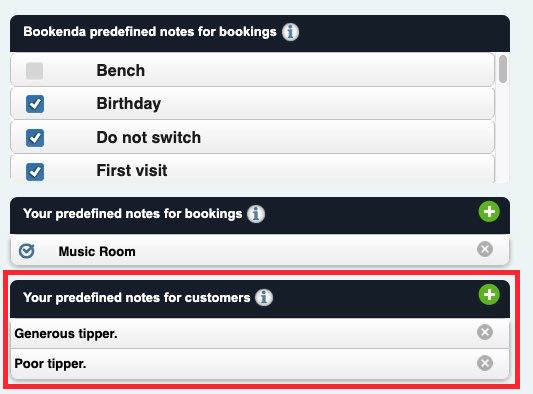
3. You will see all custom customer notes you’ve created. Click the appropriate X icon to delete a custom note.
Your custom customer notes can be used on any customer or booking dialog box that lets you enter a customer note.
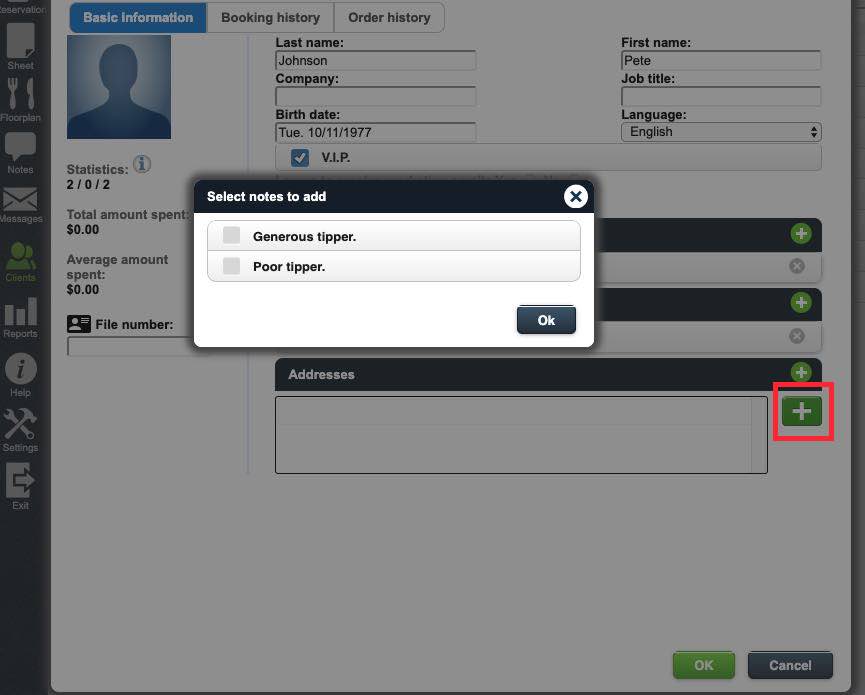
Click the Add + icon to access your list of notes.
Section 3. Predefined Answers for customer requests
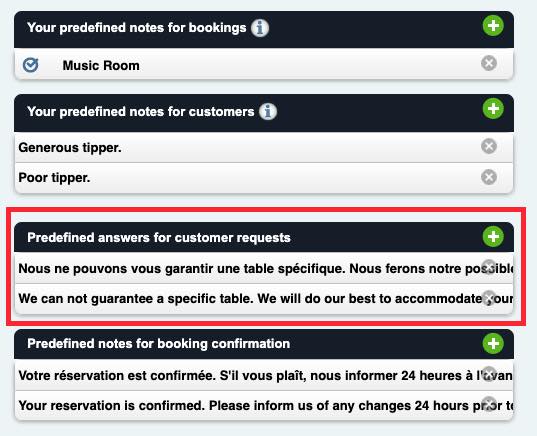
The Predefined answers for customer requests section lets you create common responses to customer requests. To add additional common responses, click the Add + icon at the top right of the Predefined answers for customer requests section.
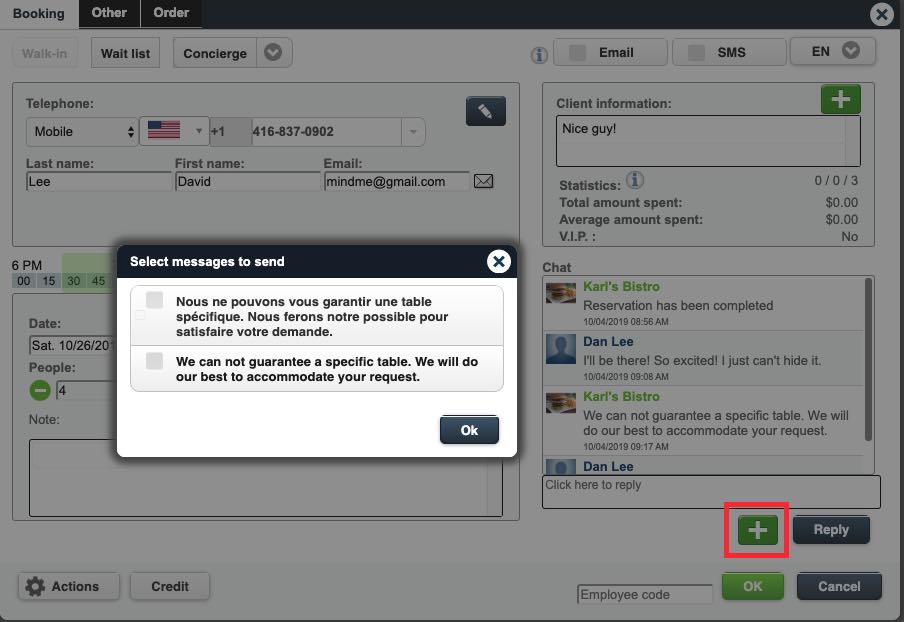
These predefined messages can be used in any booking or customer dialog box with a Chat window.
Section 4. Communications
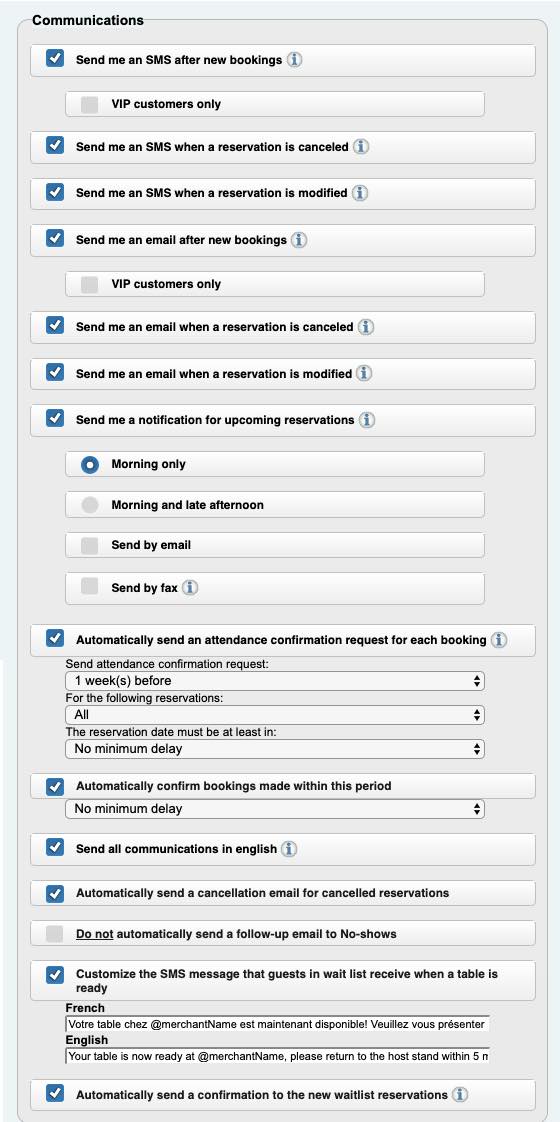
The Communications section lets you control how TouchBistro Reservations communicates with you (the venue owner) as well as the reserving party.
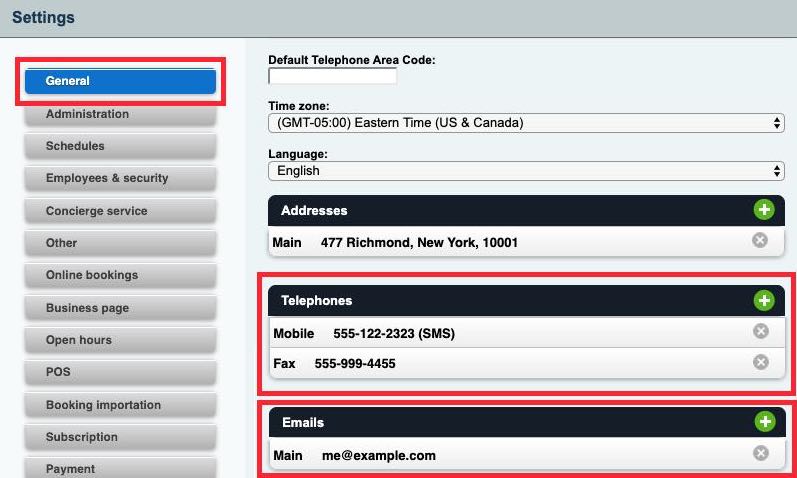
Before enabling any of these, you click the General section in Settings and review your contact information. You can click an existing phone number or email to edit it. If you don’t have a mobile or fax number set up, click the Add + icon. Ensure you specify the phone number as Mobile (or Fax)
1) Internal Communications
The top half of the Communications section controls messages you (the venue owner) can receive about reservations. You can enable receiving alerts via SMS, email, and fax.
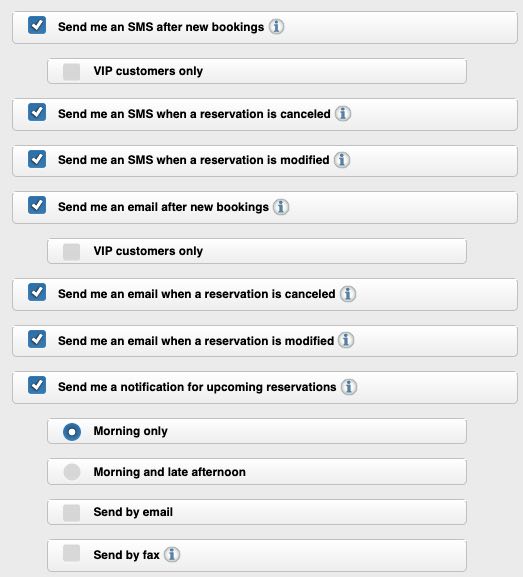
After confirming your email, mobile (SMS), and optional fax number, you can enable or disable venue owner alerts as follows:
|
Option
|
Description
|
|
Send me an SMS after new bookings
|
If enabled, every time a customer makes a booking, you can receive an SMS alerting you.
|
|
VIP customers only
|
If you prefer to only receive an SMS alert when a customer flagged as VIP books, enable this.
|
|
Send me an SMS when a reservation is canceled
|
If enabled, you will receive an SMS warning you a customer has canceled a reservation.
|
|
Send me an SMS when a reservation is modified
|
If enabled, you will receive an SMS warning you a customer has modified a reservation.
|
|
Send me an email after new bookings
|
If enabled, every time a customer makes a booking, you can receive an email alerting you.
|
|
VIP customers only
|
If you prefer to only receive an email alert when a customer flagged as VIP books, enable this.
|
|
Send me an email when a reservation is canceled
|
If enabled, you will receive an email warning you a customer has canceled a reservation.
|
|
Send me an email when a reservation is modified
|
If enabled, you will receive an email warning you a customer has modified a reservation.
|
|
Send me a notification for upcoming reservations
|
If enabled, by default, this will send the notification to your phone. TouchBistro Reservations will notify you about reservations for the day. By default, you will be alerted for all of the day’s reservations in the morning. However, if you want to be reminded of the day’s reservations in the morning and then again in the afternoon, click Morning and late afternoon. If you prefer your alerts going to email, check Send by email. If you prefer alerts going to your fax machine, check Send by fax.
|
Note: TouchBistro Reservations will not send out alerts for reservations or changes to reservations made internally.
2) External Communications
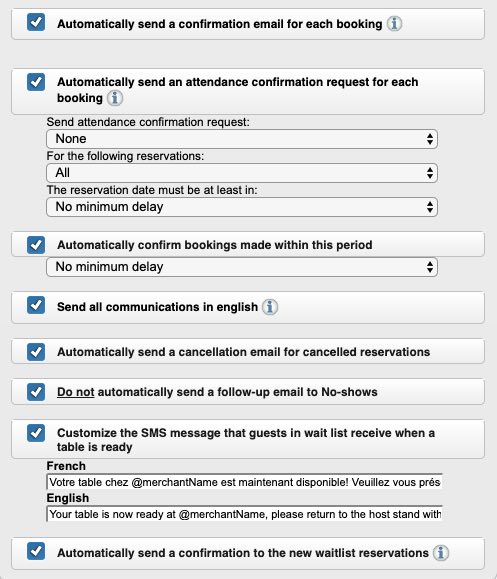
The bottom half of the Communications section controls messages the reserving party receives:
|
Option
|
Description
|
|
Automatically send a confirmation email for each booking
|
If enabled, a customer will get a confirmation email after making a reservation, either online or over the phone.
|
|
Automatically send an attendance confirmation request for each booking
|
If enabled, a customer will receive an email requesting they confirm they will keep their reservation. You can set when the confirmation request is sent (for example, the day before their scheduled reservation). If you prefer, you can limit these emails to larger parties. You can also limit who gets the attendance confirmation based on how far in advance they made the reservation. For example, if set to 1 Week, any reservation made less than a week before the reservation date won’t get the attendance confirmation. If you’re interested in getting customers who made reservations considerably more in advanced of their reservation date (for example, 3 months in advance), set it to 2 Week(s).
|
|
Automatically confirm bookings made within this period
|
By default TouchBistro Reservations will send a confirmation for all bookings. However, you can limit these emails based on how far in advance the diner made the reservation. For example, same day reservations you might not want to send a confirmation. So set this for 12 hours,10 hours, or less.
|
|
Send all communications in English
|
If enabled, alternative French text won’t be used.
|
|
Automatically send a cancellation email for cancelled reservations
|
Disable if you don’t want the diner to receive a confirmation email that the reservation has been canceled.
|
|
Do not automatically send a follow-up email to No-shows.
|
Disable if you want diners flagged as no-shows to receive an email.
|
|
Customize the SMS message that guests in a wait list receive when a table is ready
|
If you are sending messages to customers on a waitlist, you can customize the message sent.
|
|
Automatically send a confirmation to the new waitlist reservations
|
Enable if you want to automatically send a confirmation email or SMS to a party added to the Wait List.
|
Section 5. System
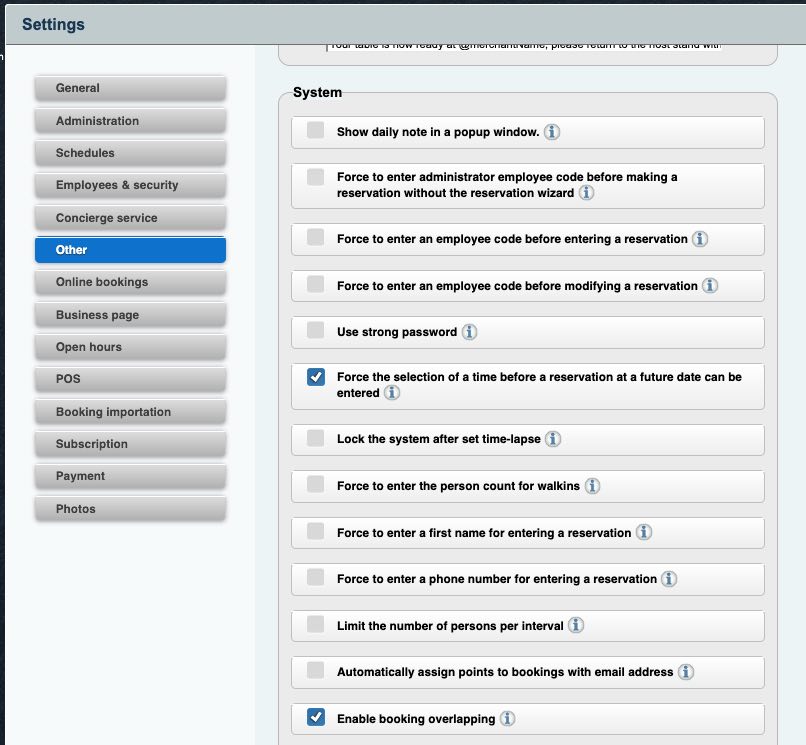
The System section lets you control workflow aspects of TouchBistro Reservations.
|
Option
|
Description
|
|
Show daily note in a popup window
|
If enabled, AM/PM timeslot notes will popup when you start an AM or PM timeslot reservation. Disable if you prefer not to have these popups show.
|
|
Force to enter administrator employee code before making a reservation without the reservation wizard
|
If you prefer employees use the Reservation
|
|
Force to enter an employee code before modifying a reservation
|
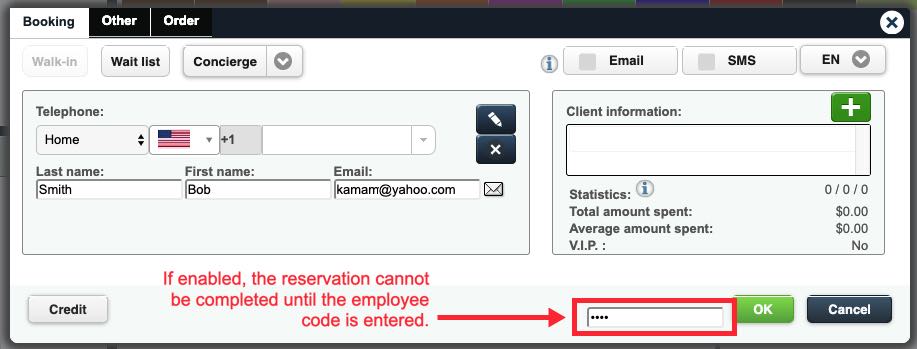
By default, TouchBistro Reservations will attribute the booking to whoever is logged into TouchBistro Reservations.
If you have multiple staff members taking reservations, you can enable this feature and force the staff member to enter his/her employee code to complete the reservation. Enable this if you want detailed tracking of which reservation was taken by which employee.
|
|
Use strong password
|
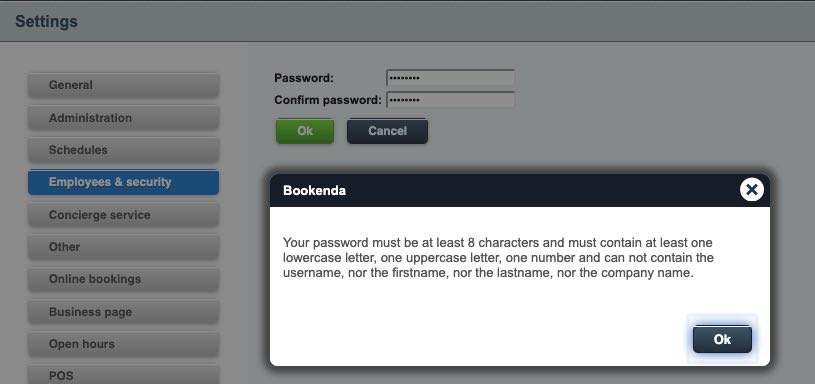
If enabled, when you create a password for an employee, TouchBistro Reservations will only accept a password that is at least 8 characters in length and contains at least 1 lowercase letter, 1 uppercase letter, one number and cannot contain part of the employee’s name or username.
|
|
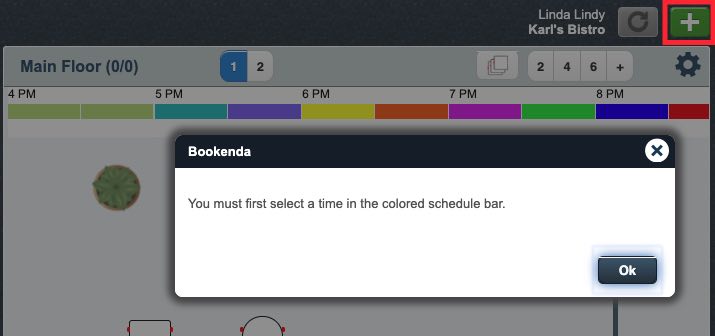
Force the selection of a time before a reservation at a future date can be entered
|
If enabled and an employee tries to start a future reservation (next day and beyond) with the + button on the top right, TouchBistro Reservations will prevent the reservation unless the employee first clicks the reservation’s start time on the colored timeline.
|
|
Lock the system after set time-lapse
|
If enabled, select the number of minutes of inactivity that triggers a lockout. After lockout, staff members will have to log back in to use the system.
|
|
Force to enter the person count for walkins
|
If enabled and you click a table and then click the Walkin
|
|
Force to enter a first name for entering a reservation
|
If disabled, you only have to enter a last name to create a reservation.
|
|
Force to enter a phone number for entering a reservation
|
If enabled, you are required to enter a phone number for a reservation.
|
|
Limit the number of persons per interval
|
This feature is no longer supported.
|
|
Automatically assign points to bookings with email addresses
|
This feature is no longer supported.
|
|
Enable booking overlapping
|
If disabled, bookings at the same table for the same time period is disallowed.
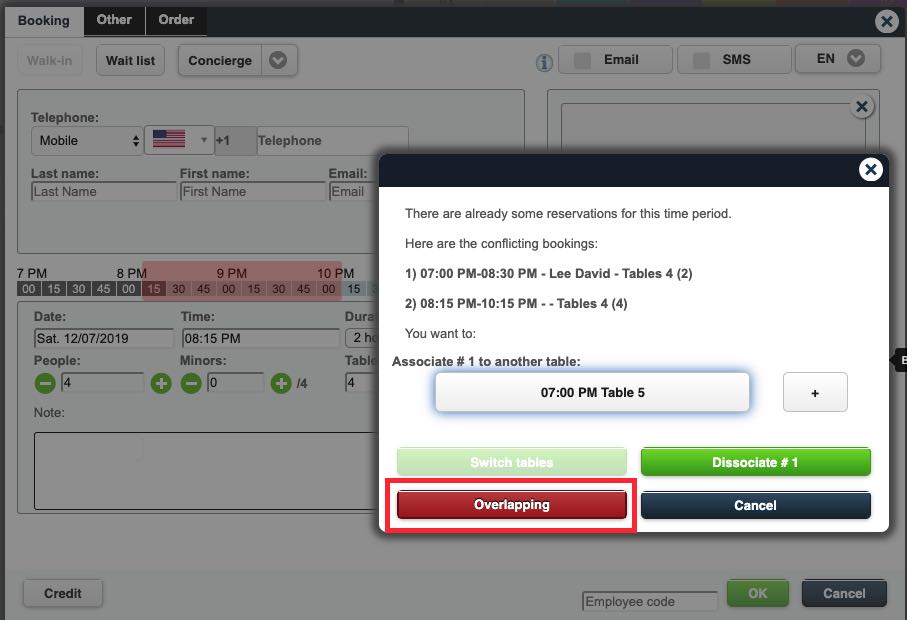
By default this is enabled. When enabled, you can book reservations at the same table with times that overlap. If enabled, you will be warned of the conflict and given an Overlapping option to override.
|
|
Seat reservations automatically when using drag-and-drop in the current period
|
If you have reservations without pre-reserved seats, this option controls what happens when you drag a party to a table.
If enabled, when you drag a party to a table, TouchBistro Reservations will automatically set the table to the Seated status. In the pictured example above, dragging the Frank and Lim parties to tables sets the tables as seated (green)
If disabled, when you drag a party to a table, TouchBistro Reservations will simply assign that table to the reservation. In the picturd example above, dragging the Frank and Lim parties to tables simply reserves these tables for the appropirate party at the pre-defined reservation time. You would then have to manually set the party to seated.
|
|
Automatically seat reservations when printing reservation sheet
|
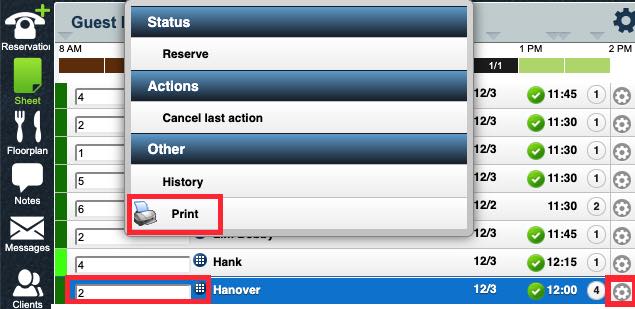
If enabled and you print an individual reservation sheet via the Sheet
In the pictured example above, if this is enabled and you print the Hanover reservation sheet by clicking the Gear
|
|
Allow to create reservation without table only from the reservation wizard
|
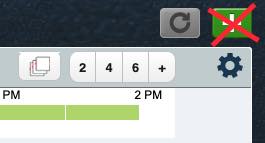
If enabled, you will not be able to start a reservation using the + button on the top right.
|
|
Allow reservations on locked tables
|
If you have locked tables, by default you cannot reserve them. However, if you enable this setting, TouchBistro Reservations will allow you to reserve a locked table. You will still have to confirm you’re trying to reserve a locked table.
|
|
Show ongoing reservations even if they started in the previous period
|
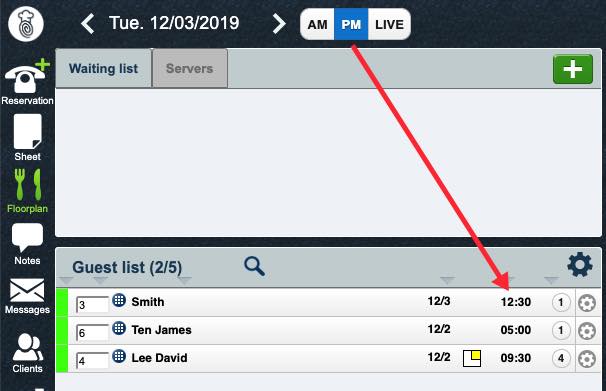
If you have a reservation seated in the AM timeslot and this is enabled, you will see the reservation in the guest list if the reservation is still seated when the time transits to the PM timeslot.
In the example above, the Smith party was seated at 12:30 pm but the party is still seated during the PM timeslot. Since this option was enabled, we will still see the Smith party in the Guest list.
|
Section 6. First input field for new booking

When you start a new booking, you can set what field input starts on.
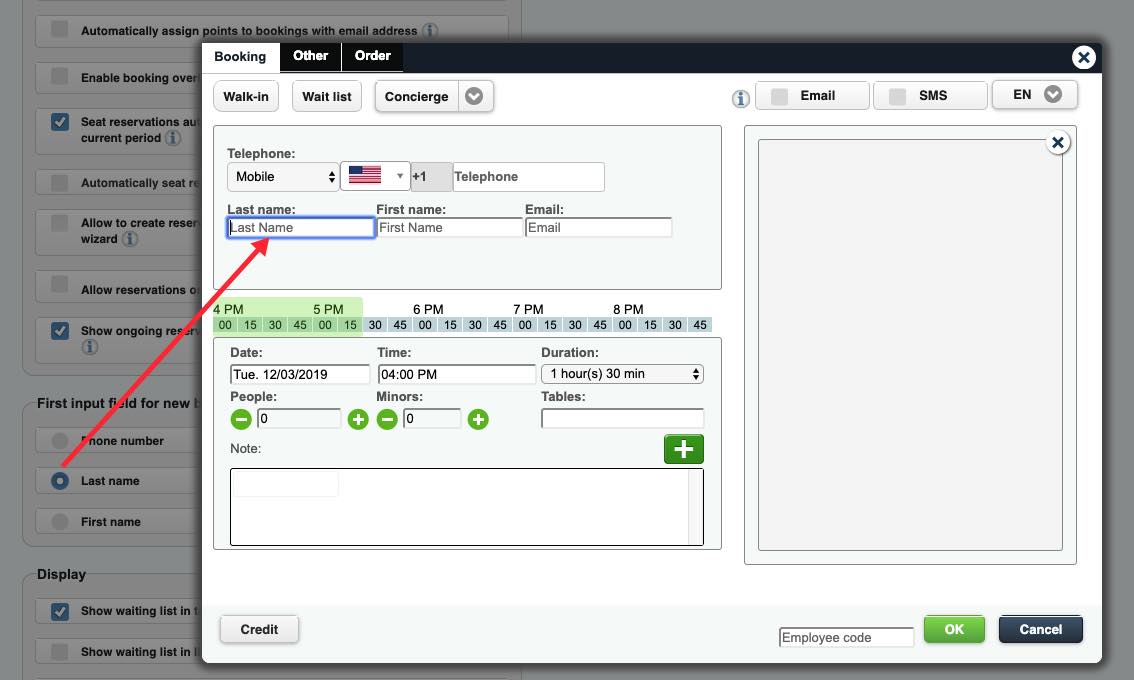
In the example above, we’ve selected Last name. When the Booking dialog box opens, the input cursor begins on Last name. You can immediately start typing the guest’s last name.
Section 7. Display
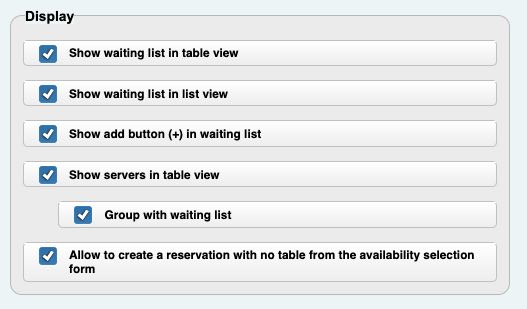
The display section lets you customize certain kinds of information appearing on TouchBistro Reservations.
|
Option
|
Description
|
|
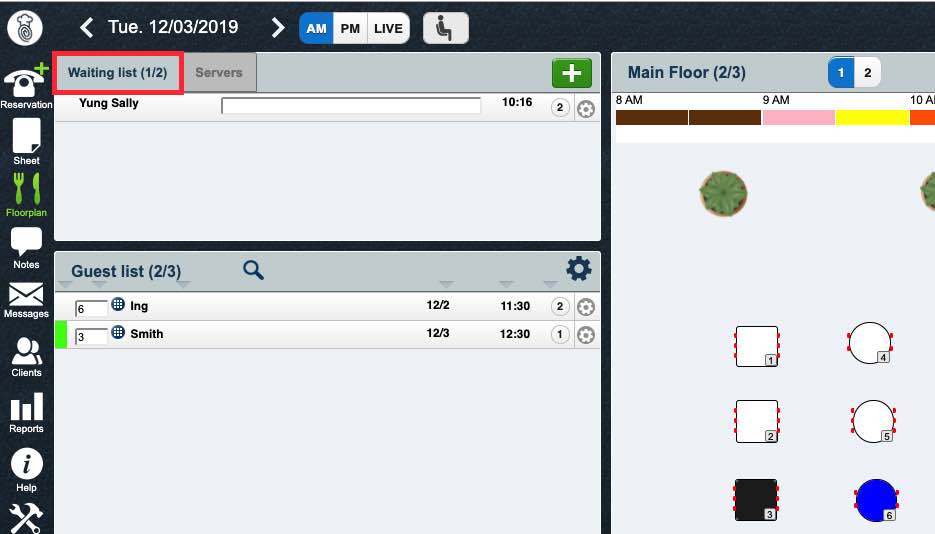
Show waiting list in table view
|
If enabled, you will see the Waiting list tab on your Floorplan screen.
|
|
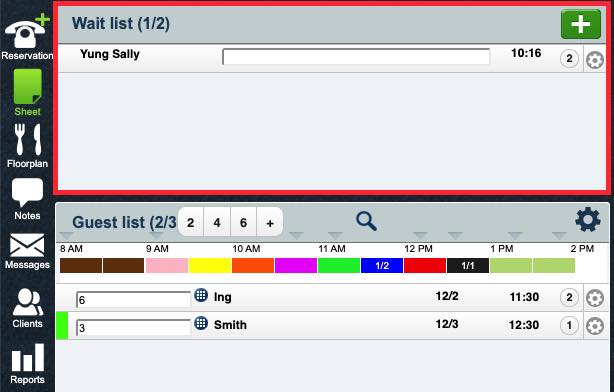
Show waiting list in list view
|
If enabled, you will see a Wait list section on your Sheet screen.
|
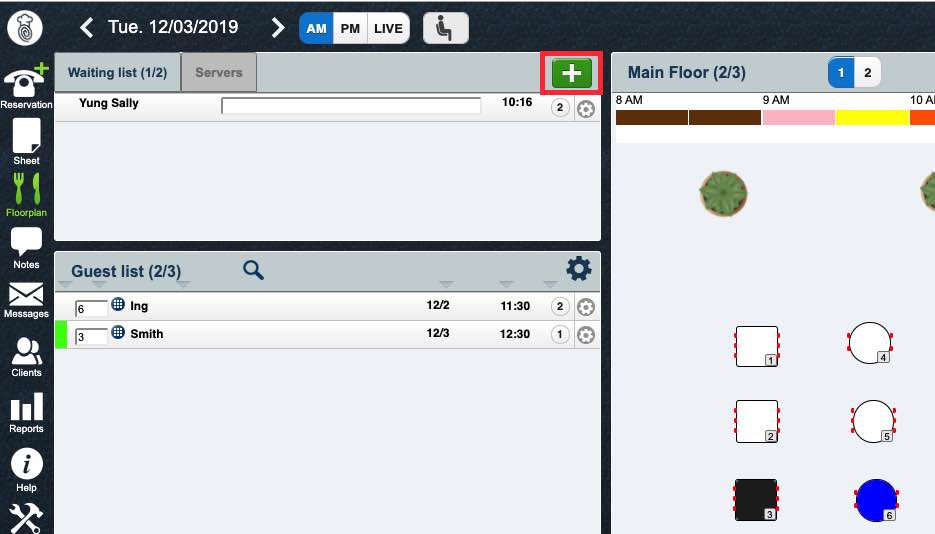
|
Show add button in waiting list
|
If enabled, the Waiting list section (either on the Sheet or Floorplan screen) will have an Add + icon at the right allowing you to add guests to the wait list.
|
|
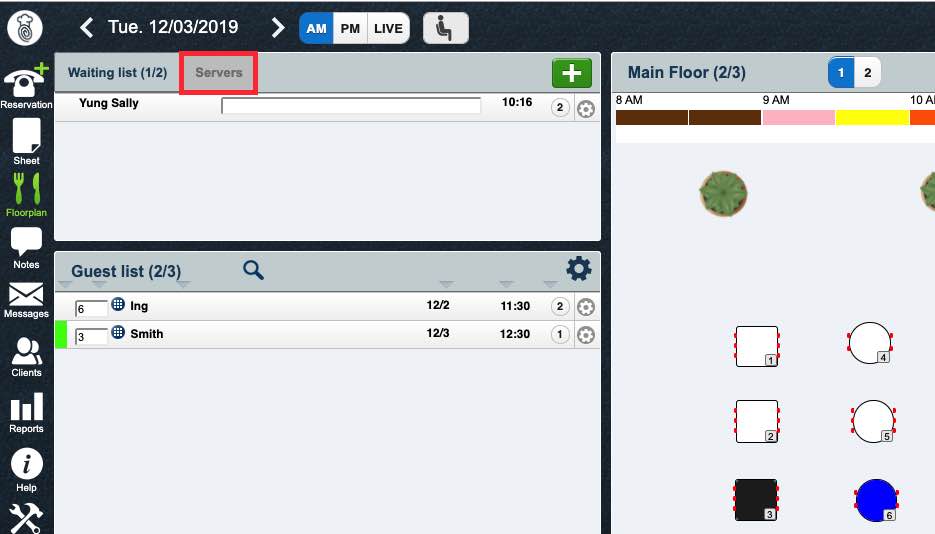
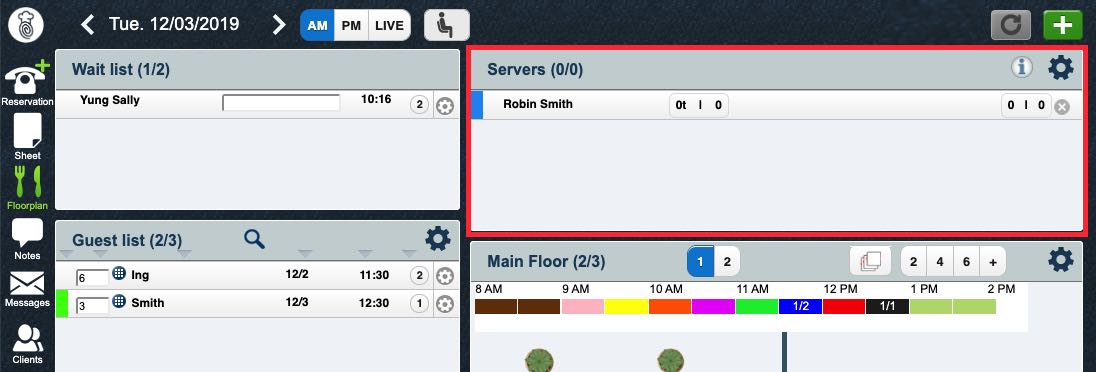
Show servers in table view
|
If enabled, you will see a list of available servers.
|
|
Group with waiting list
|
If enabled, the server list will be available as a tab.
If disabled, the server list will be its own panel on your Floorplan screen.
|
|
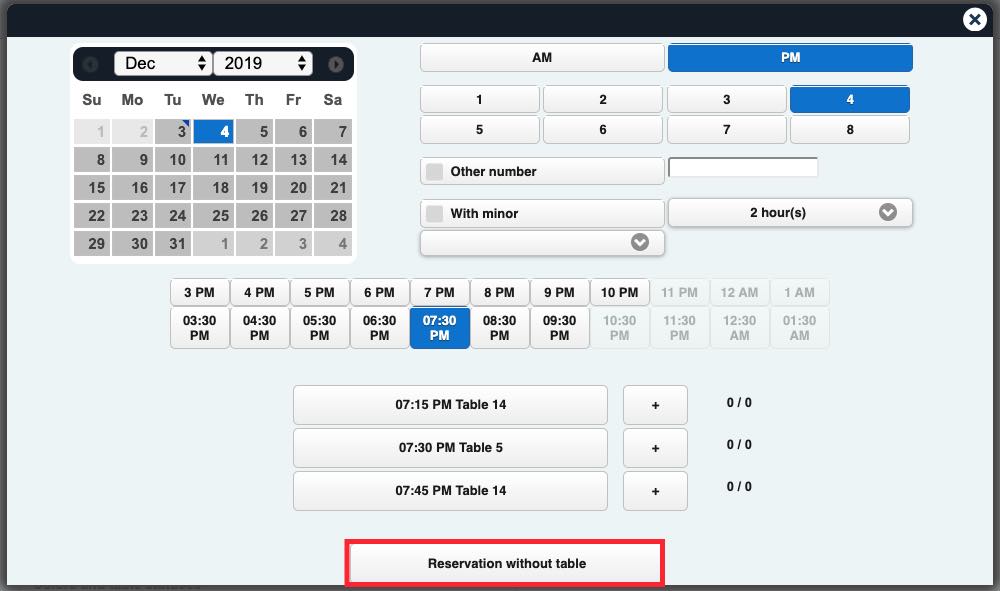
Allow to create a reservation with no table from the availability selection form
|
If disabled, the Reservation without table button will be removed.
|
Section 8. Table Turn Time Timer

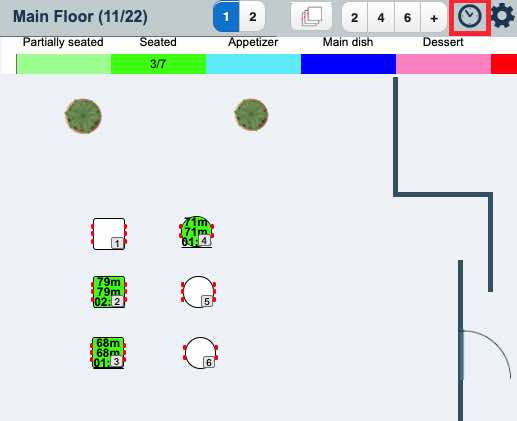
If you enable the table timer, you can control what the timer displays.
|
Option
|
Description
|
|
Display elapsed time
|
This will simply start a stopwatch type timer showing you how much time as passed since the table was sat.
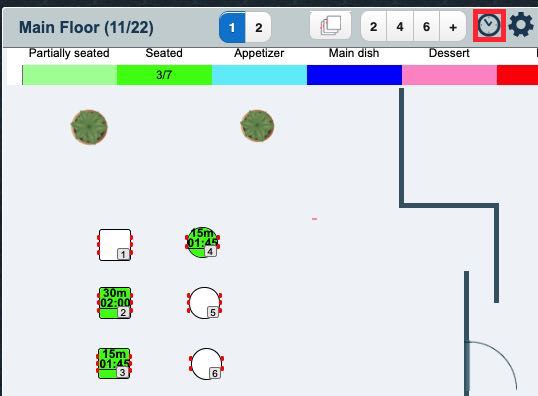
In the pictured example above, if you click the Timer button you will see how long the table has been occupied. For example, table 4 has been occupied for 71 minutes.
|
|
Display remaining time
|
This will show you how much time remains on the table based on the reservation length. For example, if you set up a 2-hour reservation for a party of two, the timer will count down from 2 hours.
In the pictured example above, if you click the Timer button you will see how long the table has until it exceeds the reserved seating time, which is displayed below. For example, table 4 was reserved for 1 hour 45 minutes and there is 15 minutes left on that reserved time span.
|
Section 9. Colors and table statuses
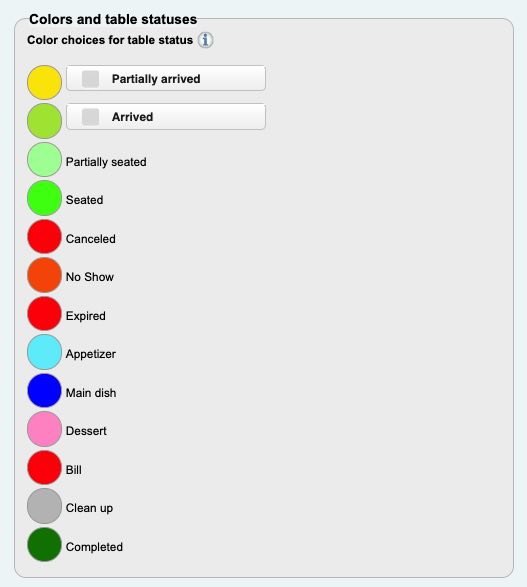
The Colors and table statuses section lets you customize table status color coding. As well, you can enable two optional table statuses: Partially arrived and Arrived. You might use these if you have a policy of not seating a party until the entire party has arrived.
To change the color of any status, click the status. For example, click No Show.
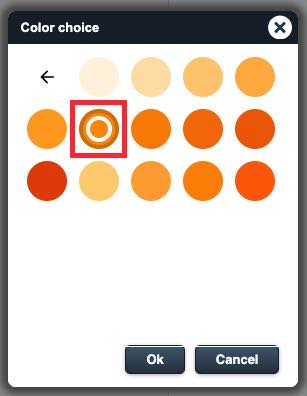
If you select a color, you will be further prompted to select the shade. A white circle in a shade option indicates this is the currently selected color and shade.
Chapter 8. Online Bookings
This section allows you to configure how customers self-book reservations.
Section 1. View your profile and integrate Bookenda to your website

If you would like to add booking tools to your own web site, click Click here to learn how to integrate Bookenda to your website.
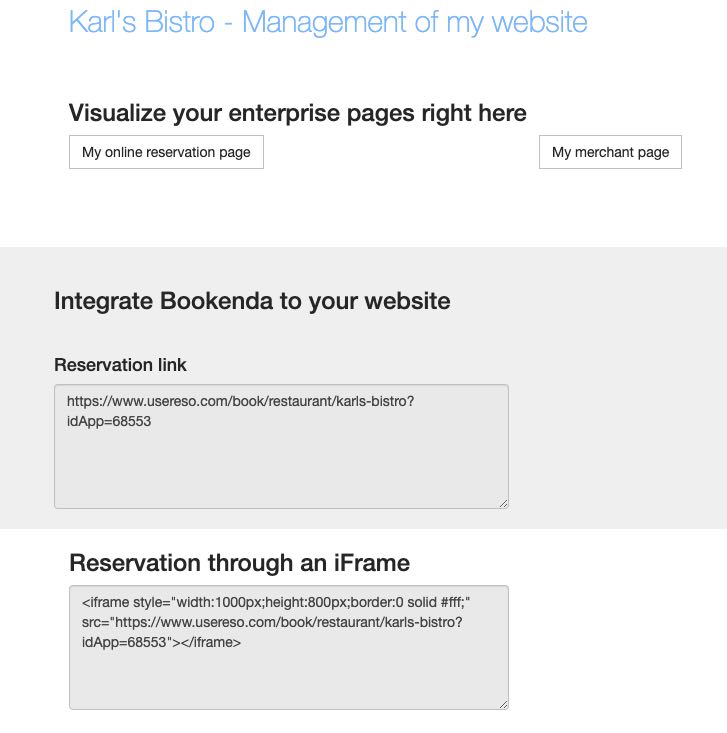
You will be taken to a web page with various HTML snippets you can copy and paste into your own website’s HTML and add reservation functionality as well as reviews.
If you would like to preview your reservation page, click Click here to open your online booking page.
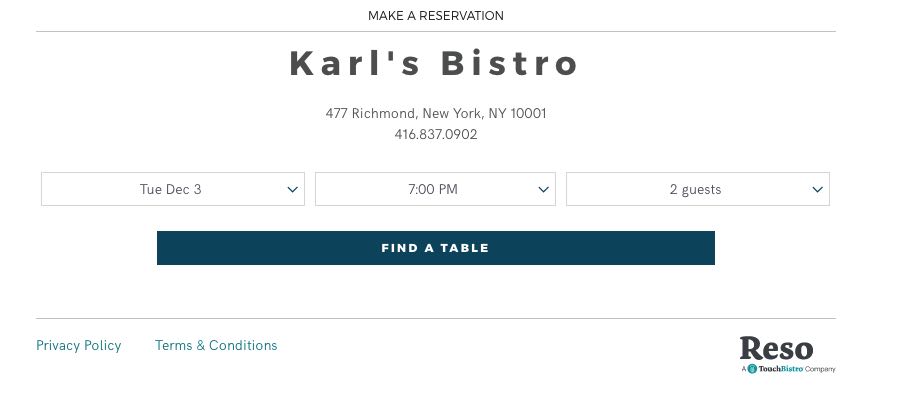
You will taken to an example of your reservation page.
If you would like to preview your restaurant’s business page on TouchBistro Dine, click Click here to open your business page.
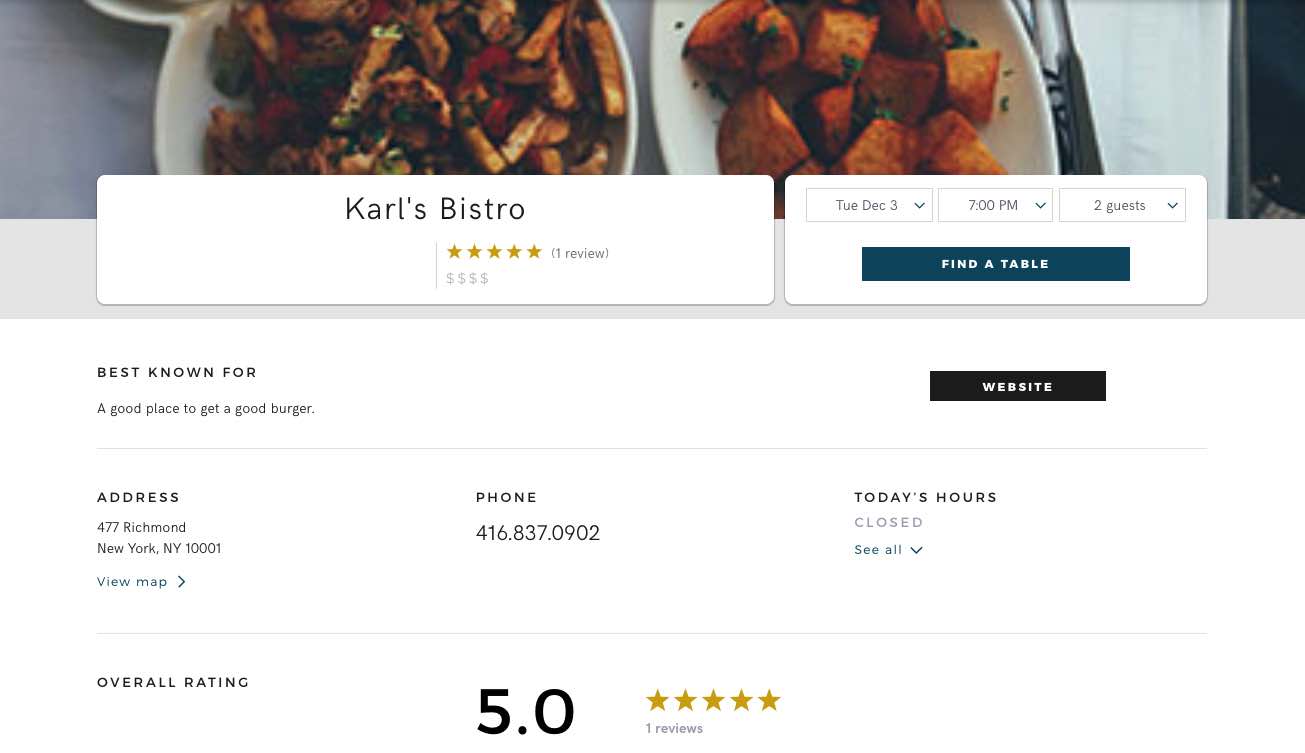
You will see your business page as it looks to users of TouchBistro Dine.
Section 2. Customize your online booking options
This section allows you to customize aspects of online booking via TouchBistro Dine.
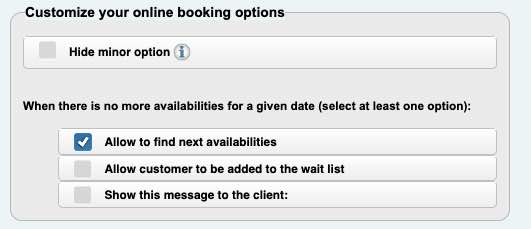
1) Hide minor option
If enabled, this removes the option to flag a certain number of guests as minors (Quebec only).
2) Allow to find next available
If enabled and there are no available tables for the online booker’s desired time, TouchBistro Dine will suggest the next available block of times.
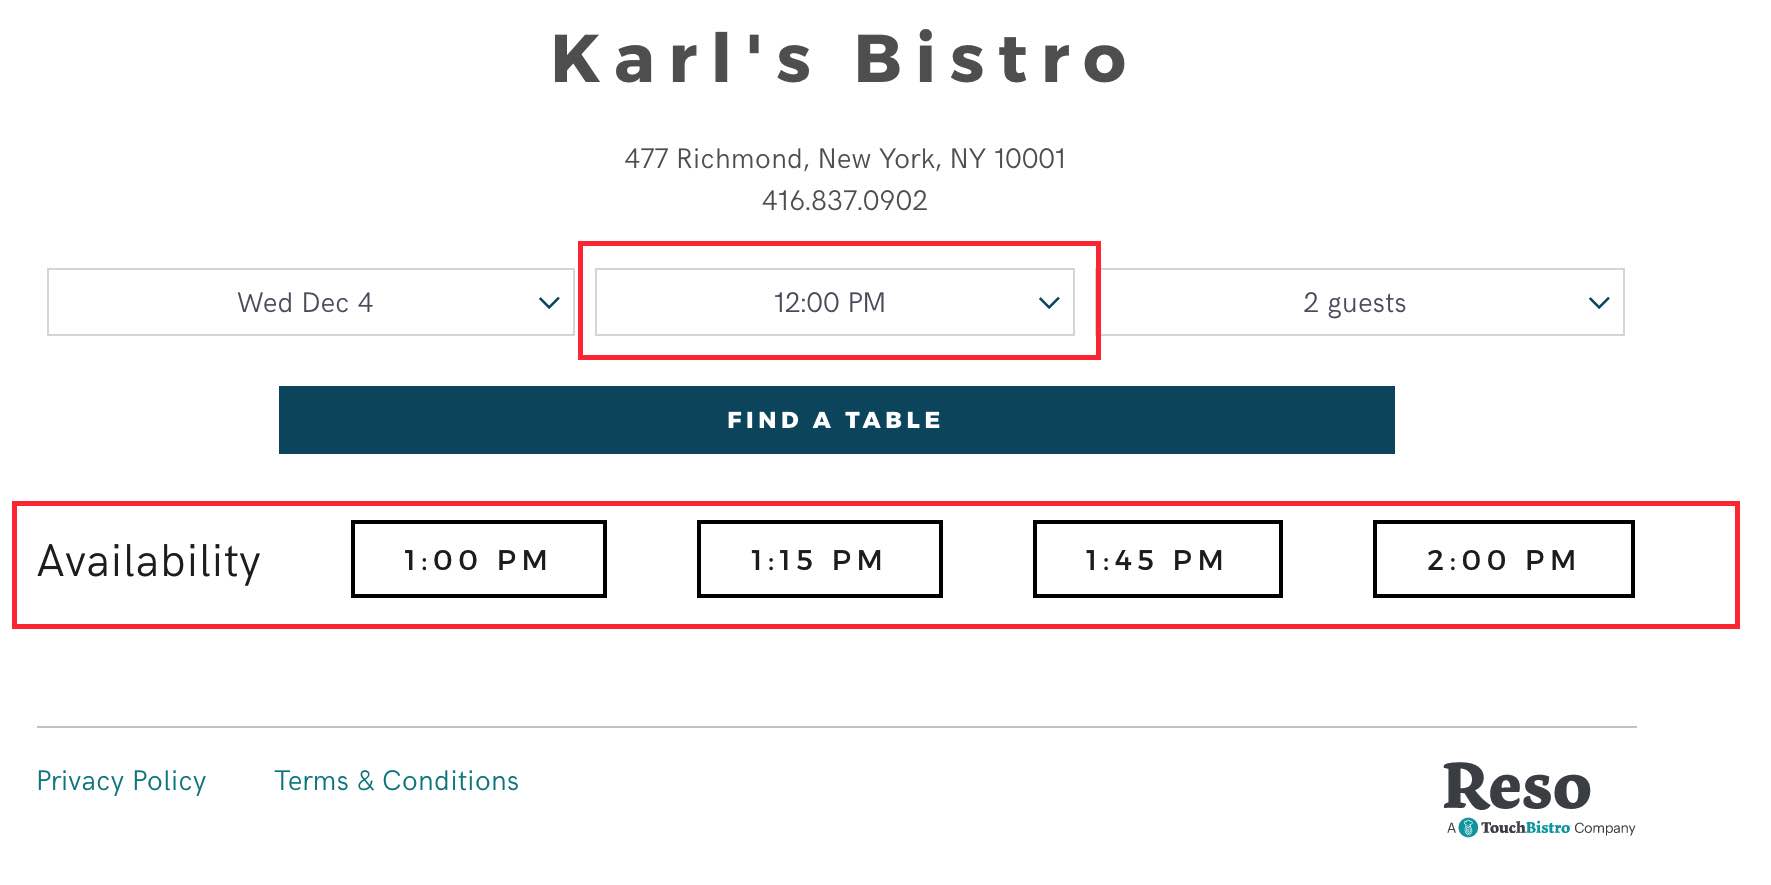
In the example above, the diner’s desired time of noon is unavailable. TouchBistro Dine recommends 1 pm and subsequent 15-minute blocks as the next available.
3) Allow customer to be added to the wait list
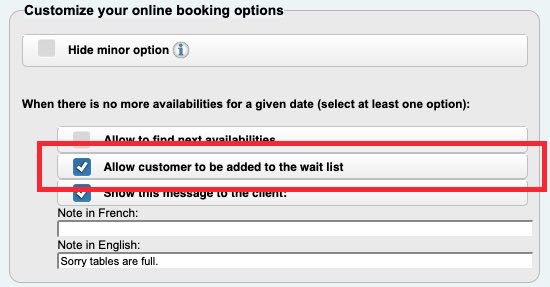
Alternatively, you can enable Allow customer to be added to the wait list to allow a customer to simply add the party to a wait list at the desired time.
Note: if Allow to find next available is also enabled, Allow customer to be added to the wait list will override. That is, TouchBistro Dine will not offer a choice between wait listing or the next available time blocks.
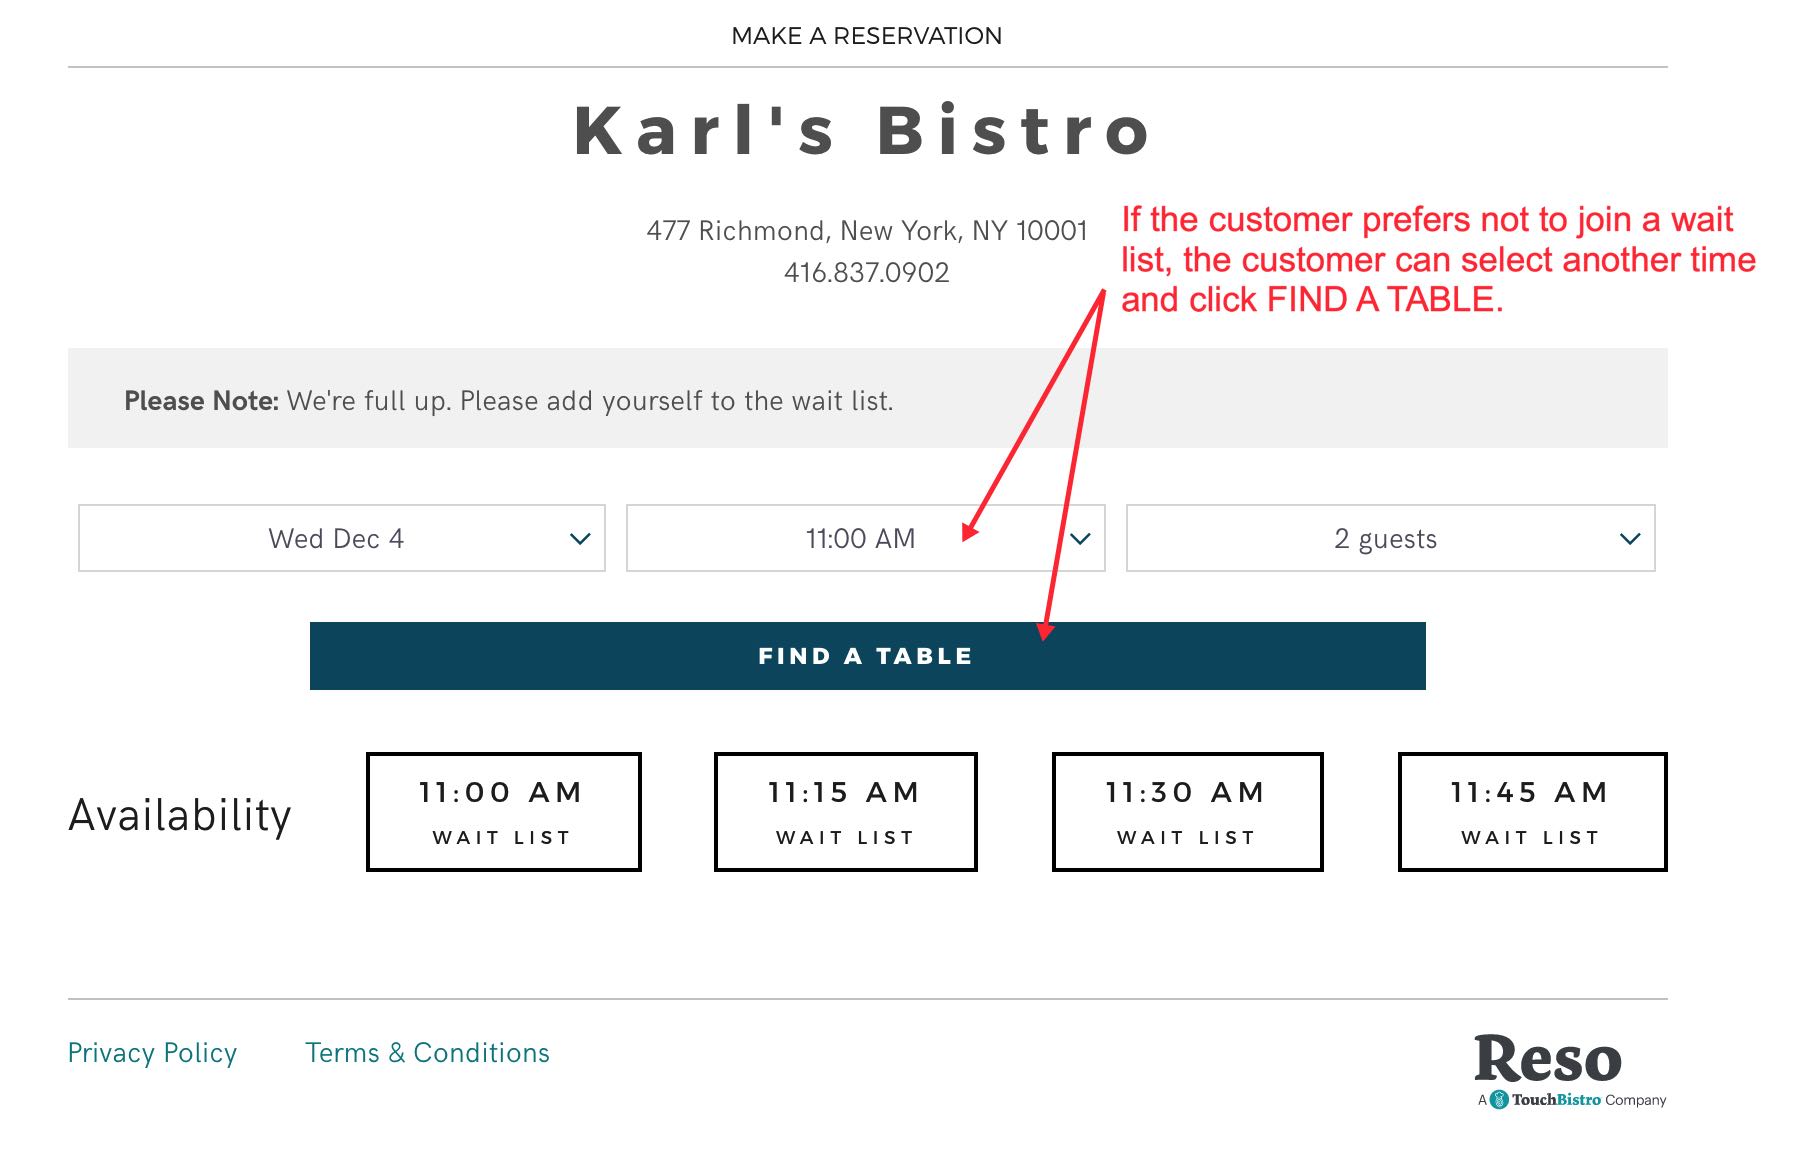
In the example above, the diner’s desired time of 11 am is unavailable. TouchBistro Dine allows the customer to add the party to a waitlist at the desired time or one of several subsequent 15-minute blocks. There is no ability to scroll forward on the waitlist If the customer does not want the party to be added to a waitlist, the customer can select another time and click Find a Table.
4) Show this message to the client
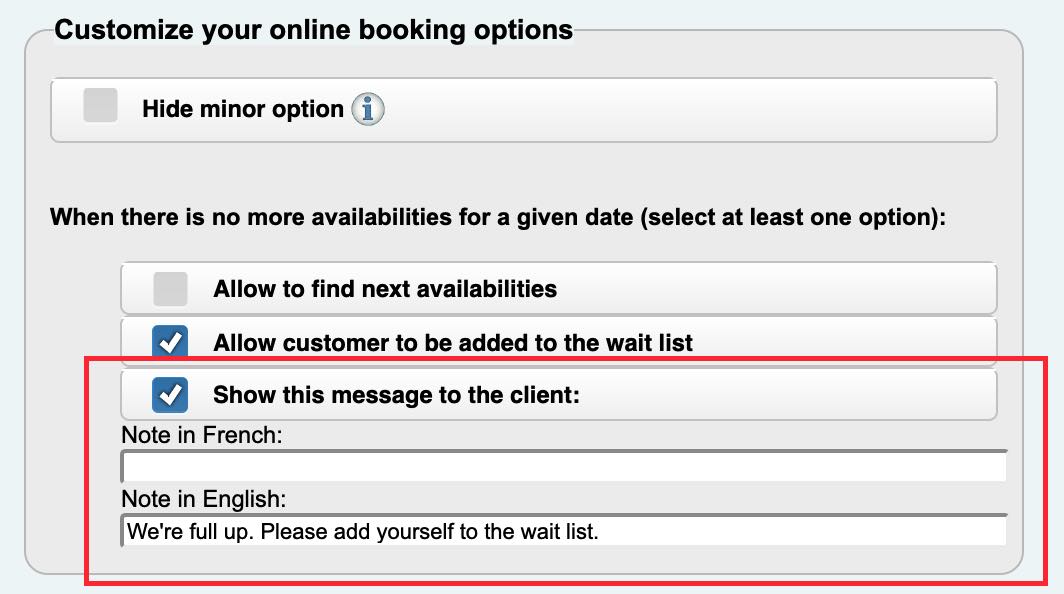
If you enable either, you can customize a message for the reservations page to display in the event of an unavailable time. For example, if we prefer customers to waitlist themselves, we can display a message directing them to add their party to the waitlist.
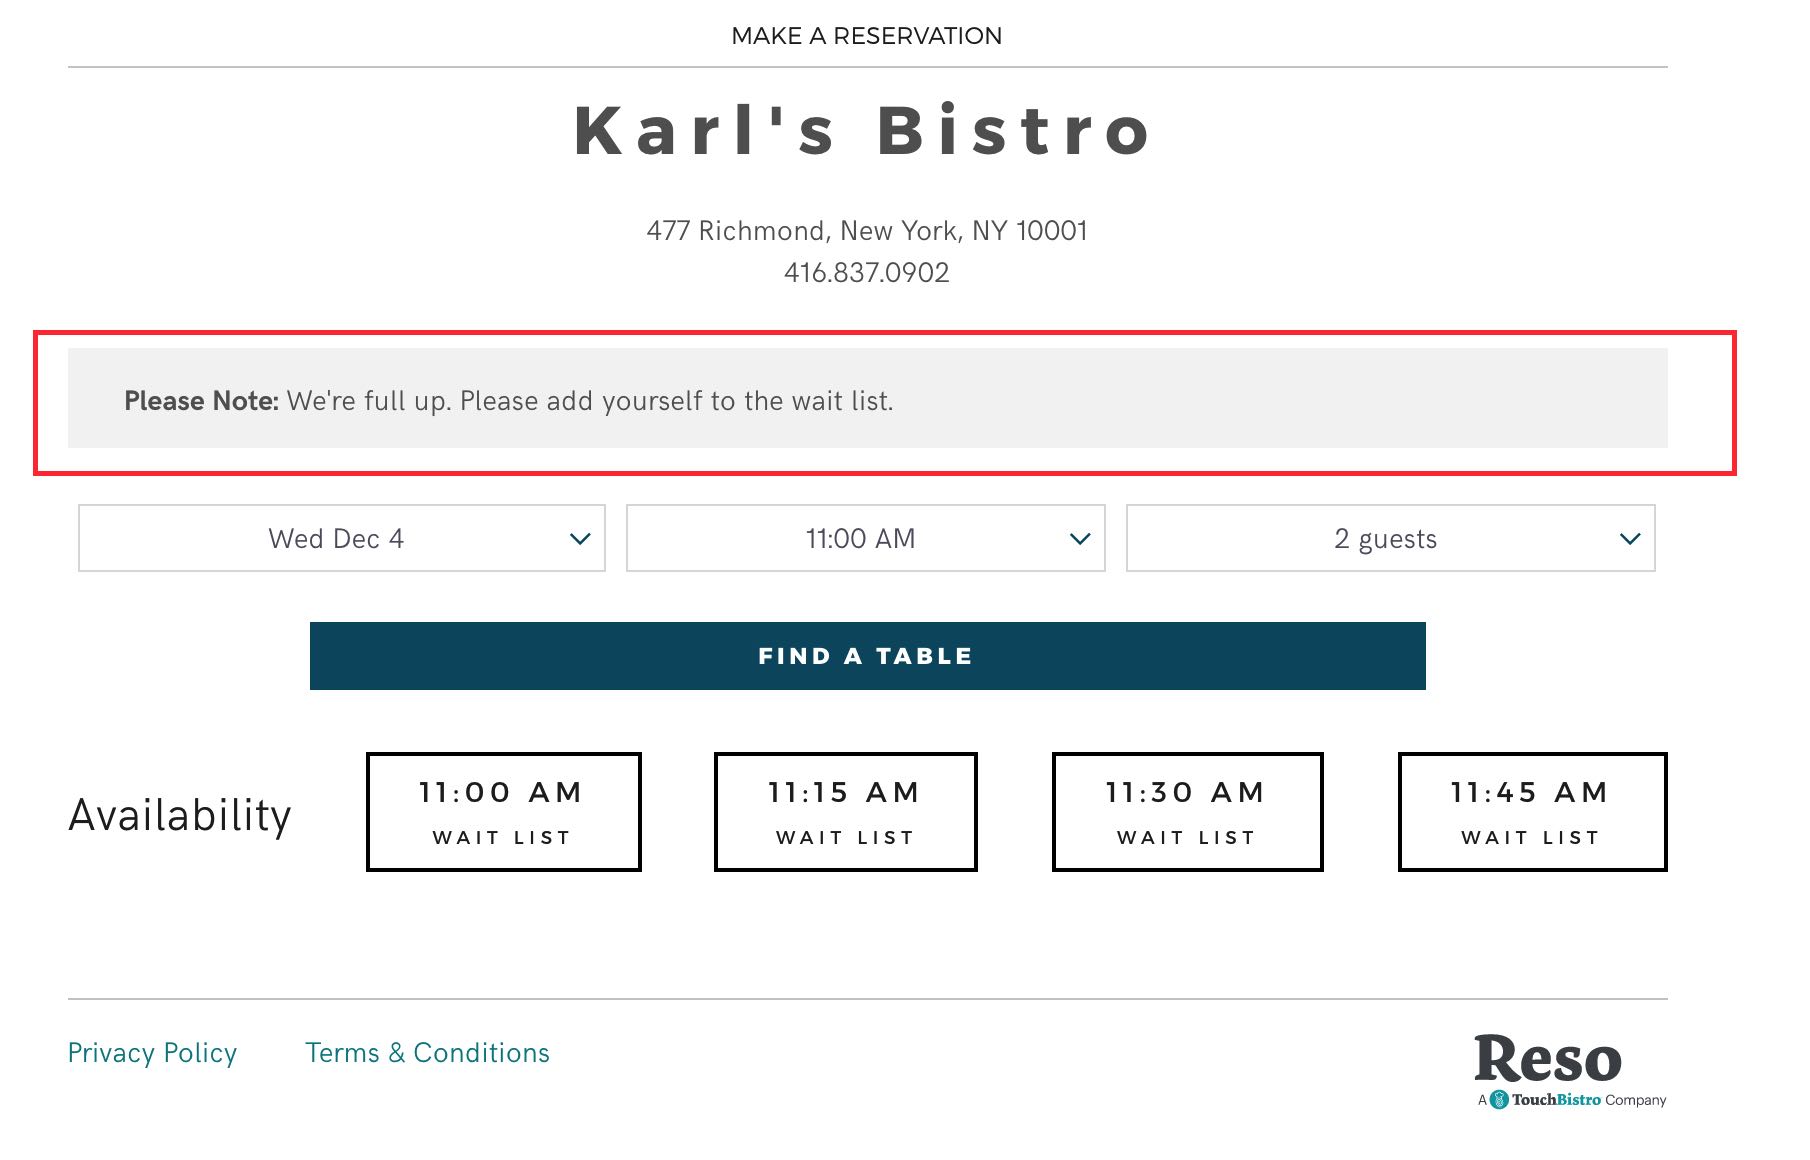
The message will display at the top of the screen.
Section 3. Message to show customers who book online
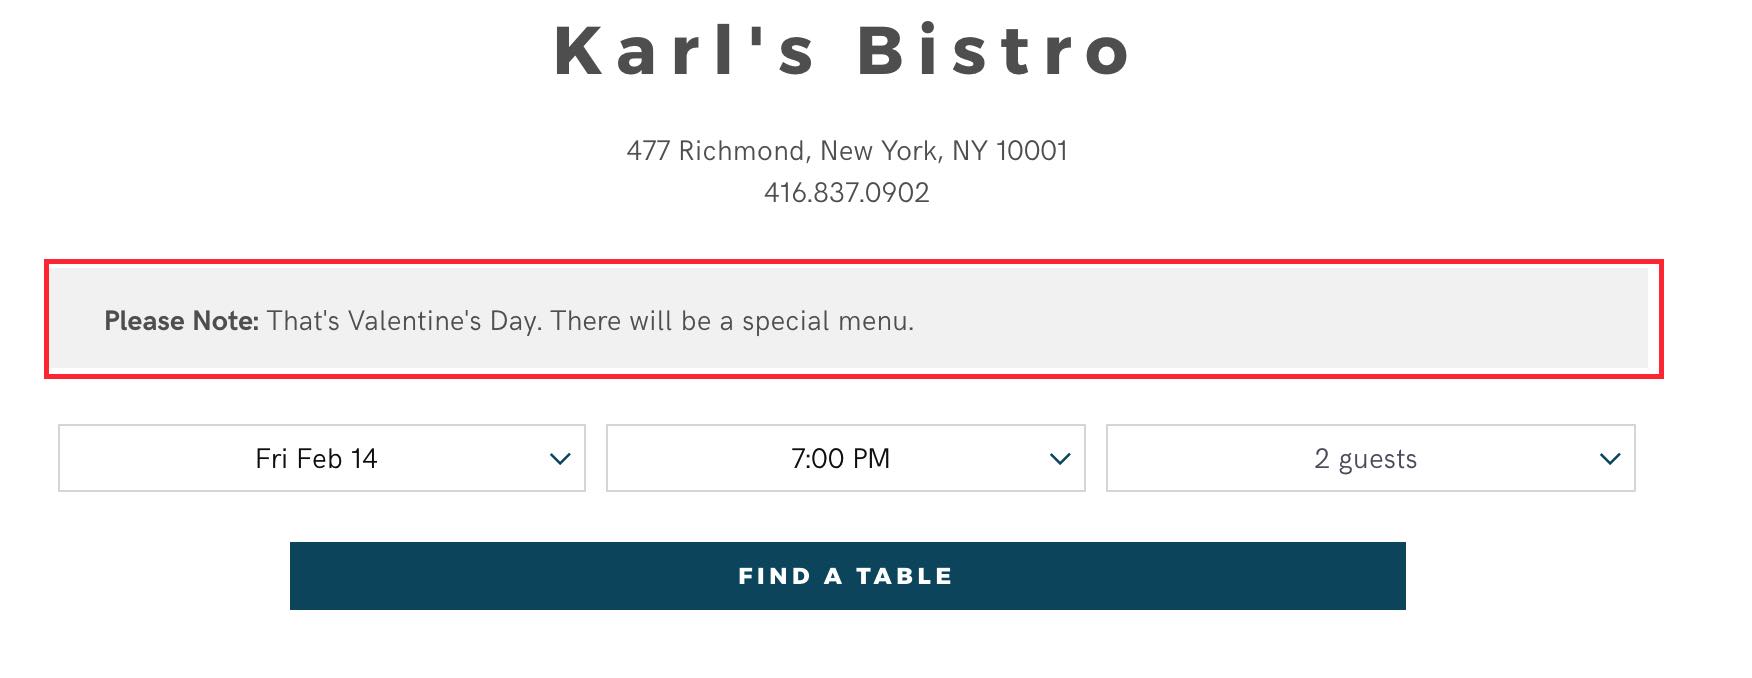
You can set up time-based messages for customers using TouchBistro Dine. These messages can appear on the booking page as well as in the confirmation email.
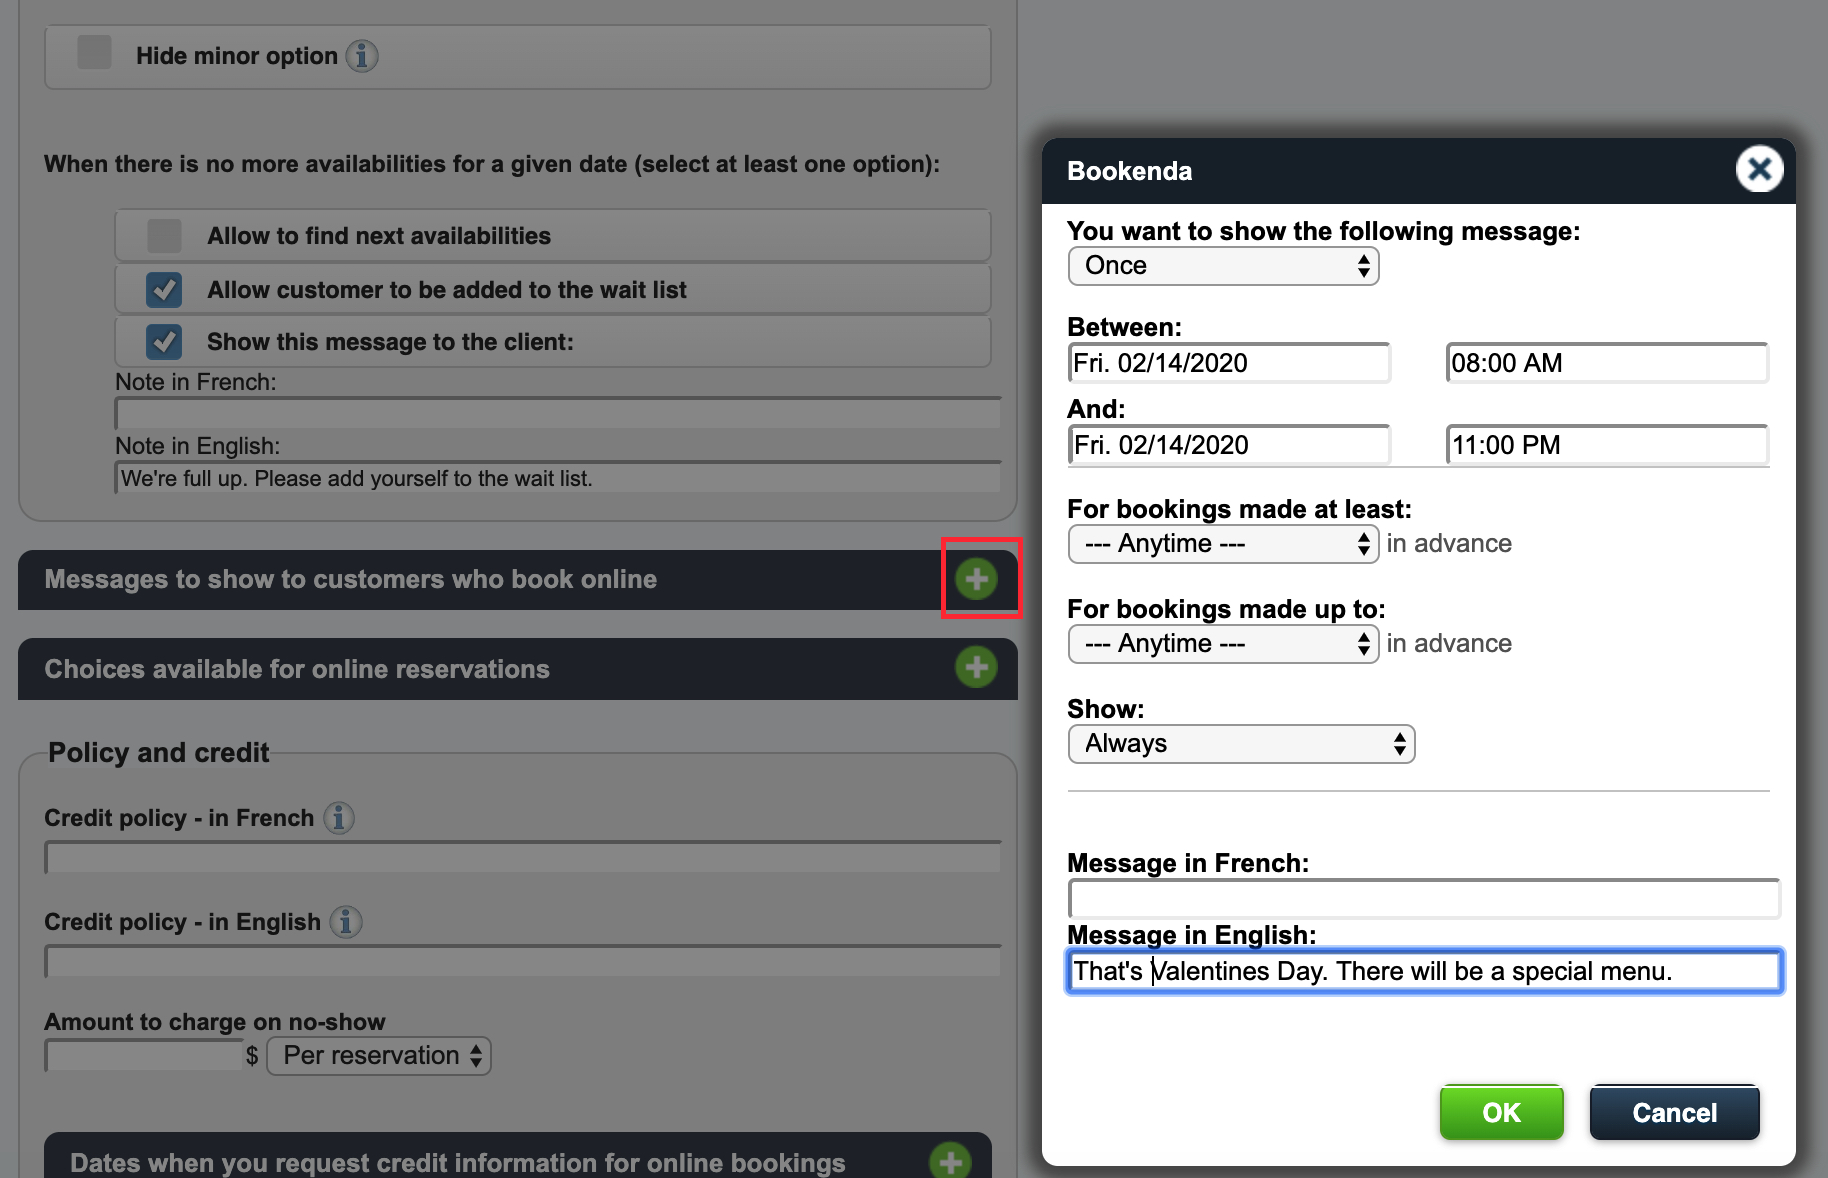
Click the Add + button to set up the message. Complete the dialog box’s settings:
|
Option
|
Description
|
|
You want to show the following message
|
Once: Ideal for a specific day like Valentine’s Day or Christmas. Set the day and time range. Daily: You want the message to appear every day on your TouchBistro Dine reservation page. Set the time range. Select Exceptionally if you want it to appear daily only between certain dates. For example, you want a daily message to appear during the summer months. Weekly: You want the message to appear on a certain day of the week. For example, you want to let TouchBistro Dine users know Sunday has a brunch menu. Select the day and the time range (e.g., Sunday 11 am to 1 pm). Select Exceptionally if you want it to appear weekly only between certain dates. For example, you want Sunday diners to know during the summer months brunch is not offered. Annually: You want your message to appear on a specific date every year. For example, you want to let diners know the kitchen closes early every Dec 24. Set the day and time range.
|
|
For bookings made at least
|
If you want the message to only show to customers booking for a certain time period in advance, set the desired time period. For example, you may want to warn customers trying to book for Valentine’s Day more than a month in advance that there will be a set menu and it’s price/options will be posted on the first of February.
|
|
For bookings made up to
|
If you want the message to not show for customers who book for a certain time period in advance, set the desired time period. For example, customers who book for Valentine’s Day a day or two before February 14, you want to display a warning that the best seating is limited and diners may have to be accommodated in a less desirable area of the restaurant.
|
|
Show
|
Always: The message will appear on both the TouchBistro Dine booking page as well as in the confirmation email. In the confirmation email: The message will only appear in the confirmation email, not the TouchBistro Dine booking page. In the reservation process: The message will only appear on the TouchBistro Dine booking page, not in the confirmation email.
|

You can edit this message by clicking the Message. You can delete the message by clicking the X button.
Section 4. Choices available for online reservations
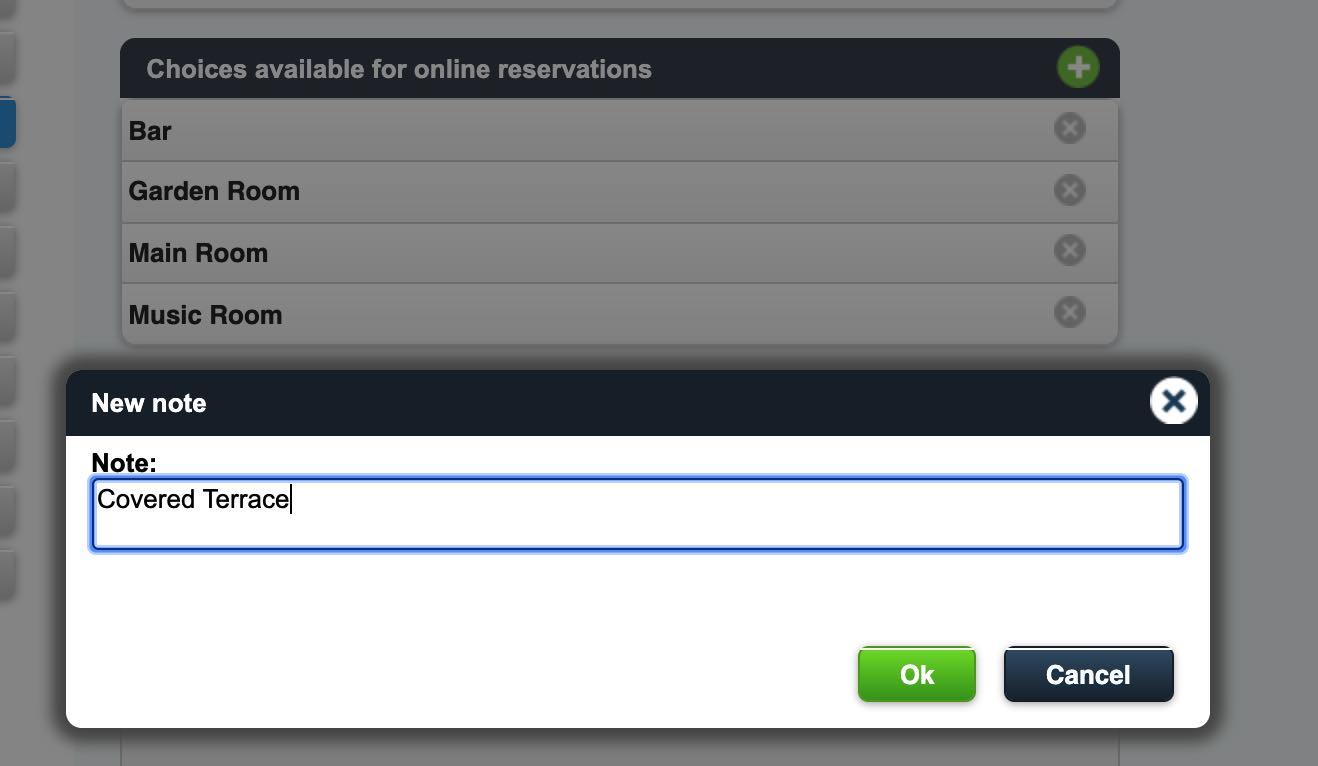
You can give the patron reserving online the ability to customize his/her reservation in some way. For example, if your venue has a number of picturesque rooms and you want to give the patron a choice of room preference, you could enter the rooms here.
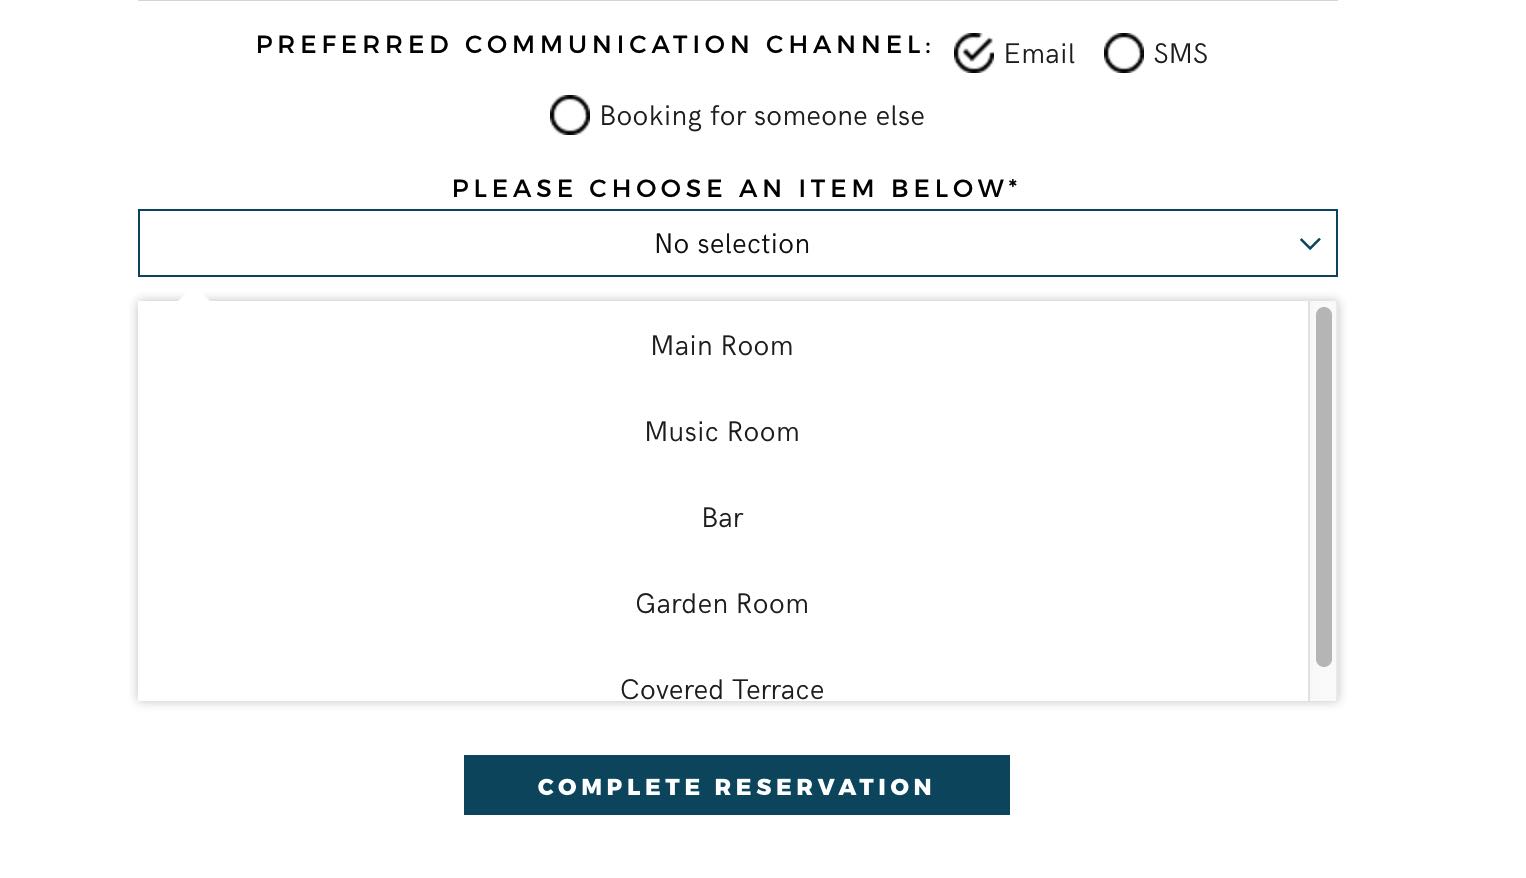
The items entered here are presented to the reservation maker on the reservation details page. The patron may only select one choice.
Section 5. Policy and credit
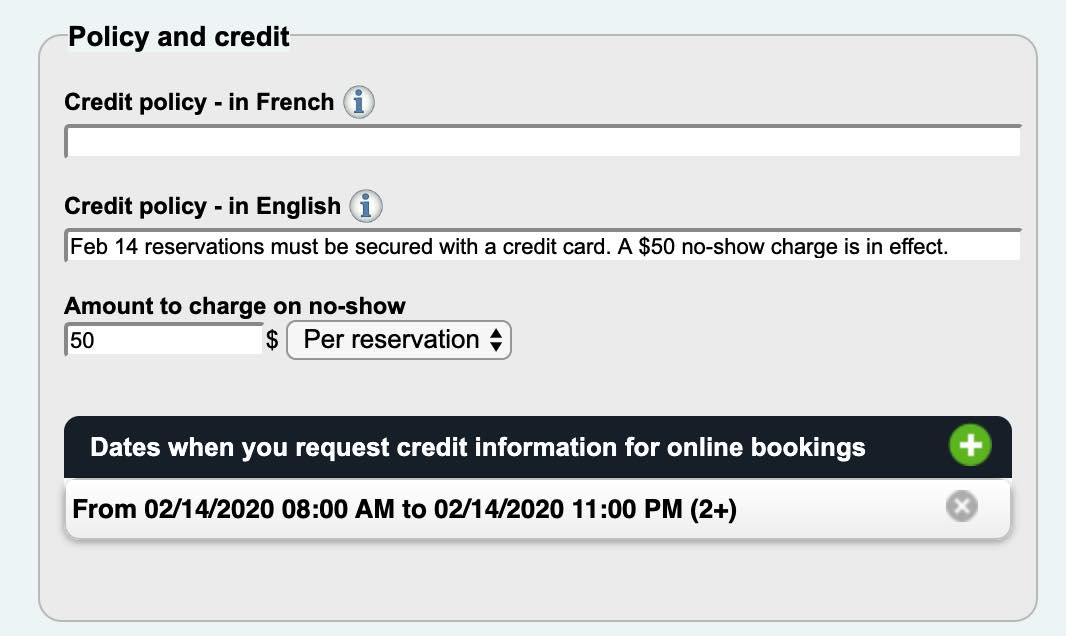
If you have a policy of charging no-shows, the Policy and credit section lets you set the terms, what is charged, as well as when the policy is in effect. Enter the displayed policy in English and/or French.

Enter the amount to charge for a no-show. You can set the charge to be per reservation or per cover.
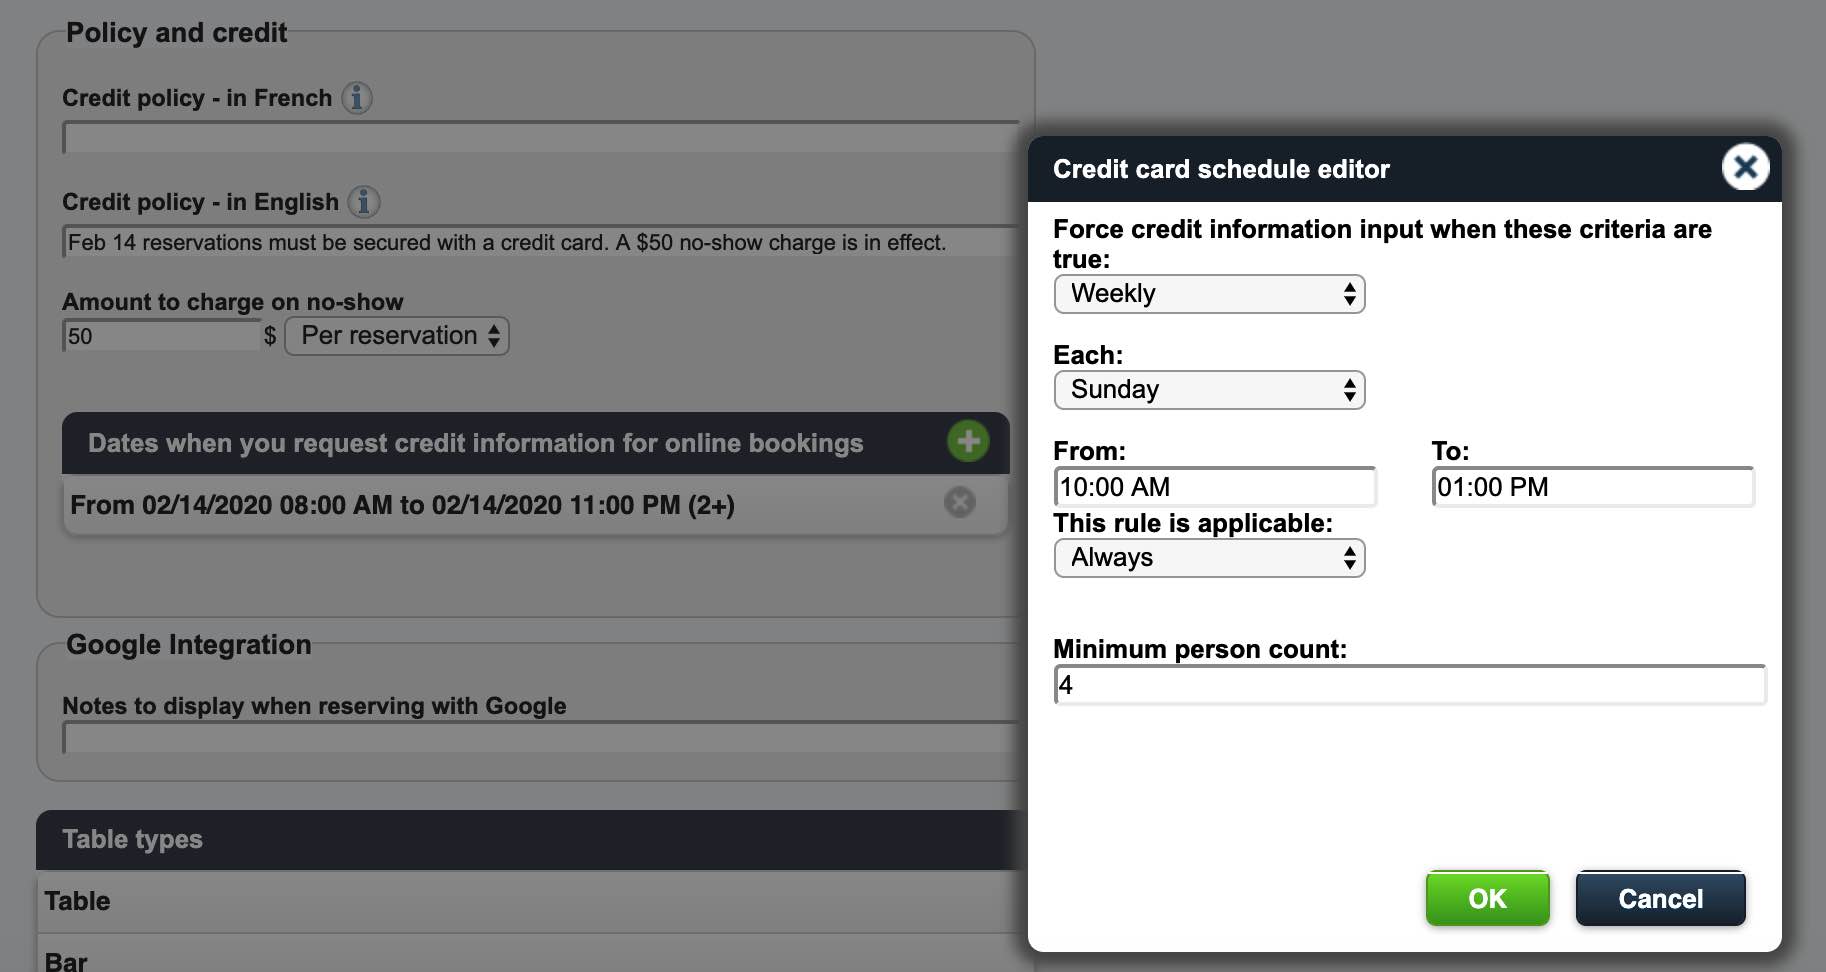
Click the Add + button to set up further details of the policy. Complete the dialog box’s settings:
|
Option
|
Description
|
|
Period
|
Once: Once is best used if you want to enforce a no-show charge for a holiday that changes every year (Easter) or a one-time event (a playoff game). For a one day a year event like Feb 14 or Dec 25, use Annually. Daily: You want the no-show charge to appear every day on your TouchBistro Dine reservation page. Set the time range. Select Exceptionally if you want it to appear daily only between certain dates. For example, you want the charge to be enforced during the summer months. Weekly: You want the no-show charge to appear on a certain day of the week. For example, your Sunday brunch is very popular and you want the charge to be enforced for people reserving Sunday brunch. Select the day and the time range (e.g., Sunday 11 am to 1 pm). Select Exceptionally if you want it to appear weekly only between certain dates. For example, you want Sunday diners to know during the summer months brunch is not offered. Annually: You want the no-show charge to on a specific date every year. For example, you want the charge to always be enforced on Feb 14 (Valentine’s day). Set the day and time range.
|
|
Minimum Person Count
|
Set this for 1 if all reservations should be subject to the no-show charge. Or set it higher for larger parties. For example, parties of 4 or more who do not show for Sunday brunch should be charged the no-show amount.
|

You can edit the logic by clicking the appropriate condition. You can delete the condition by clicking the X button.
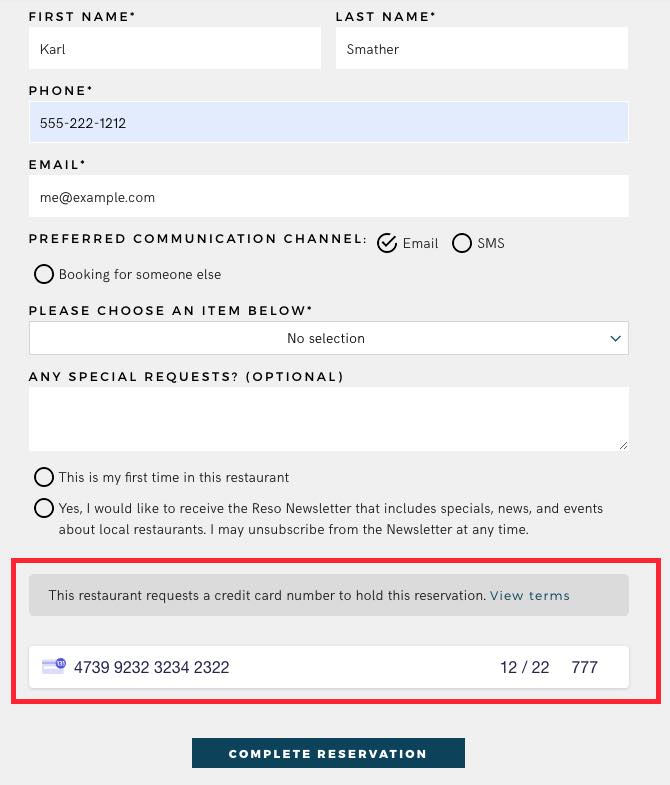
If you set up a no-show policy, the reservation details page will require the entry of credit card details before the patron can complete the reservation.
Section 6. Google Integration

If you are integrated with Google and allow direct reservations through Google search/maps, you can use this field to push a note to the Google reservation control.
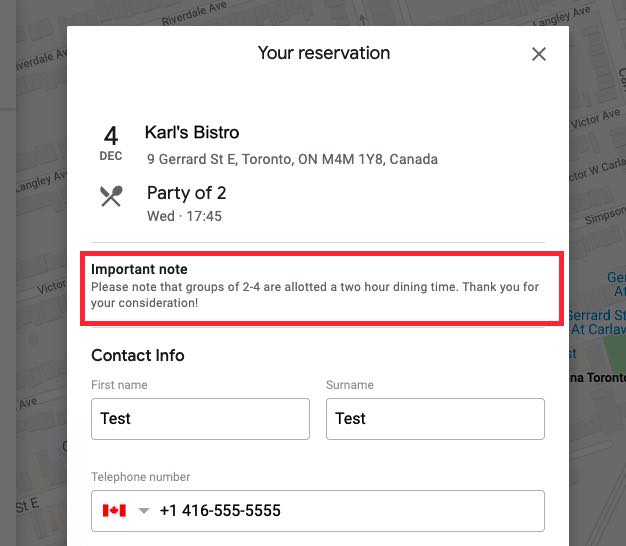
Your note will appear in the Important note section.
1) Waitlisting
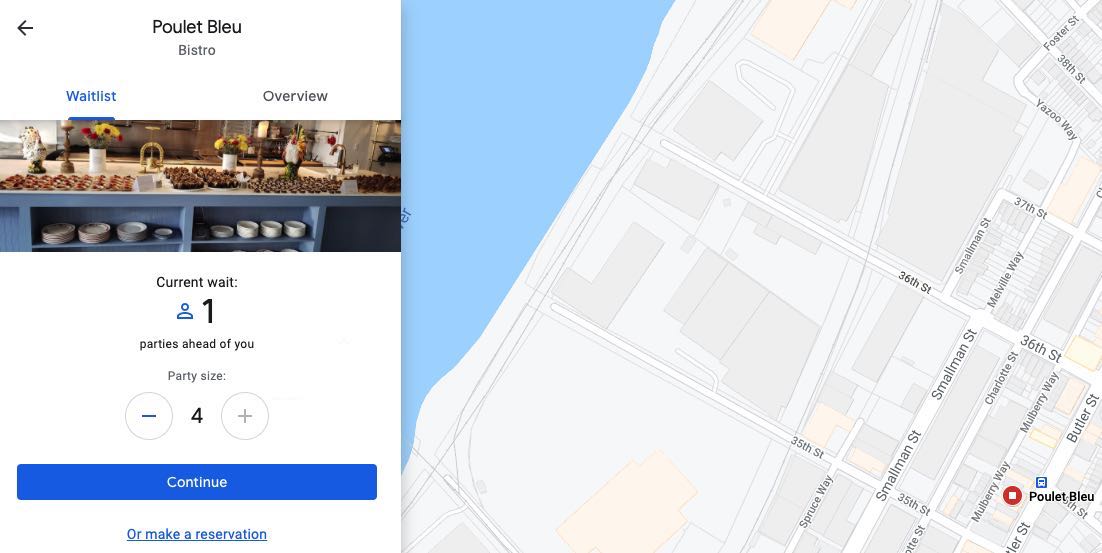
Google also allows you to offer your diners the ability to join a waitlist if they find your restaurant via search/maps and all tables are booked for the next 15-30 minutes.
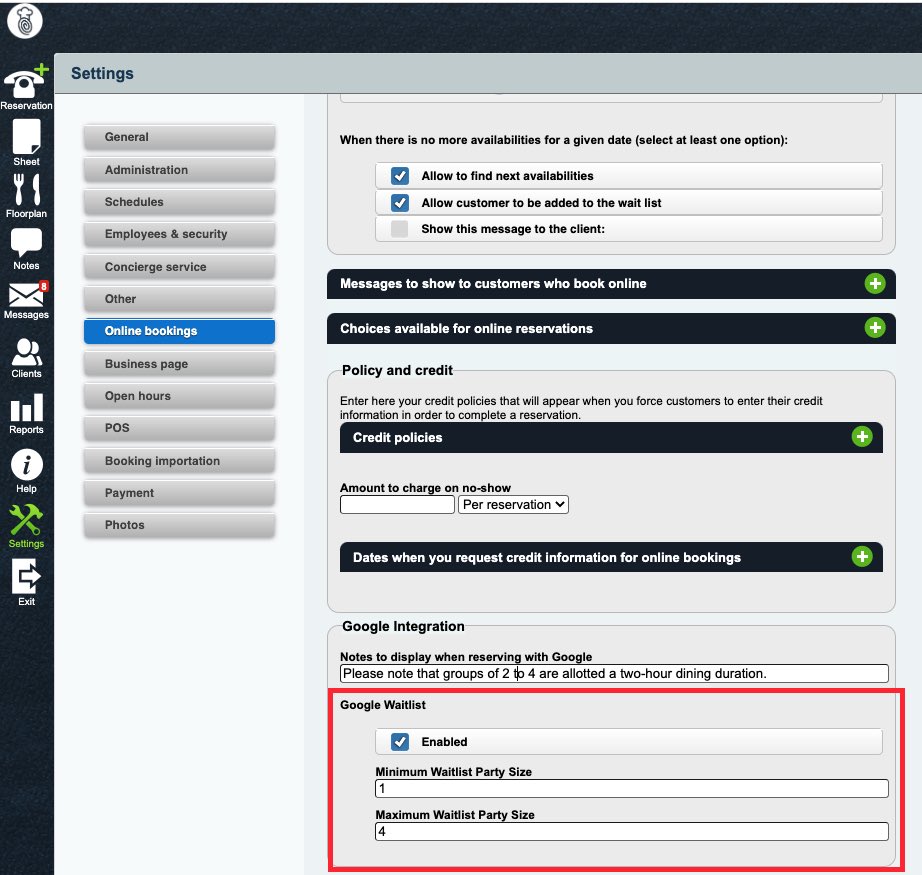
If you would like to offer this, check Enabled. Use the Minimum and Maximum Waitlist Party Size fields to control the minimum and maximum party size that can waitlist themselves. For example, if you set Maximum to 4, a diner won’t be able to select a waitlist party size greater than 4.
Note: After enabling the integration, it will take 24 hours to take into effect on Google’s end.
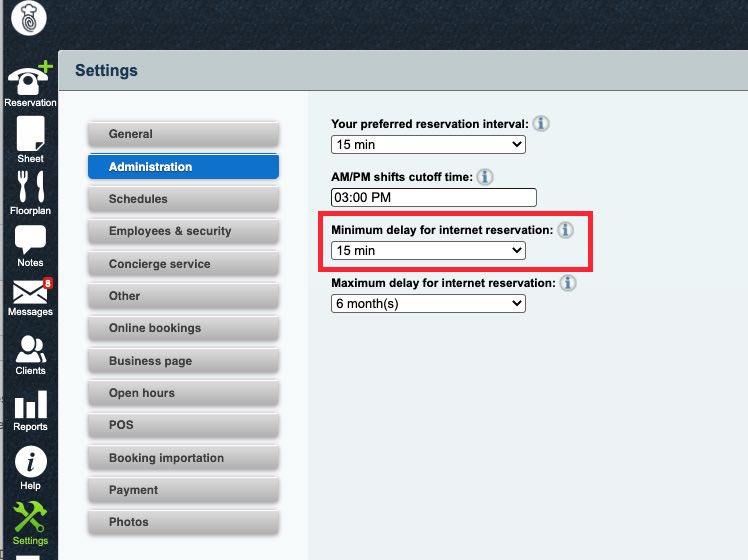
Before you enable waitlisting, you should go to Settings | Administration. Ensure Minimum delay for internet reservations is set to either 15 min or 30 min. If it is set to any value higher, the Google business page will not offer a diner the option to waitlist themselves.
For a tutorial on how to use the Google Waitlist widget, see this guide.
Section 7. Table types

TouchBistro Reservations supports three table types: Table, Bar, and Patio.
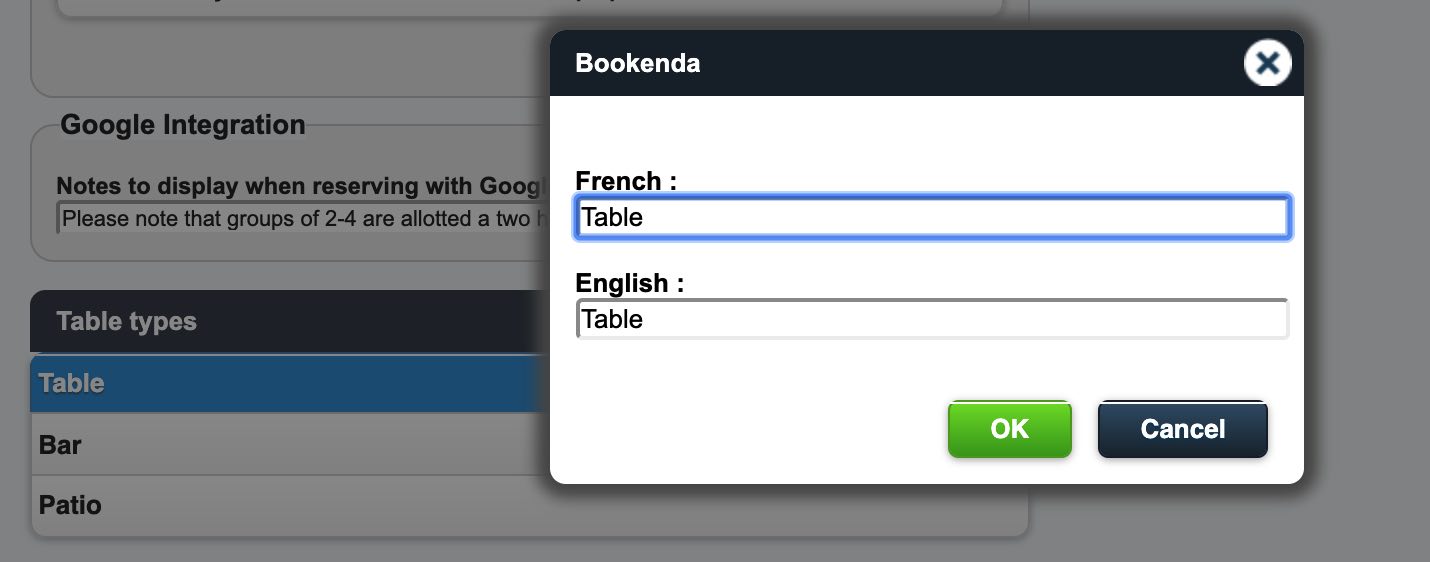
If you would like to adjust the terminology, click the type you wish to edit. Input the new term and click OK.
Chapter 9. Business page
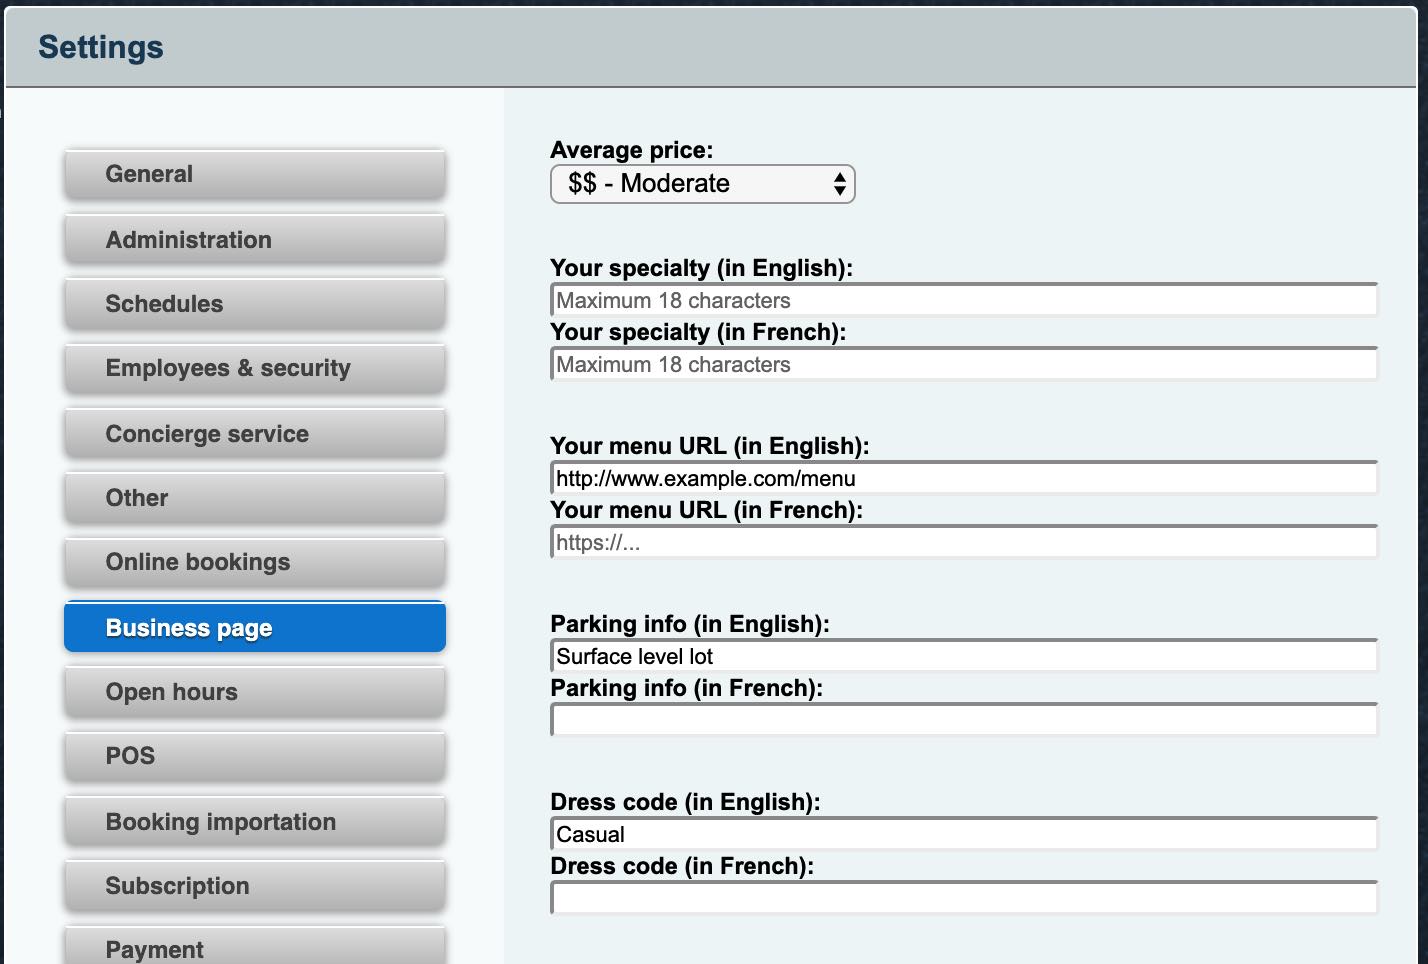
The Business page section allows you to define specifics on your TouchBistro Reservations business page.
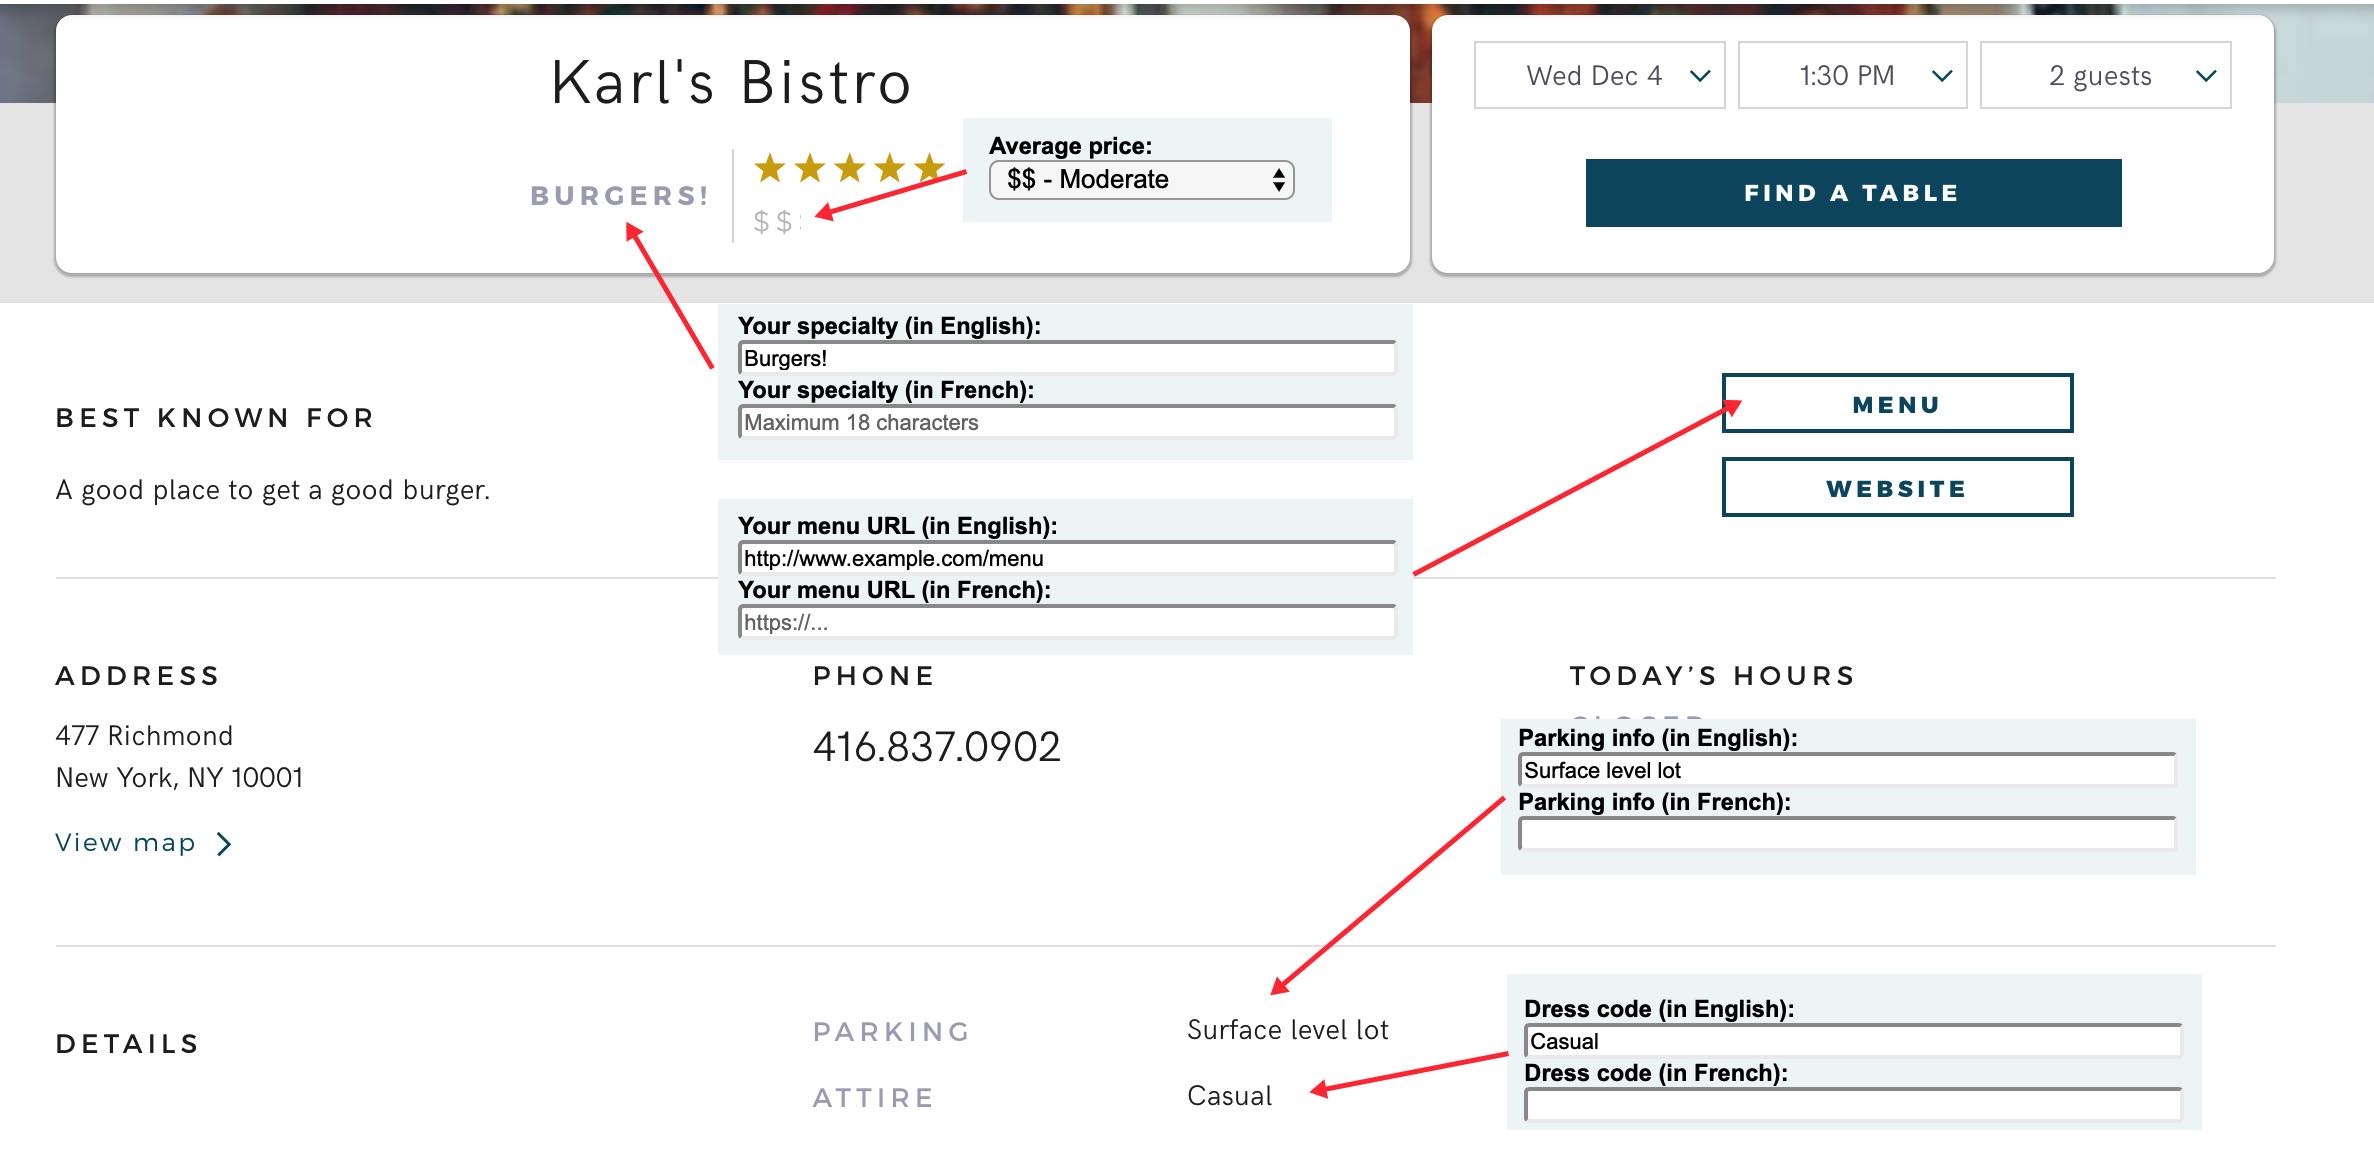
The example business page above illustrates where each item set here gets reflected on the business page.
Chapter 10. Open hours
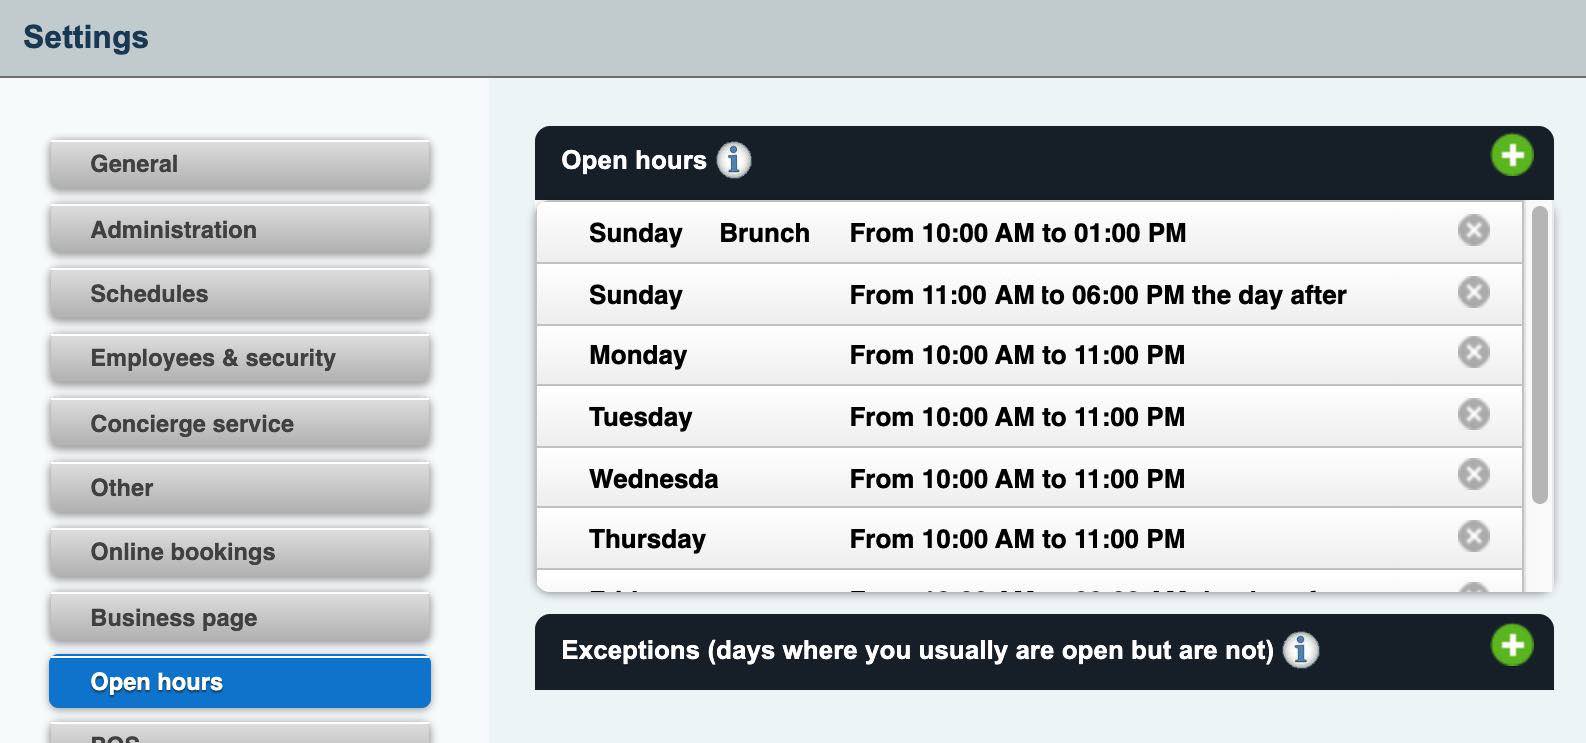
The Open hours section lets you set how your open hours displays on your business page. Click the Add + button at the top right to add a new open hours.
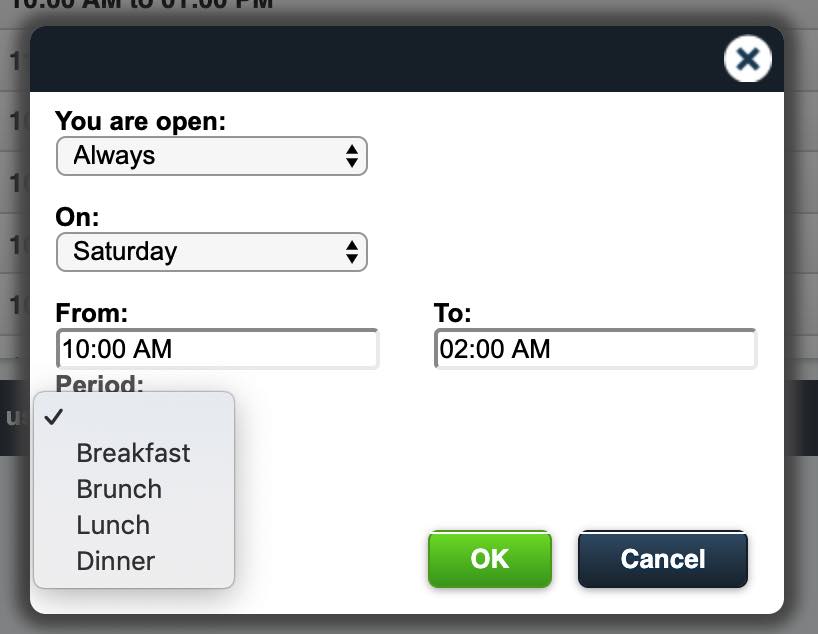
You can define your hours simply: day of the week, open and close hours. However, you can also break out different time periods. For example, you could set, say, Sunday 10 am to 1 pm as Brunch.
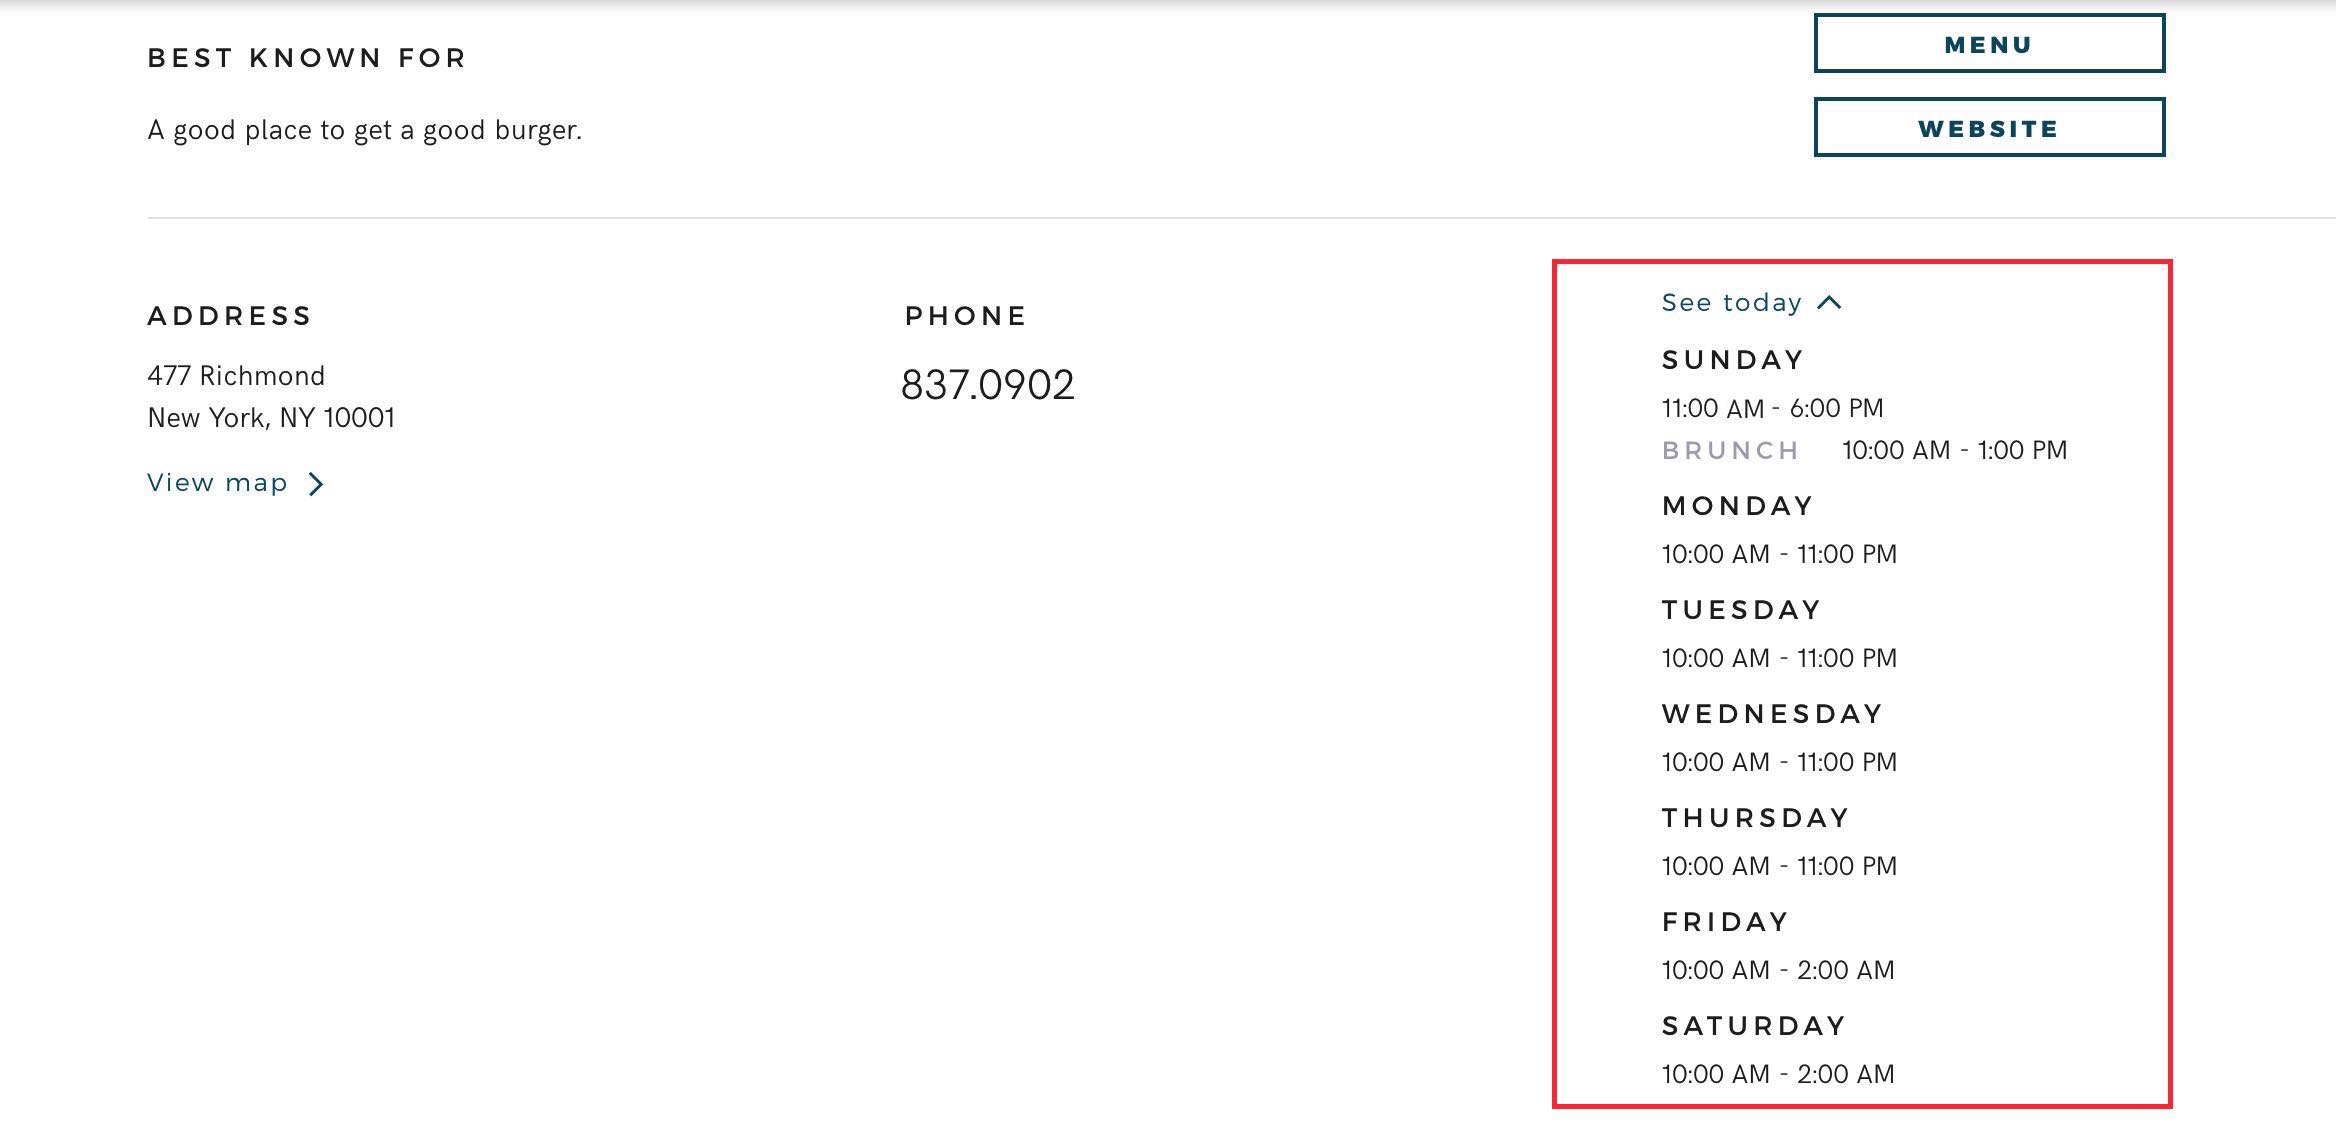
Your configured hours display on your business page as pictured above.
Section 1. Exceptions

You can have your business page automatically display your as closed based on Exceptions. To create an exception, click the Add + button at the top right.
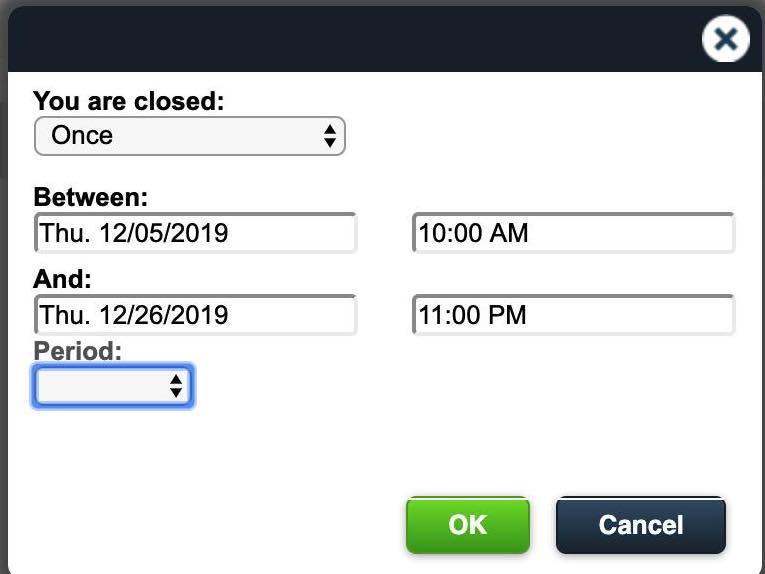
Complete the dialog box’s settings. In pictured example above, our venue closes from Dec 5 until Dec 26, 2019.
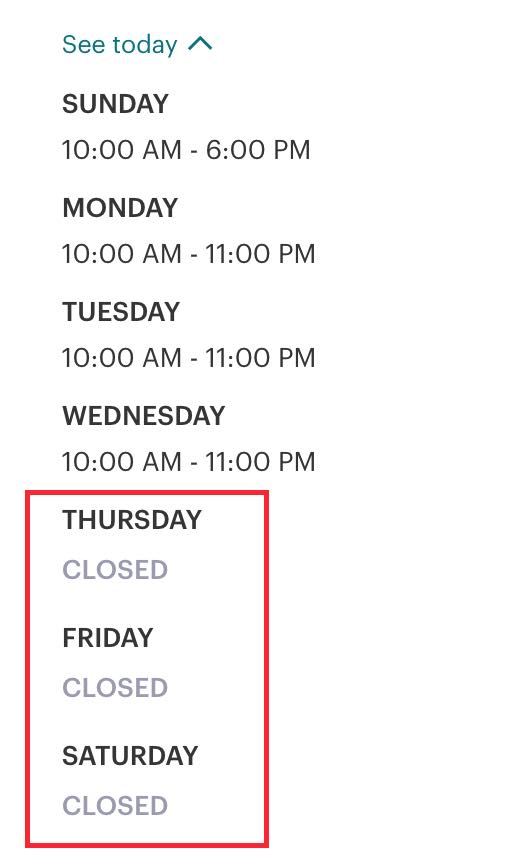
On our business page, we can see TouchBistro Dine automatically sets Thursday Dec 5 and onward as closed.
If certain days of the week, you are closed after the lunch period but then reopen for dinner, you can use the Period option to set your “down” period.

For example, Monday to Thursday, our venue is closed from 1 pm to 3 pm. We can create four weekly exceptions.
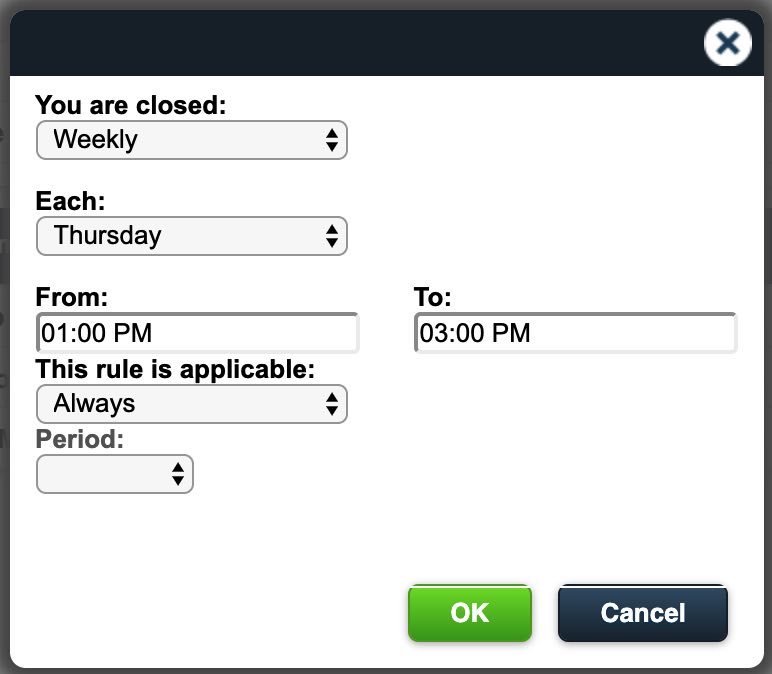
Each is created by selecting Weekly and a distinct day. Repeat for this for Monday, Tuesday, Wednesday, and Thursday.
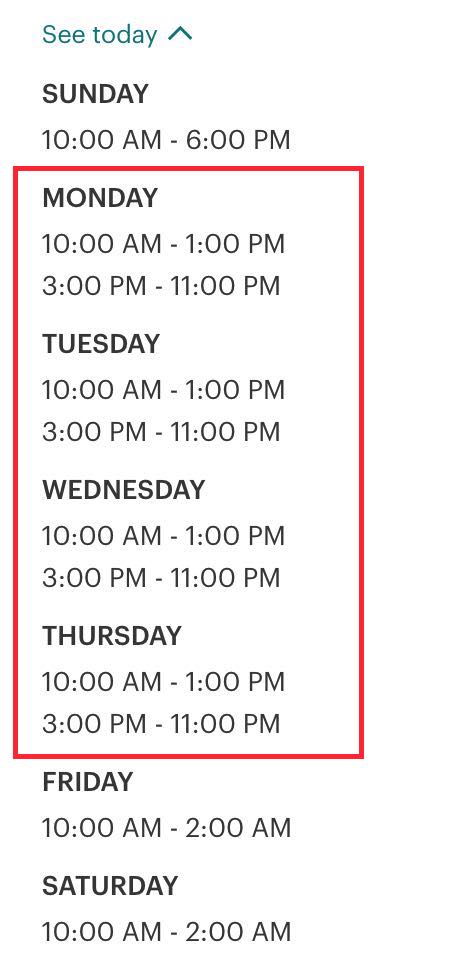
On your business page, TouchBistro Dine will probably calculate the open hours.
Chapter 11. Booking Importation
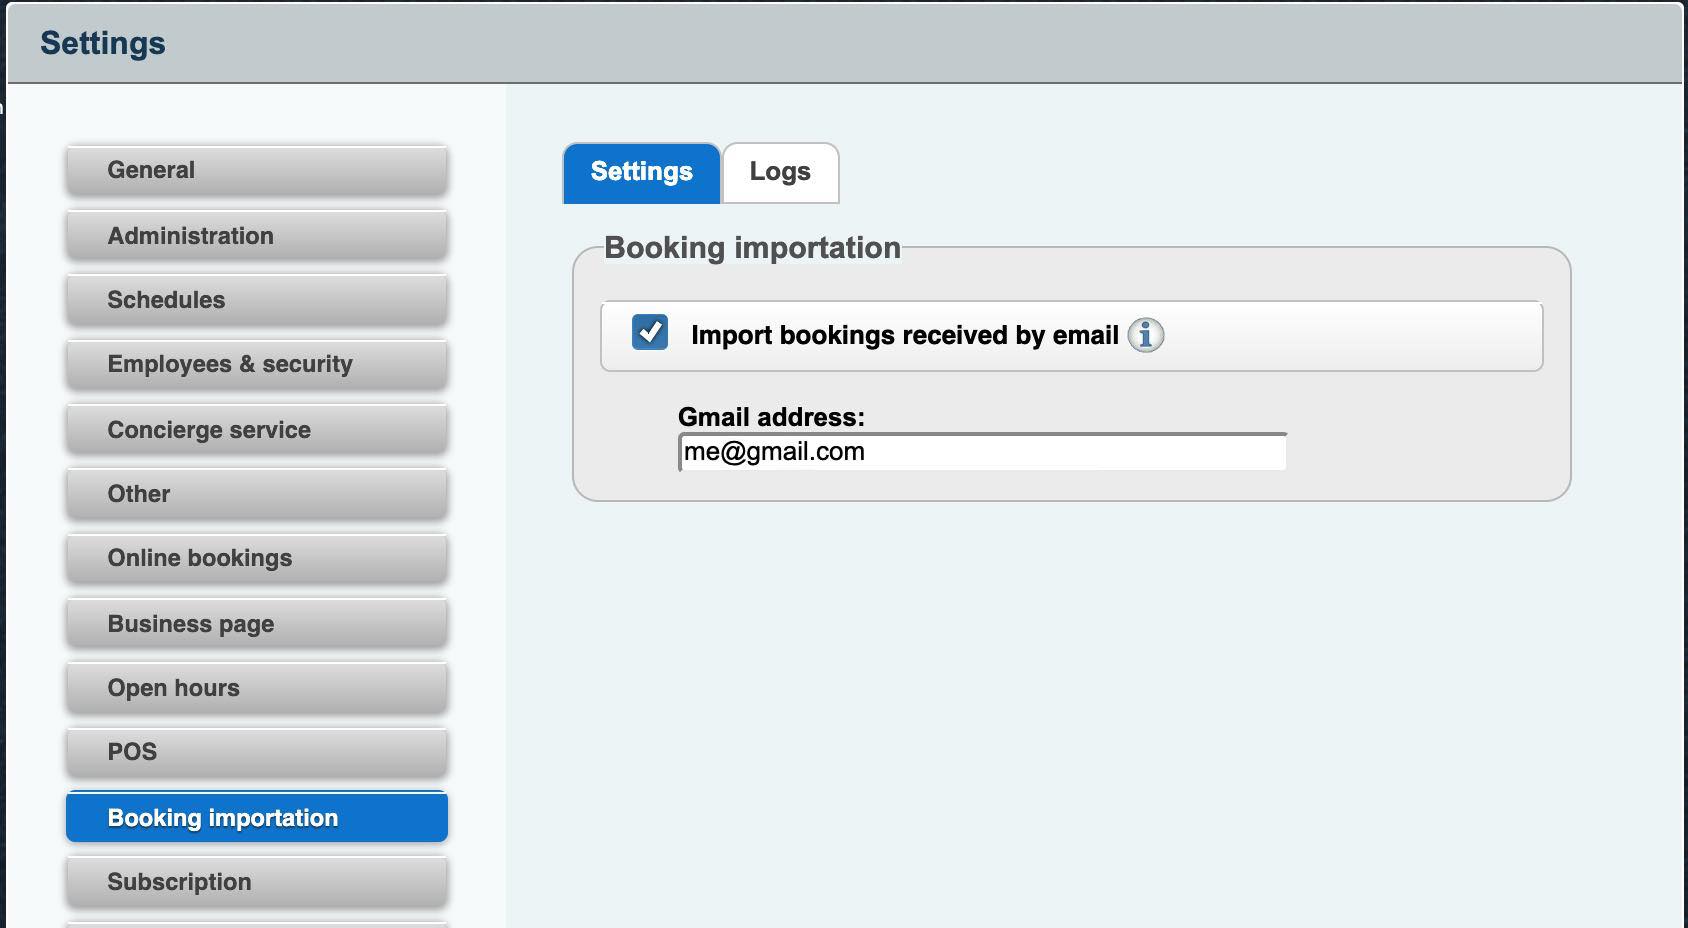
If you want to allow reservations through email, enable this setting.
Chapter 12. Subscription
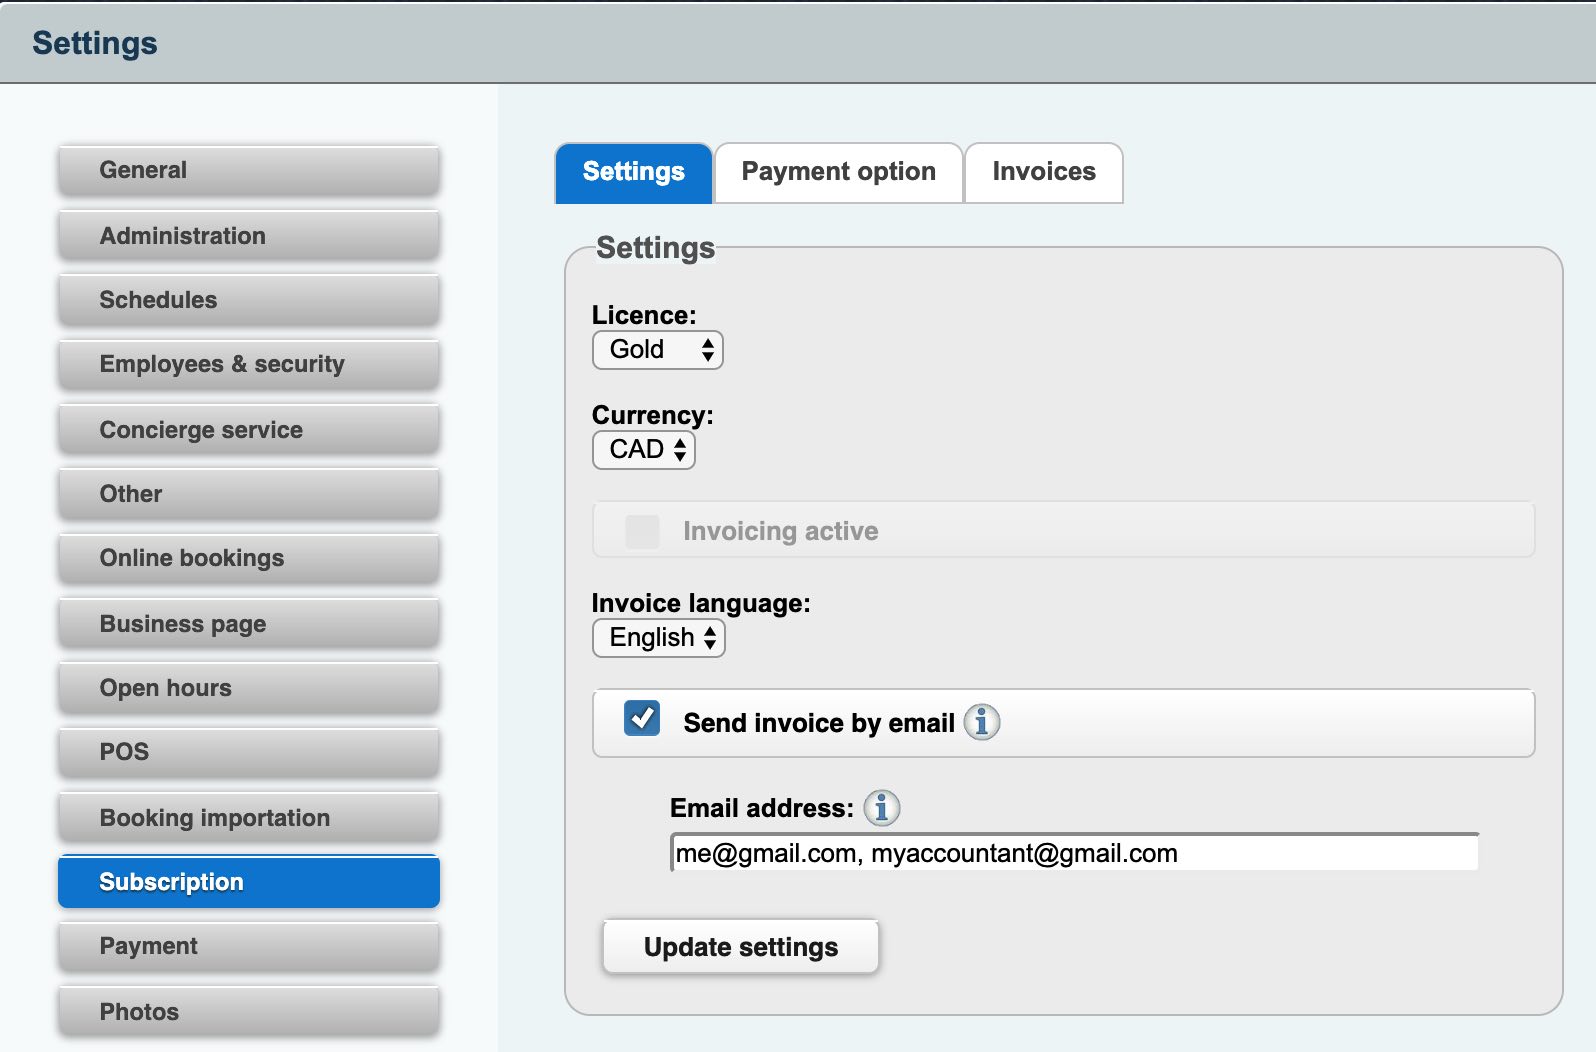
The Subscription section lets you set up how you want to receive invoices and how you want to pay those invoices. As well, you can view past invoices.
Chapter 13. Payment
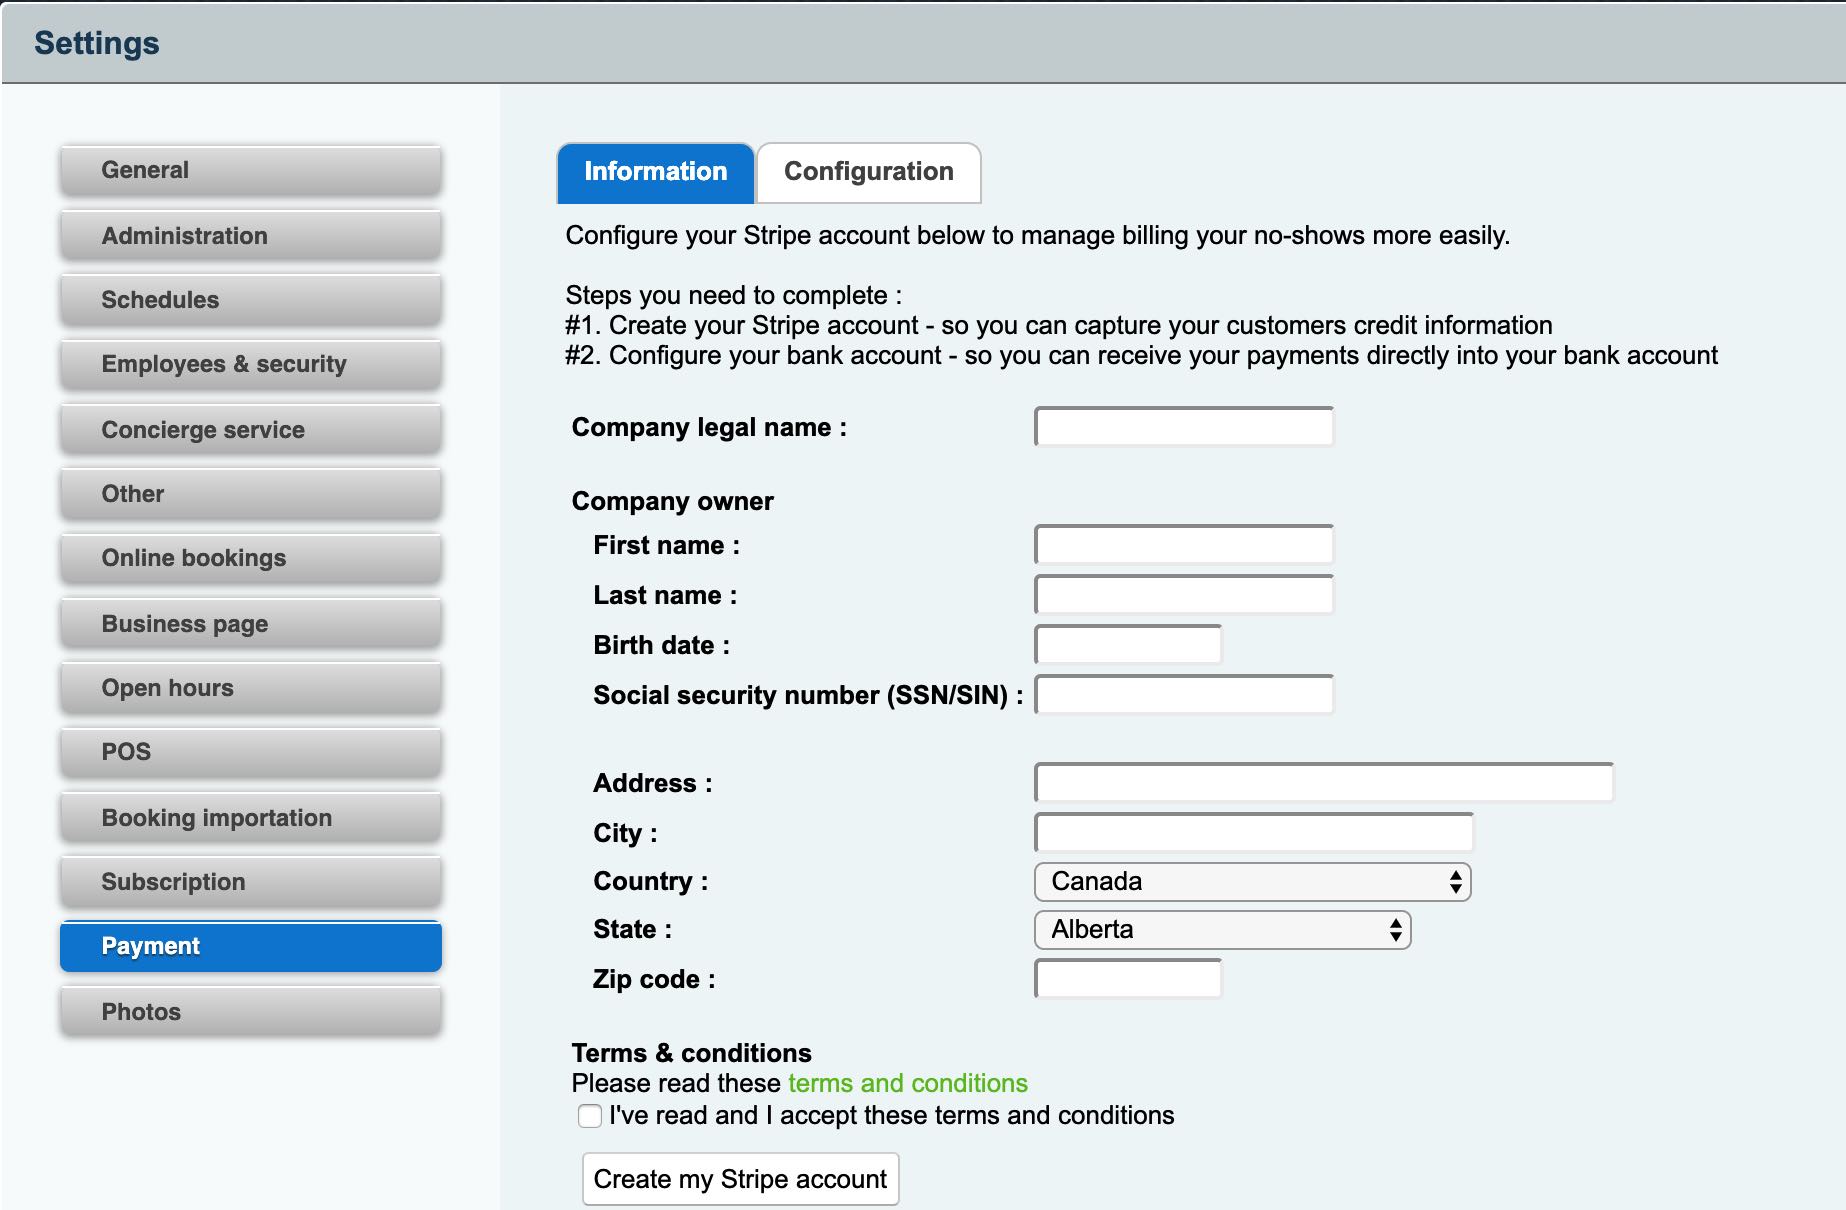
Before you can bill customers for no-shows, you need to set up a Stripe account and input your credentials in the Payment section. This feature is available in Canada, USA, and UK. Stripe is not available in Mexico.
Section 1. Changing Your Details
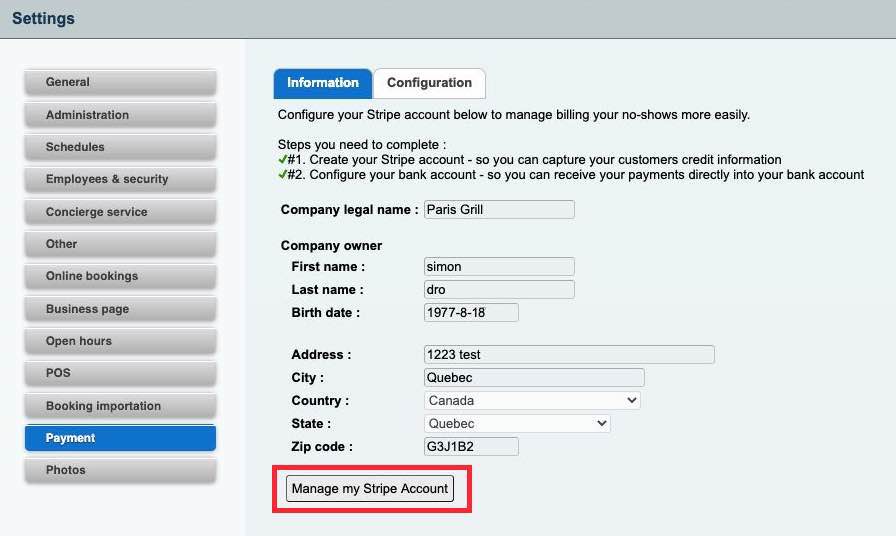
If you need to update your details, return to this screen. You will not be able to edit the display fields. To changed details, click Manage my Stripe Account.
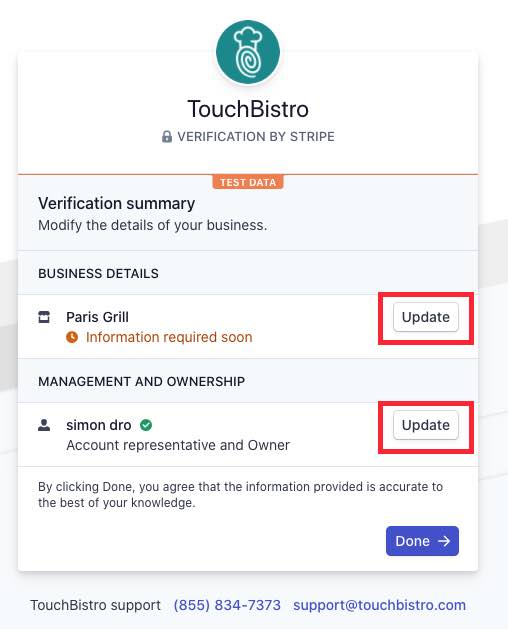
Click the Update buttons to update the required information.
Chapter 14. Photos
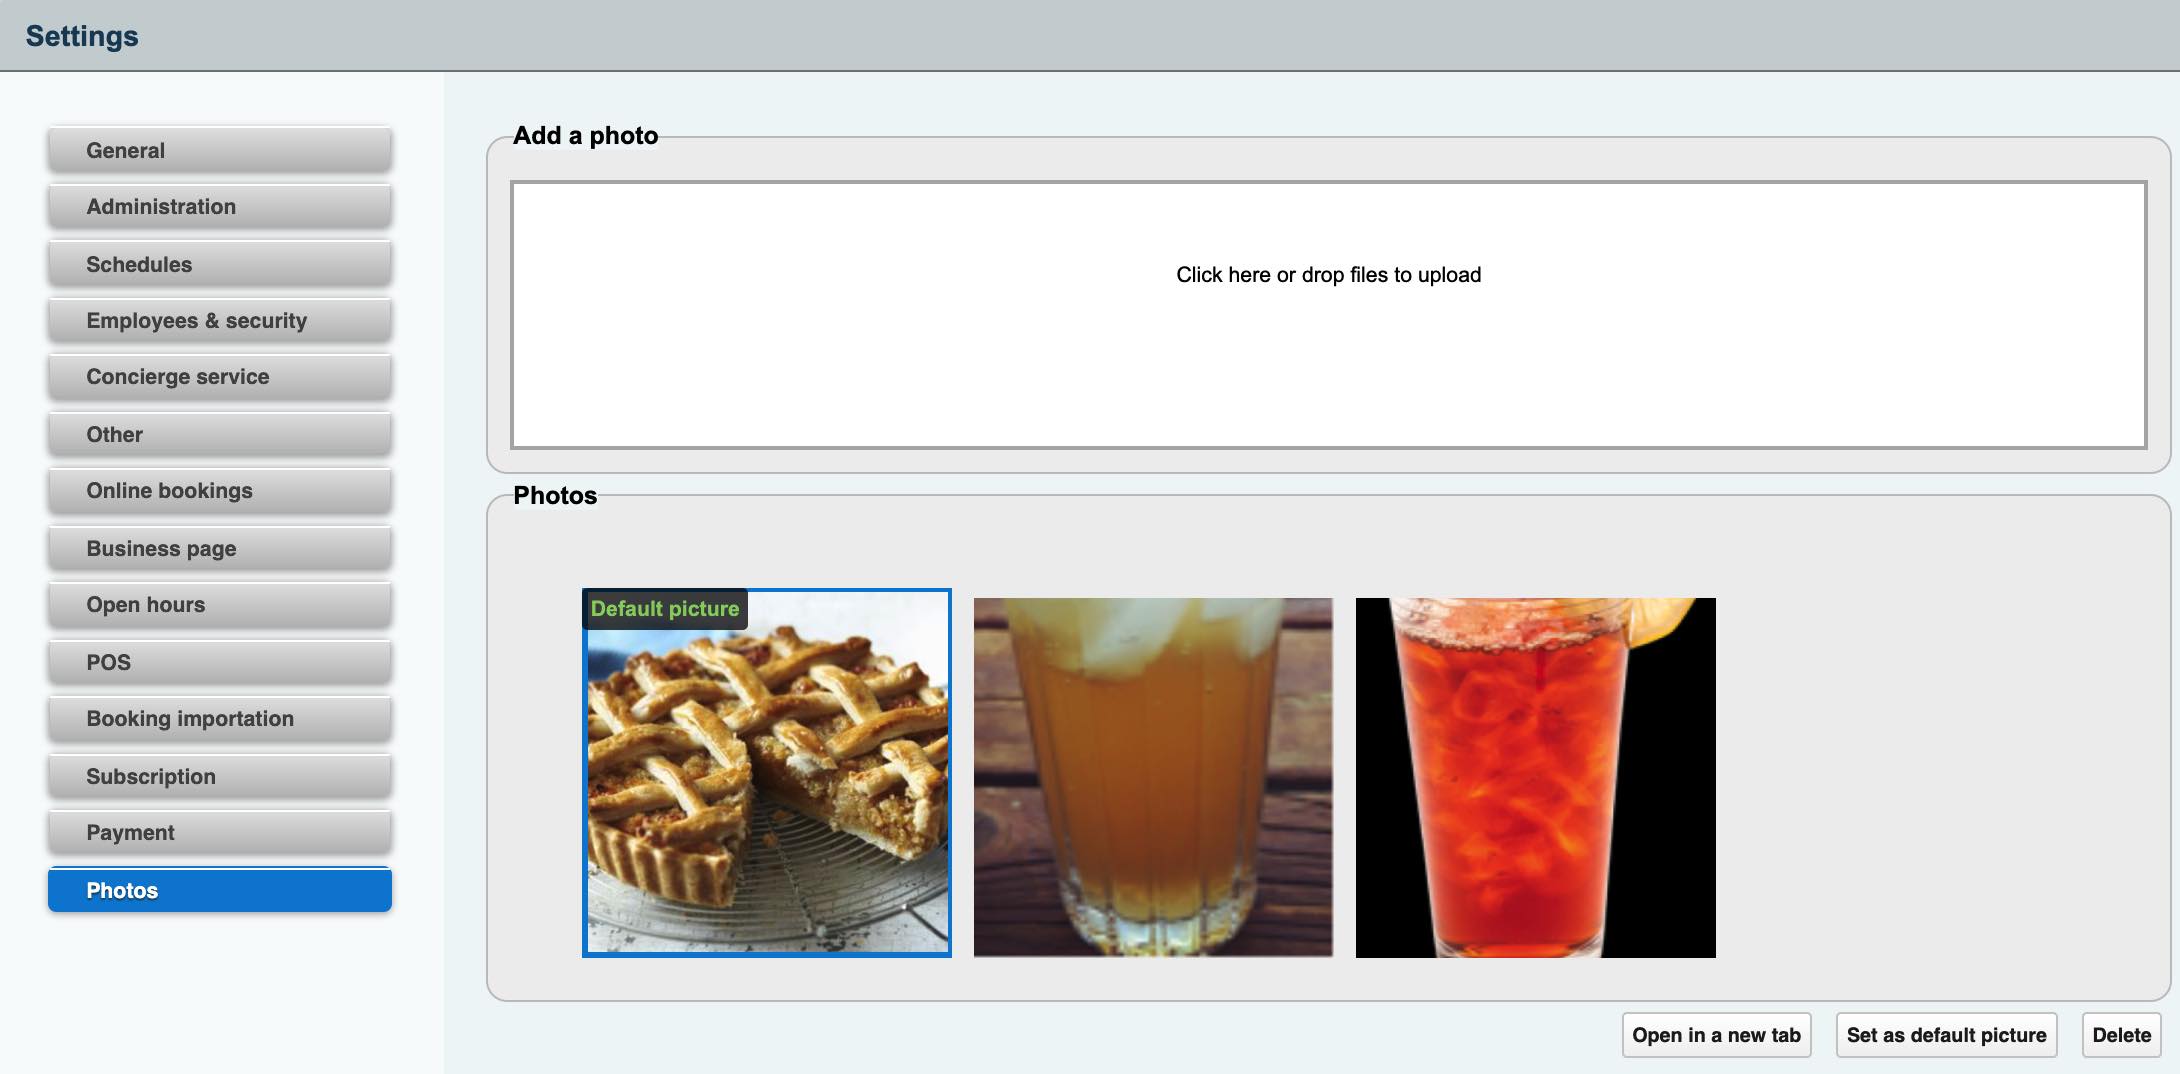
The Photos section lets you upload photos to be used on your business page. You can drag and drop photos to add into the Add a photo section. Alternatively, you can click in the area and locate the files via a dialog box. Photos should be 1000×700 pixels for optimal display on your business page.
Click on an uploaded photo and click Set as default picture to set the picture as the image used in your business page.
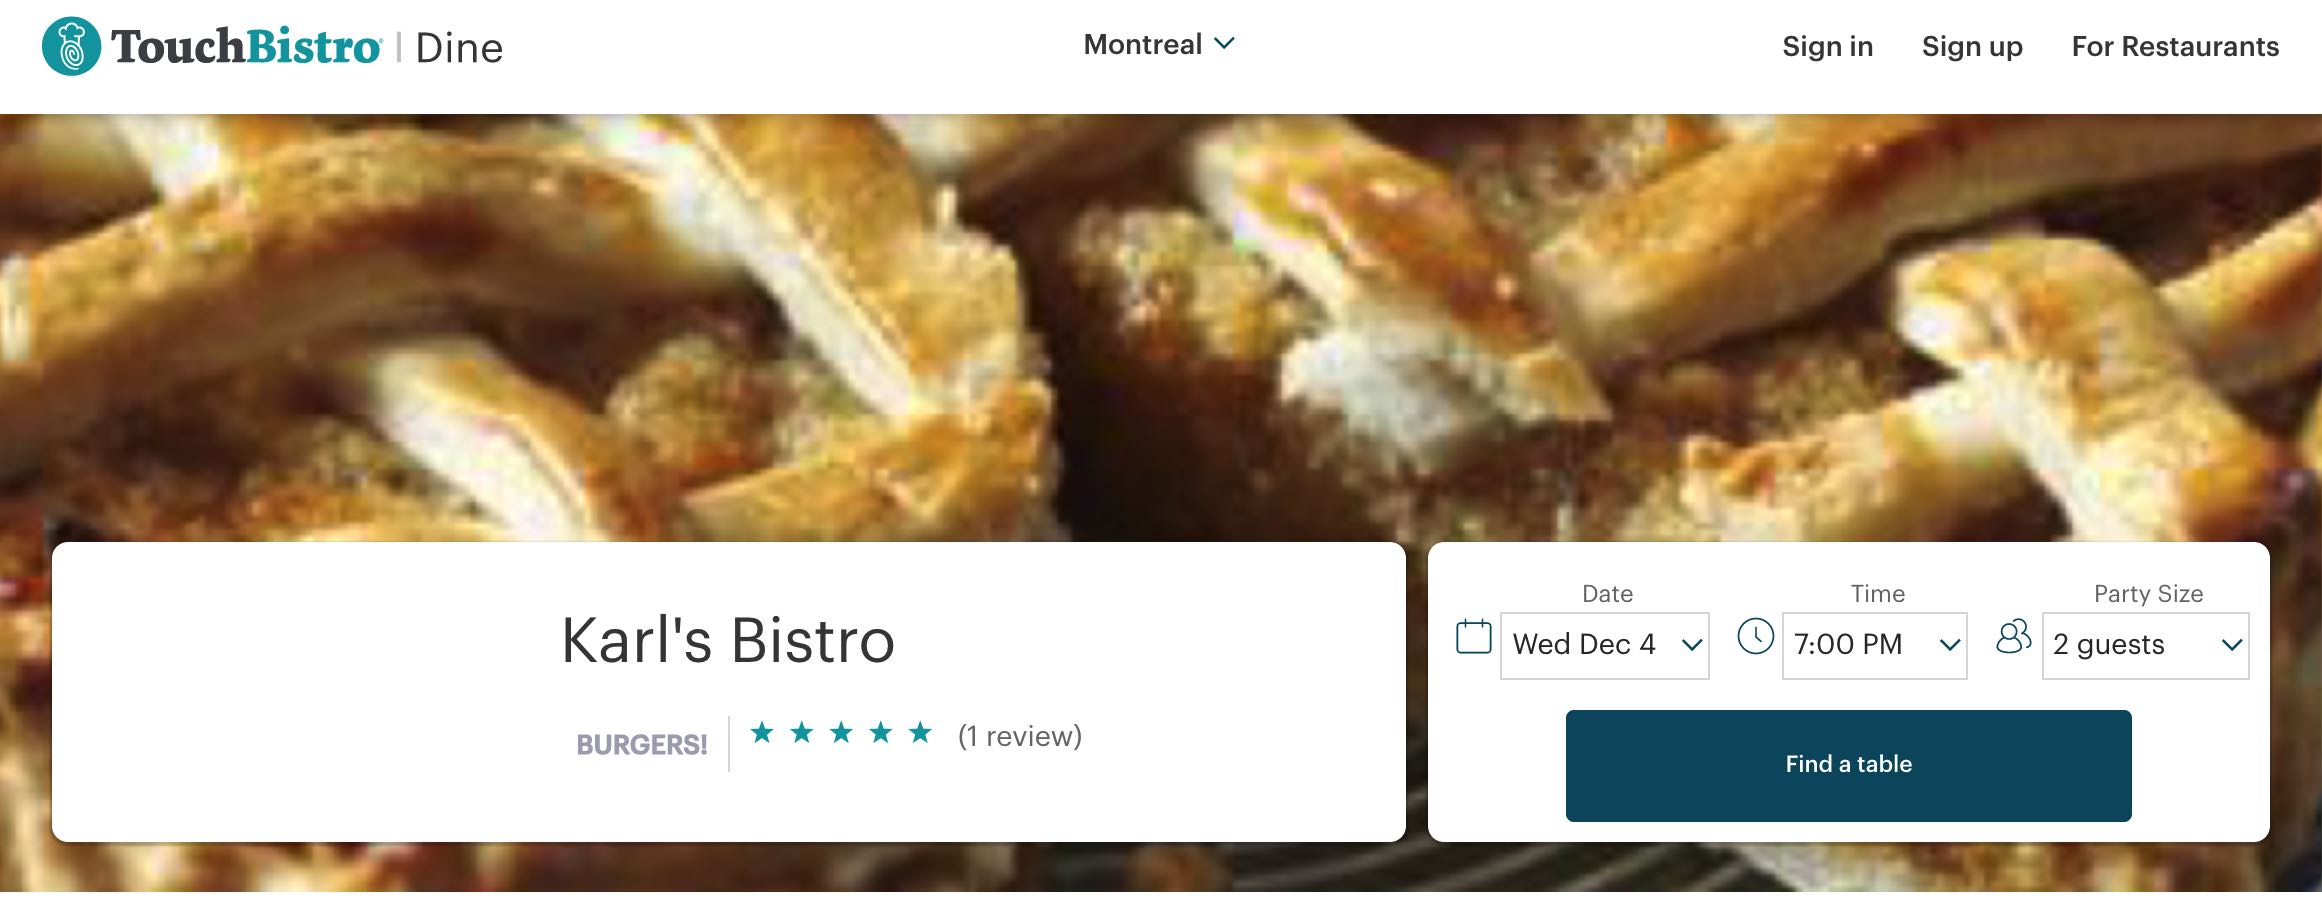
The default photo is used as your business page’s header image.
If you want to view a particular photo in detail, click on it and click Open in a new tab.
See Also
Creating a Setup and Schedule Configuration for Valentine’s Day


 Email
Support
 Frequently
Asked Questions
