Reservations – Using the Guest List
Table Of Contents
Chapter 2. Seating a Party Using the Guest List
Chapter 3. Changing a Reservation’s Reserved Table
Chapter 4. Moving a Seated Party to a New Table
Chapter 6. Client Communication and Notes
Section 2. Adding Client information and Notes
Chapter 7. Reservation Options
Chapter 8. Customizing the Guest List with List Options
Section 1. Always show the following bookings
Section 2. Show the following information
Section 4. Default sort option
Chapter 1. Introduction
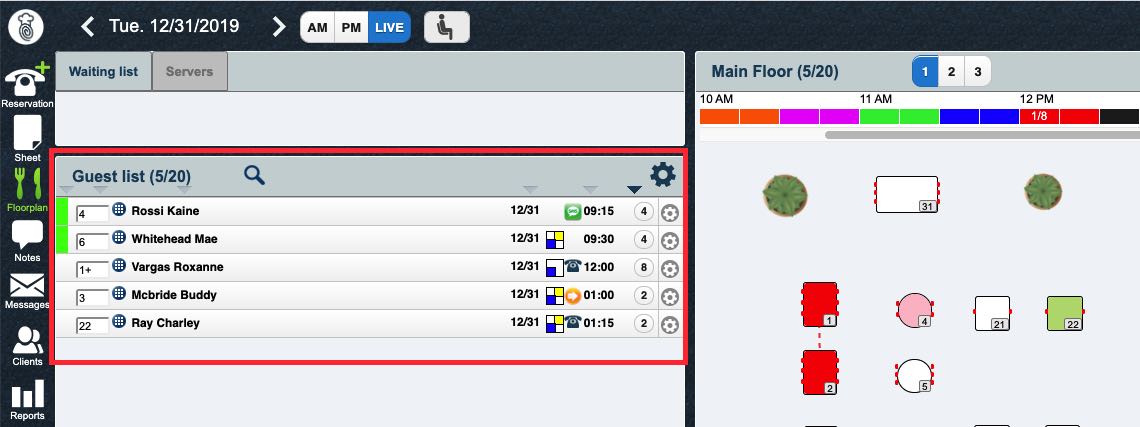
The Guest List panel on your Floorplan screen helps you manage reservations and walkins.
Chapter 2. Seating a Party Using the Guest List
The Guest List can be used to seat a reserving party when they arrive.
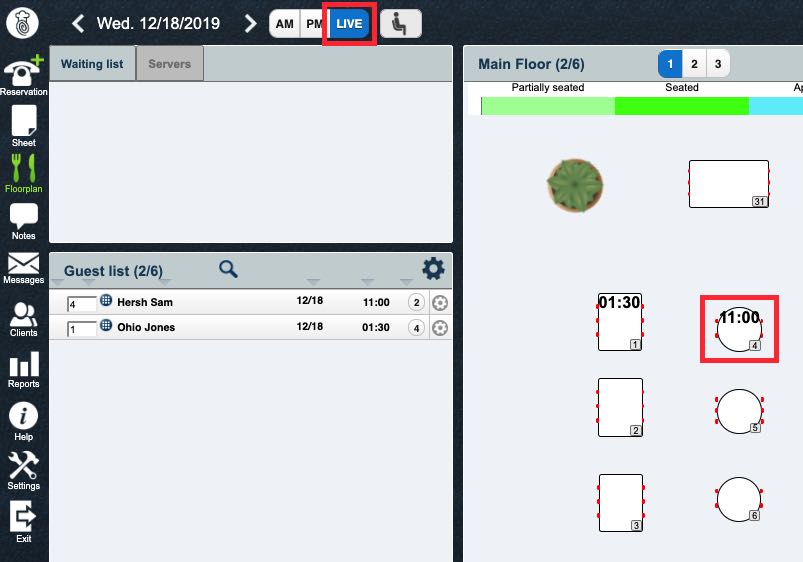
1. Click Live to view your floorplan in Live mode. In the pictured example, we see table 4 indicates there’s a party booked into that table for 11:00.
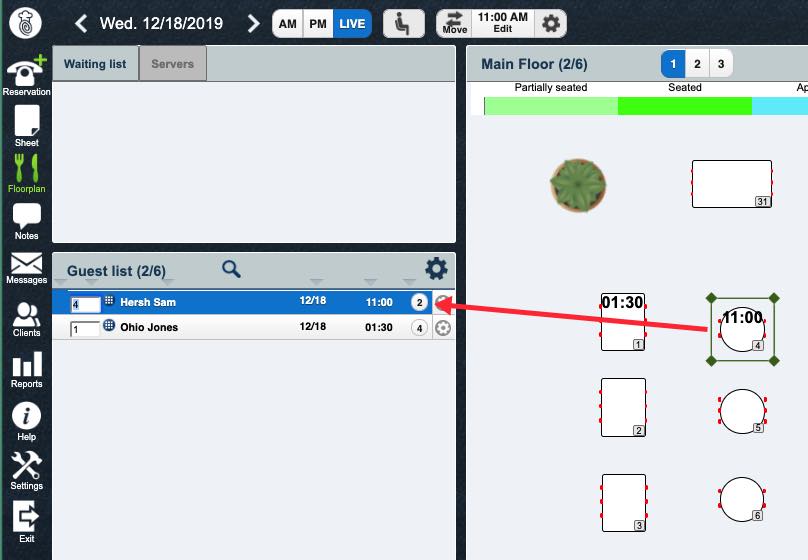
2. If you click on the table, the reserving party is highlighted in the Guest List panel.
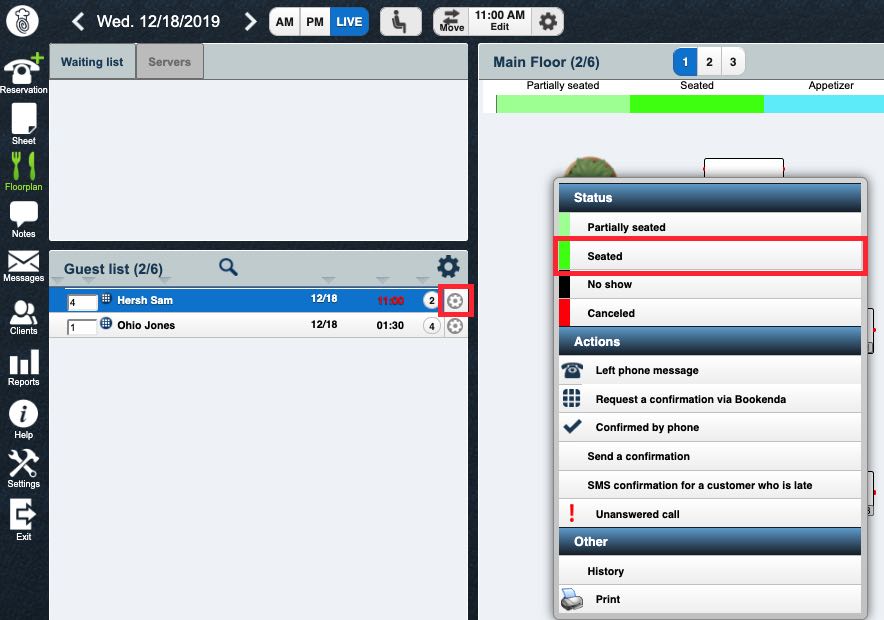
3. When the party arrives, you can click the Gear icon associated with the party and click Seated. If only a portion of the party has arrived, you can click Partially seated.
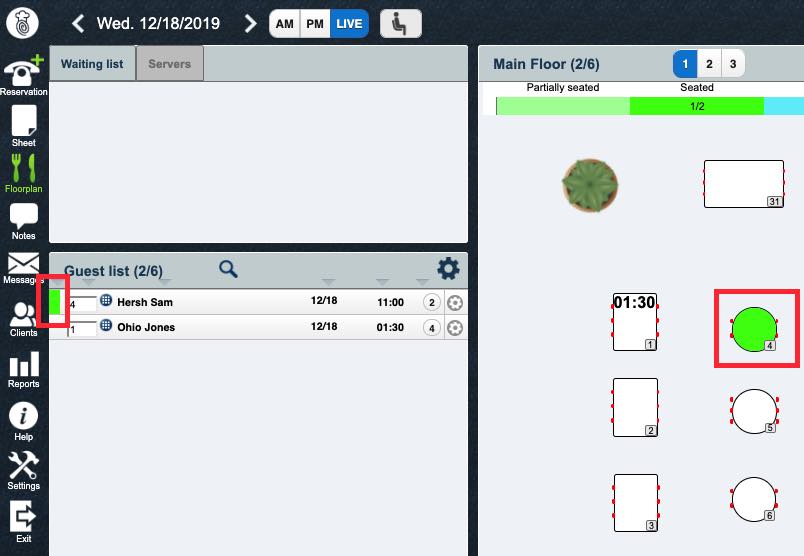
4. When you set the party to Seated, the table and the reservation in the Guest List panel both change to the configured Seated color (green by default).
Chapter 3. Changing a Reservation’s Reserved Table
You can use the Floorplan and Guest List to visually change a reservation’s table.
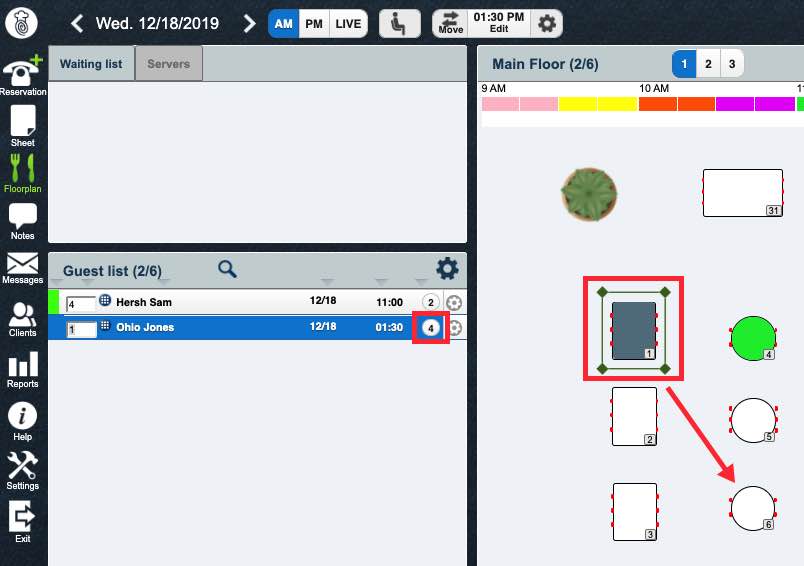
1. In the above example, we can see a party of 4 has been seated at a table for 6. There is currently an unreserved four top that might be more appropriate for this party.
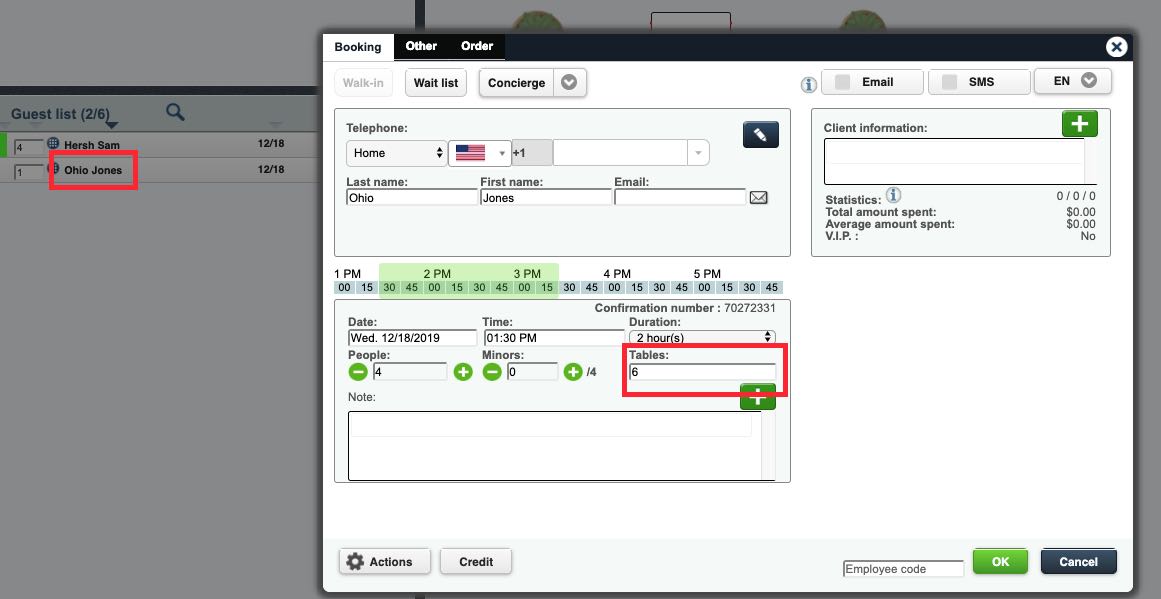
2. To move the reservation to a more appropriate table, you can click on the party name and then enter the new table number in Booking dialog box.
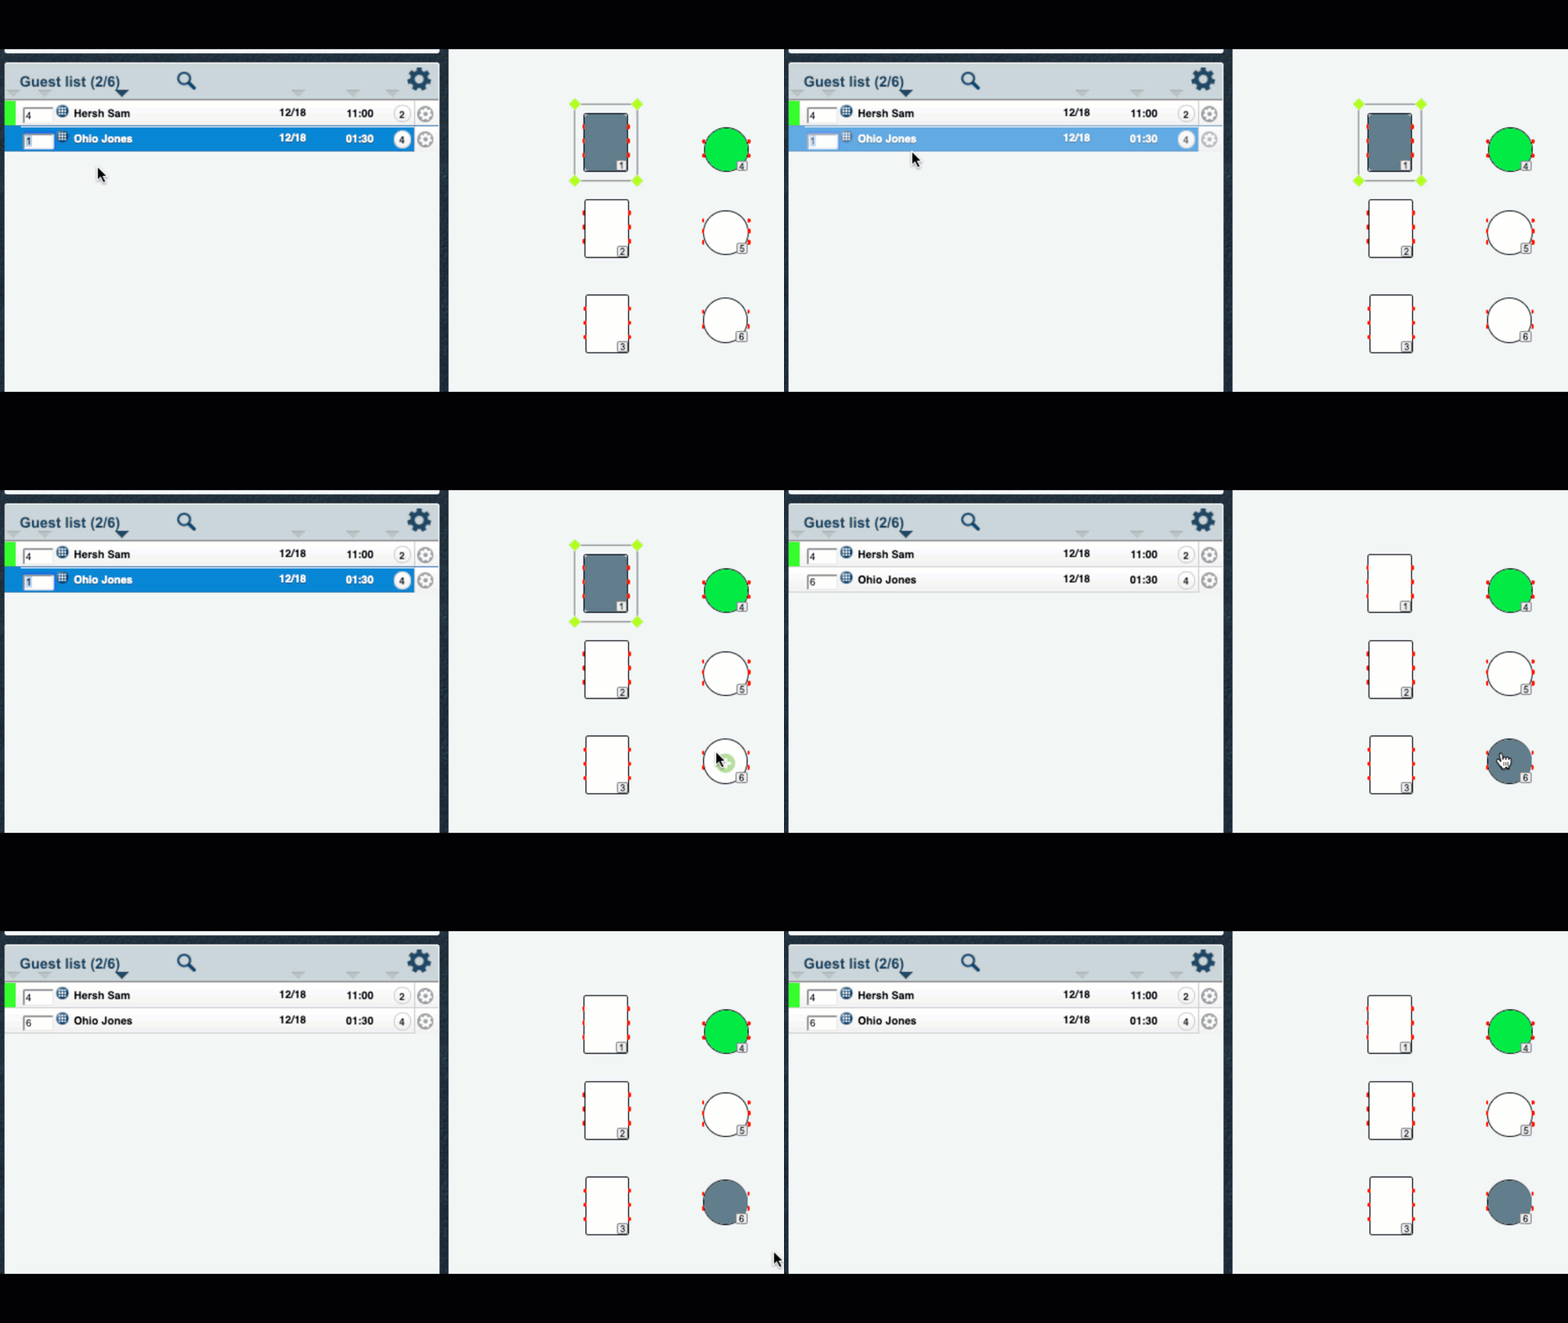
3. Alternatively, you can click and hold on the party name and drag it to the new table.
Chapter 4. Moving a Seated Party to a New Table
You can use the Floorplan and Guest List to visually change the table of a seated party.
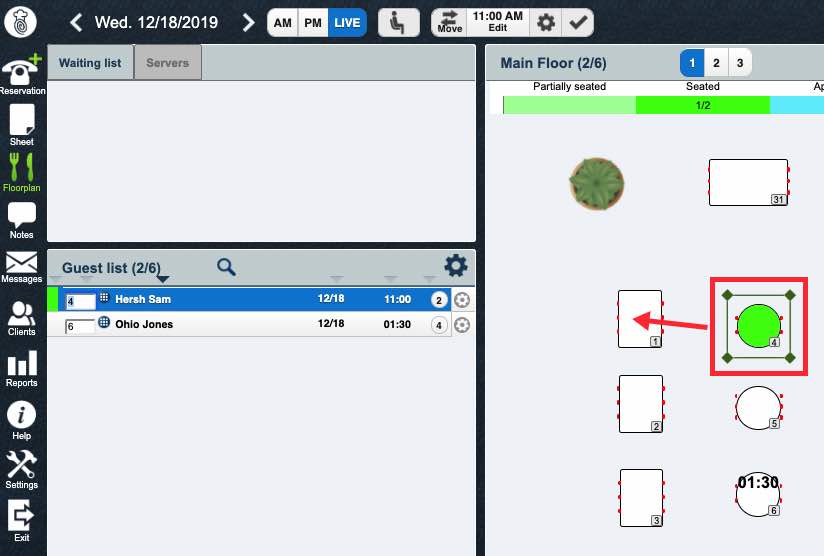
1. In the above example, the seated party at table 4 requests a move to table 1 (either the table isn’t to their liking or more guests are coming and you need to accommodate them at a larger table).
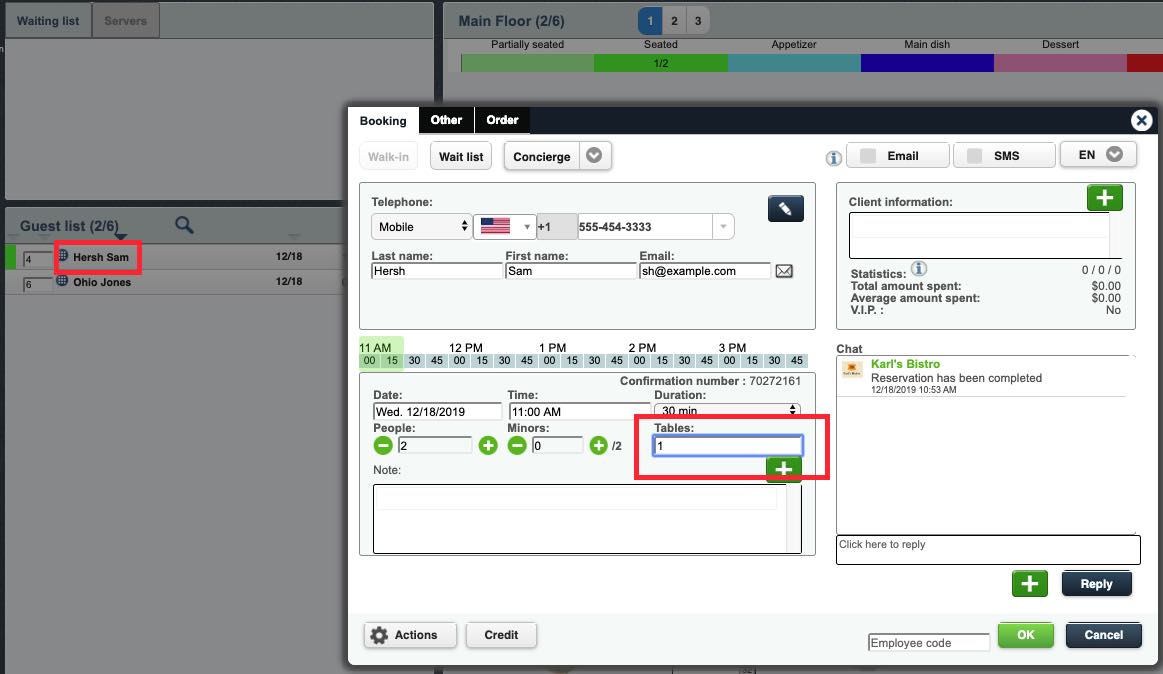
2. To move the party to another table, you can click on the party name and then enter the new table number in Booking dialog box.

3. Alternatively, you can click and hold on the party’s current table and drag it to a new table and confirm the table change.
Chapter 5. Guest List Details
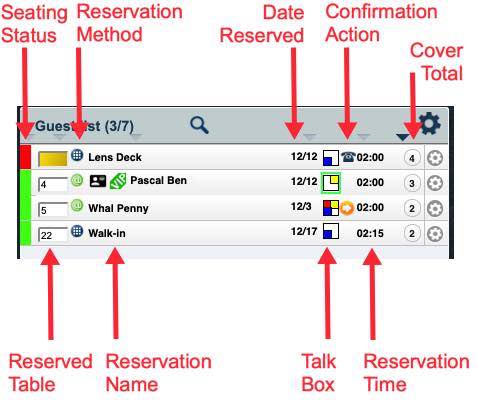
The Guest List provides a large amount of information about reservations, the party, walkins, and any communications that have taken place with the party. Much of the information is communicated via icons. Consult the table below for further details on the meaning of the various icons:
|
Option
|
Description
|
|
Seating Status
|
The color indicates if the reservation has been seated, canceled, or marked as a no show.
|
|
Reserved Table
|
Indicates which table the party has reserved. You can quickly change to a different table by typing a new table number in this field.
|
|
Reservation Method
|
A blue “dial pad” A green @ symbol icon indicates the reservation as made online by the party.
|
|
Reservation Name
|
The name given for the reserving party. Walk-in indicates this table was sat via the Walkin tool.
If a name is underlined, it indicates the table was booked via a concierge.
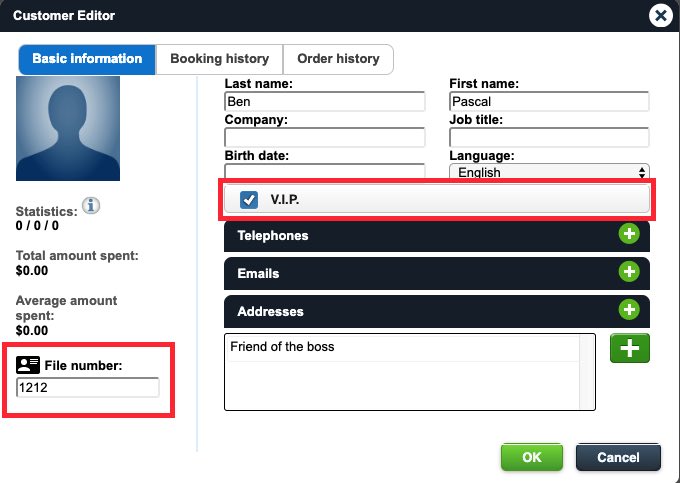
If you have flagged a customer record as VIP or you assign File numbers to customers (for example, some customers have file numbers tied to charge accounts that get settled up at the end of the month), these settings will be reflected in the guest list.
|
|
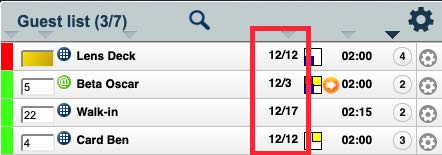
Date Reserved
|
The actual date the reservation was made (taken), not the date the reservation as made for.
|
|
Talk Box
|
The Talk Box gives a very quick visual way to determine what communication activities that have taken place with and about the reserving party.
If the Talk Box is highlighted in green, this indicates the customer has sent a message via their chat page. For more information on how to read the Talk Box and other forms of communication, you can manage for the party from the guest list see Client Communication and Notes below.
|
|
Confirmation Action
|
Indicates one of the Confirmation Actions have been used.
|
|
Reservation Time
|
Indicates the time the party requested for the reservation. If it is red, it indicates the current time is after the requested reservation time and the customer is late, a no show, or has yet to be seated.
|
|
Cover Total
|
The party size.
|
Section 1. Sorting
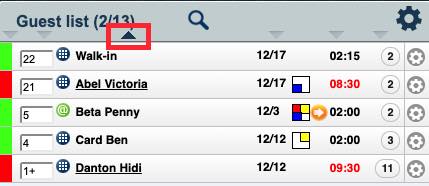
You can quickly sort the guest list by clicking one of the chevrons above the column you wish to sort. Clicking it again will change it from ascending to descending order (or vice versa). For example, if you wish to sort the guest list by last name, click the chevron over the name column. Walkins will always be sorted to the top alphabetical order and to the bottom for reverse alphabetical order.
Section 2. Filtering
You can filter the list using the Search field to search for a name or names that match a certain text string.
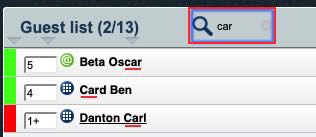
In the example above, we’re searching for any name with “car” in either the first name or last name. “Car” returns Oscar Beta (“car” at the end of his first name), Ben Card (“car” at the beginning of his last name), and Carl Danton (“car” at the beginning of his first name).
The Search field will not search on table numbers or cover sizes. For example, if you put in the number 5, it will not return Oscar Beta’s reservation at table 5.
Chapter 6. Client Communication and Notes
There are ways you can view and manage client communication via the Guest List panel.
Section 1. The Talk Box

The Talk Box gives a very quick visual alert to various communication activities that have taken place with and about the reserving party.
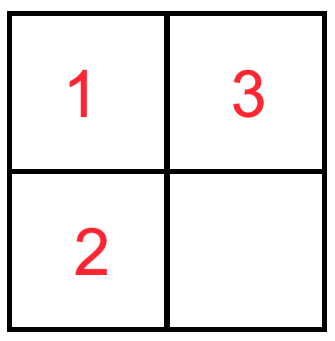
The Talk Box is divided into 4 quadrants. If quadrant 1, 2, or 3 is colored, it indicates some form of communication has taken place.
1) Quadrant 1
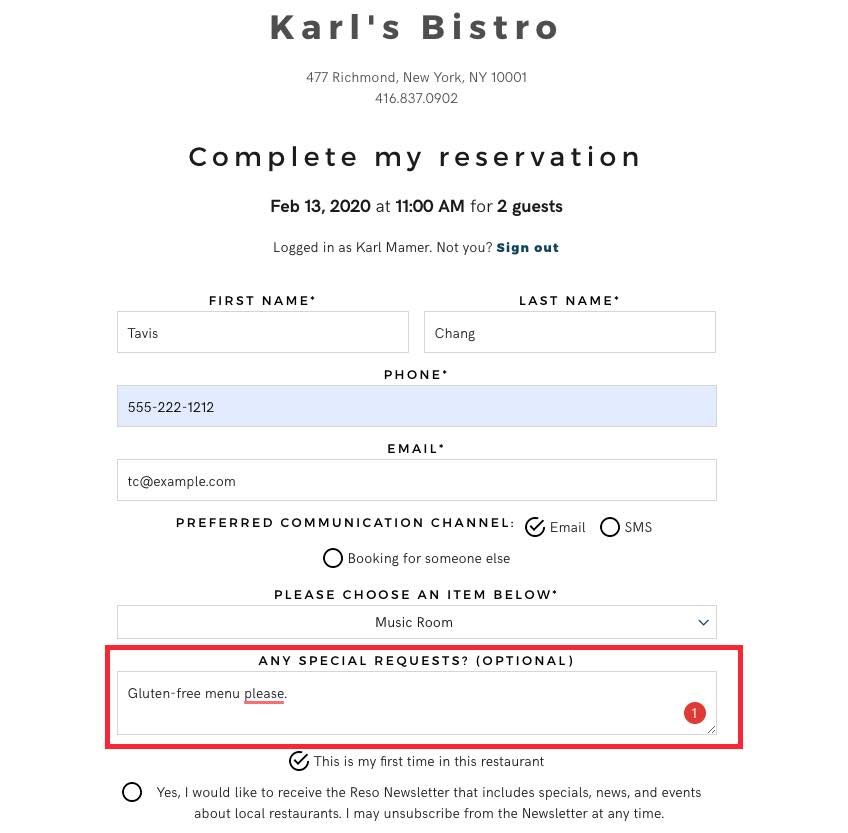
If you see Quadrant 1 filled with a red color, this indicates the customer has filled out the Any special requests field during the online reservation.
2) Quadrant 2
If you see Quadrant 2 filled with a dark blue color, this can indicate three possible things:
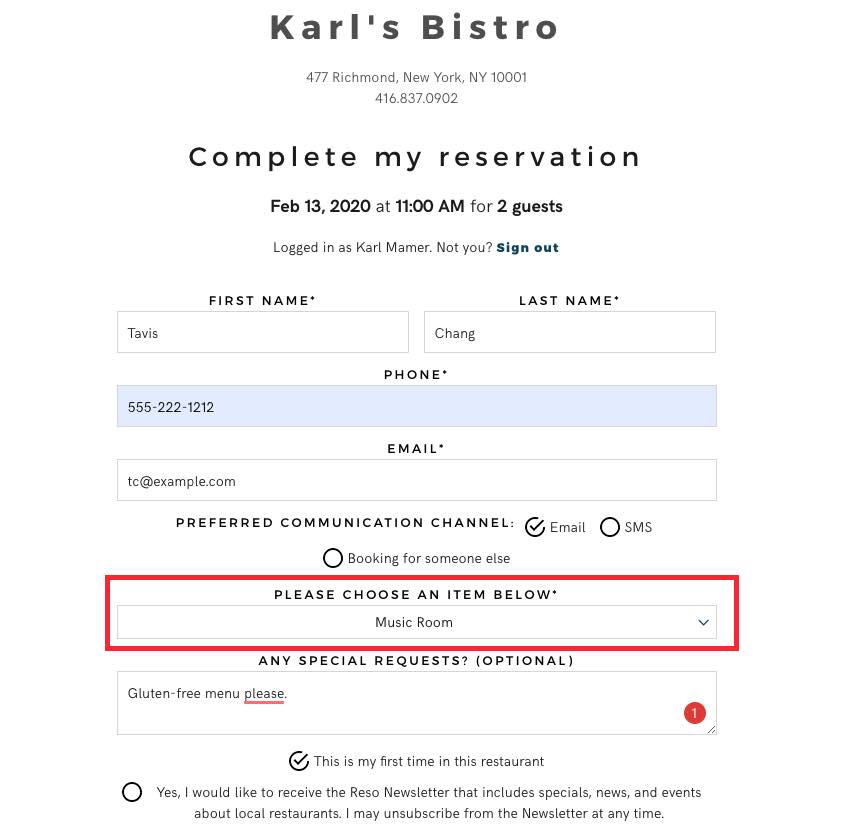
1. The customer selected something from the Please choose an item below (from online drop-down box) during the online reservation process.

2. The customer checked the First Visit checkbox during the online reservation process.

3. You added notes via the Booking dialog box.
3) Quadrant 3
If you see Quadrant 3 filled with a yellow color, this could mean two things:
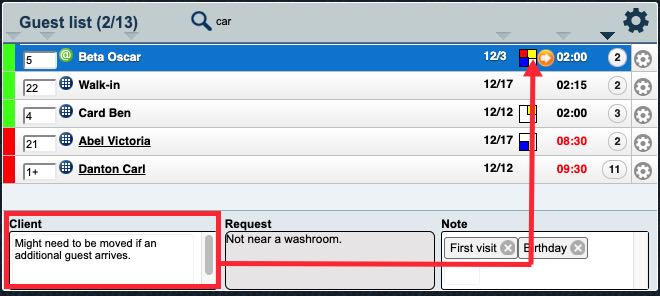
1. You added copy to the Client window at the bottom.
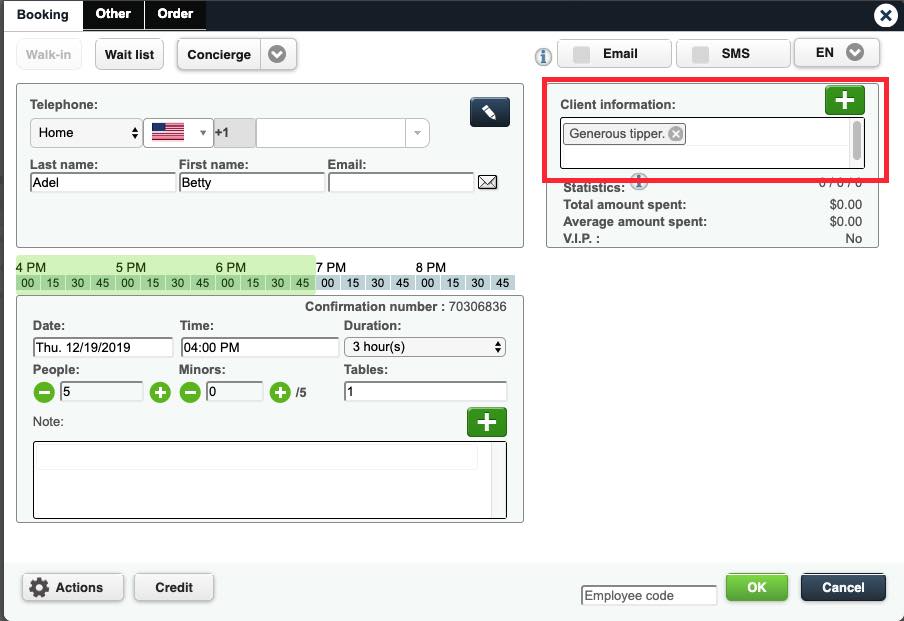
2. You added copy to the Client information field in the Booking dialog box
4) Quadrant 4
Quadrant 4 is currently unused.
5) Message Alert

If the Talk Box is highlighted in green, this indicates there’s an unread message from the party.
Section 2. Adding Client information and Notes
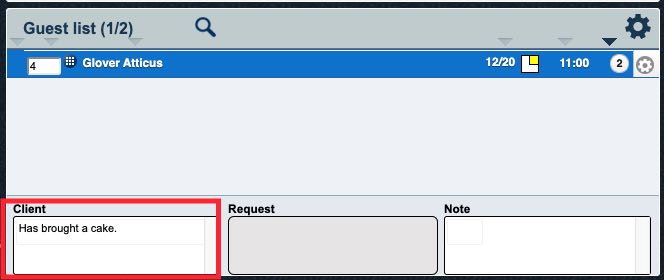
If you click on a reservation in the Guest List, you can enter Client Information directly for that party in the Client box at the bottom of the Guest List. When you add an item to the Client box, Quadrant 3 will turn yellow.
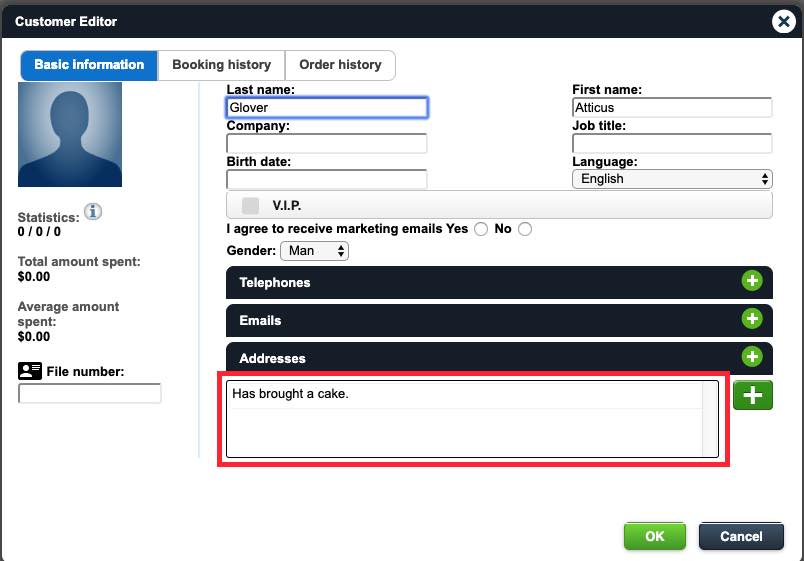
Information you enter here will become a part of the client record.
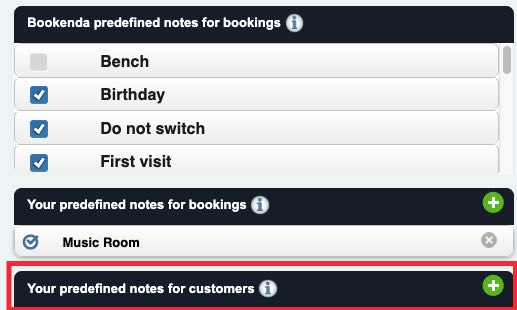
If you want to use the predefined notes you created for clients under Settings | Other, click on the party name and enter it in the booking dialog box.

Similarly, you can add a note in the Note box at the bottom of the Guest List. When you add a note, Quadrant 2 will turn blue.
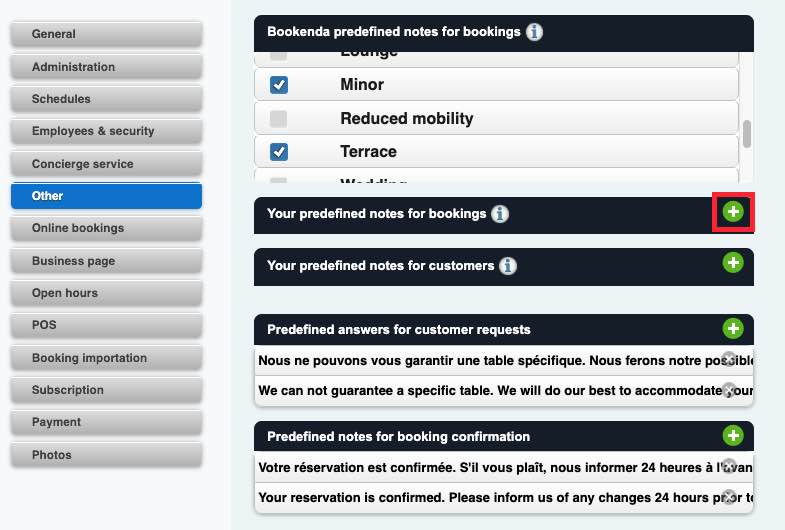
If you want to use the predefined notes you created for bookings under Settings | Other, click on the party name and enter it in the booking dialog box.
Chapter 7. Reservation Options
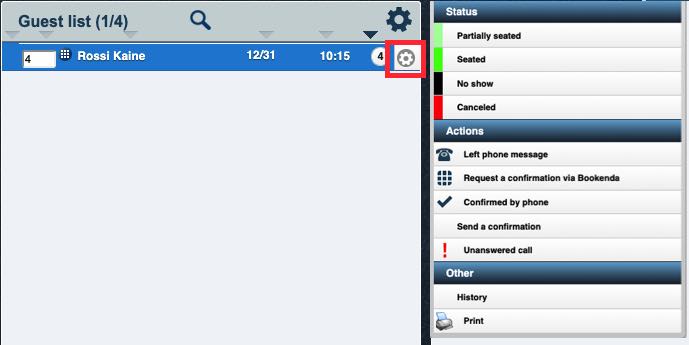
If you click on a Gear icon associated with a particular reservation, you have several options.
Section 1. Status
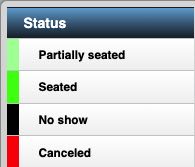
When you select a Status, the reservation’s Seating Status column will be marked with the selected Status color.
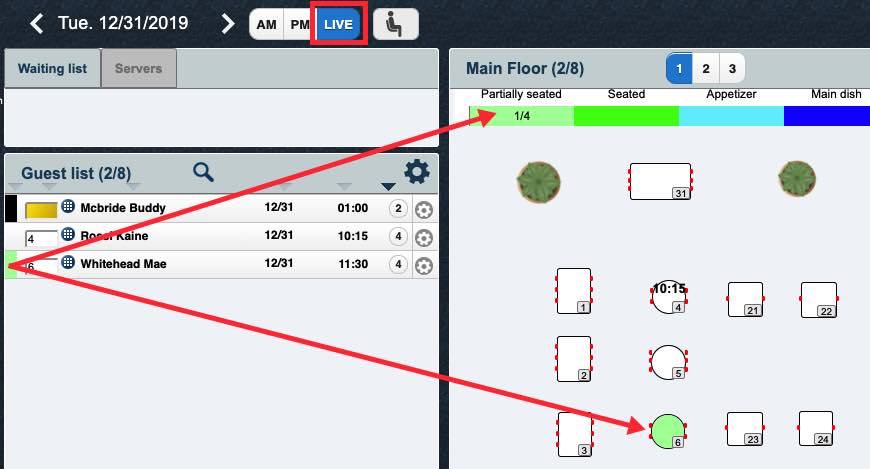
If you select either Partially seated or Seated, the reserved table in the Live view of the Floorplan will reflect this status. In the example above, the Whitehead party has been marked Partially seated. The table and Status Bar reflect this Status setting.
|
Option
|
Description
|
|
Partially seated
|
Indicates the entire party has yet to arrive but one or more party members have been seated.
|
|
Seated
|
Indicates the entire party has been seated.
|
|
No Show
|
Indicates the party never arrived.
Setting a reservation to No Show may trigger an automatic email to the reserving party member or result in an automatic no-show fee charged to the reserving party member’s credit card. Set this with care.
|
|
Canceled
|
The party has called and canceled.
|
|
Reserve
|
Click if you would like to set up a new reservation for the party.
|
Section 2. Actions
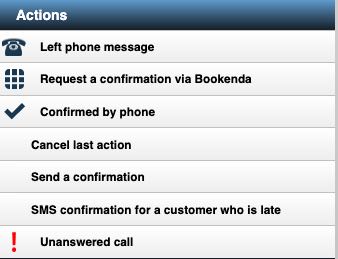
Actions helps you track your communications with the party.
|
Option
|
Description
|
|
Left phone message
|
Indicates you’ve manually called the party contact and left a verbal reminder on his/her voice mail.
|
|
Request a confirmation via Bookenda
|
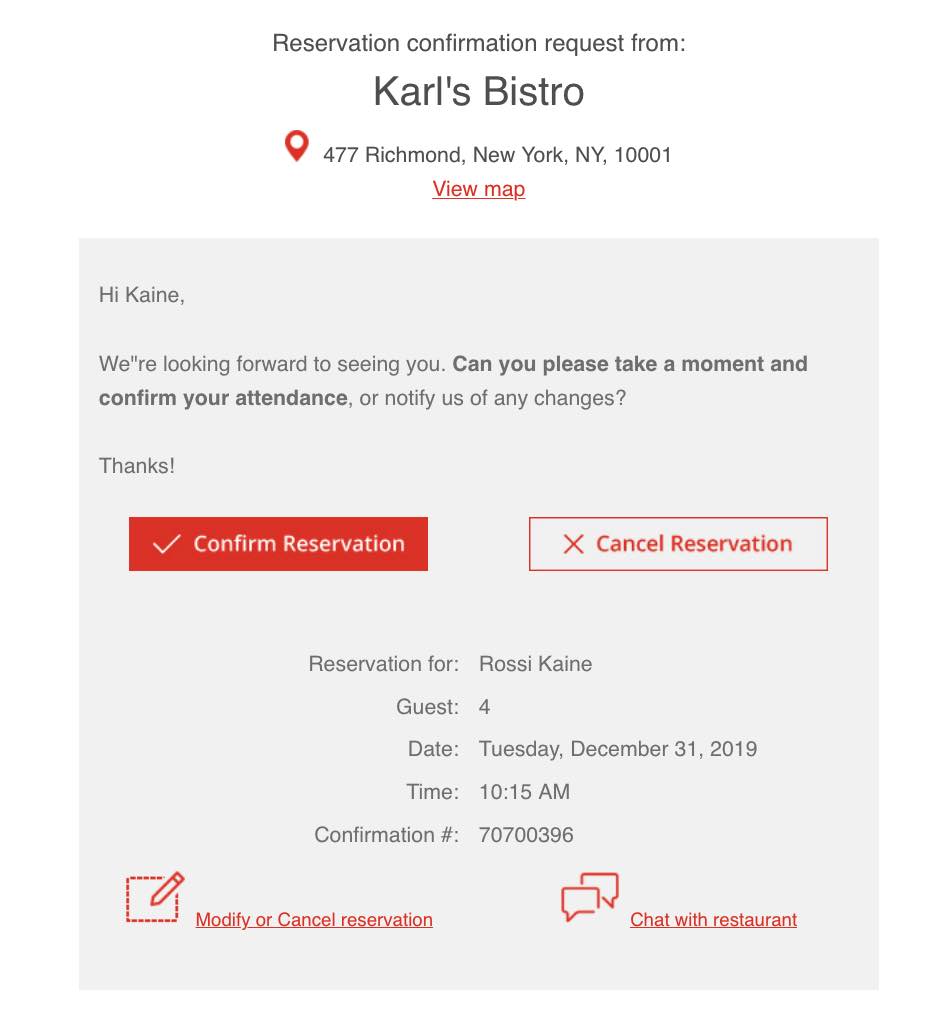
If selected, TouchBistro Reservations will generate an email to the party contact (pictured above) requesting they confirm the reservation.
|
|
Confirmed by phone
|
Indicates you’ve manually called the party contact and received a verbal confirmation that the party will honor the reservation.
|
|
Cancel last action
|
If you’ve mistakenly flagged this reservation with any of the Actions, click Cancel last action to remove the flag. This will not, however, withdraw any emails or SMS messages.
|
|
Send a confirmation
|
If selected, TouchBistro Reservations will generate an email or SMS to the party contact indicating their reservation has been confirmed by you.
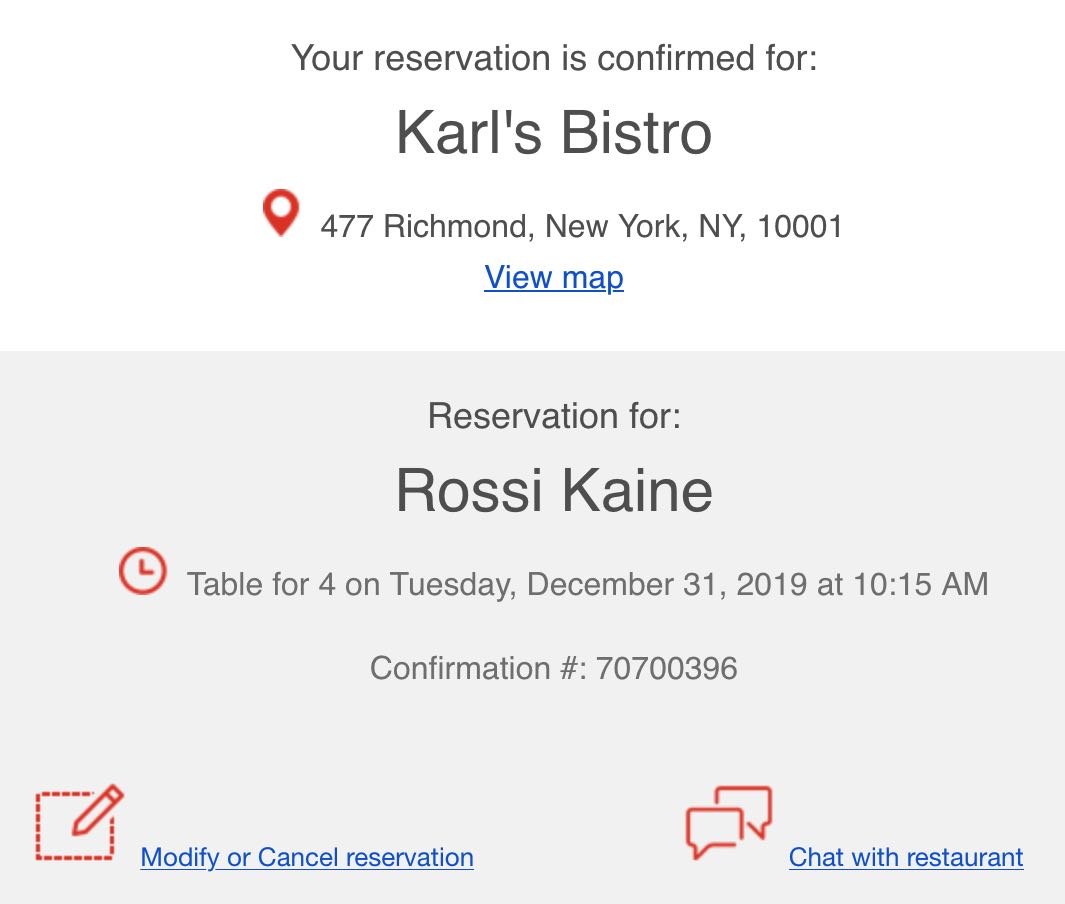
The format of the confirmation is determined first by the party’s preferred communication preference.
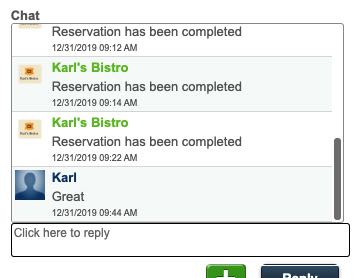
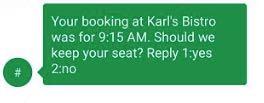
The SMS version will appear similar to the one above. The customer can reply to this SMS.
If so, it will appear in the reservation’s Chat window.
The email version will appear similar to the one above. The email provides options for the party to modify the reservation.
|
|
SMS confirmation for a customer who is late
|
This will only appear as an option if the current time is after the reservation time.
The customer can reply with 1 to hold the reservation or 2 to cancel.
|
|
Unanswered Call
|
Indicates you’ve manually called the party contact and the call went unanswered or no voice mail was available.
|
Section 3. Other

Other provides two options:
|
Option
|
Description
|
|
History
|
If selected, History will show you a chronological list of communications, changes, and status settings made to the reservation. The staff member who made the changed is also logged.
|
|
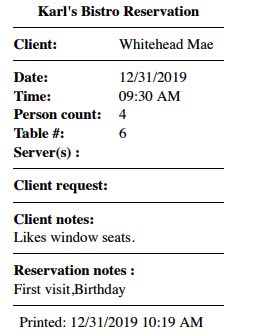
|
Print will print basic details about the reservation.
|
Chapter 8. Customizing the Guest List with List Options

If you click the Gear icon to the right of the Guest List panel, you get several options. Click List options.

The effect of enabling or disabling the various options is documented below:
Section 1. Always show the following bookings
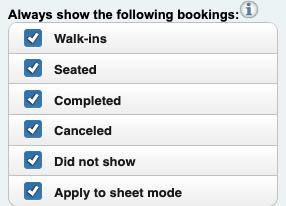
By enabling or disabling these settings, you can control what kinds of bookings appear in the guest list.
|
Option
|
Description
|
|
Walkins
|
If enabled, you will see any party designated as a Walkin. Disable if you want to filter out Walkins. If you give a walkin party a name disabling Walkins will not hide a named walkin party.
|
|
Seated
|
If disabled, you will not see any party set for the Seated status. Disabling this option will not hide parties marked for a Partially Seated status.
|
|
Completed
|
If disabled, you will not see any party marked as Completed.
|
|
Canceled
|
If disabled, you will not see any party marked as Canceled.
|
|
No show
|
If disabled, you will not see any party marked as No Show.
|
|
Apply to Sheet Mode
|
Disable if you want to set these options differently for the Sheet tool.
|
Section 2. Show the following information
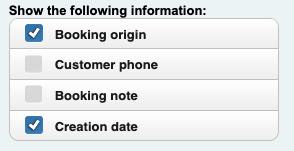
By enabling or disabling these settings, you can control what kinds of information appears for each reservation in the guest list.
|
Option
|
Description
|
|
Booking origin
|
If enabled, your Guest List will display the origin of the reservation (phone/internal versus online).
|
|
Customer phone
|
If enabled, your Guest List will display any recorded phone number for the reservation.
|
|
Booking note
|
If a note was added to the party via the Booking dialog box or the Note window at the bottom of the Guest List, you can enable this setting to display the notes inline.
|
|
Creation date
|
If enabled, you will see the date the reservation was made/created.
|
Section 3. Group bookings by
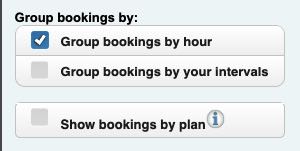
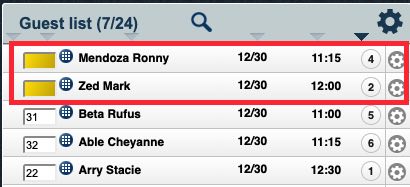
By default, your guest list is sorted by time. Earlier reservations appear at the top, later reservations appear at the bottom. This list is sorted secondarily by seat count, by name, or by hour.
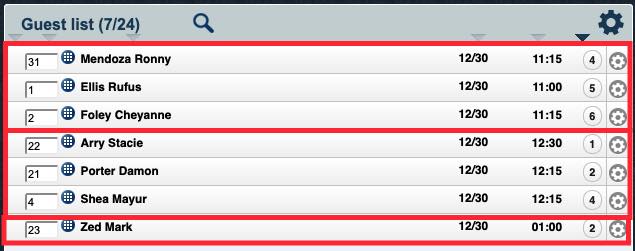
In the above example, we are sorting using the Group bookings by hour option as well as sorting via seat count. The Guest List groups reservations into hourly blocks (11 am, noon, 1 pm). It then sub-sorts each hour block by seat count, from lowest to highest. This has the effect of, say, putting a slightly later reservation at the top of the guest list because it has fewer seats reserved. So a 4 person party reserved for 11:15 displays above a 5 person party reserved for 11:00.
You can increase the time granularity by setting Group bookings to Group bookings by your interval.
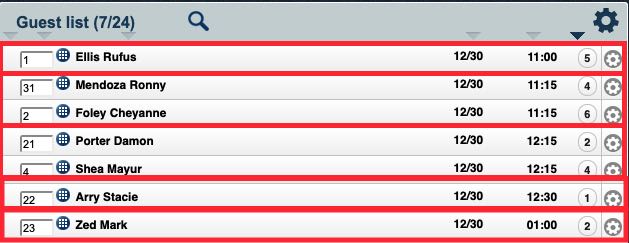
In the above example, we switched to Group bookings by your interval. Reservations are grouped to our timetable interval (set under your floorplan’s Options | Edit timetable) which is set for 15-minute intervals. Within each 15-minute interval, our reservations are then sub-sorted by our default sort option (seat count, by name, or by hour).
Section 4. Default sort option
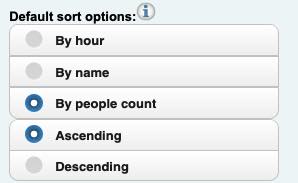
The Default sort options section determines how reservations in the guest list are sub-sorted within their hour or interval grouping. Select By hour if you don’t want any sub-sorting within hour or interval groups. Select Ascending or Descending to change the order (from least seats to most seats, for example, or from most seats to least seats).
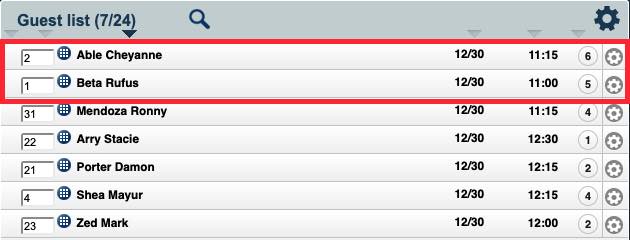
In the pictured example above, Default sort options is set to sort by name (ascending). The Guest List is also set to group by hour, hence the Able party (6 covers) appears before the Beta party (5 covers).

If Default sort options is then set to sort by people count (ascending), we would see the Beta party (5 covers) appears before the Able party (6 covers).
Section 5. General Guest List Settings
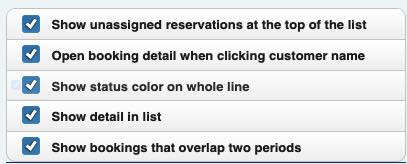
The General Guest List Settings section lets you enable or disable various options:
|
Option
|
Description
|
|
Show unassigned reservations at the top of the list
|
If enabled, reservations that have not been assigned seats will be forced to the top of the Guest List.
|
|
Open booking details when clicking customer name
|
If enabled, you can edit the reservation by clicking the customer name.
If disabled, you will be given a button bar at the bottom of the Guest List. You must click on the reservation and then click the Edit button.
|
|
Show status color on whole line
|
If enabled, the reservation status color (partially seated, seated, canceled, no show) will fill the reservation’s complete line in the Guest List.
|
|
Show detail in list
|
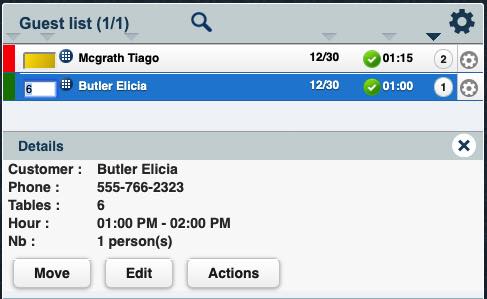
If enabled, clicking on the customer name will show basic details about the reservation within the Guest List. Click Edit to alter the reservation.
|
|
Show bookings that overlap two periods
|
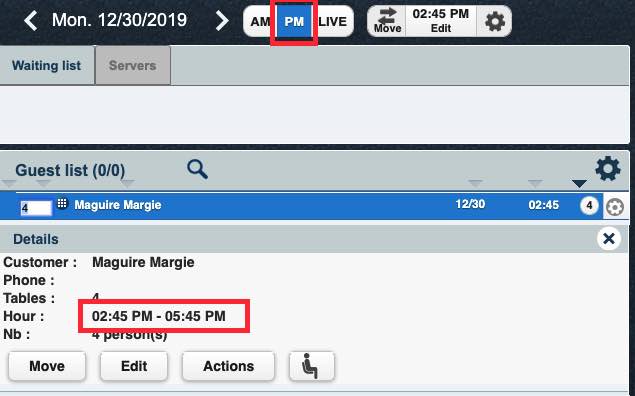
If enabled, any AM reservation that terminates in the PM timeslot will be also be shown in the PM view of the Guest List. In the example pictured above, the reservation started in the AM (pre 3 pm) timeslot. If we enabled Show bookings that overlap two periods, that reservation will be carried over into the PM timeslot view as well as the Live view if the actual time falls in the PM timeslot.
|
Section 6. When Printing
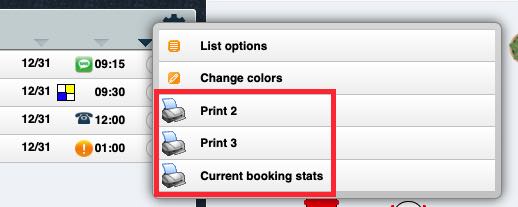
The Guest List‘s Gear icon, if clicked, provides several print options.

The When printing section under List options lets you set how much space appears between each group (time or segment). In the above example, we want 4 additional lines to appear between each group in the printed Guest List.
If Print all table numbers un-checked, bookings across 3 or more tables will only show the lowest table number booked and the highest table number booked.
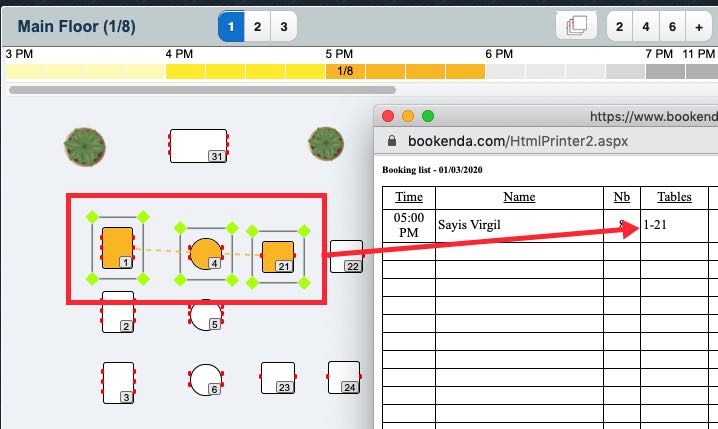
In the pictured example, we’ve disabled Print all table numbers. When we print our reservation list, Tables will display only 1-21 instead of 1, 4, 21. The – indicates there are one or more additional tables booked for this party but not displayed.
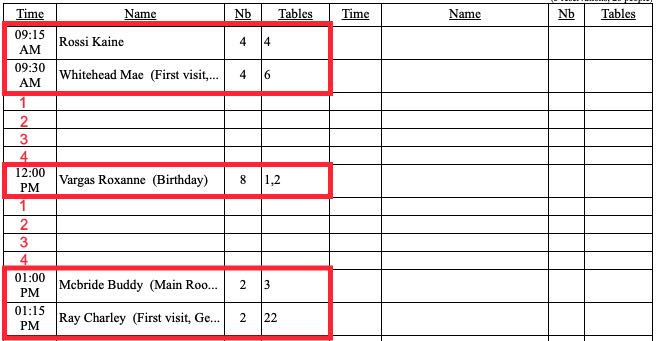
When we select one of the Guest List print options, we can see it includes the four extra lines after the 9:00 am group and four lines after the noon group. You might want to add 1 or more additional lines between reservations to allow you to add in your own written notes.
Chapter 9. Printing

You have three print options available if you click the Guest List‘s Gear icon.
Section 1. Print 2

Print 2 prints a simple list of all reservations on the guest list. If there are a lot of reservations it will print two column.
Data included: Reservation time, party name, covers, and table number(s).
Section 2. Print 3
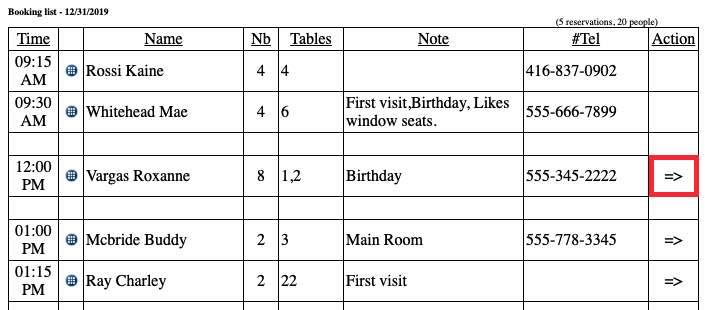
Print 3 prints a detailed, single-column list of all reservations on the guest list.
Data included: Reservation time, reservation method, party name, covers, and table number(s), notes, phone number, and action. If you see a => symbol in the Action cell that indicates the party has a pending email confirmation request or a voice mail has been left.
Section 3. Current booking stats
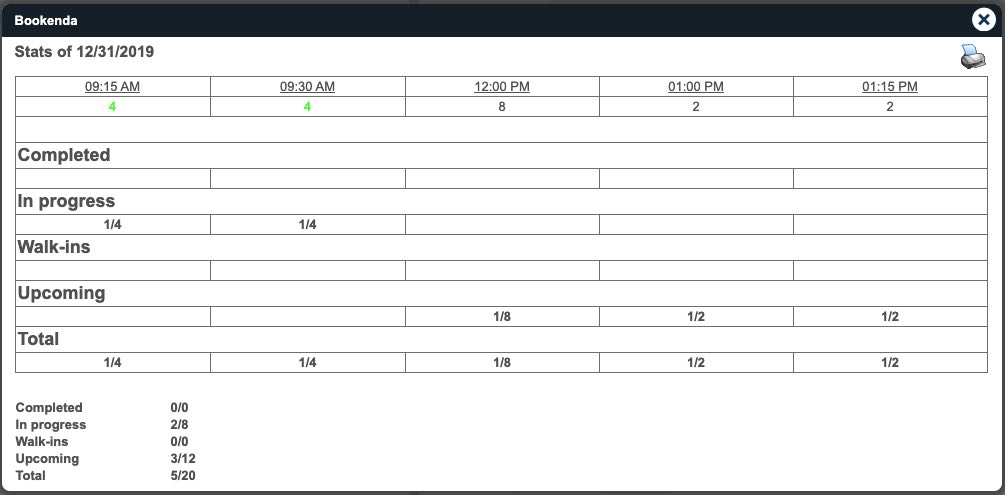
Current booking stats prints a summary of bookings by time segment and their progress.


 Email
Support
 Frequently
Asked Questions

