Security
Table Of Contents
Chapter 5. Mac Computer Security
Section 1. Do Not Use Third Party Apps
Chapter 6. Change Your Admin Passcode Regularly
Chapter 7. Change Your Account Password Regularly
Section 1. Changing Your Password
Section 1. Checking Security Settings on an Apple AirPort Router
Section 2. Checking Security Settings on a Ubiquiti AmpliFi Router
Section 3. Guest Networks and Third Party Apps
Section 4. Disabling Guest Network on a Ubiquiti AmpliFi Router.
Section 5. When to Change Your Router Password
Section 6. Using WPA2 Enterprise
Chapter 9. From Your Router to the Internet
Chapter 10. Security Over the Cloud
Chapter 12. The TouchBistro Cloud Data Center
Chapter 13. Credit Card Data/PCI Data Security Standard
Section 1. Limit Restaurant Opening
Section 3. Discounts and Autograts
Section 4. Kitchen Ticket Security
Section 5. Setting Menu Items to Require Manager Approval
Section 6. Creating a Paper Record of Staff Clock-Ins and Clock-Outs
Chapter 16. Enabling Location Services
Chapter 1. Before You Begin
Before you follow any of the steps in this guide, ensure you are not in service. Review these settings and steps before your business day or at the end of your business day.
Chapter 2. Apple ID
It’s recommended you not use a personal Apple ID or the Apple ID of an employee. Using a personal Apple ID exposes personal activity to other users of the iPad. As well, it does not allow the license owner to transfer their ID to a business partner. If you’ve not yet set up your iPads or Mac computer (Pro Users) visit Apple and apply for an ID to use exclusively with your business. Record this ID and password and keep it in a safe place.
Chapter 3. iPads
Your first line of defense is secure access to your iPads and prevent unauthorized users from accessing your iPad. The best way to do this is set up a passcode for each iPad running TouchBistro. You might have set one up initially but if you haven’t you can follow the following steps:
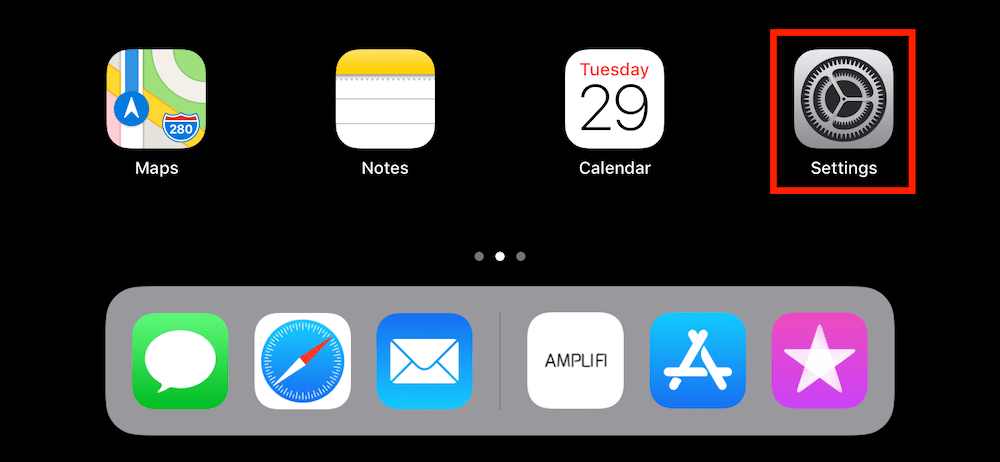
1. Tap Settings.

2. Tap Touch ID & Passcode.
3. Tap Turn Passcode On.
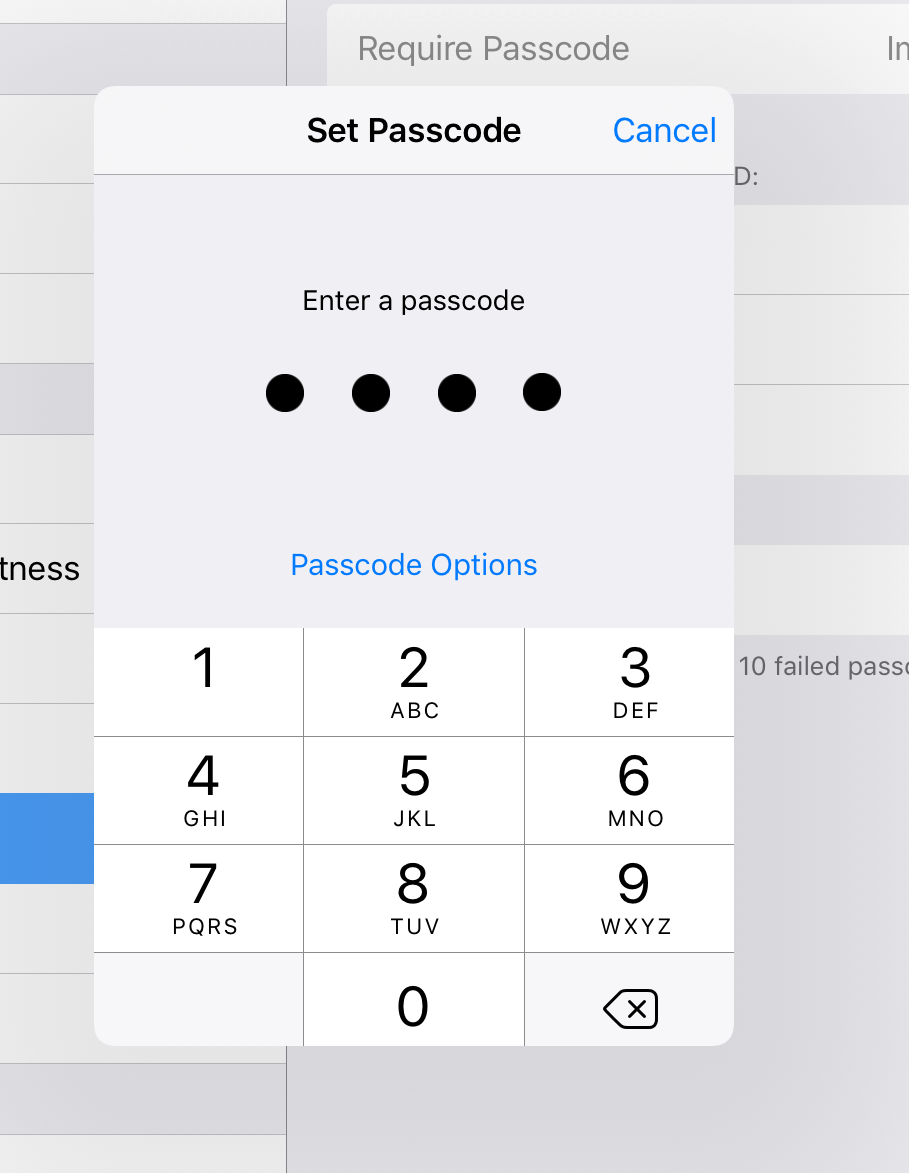
4. Enter a 6 digit passcode (or tap Passcode Options for a 4 digit passcode, or textual password) and verify it when prompted. It is VERY important to keep a safe record of this passcode. If you lose it, it might result in needing to take your iPads to an Apple store with proof of purchase. A recovery fee may be charged.
5. Use Require Passcode to select when the iPad should prompt for the passcode. Immediately implies every time you try to turn the screen back on, you are prompted for the passcode.
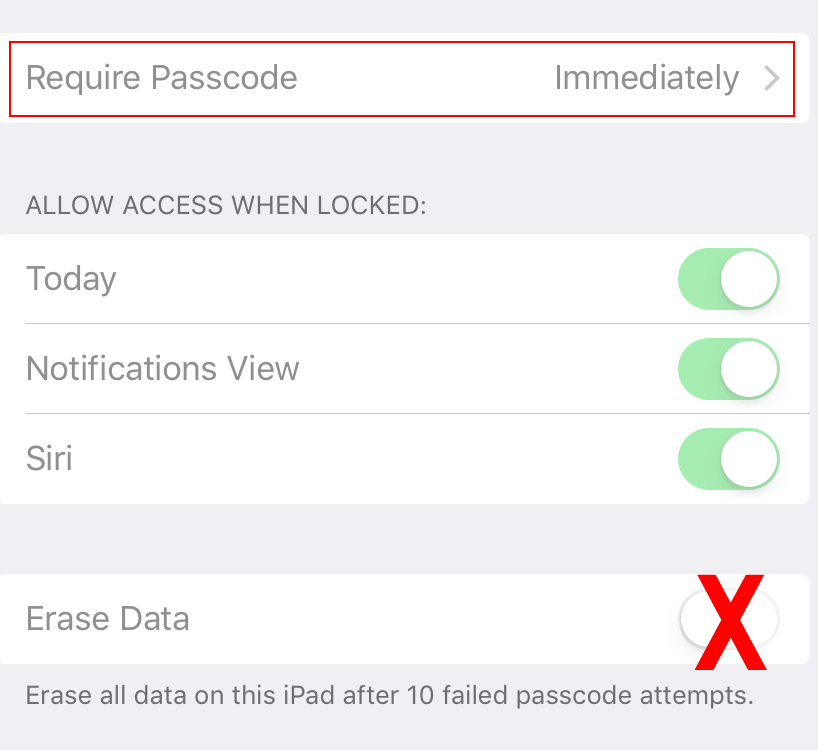
6. We do not suggest enabling Erase Data as customers may gain access to your iPad, enter a passcode 10 times, and erase your data.
7. You should also prevent TouchBistro from being deleted from your iPad. Follow this guide to set this up.
8. Finally, if customers or less trusted staff have access to the iPad, you might consider preventing users from exiting TouchBistro and accessing other apps. Follow this guide to set this up.
Chapter 4. Backing Up
You should regularly back up your iPad(s) and if you’re a Pro user back up your Pro Server on your Mac computer. See this guide for back up and restore steps.
Chapter 5. Mac Computer Security
When your Mac computer (pro users) was set up, it was set up with a user name and password. You should not try to remove this. You normally don’t need to physically access your Mac computer during service hours (although, it needs to be on and running TouchBistro Pro Server) so it is suggested you set up your Mac computer in a location where it can be behind a locked office door or cabinet door. Alternatively you might want to invest in a locking system.
Section 1. Do Not Use Third Party Apps
Your Mac computer should only be used with TouchBistro. We recommend you do not run other third party apps on your Mac computer. Doing so may cause performance issues , system crashes, and can complicate support. It also exposes you to malware. Although the Mac operating system is very secure, no system is 100% proof against malware. We also recommend you don’t use your Mac computer to visit web sites other than sites related to TouchBistro and your payment provider.
Chapter 6. Change Your Admin Passcode Regularly
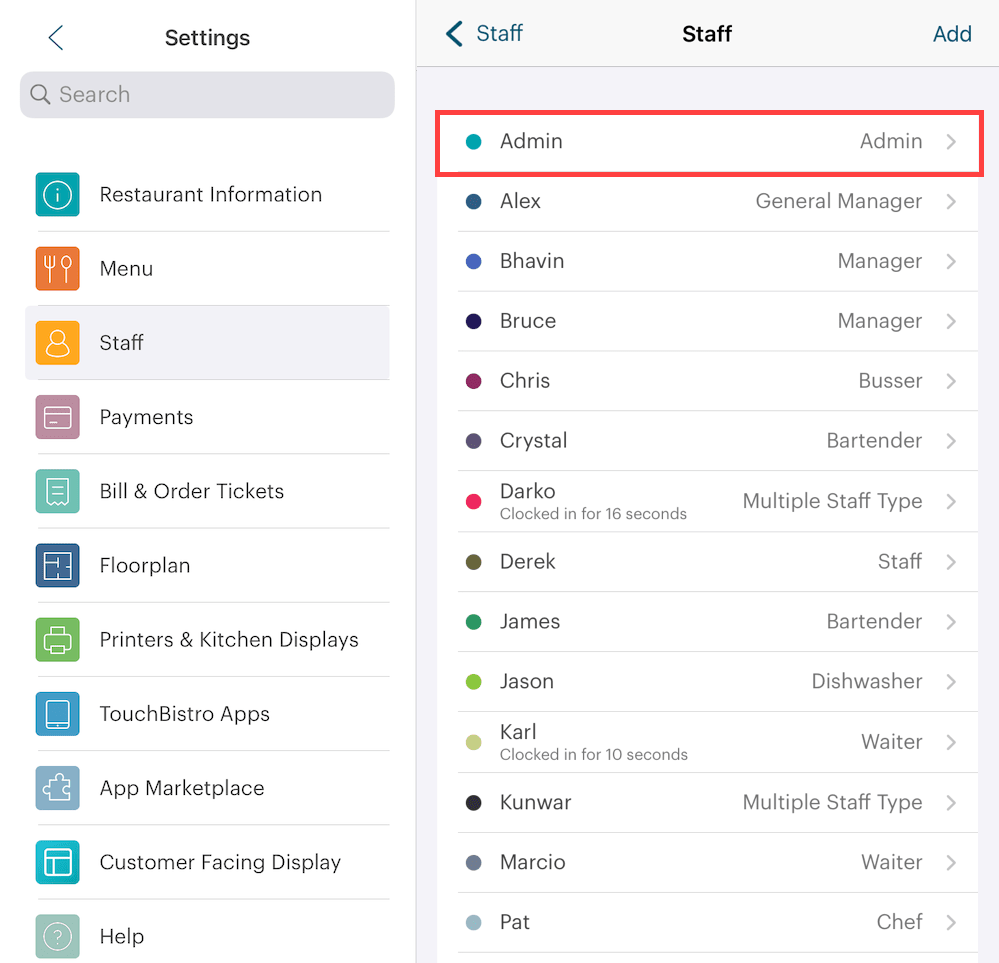
If you’ve not changed the default TouchBistro Admin passcode, visit Admin | Admin Settings | Staff | Staff and edit your Admin account. Keep a copy of this password in a safe place. If you lose your Admin password there is no easy way to recover it. You will need to contact TouchBistro technical support. Password recovering is a billable charge. You should change it periodically as staff members may learn it via a method called shoulder surfing.
Your Admin passcode is non-encrypted. When 4-digit passcodes are utilized, there are only 10,000 possible passcode combinations to choose from. In these situations, encryption is not an effective defence against brute force attacks. For this reason, we encourage you to change your Admin passcode frequently.
Staff passcodes are similarly non-encrypted.
Chapter 7. Change Your Account Password Regularly

You created this password when you first registered your new account with TouchBistro via the TouchBistro app.
It’s recommended you change your password from time to time. Although we don’t advise giving non-owners the account password, you may have given trusted staff, like managers, the login details for accessing cloud reporting. It’s important to change this password when such staff members leave your employment.
Your account password is encrypted using a one-way hash, to keep your password safe. Customer Service staff at TouchBistro can initiate password resets. However, due to this encryption, they are unable to retrieve existing passwords.
Section 1. Changing Your Password

1. Using a browser, log into your cloud reporting account.
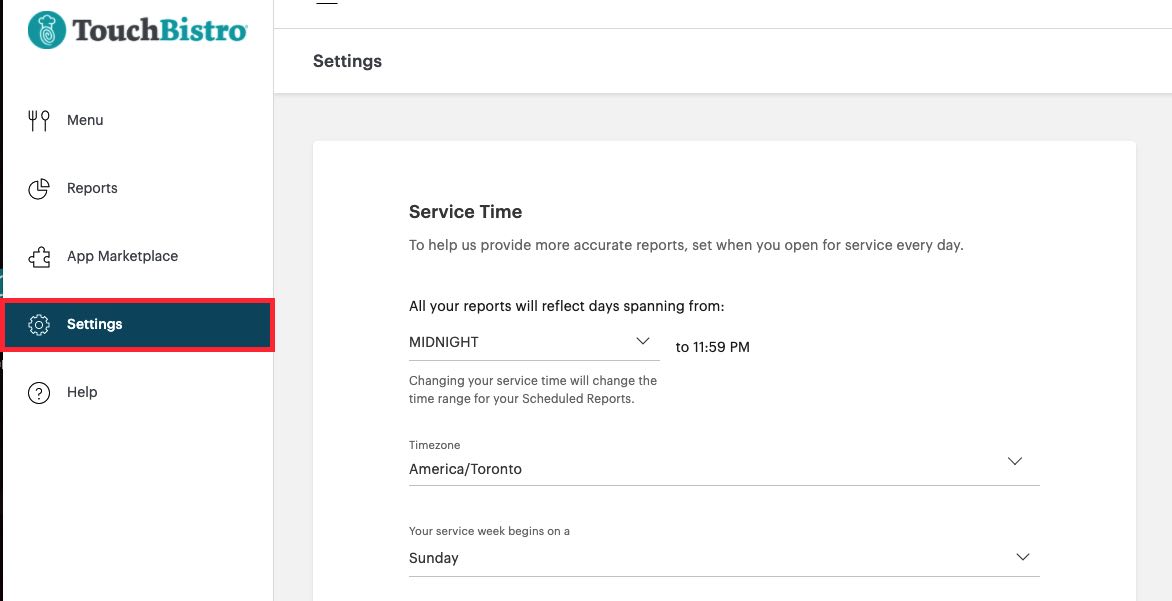
2. Click the Settings option.

3. At the bottom enter your current password. Enter your new desired password. Re-enter it and tap Change Password.
Chapter 8. Wi-Fi
TouchBistro talks to your router over Wi-Fi. When you setup your router, the router factory defaults to the WPA2 Personal security protocol. With the exception of WPA2 Enterprise security (see below), this is the strongest security (256 bit key) available over Wi-Fi. After preventing physical access to your iPads this is your next level of security. Wi-Fi encryption prevents non-authorized users from intercepting data being transmitted from your iPad to your Mac server or the Internet. For example, credit card data is encrypted via WPA2 over the Wi Fi connection.
Section 1. Checking Security Settings on an Apple AirPort Router
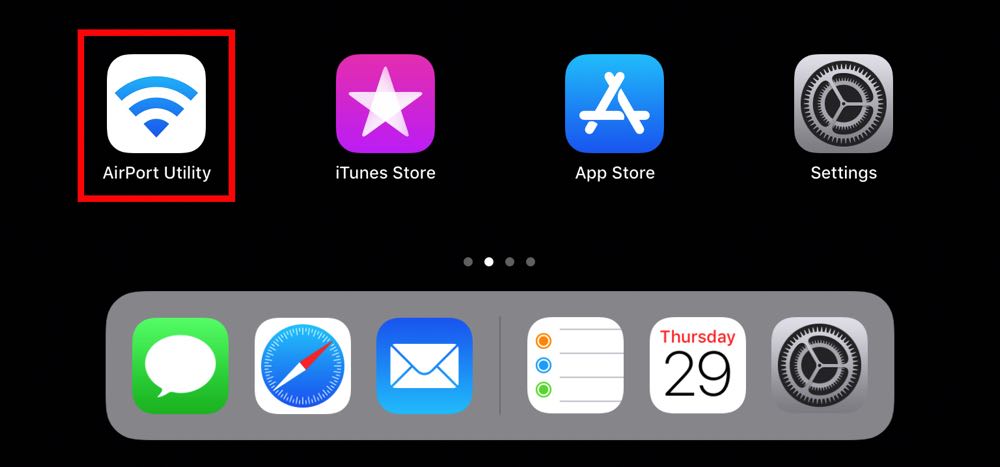
1. Launch Airport Utility.

2. Tap the AirPort icon.
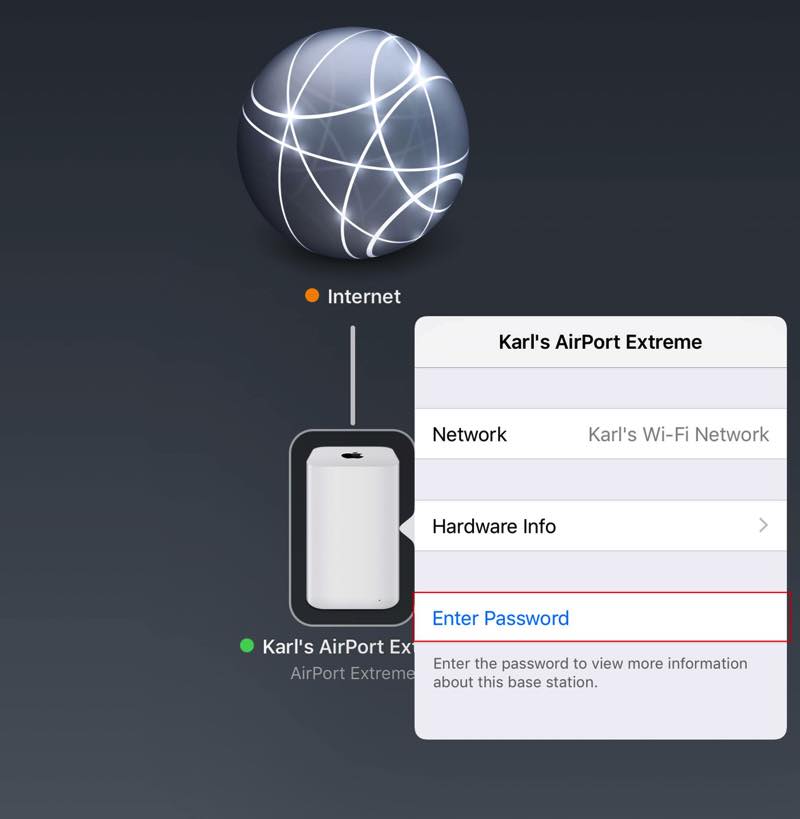
3. If you are prompted for a password, enter the password you use when you try to connect iPads and other devices.

4. Tap Edit.
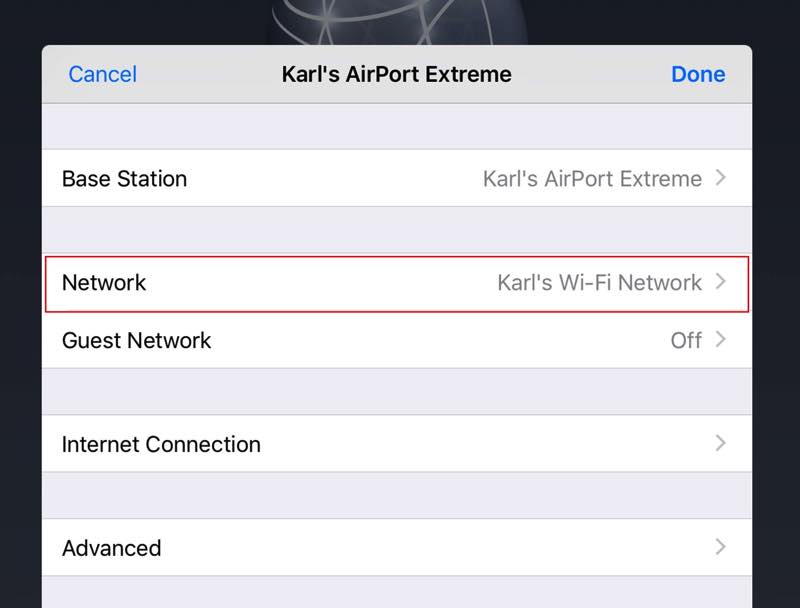
5. Tap Network.

6. Security should say, WPA2 Personal. We do not suggest setting this to anything else unless you’ve been advised by TouchBistro or a qualified technician.
Section 2. Checking Security Settings on a Ubiquiti AmpliFi Router
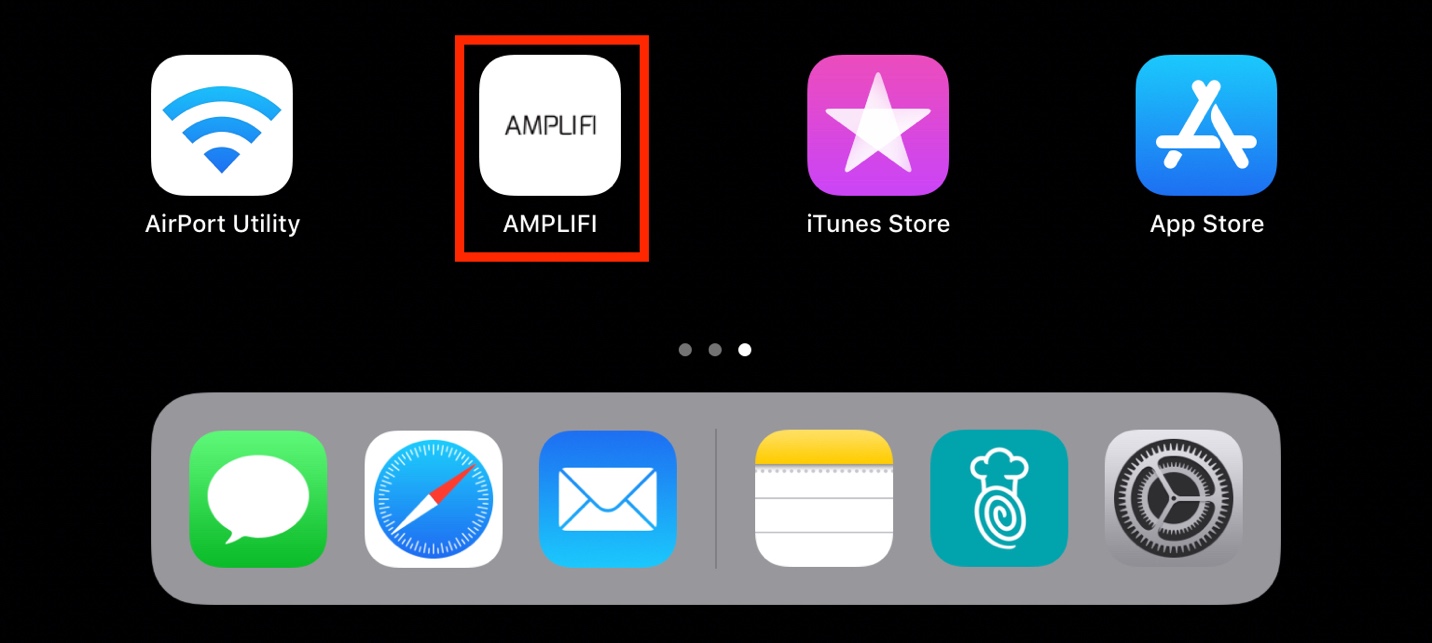
1. On your iPad, tap the AmpliFi app.
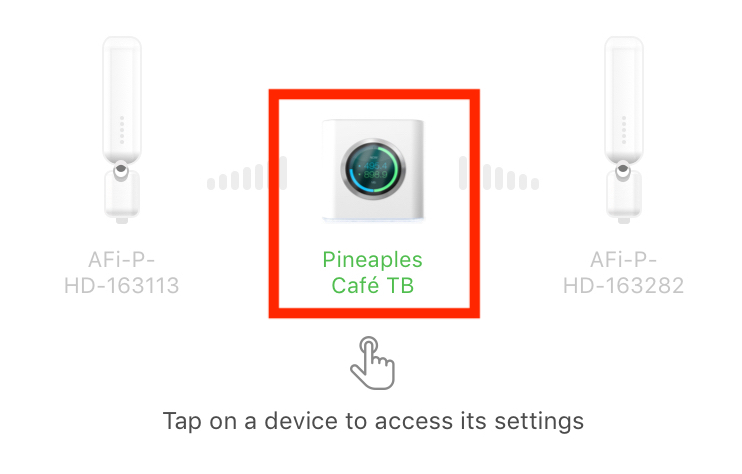
2. Tap on the picture of the AmpliFi Router in the middle of the screen.

3. Tap Wireless.

4. Ensure that WPA2 PSK is selected under Security in the General section.

5. Ensure that Hidden SSD is set to the off position.
Section 3. Guest Networks and Third Party Apps
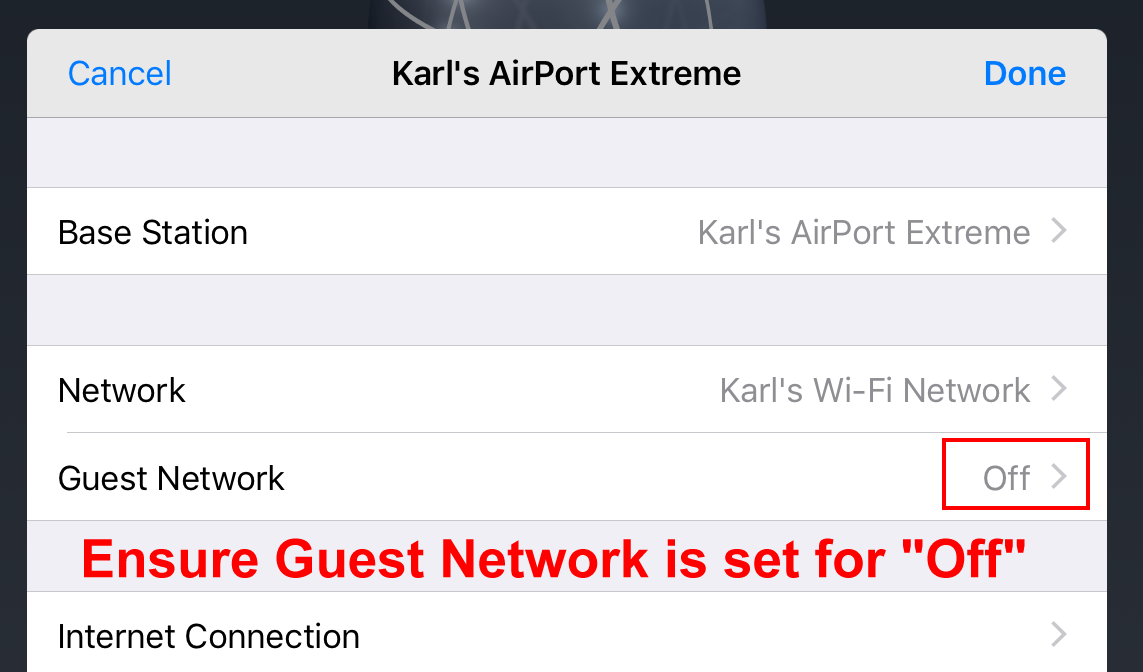
Do not enable a guest network for your TouchBistro network. Doing so can cause performance issues. Do not make your router password public in any manner. Do not run apps on your iPad or Mac computer that use your TouchBistro router. Doing so can likewise cause performance issues.
Section 4. Disabling Guest Network on a Ubiquiti AmpliFi Router.

1. On your iPad, tap the AmpliFi app.
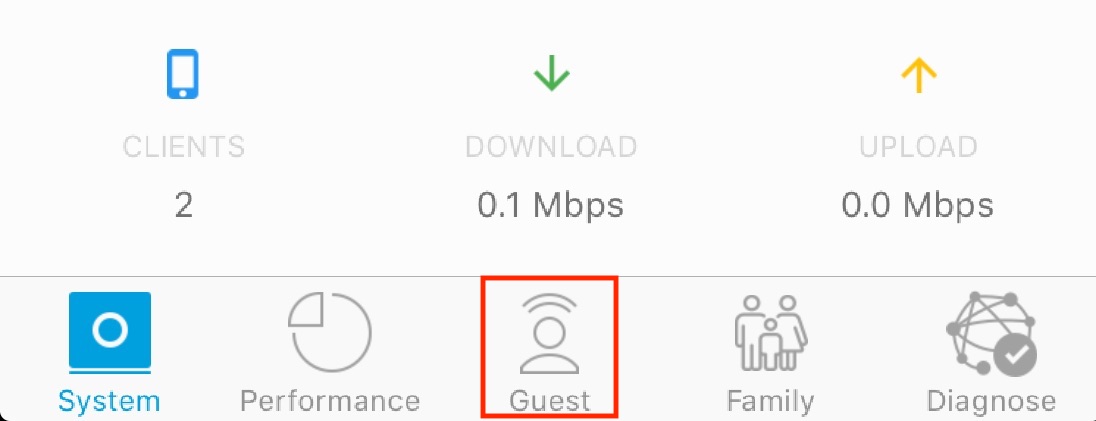
2. Tap Guest at the bottom of the screen.

3. If at the top of the page it says that your guest network is active (in green), tap the large red Stop button. If the network is already inactive, no action needs to be taken.
Section 5. When to Change Your Router Password
It’s good practice to change your Wi-Fi password from time to time, especially if you have ex-staff members who have knowledge of the password or you suspect may have gained knowledge of the password. See this guide for steps on how to change your Airport router’s password.
Section 6. Using WPA2 Enterprise
WPA2 Enterprise authentication requires setting up a RADIUS server. This is out of scope for TouchBistro’s installation and support teams. TouchBistro will not be necessarily be able to provide support help for a TouchBistro network using WPA2 Enterprise authentication. If you’ve set up your own RADIUS server and you’ve set your Airport router to use WPA2 Enterprise authentication, TouchBistro will work with WPA2 Enterprise authentication. However, you will be required to sign an Unsupported Network Agreement indicating you understand troubleshooting and diagnosis may take longer than normal due to TouchBistro’s limited access and visibility to your network.
Chapter 9. From Your Router to the Internet
Your router is physically wired to your Internet modem and your modem is physically wired to the Internet source (cable, phone ADSL, etc.) so there is no risk of an unauthorized party intercepting the wired transmission of data.
Chapter 10. Security Over the Cloud
TouchBistro maintains sales data on either your iPad (Standard users) or the Mac server (Pro users). TouchBistro does not use the cloud to store your data. However, you can enable Cloud Reporting. If enabled, TouchBistro transmits sales data required to generate the various reports to the Cloud Reporting servers.

If you’re using TouchBistro Cloud Reporting, your cloud data goes between your browser and the cloud reporting data center via a secure HTTPS connection. This secure connection employs a 128 bit key. It is the same secure connection you use to access banking and financial services.
Chapter 11. Port Access
If you whitelist outbound traffic on your firewall, you will need to ensure TouchBistro and its payment integrations have TCP/IP access to ports 21, 80, 443. Whitelisting these ports will also give you access to the App store for product updates. You should also ensure these URLs are whitelisted:
touchbistro.com
itunes.apple.com
x.itunes.apple.com
albert.apple.com
gs.apple.com
You should also consult this Apple support page for additional ports you might need to open
Chapter 12. The TouchBistro Cloud Data Center
TouchBistro uses the Amazon Webservices cloud data center to store your sales data. Amazon’s security meets or exceeds data security requirements of most nations and security validating service. You can review Amazon’s compliance here.
Chapter 13. Credit Card Data/PCI Data Security Standard
TouchBistro, as regards PCI compliance, is an “out of scope” device. TouchBistro does not “see” or transmit any “in scope” credit card data (the credit card number, the expiration date, PIN, and the CVV/CVC/CID). TouchBistro does not store any credit card data on the iPad the Mac server or the Cloud Reporting site except for the card holder’s name and the last 4 digits of the credit card (which is permissible for out of scope devices). It does not store digital signatures on the iPads, the Mac server, or the Cloud Reporting site. All data is transmitted to payment devices and to payment gateway partners using your Airport router’s WPA2 Personal encryption. TouchBistro complies with the security requirement made by our payment partners.
In any integrated payment system, TouchBistro does the following:
- When a payment is initiated in TouchBistro, TouchBistro “wakes up” the payment integration’s PCI-compliant card reader and tells it to be ready to detect a card swipe, tap, or dip.
- TouchBistro sends the amount to be charged to the credit card. No itemized list is sent to the payment device.
- The payment device upon sensing a swipe, tap, or dip:
- Reads the card data.
- Encrypts the card data at the point of swipe/tap/dip. It also encrypts the amount charged to the card (the amount sent by TouchBistro plus any tip entered on the payment device).
- Uses the iPad’s Internet connection to send that encrypted data to the payment integration. This encrypted card data does not pass through TouchBistro.
- The payment integration’s servers accept or decline the transaction and transmit back to the payment device the accept/decline status.
- The payment device transmits to TouchBistro the accept/decline acknowledgement, the card holder’s name, and the last 4 digits of the card to TouchBistro. If the transaction was accepted, it passes on the final amount charged (the guest check’s total plus any tip entered on the payment device).
- TouchBistro includes the final amount, the card holder’s name, the card’s final 4 digits, and the accept/decline status on credit card slip (if generated by TouchBistro) as well as on the guest check.
- TouchBistro allows the server/venue owner to close the order/table.
Chapter 14. Cash Drawer
Your cash drawer can be opened with the original key that came with it or electronically via TouchBistro.

You can turn TouchBistro’s ability to open the cash drawer automatically on/off by enabling or disabling the Advanced setting Open Cash Drawer When Accepting Cash Payments.

Even if that is turned off, servers still have the ability to open the cash drawer by tapping the No Sale button.

From the Checkout screen servers can tap Open Cash Drawer and open the cash drawer.
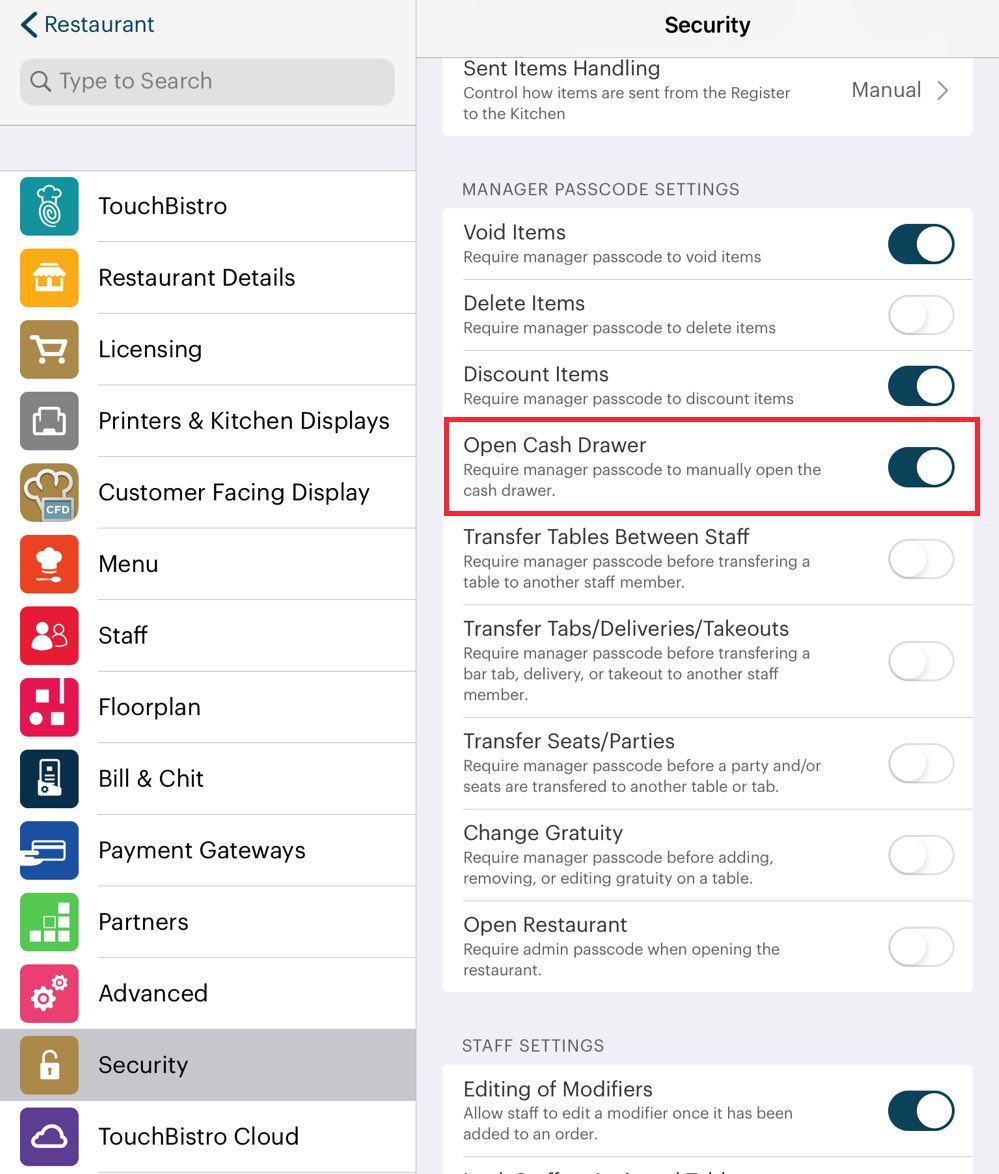
You can control this by accessing the Security page enabling Open Cash Drawer. If enabled, the server requires either an Admin passcode or a manager staff type that has the Manager option Can Open Cash Drawer enabled.
TouchBistro also provides a No Sale Report and a Detailed No Sale Report that lets you track which staff members are opening the cash drawer and which staff members are approving cash drawer open requests.
If you do both tableside and counter services, see this guide for a discussion on how to set up cash drawer access for counter servers and turn off cash drawer access for tableside servers.
Section 1. Key Replacement
If you lost your original keys and you use the MMF cash drawer line, see this site for key replacement. TouchBistro cannot replace your keys.
Chapter 15. Staff Oversight
TouchBistro provides venue owners a number of ways to limit staff access to TouchBistro and monitor their activity.
Section 1. Limit Restaurant Opening

By default any staff member with a valid passcode can open your restaurant for the day. If you want to limit who can open your venue, access the Security page and enable Open Restaurant.
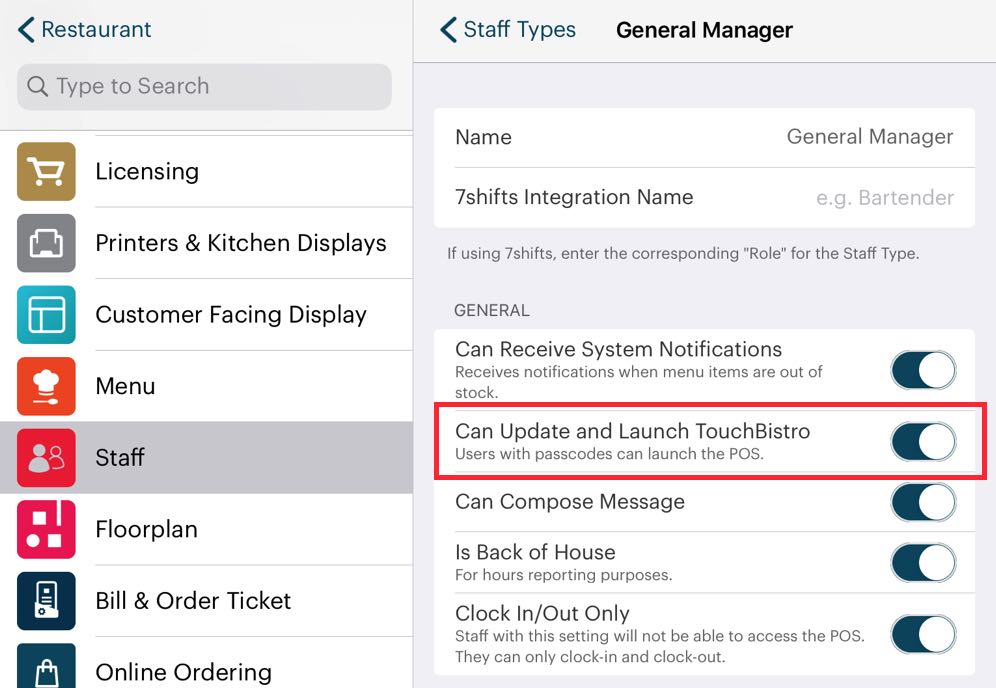
If this is enabled, only the Admin and staff types with the Can Launch TouchBistro manager permission enabled will be able to start the business day. Also, if this is enabled, TouchBistro will also prompt you for an Admin passcode to access the Admin options.
Section 2. Voids and Deletes

Allowing servers to freely void and delete items from the Order screen can be a common way for servers to under report their sales or perform unauthorized sales. You can limit the ability for servers to void items or delete items by accessing the Security page and enabling oid Items and/or Delete Items. If either of these are enabled, the server will require either an Admin passcode or a manager staff type to proceed. If Can Manage Voids is enabled for the Staff Type, the user can approve voids. If Can Manage Orders is enabled for the Staff Type, the user can approve deletes from the order screen.

The Void report can be used to monitor voids and which staff members are approving voids.
On the Advanced setting page, TouchBistro provides two options you can set for voids.
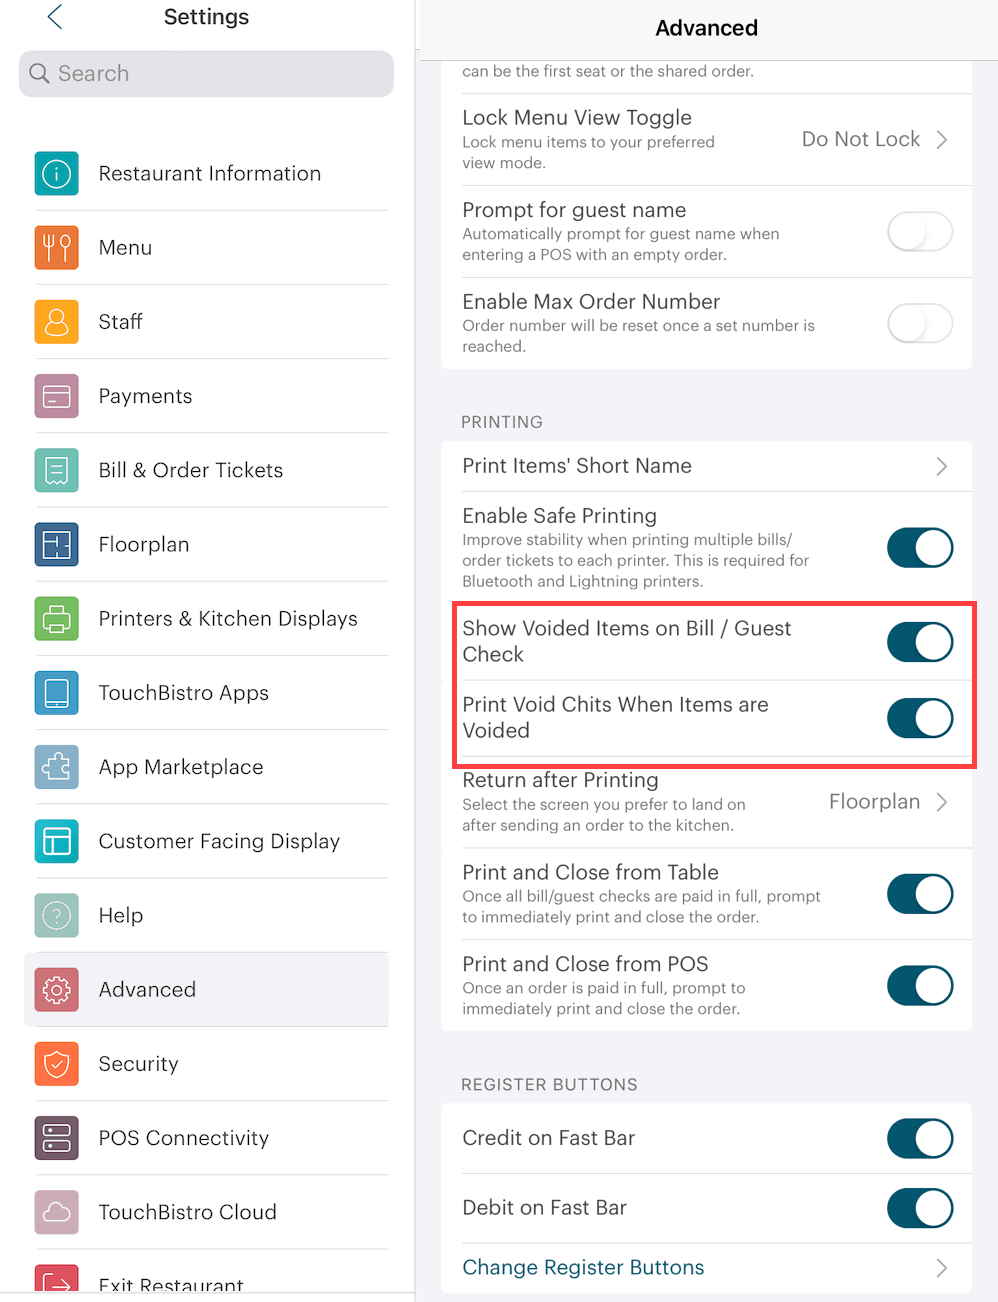
If enabled, Show Voided Items on Bill/ Guest Check will display the voided items on the customer receipt. Disable if you prefer this information not to be included on the customer receipt. If enabled, Print Void Chits When Items Are Voided will send a ticket to the kitchen printer (or KDS) indicated the item has been voided.

TouchBistro also collects data on items being deleted for a Deleted Items Report. The Deleted Items Report can be helpful in identifying staff members with unusually high number of deletes and then an appropriate conversation with the staff member can be arranged.
Section 3. Discounts and Autograts
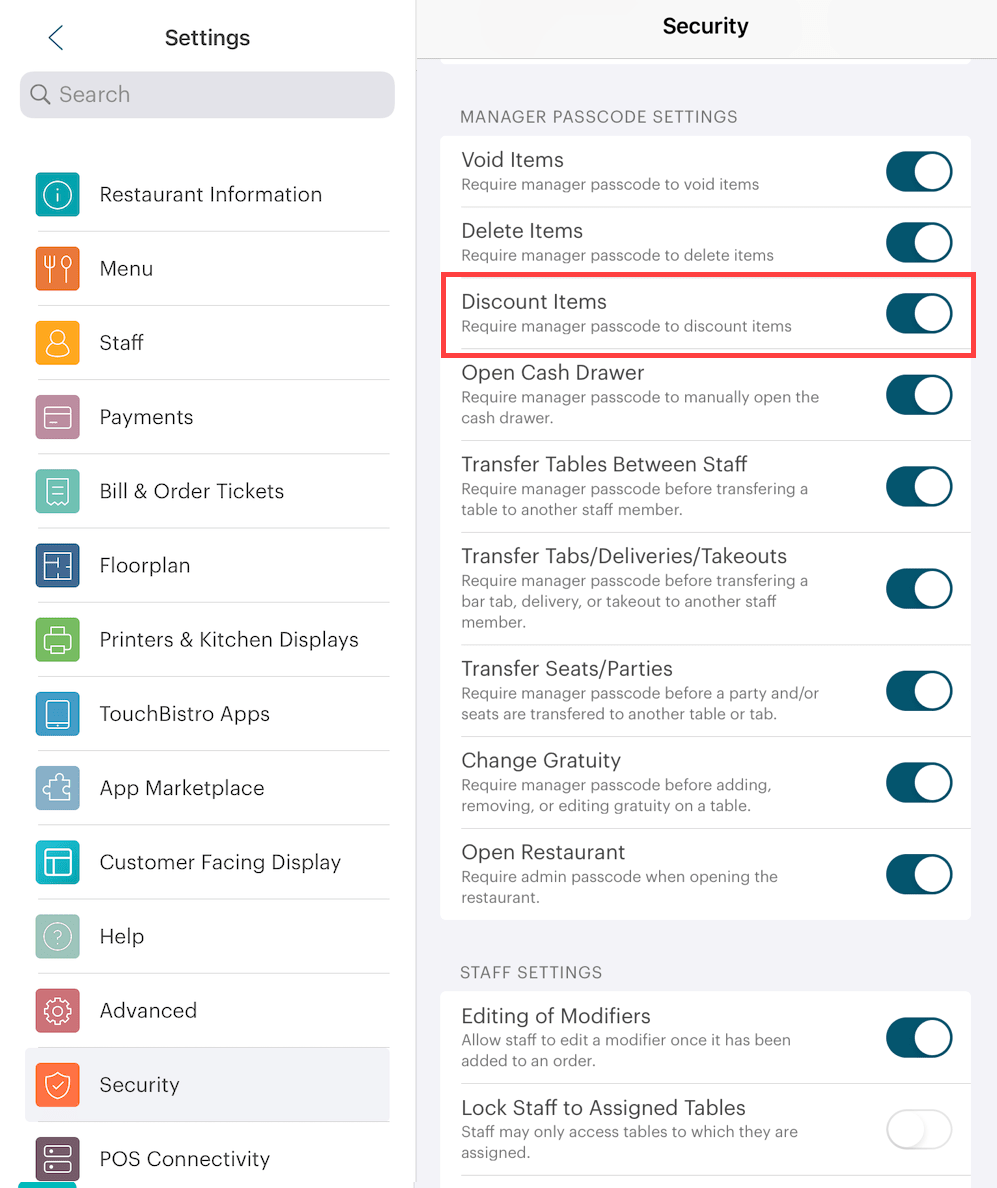
You can keep staff members from issuing discounts without manager approval by accessing the Security page enabling Discount Items. If enabled, the server will require either an Admin passcode or a manager staff type to complete a discount.
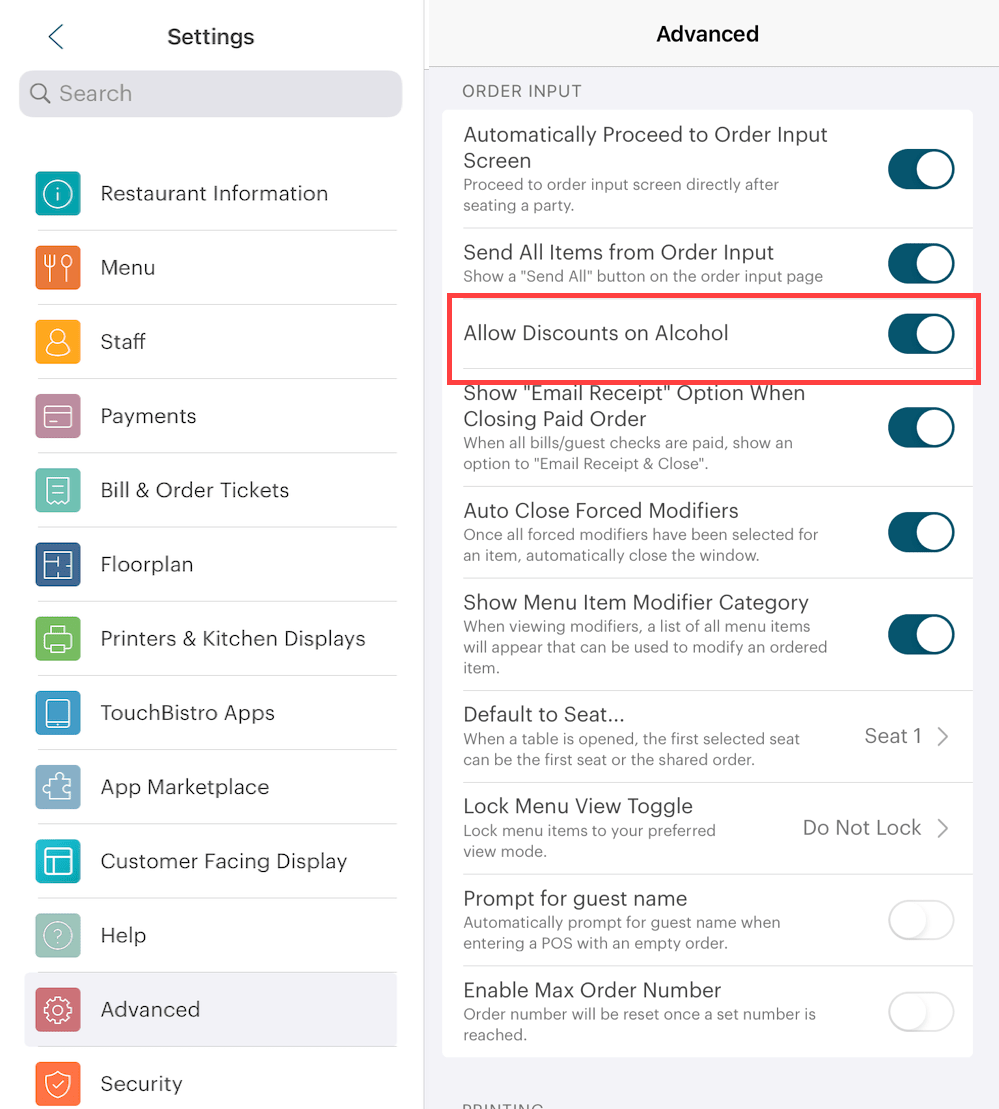
You can also categorically prevent discounts on any item under the Alcohol sales category being discounted by accessing the Advanced page and disabling Allow Discounts on Alcohol.
Access the Security page and enable Require Passcode To Change Gratuity to prevent an employee from removing an autograt without Admin or a manager staff type approval.

If enabled, an Admin/Manager passcode will be required to use the Include Gratuity feature under Adjustments.
Section 4. Kitchen Ticket Security
Servers may try to under report sales by not sending items to the kitchen.
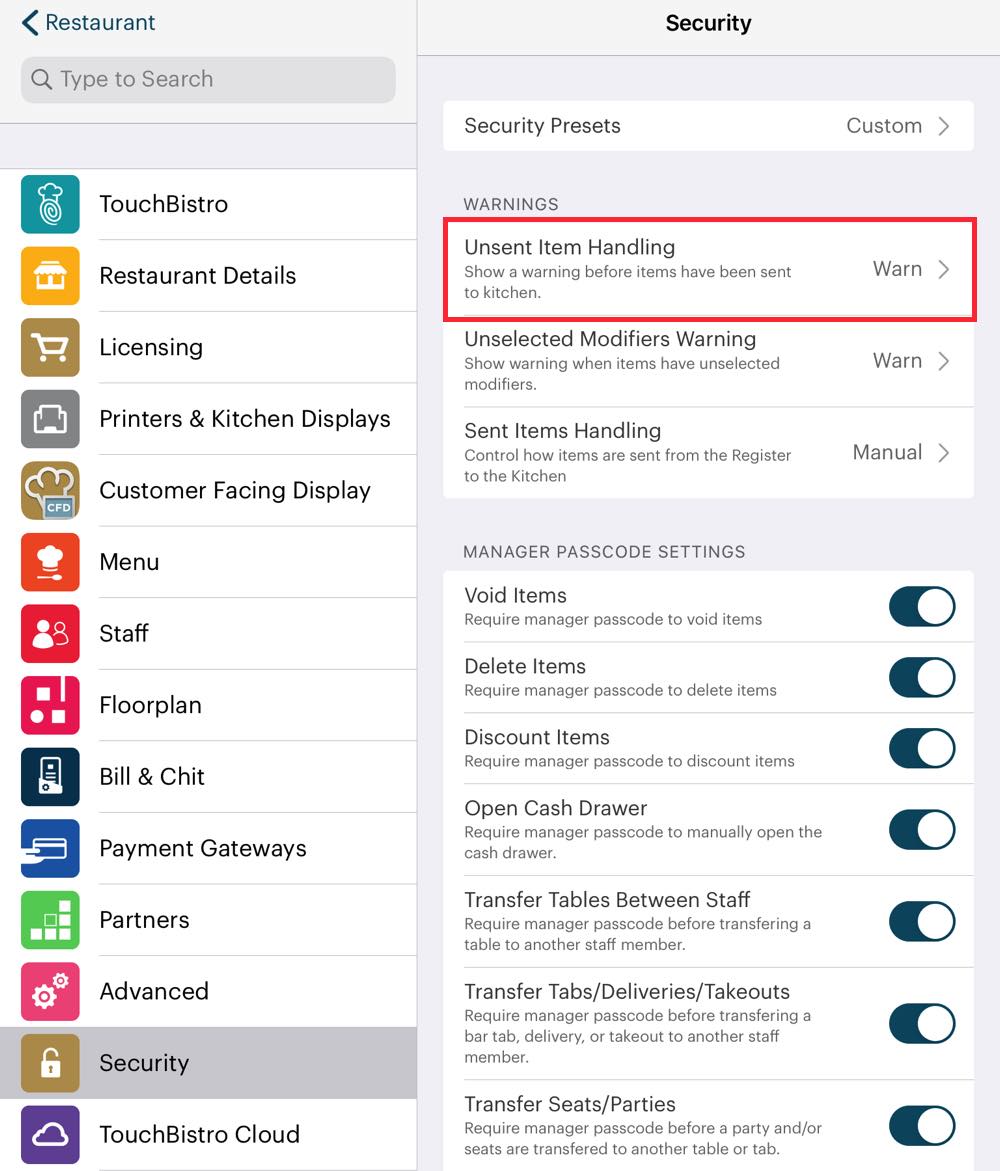
To prevent this access the Security page and enable Unsent Items Warning and set it for Manager Required. If enabled, the server will require either an Admin passcode or a manager staff type to close the order or table with unsent items on the Order screen.
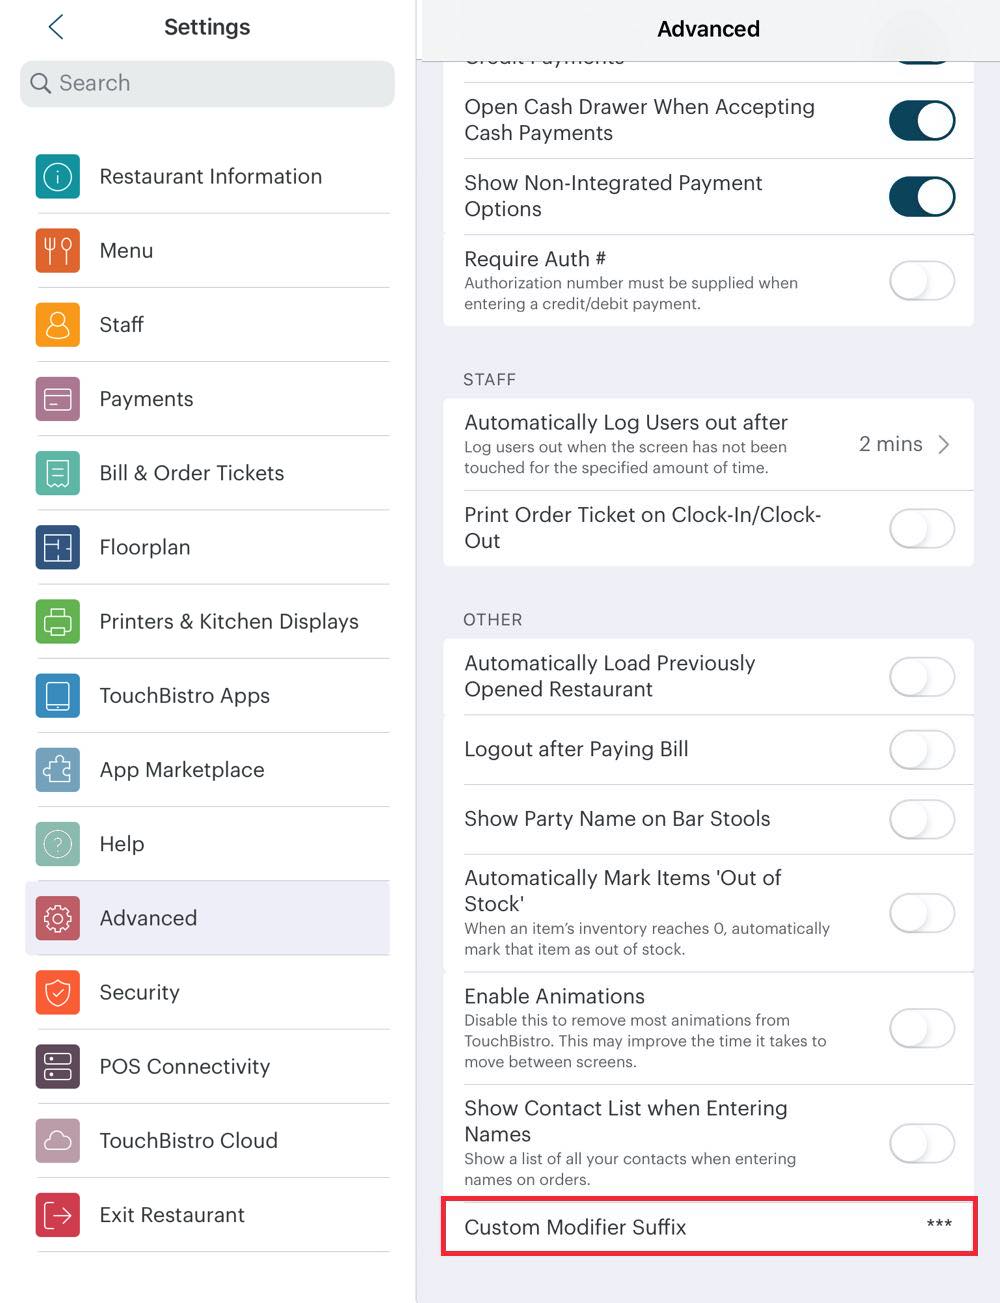
Staff members can use custom modifiers entered with the same name as a modifier programmed with an up charge as a way to underreport sales. Visit the Advanced page and complete a custom modifier suffix. All custom modifiers entered by the server will get the entered suffix appended to the modifier.

You can alert back of the house staff to question and report servers sending a large number of custom modifiers that resemble modifiers with up charges. Likewise, you can generate Modifier reports and see if servers are creating custom modifiers and take action.
Section 5. Setting Menu Items to Require Manager Approval
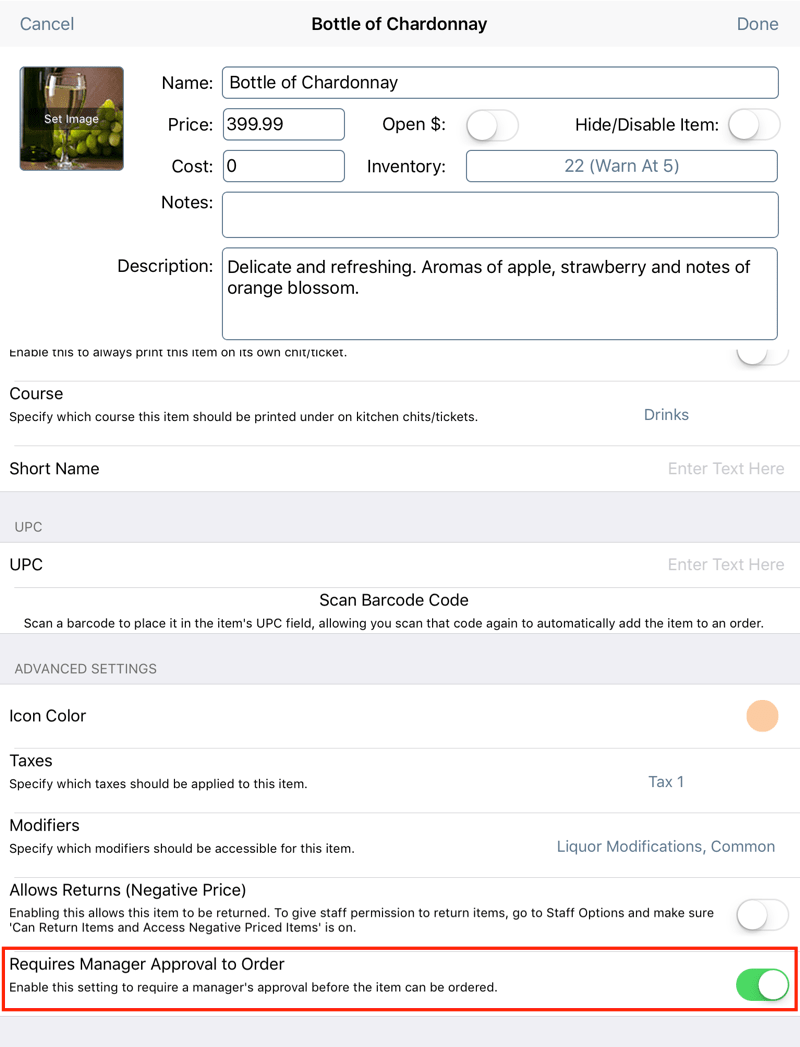
You may have some items on your menu that you want to sell but you don’t want regular staff members to sell them without some manager oversight. For example, you may have some very expensive bottles of wine on your menu and to avoid any miscommunication between a server and customer, a manager is required at tableside to double check the customer understands what he/she is ordering. To do this, open appropriate menu items and enable Requires Manager Approval to Order. If enabled, the server will be prompted to get a Admin or Manager staff type passcode approval to add the item to the Order screen.
Section 6. Creating a Paper Record of Staff Clock-Ins and Clock-Outs
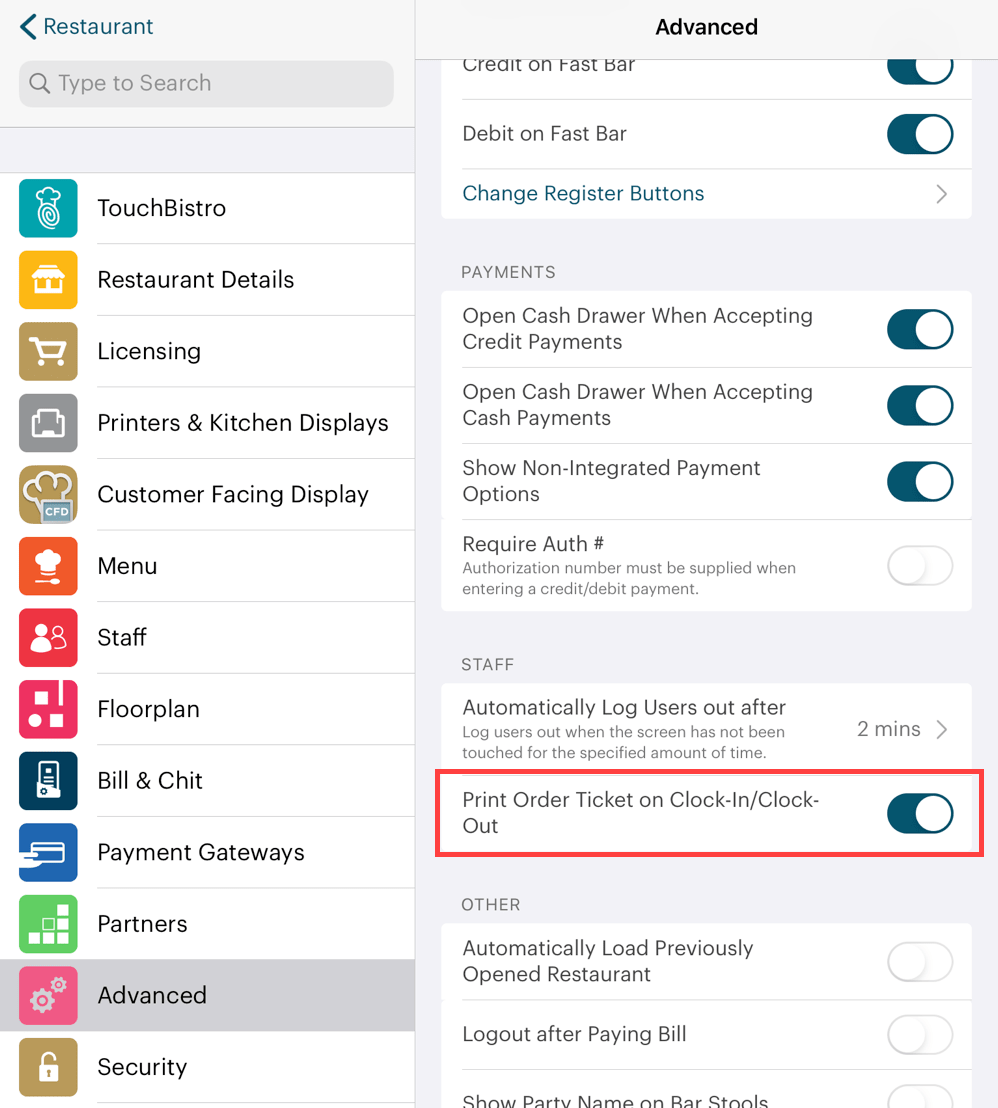
If you would like a paper record of when staff members clock in/clock out for the day, enable Print Chit on Clock in and Clock out under the Advanced screen’s Staff section. The clock-in ticket will go to your configured global receipt printer.
Chapter 16. Enabling Location Services
The TouchBistro app may require location services enabled. Some integrated payment processor solutions use location services as an extra layer of security. To enable location services, or check if they are enabled for the TouchBistro app, do the following:

1. Tap Settings.
2. Scroll to the bottom and tap TouchBistro POS.

3. Ensure Location is set for While Using.
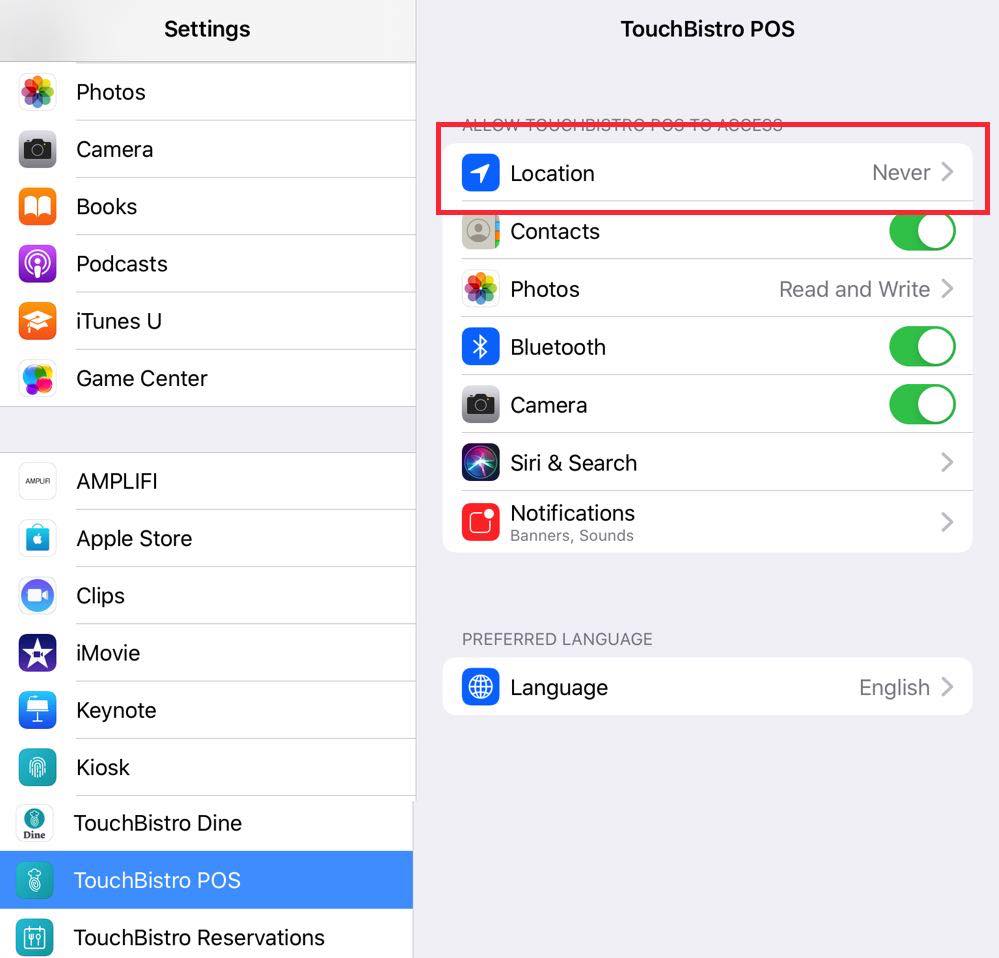
4. If it says Never, tap Never.

5. Tap While Using the App and then tap TouchBistro POS.
6. Your iPad is now set to use location services with the TouchBistro app.
Section 1. If Never is Grayed Out and Unavailable
If in step 4 above tapping Never does not open the Location setting screen (it’s “grayed out”), you need to enable location sharing in general. To do this:
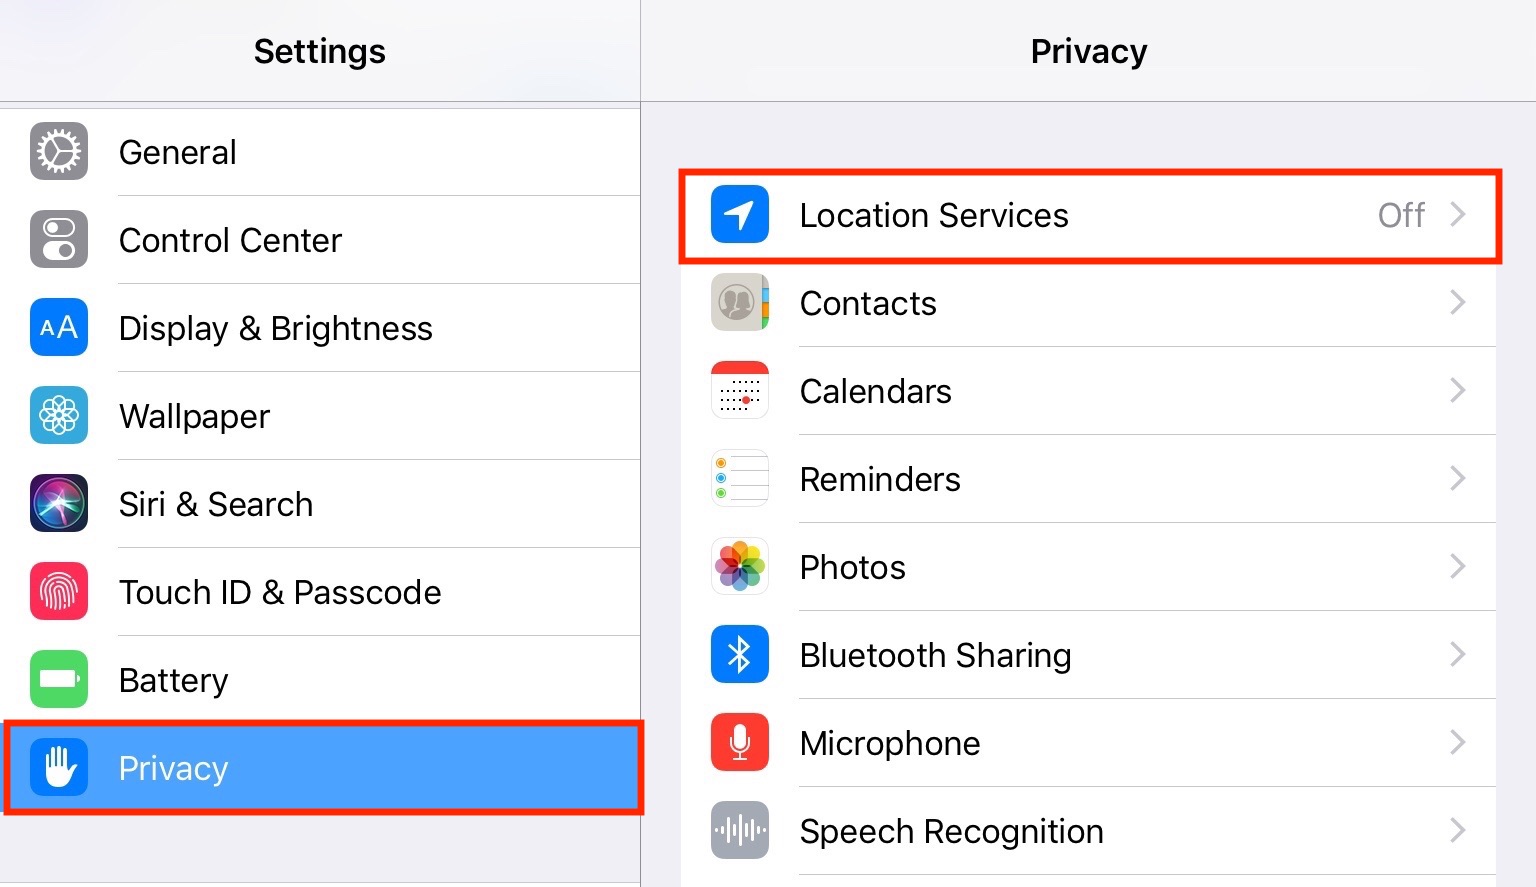
1. From the Settings screen, tap Privacy and then tap Off next to Location Services.
2. Enable Location Services and then tap TouchBistro POS.

3. Tap While Using the App then tap Location Services to return.
4. Your iPad is now set to use location services with the TouchBistro app.
Chapter 17. Related Articles
Security Settings
Using TouchBistro to Help Protect Against Post Payment Adjustment Scams
Using TouchBistro to Help Protect Against Server Check Padding
Using TouchBistro to Help Protect Against the Wagon Wheel Scam


 Email
Support
 Frequently
Asked Questions