Setting Up TouchBistro Kiosk
Table Of Contents
Chapter 2. PIN pad Integration – USA & Canada Only
Chapter 6. Dark Mode in iPad OS 13
Chapter 7. SP700 Impact Printer – Epson Mode Not Supported
Chapter 9. Enable TouchBistro Kiosk in TouchBistro
Chapter 10. Set Up One or More Receipt Printers for TouchBistro Kiosk
Section 1. Adding a USB/Lightning Printer
Section 2. Adding an Ethernet/Wi-Fi Printer
Section 3. Using a Single Printer with Multiple Kiosks
Chapter 11. Configuring PIN pads for Kiosk
Chapter 12. Launching and Connecting TouchBistro Kiosk
Chapter 1. Introduction
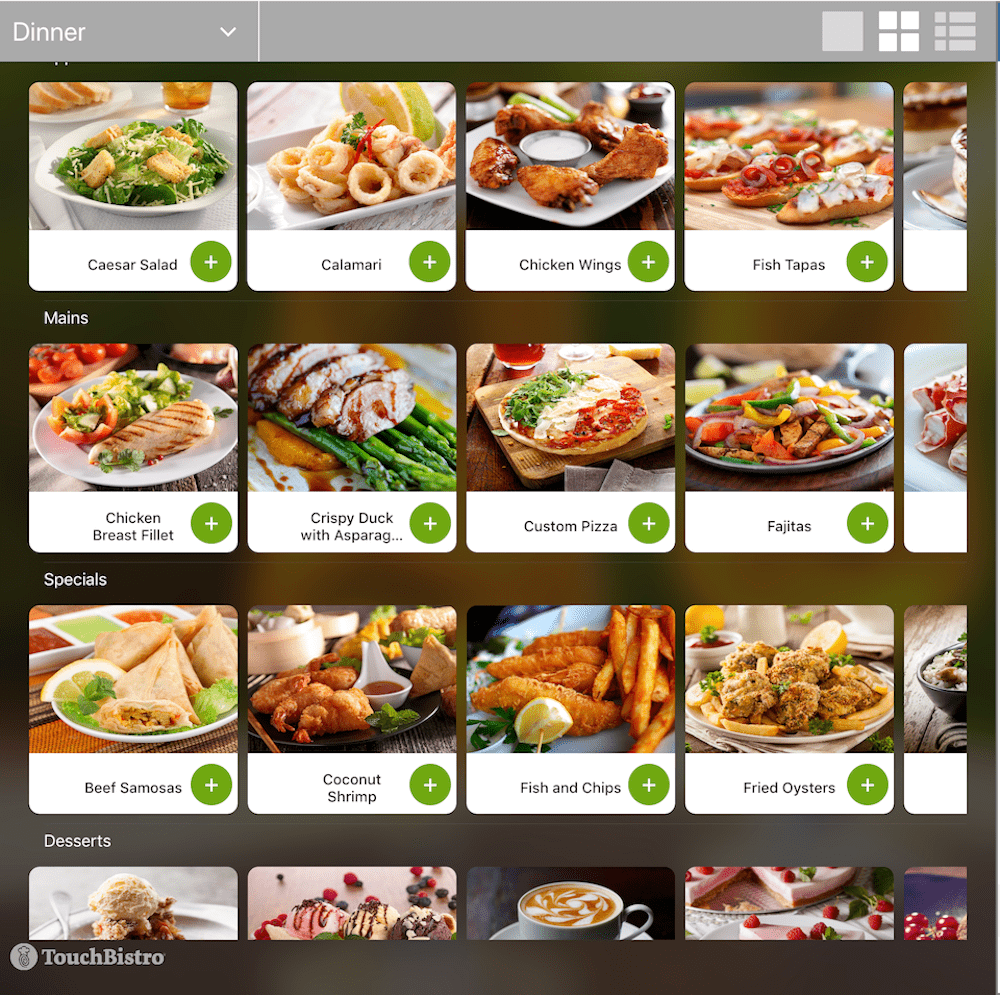
TouchBistro Kiosk is an app that lets you set up a self-ordering station. Customers can select their TouchBistro menu items from the iPad screen. If a menu item has modifiers (both forced modifiers and optional modifiers) they are presented. After completing their order, they can send it, and either pay at the Kiosk station using a PIN pad integration or opt to pay with cash at the counter.
Chapter 2. PIN pad Integration – USA & Canada Only
PIN pad integration is currently only available in the USA to existing customers using the Worldpay iPP350 PIN pad, and in Canada to existing and new customers using the Moneris iPP320 PIN pad.
Note: Worldpay is no longer offering iPP350 devices to new customers. If you have iPP350 devices already, you can repurpose them for use with Kiosk.
If you do not have access to Worldpay iPP350 PIN pads, you’re not in Canada or are not using Moneris, you may use Kiosk non-integrated, which means that your customers may place orders at the Kiosk, and pay at the counter. You can also use TouchBistro Online Ordering as an alternate solution. TouchBistro Online Ordering allows your customers to order and pay for their meals using their own devices.
Chapter 3. Taxes
Your Tax Settings, as well as your Order Type Exclusions, will be reflected in all orders taken in Kiosk.
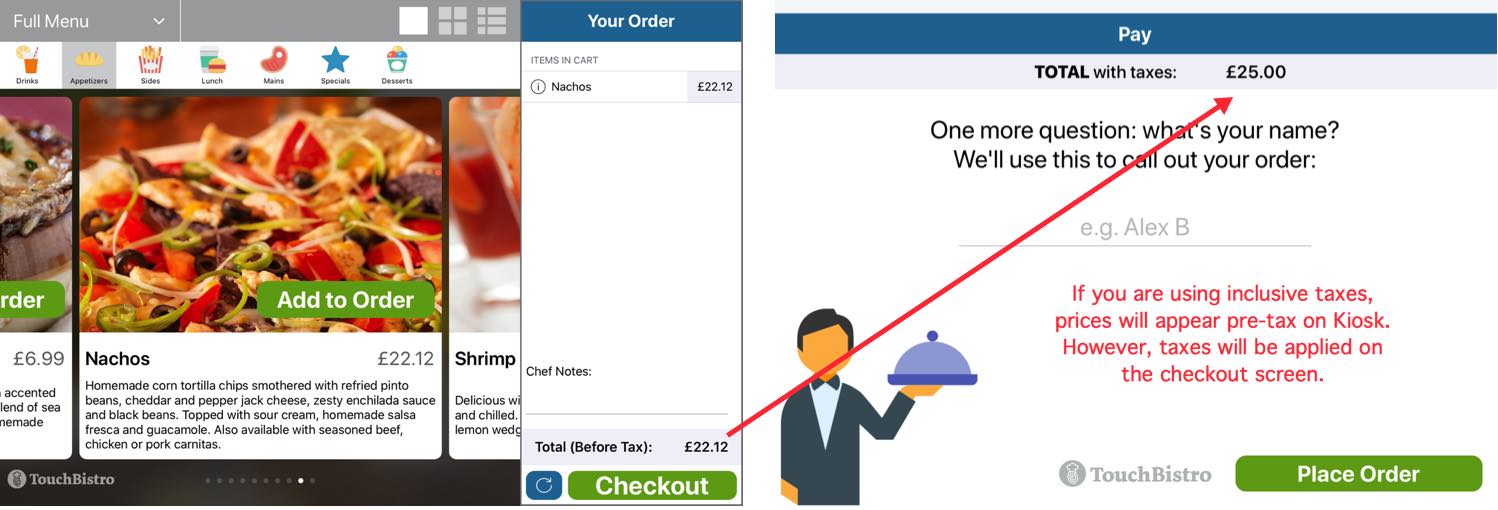
Note, however, if you are using inclusive taxes, menu item prices will display pre-tax. VAT-type taxes will then be properly applied when the diner proceeds to the checkout screen.
Chapter 4. Printers
Each Kiosk iPad requires it’s own dedicated printer. Printers set up for Kiosk cannot be used as a staff-facing receipt printer or kitchen printer.
Chapter 5. Currency
The currency symbol ($, £, €, ₹, ₽, etc.) used in Kiosk can be changed using your iPad’s Settings. Changing your Region Settings may also affect the way in which dates, times, and languages are displayed.
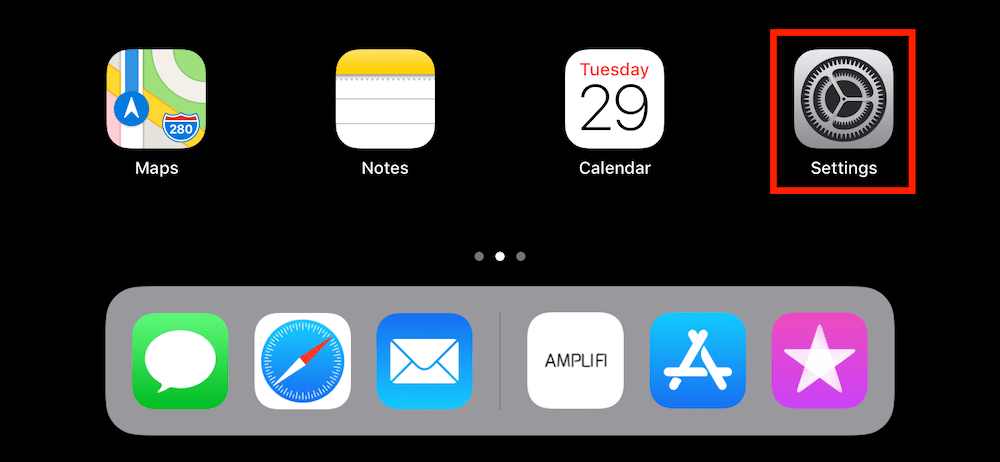
1. Tap your iPad’s Settings icon.
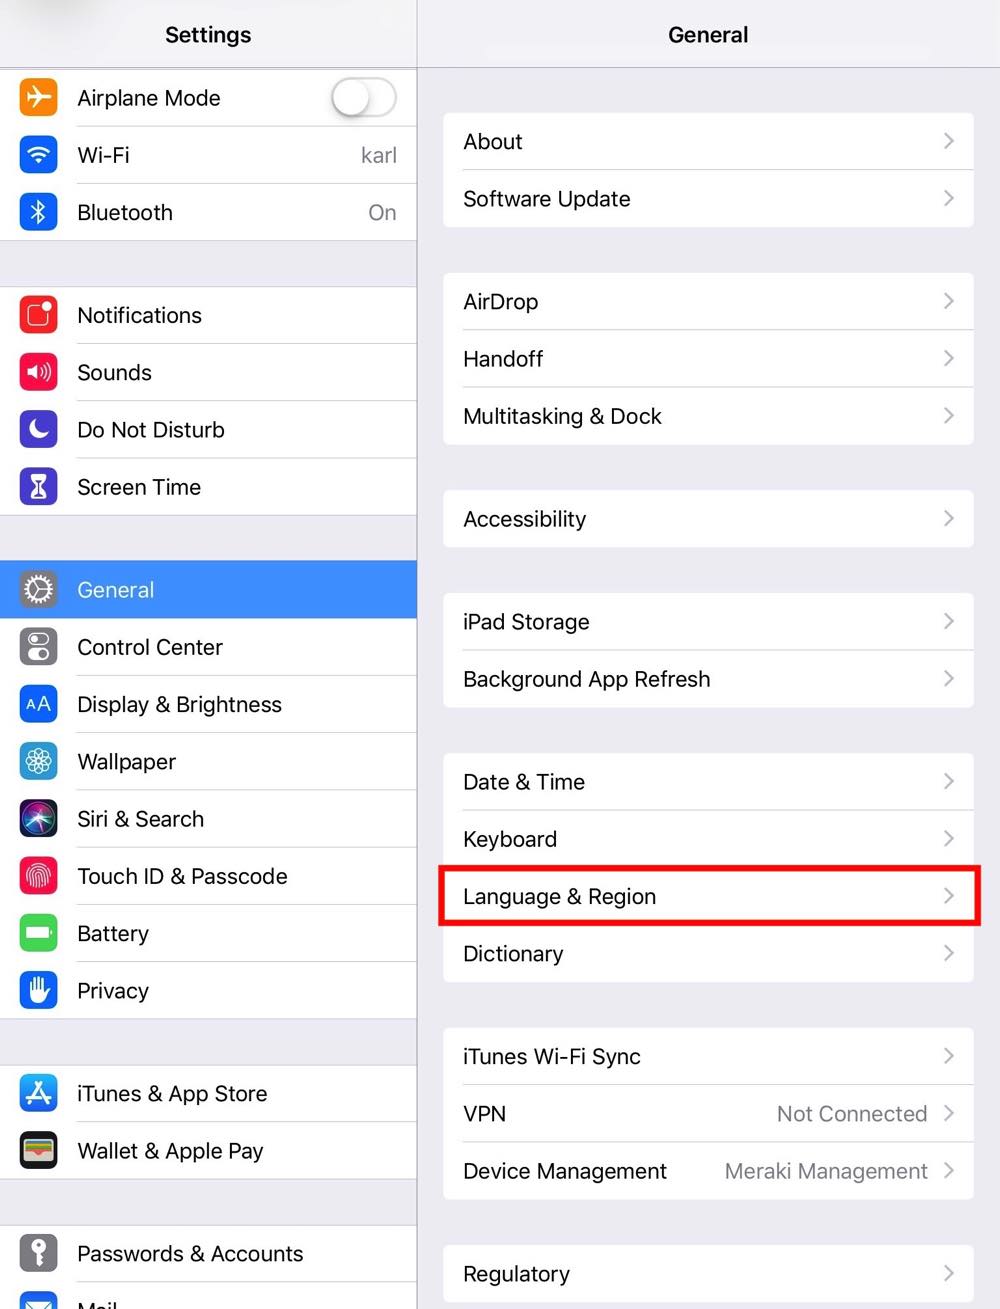
2. Tap General, scroll down in the right frame, and tap Language & Region.
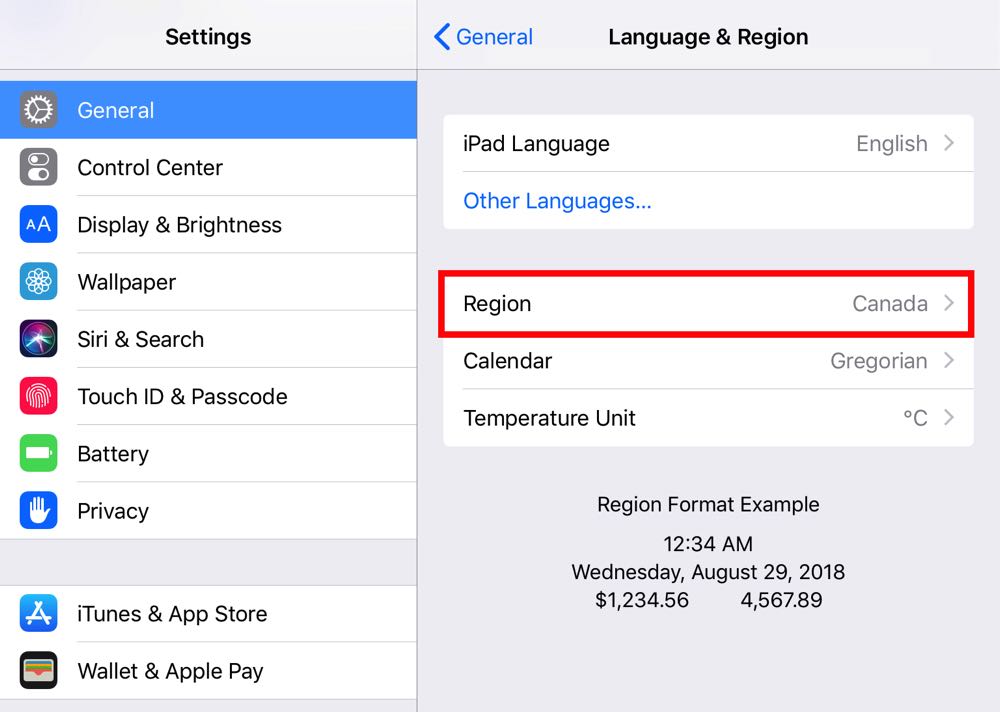
3. Tap Region.
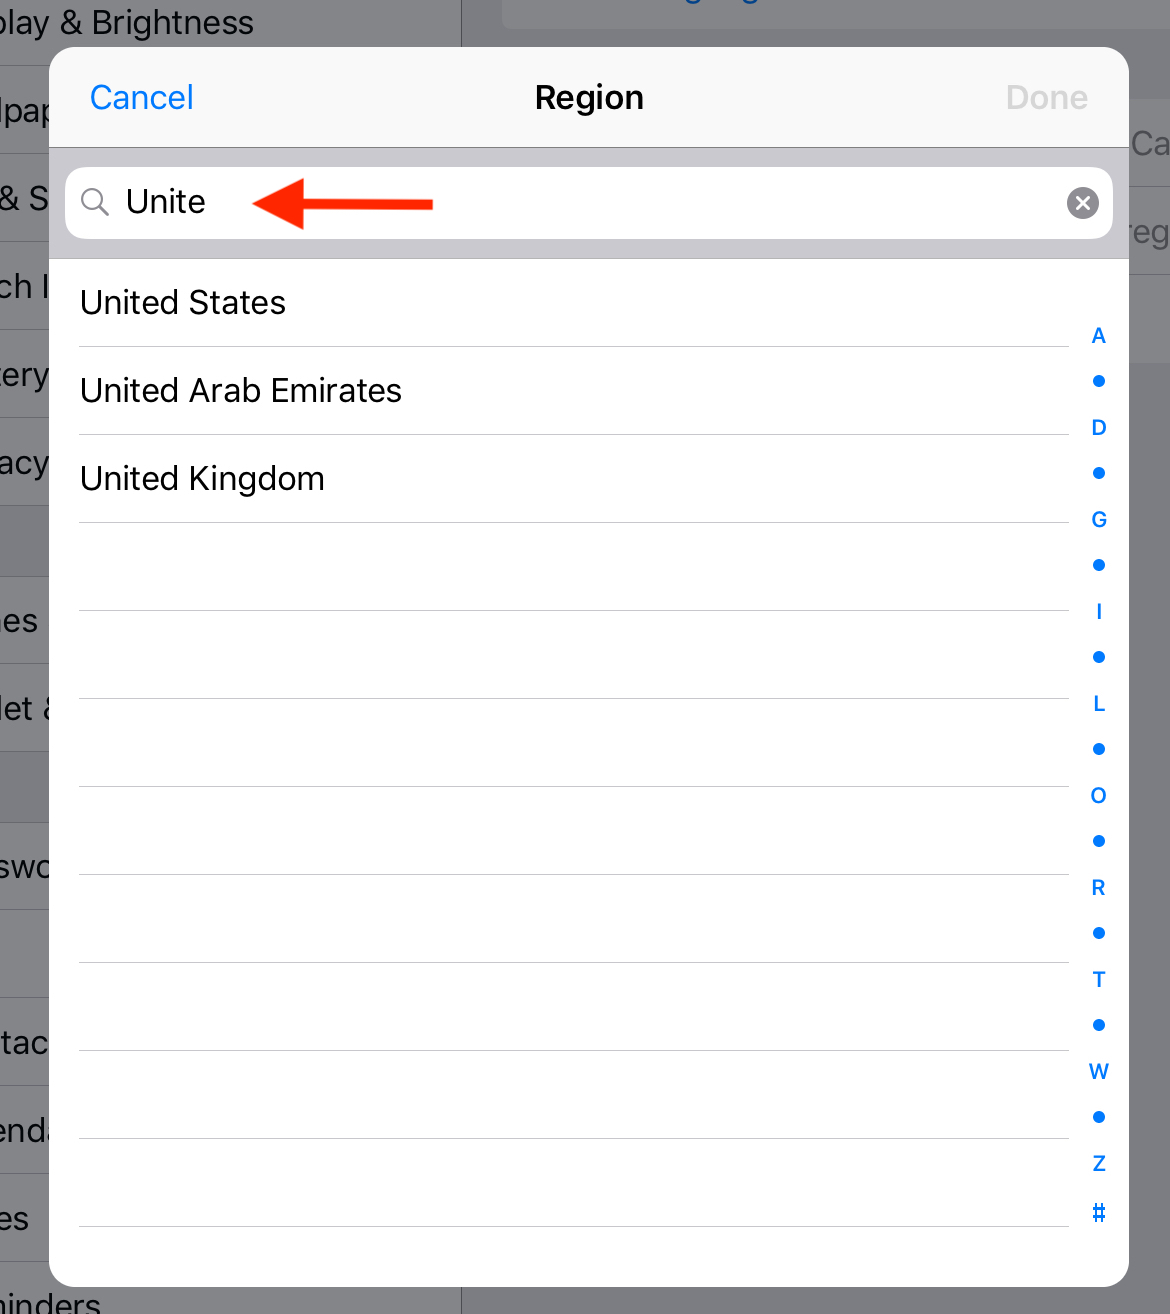
4. Type the name of your region (the name of your country, or administrative region) into the field that appears at the top of the Region list, select your region and tap Done.
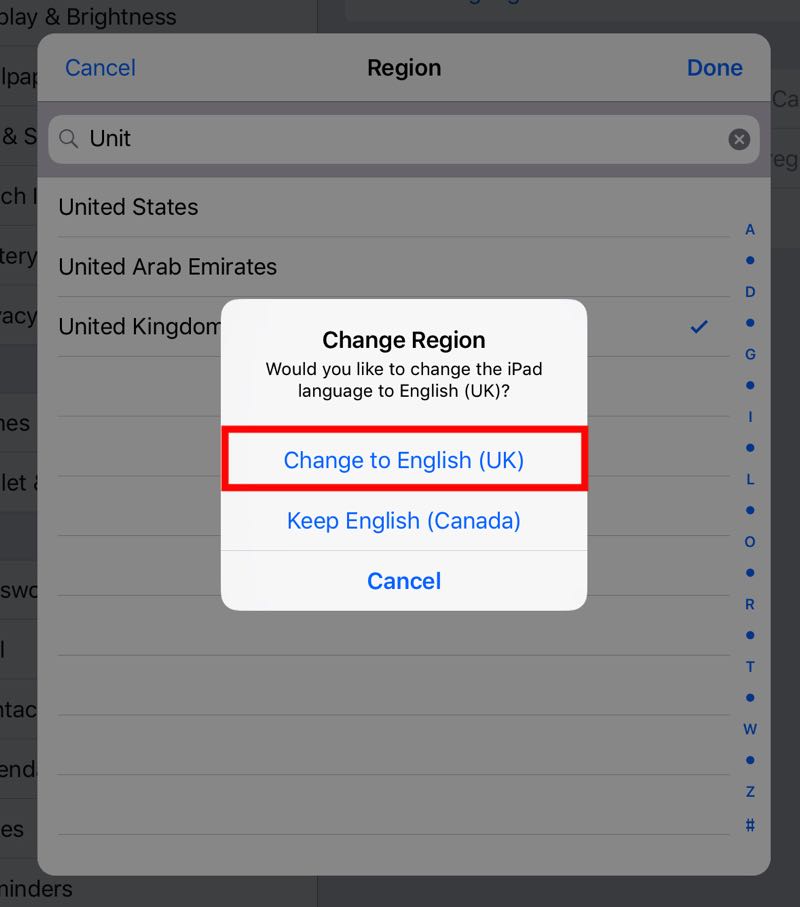
5. Tap Change To… in the Change Region dialog box if you’d like to change the language setting or tap Keep… if you’d like your language to remain the same.
Chapter 6. Dark Mode in iPad OS 13
Dark Mode in iPad OS 13 is not supported in Kiosk. Enabling Dark Mode on your iPad will not impact the way Kiosk functions or appears on-screen.
Chapter 7. SP700 Impact Printer – Epson Mode Not Supported
You are unable to use Kiosk with the SP700 printer in Epson Mode. It must be set up using the standard configuration in TouchBistro POS. If your SP700 printers are currently in Epson Mode, please see How to Put your Star SP700 Back into Star Mode.
Chapter 8. Before You Begin
The diagram below displays a typical TouchBistro Pro system, with two Kiosk stations on the right, alongside their integrated PIN pad payment devices and printers.
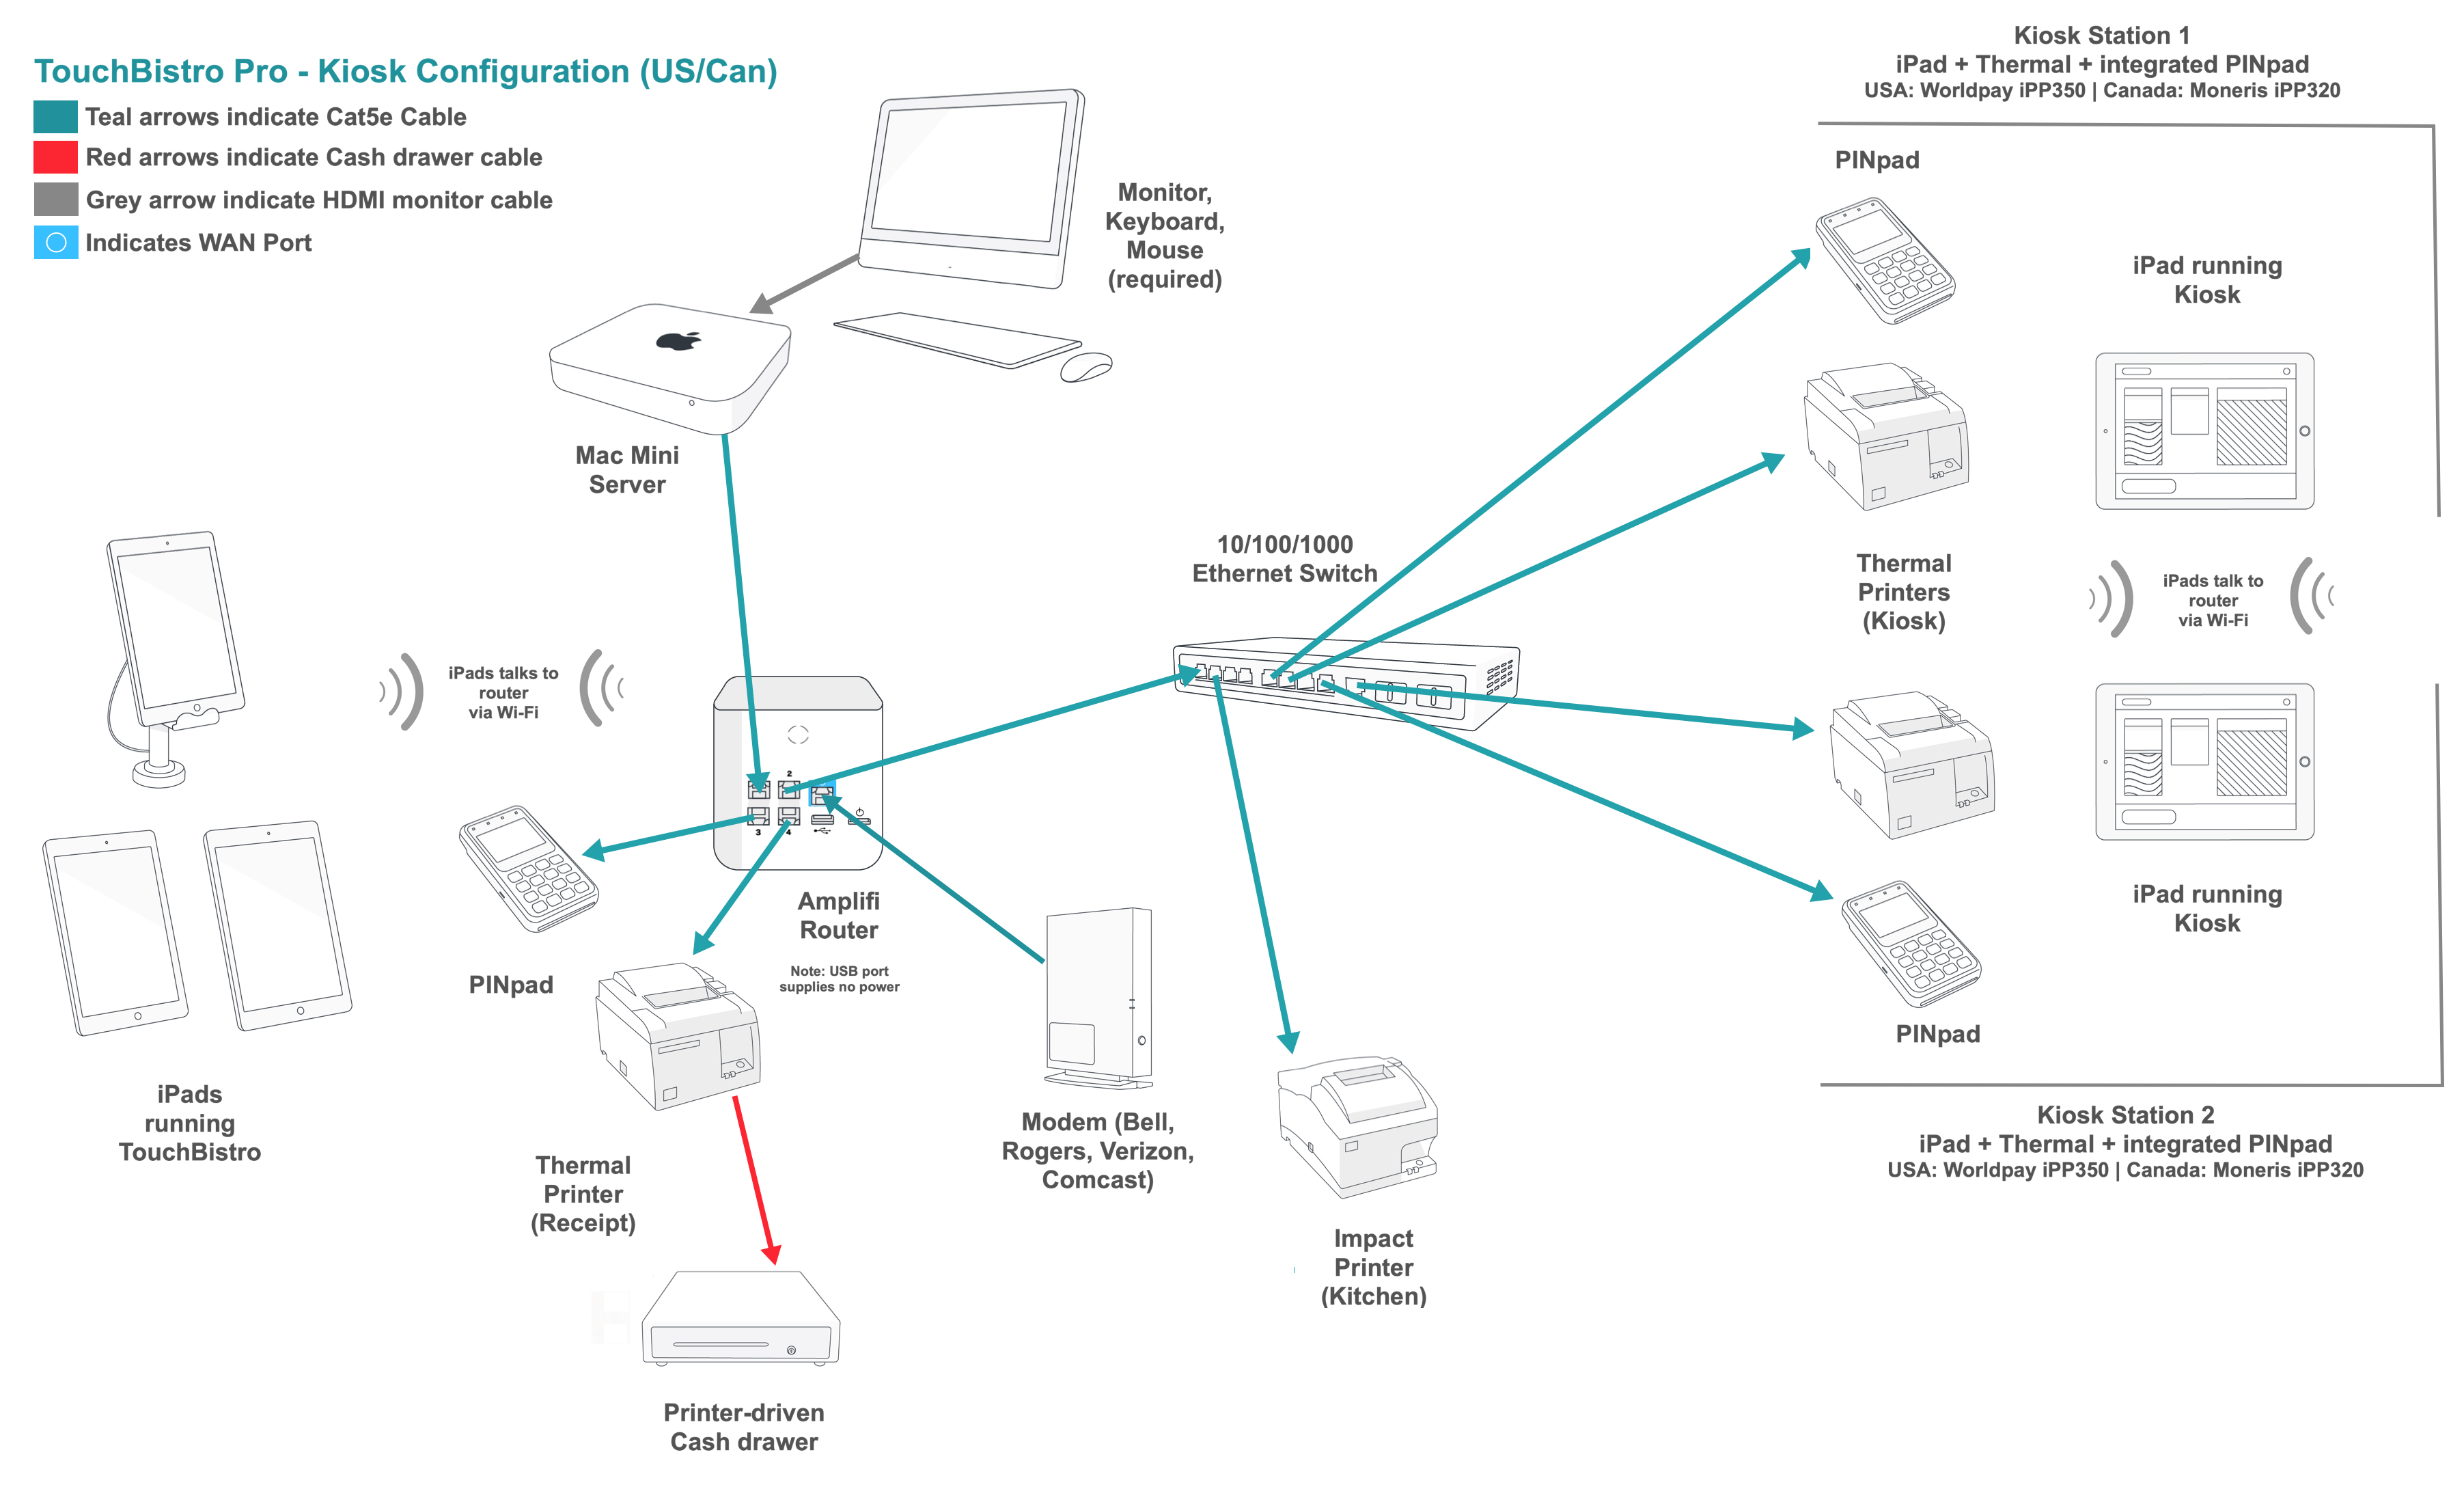
Before you launch TouchBistro Kiosk ensure:
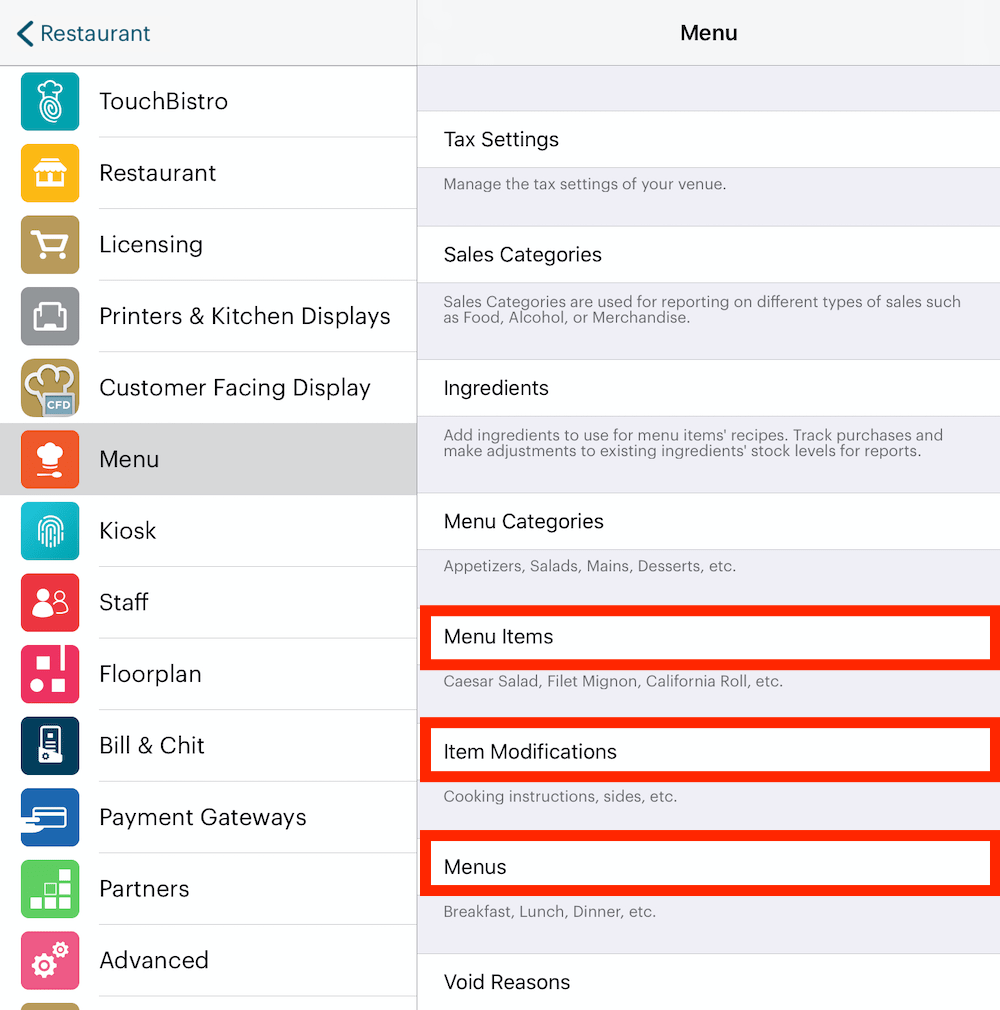
1. You’ve completed your menu items, modifiers, and menus (e.g., full, dinner, breakfast, lunch, etc.).
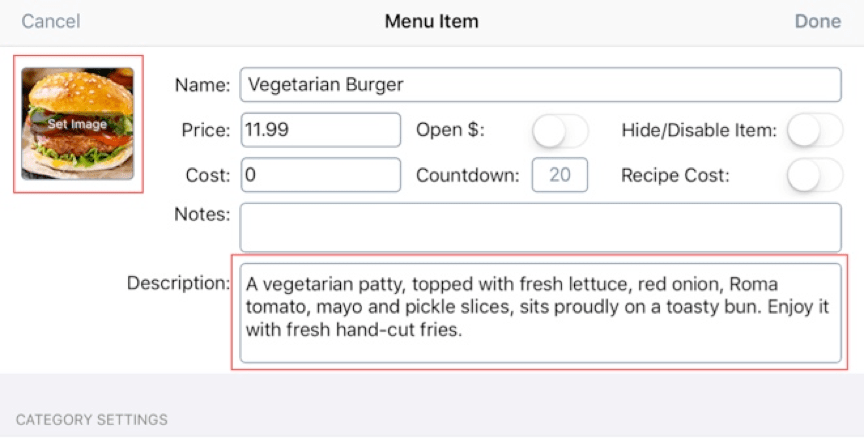
2. You’ve completed associating menu items with images and you’ve included customer-facing descriptions. You should then take a moment to review the menu images you use and make sure they are of good quality and do not appear pixelated in the menu view. Your ideal resolution depends on your preferred customer menu view:
|
View
|
Resolution
|
|
Card
|
W:700px x H:488px
|
|
Tile
|
W:800px x H:568px
|
|
List
|
W:768 x H:768px
|
3. You should also review your menu item descriptions and ensure they’re well written (free of grammar errors) and helpful for customers.
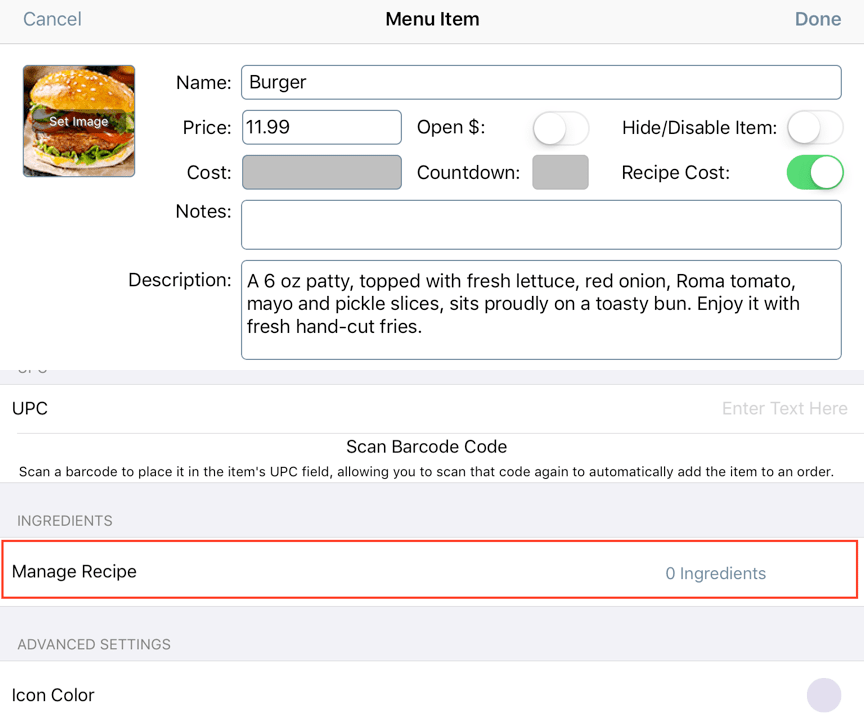
4. You’ve completed menu item recipes if you intend to display them in Kiosk.
5. You’ve entered any allergens in the Description field in order to display them in Kiosk.
6. You’ve uploaded your restaurant to your Pro Server.
7. Any changes you’ve made to your restaurant have been upload to the Pro Server.
8. Your PIN pad payment integration is configured and able to accept payments. TouchBIstro Kiosk may be used with the WorldPay iPP350 in the USA (see note under Pin Pad Integration above) and the Moneris iPP320 in Canada. If using Kiosk unintegrated, skip this step.
9. Your Menu Items are set up to print to the correct kitchen printer, or printers.
10. You have at least one thermal printer set up and reserved for the Kiosk.
11. You may want to prepare two images:
|
Image
|
Image Dimensions
|
Use
|
|
Restaurant Title Screen
|
Landscape 2732 pixels wide 2048 pixels high
|
Used on the initial Start Order screen.
|
|
Custom Background Image
|
Landscape 2732 pixels wide 2048 pixels high
|
Used on the Order screen.
|
Chapter 9. Enable TouchBistro Kiosk in TouchBistro
1. Launch the TouchBistro Pro Server.
2. Launch TouchBistro on one of your iPads and login as admin.
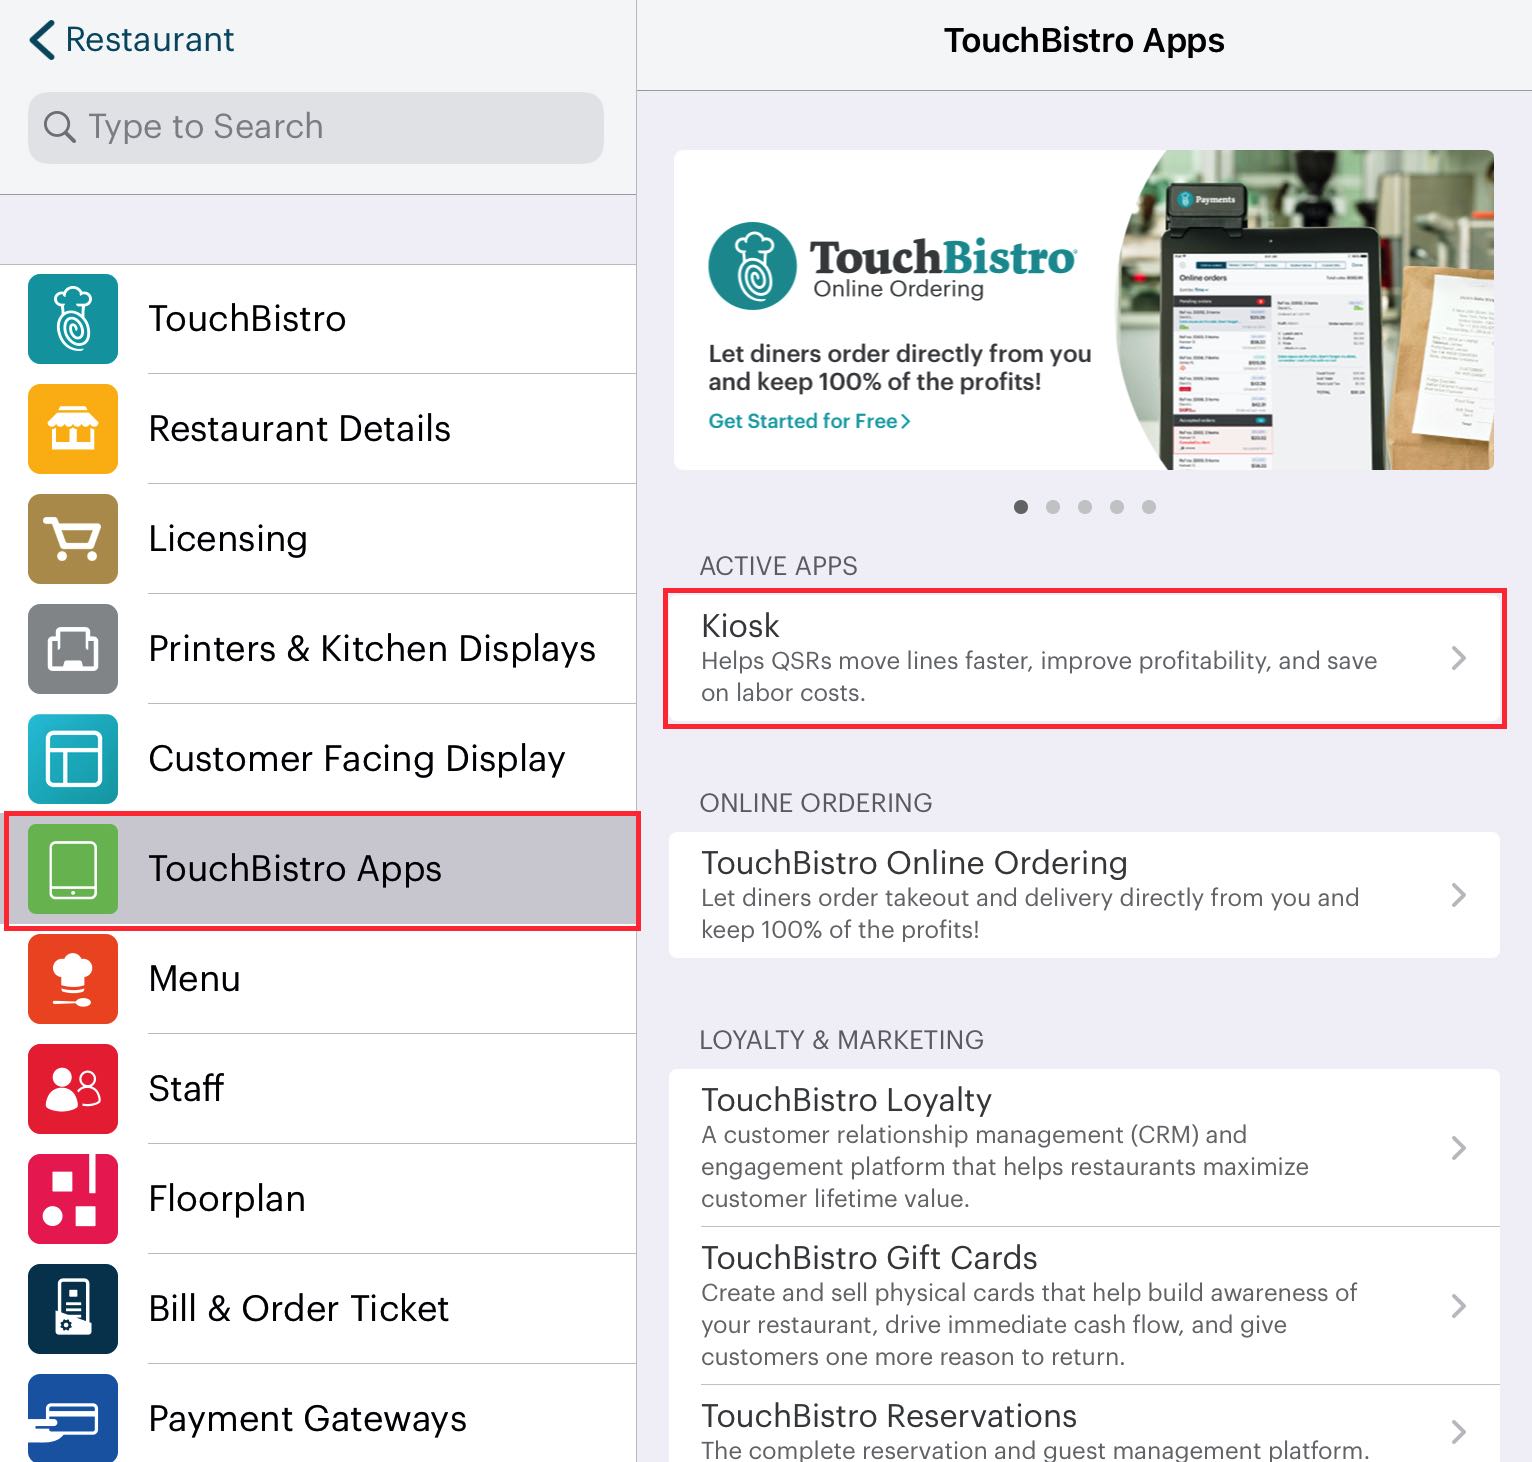
3. Tap Admin | Admin Settings | TouchBistro Apps | Kiosk.
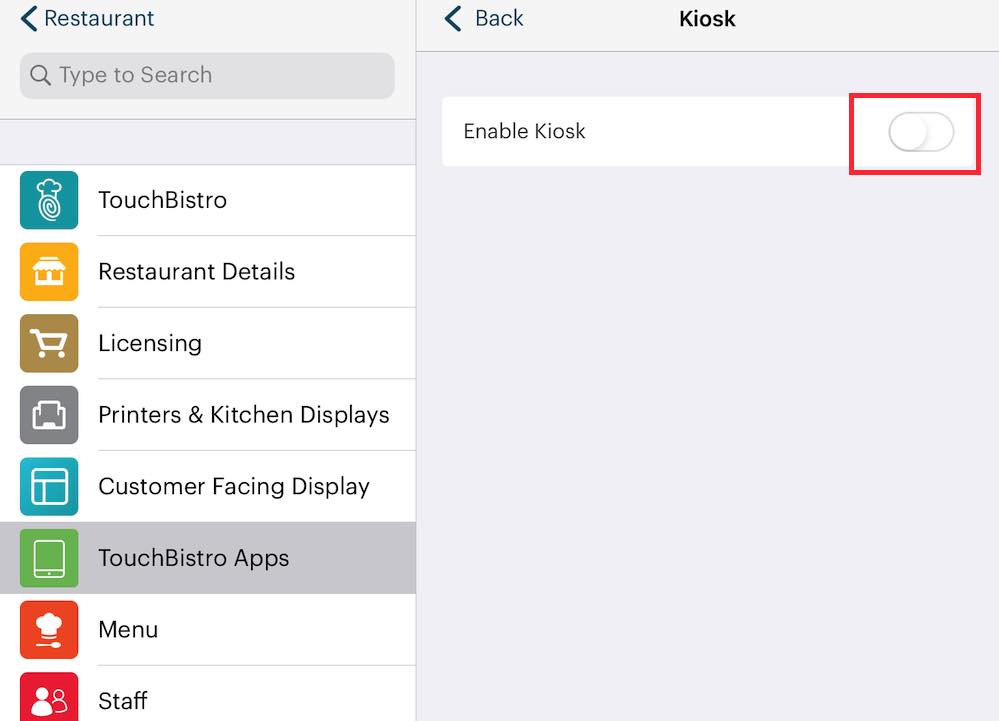
4. Slide Enable Kiosk to the green position.
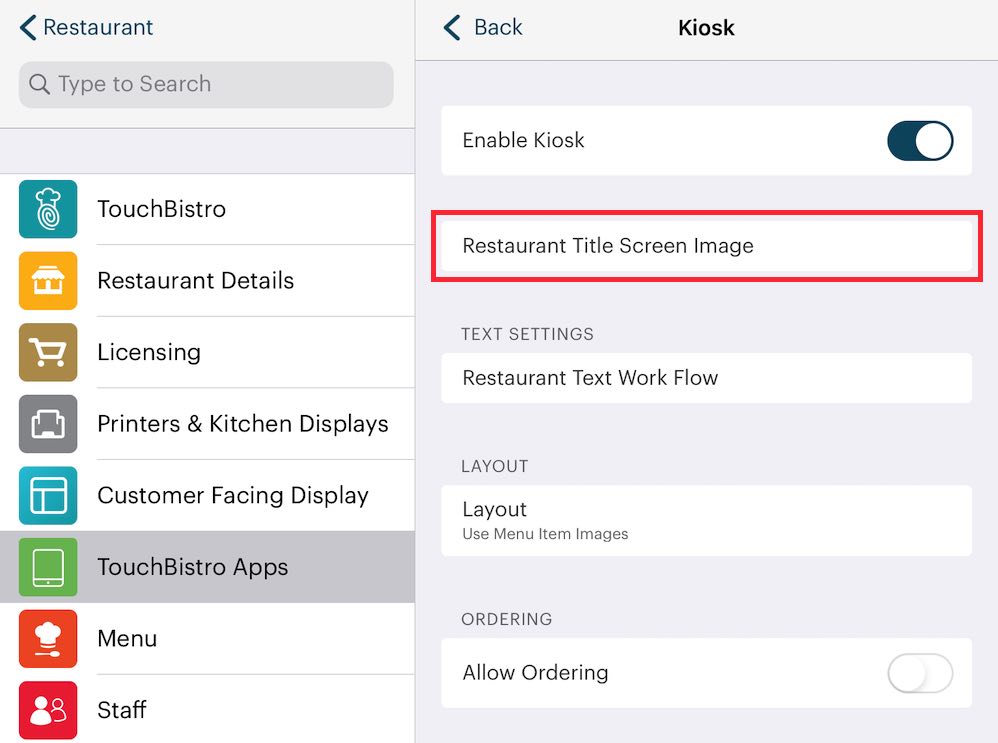
5. Tap Restaurant Title Screen Image if you wish to customize the start-up screen with your own image.
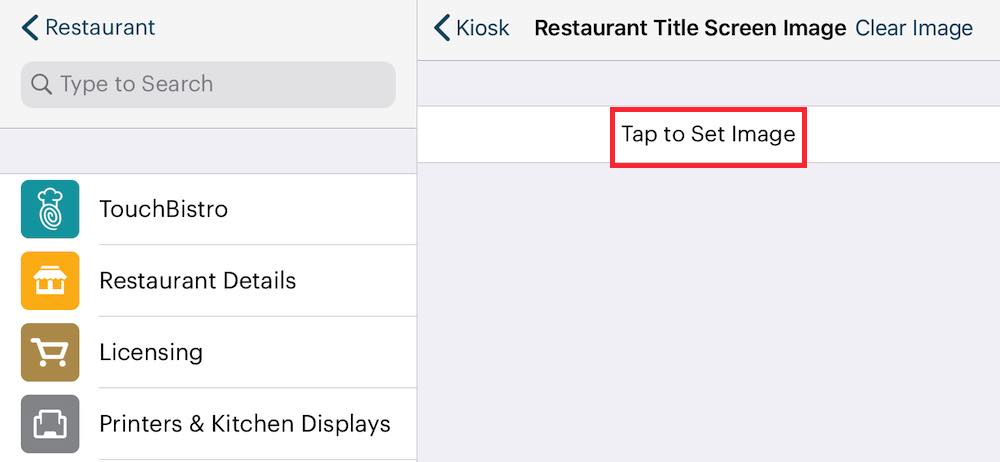
6. After tapping Restaurant Title Screen you will be prompted to select an image. (You can remove the image by revisiting this screen and tapping Clear Image.)
7. Tap Restaurant Text Work Flow to customize the language for your user prompts.
8. Tap Layout to select Use Custom Background Image to use your own image as a background for the order screen. Alternatively, tap Layout to select Use Menu Item Images to not use a custom background image.
9. Slide Allow Ordering to the green position.
10. The Smart Ordering feature allows you to choose whether or not to automatically warn patrons when they order too many menu items. This will also prevent troublemakers from ordering copious amounts of food from the kitchen which they never intended to pay for, should they be choosing the Pay at Counter option.
Select from one of three options:
- Disable – Patrons can order as many items as they wish.
- Warn – Patrons will be warned when they order too many items.
- Stop – Patrons will be prevented from ordering too many items.
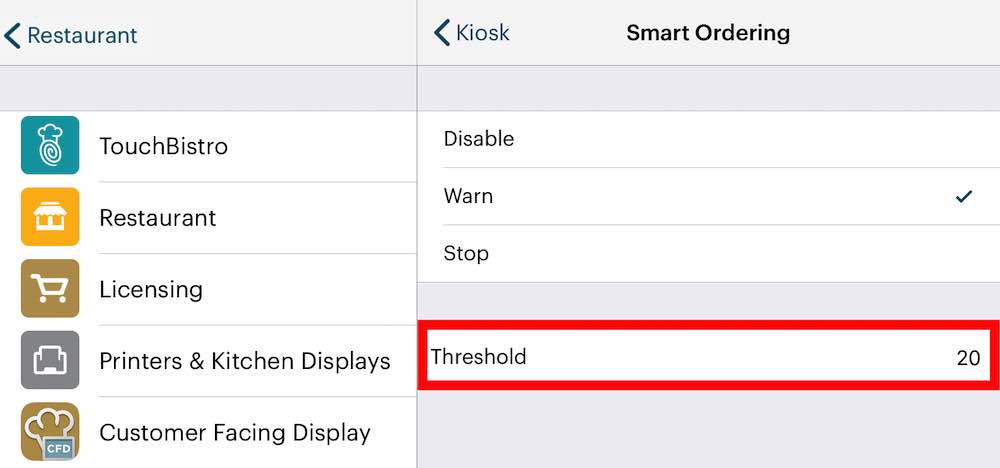
When Warn or Stop is selected, then a numerical Threshold must be set, indicating how many items you wish them to be able to order before they receive a warning, or are prevented from placing an order. In the above example, we see that Warn is selected, and the threshold is 20. If a patron orders more than 20 Menu Items, they will receive the following warning: 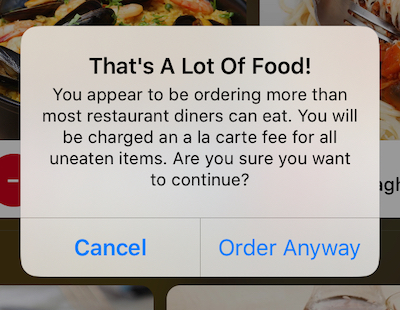 An à la carte fee may be charged to the patron at your discretion, depending on the circumstance. For example, if someone was misusing the Kiosk, and ordering food that they had no intention of paying for. If Stop is selected, the patron will see the following warning when they reach that threshold.
 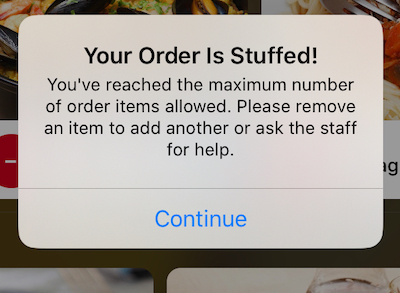 In this instance, because they’ve exceeded the order limit item you’ve set for them in the Threshold field, patrons may order directly from the counter.
11. Ensure Name Required on Order is enabled. You can disable it if you don’t wish a customer name to be mandatory to complete an order.
12. In Kiosk Payment Method select whether you may select from one of the following three options:
- Pay at Cashier or Credit/Debit – Allows patrons to select the option to pay either with cash with the cashier, or credit/debit card using a payment terminal at the Kiosk.
- Pay at Cashier – Allows patrons the option of paying at the cashier (using cash, or another method), when no payment terminal is available at the Kiosk. See the section below titled Accepting Payment at the Cashier.
- Credit/Debit – Allows patrons the option of paying using a payment terminal at the Kiosk, and doesn’t give them the option of paying at the cashier.
13. Ensure Show Prices is enabled. Disable if you’re, for example, a company canteen and meals are complimentary.
14. If you want to show your menu item’s ingredients and allergens on the kiosk, enable Show Ingredients and Show Allergens respectively.
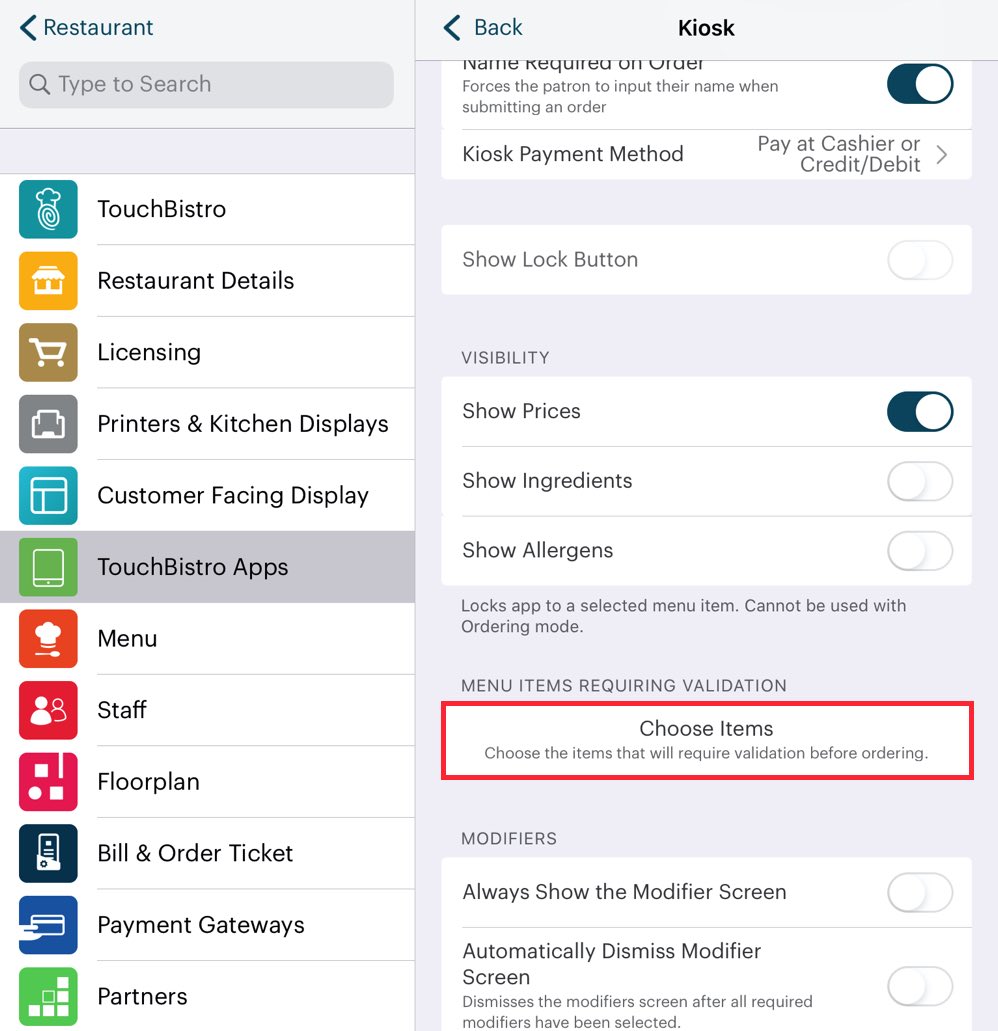
15. In the Menu Items Requiring Validation section, you can select any menu items that require managerial approval before a customer can order them. To do so, Tap Choose Items.
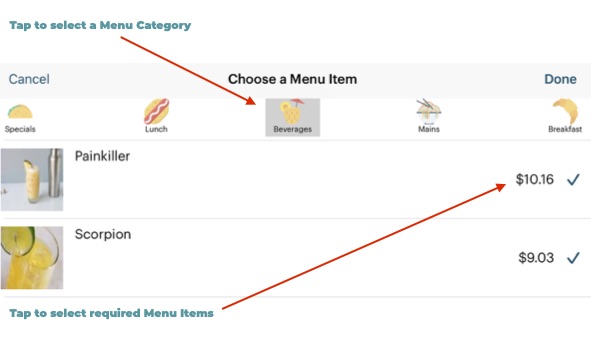
16. Select a Menu Category by tapping one of the icons along the top of the screen, and then select the Menu Items requiring managerial validation from within those categories by tapping on them. Going forward, when these selected items are ordered, a manager will be required to approve the transaction.
17. Slide Always Show the Modifier Screen to the green position if you want menu items with non-forced modifiers to display optional modifiers.
18. Slide Automatically Dismiss Modifier Screen to the green position if you want the kiosk modifier selection screen to close after all required modifiers have been selected. If disabled, the modifier selection screen will remain open, displaying optional modifiers, and the screen will have to be closed by the user.
19. If you have multiple menus (e.g., dinner, lunch, breakfast) but want the kiosk to only display one menu (e.g., dinner) tap Lock to Menu and select the desired menu.
20. Tap Lock to View Mode if you want TouchBistro Kiosk to always display one particular view option (Card, Title, or List).
21. Tap Restaurant to exit from the setup and have the iPad update Pro Server with the changes.
Chapter 10. Set Up One or More Receipt Printers for TouchBistro Kiosk
You need to set up a thermal printer to print receipts at your Kiosk. Receipts can then print for your customers after they order, whether they pay with the PIN pad, or at the counter.
TouchBistro Kiosk will work with only the following Star printers:
- USB/Lightning: TSP100 (143IIIU)
- Ethernet/LAN: TSP100 (113LAN, 143LAN), TSP100III (143IIILAN), or TSP650 II (TSP654IIE3)
- WiFi: TSP100 (143IIIW)
TouchBistro Kiosk does not support Epson printers or the TSP650 II series Bluetooth Printer (TSP654IIBI).
Section 1. Adding a USB/Lightning Printer
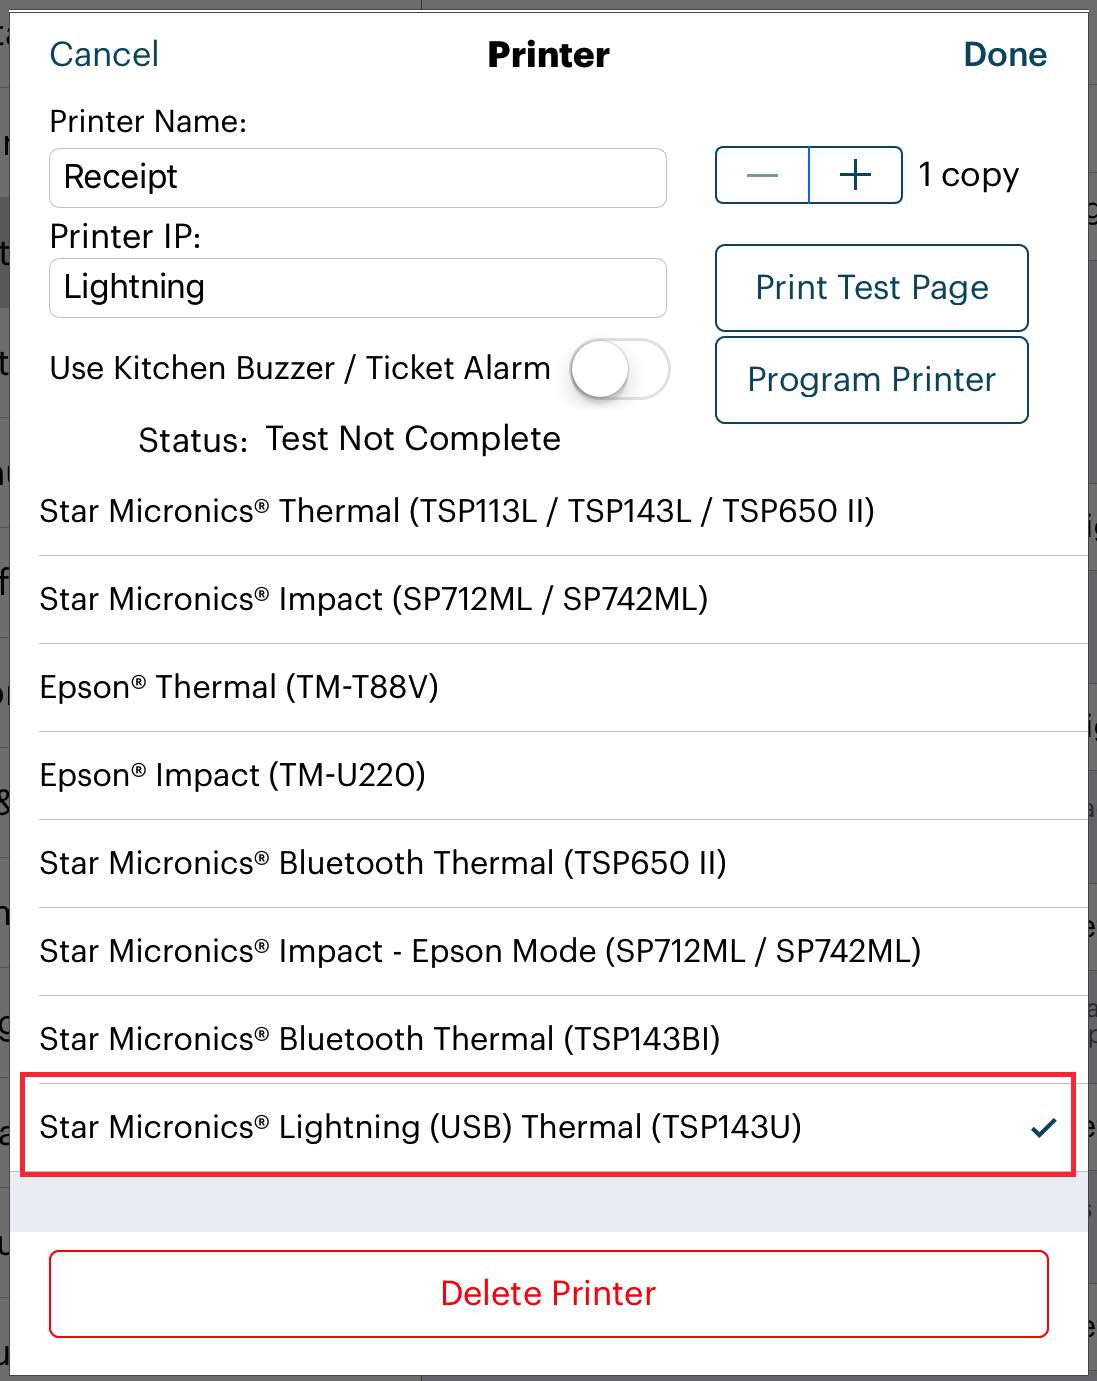
Kiosk supports the Star TSP143IIIU USB/lightning cable printer for printing receipts. You can plug the TSP143IIIU directly into your Kiosk iPad (one per iPad) instead of having to wire an ethernet printer back to your router or switch. This makes setup especially quick and easy when compared with configuring the network, Wi-Fi, or USB printers. When using Kiosk, Lightning printers are the easiest to configure, troubleshoot, and maintain.
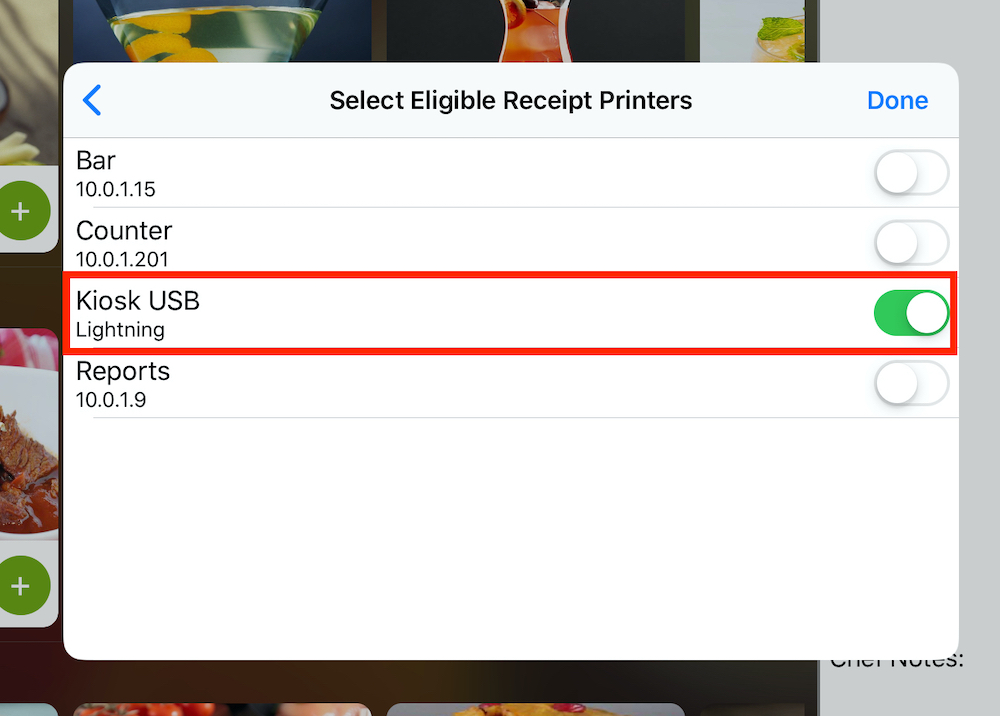
Once one of the iPads in your system has been configured with a USB/Lightning printer, you may then open Kiosk and select that printer for each Kiosk iPad as described in the below chapter.
If you are opting to share a single printer amongst more than one printer, please see the section below entitled Using a Single Printer with Multiple Kiosks.
Section 2. Adding an Ethernet/Wi-Fi Printer
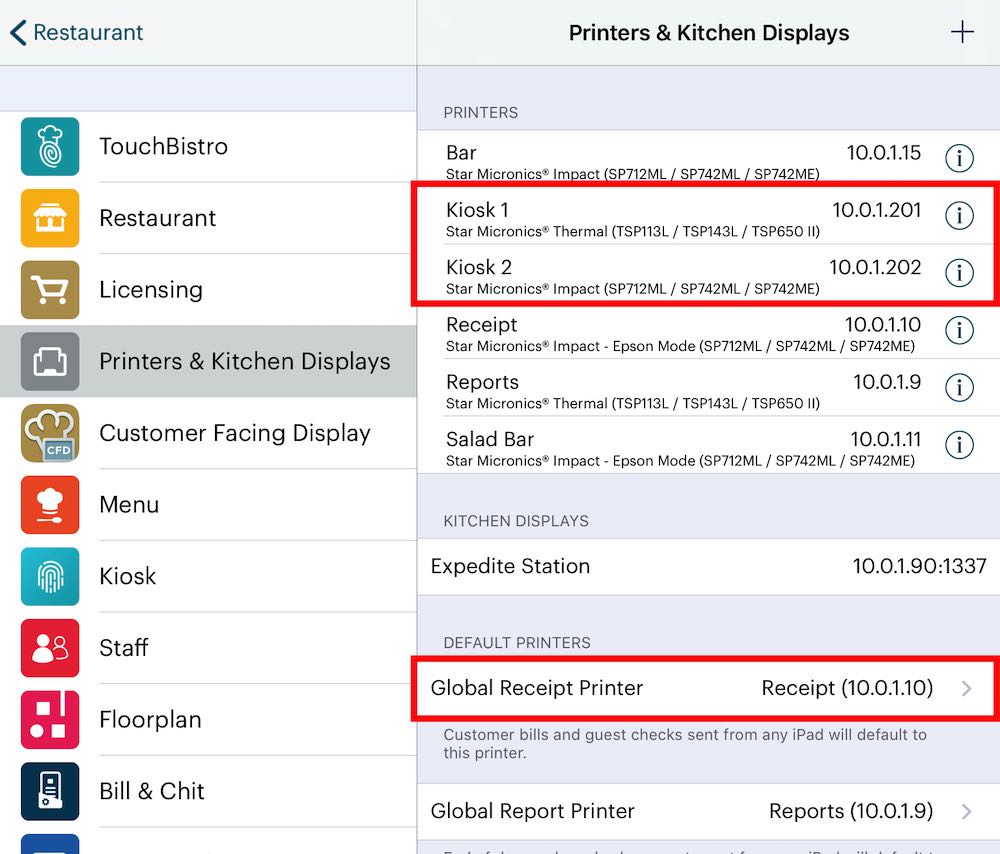
Your printer cannot be an existing printer already earmarked for use as a staff-facing receipt printer or kitchen printer. For example, the Receipt printer selected as the Global Receipt Printer will not be made available for Kiosk use.
Once your printers have been configured, they will then be available to be
1. Tap Admin | Admin Settings | Printers & KDS.
2. Tap the Add + icon at the top right and follow this guide for instructions on how to configure each printer. We suggest giving your Kiosk receipt printers an IP of 10.0.1.210 and above. If you already have printers using 10.0.1.210 then give it 10.0.1.211 or whatever IP is not used between 10.0.1.201 and 10.0.1.254.
Once your printers have been configured, you may then open Kiosk and select printers for each Kiosk iPad as described in the below chapter.
Section 3. Using a Single Printer with Multiple Kiosks
In some instances, it may be feasible to use a single printer with more than one Kiosk. However, this could present a problem during busy times, if customers reach for and grab the wrong credit card slip from the printer shared amongst Kiosks.
Sharing a printer between more than two Kiosks can be confusing for customers, and should only be done in low-traffic venues, where confusion about printed tickets is unlikely to arise.
Before beginning this process, set up a Star TSP100 printer for use with your Kiosks using this guide: Setting Up your Star TSP100 (TSP113/143/650II) Receipt Printer, and position your printer in the appropriate place in your venue.
To set up a single printer to be used with multiple iPads:
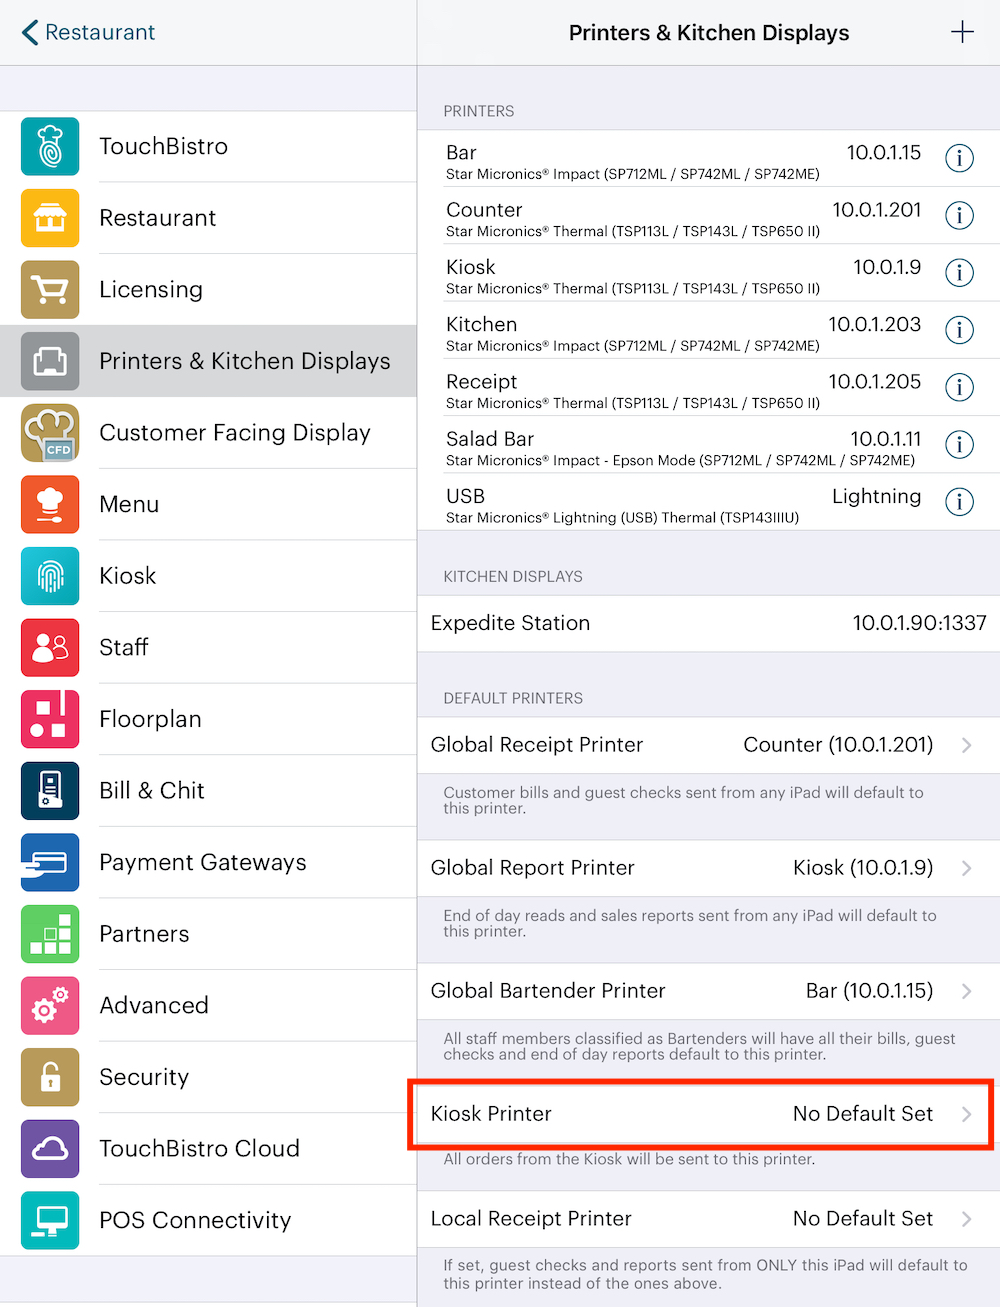
1. In Admin Settings go to Printers & Kitchen Displays and select Kiosk Printer.
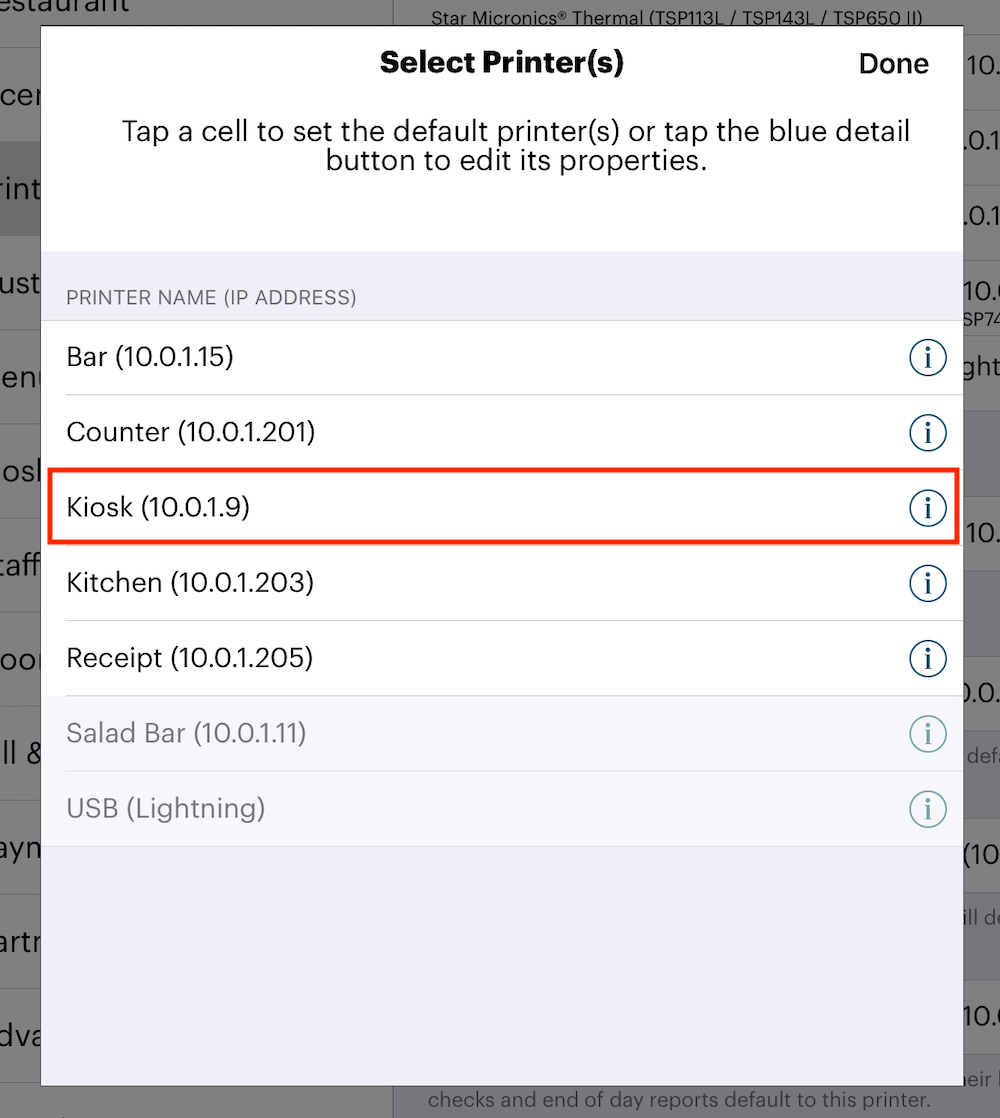
2. Select the printer you wish to use with your Kiosk from the list.
At this point, all Kiosks will print all credit card slips to the selected printer.
If printers are also redundantly selected within Kiosk, then credit card slips will print to both printers. This is likely not required and is considered a waste of paper by most business operators.
Chapter 11. Configuring PIN pads for Kiosk
Most TouchBistro setups will include a PIN pad adjacent to each Kiosk to allow customers to easily pay for their meals. This typically involves configuring the PIN pad devices in advance of launching your Kiosk setup.
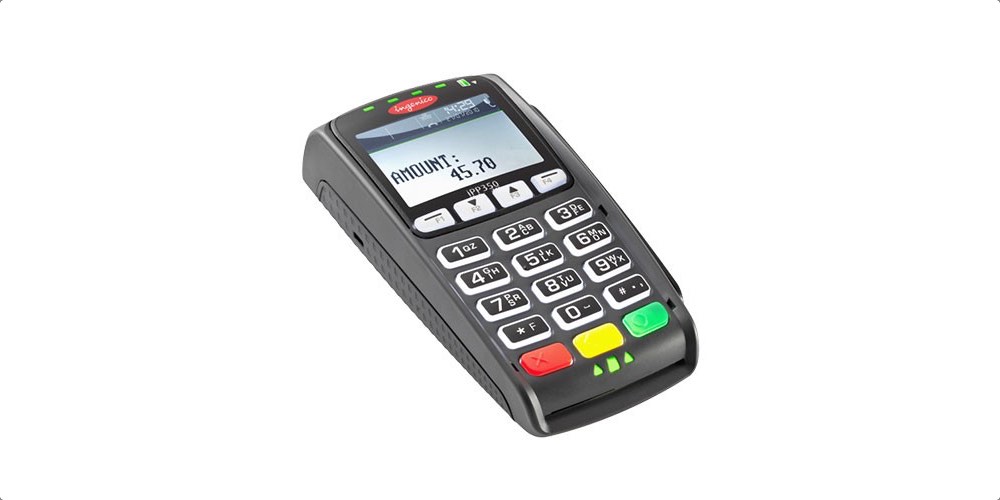
If you’re in the United States and are a Worldpay customer, then you’ll want to set up your Worldpay iPP350 devices in advance before proceeding. If you’re in Canada, then you’ll want to set up your Moneris iPP320 devices in advance.
| USA | Canada |
 |
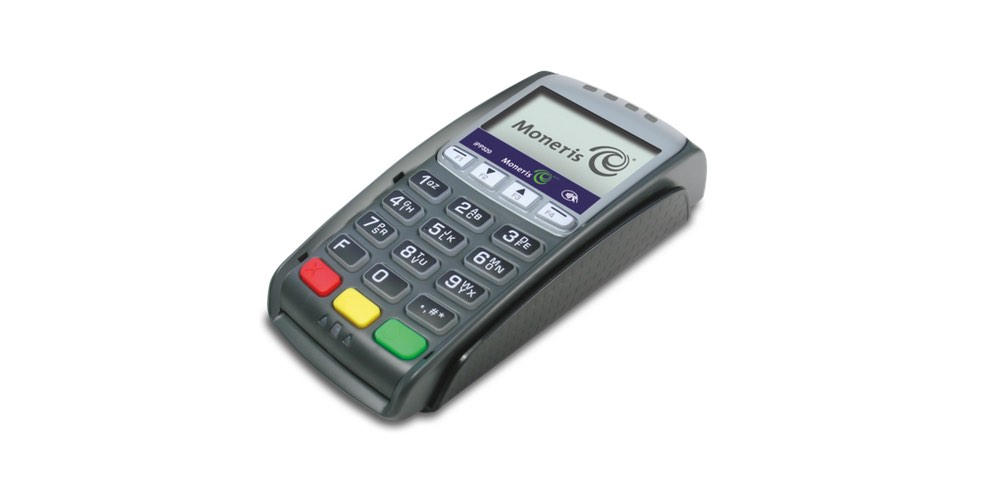 |
| Worldpay iPP350 | Moneris iPP320 |
Each PIN pad should be uniquely named for Kiosk. For example, Kiosk 1, Kiosk 2, et cetera. This will make it easier to allocate them to your Kiosk iPads later.
Chapter 12. Launching and Connecting TouchBistro Kiosk
After setting up TouchBistro Kiosk in the TouchBistro app, you are now ready to launch and connect TouchBistro Kiosk.
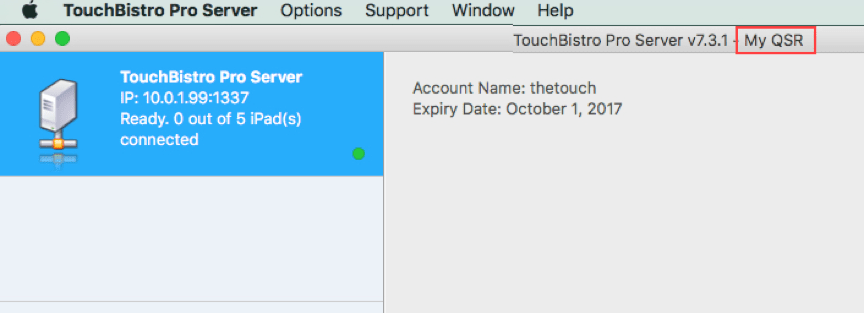
1. Ensure the TouchBistro Pro Server is running. Note your venue name in the title bar.
2. Ensure the iPad running TouchBistro Kiosk is on the same Wi-Fi network as the Pro Server.

3. Tap Settings.
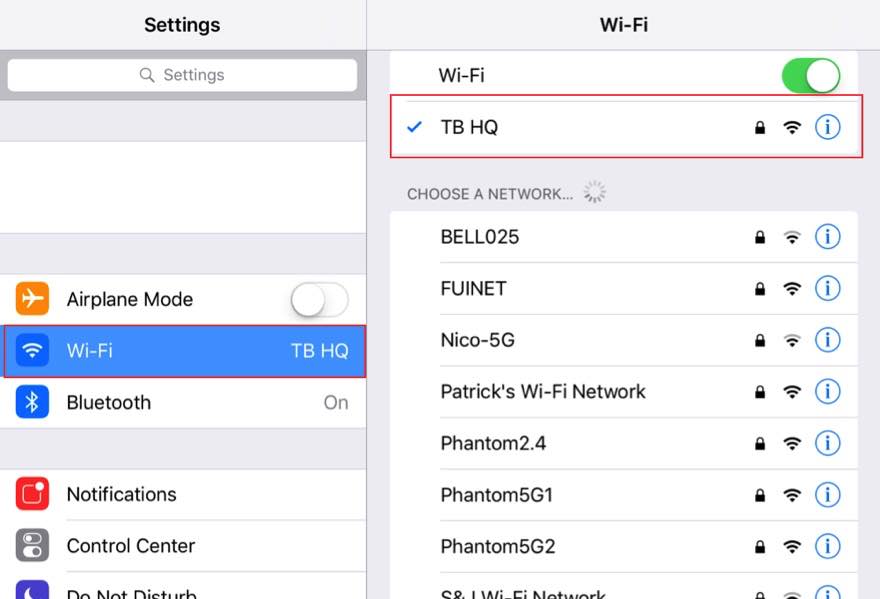
4. Tap Wi-Fi. Ensure the iPad is connected to the TouchBistro network that was set up for your system. Usually, your TouchBistro Wi-Fi network was named starting with TB.
5. Swipe up from the bottom of the screen, or tap your iPad’s Home  button.
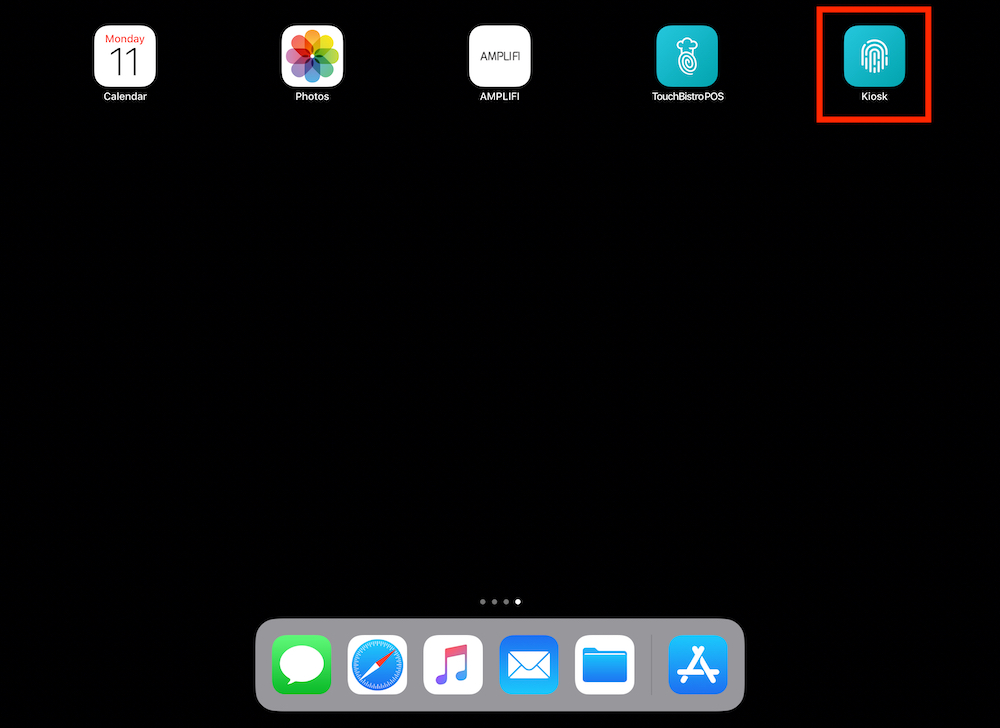
6. Locate the TouchBistro Kiosk app on the iPad you’re using for the kiosk and tap it. TouchBistro Kiosk is a landscape-only app, so ensure your iPad is landscape oriented.
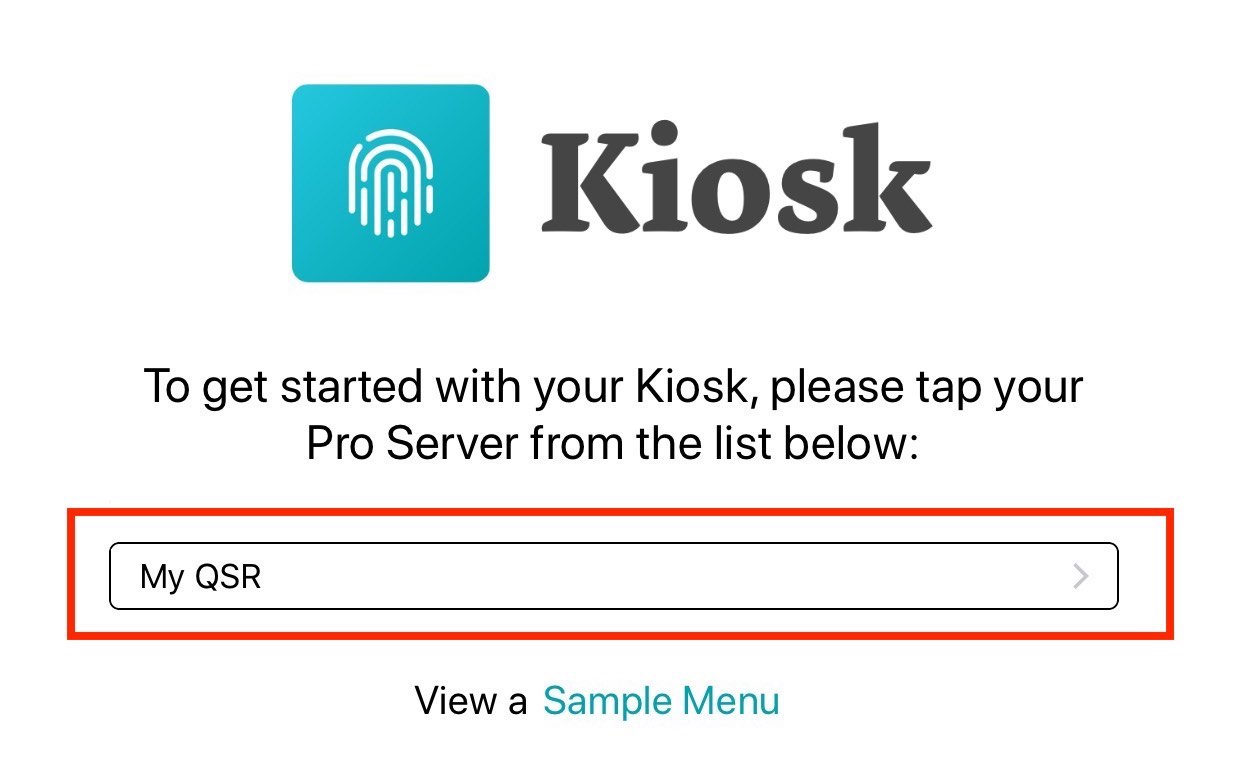
7. TouchBistro Kiosk will autodetect your Pro Server and list it by your restaurant’s name (same as the name in the Pro Server title bar). Tap it. If you want to first practice with TouchBistro Kiosk, tap Sample Menu.
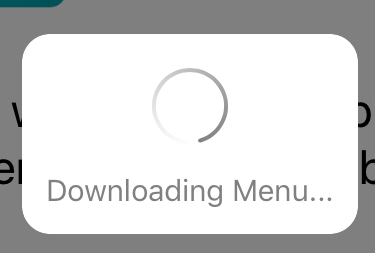
8. After tapping your Pro Server, TouchBistro may need to download your menu and images. This could take a few minutes. Do not interrupt the process. If there have been no menu changes since the last time Kiosk was opened, the menu will not have to be downloaded again.
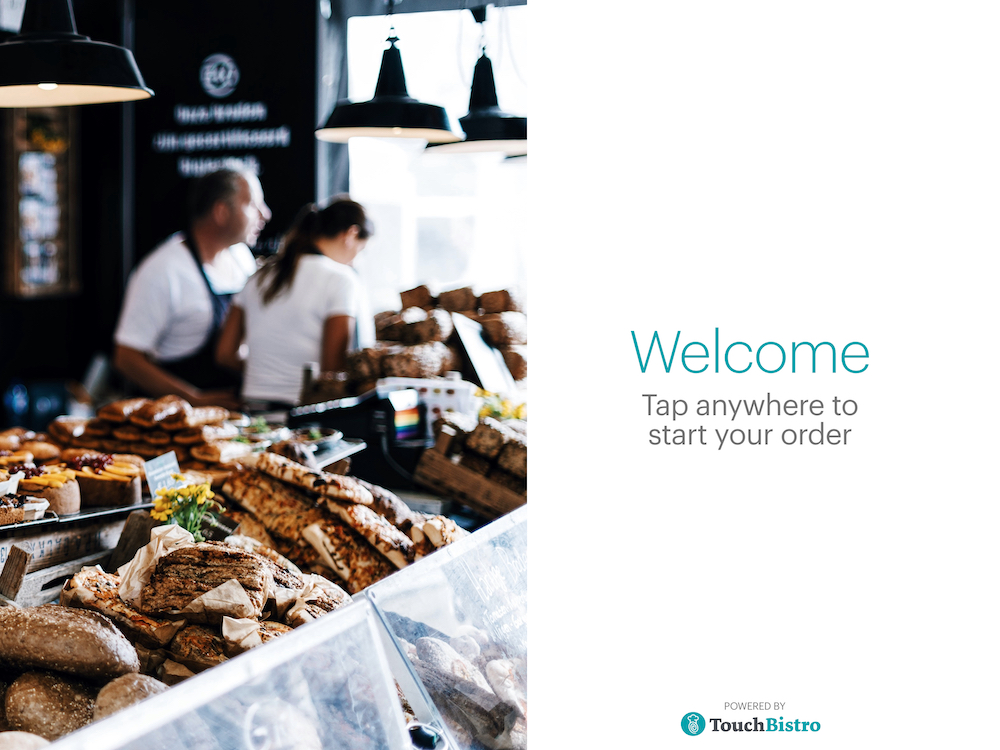
9. TouchBistro Kiosk will start at the Start My Order screen. If you uploaded a Restaurant Title Screen image, you will see it here.
10. Tap Start My Order to begin.
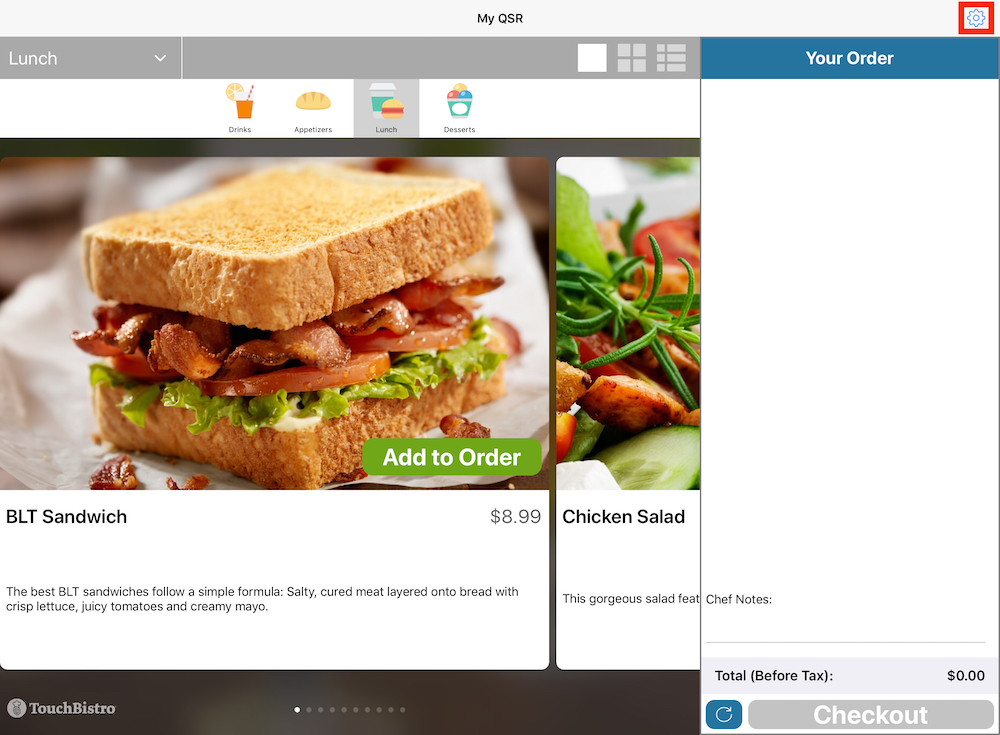
11. If you are setting up Kiosk for the first time, or if menu changes have been made since the last time Kiosk was in use, tap the Setup icon on the top right. If you’ve been using Kiosk, and no Menu changes have been made, skip forward to the next section Using TouchBistro Kiosk as a Customer.
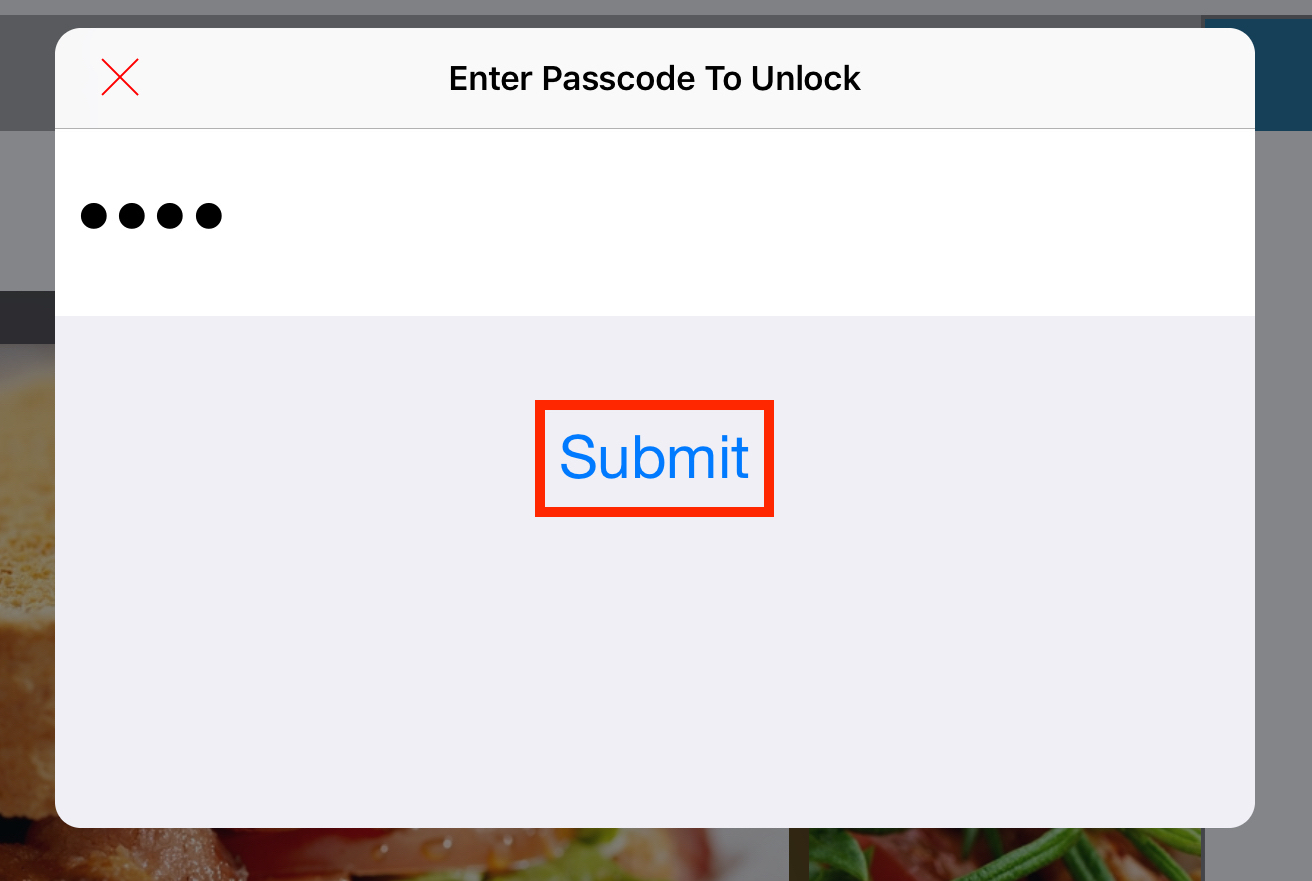
12. Enter your Admin passcode (the same passcode you use to log in as an administrator on TouchBistro).
13. Tap Submit.

14. Tap Eligible Receipt Printers to select which printer will print a copy of the order for the customer.
15. Select which receipt printer will be used for this particular iPad running TouchBistro Kiosk.
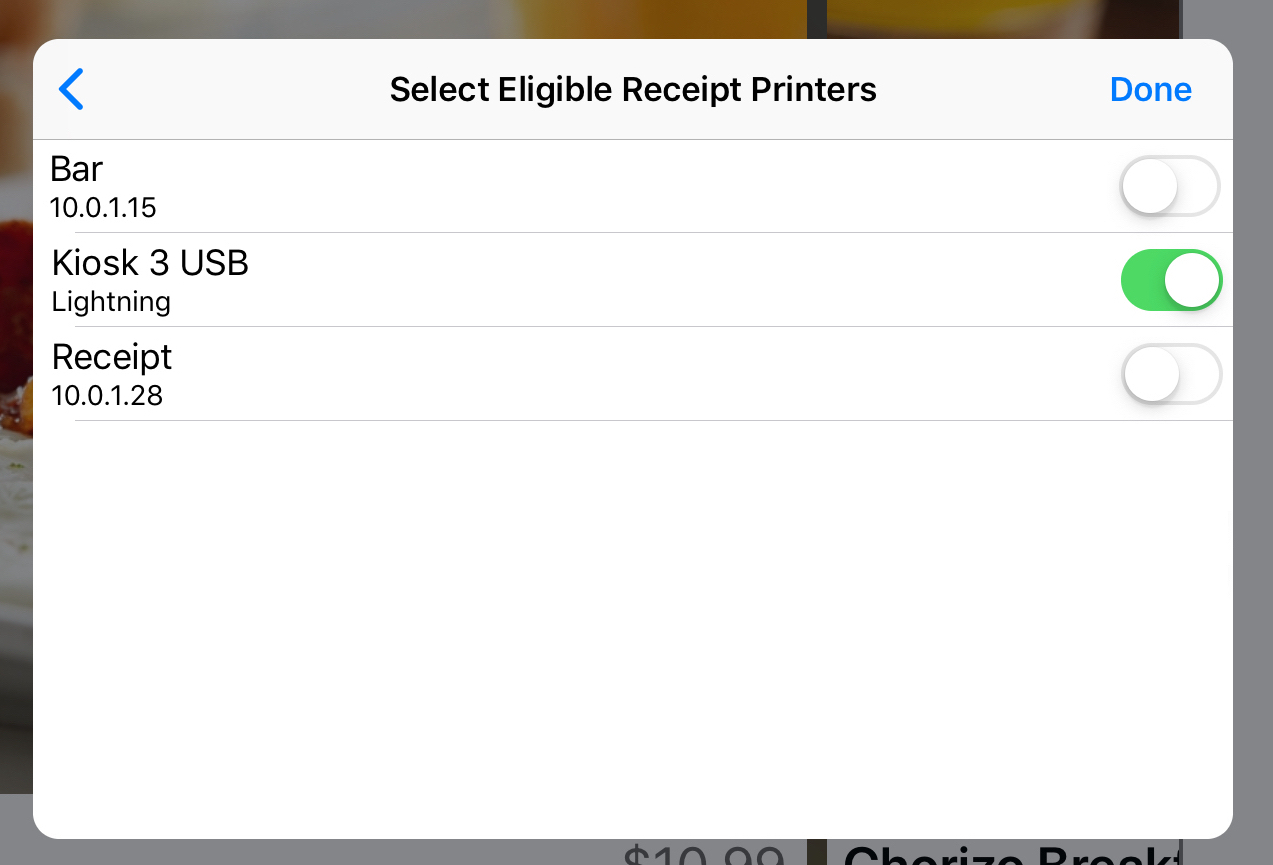
- Lightning Printers: If a Lightning printer is attached, then it should be selected.

- Ethernet/Wi-Fi Printers: This setting is unique to this iPad. If you have additional iPads running TouchBistro Kiosk, you can select another printer. For example, for this iPad you might select the Kiosk 1 printer and for your second kiosk station you might select the Kiosk 2 printer.
16. Tap Done.

17. Tap the Setup icon again.
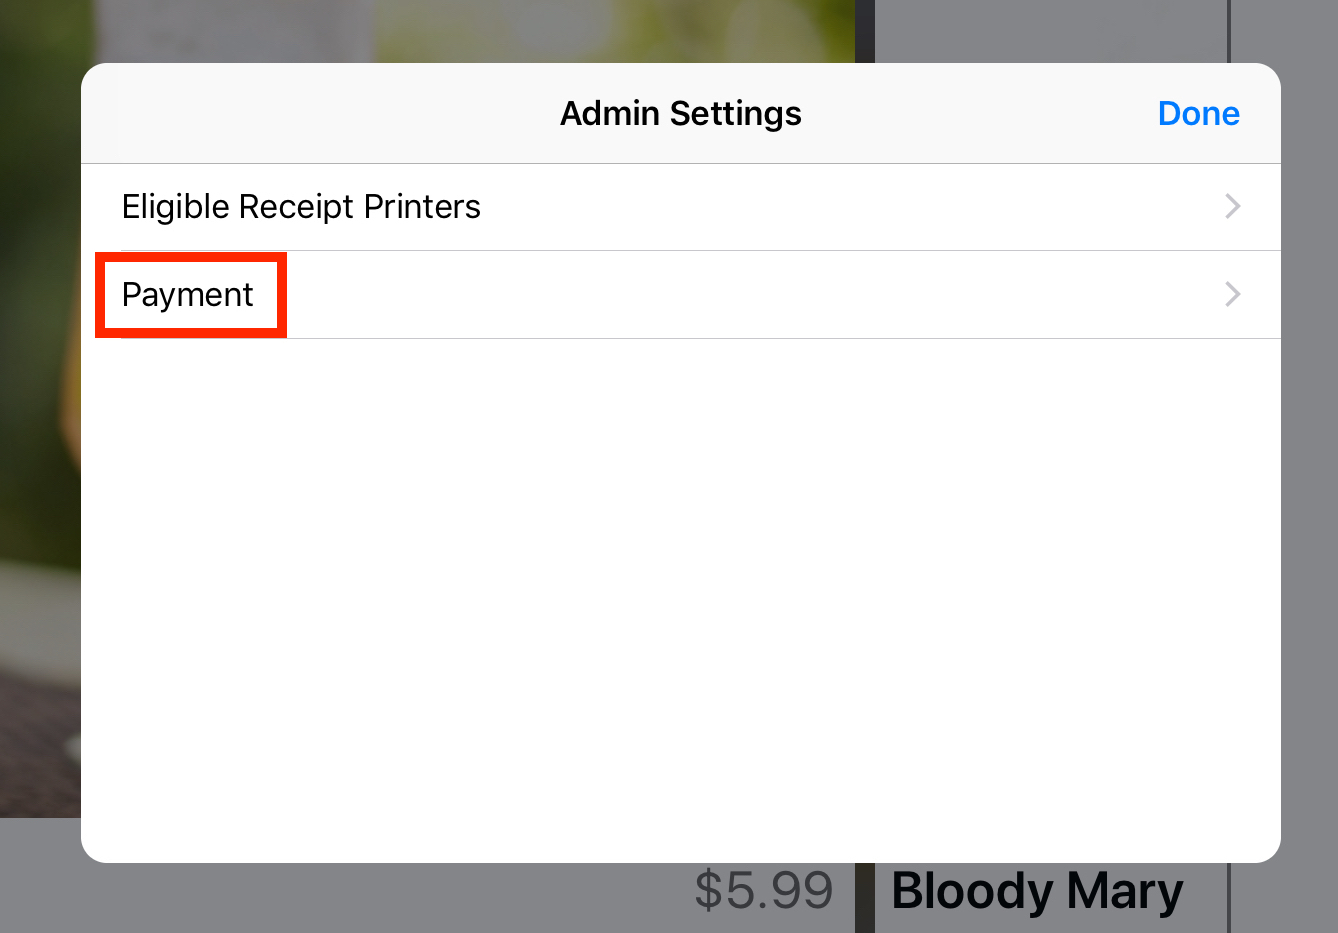
18. Tap Payments.
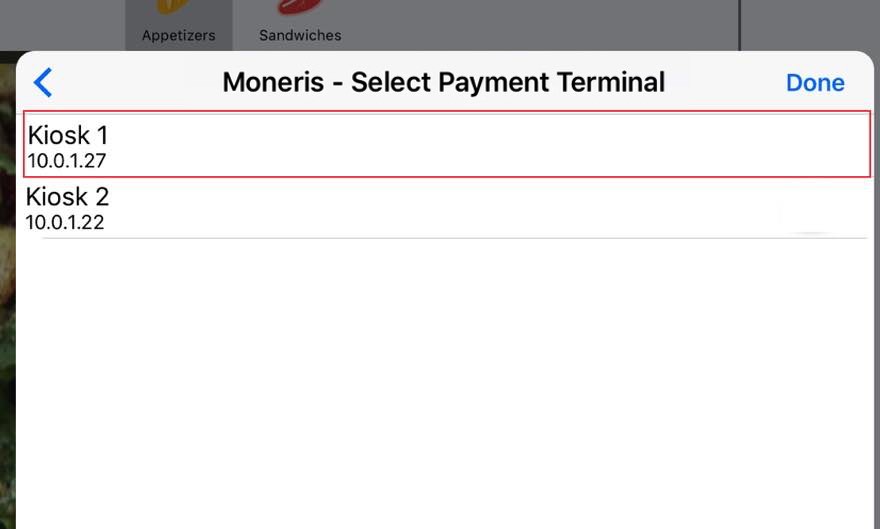
19. Select which PIN pad should be used with this iPad to take card payments. If you have more than one configured, tap the one that will be used with this particular kiosk station iPad.
20. Tap Done.
Chapter 13. Accepting Payment at the Cashier
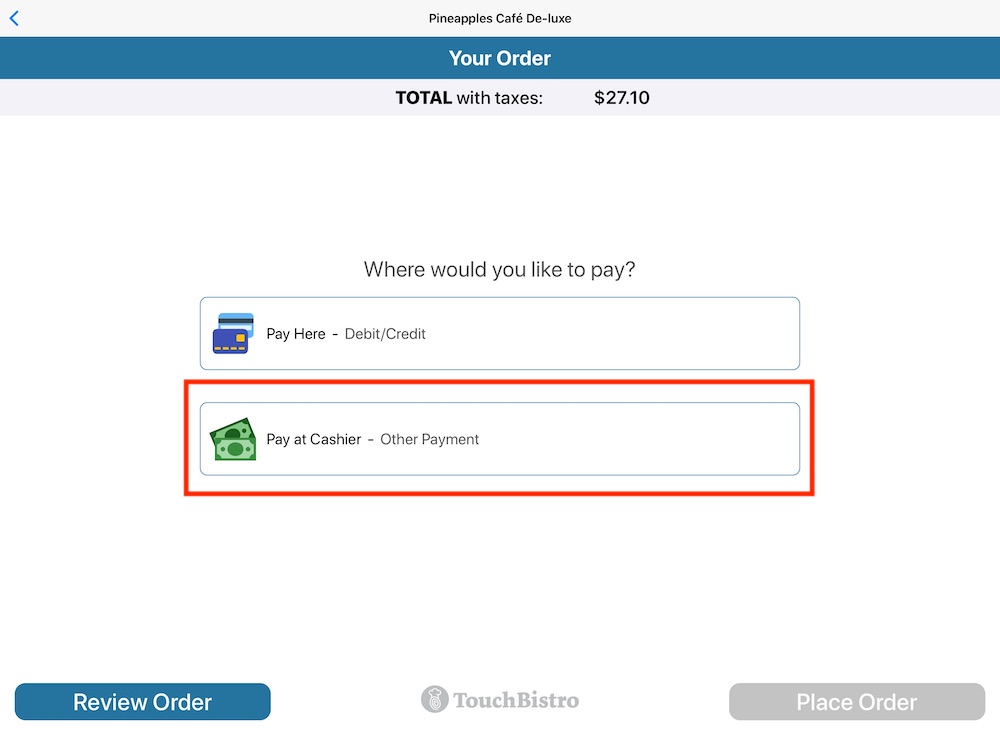
When the customer taps Place Order, the kitchen ticket is printed.
Chapter 14. Making Changes After Set Up
If you make changes to your restaurant (for example you change menu prices, add new menu items), you should force quit the app.
To force quit:
1. Swipe up from the bottom of the screen, or tap the Home  button twice.
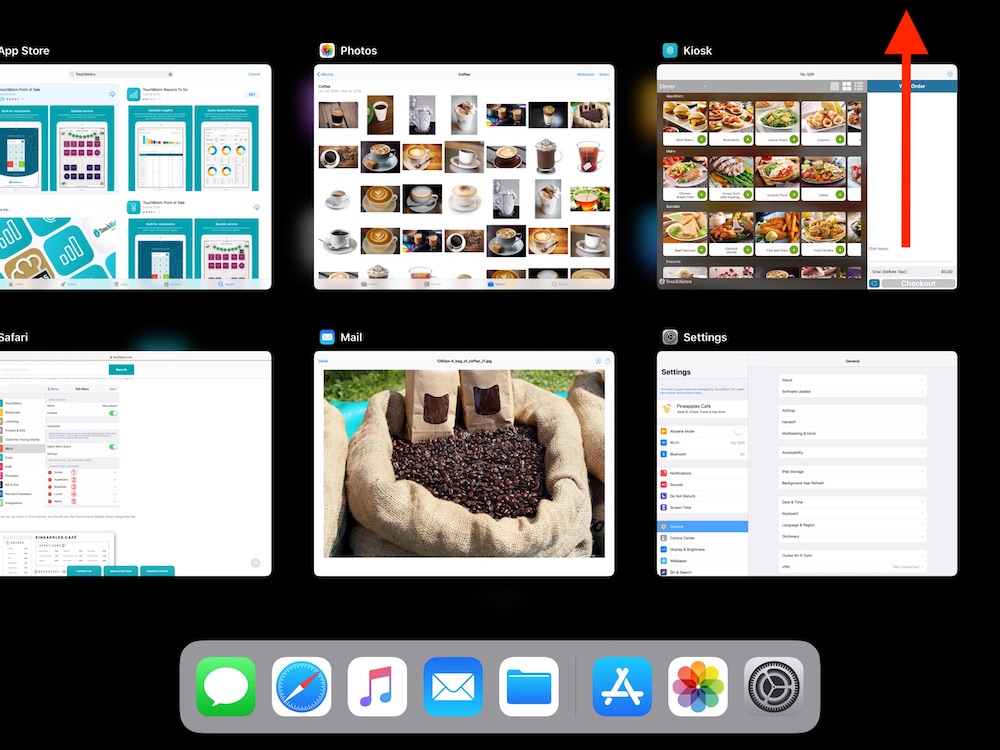
2. Swipe up on the TouchBistro Kiosk app to force quit it.
After force quitting, relaunch TouchBistro Kiosk. It will re-download the menu and images along with any changes you’ve made to the kiosk defaults.
Timed Menus (for example, a breakfast or lunch special menu) will appear automatically. You do not have to restart the app.
See Also
Setting Up and Using the Worldpay


 Email
Support
 Frequently
Asked Questions
