
 Email
Support
Email
Support Frequently
Asked Questions
Frequently
Asked Questions
Using the TSYS Genius Mini
Table Of Contents
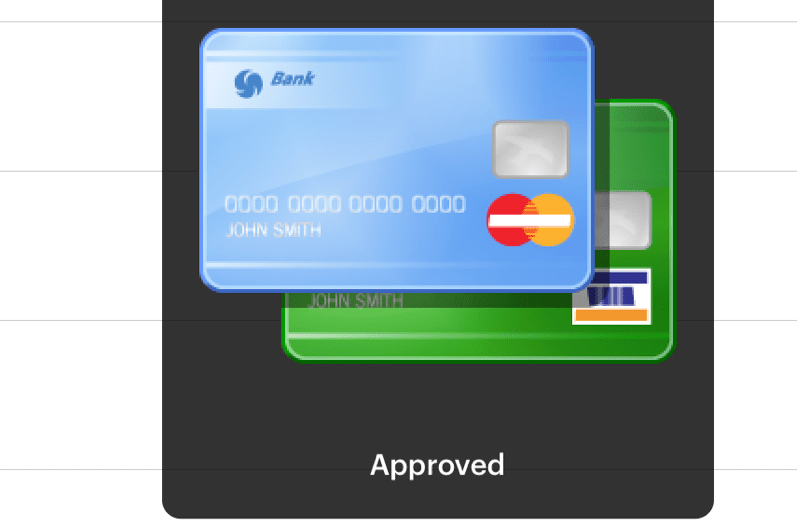
Chapter 1. Accepting a Credit Card Payment (Quick Serve)
Chapter 2. Accepting a Credit Card Payment (Fine Dining)
Section 1. Reconciling Tips Written on Receipts
Chapter 4. Create/Open Bar Tabs by Swiping Card or Inserting a Card
Section 2. Zero Auth Authorization
2) Using Zero Auth to Start and Close a Bar Tab
Chapter 5. Credit Card Refunds, Voids, Returns, or Reprints
Section 1. Refunding a Bill before you Close Your Day
1) Refund Process is Interrupted
Section 2. Performing a Partial Refund
Section 3. Performing a Refund for a Bill from a Previous Day
Section 5. Doing a Manual Refund
Section 6. Reprint a Credit Card Slip
Chapter 7. Using TSYS Gift Cards
Section 1. Managing the Gift Card
1) Activate or Reload a Gift Card
2) View remaining balance on a gift card
Section 1. Setting Up Your Menu
Chapter 1. Accepting a Credit Card Payment (Quick Serve)

1. From your order screen tap Checkout.
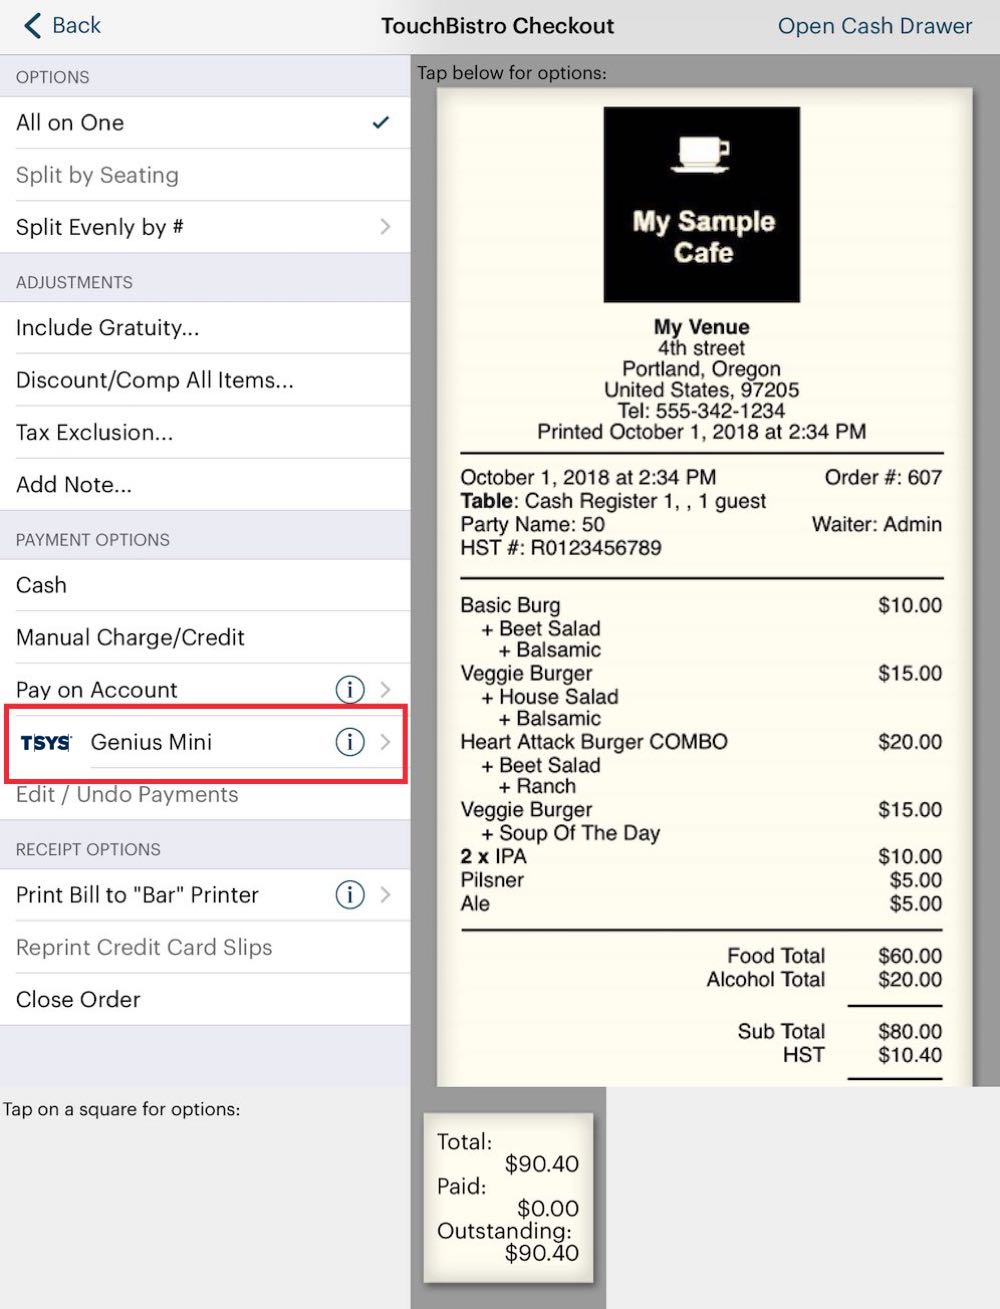
2. Tap Genius Mini.
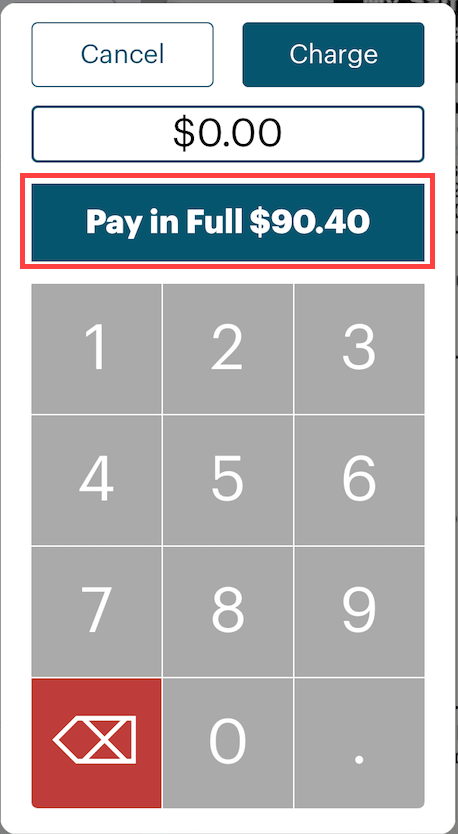
3. Tap Pay in Full. Do not include tip. Alternatively, if the customer only wishes to pay a portion of the full amount, enter the amount the customer wishes to charge to the card and tap Charge.
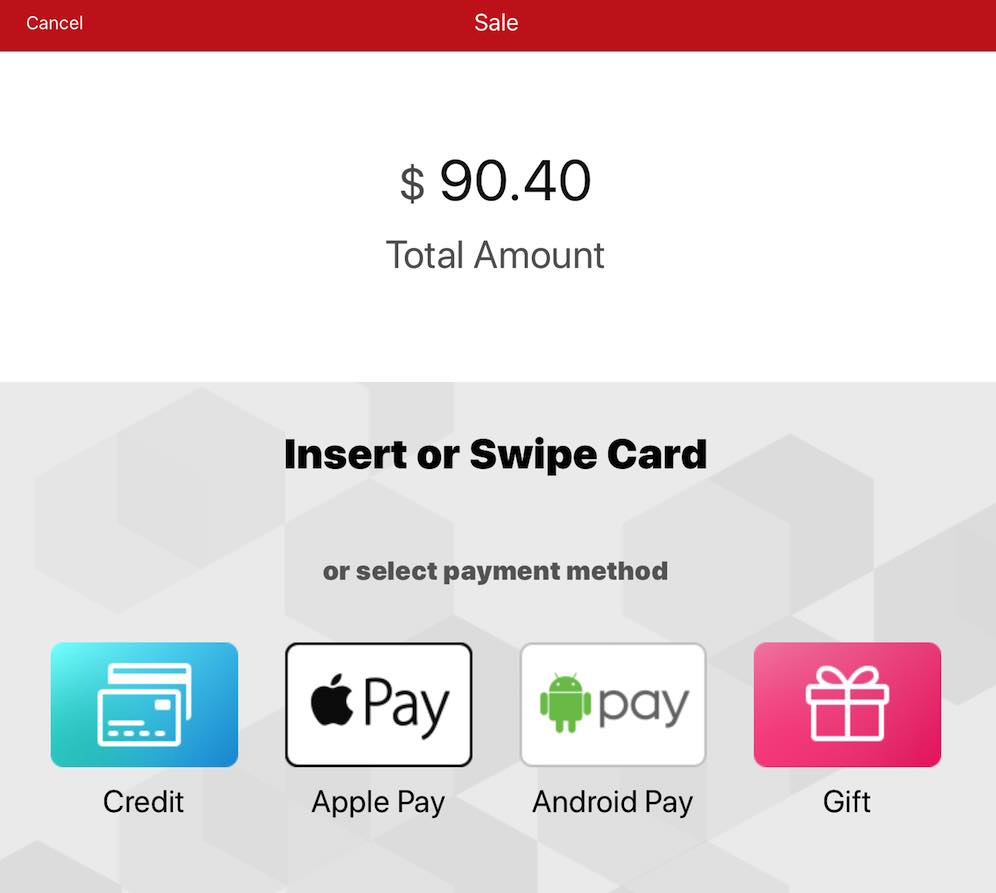
4. Pass the iPad to the customer and have the customer insert, swipe, or tap his/her card. The customer can also use a TSYS gift card.
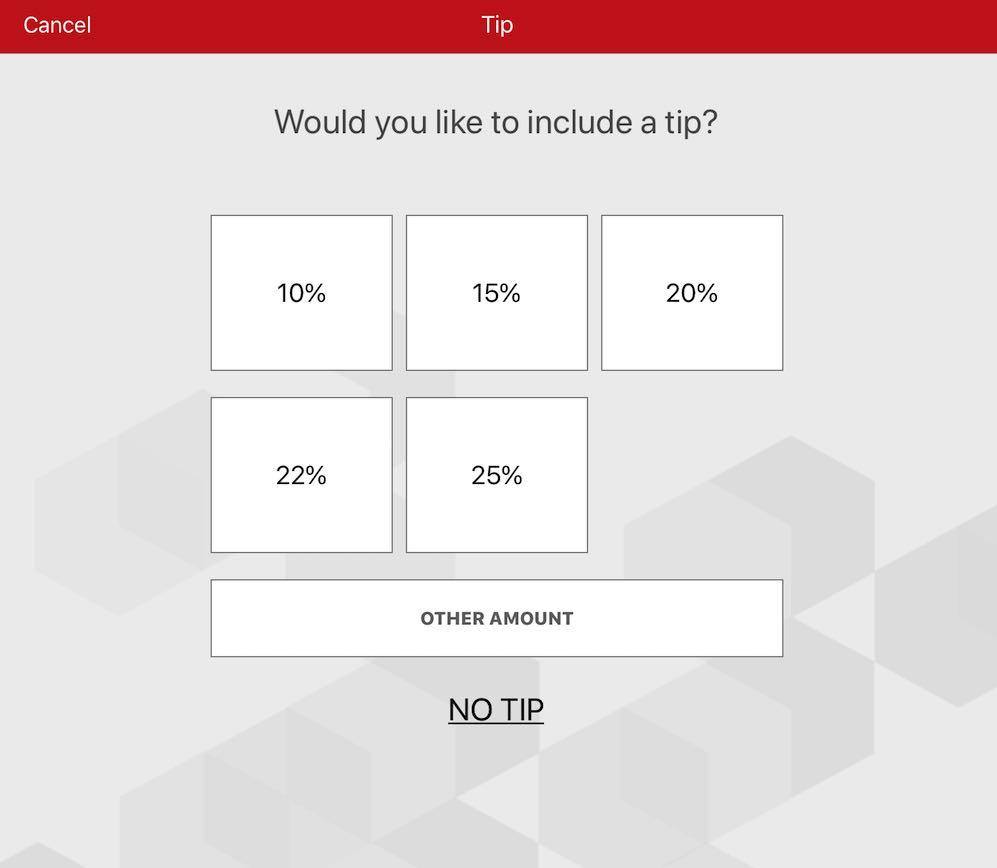
5. If tipping is set up, have the customer select a tip. Tipping and tip amounts are set up by TSYS. Please contact your TSYS representative to enable the tip screen or change tip percentages.
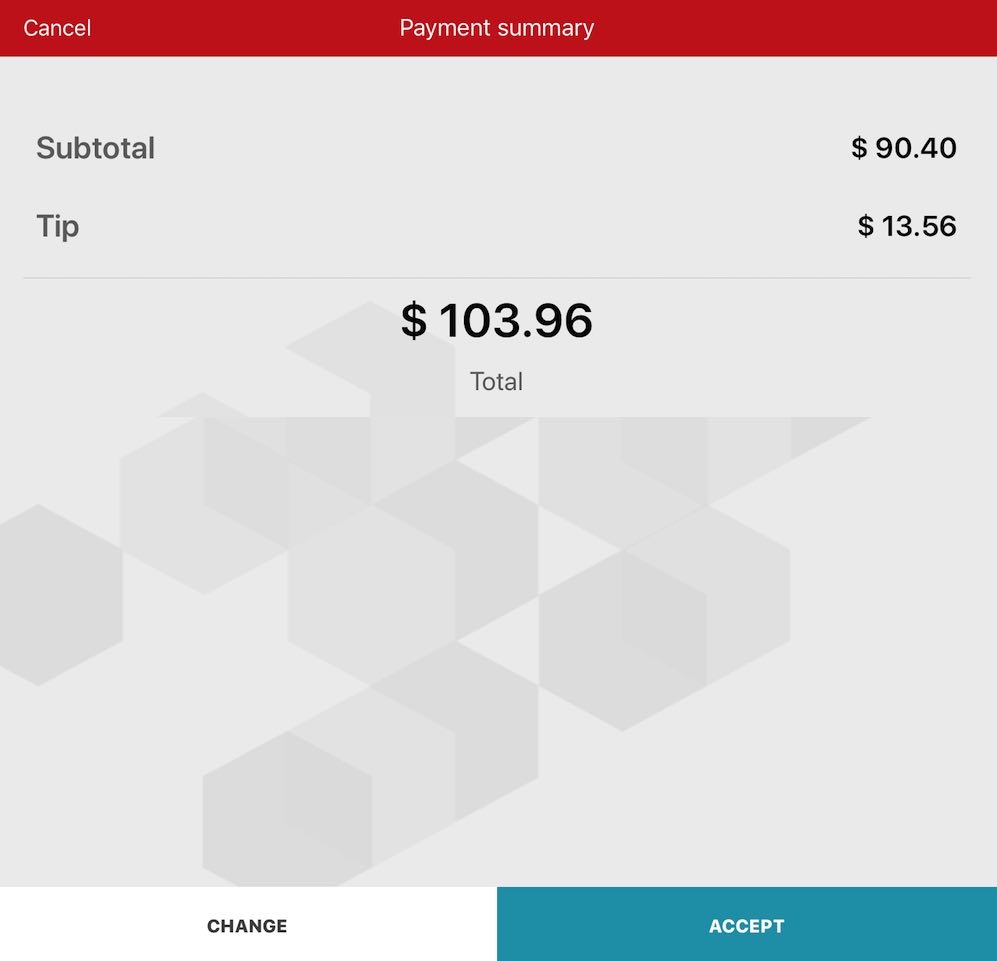
6. Tap Accept.
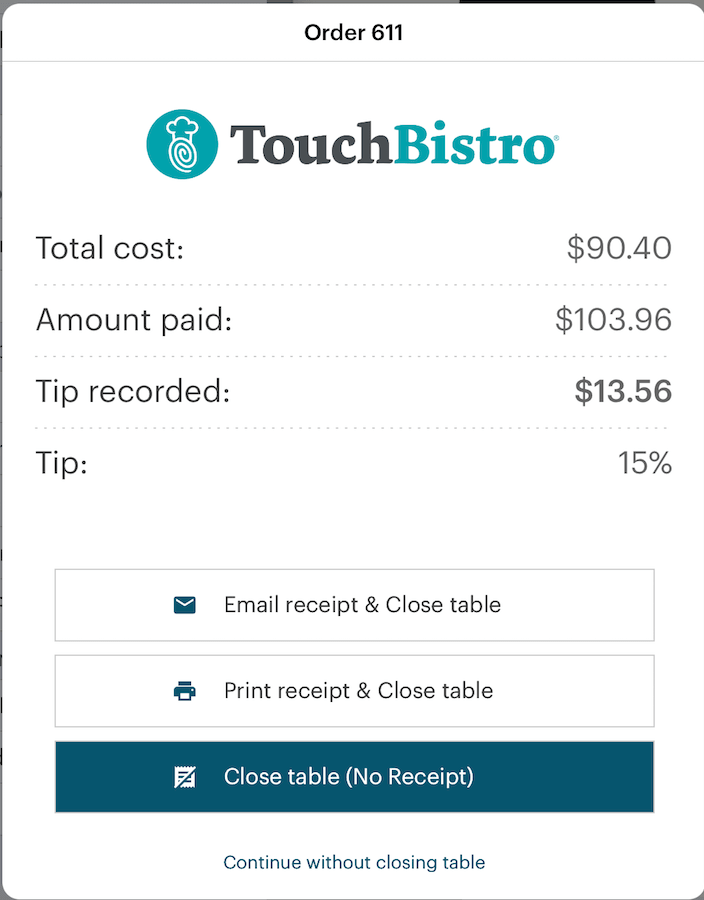
7. Close the order by selecting one of the options to print the guest check options. If you turned off the printing of the merchant and customer copy, if you print the guest check it will have the credit card authorization number.
Chapter 2. Accepting a Credit Card Payment (Fine Dining)
If you prefer the customer writes in the tip on the credit card receipt (that is you’ve configured TSYS for Fine Dining, follow these steps for accepting payment and completing the pre-auth.
If you have enabled Fine Dining, ensure you’ve enabled the printing of the Merchant and Customer copy.
1. From your order screen tap Checkout.
2. Tap Genius Mini.
3. Tap Pay in Full. Do not include tip. Alternatively, if the customer only wishes to pay a portion of the full amount, enter the amount the customer wishes to charge to the card and tap Charge.
4. Do not pass the iPad to the customer if you are set for Fine Dining. Insert, swipe, or tap the customer’s card.
5. If tipping is set up, tap NO TIP. If all your transactions are pre-auths and you do not want this tipping screen, please contact your TSYS representative to disable the tip screen.
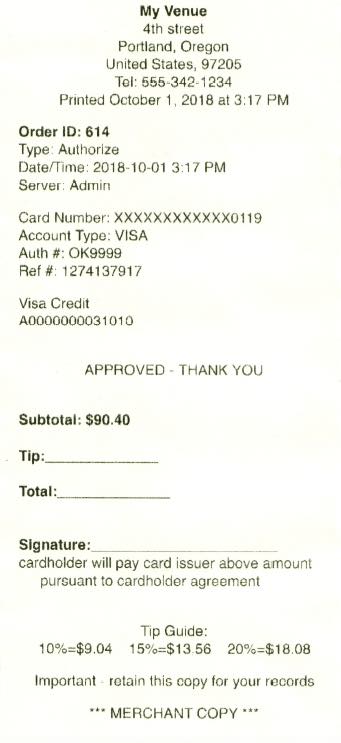
6. TouchBistro will print your credit card receipts to the receipt printer. It will print a merchant copy the customer can sign and write in a tip.

7. Close the table. In a sign-on-slip workflow, you typically presented the customer with the guest check already so you might close the table by tapping Close table (No Receipt).
8. You can now complete the pre-auth. See below.
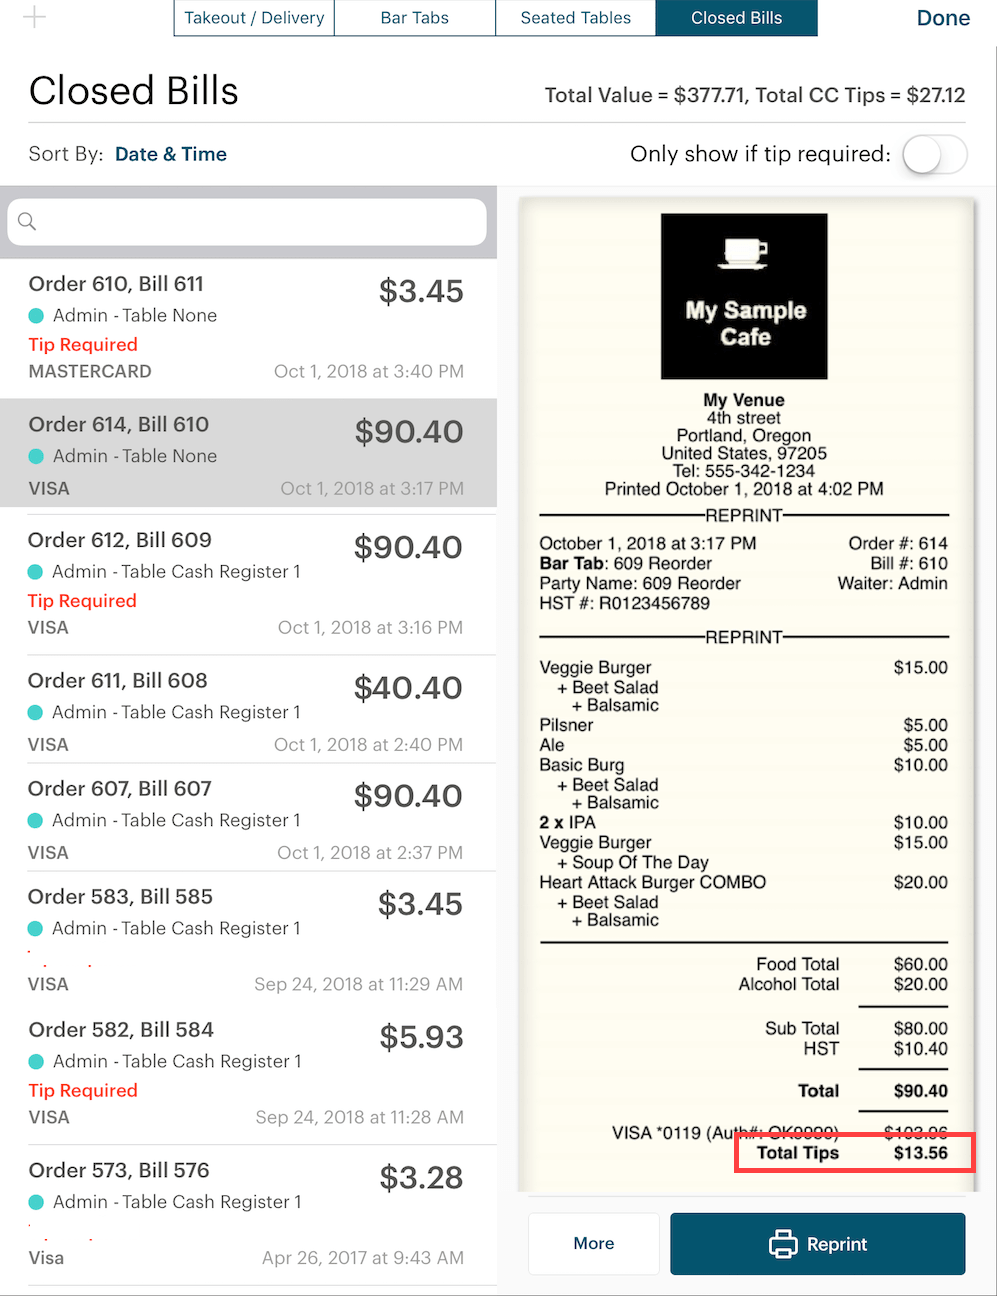
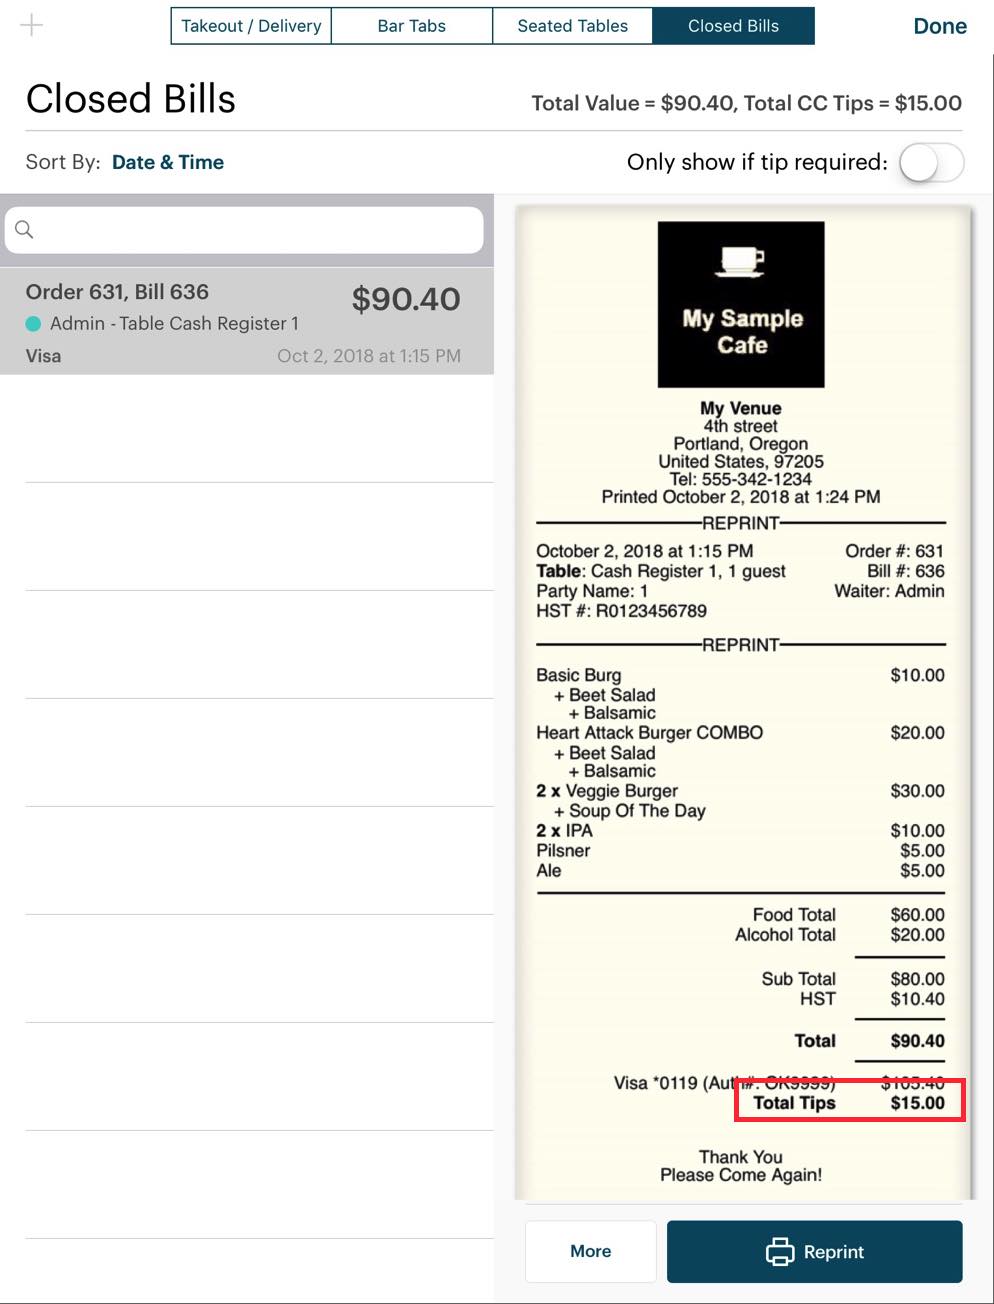
Section 1. Reconciling Tips Written on Receipts
If the customer writes in a tip on the credit card receipt, the server or a user with a manager or admin passcode needs to access the closed bill and enter the tip.
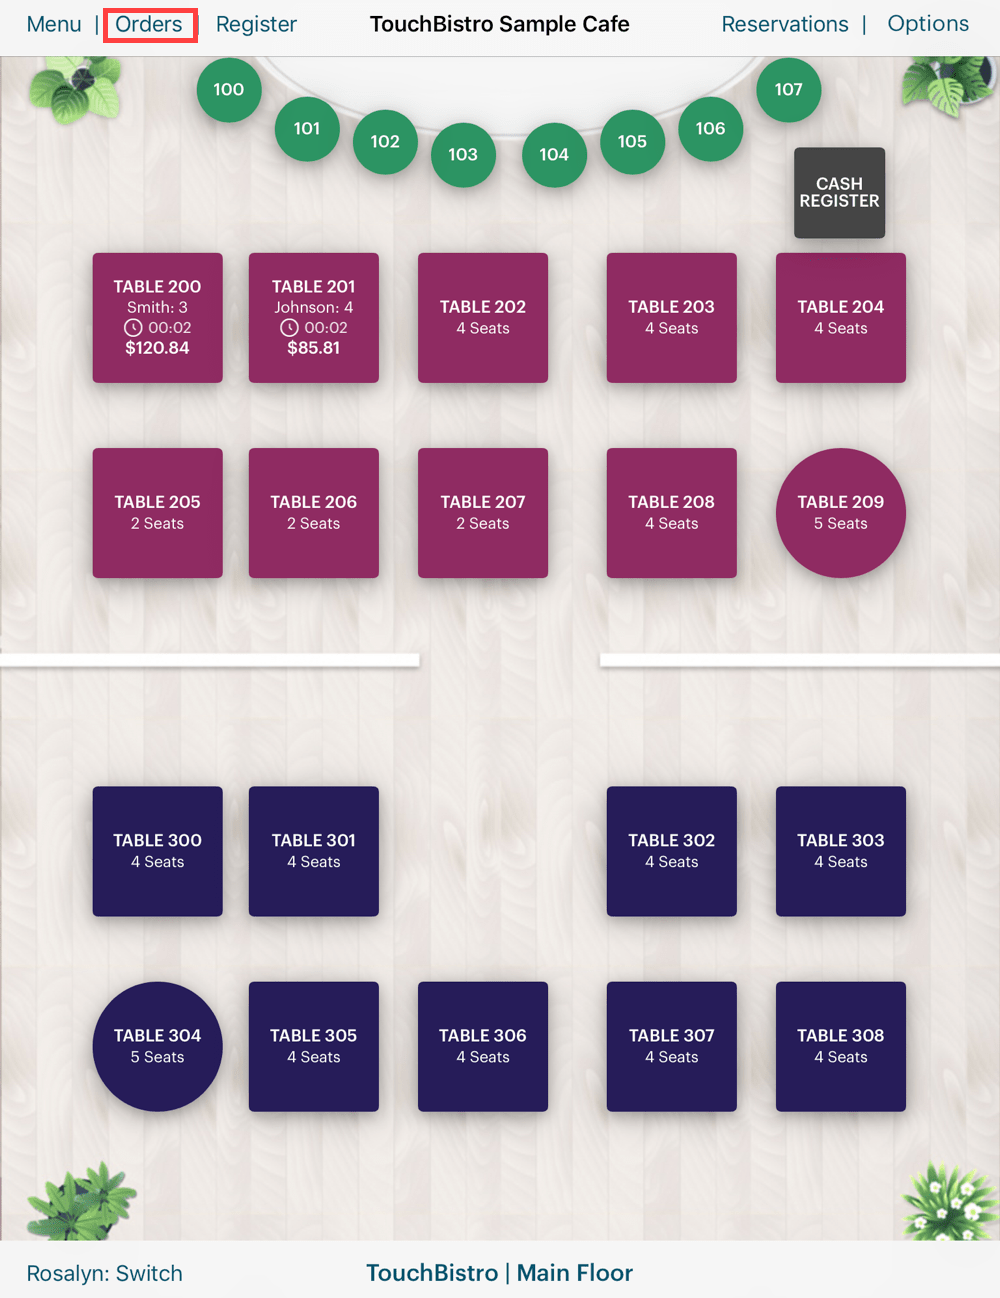
1. From the floor plan layout screen, tap Orders.
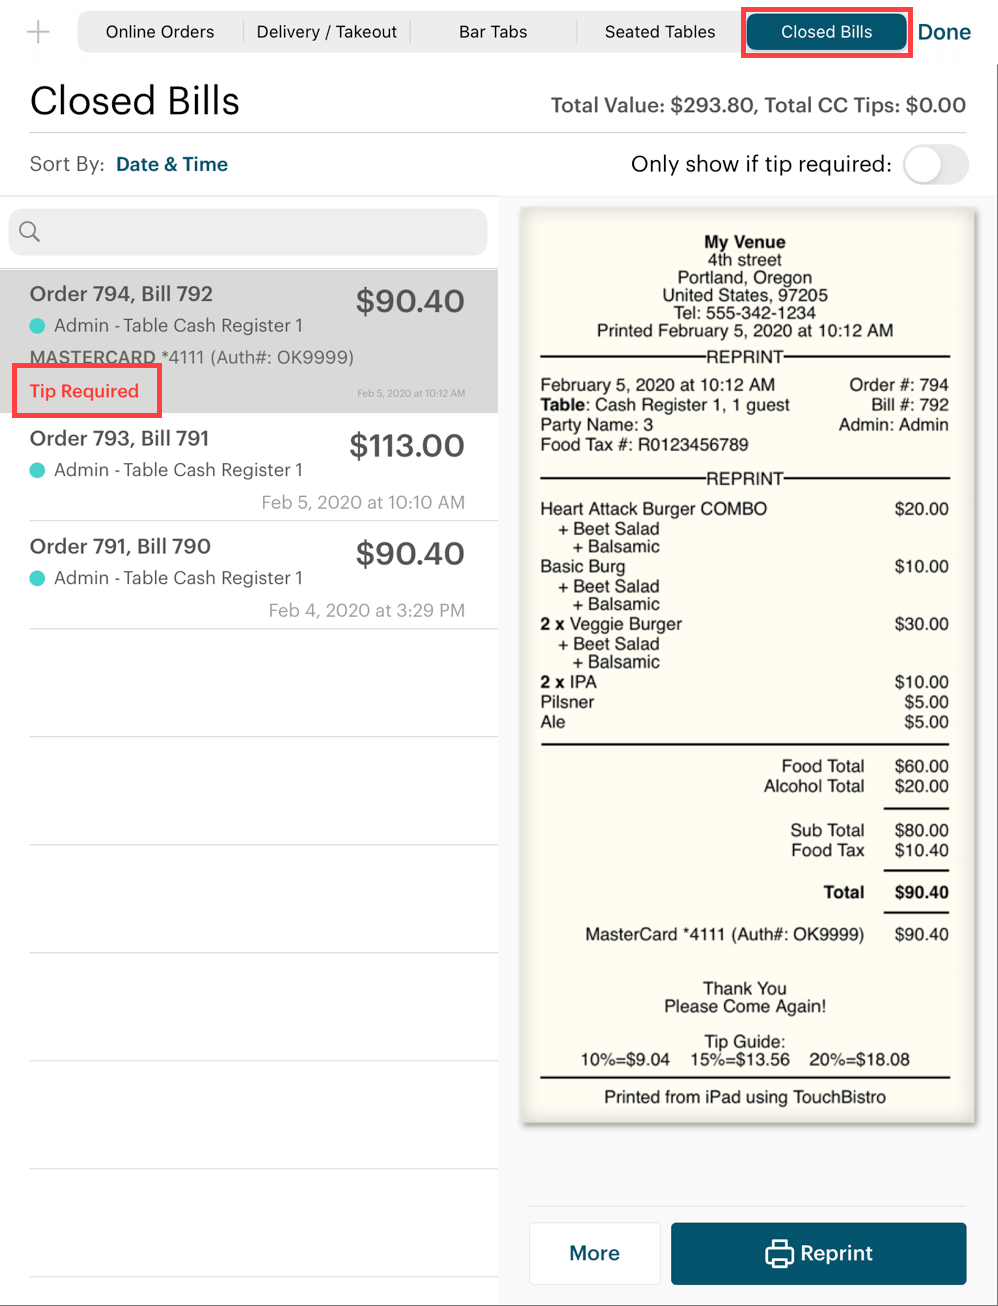
2. Tap the Closed Bills tab.
3. Locate the bill with Tip Required. If you have a lot of closed bills, slide Only show if tip required to the green position to filter out bills not requiring tip reconciliation. To further aid you, the Closed Bills tab also displays the authorization details found on the credit card slip and the guest check. That is the credit card type used, the last four digits of the credit card. This information is only displayed on closed bills that need the pre-auth completed.
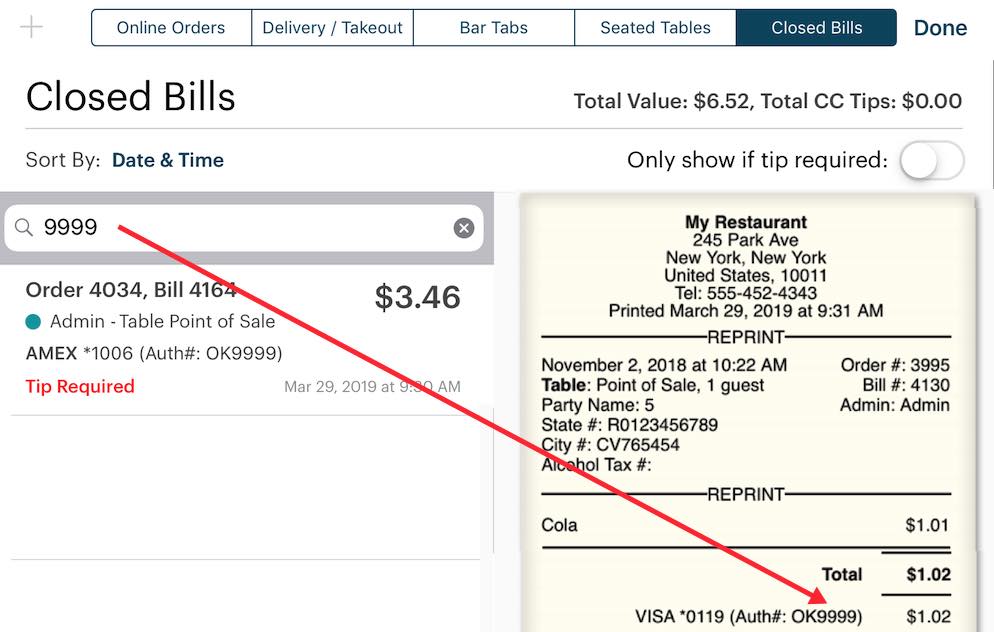
Additionally, you can enter the bill’s authorization number or the last four digits of the credit card number in the search field and find any bills that match the entered number pattern.
4. When you’ve located the bill, tap the bill.
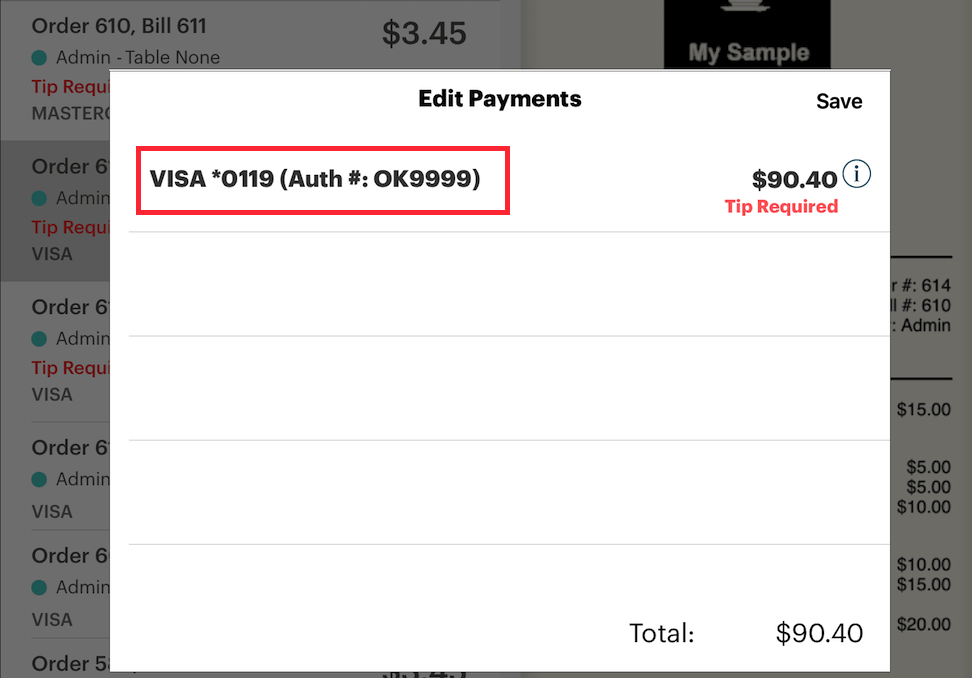
5. Tap the payment.
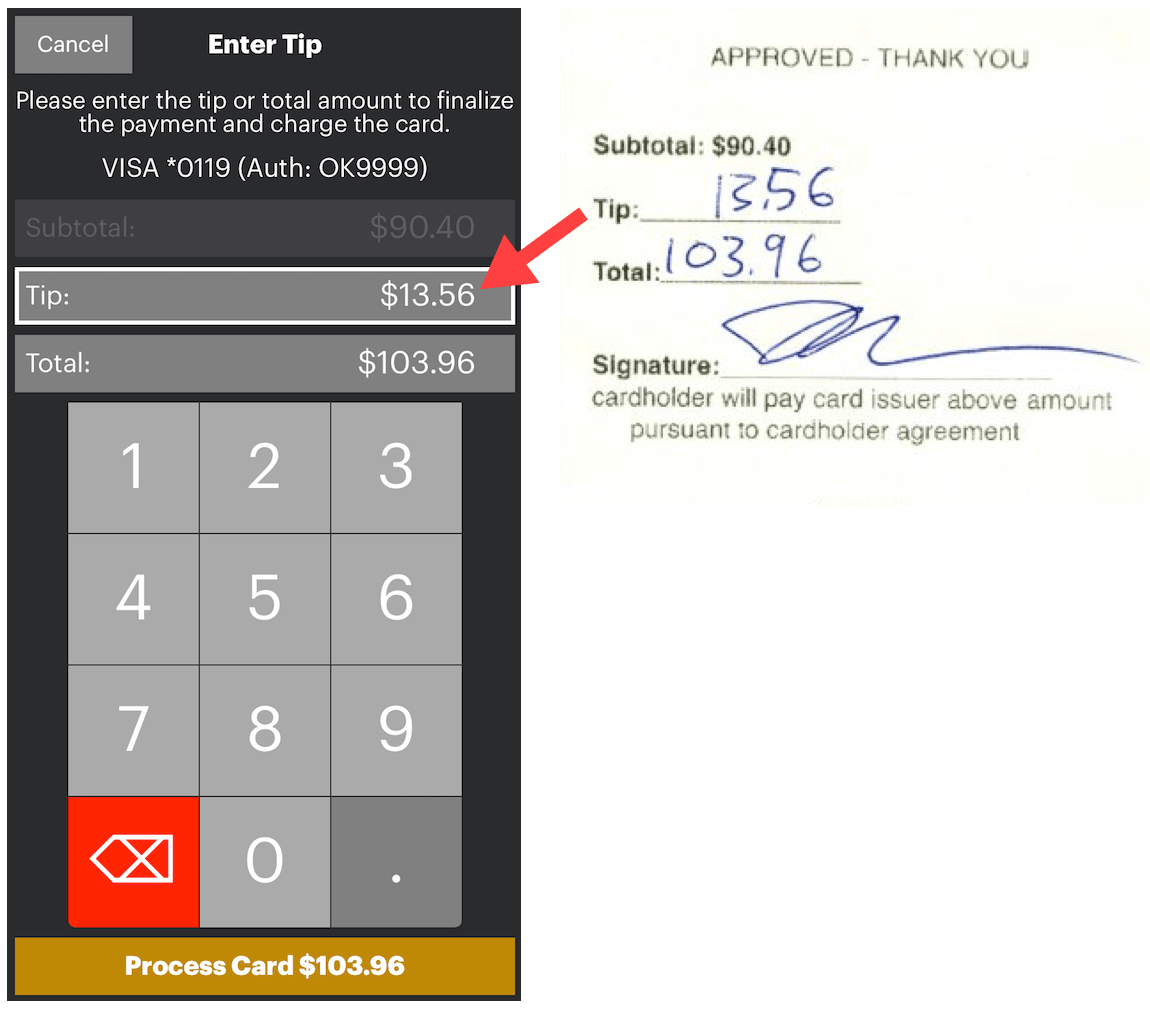
6. Enter the tip written on the receipt in the Tip field. Tap Process Card.
7. Verify you want to charge the credit card for the new amount and tap Yes.
8. You will see an approval message.
9. Repeat if the bill had multiple payments requiring the entry of tips.
10. If you tap on the bill, in the Print Preview, you will see the tip has been added to the final bill.
1) Correcting a Pre Auth Tip
If a tip written on a credit card slip was entered incorrectly, as long as the batch has not been submitted, you can correct the tip.
1. Tap Orders.
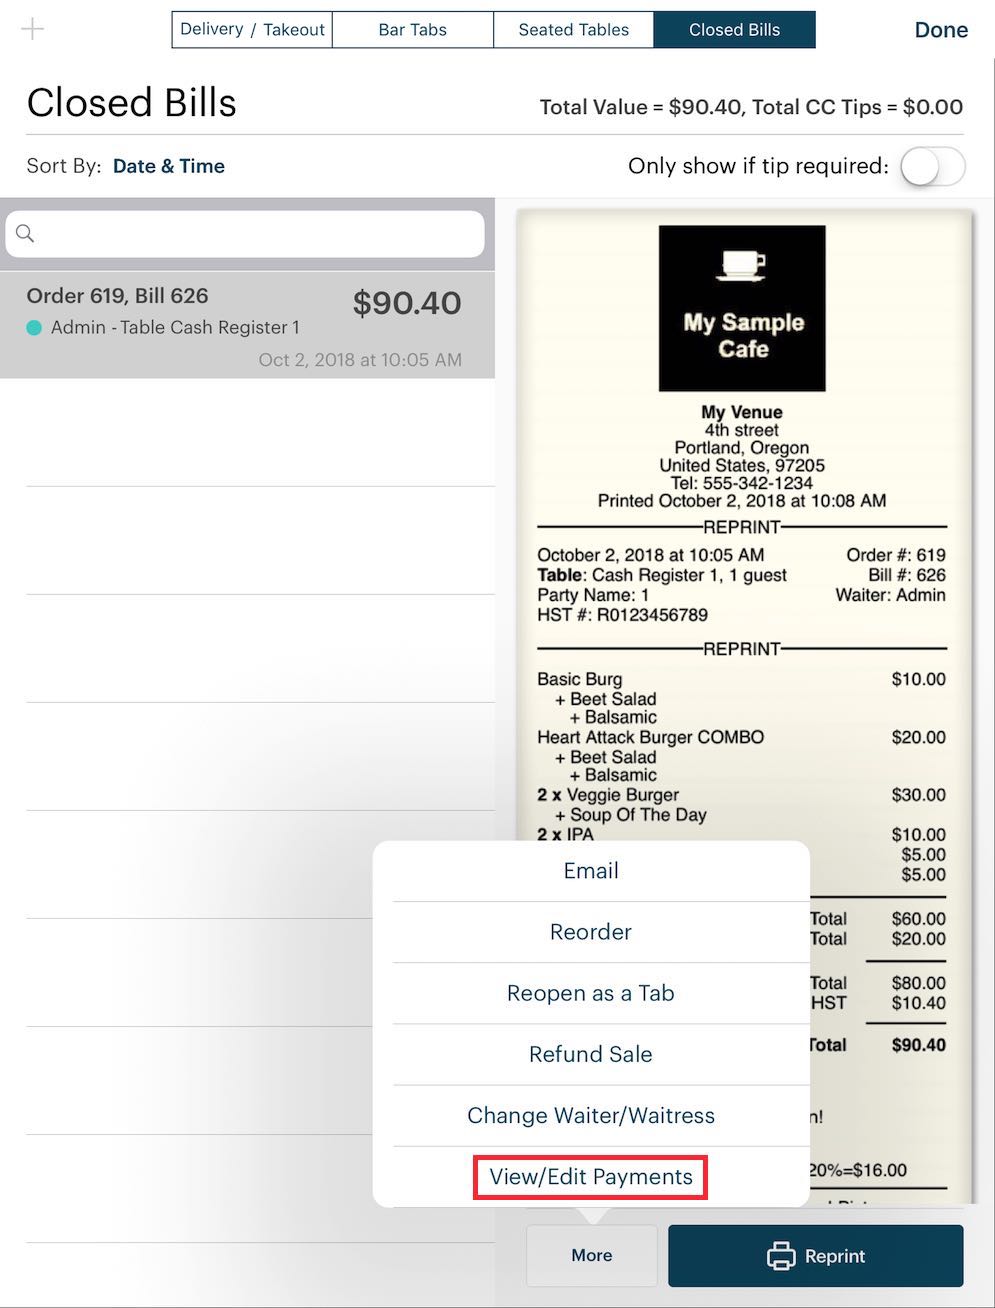
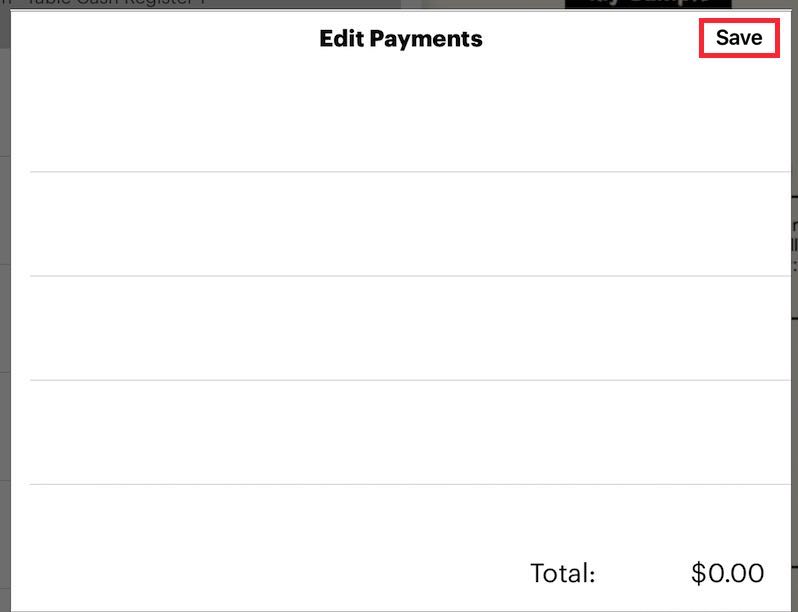
2. Tap the Closed Bills tab, tap the closed order you wish to correct, tap More, and then tap View/Edit Payments.
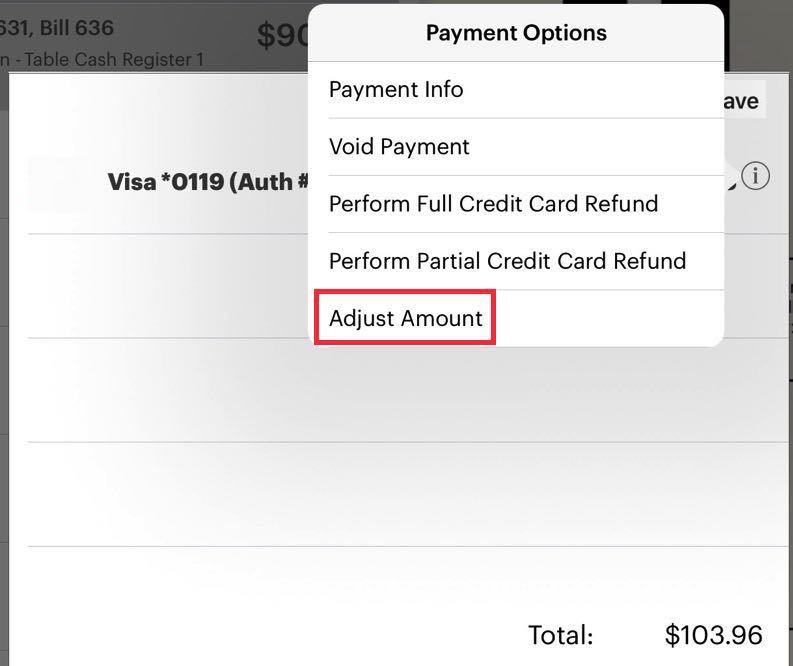
3. Tap the Information ![]() icon associated with the payment and then tap Adjust Amount.
icon associated with the payment and then tap Adjust Amount.

4. Enter the correct amount and tap Save.
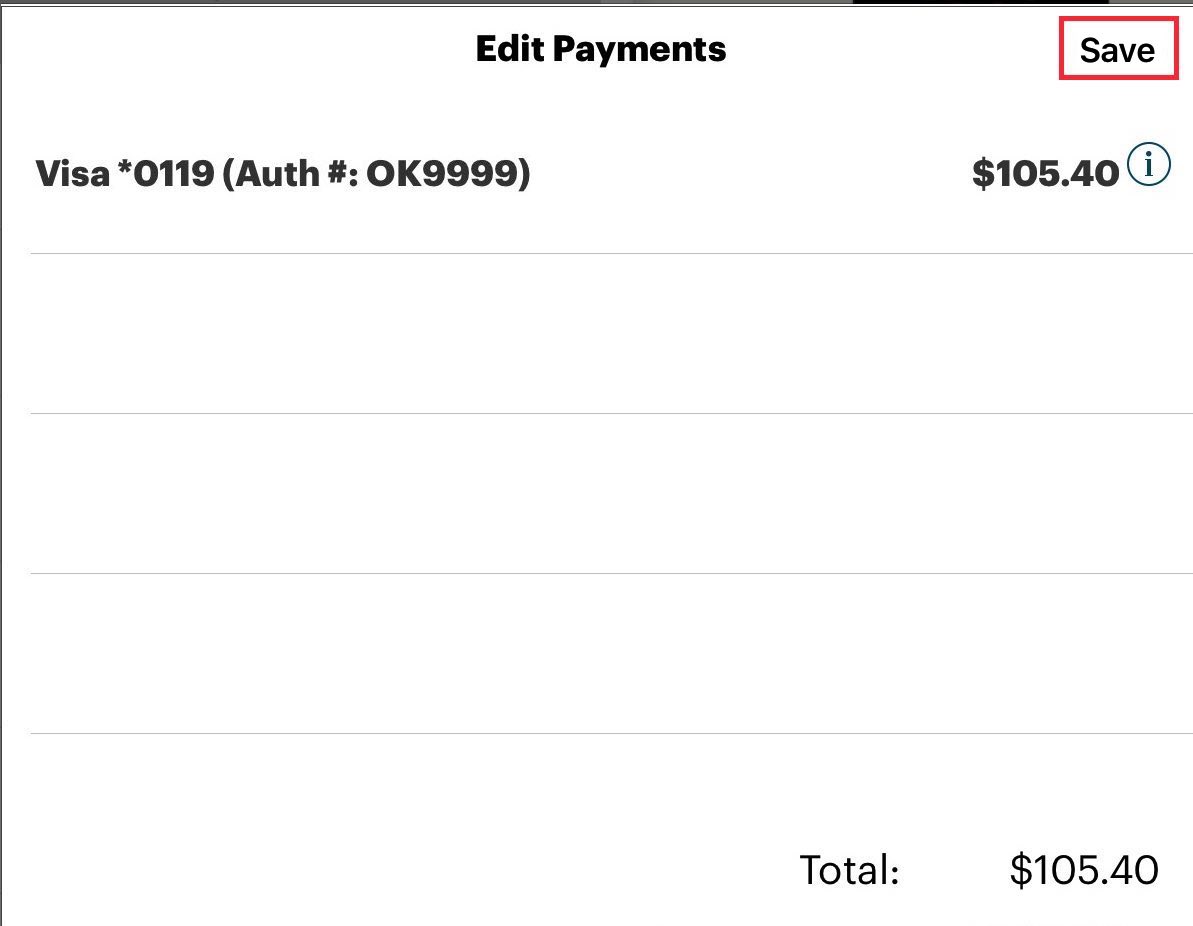
5. Tap Save.
5. If you examine the closed bill, the tip has been adjusted.
Chapter 3. Using Hosted Pay

1. From the Checkout screen, tap the Information ![]() icon next to Genius Mini.
icon next to Genius Mini.
2. Tap Hosted Checkout.
3. Tap Pay in Full. If you have set TSYS to operate as Quick Serve (that is sign on screen), to enter a tip you will need to enter an amount higher than the bill amount (pay in full amount). The excess will be treated as a tip. If you have set TSYS to operate as Full Service (that is sign on slip), tap Pay in Full. The credit card receipt will print a tip line and ask you to complete the pre-auth.
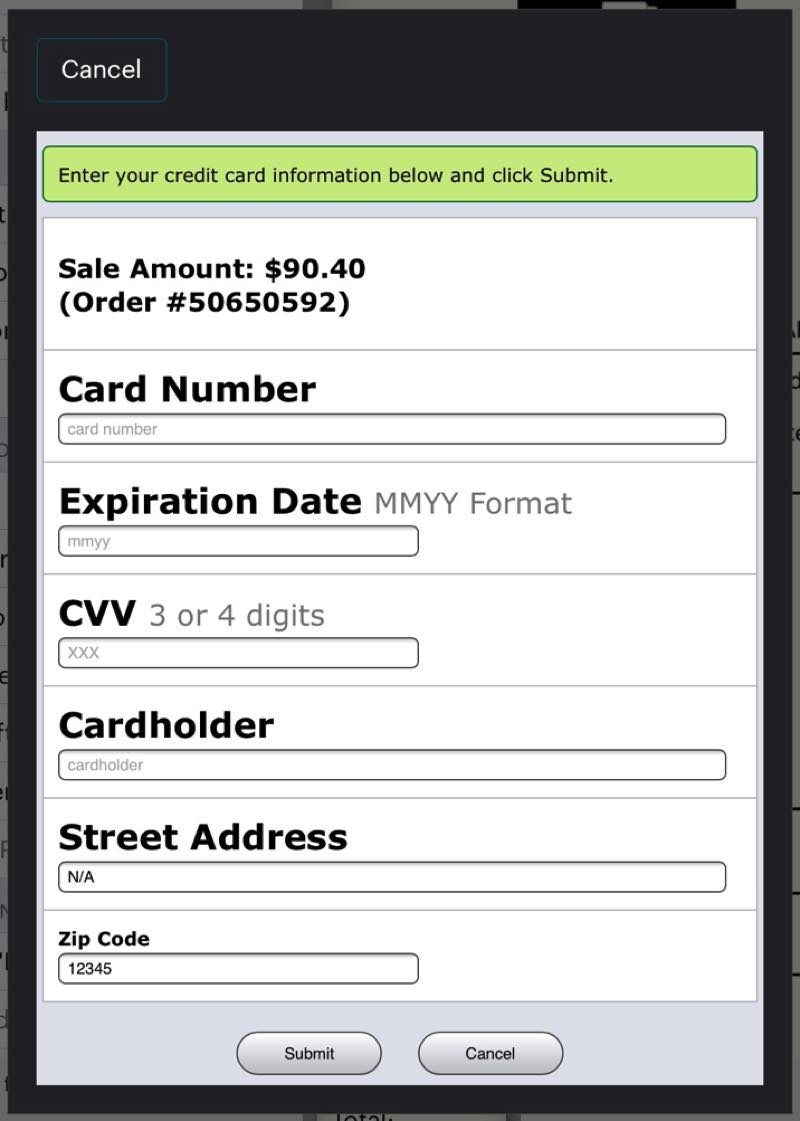
4. Enter the credit card details and tap Submit.
Chapter 4. Create/Open Bar Tabs by Swiping Card or Inserting a Card
Section 1. Setting Up
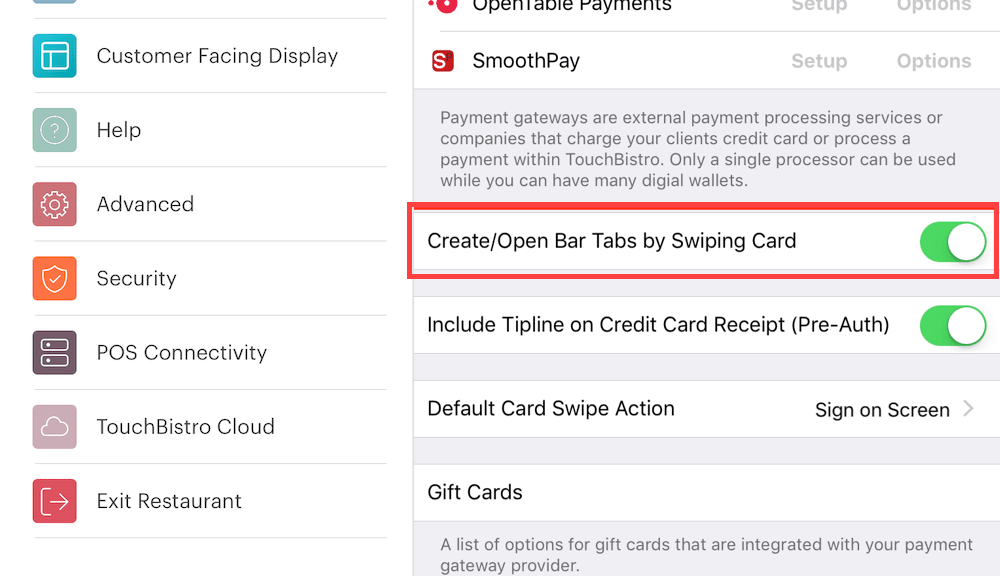
Bar tabs can be more quickly started if you enable Create/Open Bar Tabs by Swiping Card. If enabled, you can quickly populate the bar tab’s information screen with a swipe or dip of the card. The card holder’s name and the last four digits of the card are captured.
Section 2. Zero Auth Authorization
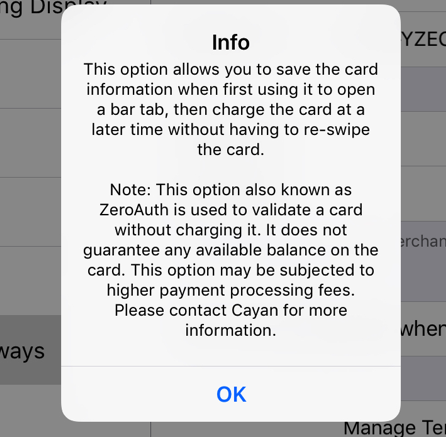
If you are using TSYS as your integrated payment provider, you can enable TouchBistro to obtain a TSYS “valid card” authorization when swiping or dipping to create a bar tab. After swiping/dipping the card to create the tab, TouchBistro will receive an authorization token that lets you process the card from the checkout without having to re-swipe/re-dip the credit card when the patron wishes to close his/her bar tab.
It’s important to understand no pre-authorization (pre auth) is issued by TSYS. TSYS issues a “zero auth”. In other words, the swipe or dip does not check if the cardholder has enough remaining credit limit to pay for the accrued tab. The charge may still be rejected at checkout. So you should retain the card even if you’ve enabled this zero auth option.
1) To enable zero auth
1. Access Admin | Admin Settings | Payment Gateways and enable Create/Open Bar Tabs by Swiping Card.
2. You can ignore the Default Card Swipe Action option.
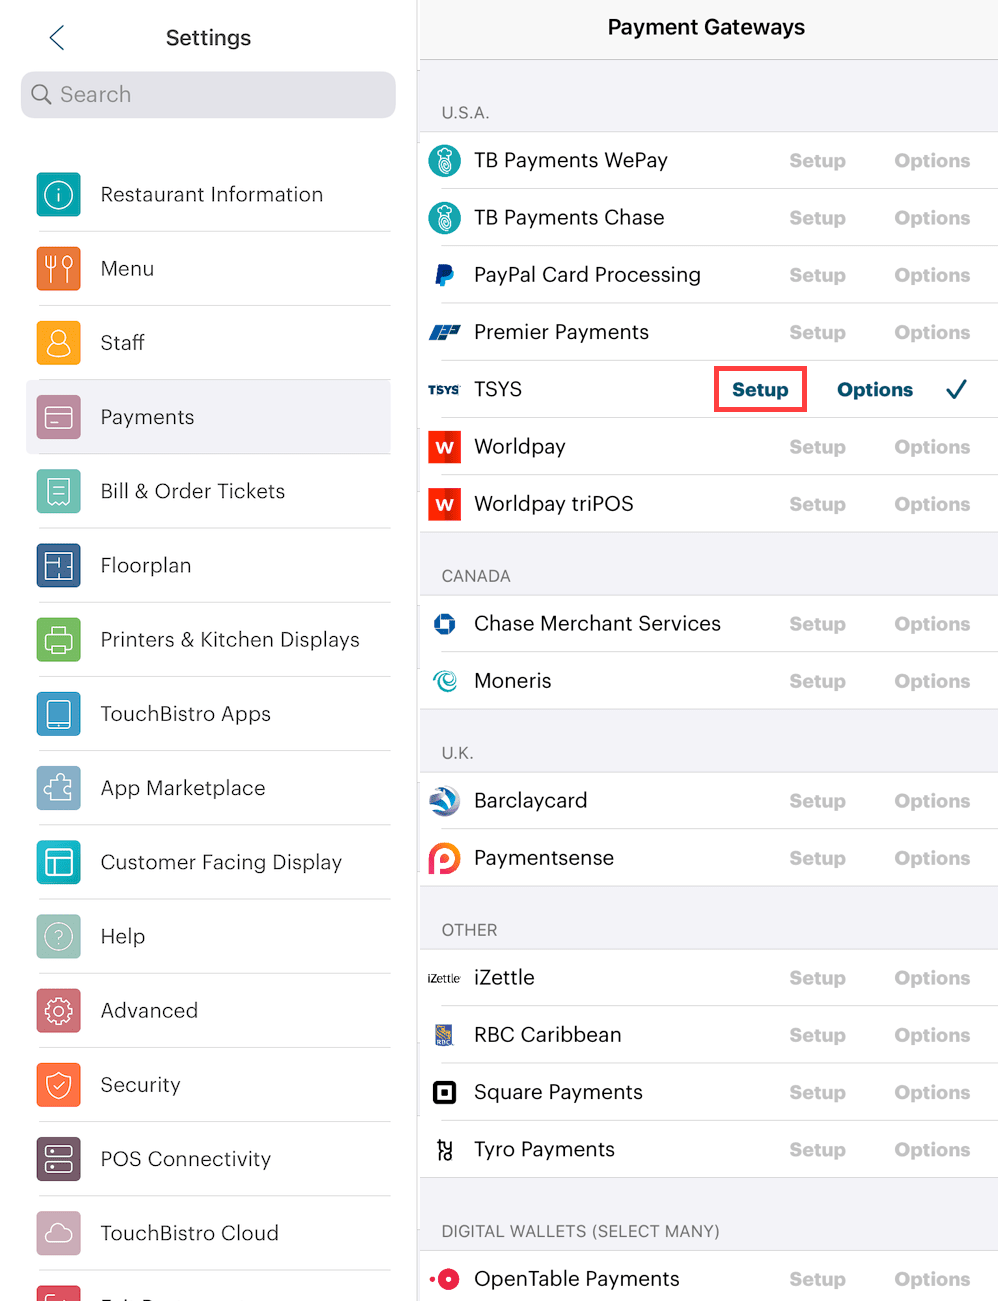
3. Tap TSYS’s associated Setup option.
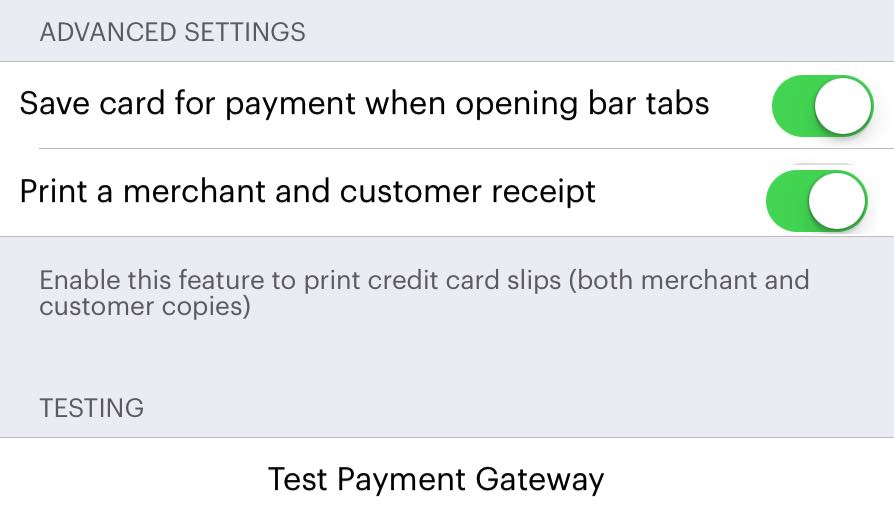
4. Scroll down to the Advanced Settings area and enable Save card for payment when opening Bar Tabs.
5. When you enable this feature note the limitations and possible higher merchant fees for these kinds of transactions. You cannot use this feature with American Express cards.
6. Tap Done.
2) Using Zero Auth to Start and Close a Bar Tab

1. Tap the + icon to start a bar tab. You cannot start a zero auth bar tab via the cash register or a table.

2. Tap Genius Mini to start the Zero Auth.
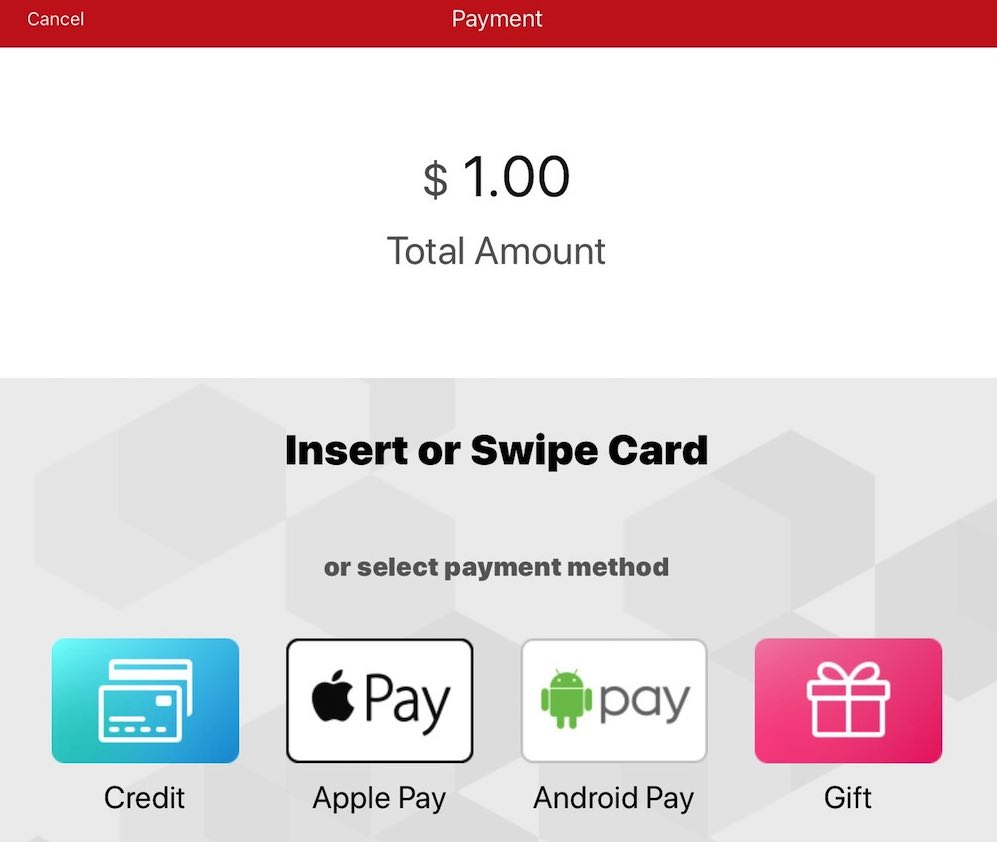
3. The Genius payment app will launch and issue a $1 test charge. This will not appear on the customer bill. Insert the card or swipe it.

4. If tipping is enabled, tap NO TIP.
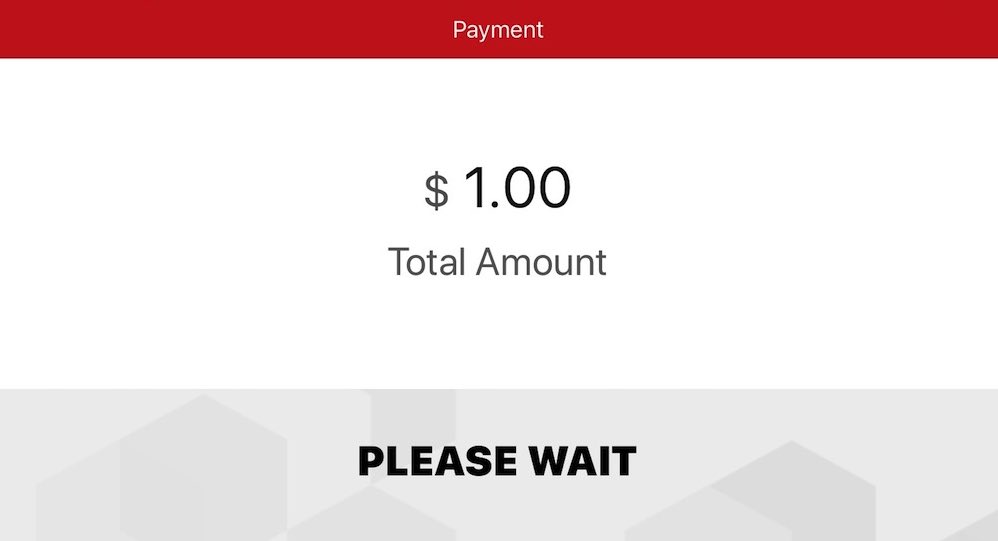
5. The test charge will be sent to TSYS and if the card is valid (not expired or reported lost/stolen) the Zero Auth will be approved. This $1 transaction may take a few days to reverse or “fall off” the customer’s bill.
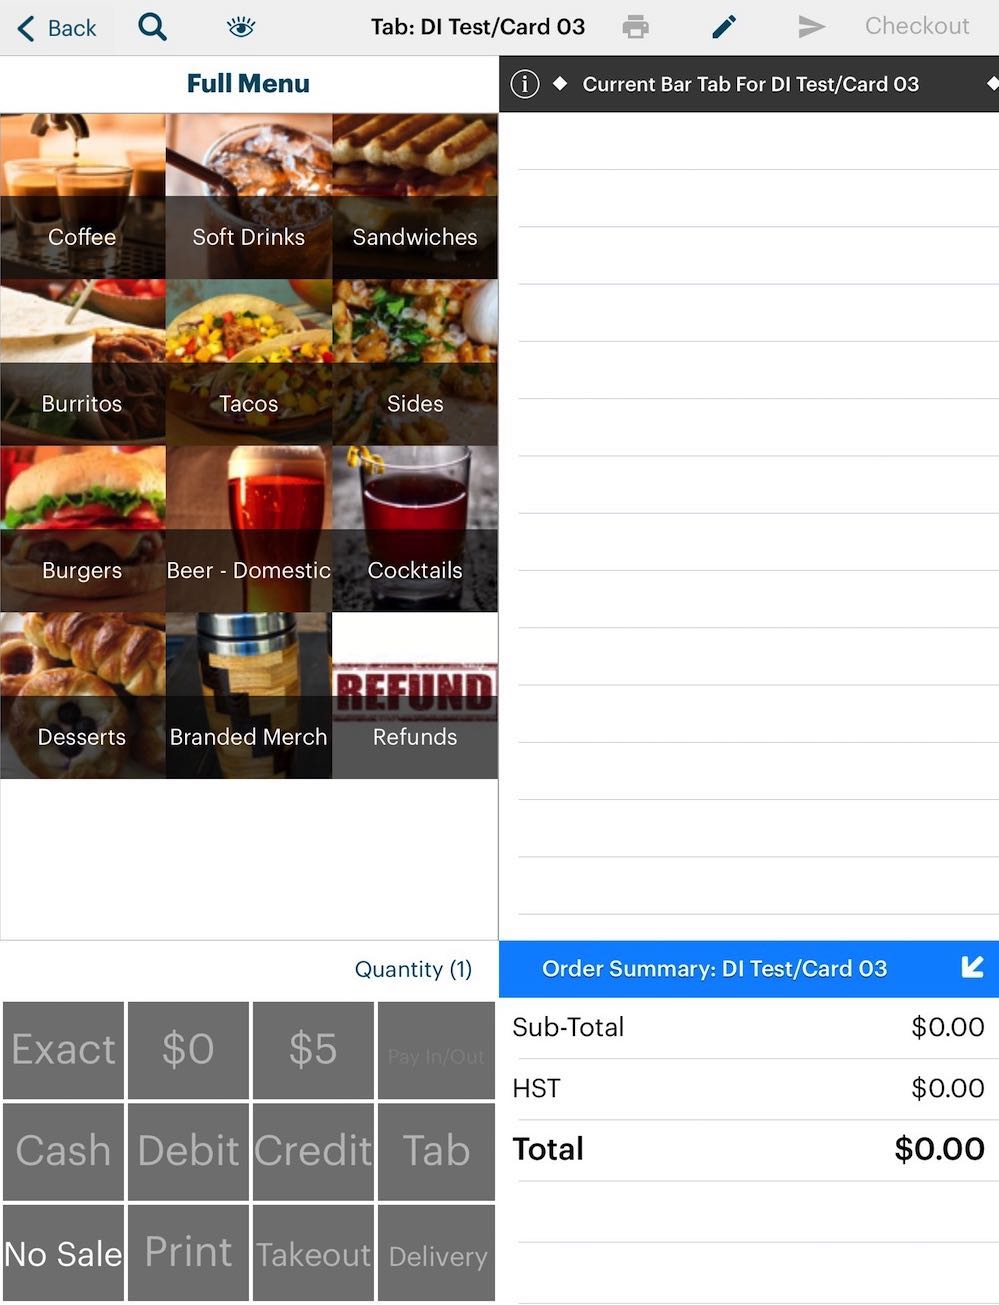
6. You will be returned to TouchBistro in a bar tab order screen. You will notice the $1 test charge does not appear on the order. Complete the customer order per usual.
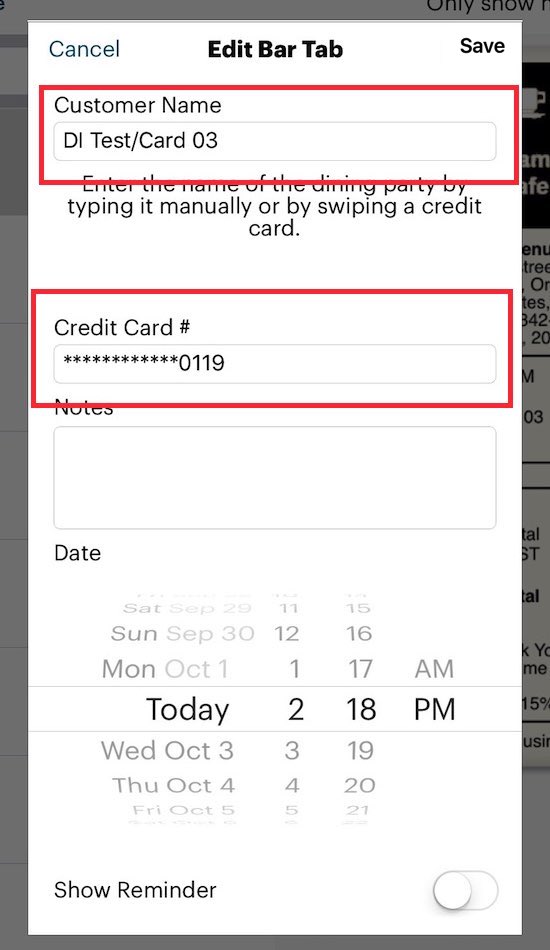
7. If you were to examine the bar tab’s Edit Info screen, you would see the card swipe or dip you used to start the Zero Auth has captured the name on the card as well as the last four digits of the customer’s credit card. You can use this information to link a held card with the patron at the bar.
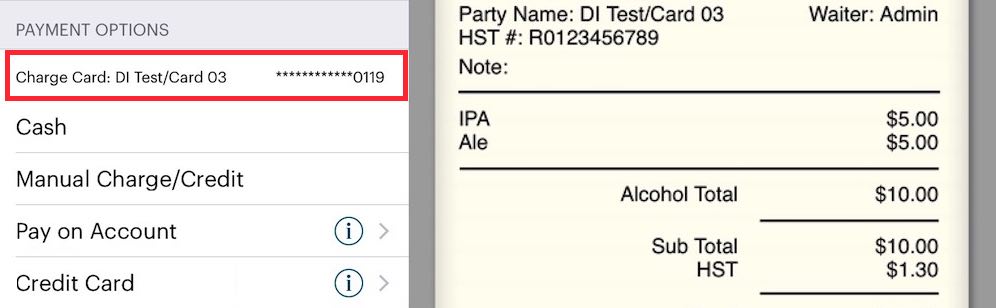
8. When the patron is ready to pay, proceed to the checkout screen and tap the Charge Card payment option.

9. All Zero Auth charges will print as a sign on slip/pre auth. Give the customer and merchant copies to the patron to write in a tip and sign.
Chapter 5. Credit Card Refunds, Voids, Returns, or Reprints
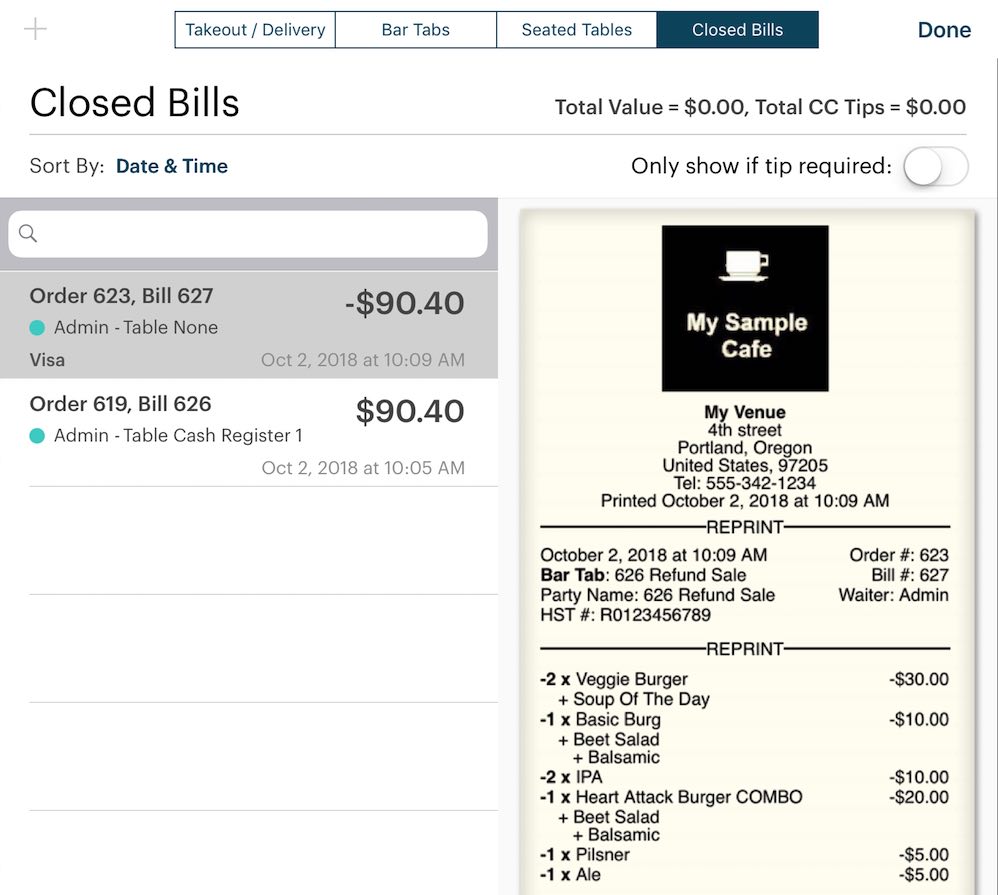
Section 1. Refunding a Bill before you Close Your Day
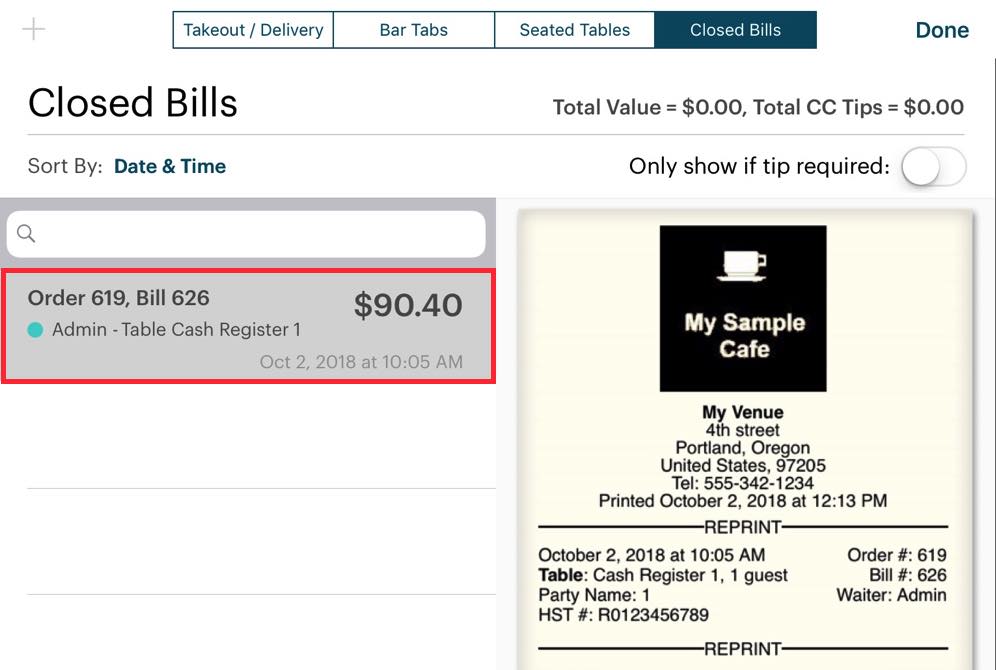
1. From your floor plan, tap Orders.
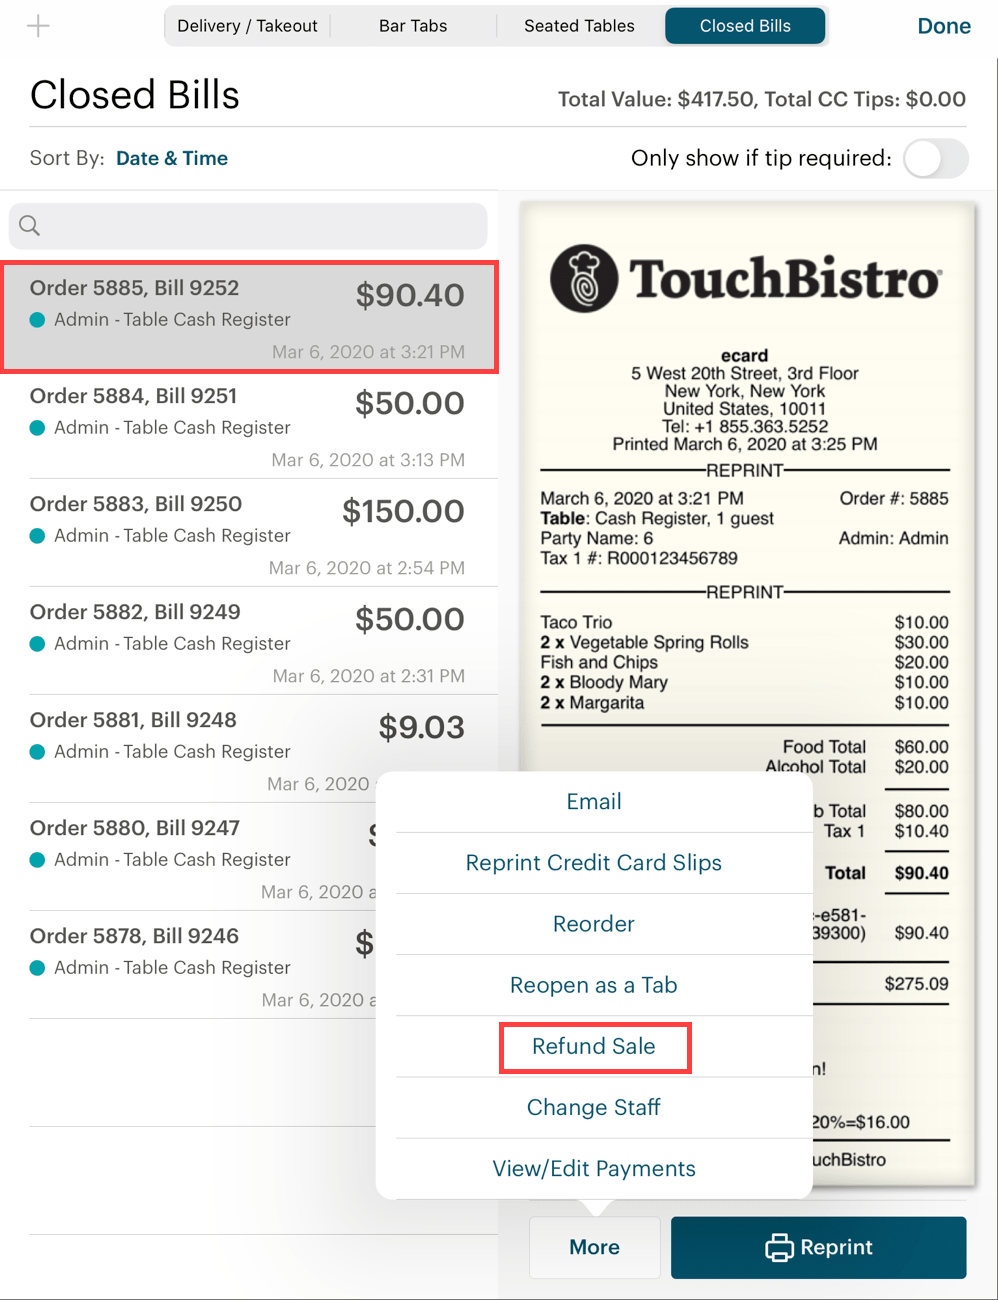
2. Tap the bill you wish to refund and tap the More button. Tap Refund Sale.
2. Tap Full Refund.
3. Tap the Integrated Refund option.
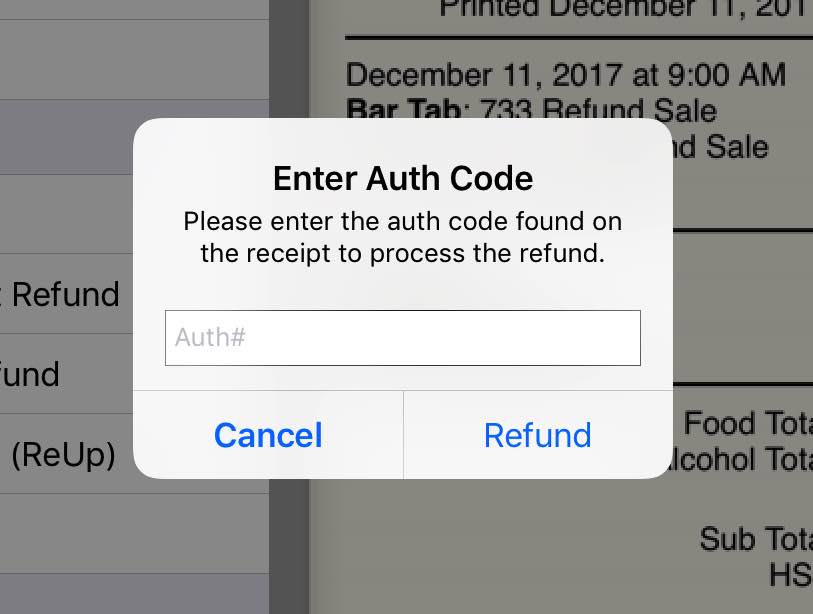
4. Enter the Authorization code from bill you are refunding. The authorization code is printed on the credit card receipt and the guest check.

5. Close the sales refund invoice.
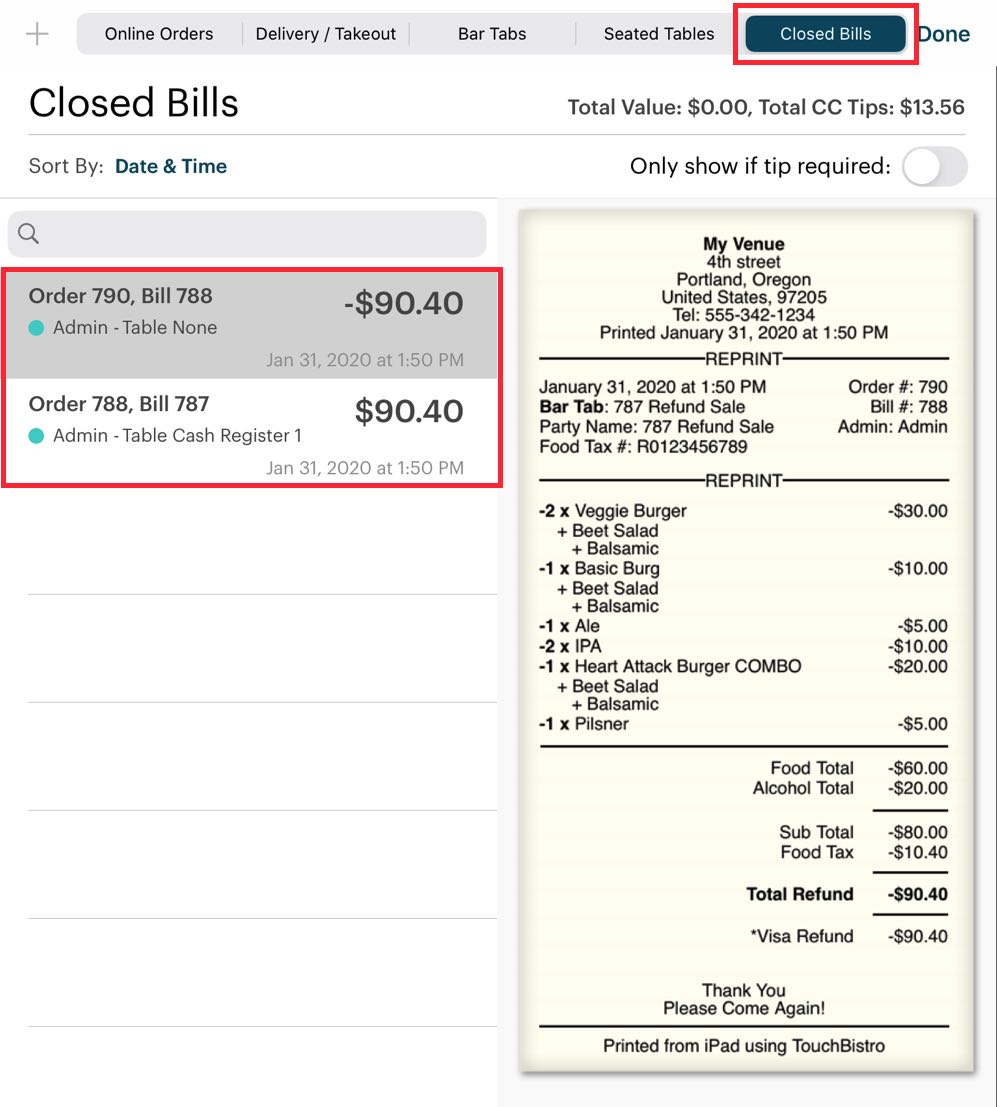
6. You are returned to the Closed Bills tab. Your refunded negative sales invoice is moved to Closed Bills.
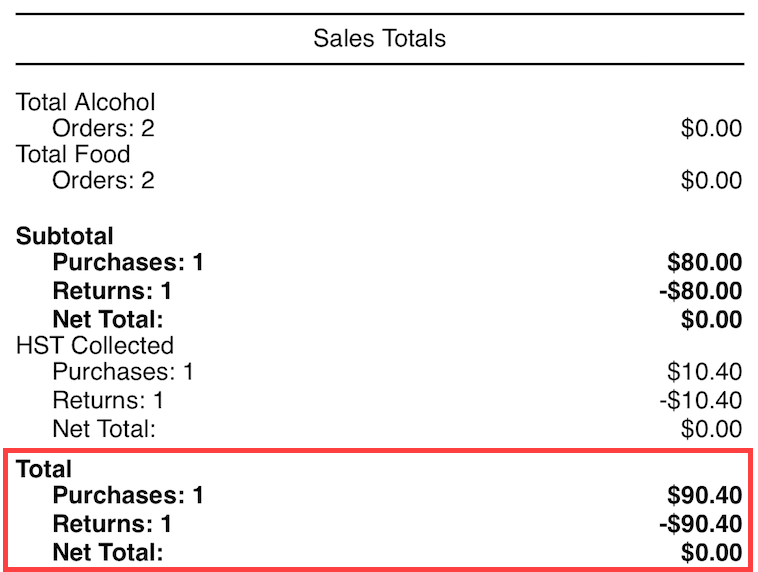
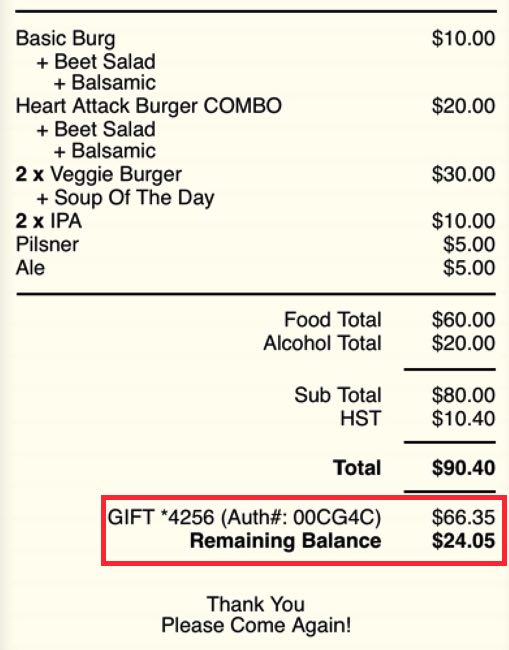
7. Your end of day will properly reflect the original bill and the matching refund. In the example pictured above, we’ll assume we had one order for the day and we also refunded it. We can see the order is matched with an equal but negative refund. It nets out to $0 sales for the day.
1) Refund Process is Interrupted
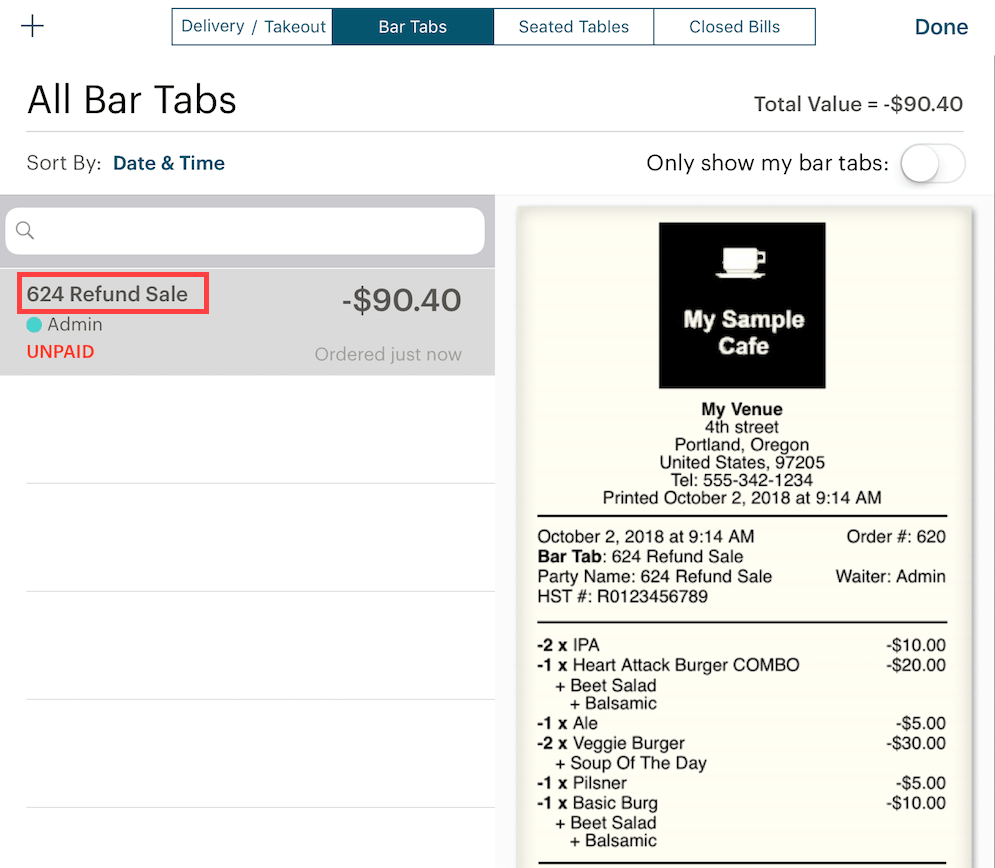
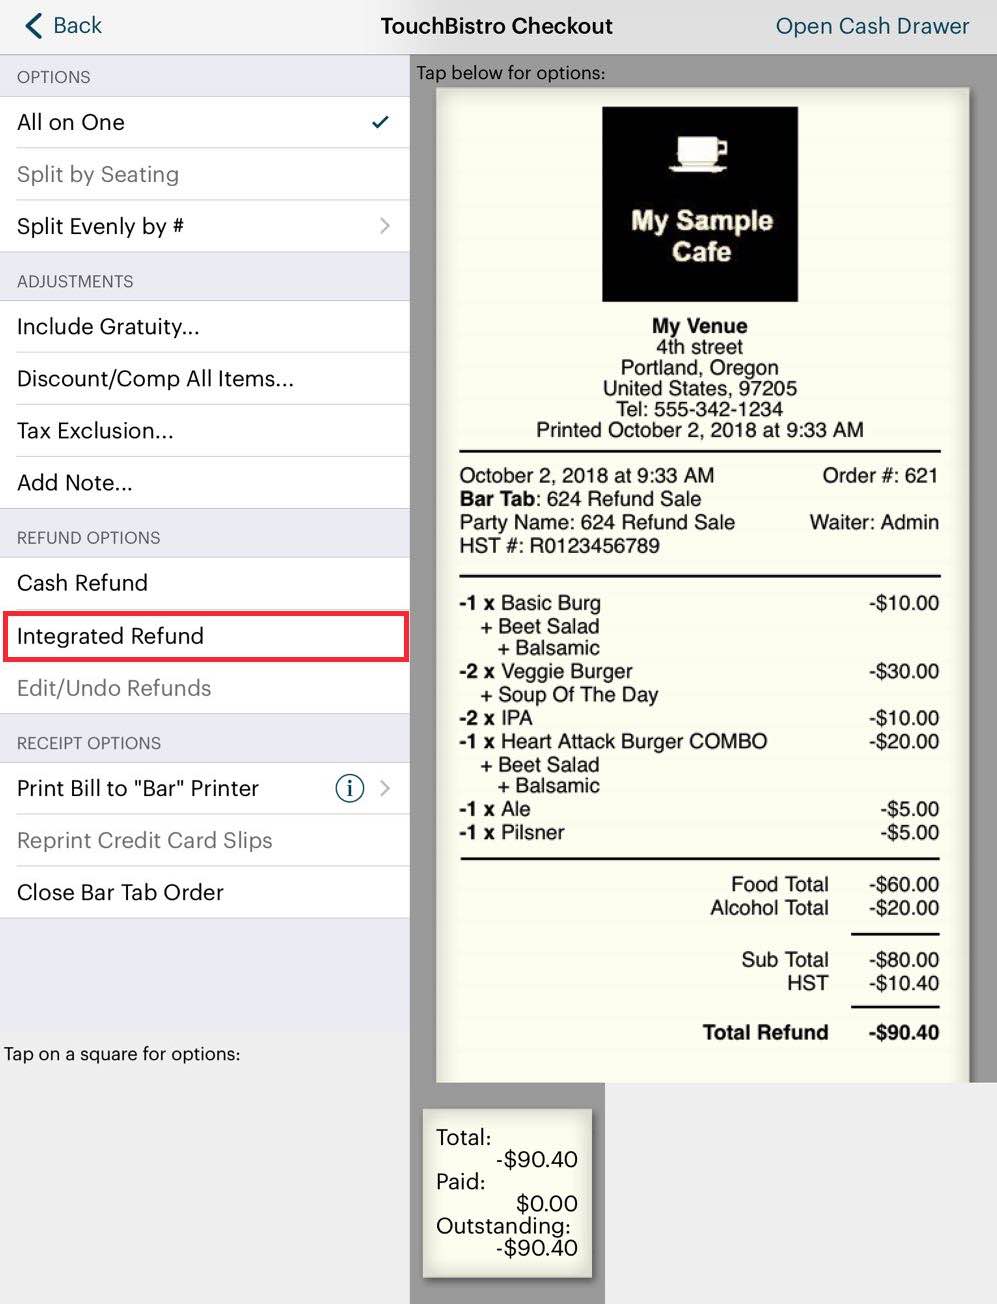
If for some reason you are interrupted and you did not complete the refund process, you can access Bar Tabs and find your negative refund invoice under bar tabs. The refund sale invoice is automatically named after the bill number of the refunded bill. Tap it and tap Edit Order to open it (or right swipe on the order).
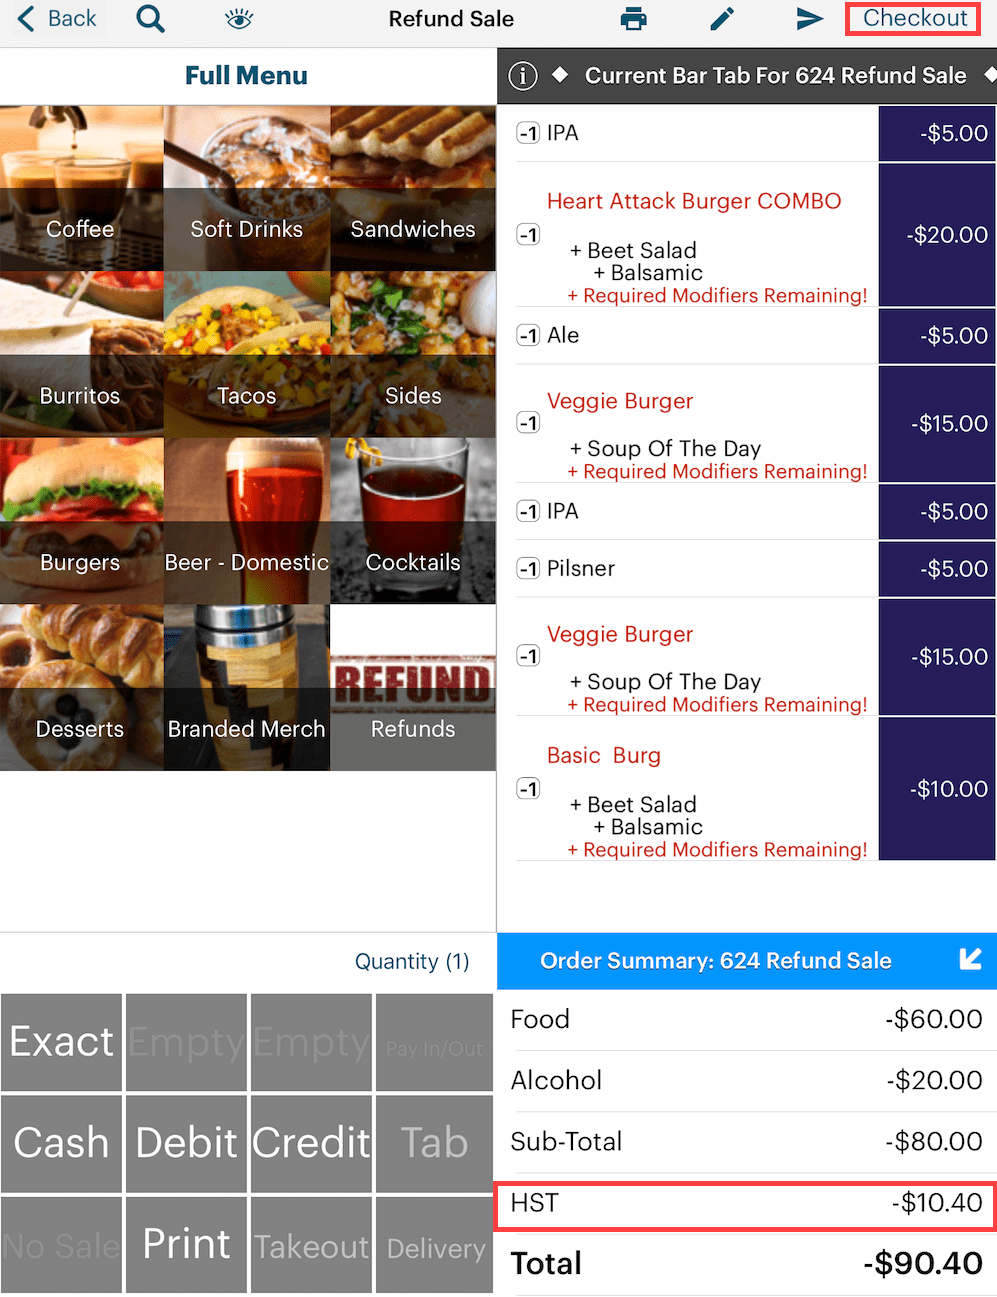
When you open the refund sale invoice, you will notice all items in the refunded bill are negative quantities. If the items have programmed mandatory modifiers, ignore the warning. If the refunded items are inventoried, TouchBistro returns the inventory count. As well TouchBistro correctly calculates the refunded tax. Tap Checkout to close out this refund invoice.
to close out this refund invoice
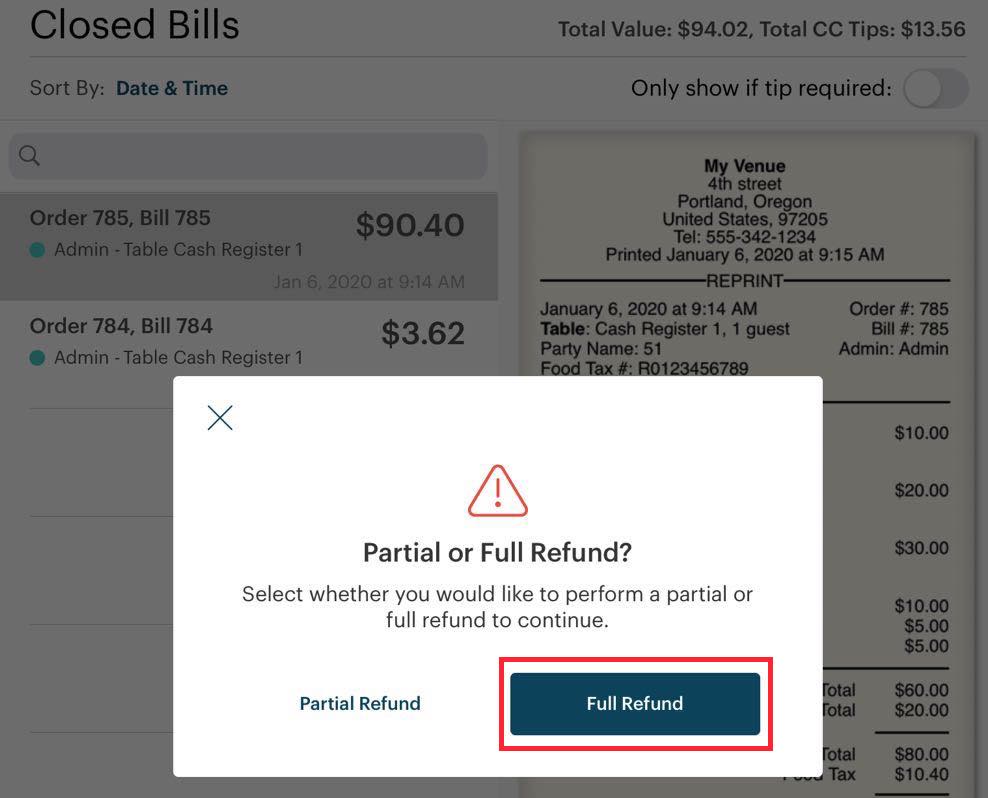
Section 2. Performing a Partial Refund
These steps assuming you’re refunding a bill for the current day. If the bill that needs to be refunded is from a previous day, find the bill via Bill / Guest Check History.
1. From your floor plan, tap Orders.
2. Tap the bill you wish to refund and tap the More button. Tap Refund Sale.
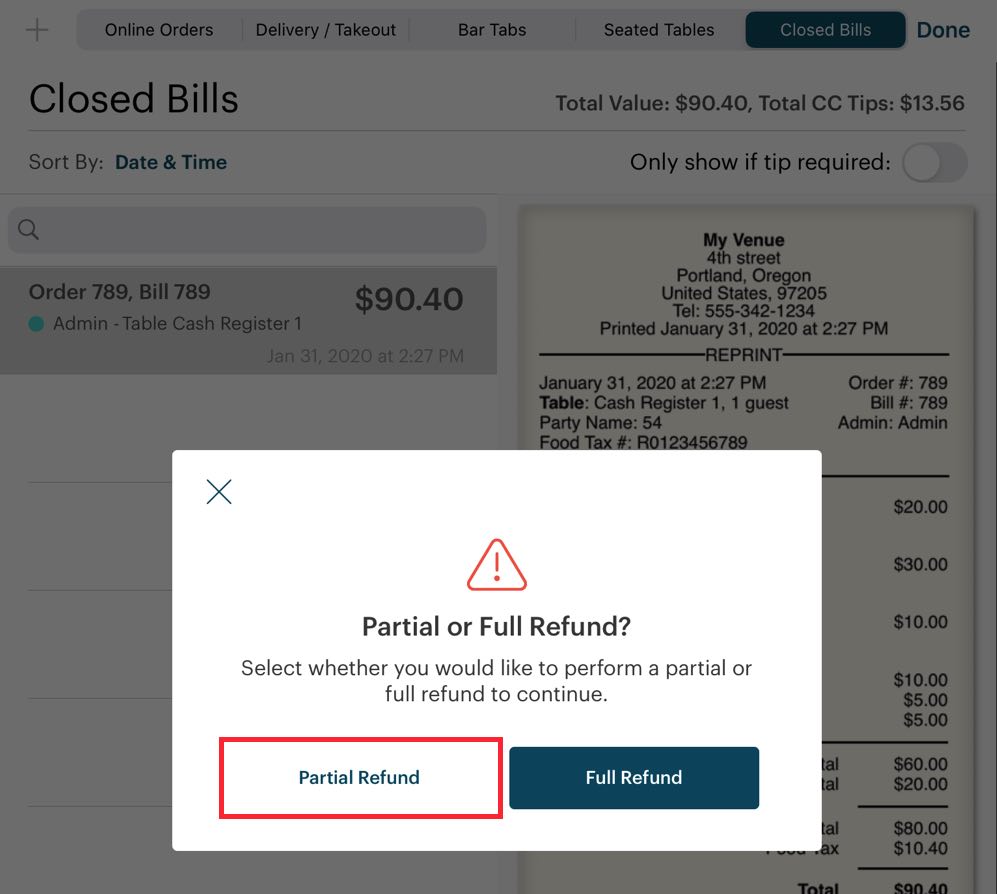
3. Tap Partial Refund.
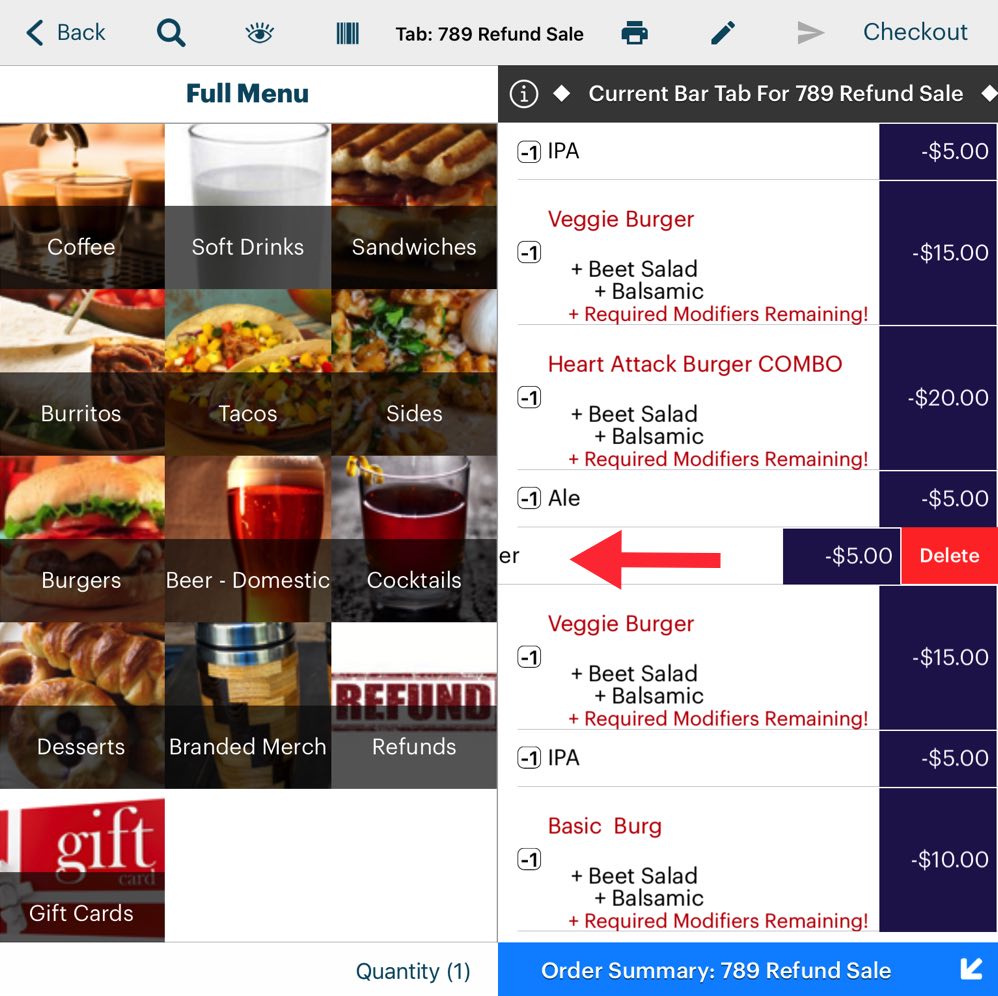
4. Swipe left on the items you don’t want to refund and tap Delete.
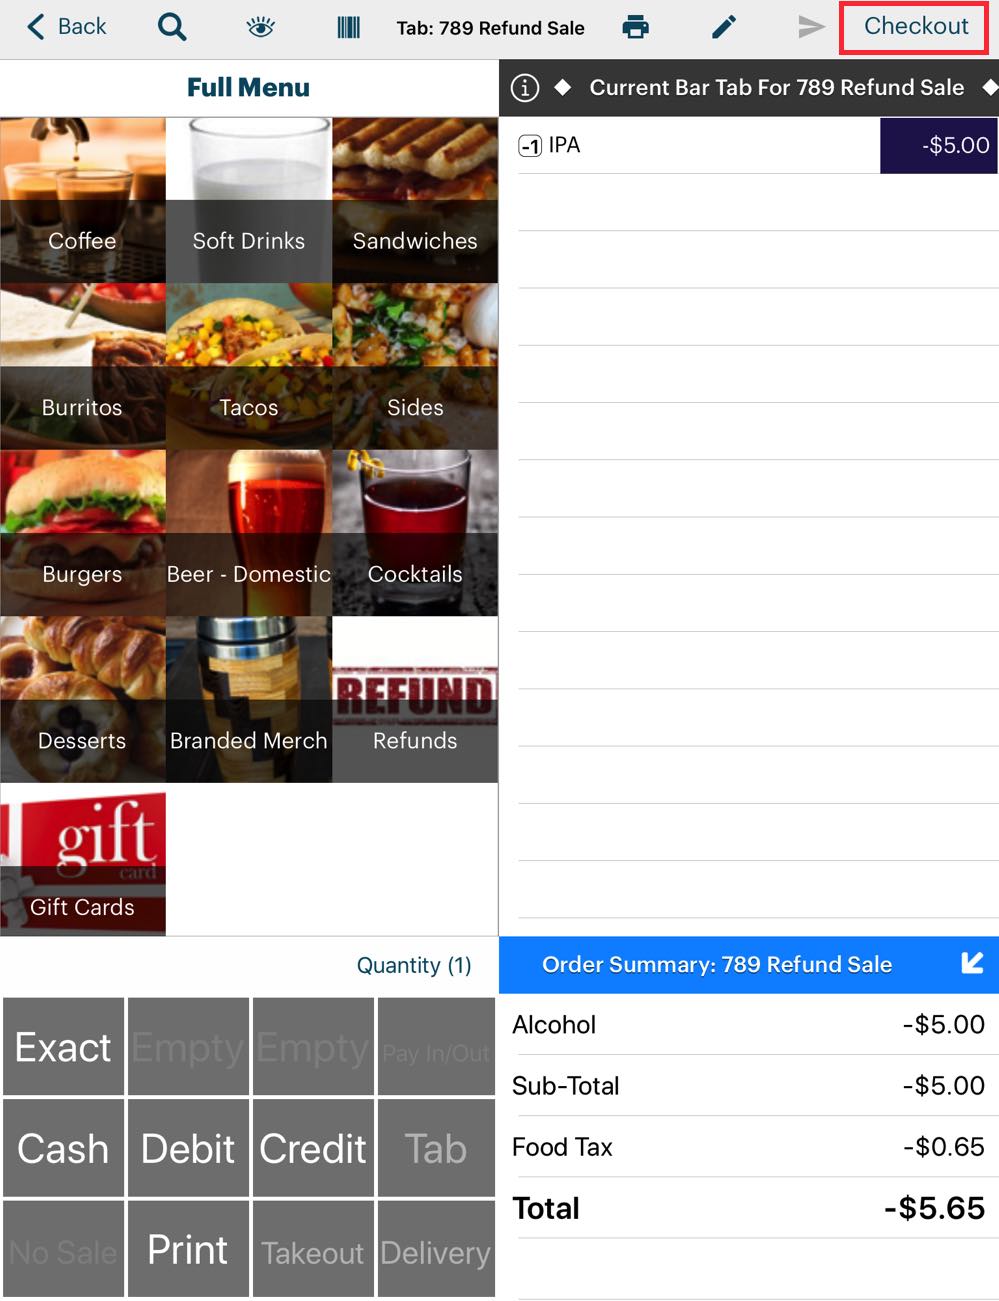
5. Tap Checkout. Ignore any warnings about unsent items.
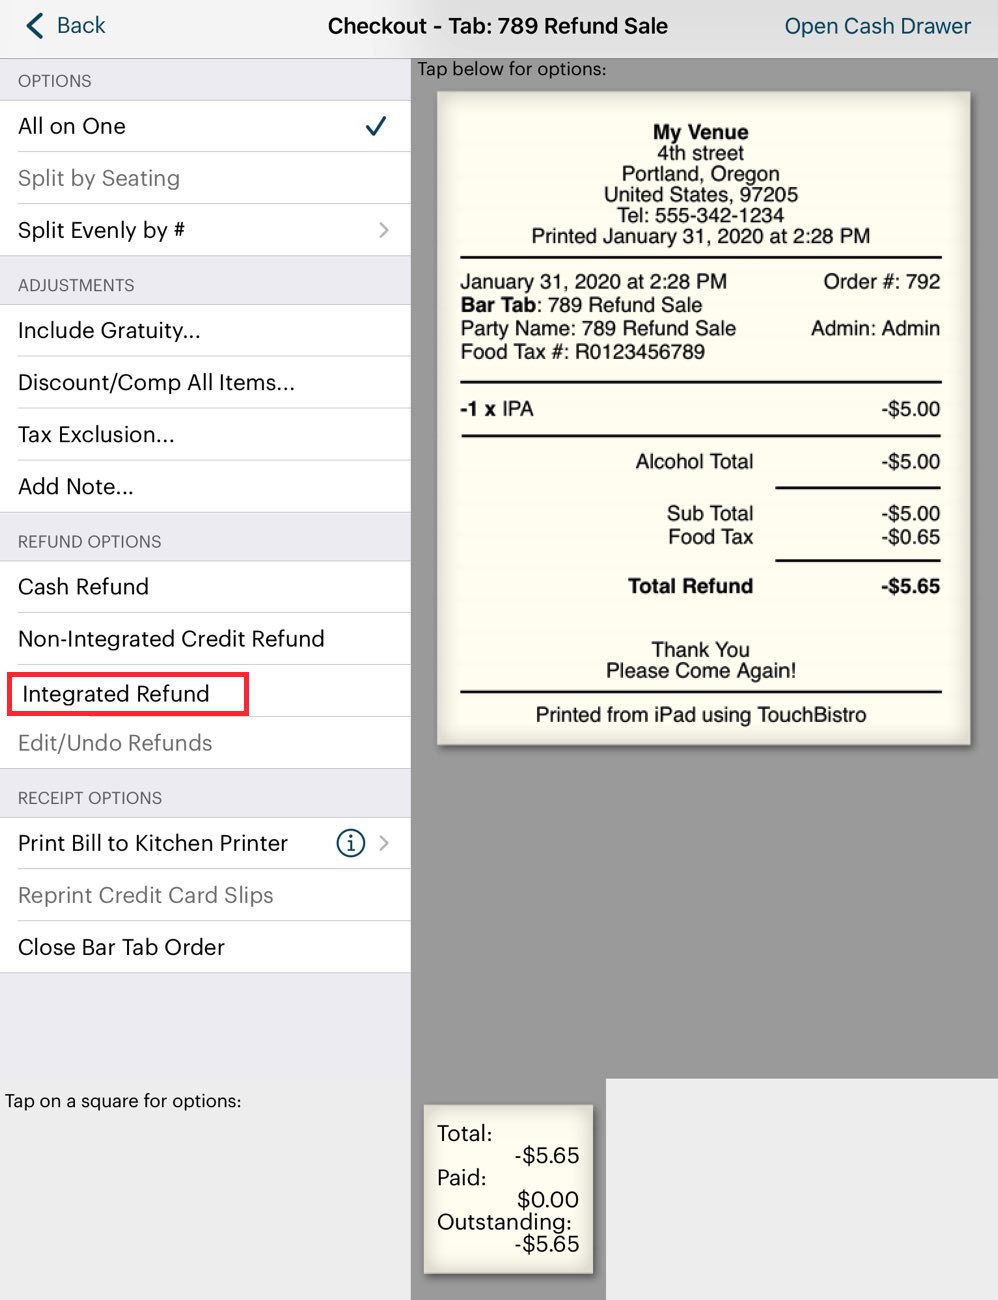
6. Tap the Integrated Refund option.
7. Follow the normal steps for performing a full refund.
Section 3. Performing a Refund for a Bill from a Previous Day
If you need to refund a bill from a previous day, it will no longer be found under the Closed Bills tab. Use the Bill / Guest Check History option.
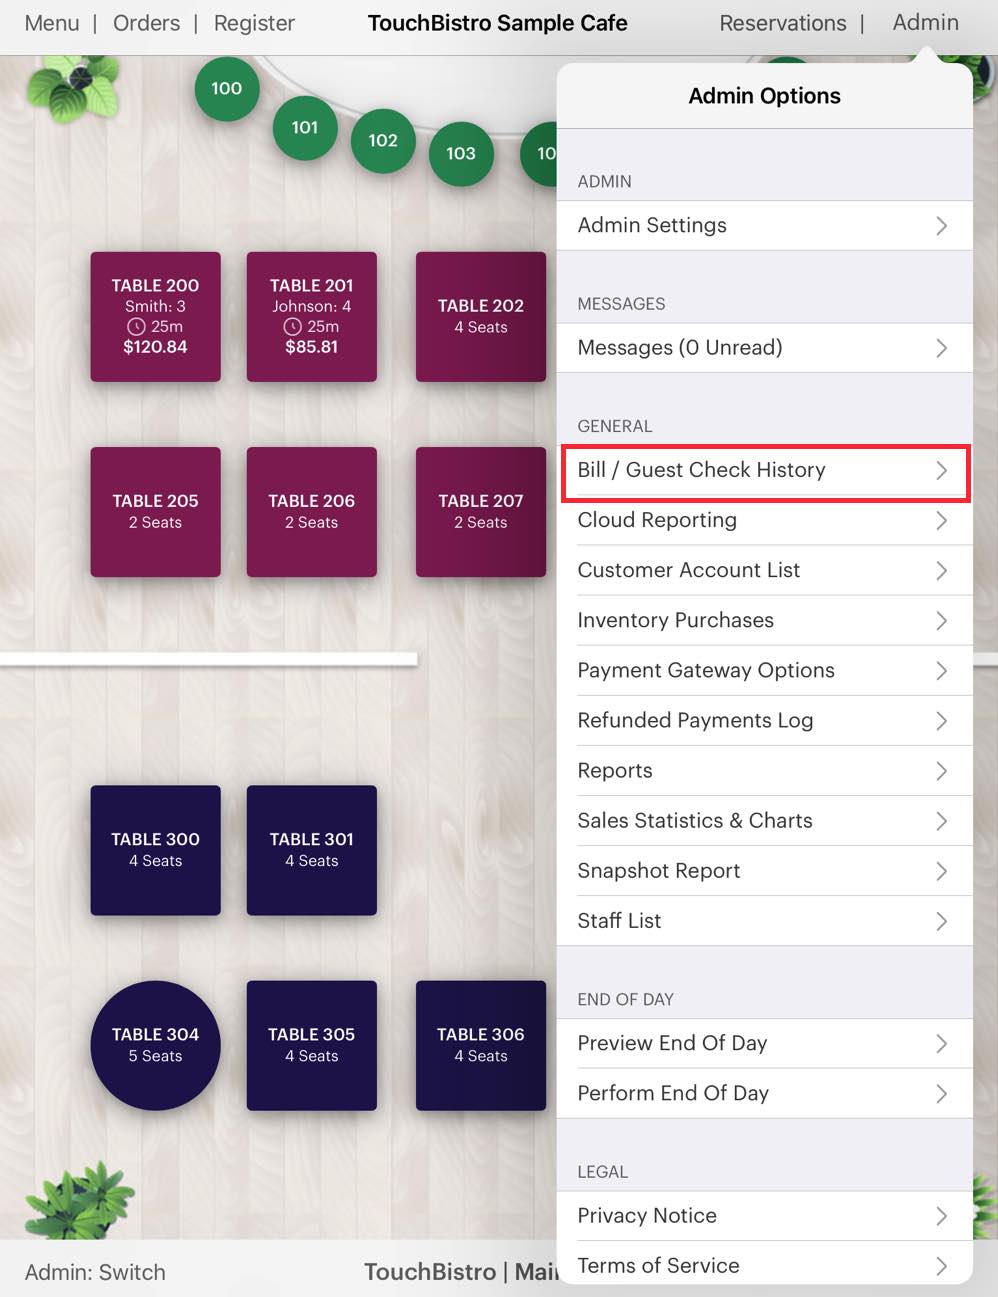
1. Tap Admin | Bill / Guest Check History.
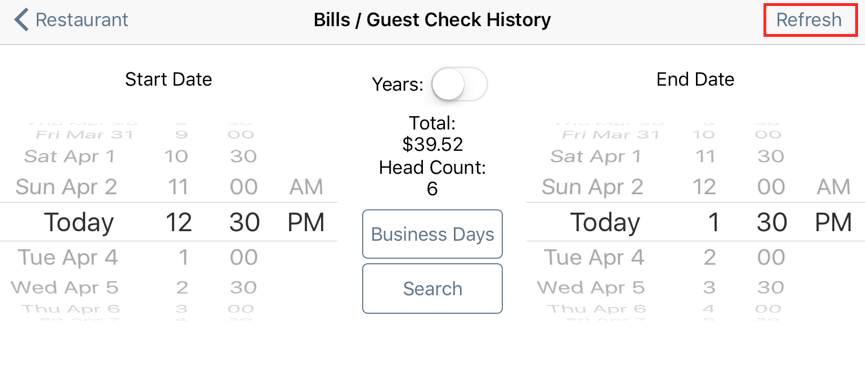
2. Use the date/time wheels to set a search range based on the date/time the bill was paid. Tap Refresh.
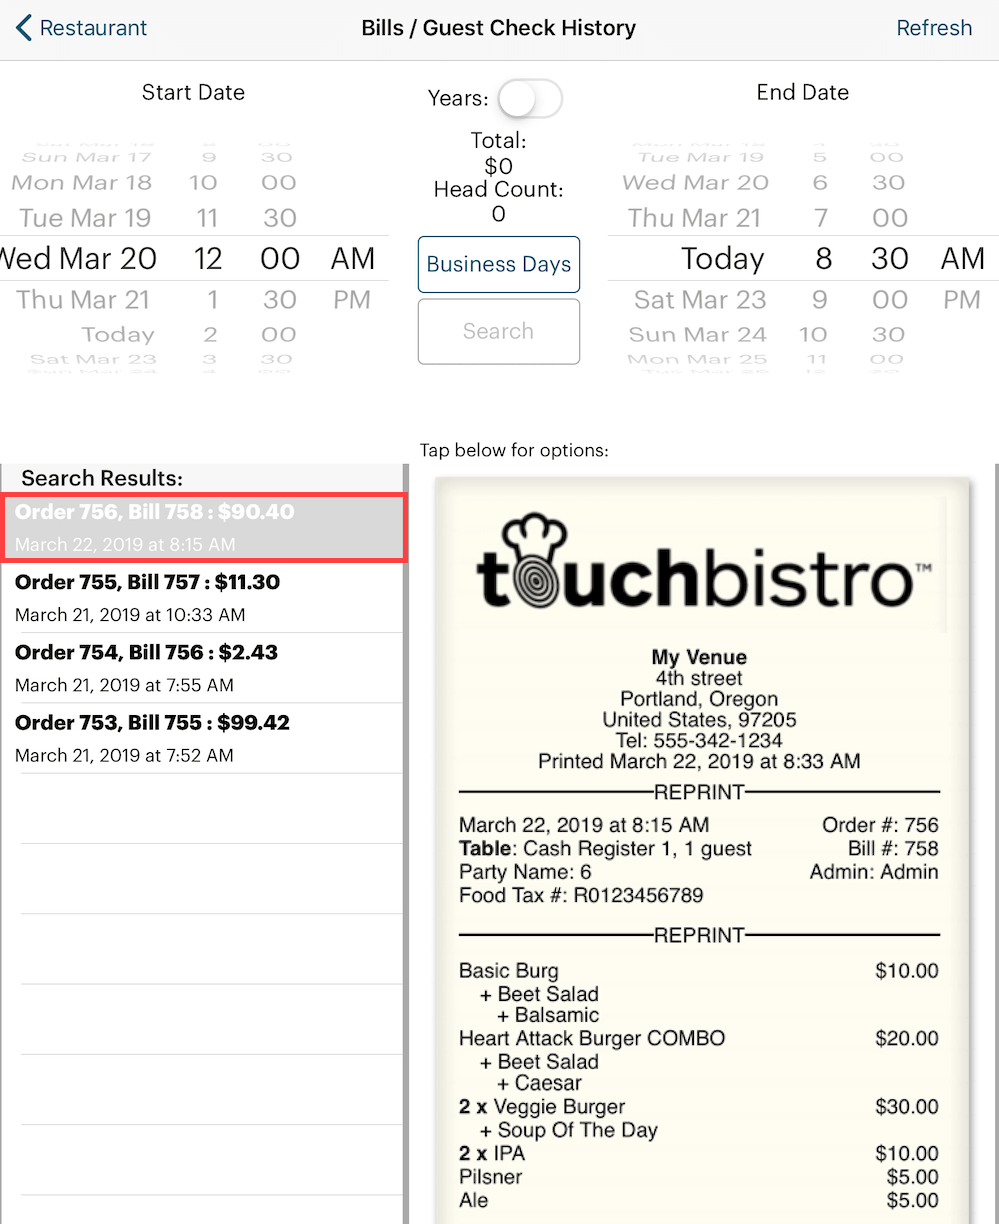
3. Locate the bill in the search results and tap it.
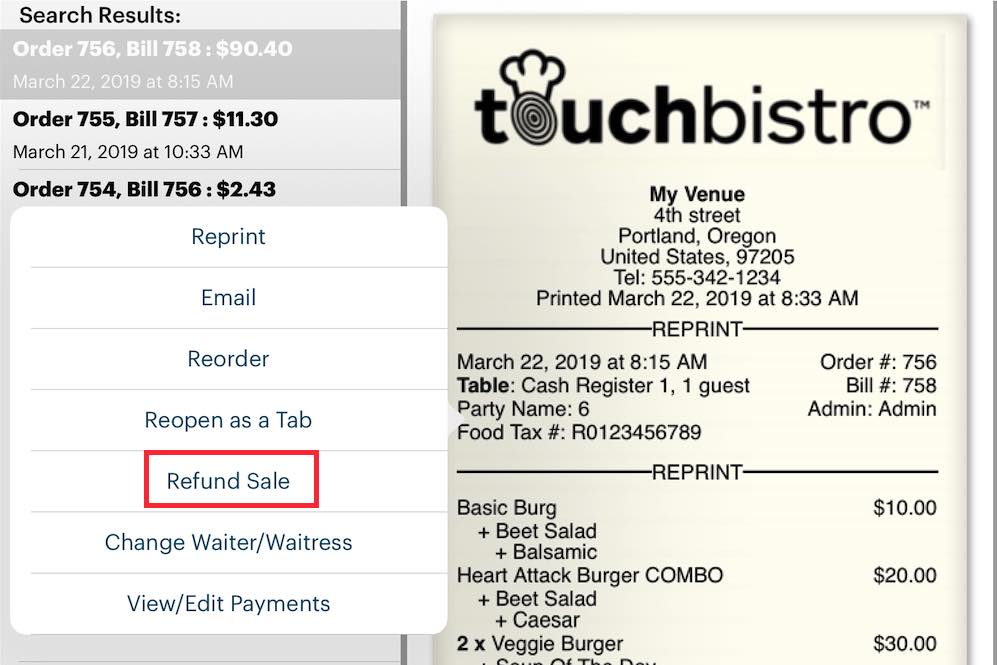
4. Tap Refund Sale.
5. Tap Full Refund.
6. Tap the Integrated Refund option.
7. Enter the Authorization code from the bill you are refunding. The authorization code is printed on the credit card receipt and the guest check.
8. Close the sales refund invoice.
Section 4. Processing a Void
TSYS uses a batch system. Money is not deposited into your merchant account until the batch is submitted. This has the advantage of allowing you to void transactions before they get submitted. It can be helpful if you have correct an error (for example, the customer used the wrong credit card). The advantage of using a void is no transaction is registered on the customer’s credit card report. Voids can only be performed as long as you have not submitted your batch. After a submission, you need to refund a purchase to correct any error.

In the example image above, imagine we’ve done one transaction so far for the day. If we examined our batch (Admin | Payment Gateway Options), we would see that transaction (plus any tip left) in the batch. Until you tap Batch Close, you still have the opportunity to void that transaction. To void:
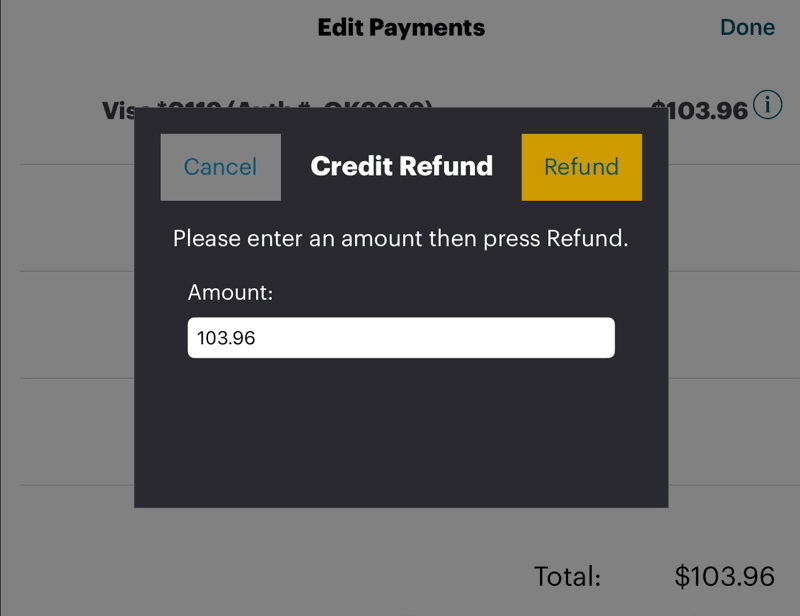
1. Tap Orders.
2. Tap the Closed Bills tab, tap the closed order you wish to void, tap More, and then tap View/Edit Payments.

3. Tap the Information ![]() icon associated with the payment and then tap Void Payment.
icon associated with the payment and then tap Void Payment.
4. You will be given a warning. After acknowledging the warning, you will see your payment is now gone. Tap Save. At this point the payment has been deleted from the batch. There is no way to get it back.
5. You are returned to the Close Bills tab. Although you voided the payment, the void does not delete the closed bill. It just removes the integrated payment. If you were to close your day at this point, you would have $90.40 in sales but no matching payment. You need to balance this voided bill with a non-integrated refund.
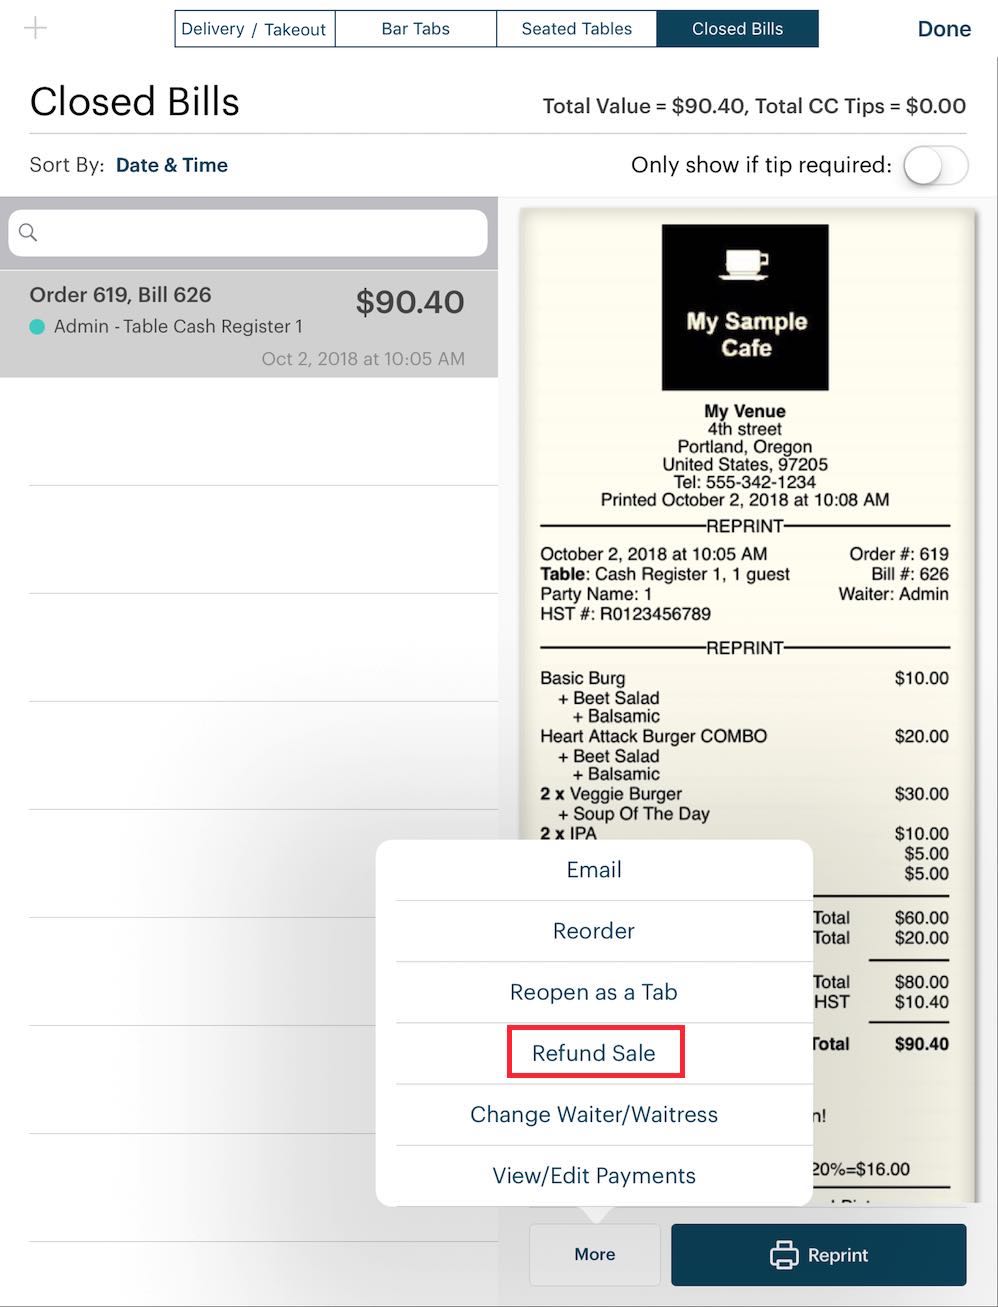
6. Tap the voided bill, tap More, then tap Refund Sale.
7. After tapping Refund Sale, TouchBistro creates the refund sale invoice under Bar Tabs. So tap that.
8. The refund sale invoice is automatically named after the bill number of the refunded bill. Tap it and tap Edit Order to open it (or right swipe on the order).
9. When you open the refund sale invoice, you will notice all items in the refunded bill are negative quantities. If the items have programmed mandatory modifiers, ignore the warning. If the refunded items are inventoried, TouchBistro returns the inventory count. As well TouchBistro correctly calculates the refunded tax. Tap Checkout to close out this refund invoice.
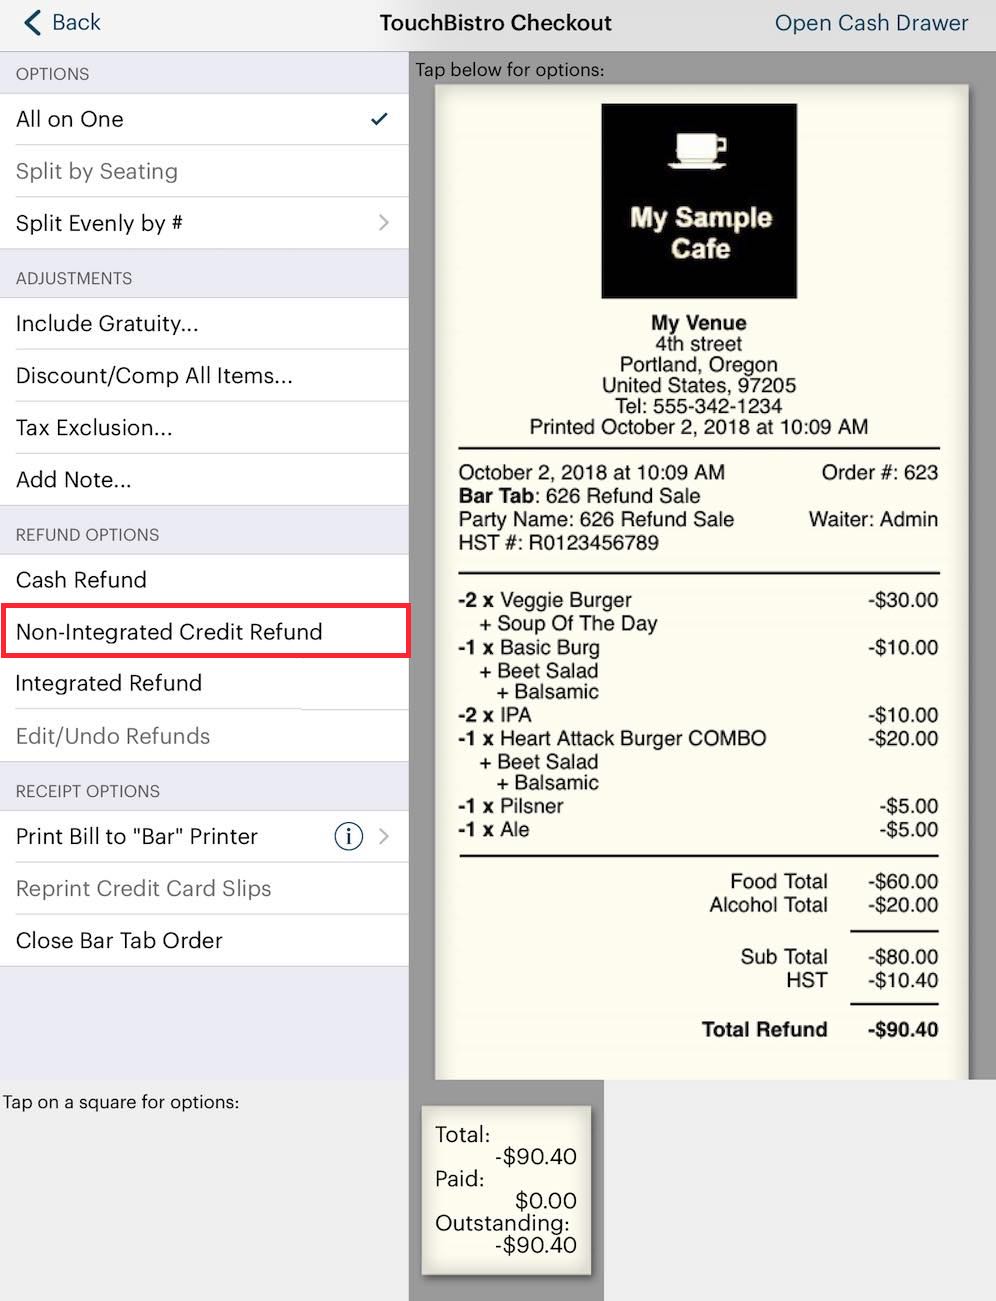
10. Do not tap Integrated Refund option at this point. Close this refund invoice using the Non-Integrated Credit Refund option.
11. Select the card type you voided. For example, if you voided a Visa transaction, tap Visa.
12. Tap Full Refund.
13. Close the sales refund invoice.
14. If you were to return to your Closed Bills tab, you’d see your original closed bill and the negative refund that balances out the void.
15. Similar to a refund, if this was the only transaction you did for the day, your sales would be properly balanced out to zero.

16. As well if you examined your batch, you would find it empty (or less the bill plus tip amount if there were additional, non-voided charges).
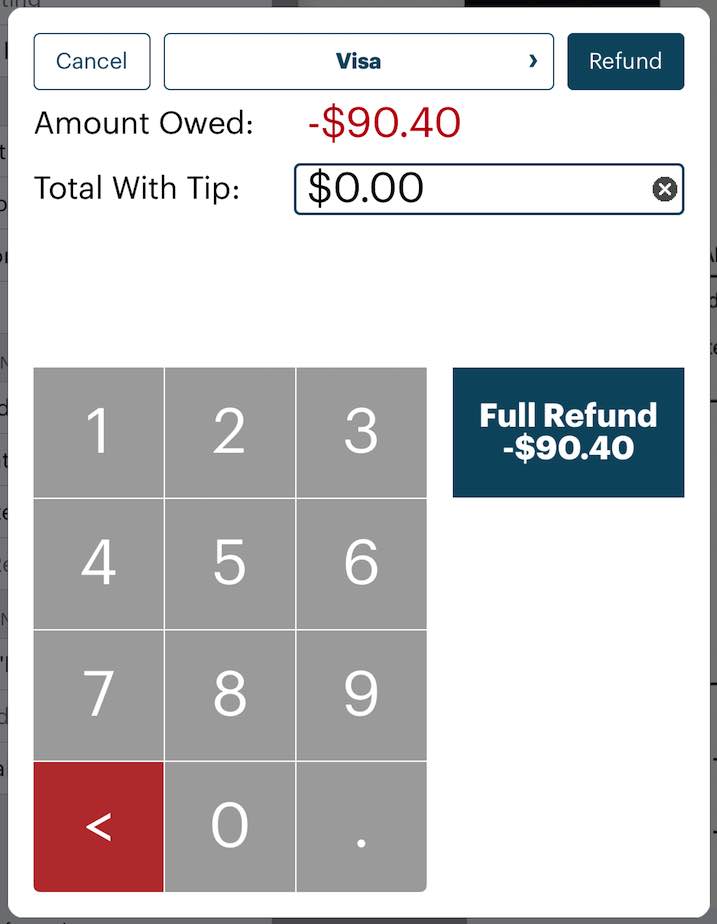
Section 5. Doing a Manual Refund
1. From the floor plan layout screen, tap Orders.
2. Tap the Closed Bills tab, tap the closed order you wish to manually refund, tap More, and then tap View/Edit Payments.

3. Tap the Information ![]() icon associated payment and tap either Perform full Credit Card Refund or Perform Partial Credit Card Refund. The return will appear on the credit card bill and can be performed if you’ve submitted a batch.
icon associated payment and tap either Perform full Credit Card Refund or Perform Partial Credit Card Refund. The return will appear on the credit card bill and can be performed if you’ve submitted a batch.
4. Enter the amount and tap Refund.
5. Confirm you want to process the return.

6. Unlike a void, a manual refund will submit both the original charge and the refund in the batch. A refund item may show up on the customer’s credit card statement if you use this option.
Section 6. Reprint a Credit Card Slip
If you need to reprint a credit card slip, see this guide for complete details.
Chapter 6. Closing Your Batch
Follow these steps to close your batch via TouchBistro:
1. Login as an Admin or Manager.
2. Tap Admin or Options (if you’re logged in as a Manager profile).
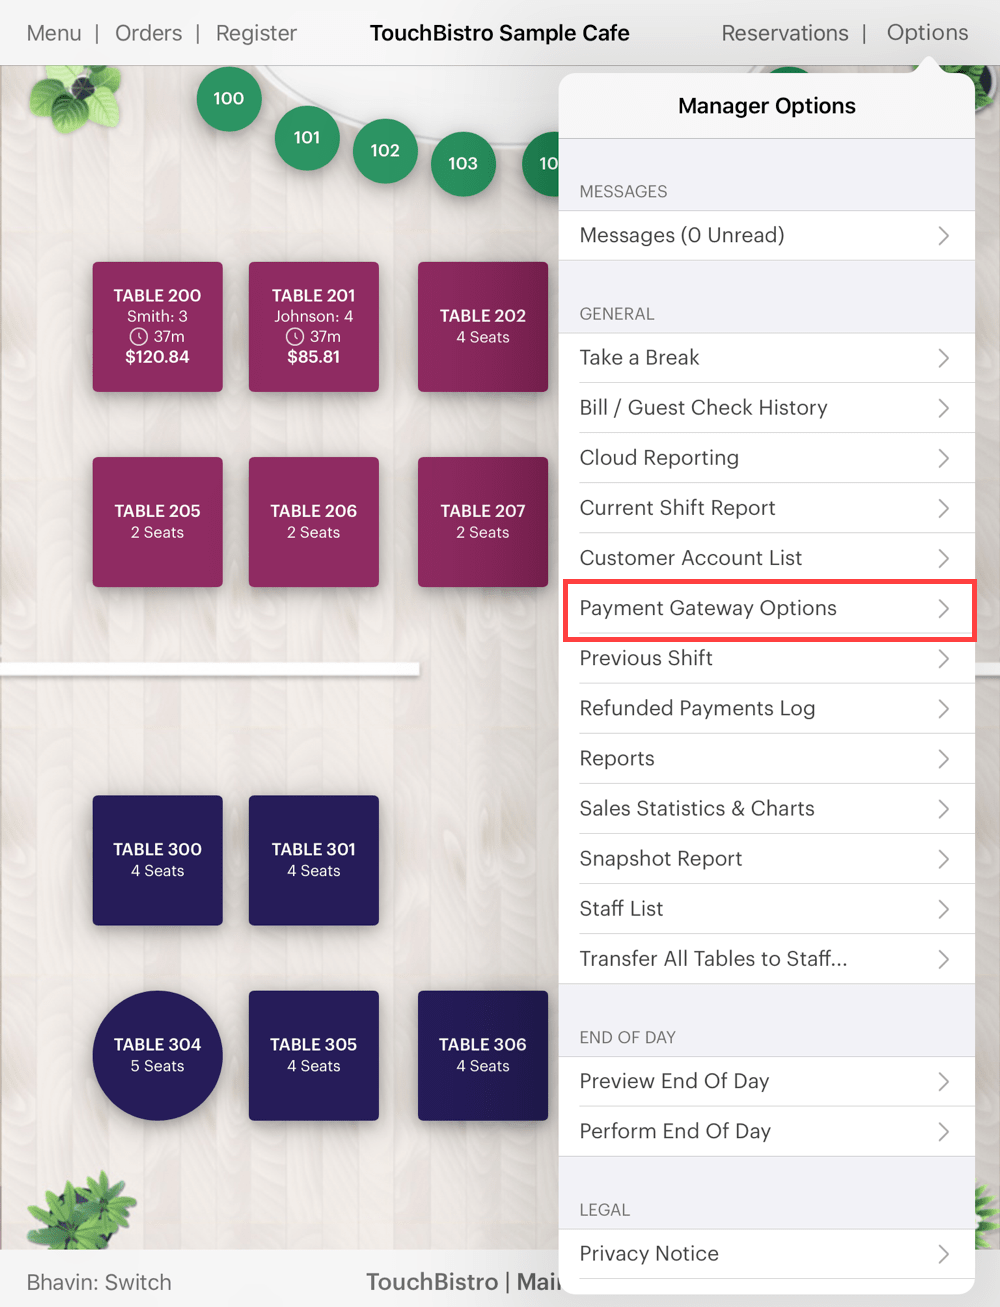
3. Tap Payment Gateway Options.
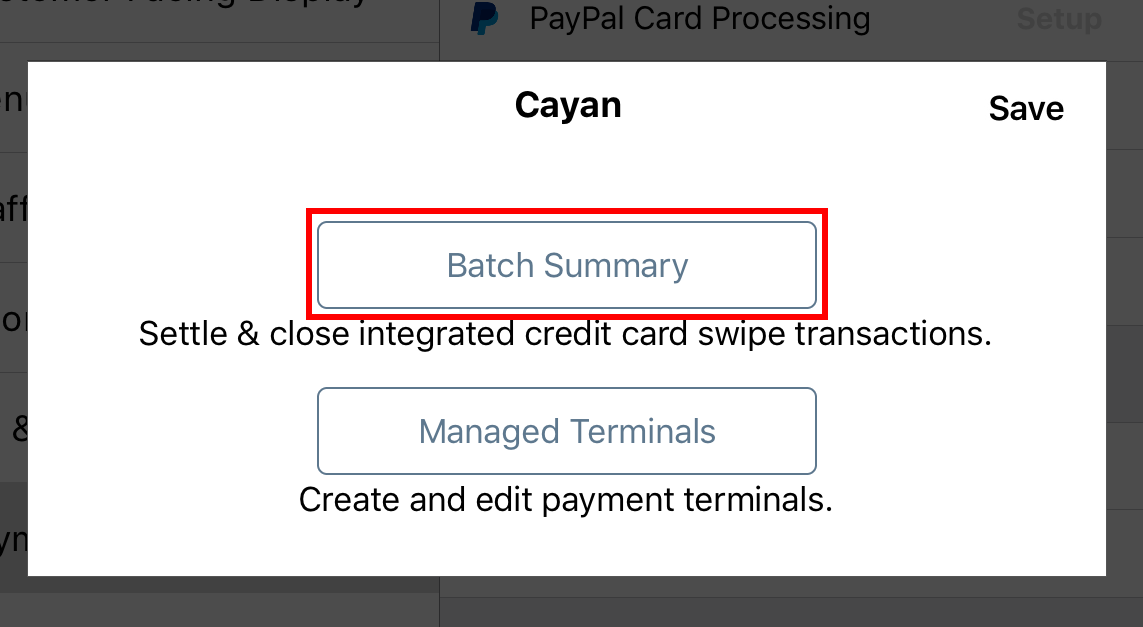
4. Tap Batch Summary.
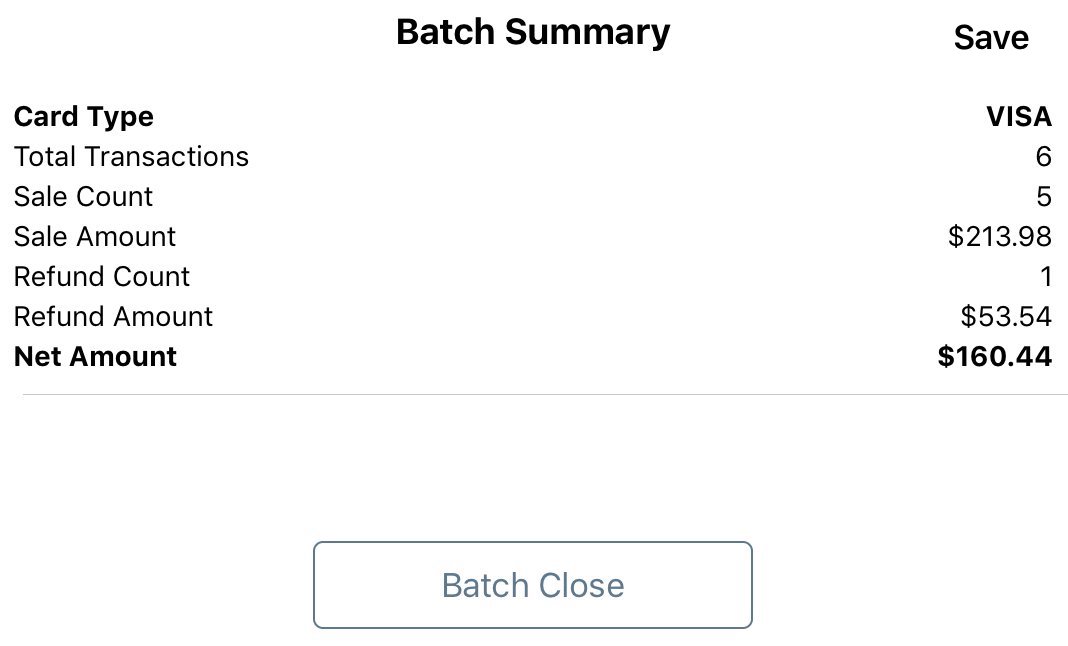
5. Review the batch summary and tap Batch Close.
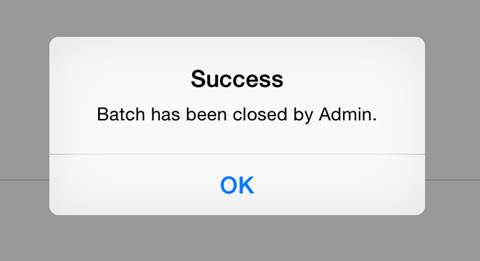
6. TouchBistro will prompt you your batch has been submitted successfully. Tap OK.
Chapter 7. Using TSYS Gift Cards
1. Tap Checkout in the top right to access the Checkout screen.
2. Tap Genius Mini.
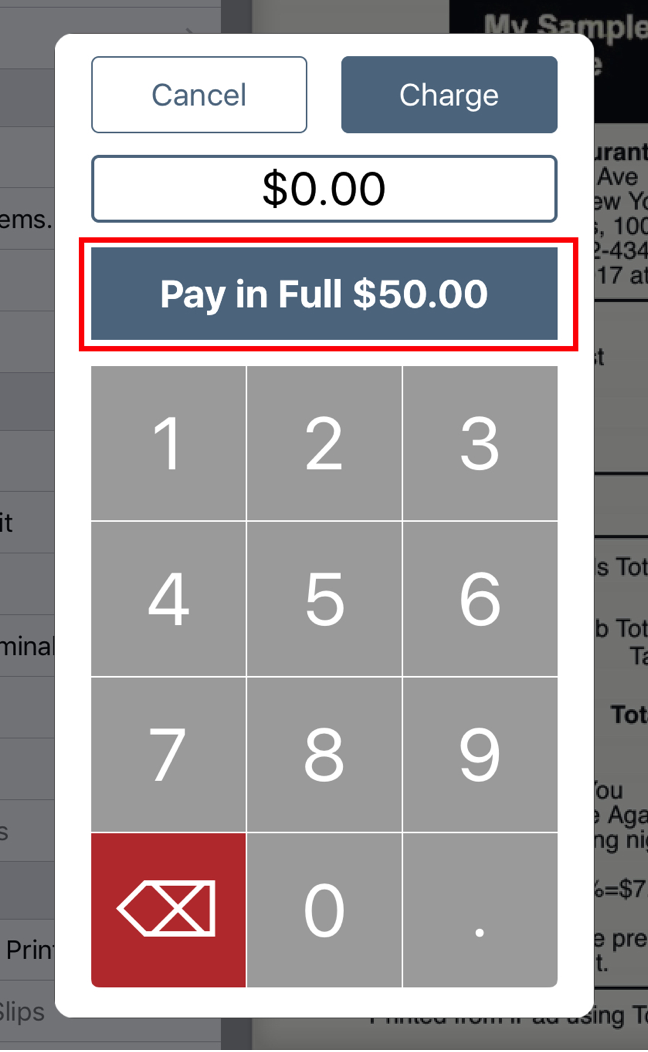
3. You will see the Charge Amount screen. Tap Pay in Full. Do not include tip. Alternatively, if the customer only wishes to pay a portion of the full amount, enter the amount the customer wishes to charge to the card and tap Charge.
3. Tap Gift.
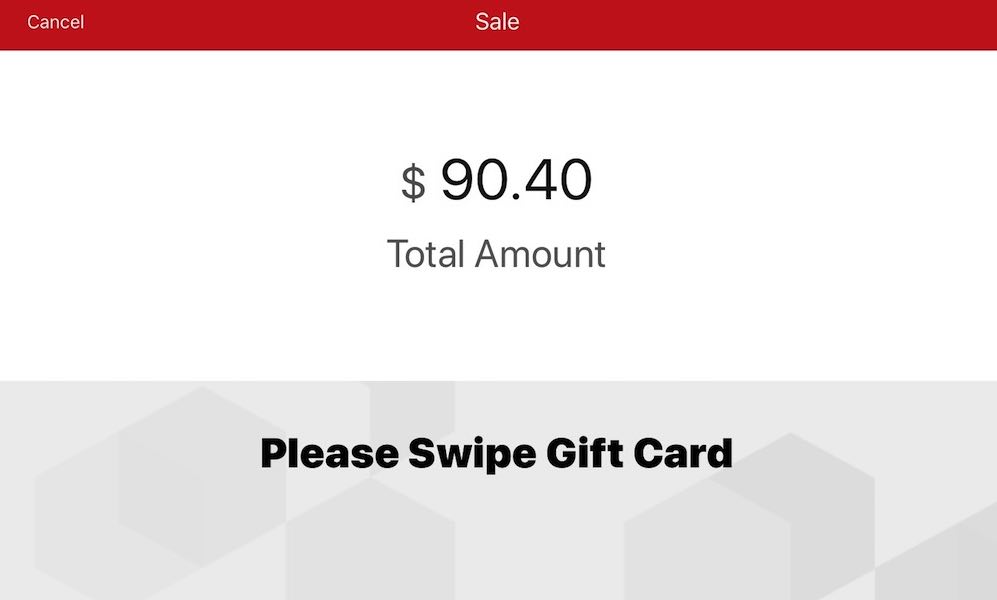
4. Swipe the gift card as prompted.
5. Print a receipt and close the order.
If you print a receipt, the receipt will display the remaining balance.
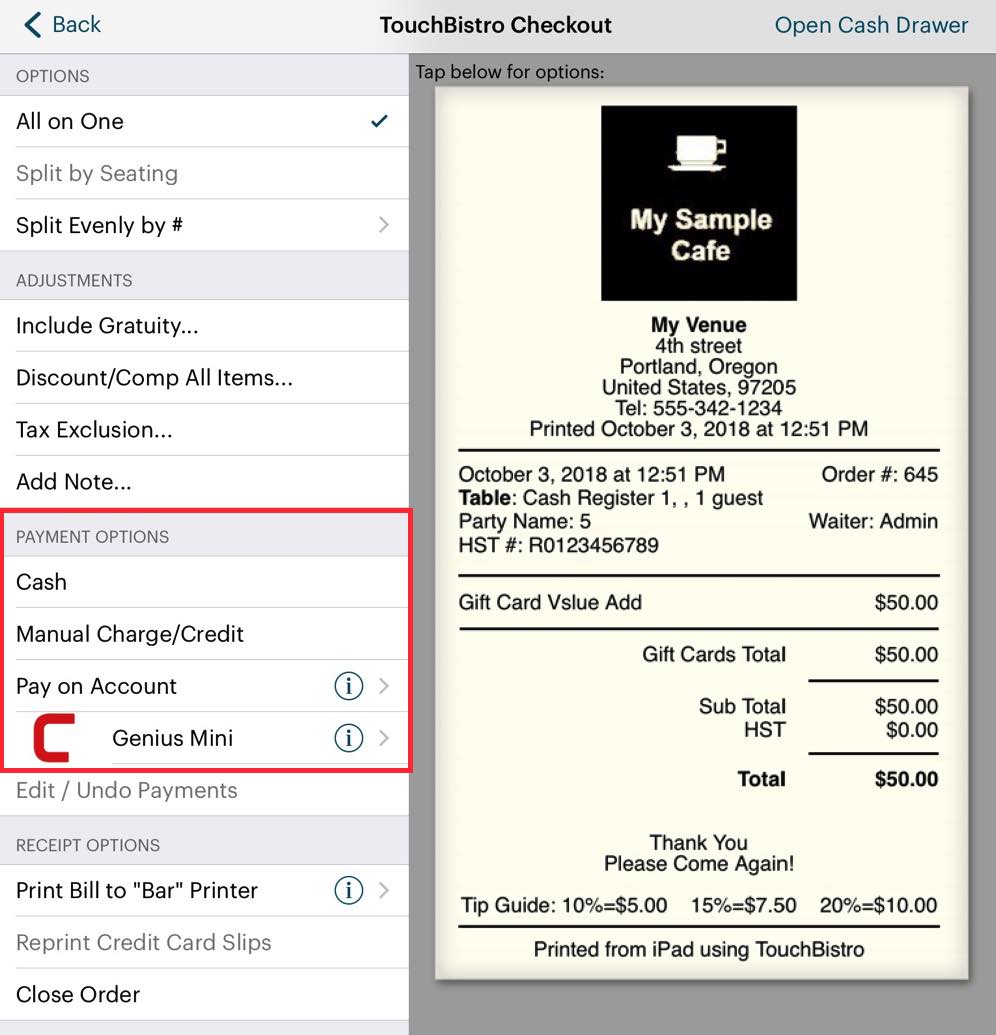
Section 1. Managing the Gift Card
You can activate/add funds to a gift card, process a refund onto the gift card (return a dollar amount to the card), or view a gift card’s balance from the checkout. You can do this from the Checkout screen.
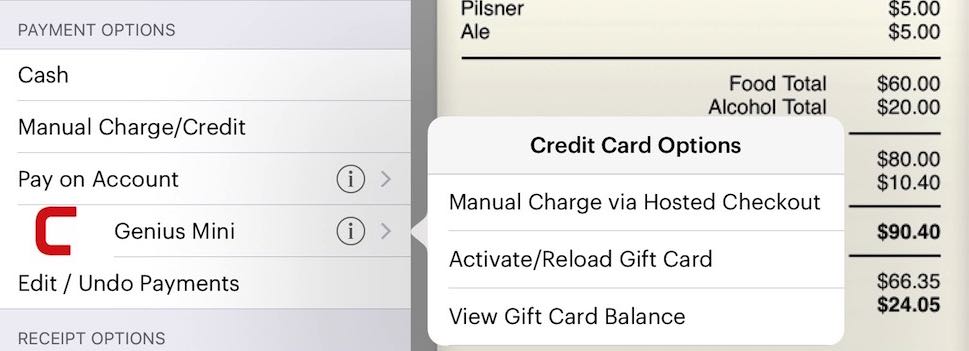
To access the Gift Cards options menu, tap the Information ![]() icon associated with the Genius Mini option.
icon associated with the Genius Mini option.
1) Activate or Reload a Gift Card
Activating or reloading a gift card requires Manager approval. If the user is not a manager, they will see a Manager Confirmation screen first before they are shown the Activation screen.
To activate or reload a card:
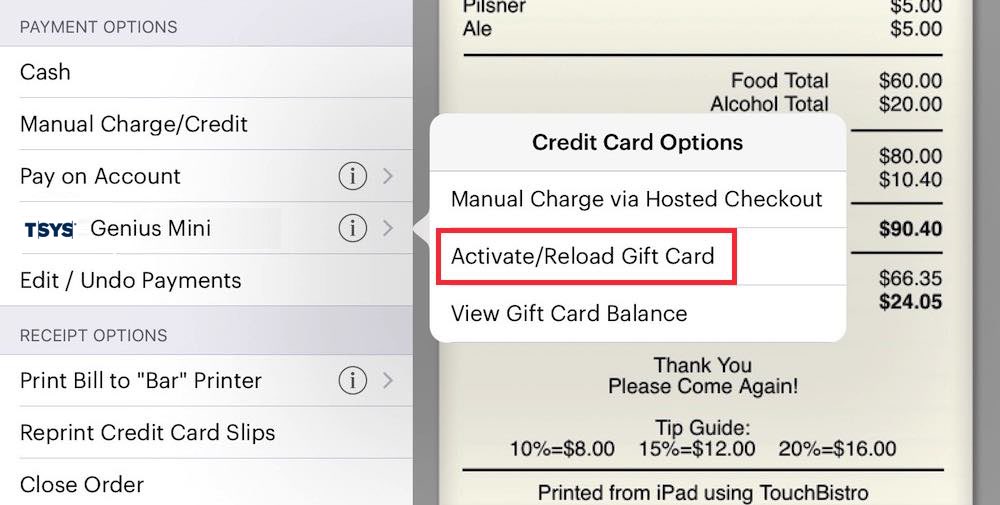
1. Tap Activate/Reload Gift Card.
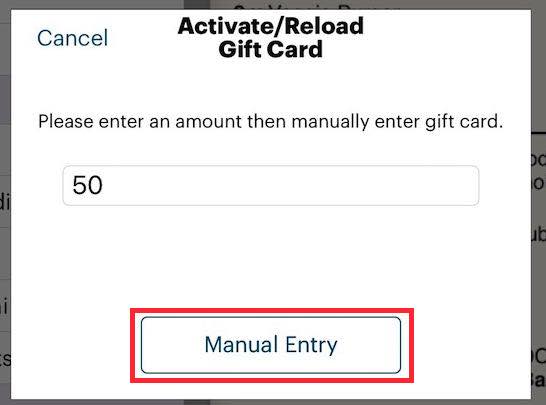
2. Enter in the amount the customer wants to put on the card and tap Manual Entry.

3. Enter the gift card’s number (usually found on the back) and tap Next. Follow the on-screen prompts.
2) View remaining balance on a gift card
If you wish to check a gift card’s balance before processing it follow these steps:

1. Tap View Gift Card Balance.
2. Enter the gift card’s number (usually found on the back) and tap Next.
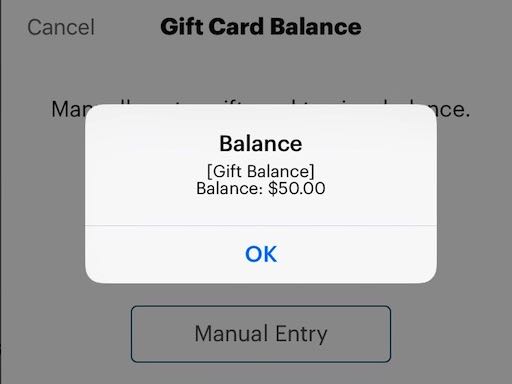
3. The card’s balance is displayed. Tap OK.
Chapter 8. Selling Gift Cards
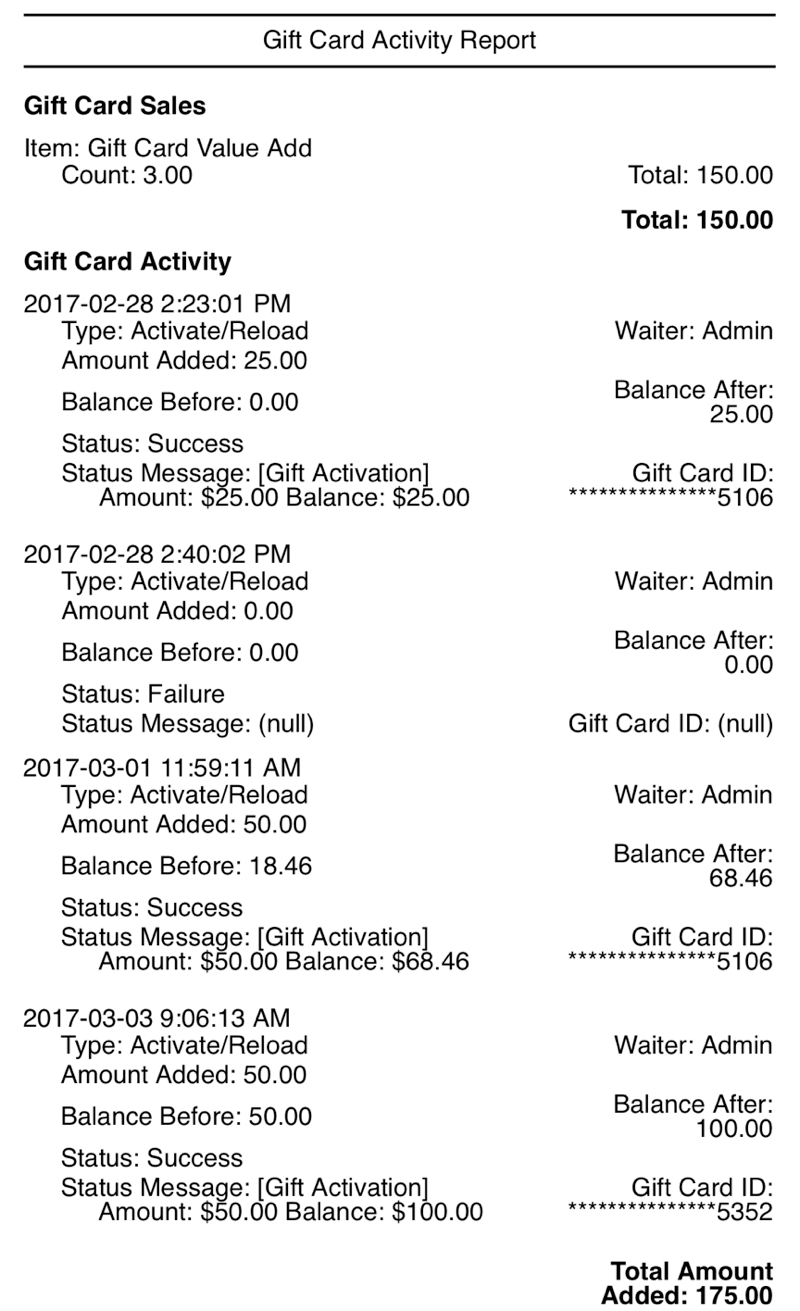
When you activate or load a gift card, TouchBistro logs the sale in the Gift Card Activity report’s Gift Card Activity section (pictured above). However, it’s important to log any value added to a gift card as a menu item sale to help balance out your cash drawer and credit card receipts as well as accurately log payment methods.
Although it might seem unnecessary to log a gift card value addition as a sale when the Gift Card Activity report already captures a sale, it only provides half the necessary information. Imagine, for example, a customer topped up a gift card for $50 and paid with a $50 bill. Your Gift Card Activity report would show a $50 value addition but your End of Day sales report would have no record of the $50 cash payment. Your cash drawer would be $50 over and you could only guess that that $50 represents the $50 gift card top up. As well, many customers will want to pay for the gift card value add with a credit card. To be able to process a sale, you need a gift card value menu item to execute the credit card sale.
To ensure complete and accurate accounting, follow the following steps:
Section 1. Setting Up Your Menu
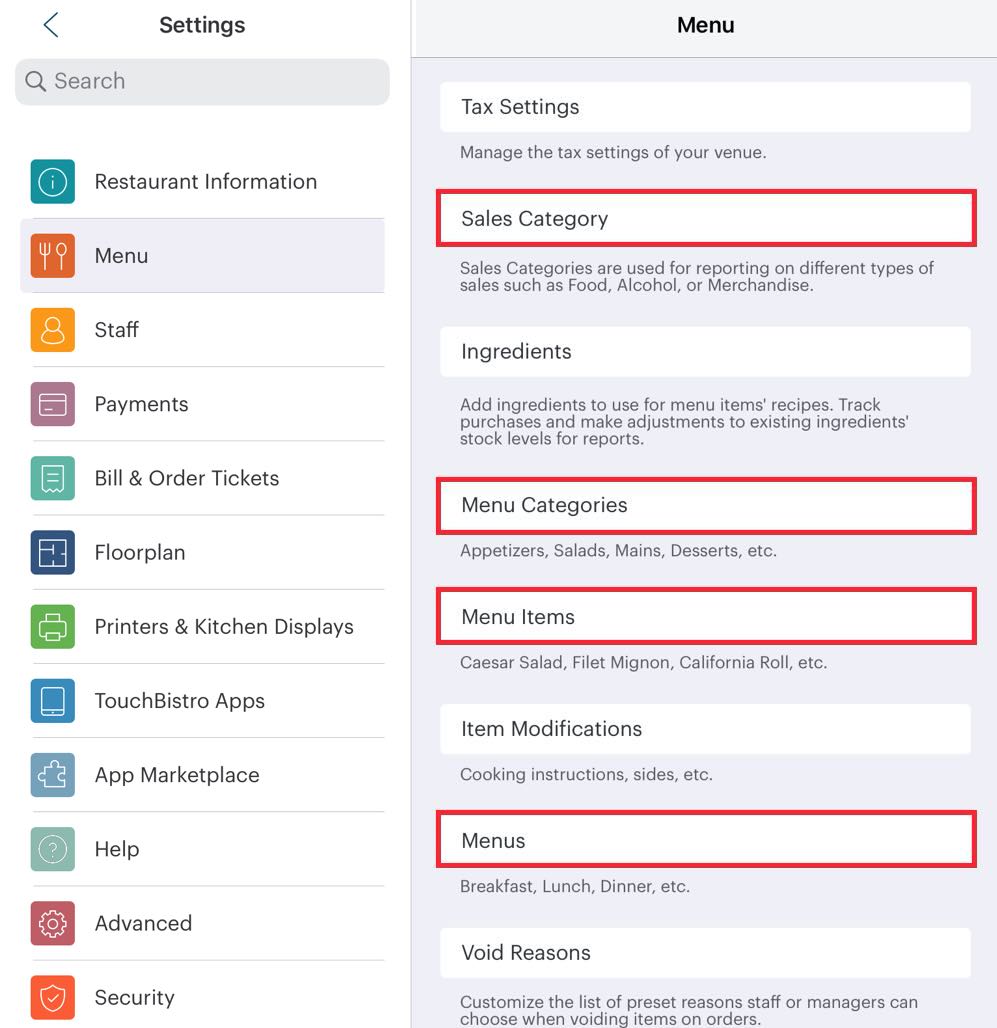
1. Access Menu.
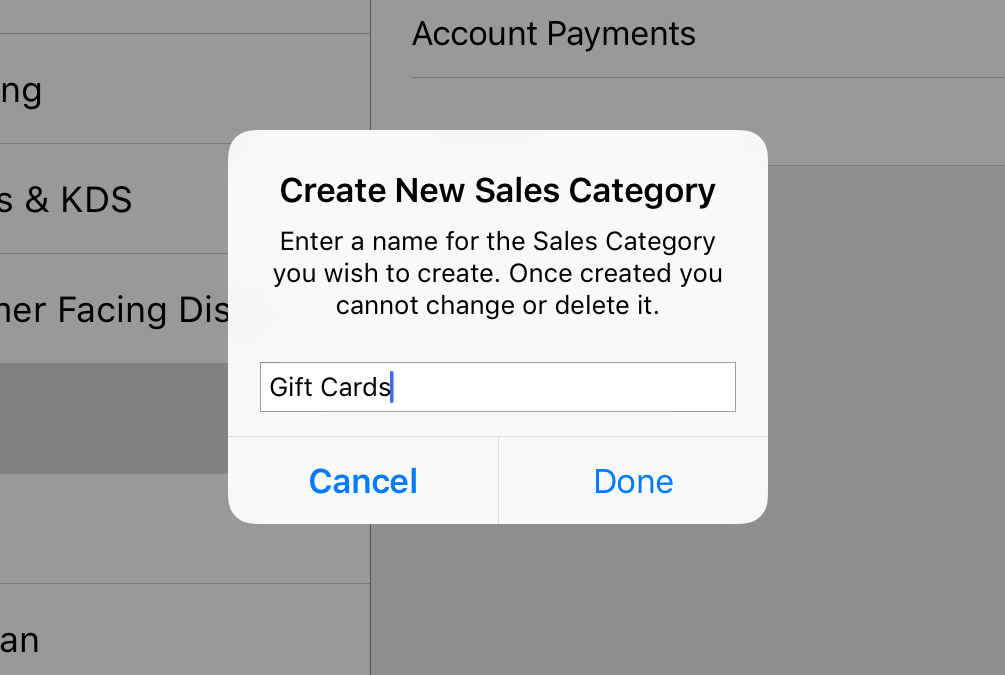
2. Tap Sales Category. Create a Sales Category called Gift Cards or Merchandise (if you want to sell other non food/drink items).
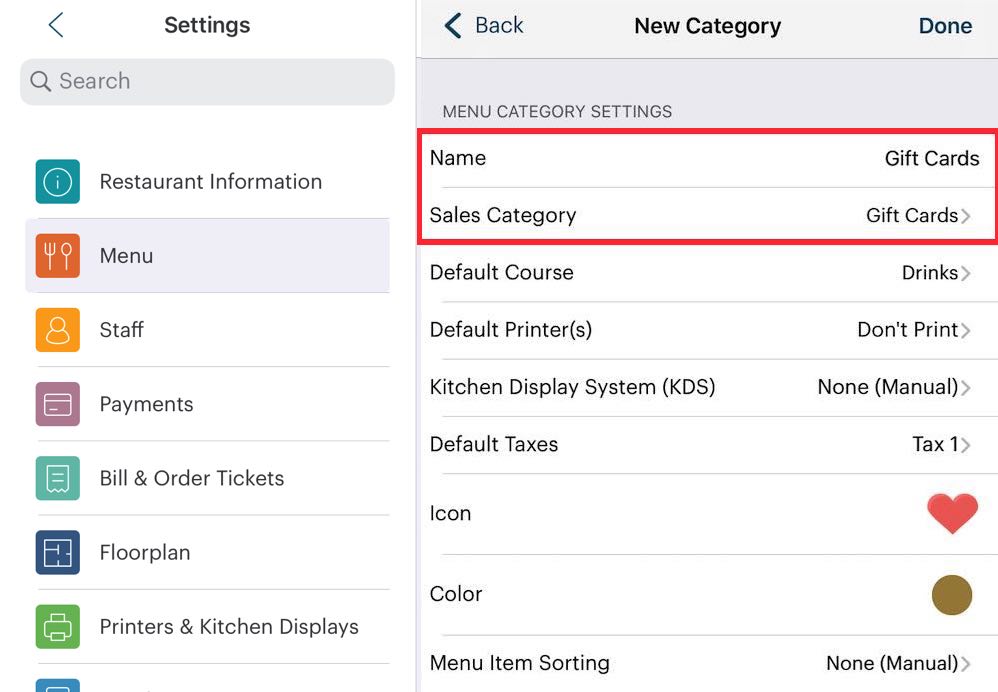
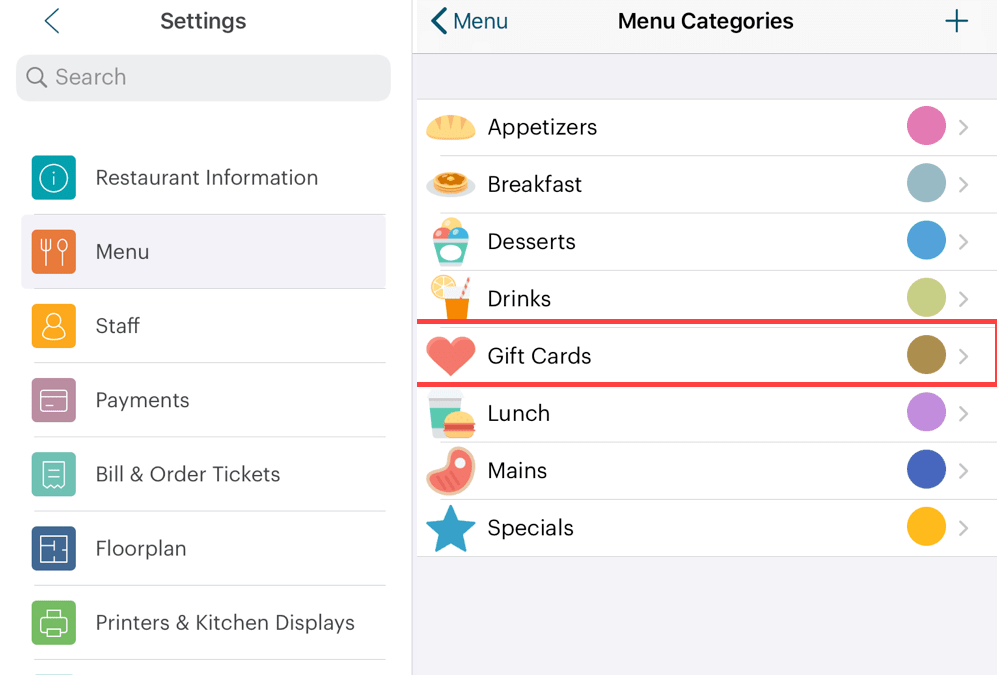
3. Create a Menu Category called Gift Cards. Set the Sales Category for Gift Cards or Merchandise (depending on what you created in step 2).
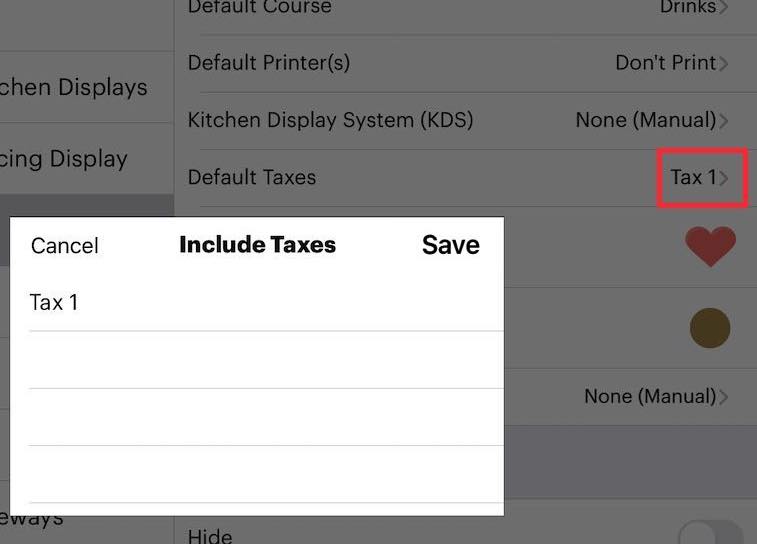
4. Ensure you disable Taxation by removing the checkmark from the included tax. Tap Save.
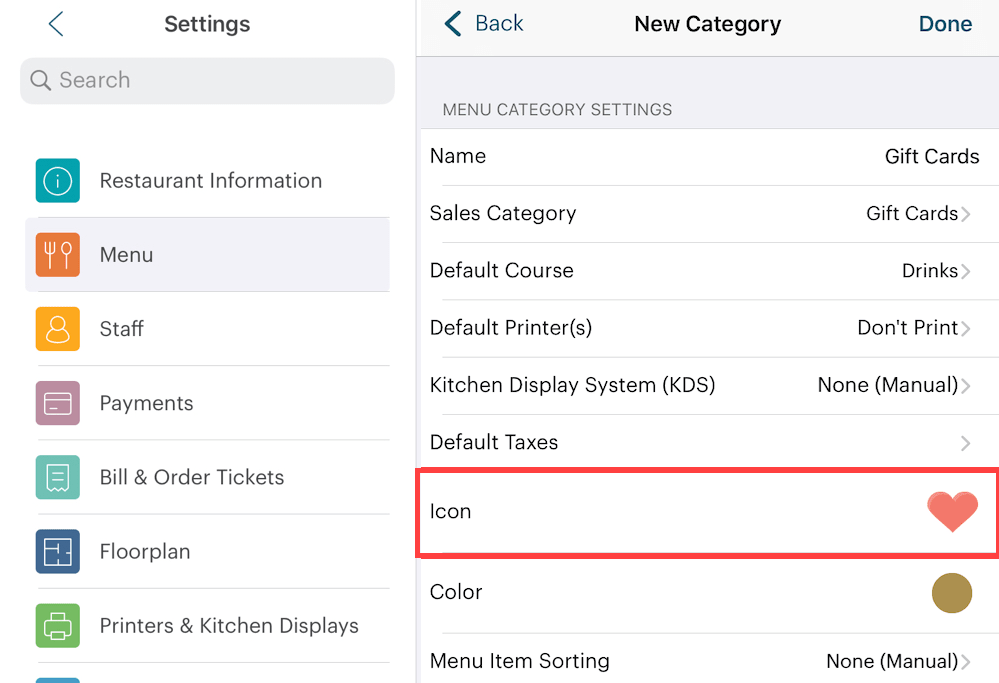
5. Tap Icon and set an appropriate icon.
6. Tap Done.
7. Access Menu Items. Tap Gift Cards.
8. Create a Gift Card Value Add menu item under the Gift Cards category.

9. Give the menu item name something like Gift Card Value Add. This will be used when a new card is purchased and value is added to it or when an existing card is topped up.
10. Set it for an Open Price.
11. Ensure Taxes is set to No Tax.
12. Enable Is a Gift Card.
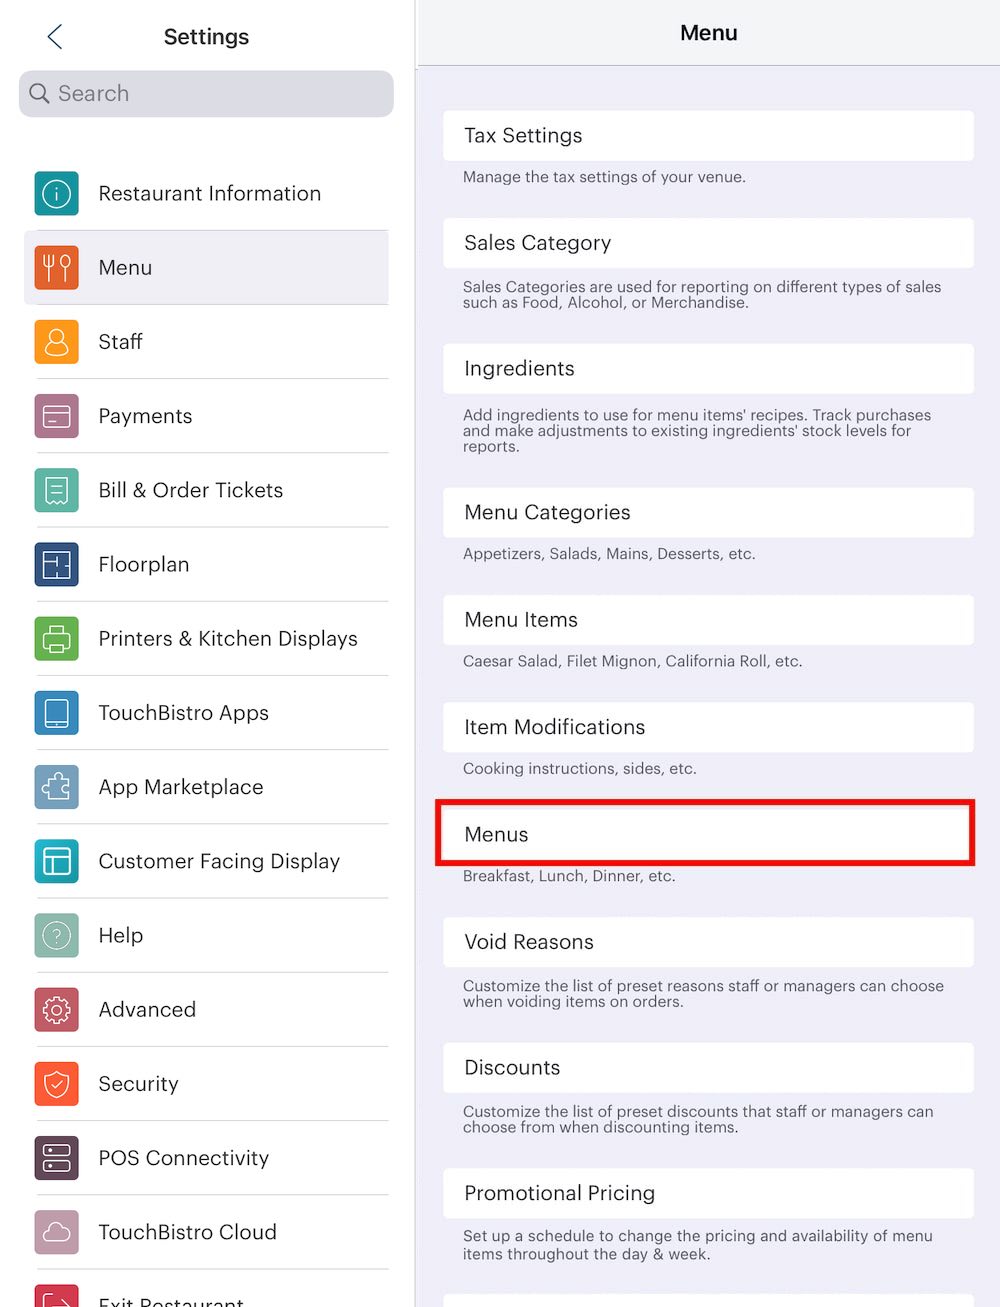
13. Return to the Menu setting screen and tap Menus.
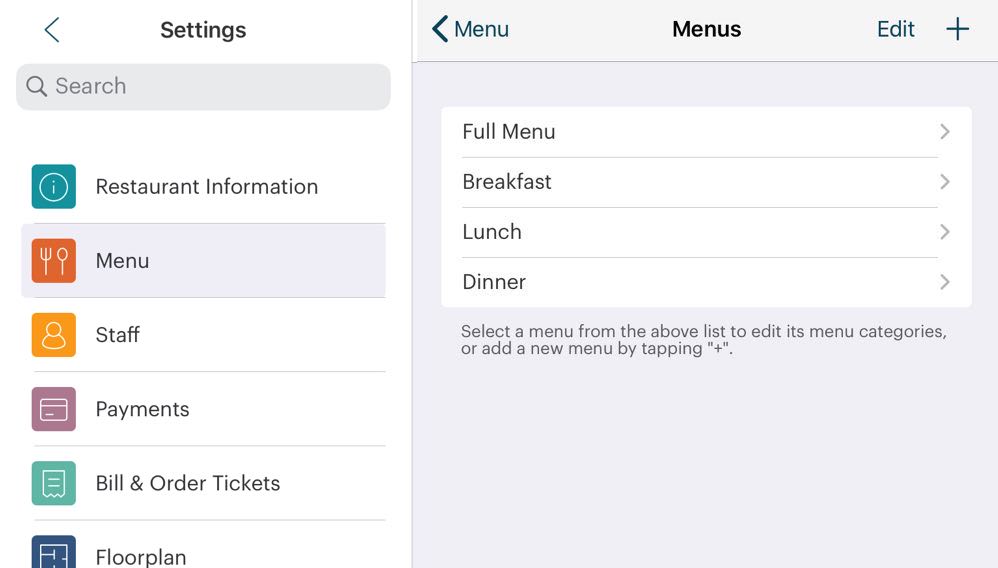
14. Tap a menu category (for example Full Menu).
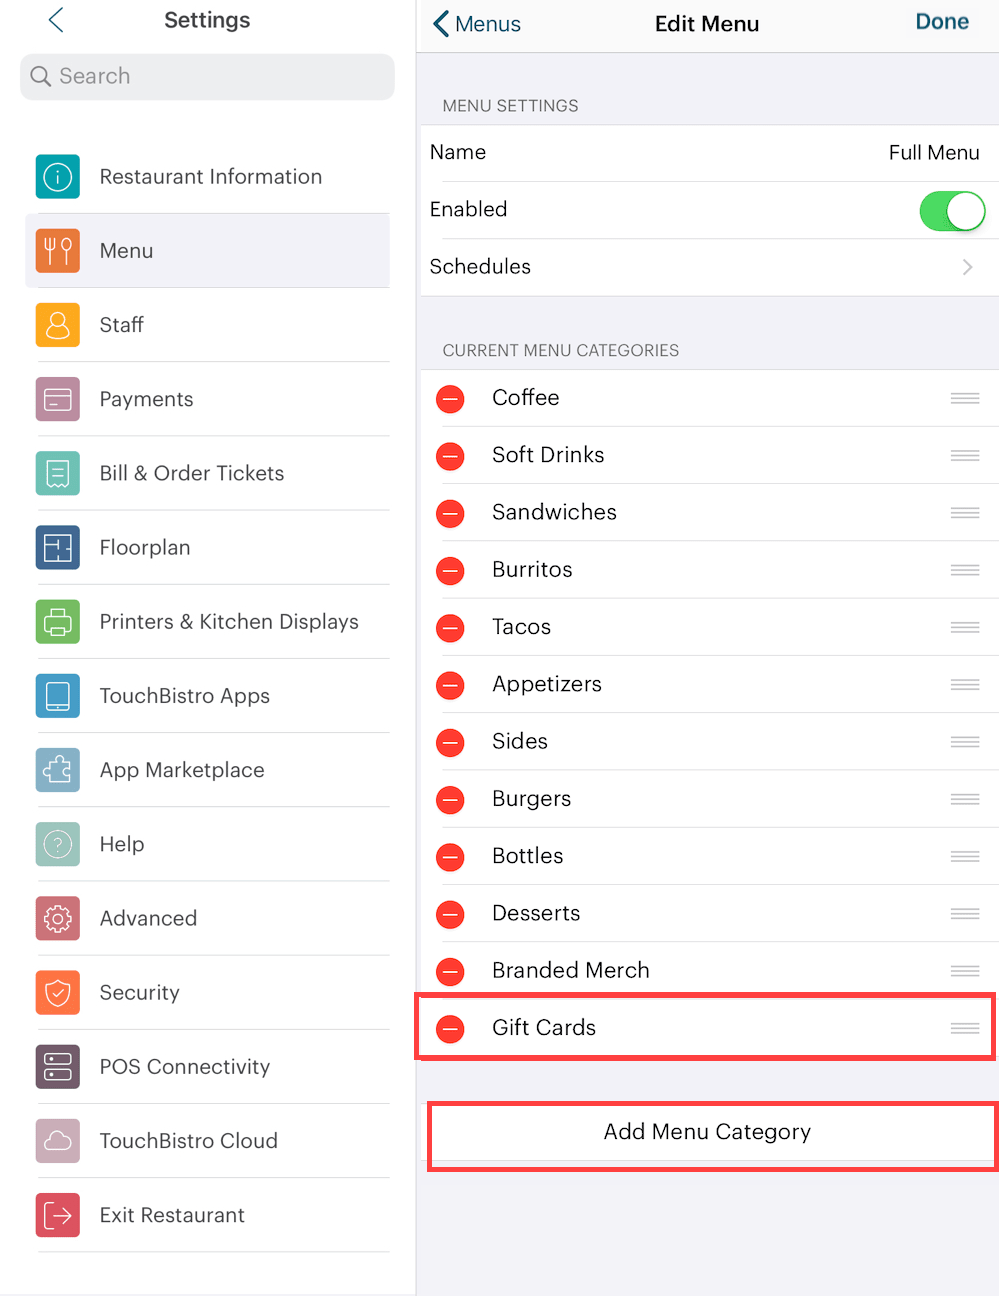
15. Tap Add Menu Category and add our Gift Cards menu category.
16. Tap Done and then add the Gift Cards menu category to additional Menus as necessary.
Section 2. Processing the Order
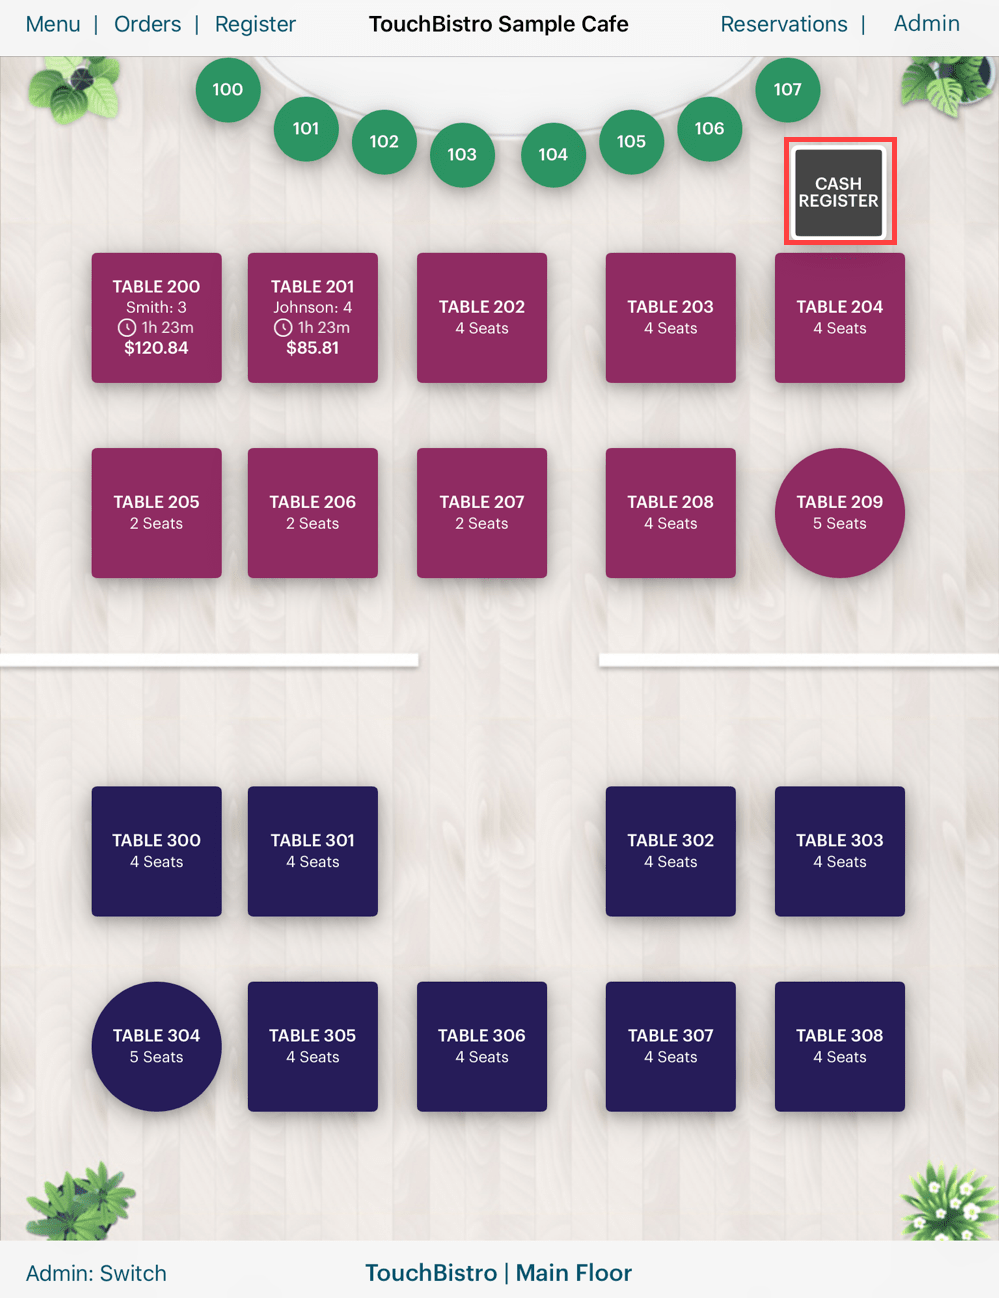
1. Open your cash register.

2. Tap your Gift Card menu category.
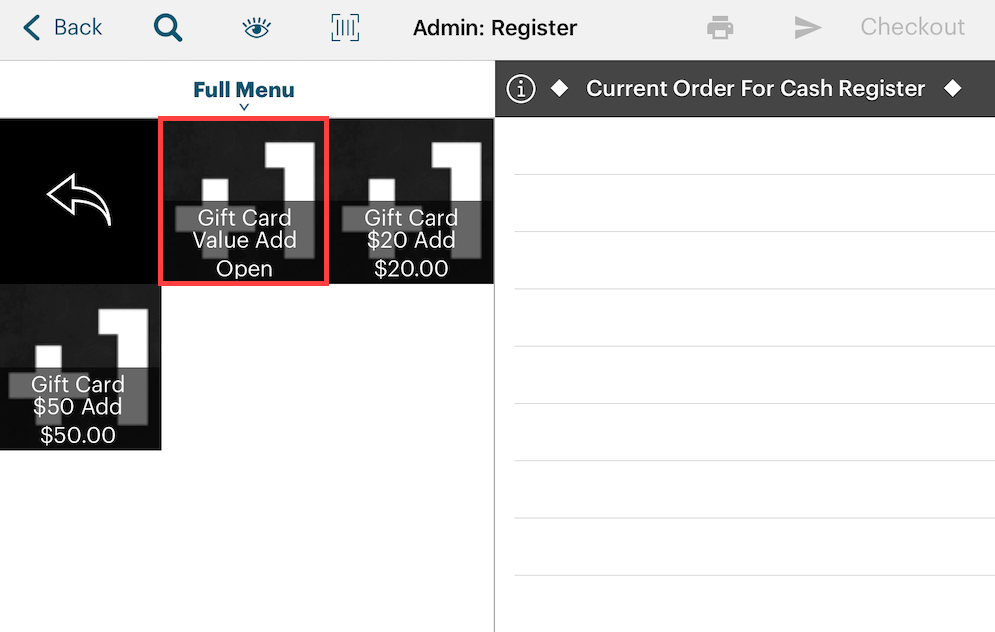
3. Tap your Gift Card Value Add menu item.
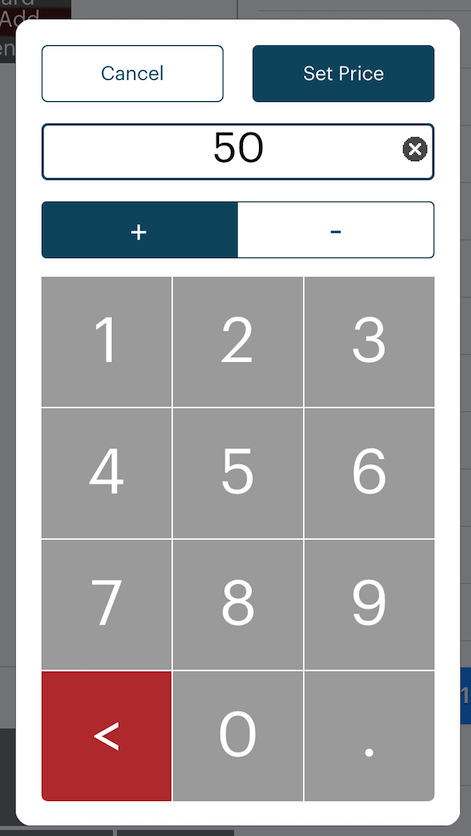
4. Enter the value you wish to add to the card and then tap Set Price.
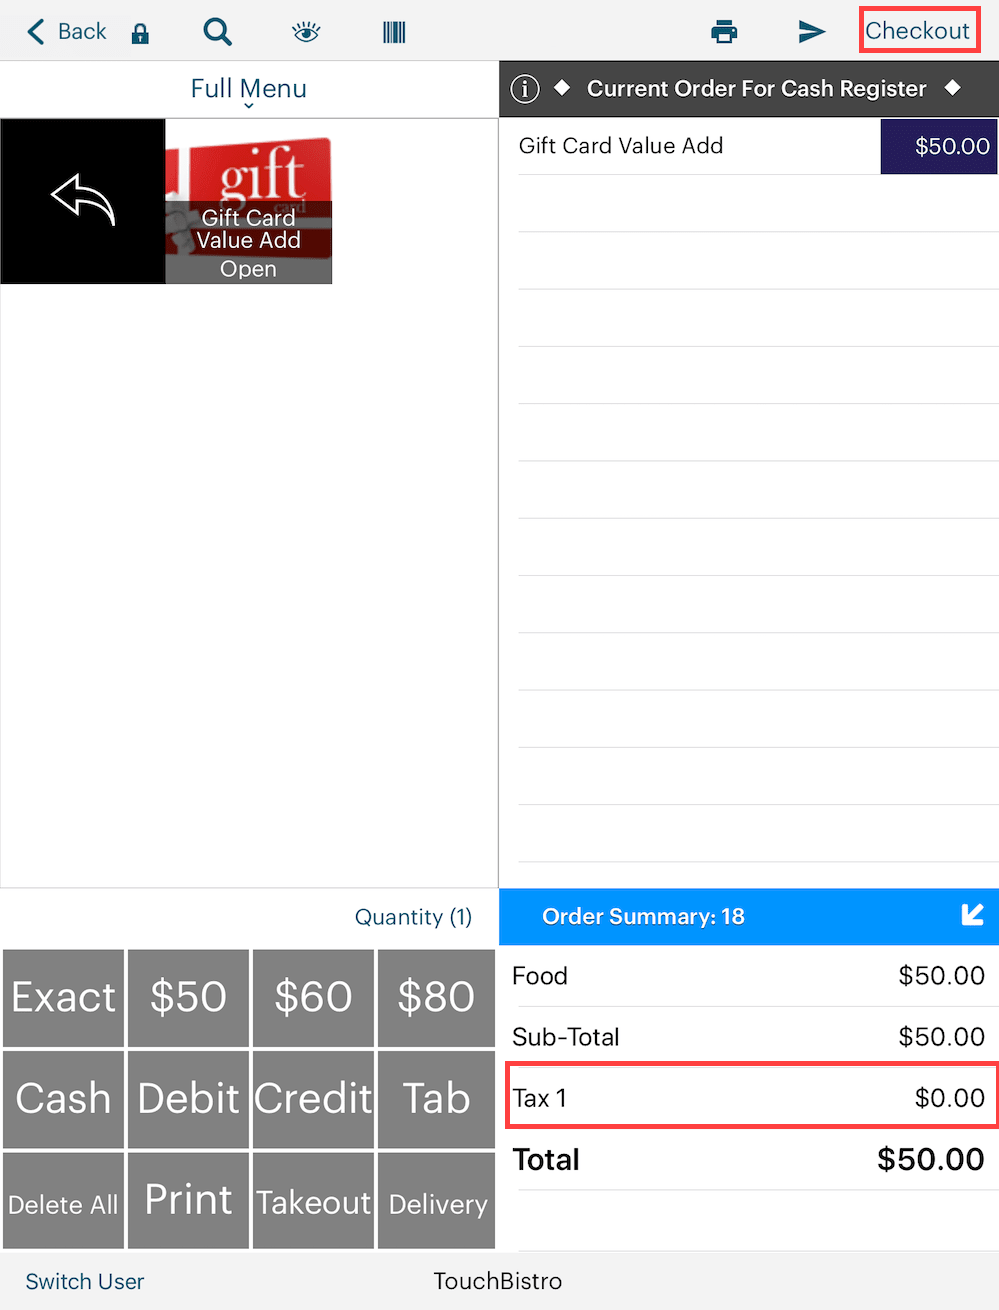
5. Double check you set this menu item up not to charge tax. In most jurisdictions, you do not charge tax on values added to a gift card, as the tax is paid when the gift card is used to pay for a good or service. Tap the Checkout.
6. Tap the Information ![]() icon associated with the Genius Mini payment option. Tap Activate/Reload Gift Card.
icon associated with the Genius Mini payment option. Tap Activate/Reload Gift Card.
7. Enter the amount you wish to add to the card and tap Manual Entry.
8. Enter the gift card’s number (usually found on the back) and tap Next.

9. Confirm the amount by tapping Yes.
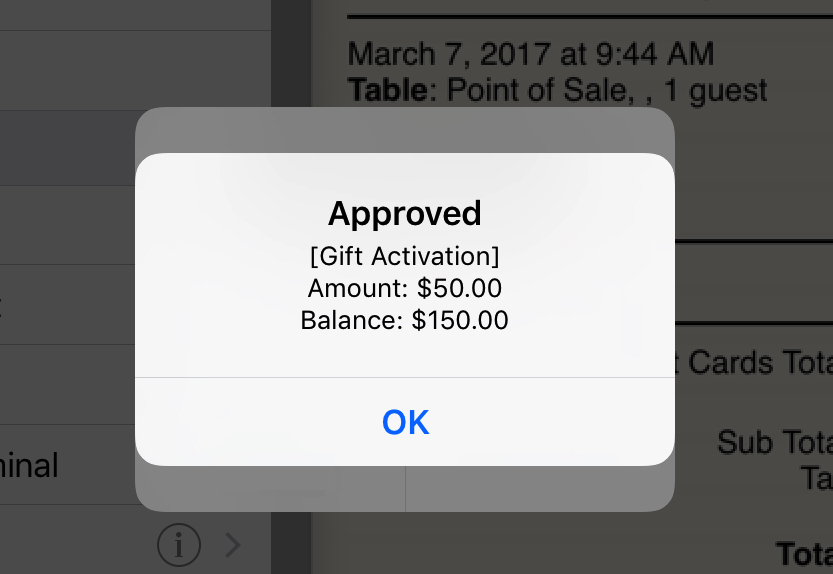
10. You will see the new balance. Tap OK.
11. Even though we’ve added a value to the card, we have yet to actually collect payment for the value addition. You can now tap a payment option to collect. If the customer wants to pay cash, tap Cash. Or tap an integrated payment option if the customer wants to pay with a card.
12. After selecting your payment method, tap Pay in Full and complete the sale as you would complete any other menu sale.
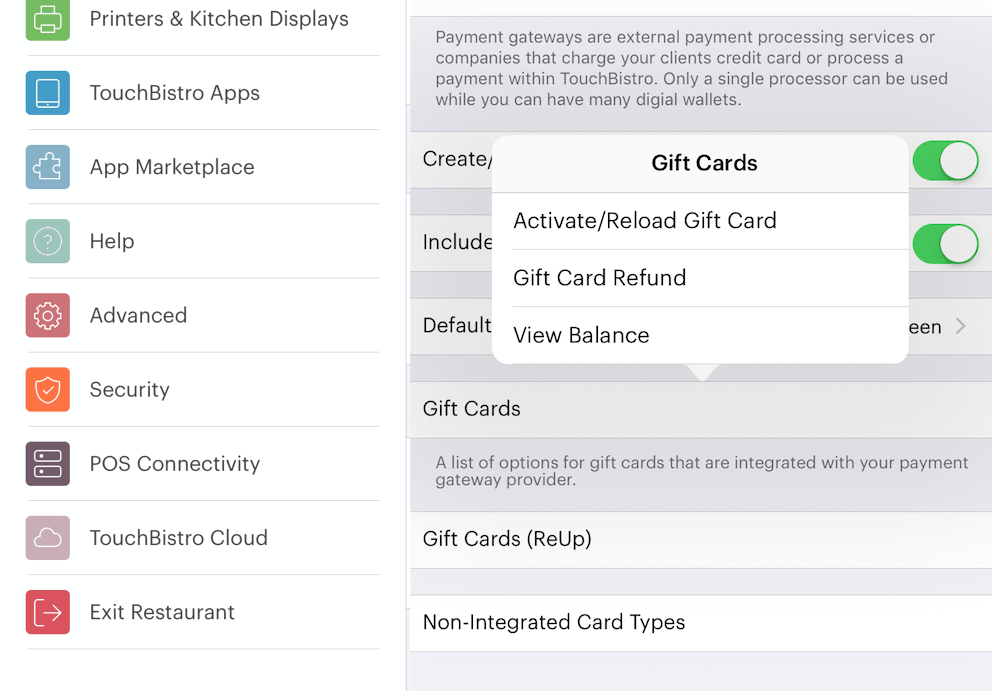
If you need to load a gift card (or perform another gift card function) without accessing the register screen, access Admin | Admin Settings | Payment Gateways. Tap the Gift Cards option.
Section 3. Reporting
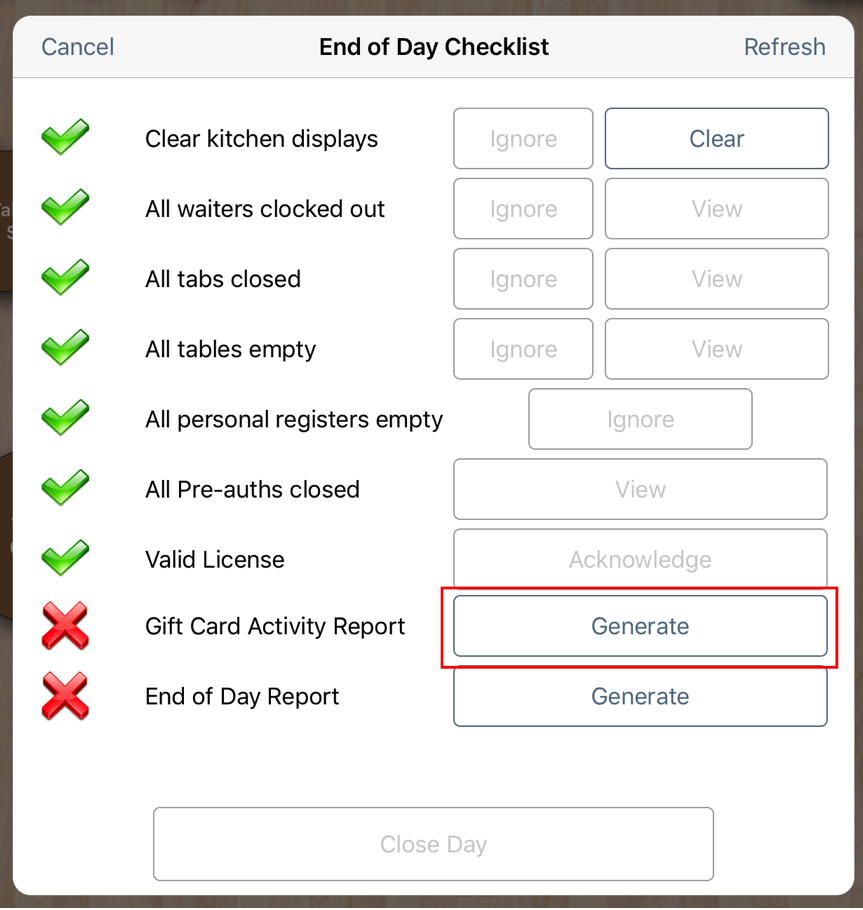
When you do your end of day, you will be prompted to generate the Gift Card Activity Report along with the usual End of Day Report.
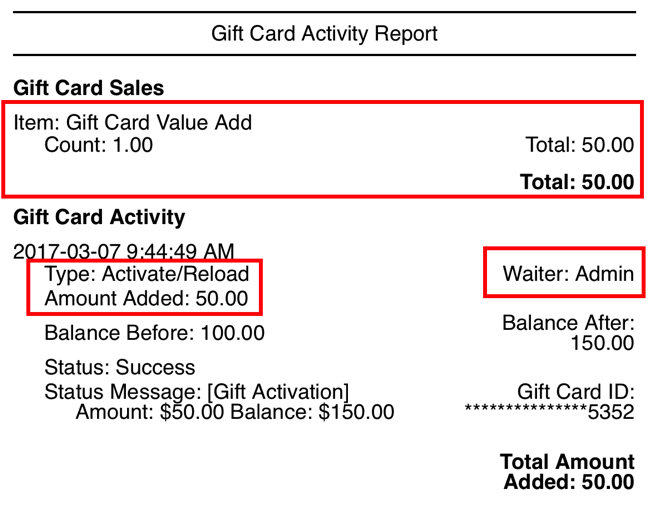
In the pictured example above, our Gift Card Activity report shows we sold one menu item flagged as a gift card (the Gift Card Value Add menu we created above). It also logs the actual value addition we did, indicating the amount loaded onto the card. Waiter indicates the staff member who added the card value.
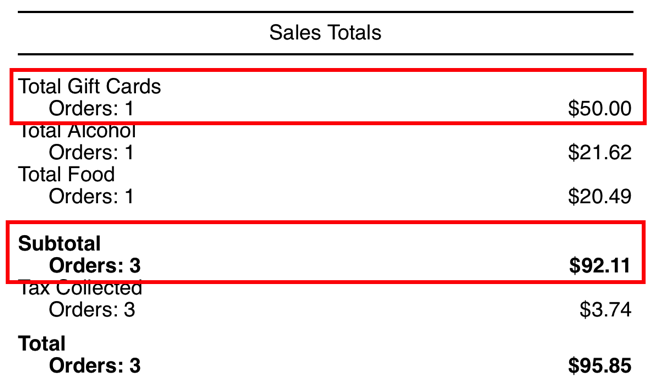
In the pictured example above, our End of Day report also captures the gift card menu item sale in Sales Totals. It’s important to keep gift card value associated with their own sales category to help separate out such sales and keep food/alcohol cost reports accurate.
The Gift Card Activity report helps us properly account for sales we can recognize for that day or period. For example, we have $92.11 in pre-tax sales. However, our Gift Card Activity report indicates $50 was a gift card value addition. We know to deduct $50 from today’s sales, leaving us with $42.11 in sales we can realize for that day. Of course, when the customer spends the $50 gift card on food, drinks, merchandise, or services, TouchBistro will capture those menu sales and the $50 will be realized then.
Chapter 9. Updating the Genius Mini
At times you may need to update your Genius Mini hardware. To do this follow these steps:

1. Tap the Information ![]() icon to access updating options.
icon to access updating options.
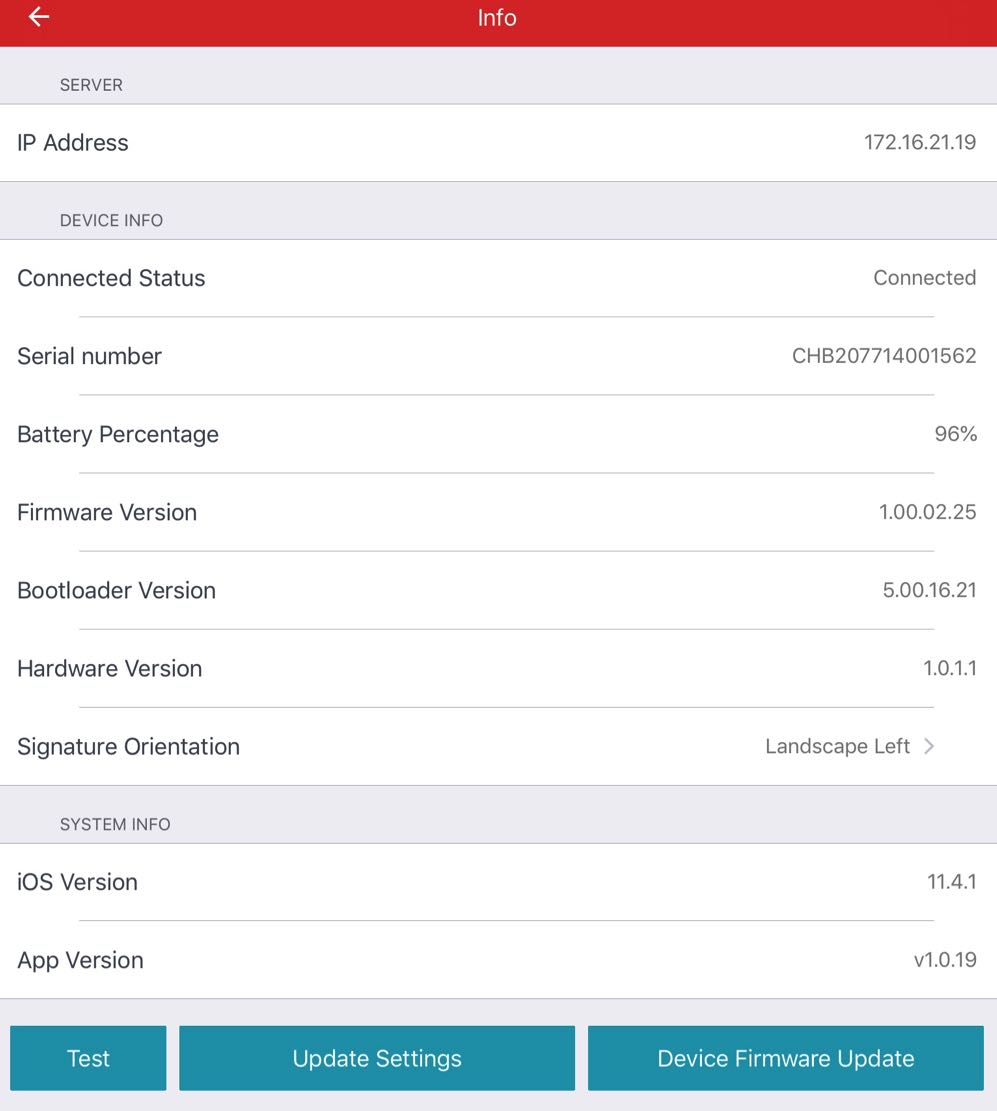
2. Tap Test if you want to test the connection between the Genius Mini iPad app and the Genius Mini. Tap Update Settings if your TSYS representative has made changes to the workflow on the app. For example, TSYS has enabled/disabled tipping or changed tip amounts. Tap Device Firmware Update to see if there are any needed updates to the firmware.
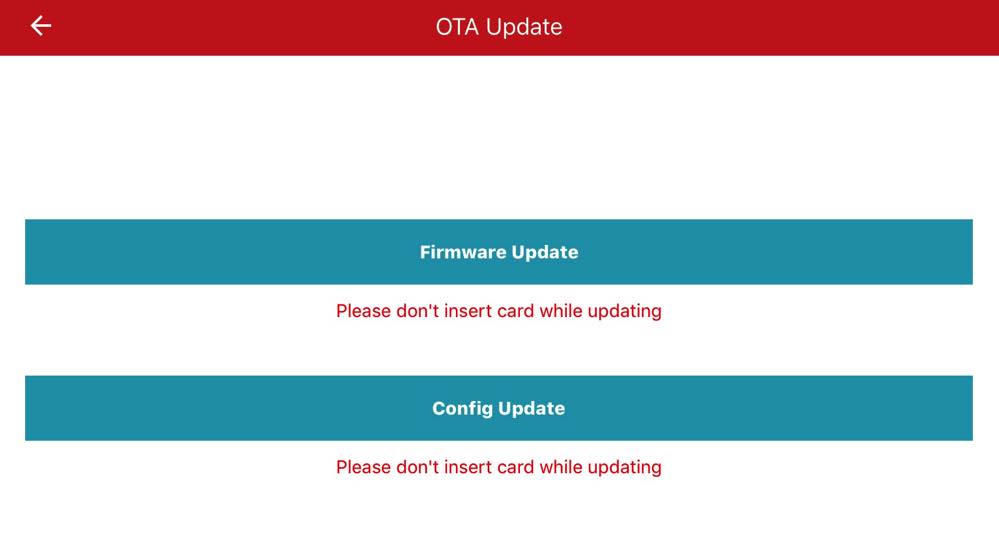
3. If you tapped Device Firmware Update, you can update your device’s firmware or configuration. Use these as directed by your TSYS support representative.

4. If you accessed the Info screens, ensure you return to the main screen. You will not be able to process an order if you are still on an Info screen.
 Return to Table of Contents