Setting Up TouchBistro Reservations Tutorial
Table Of Contents
Chapter 2. Step 1 – Build a Simple Floorplan
Chapter 3. Step 2 – Adjust Your Reservation Intervals
Chapter 4. Step 3 – Set Up Schedules and Configurations
Chapter 5. Step 4 – Set Up Some Communication Preferences
Chapter 6. Step 5 – Set Online Booking Details
Chapter 7. Step 6 – Review Your Business Page
Chapter 8. Step 7 – Set Open Hours
Chapter 9. Step 8 – Set Up Photos
Chapter 1. Introduction
This guide will walk you through a basic setup of TouchBistro Reservations.
Chapter 2. Step 1 – Build a Simple Floorplan
We will start by adding a few of our tables to our Floorplan.
1. Click the Floorplan  tool on the Left toolbar.
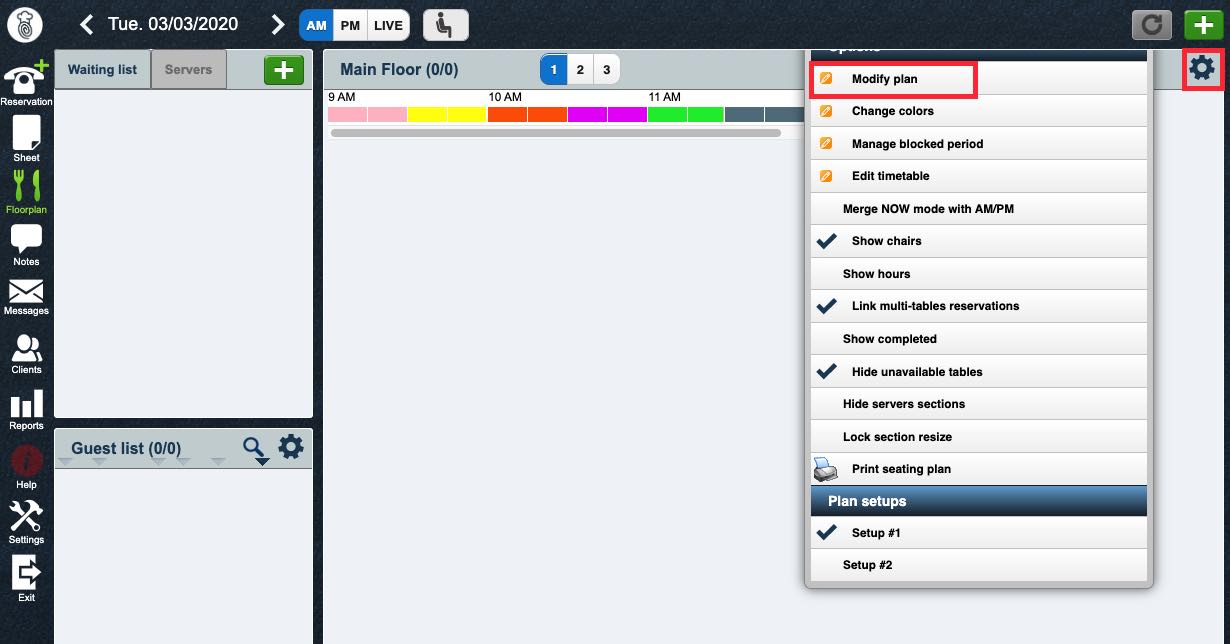
2. Click the Gear icon and then click Modify Plan.
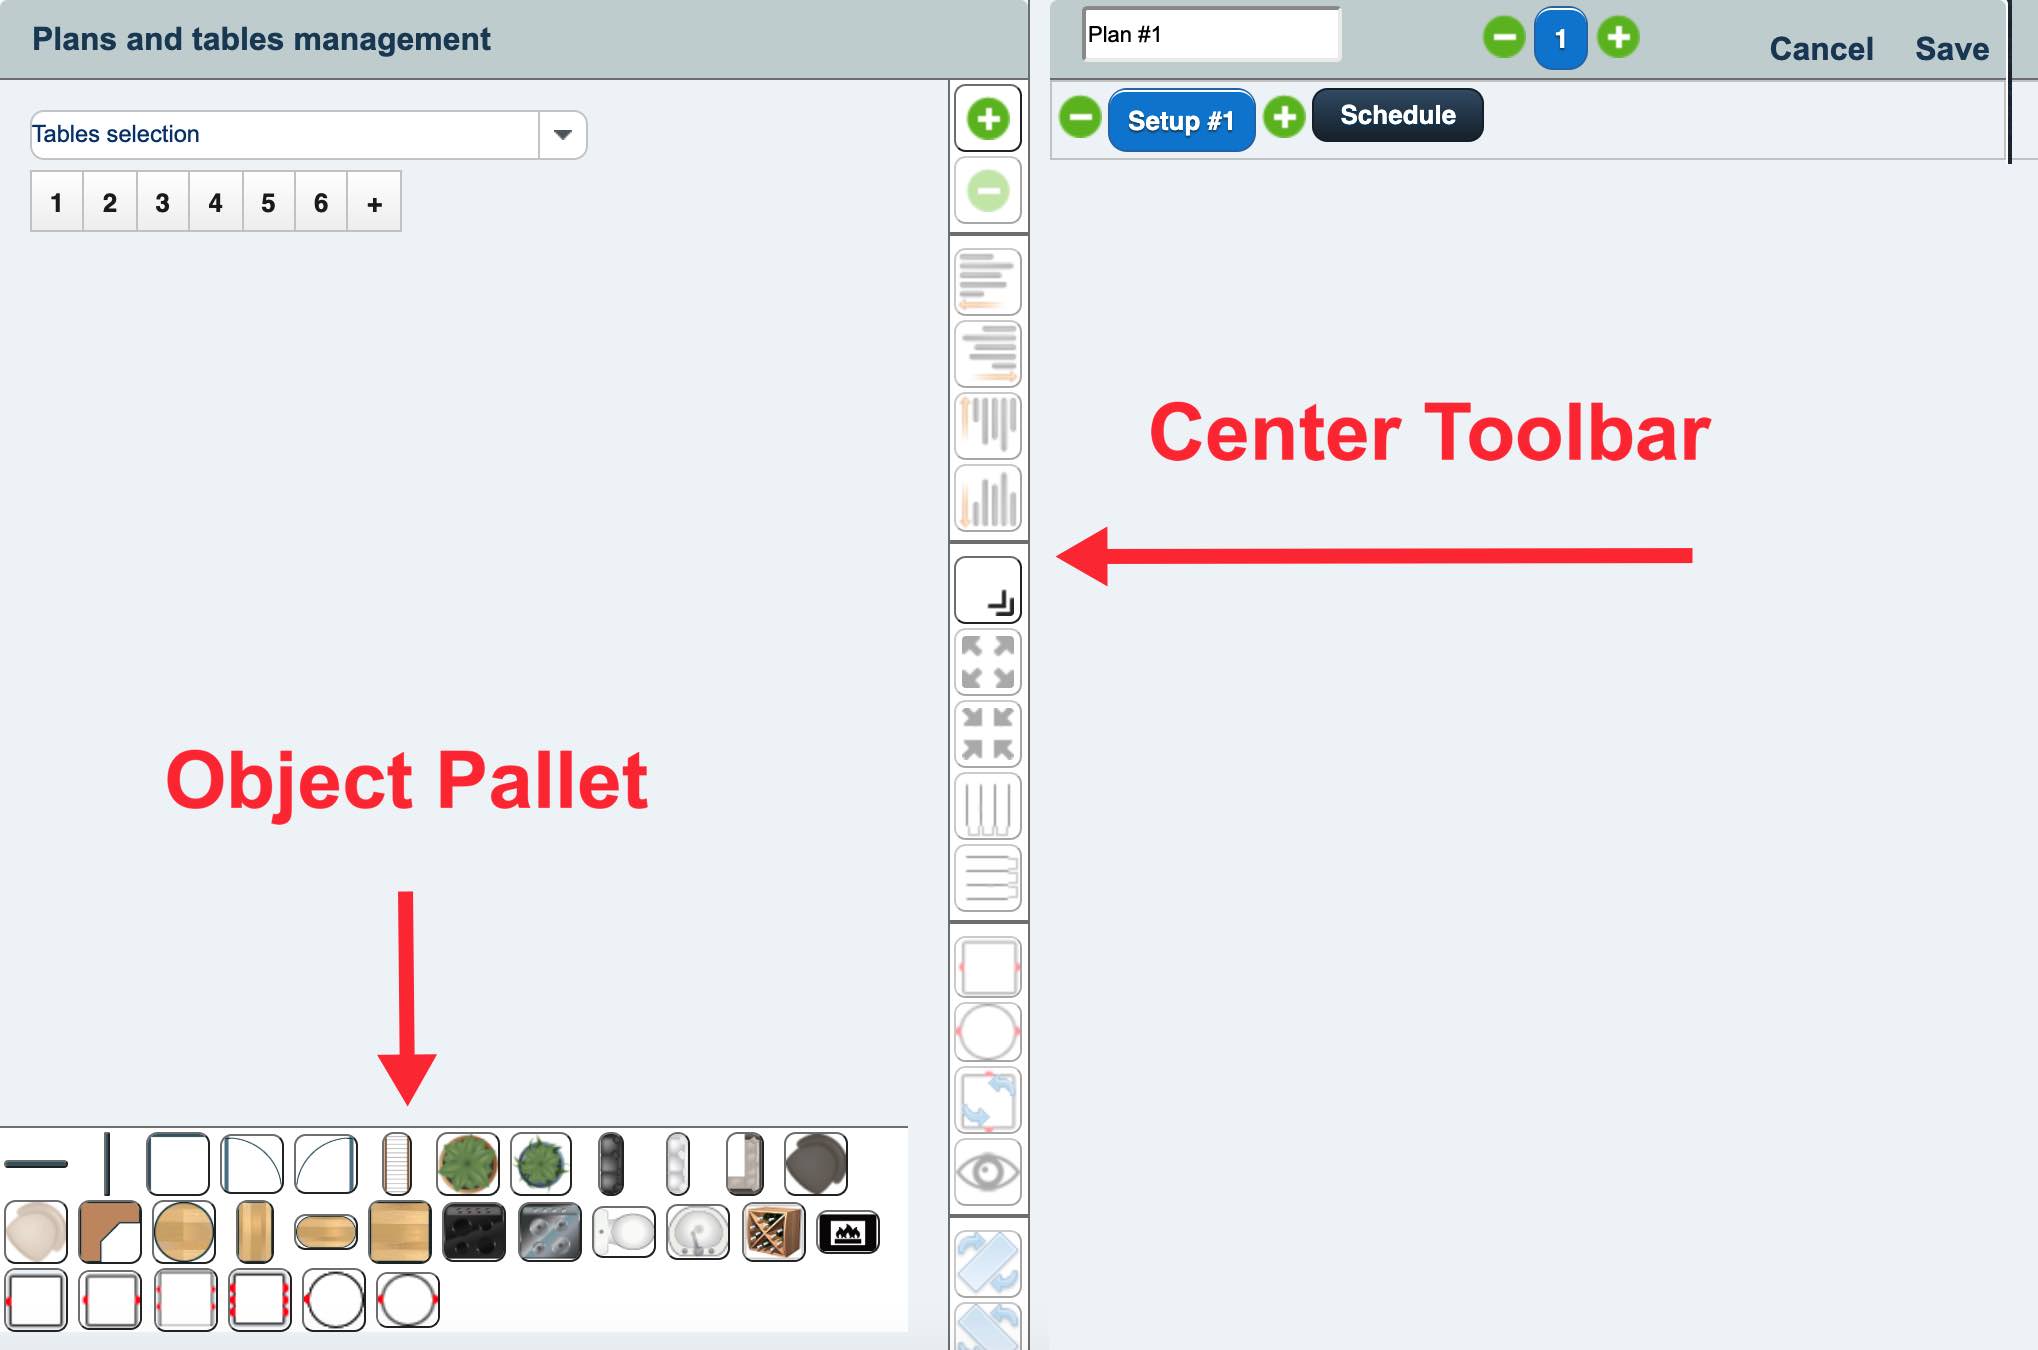
3. When you click Modify Plan, you get a Center Toolbar and a floorplan Object Pallet at the bottom of the screen. A complete guide on how to use all the elements of these toolbars can be found here. However, for this tutorial we’ll only make use of a few of these items.

4. First, click and hold on one of the table types. The red dots represent the default number of seats.
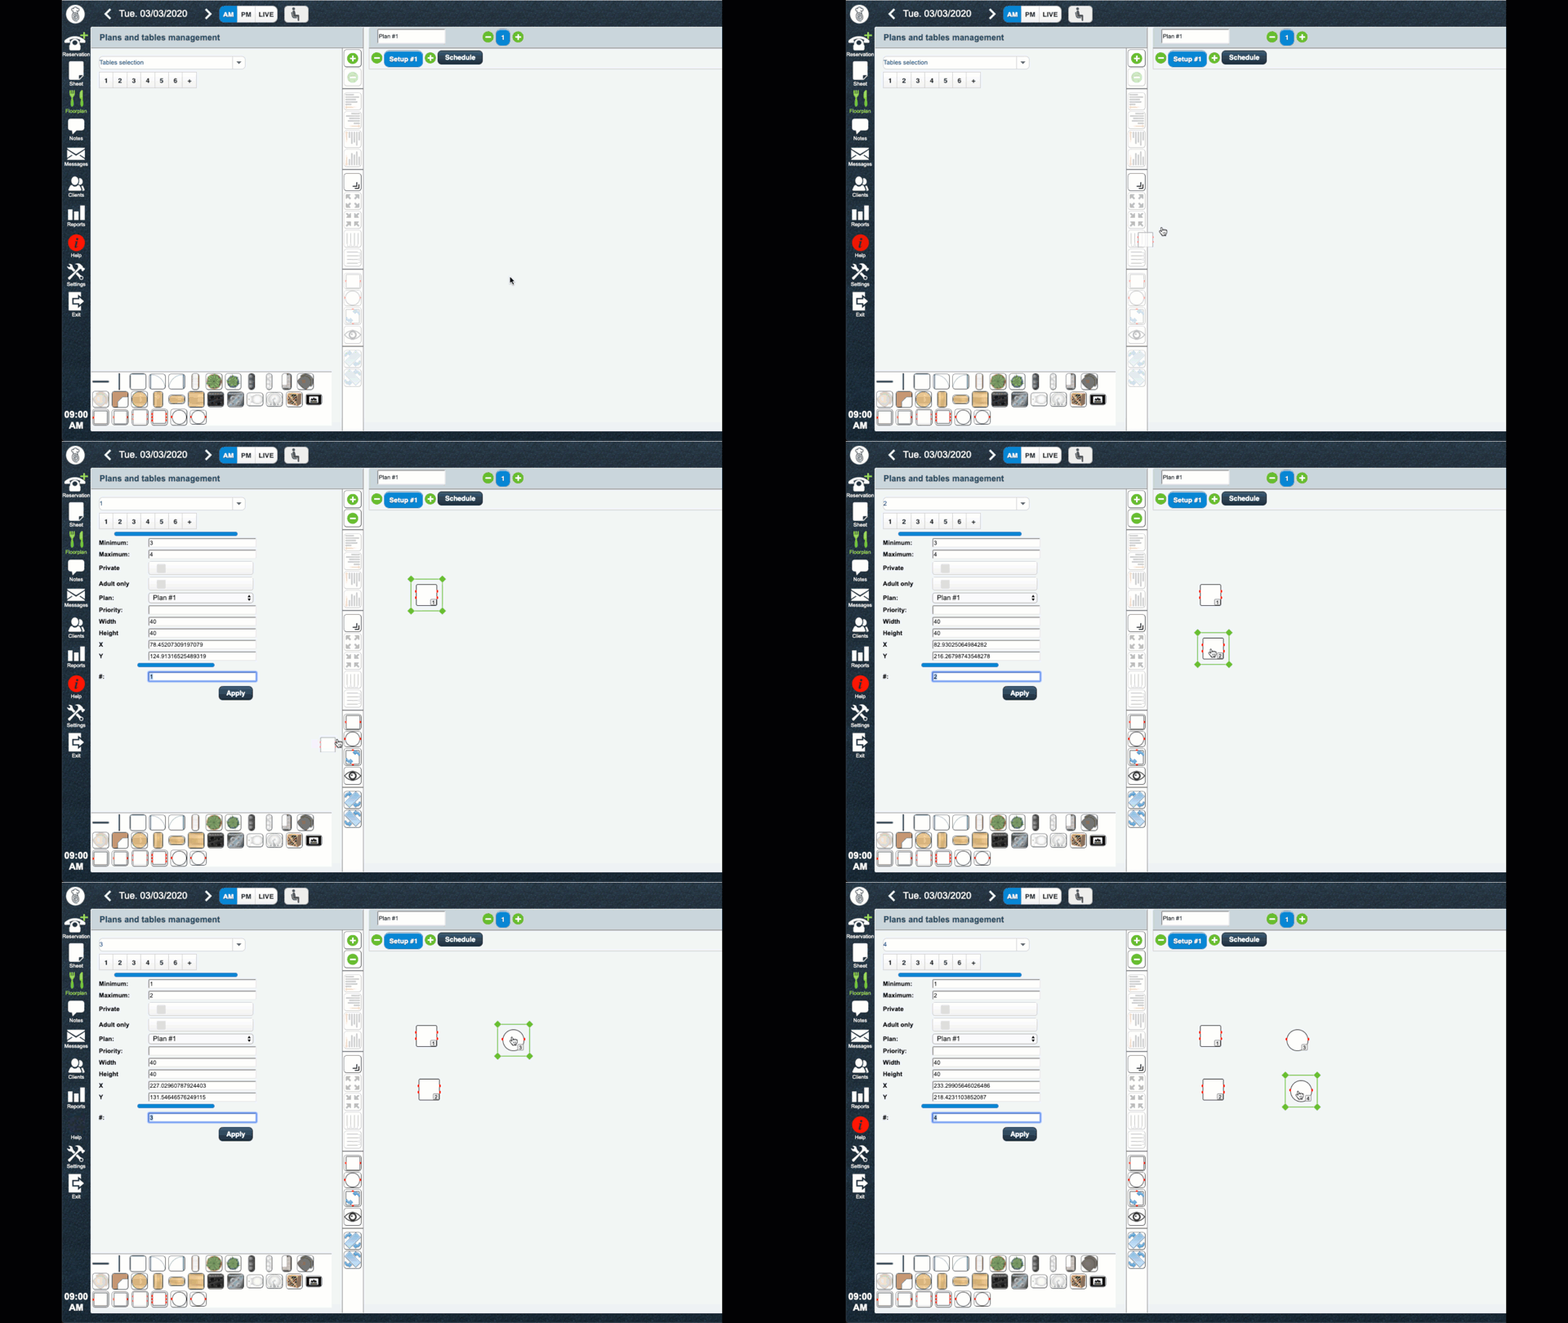
5. In the example above, we’re adding two four tops and two round two tops to our Floorplan.
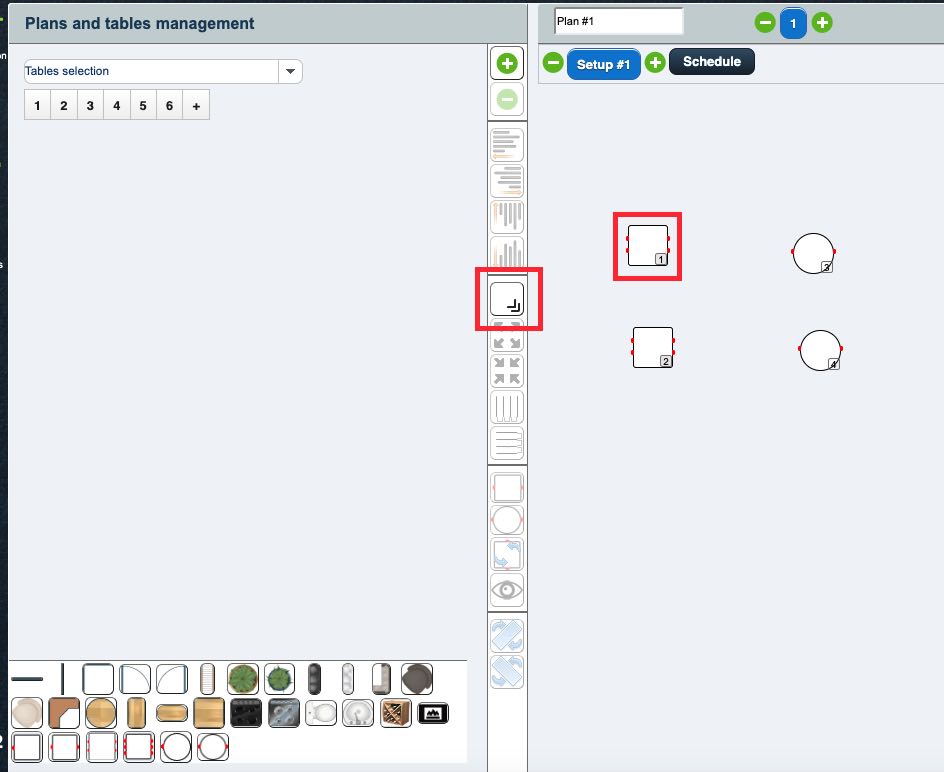
6. Next we can resize our tables. To resize click a table you want to resize and then click the Resize tool.
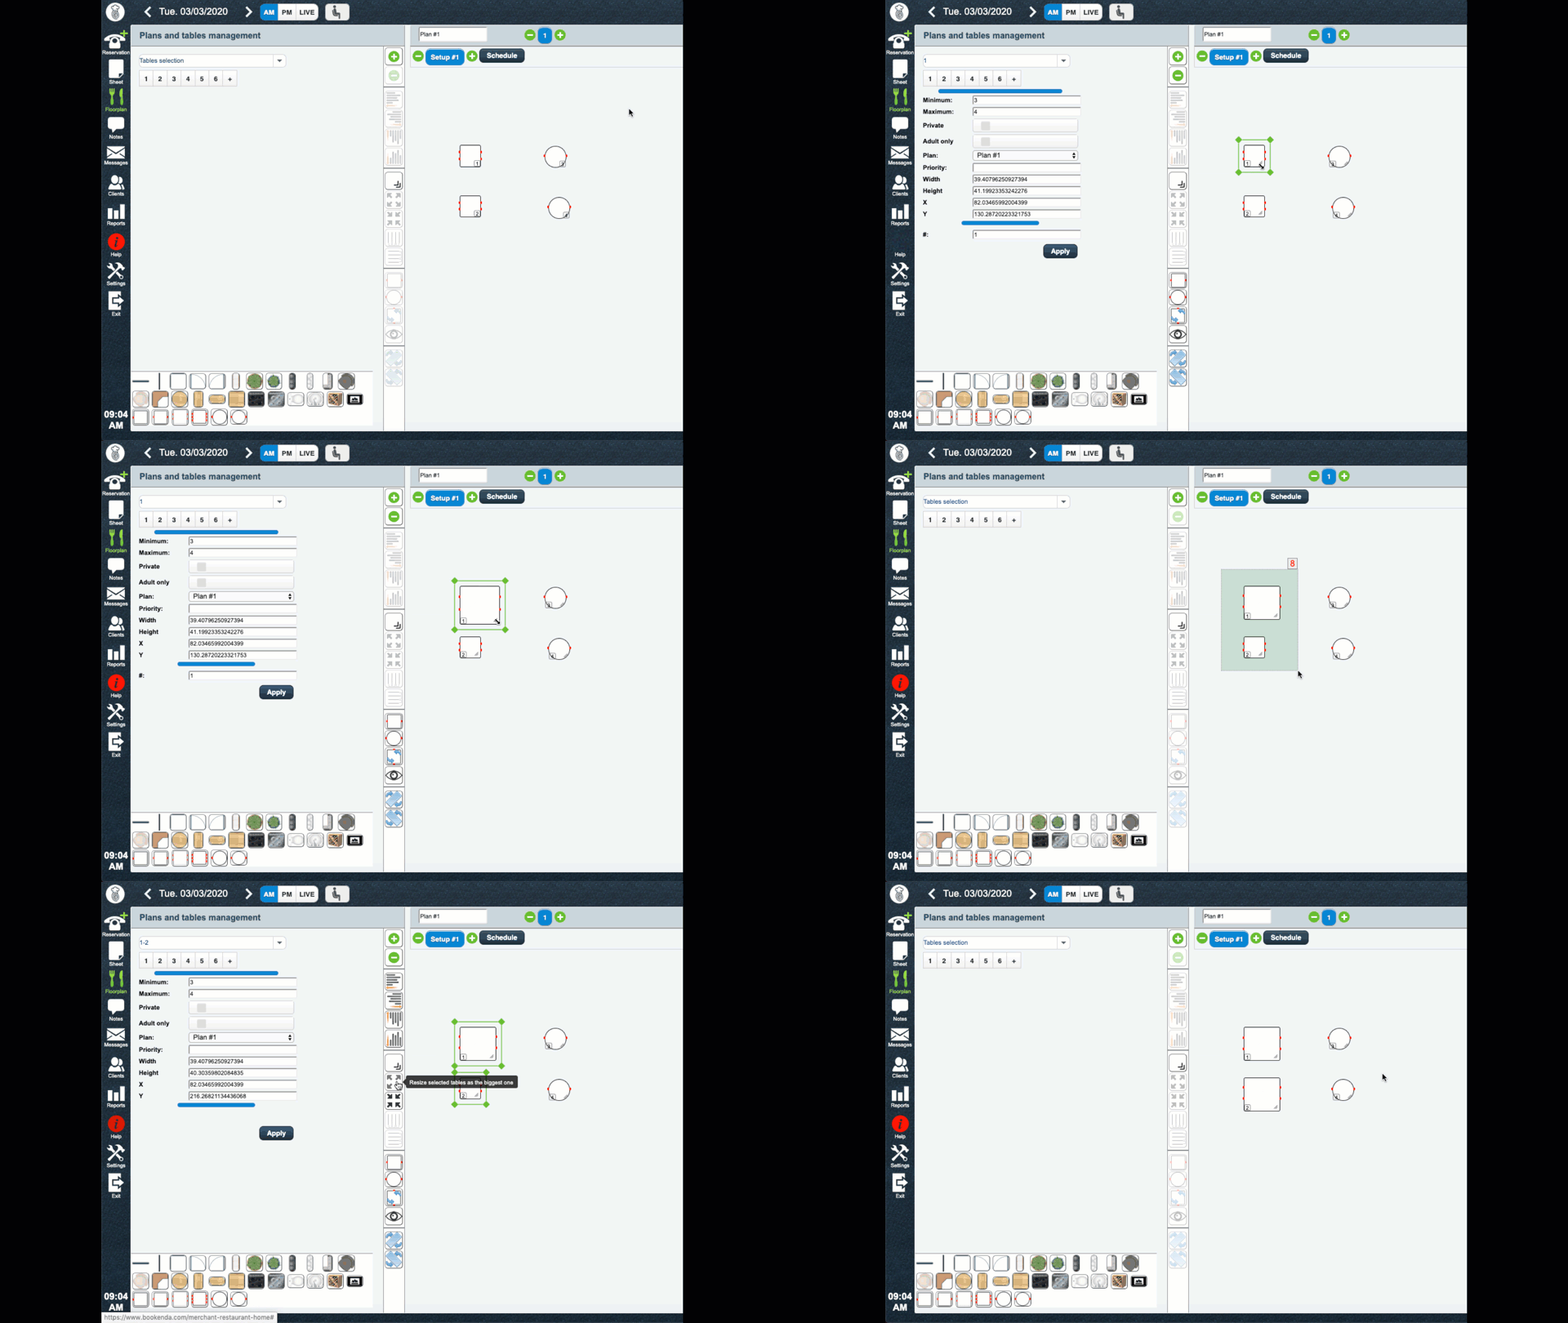
7. In the pictured example, once we click the Resize tool all tables are in resize mode. We can then click and hold on a table edge or corner and resize the table. If we want to make additional tables the same size, we can click and drag to select additional tables and then click the Group Resize tool.
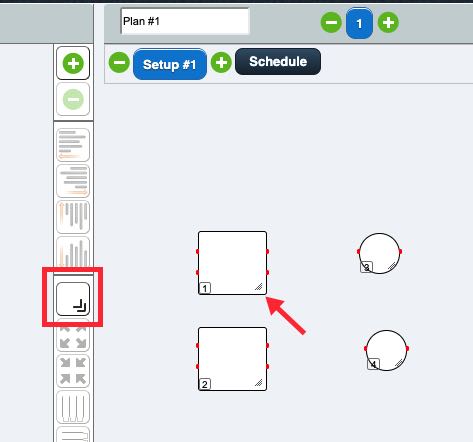
8. Click the Resize tool again to take your Floorplan out of Resizing mode. You know you’re in Resizing mode because each table has a small chevron at the bottom right of the table.
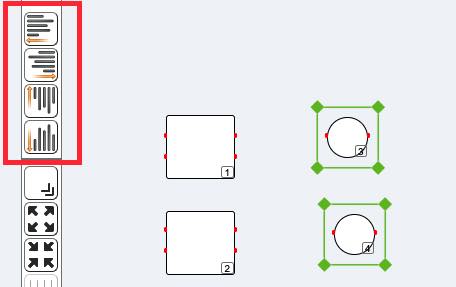
9. Next for this tutorial, we’ll add a few more two tops and then use one of the Alignment tools to help align the tables we’ve added.
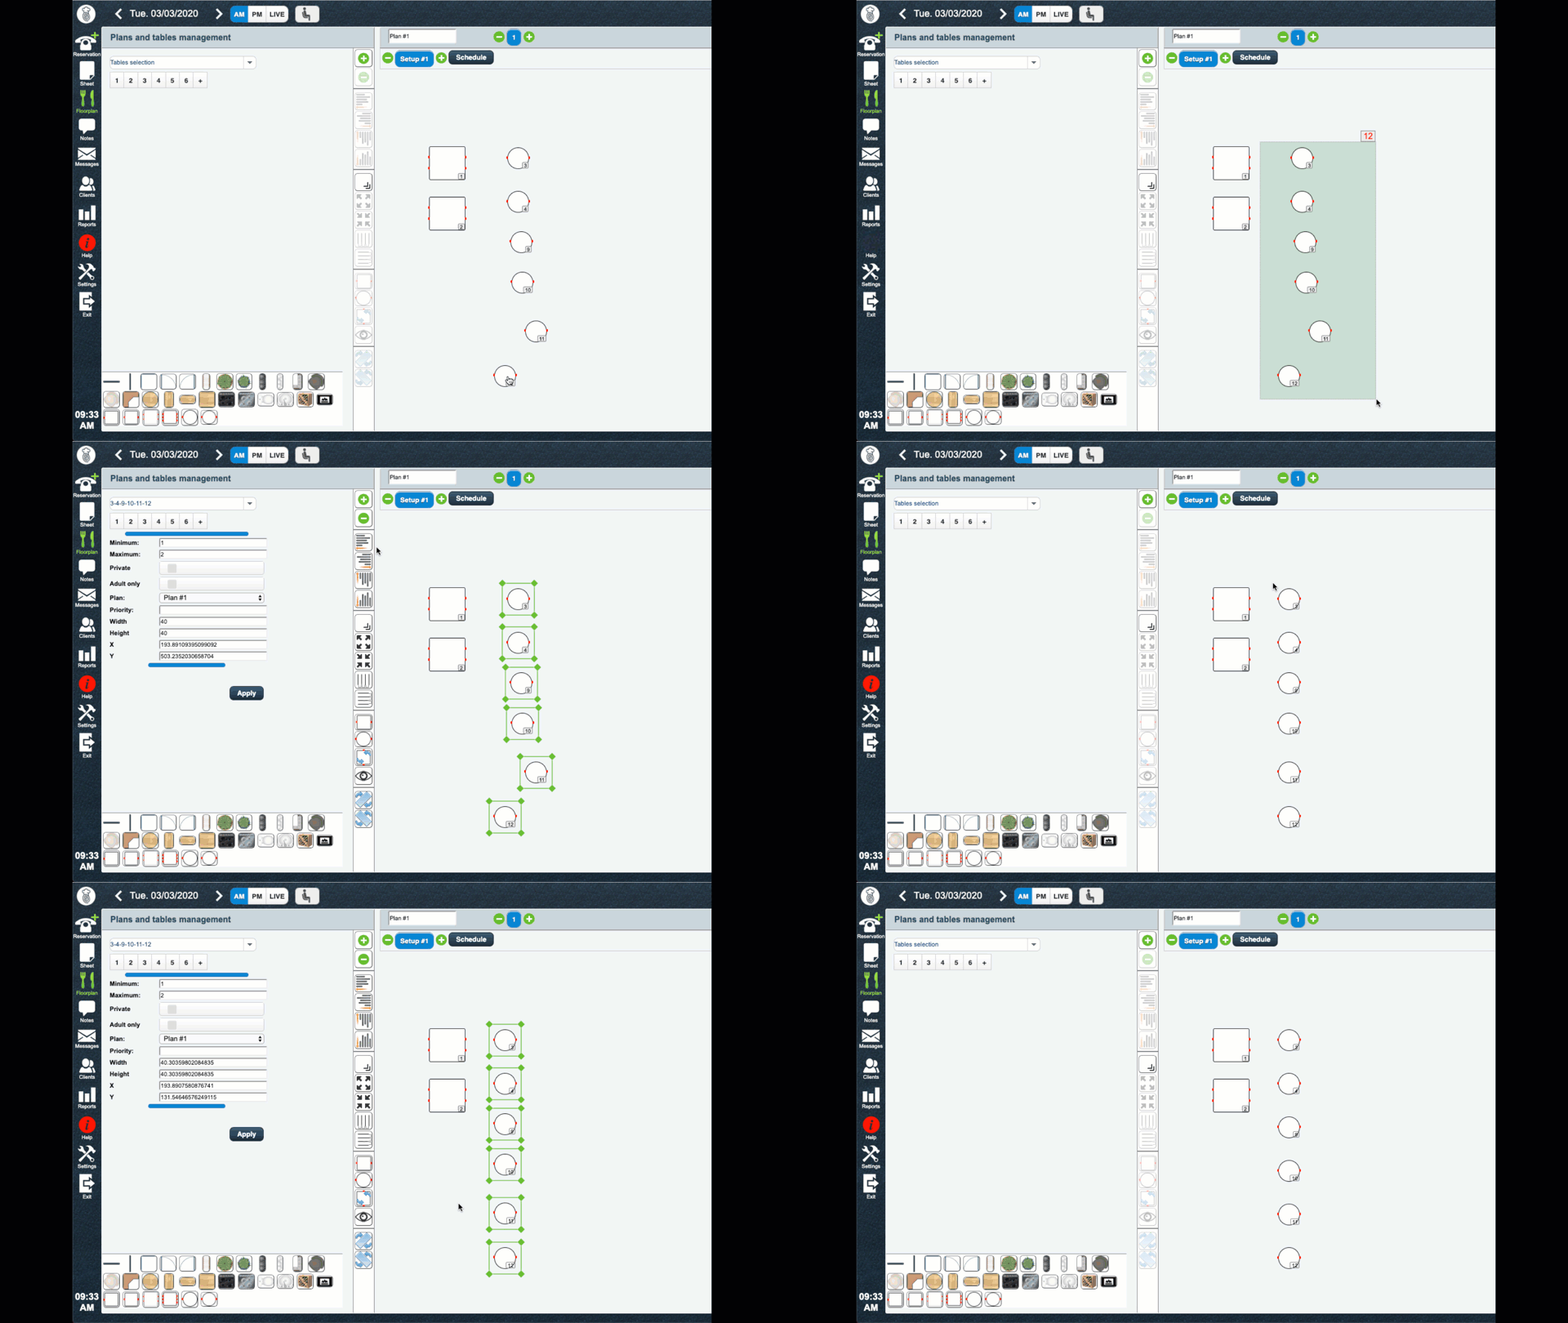
10. In the pictured example, we added a bunch of two tops rather quickly and didn’t align them very well. Simply click and hold to select all the tables and then click one of the Alignment tools. Likewise, you can click one of the Spacing tools to ensure the tables are evenly spaced on your floorplan.
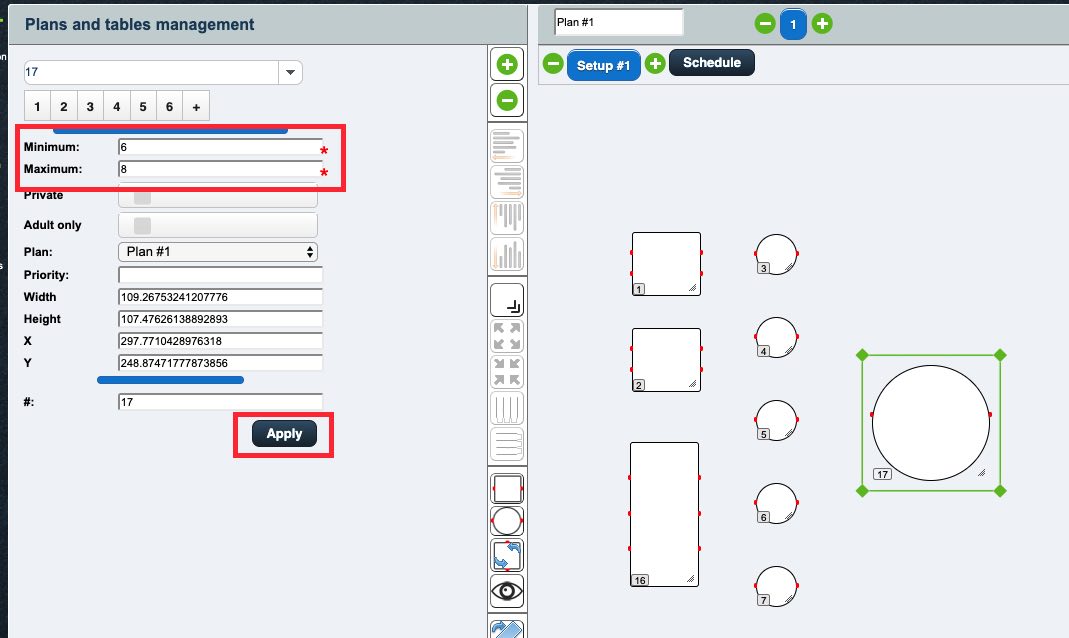
11. Finally, we’ll add a few more tables, for example, a long communal table and a “family style” round table. However, you’ll notice even though we increase the size of the table on the Floorplan it doesn’t increase the number of seats at the table. To do that, click on the table and adjust the Minimum and Maximum numbers. In this case, the table is set to seat a maximum of 8 and won’t allow any party less than 6 to reserve this table. Click Apply when done.
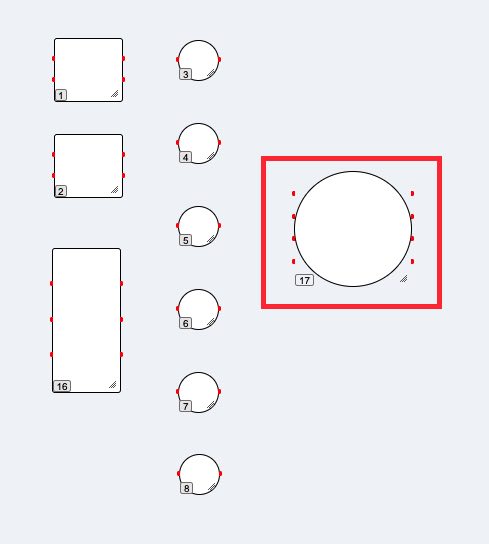
12. The red dots representing the maximum seating is increased appropriately.
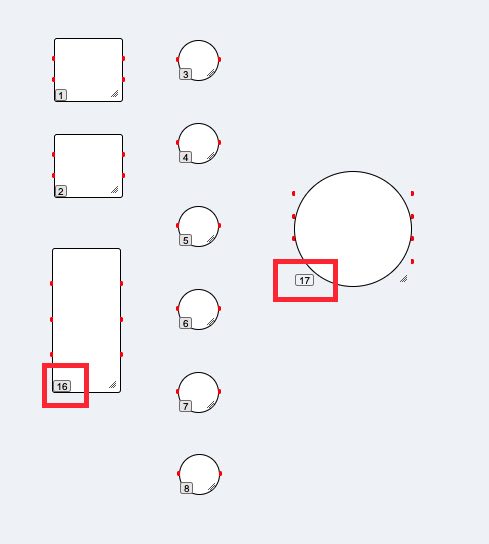
13. There’s one last tweek we might want to make. As illustrated above, our table numbering goes from 1 to 8 and then jumps to 16 and 17. This is because we added some tables in error and then deleted them. TouchBistro Reservations names each new table sequentially and doesn’t by default reuse the number of a deleted table.
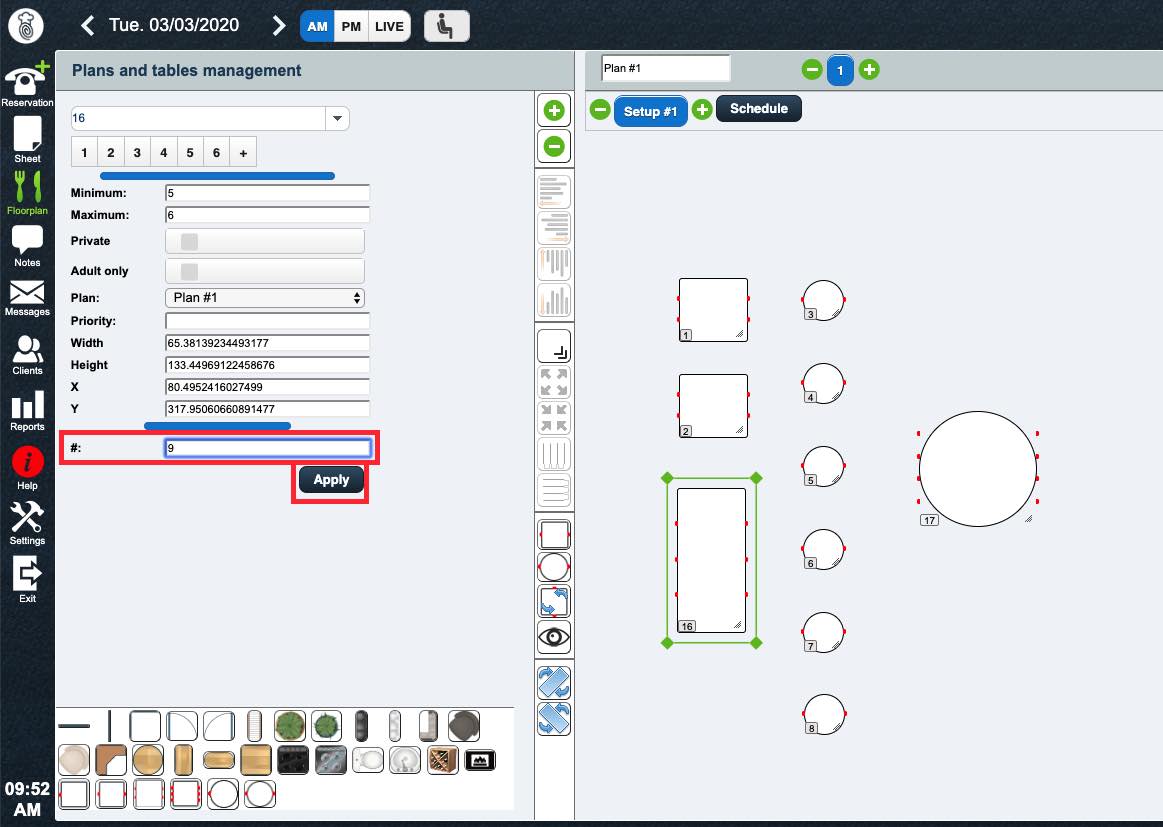
14. To correct this, click on an out of order table and then give it the proper number in the # field. Click Apply when done.
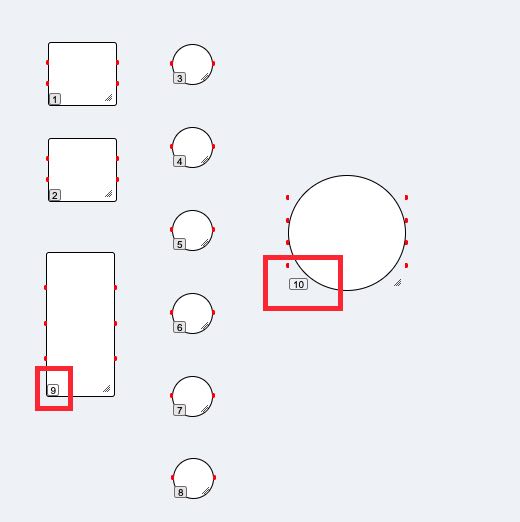
15. Repeat for all out of order table numbers.
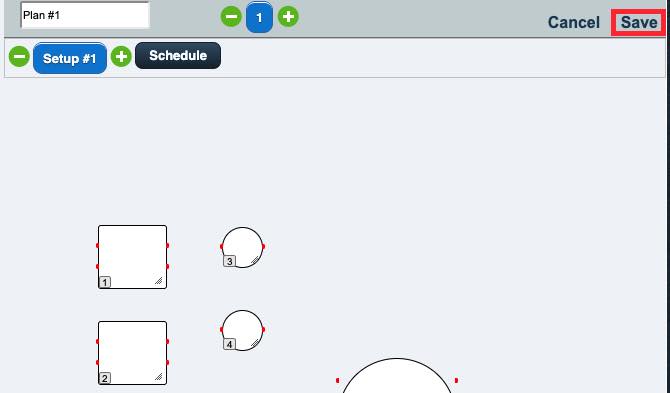
16. When you’re done with setting up your tables, click Save.
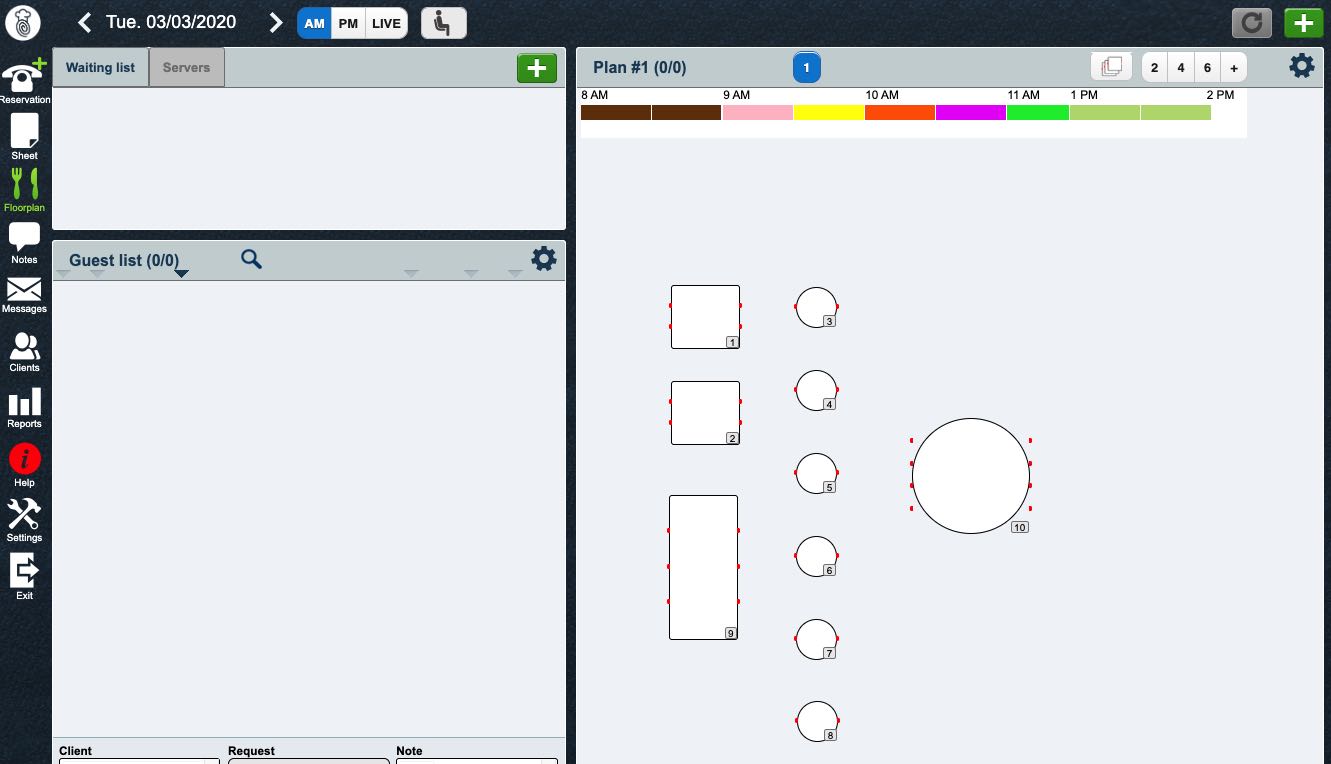
17. Your Floorplan is complete and you’re now ready to set up scheduling.
To further fine tune your Floorplan, see this guide.
Chapter 3. Step 2 – Adjust Your Reservation Intervals
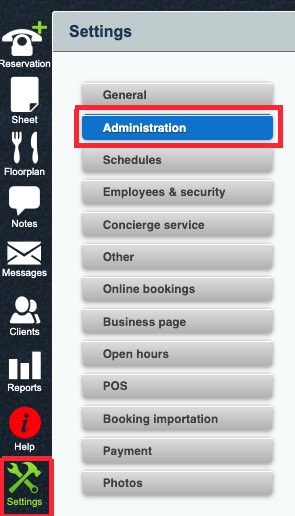
Now that you have your Floorplan set up, you can start to define how and when those tables can be reserved (both online and in-house). The first step is to set some preferences under Settings | Administration.
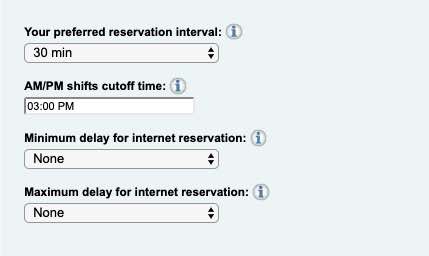
The first setting to consider is Your Preferred Reservation Interval. By default TouchBistro Reservations assumes reservations can be booked at 30-minute intervals.
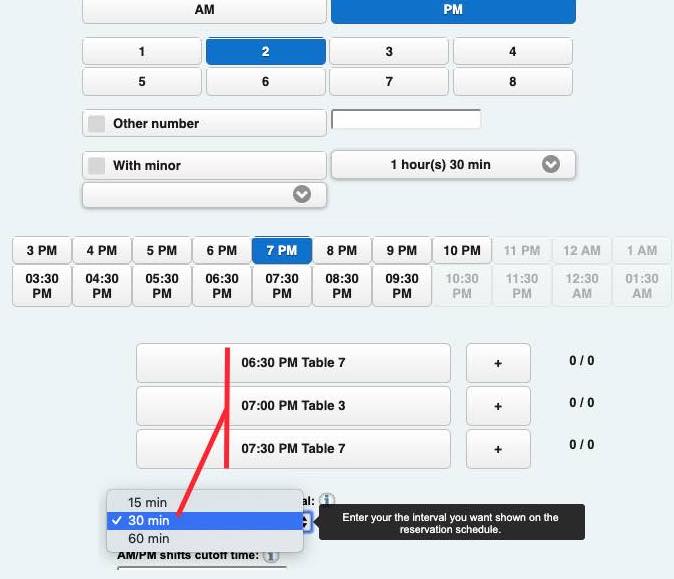
If we leave this set to 30 minutes, the Reservation tool and TouchBistro Dine will suggest tables reservation times 30-minute intervals on either side of the desired time. So, one could book a table at the desired 7 pm or 6:30 pm or 7 pm. But not 6:45 pm.
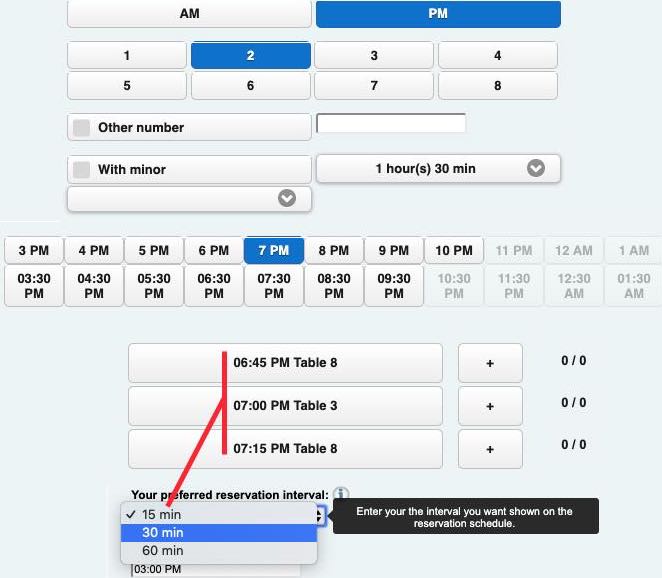
You can set the reservation interval to a 15-minute interval. That is, a customer can reserve a table 15-minutes before or after the desired time. Finally, you can change this to a 60-minute interval. This allows a customer to reserve only on the hour (e.g., 7 pm, 8 pm, 9 pm, etc.).
The next setting to consider is the AM/PM shifts cut off time setting. This is the cut off between your pre-dinner and dinner services. Pre-dinner is called an AM timeslot in TouchBistro Reservations. Dinner service is called a PM timeslot.
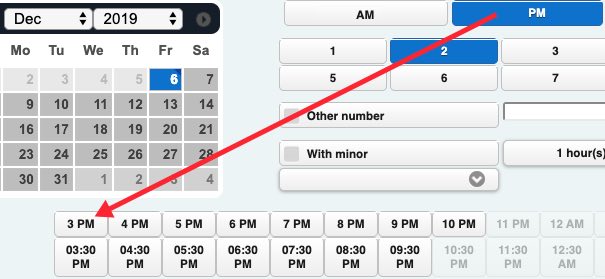
By default, TouchBistro Reservations sets the cut off at 3 pm. After 3 pm, reservations are grouped under the PM timeslot. In the pictured example, when making a reservation, if we select the PM timeslot, reservation blocks start at 3 pm.
The other two settings are advanced settings. You can ignore for the purposes of this tutorial. These settings are discussed in Chapter 3 of this guide.
Chapter 4. Step 3 – Set Up Schedules and Configurations
A Configuration defines what tables are available for reservations. Typically, you might create one for the AM timeslot and one for the PM timeslot you just configured in Step 2.
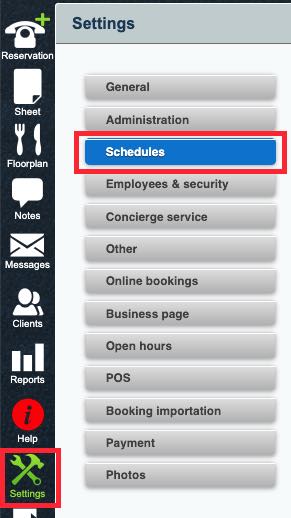
1. Click the Settings tool and then click Schedules.
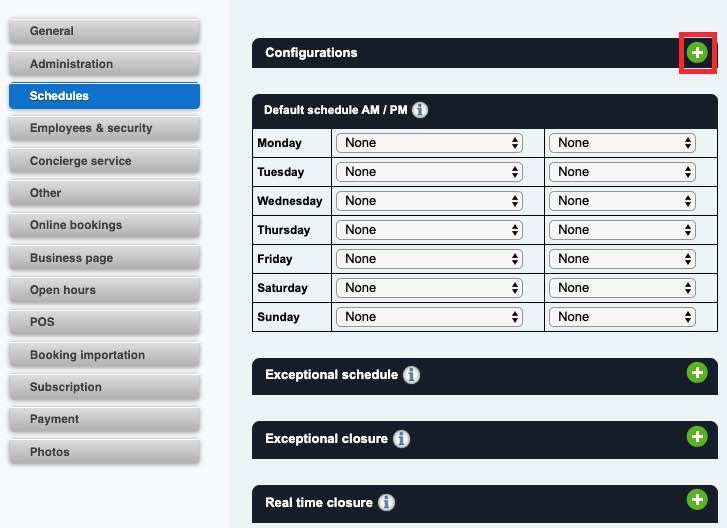
2. Click the Add + icon at the top right.
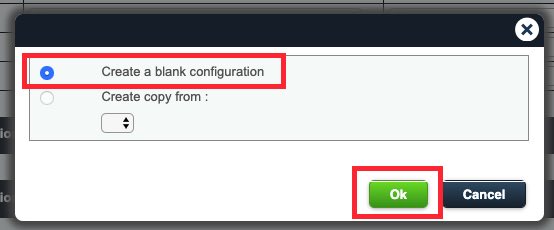
3. Click Create a blank configuration and click Ok.
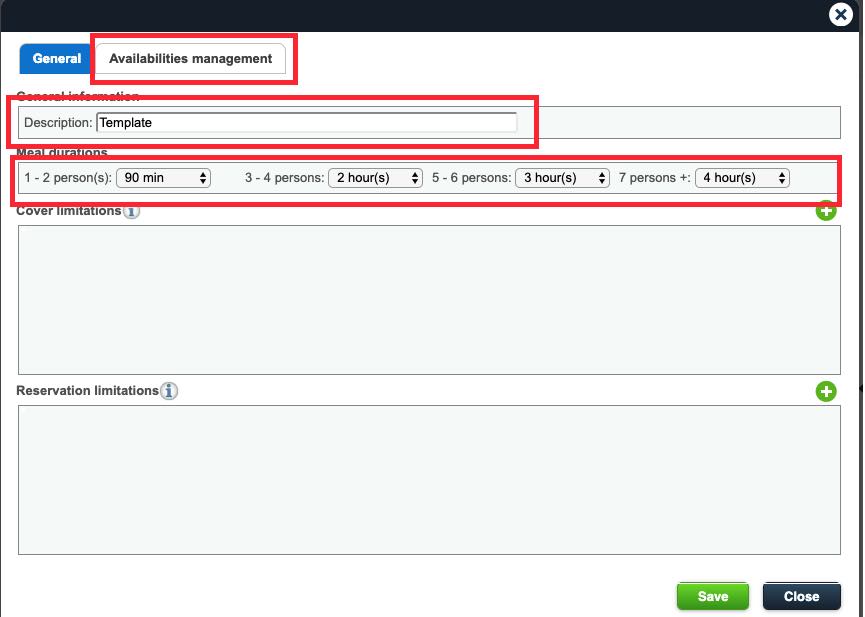
4. In the Description field enter Template.
5. Use the Meal duration drop-down boxes to select the default table turn times based on party size. For example, we expect a party of 2 to occupy the table for 90 minutes. A party of 4 might occupy the table for 2 hours. A party of 6 might occupy the table for 3 hours. Very large parties (7+) could occupy the table for 4 hours.
6. Click the Availability management tab.
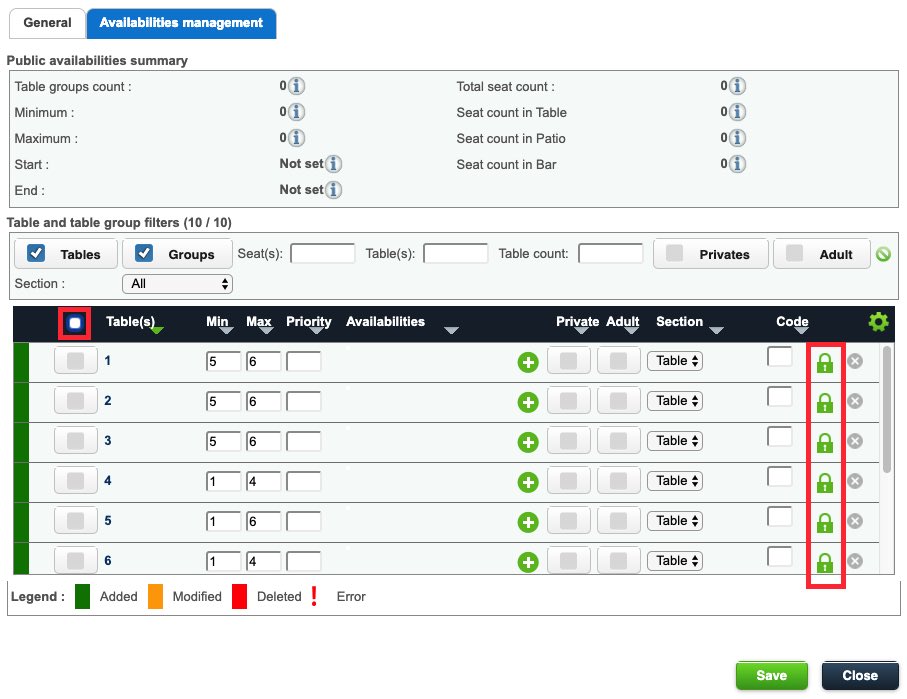
7. By default, all tables you created in Step 1 start off as locked. If a table is locked, it will not be available for booking (online or over the phone). We’ll unlock all the tables. Click the checkbox above the table numbers.
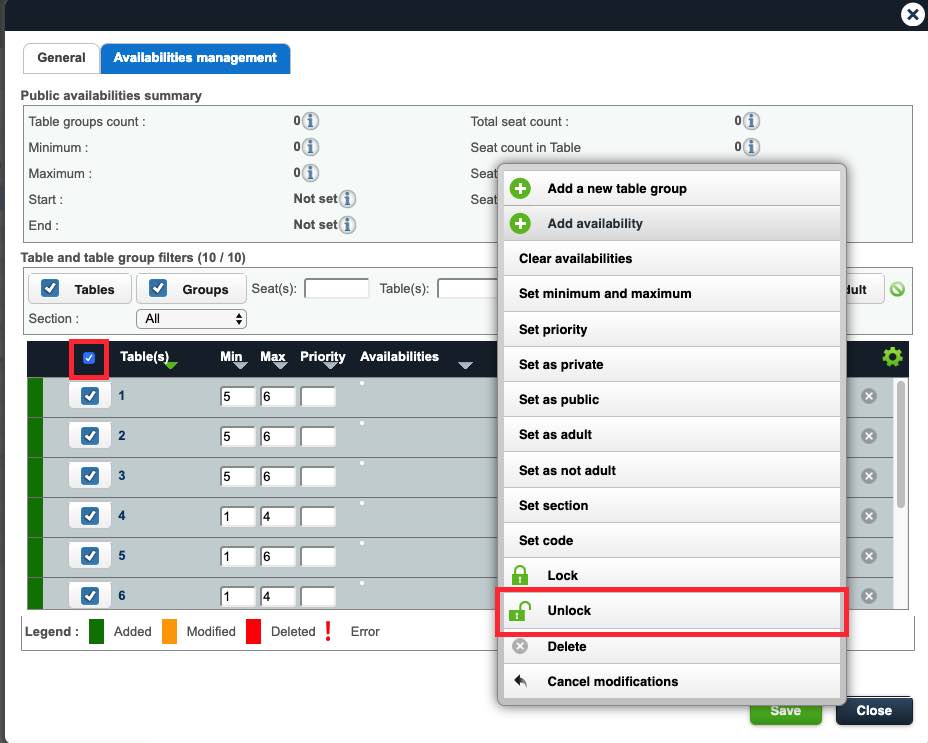
8. Click the Gear icon and then click Unlock.
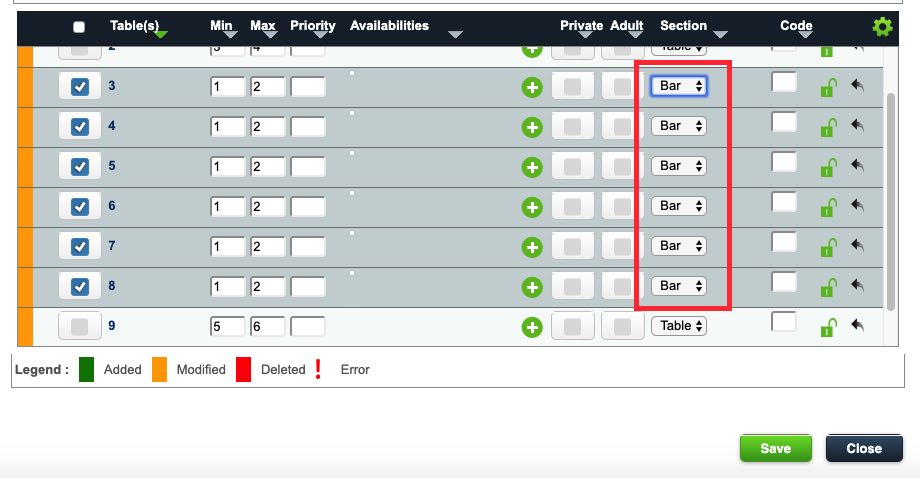
9. If you have sections (a patio area, a bar area, etc.) you can click the Section drop-down box and then set tables for their proper section. For example, let’s say the two tops are all in the bar section.
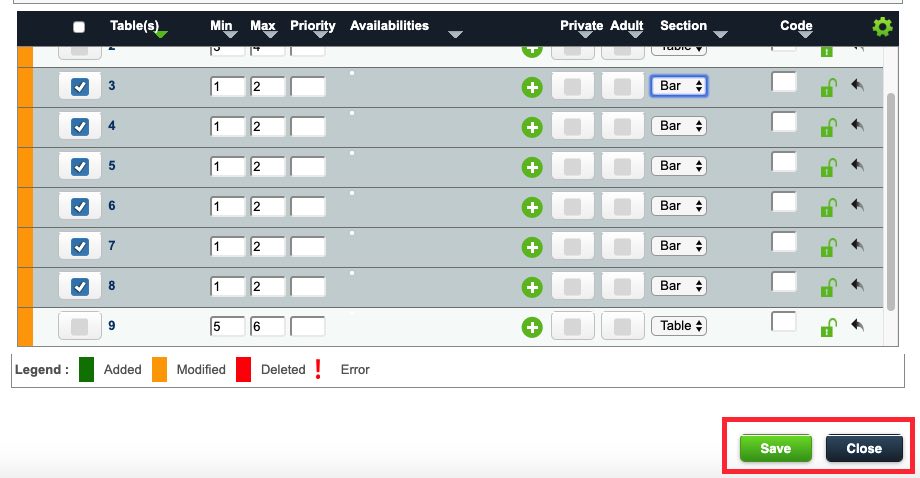
10. Click Save to save this configuration and then click Close to return to the Schedules page.
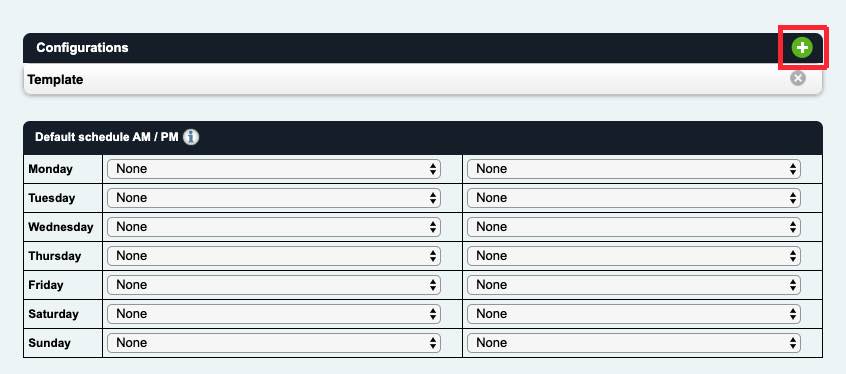
11. Now that your Template configuration is done, you can add your actual configurations. We will create Configurations to represent our AM and PM timeslots. What’s a timeslot? TouchBistro Reservations divides each day into two service blocks. The AM timeslot might be considered breakfast/lunch service while your PM timeslot is your dinner service.
12. Click the Add + icon at the top right to add your AM timeslot configuration.
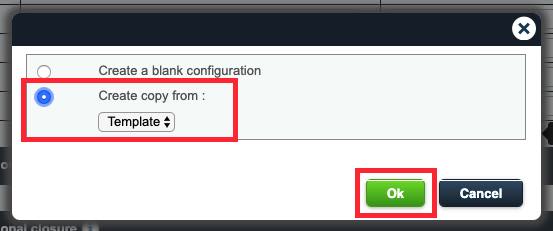
13. Click Create copy from and select Template. Click Ok.
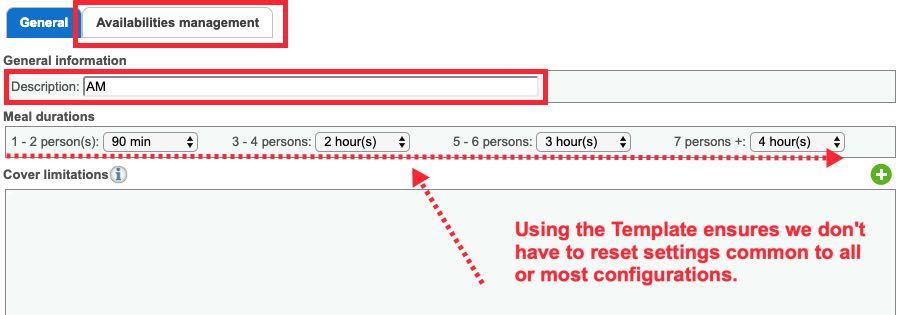
14. Give this template the name AM. You’ll notice since we created from the Template configuration, there is no need to reset Meal durations. Click Availabilities management.
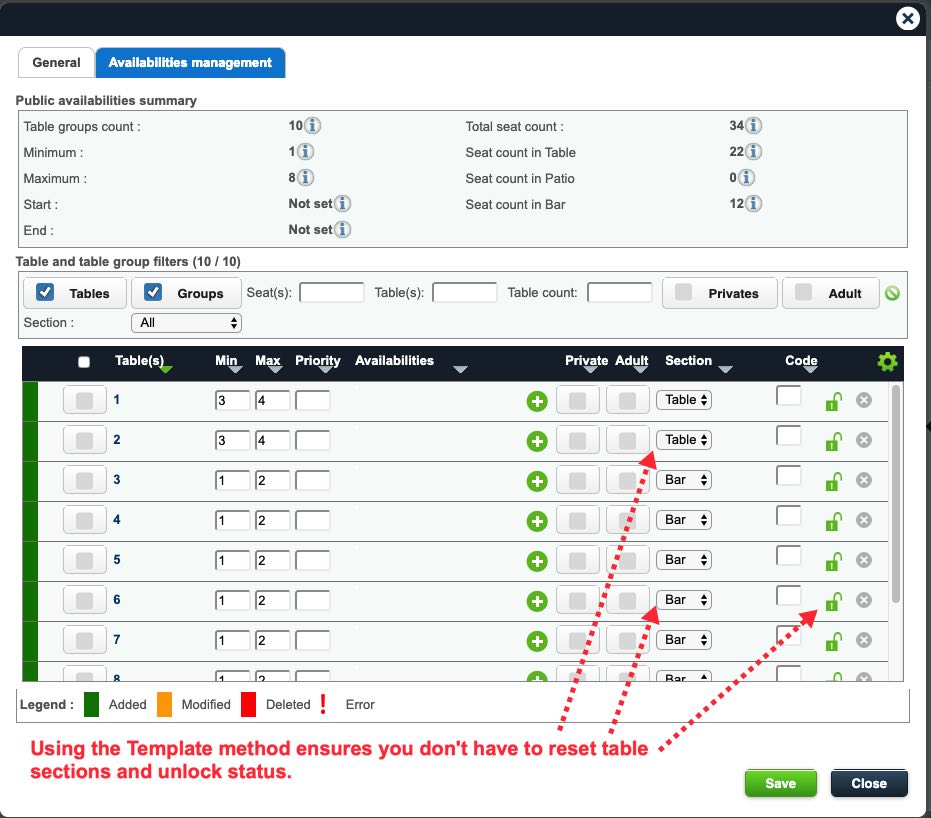
15. Again, we can see by using the template we don’t have to reset tables to unlocked. As well, tables we set for different sections are preset when using the Template configuration. On this screen, we can now tailor presets to the AM configuration.
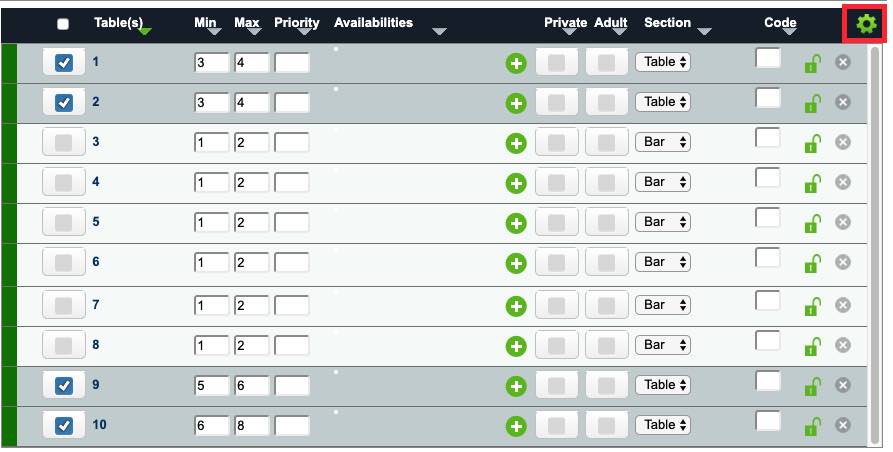
16. In this example, we’re only going to select Table section tables and not the Bar section tables. For our AM timeslot, we do not open the bar area (the 2 tops). So we’ll only set availability for non-bar tables. Click the Gear icon.
Note: if you have Patio tables, we’d suggest keeping them locked. You do not want parties to online book patio tables, particular in winter.
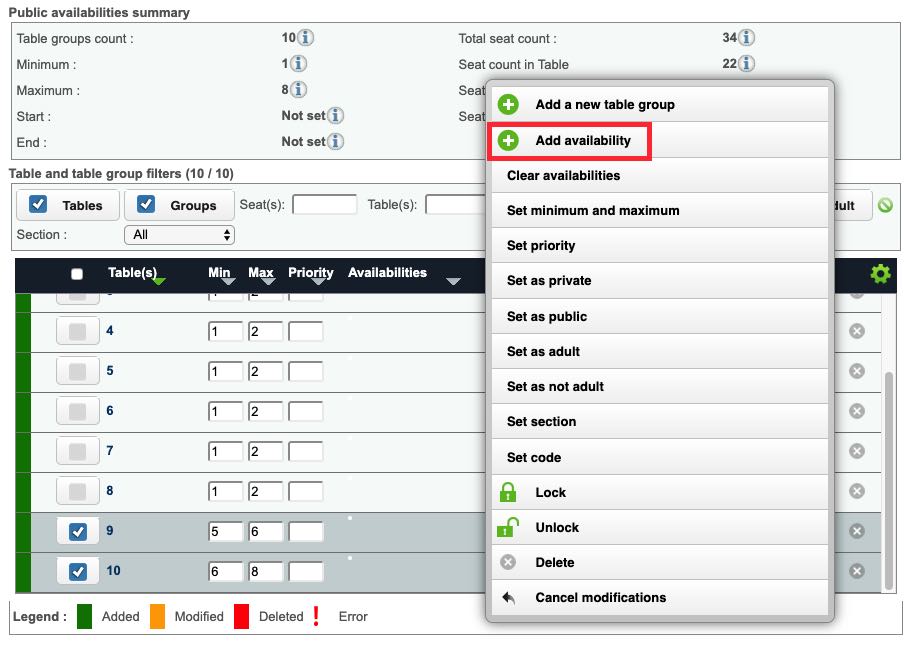
17. Click Add availability.
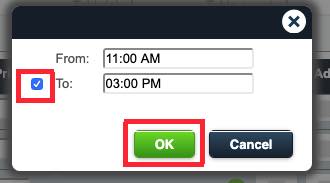
18. Click the From field and enter your start time. For example, your AM timeslot is from 11 am (doors open) until 3 pm. Click the checkbox next to To and then enter the end time of your AM timeslot. For example, enter 3 pm. Click OK.
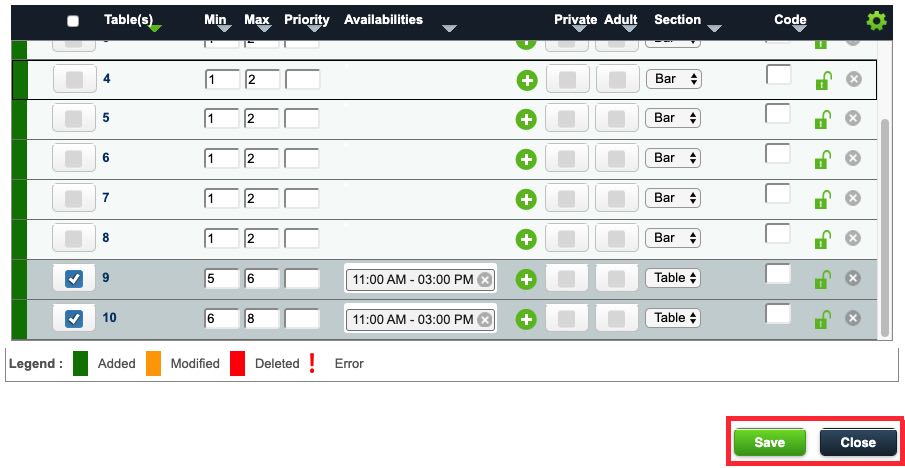
19. Click Save and then Close.
20. You can now repeat this process and create a PM configuration.

21. Click Create copy from and select Template. Click Ok.

22. Give this template the name PM. Click Availabilities management.
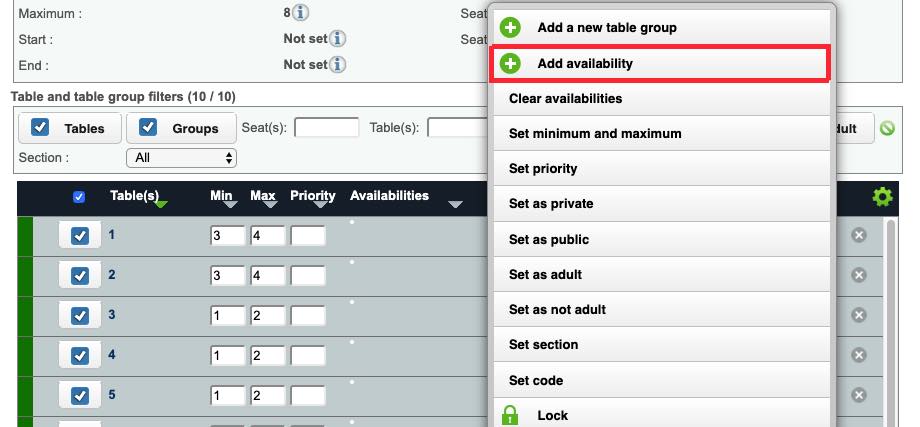
23. Here we presume all tables are available for the PM timeslot so select all the tables. Click the Gear icon and click Add availability.
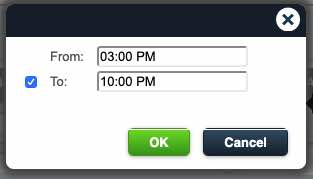
24. Set your PM timeslot from the end of the AM timeslot (i.e., 3 pm) and then select the last time you want to take a reservation. For example, if you close at 11 pm but you won’t book a table after 10 pm, select 10 pm for the To: time. Click OK.
25. For our PM (or even our AM) timeslot, we might want to accommodate larger parties by automatically making two or more tables available for one reservation. (Note: if you want to offer table groups for both your AM and PM timeslots, it’s faster to set these table groups up in your template instead of individual timeslots.)
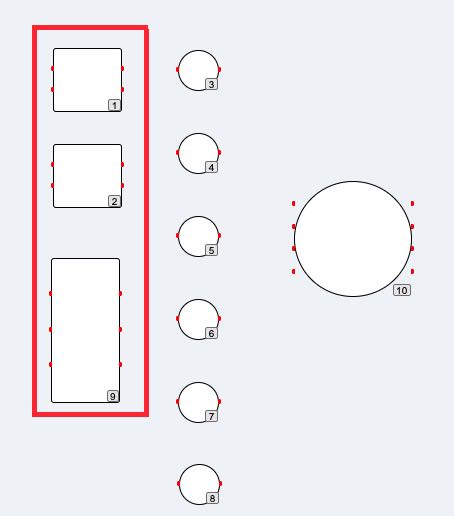
26. If we look at our existing floorplan, we can see tables 1 to 2 could be pushed together to accommodate larger parties. For example, a party of 8 could be accommodated by pushing tables 1 and 2 together. A party of 10 could be accommodated by pushing tables 2 and 3 together. A party of up to 14 could be accommodated by pushing tables 1, 2, and 3 together.
27. To enable TouchBistro Reservations to allow larger party sizes if it finds free tables capable of being pushed together, click the Gear icon and then click Add a new table group.
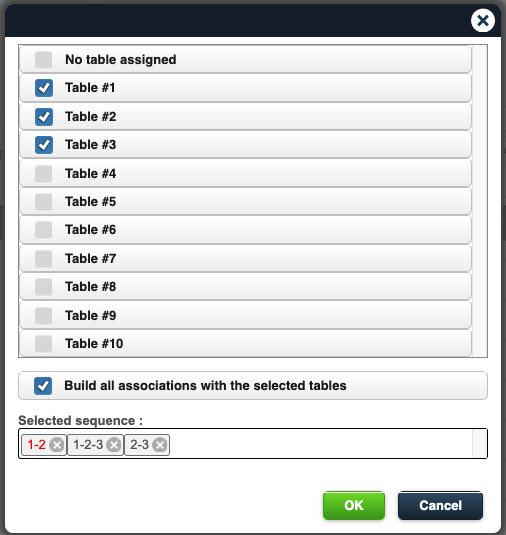
28. First click Build all associations with the selected tables and then click tables 1, 2, and 3. TouchBistro Reservations creates all possible permutations. Notice it doesn’t create a 1-3 grouping as TouchBistro Reservations recognizes these two tables are not adjacent and can’t be easily pushed together. Click OK.
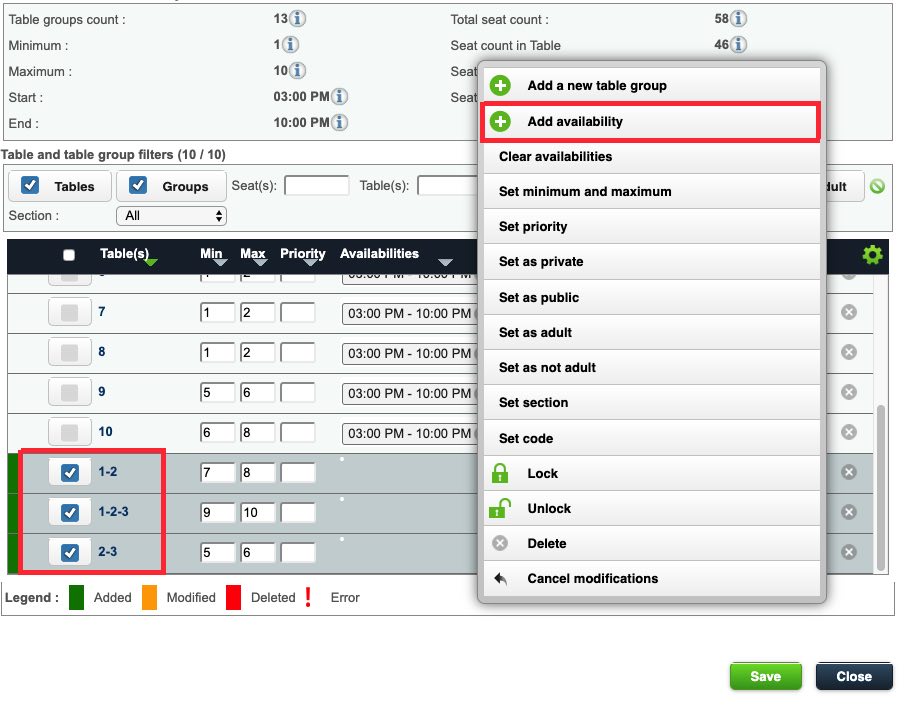
29. Scroll down. You will see your table groups. None yet have Availability set so check each of them and then select Add availability.
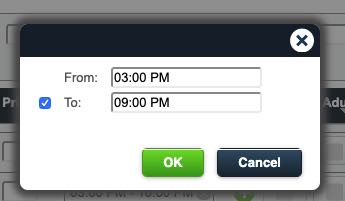
30. Enter your PM timeslot start and the last time you want to take a reservation. Normally, our single tables can be reserved up until 10 pm. However, since these table groups will be reserved necessarily by very large parties, you might want to set the last reservation to a slightly earlier time (e.g., 3 pm to 9 pm).
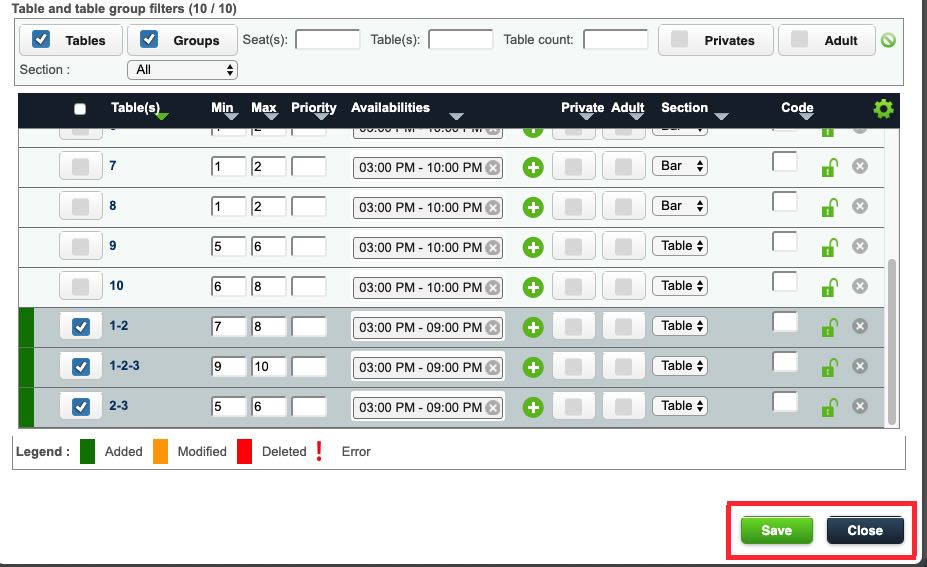
31. Click Save but don’t click Close.
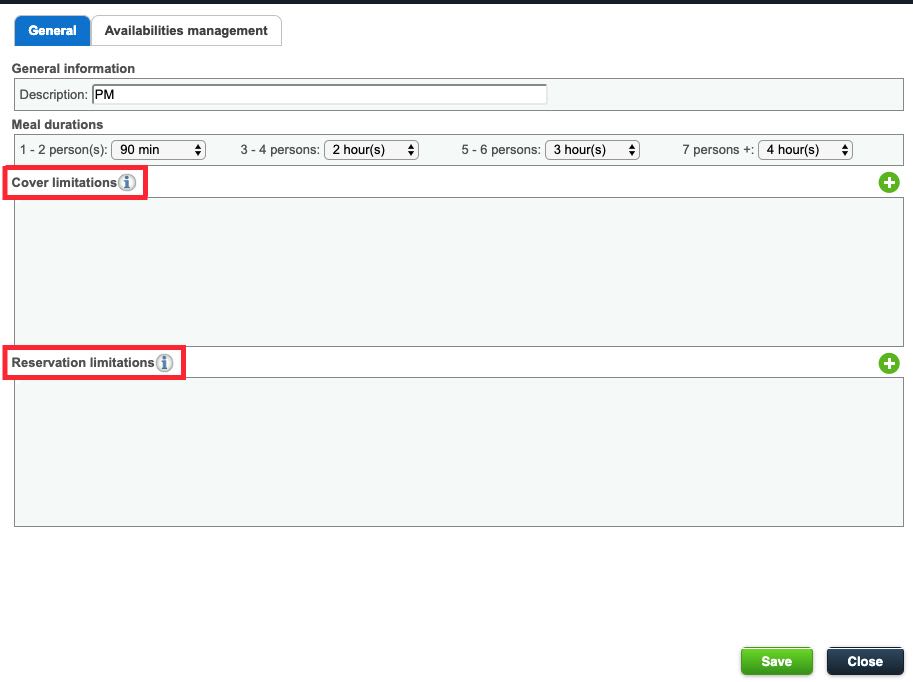
32. After clicking Save, you are returned to the General tab. Here you can fine-tune your PM timeslot by limiting the number of covers (seats) that can be reserved and or the number of reservations that can be taken. For the purposes of this tutorial, we will skip this. However, you can see Chapter 4 of this guide for steps on how to set such limitations.
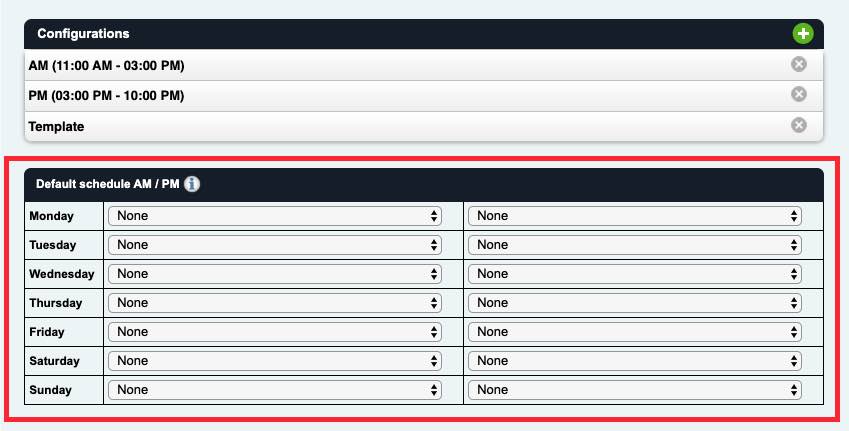
33. After creating your Configurations, you have to indicate which configuration applies for each timeslot for each day of the week.
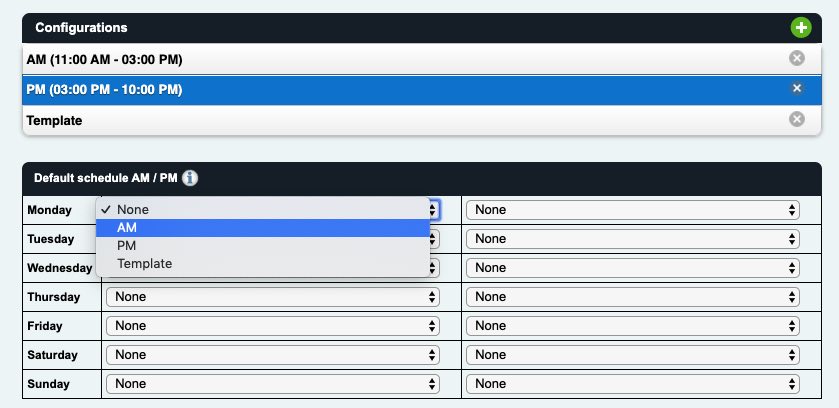
34. Click on each drop-down box and select the appropriate configuration. For example, most days your AM timeslot will be set to your AM configuration.
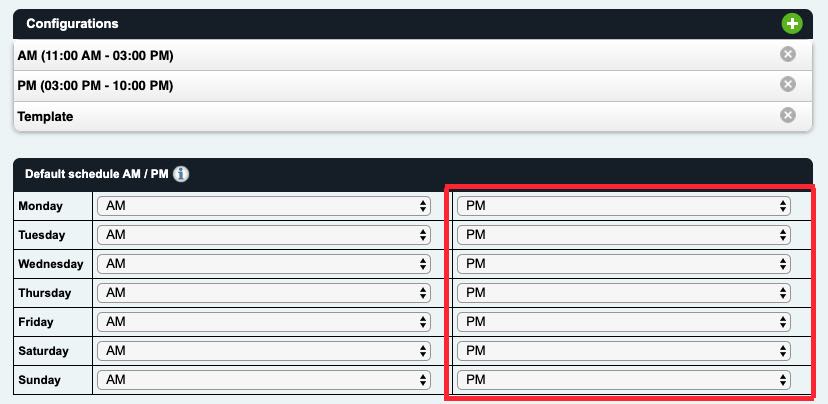
35. Likewise, your PM timeslots will be set to your PM configuration. However, you might have a Sunday brunch configuration you apply for the Sunday AM drop-down box. A Sunday Brunch configuration might, for example, eliminate the ability to reserve grouped tables. Or it might make tables available in the bar area, which are normally not reservable during weekday AM timeslots.
For now, you have a basic Floorplan and a basic schedule. There’s more you can do with this Schedules page. So see Chapter 4 of this guide for steps on how to set exceptional schedules.
Chapter 5. Step 4 – Set Up Some Communication Preferences
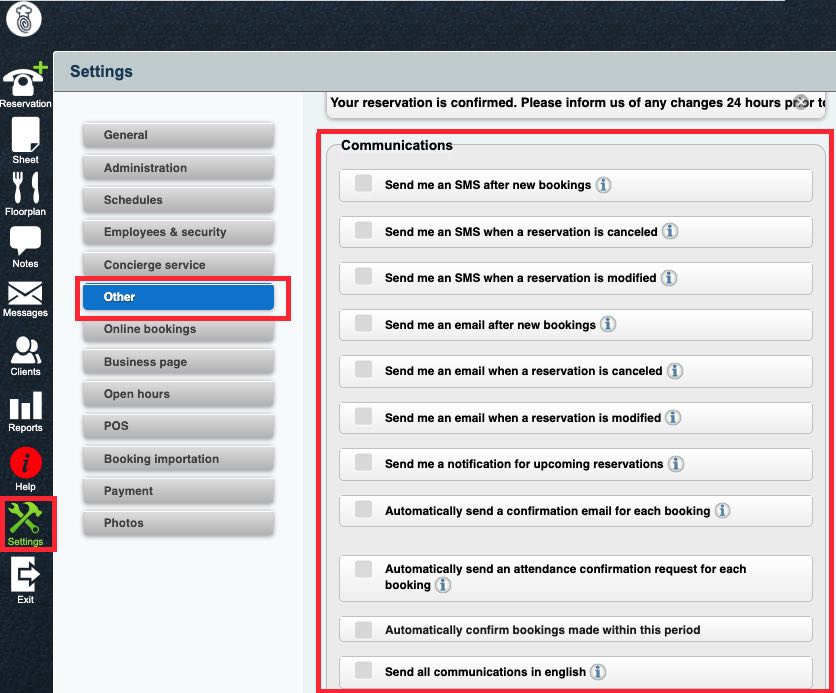
TouchBistro Reservations can be configured to communicate with you via alerts to your email or phone. As well, TouchBistro Reservations can be configured to communicate with customers, for example sending them emails confirming their reservation.
What each of these settings does is explained in Chapter 7 Section 4 of this guide. However for the scope of this tutorial consider the following:
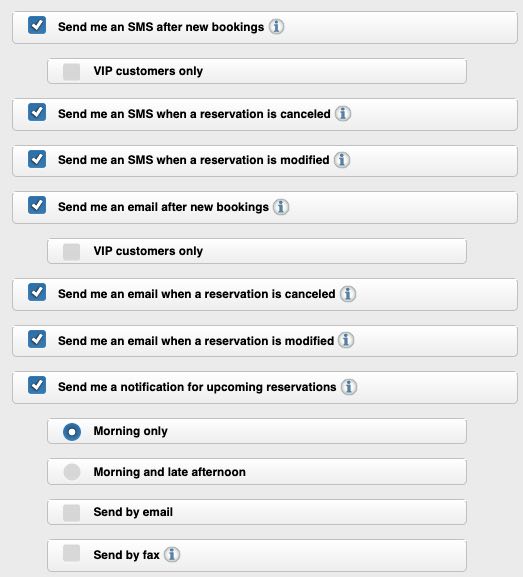
The top half of the Communications section controls messages you (the venue owner) can receive about reservations. You can enable receiving alerts via SMS, email, and fax.
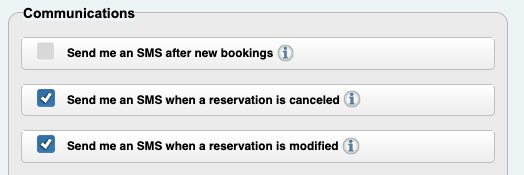
You might want, for example, be sent an SMS when a booking is cancelled or somehow modified, but you don’t want to be alerted every time a standard reservation is made.
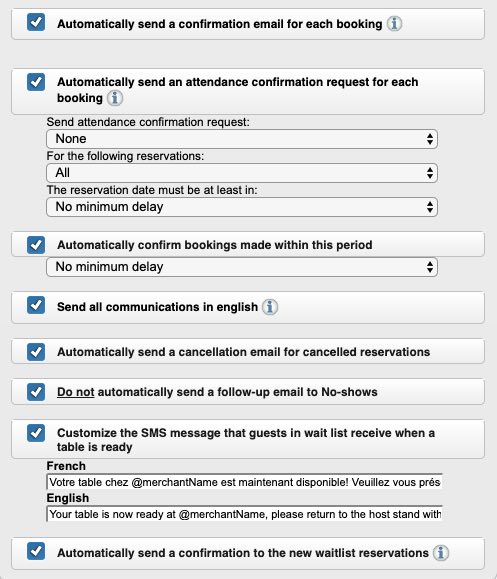
The bottom half of the Communications section controls messages the reserving party receives.
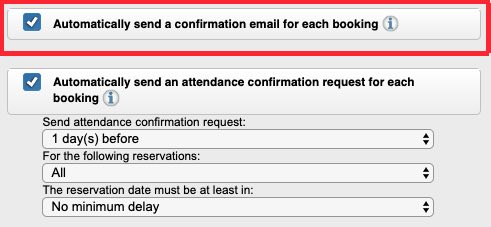
You might want, for example, enable Automatically send a confirmation email for each booking.
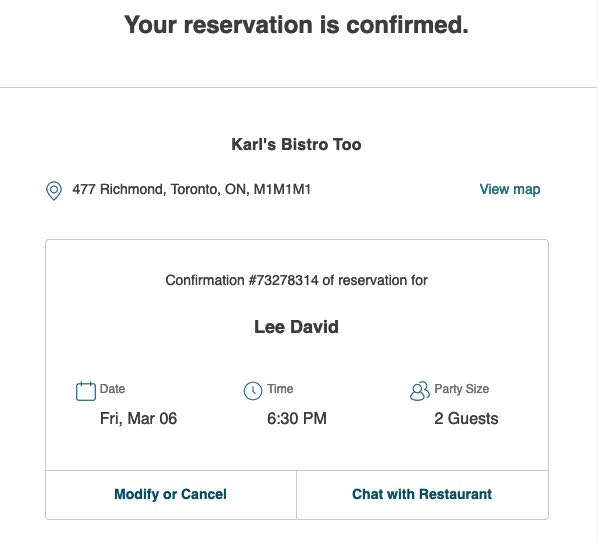
If enabled this sends an email confirmation to the reserving party. The email also allows the party to modify/cancel their reservation or send messages to you via the chat function.
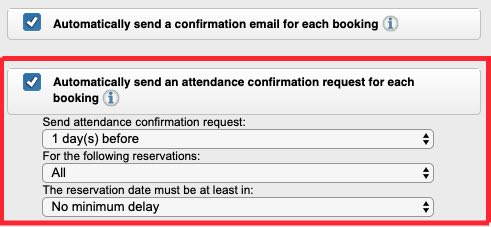
You might also want to enable Automatically send an attendance confirmation request for each booking.
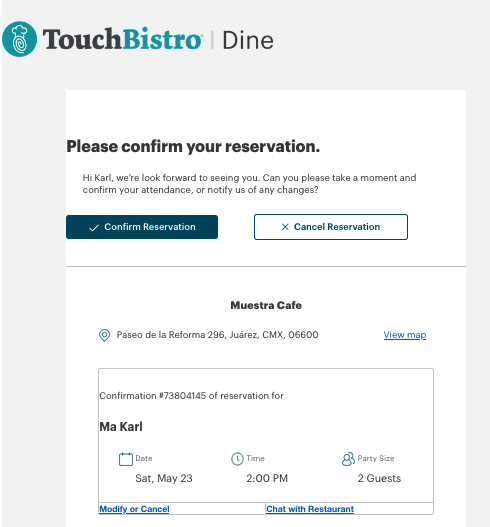
If enabled, a customer will receive an email requesting they confirm they will keep their reservation. In the pictured example, the day before a reservation we sent a confirmation request.
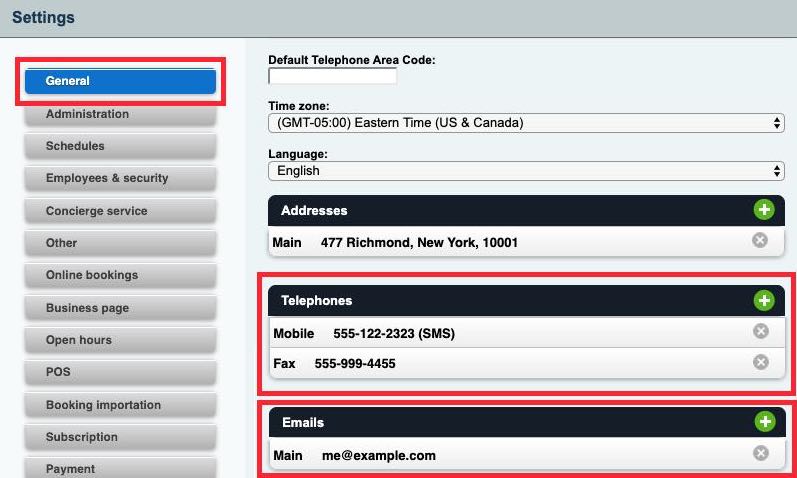
If you enable any of these communications, you should also go to General and ensure your mobile and email address are correct. Emails and text messages you want sent to yourself will be sent to the email and mobile number here.
Chapter 6. Step 5 – Set Online Booking Details
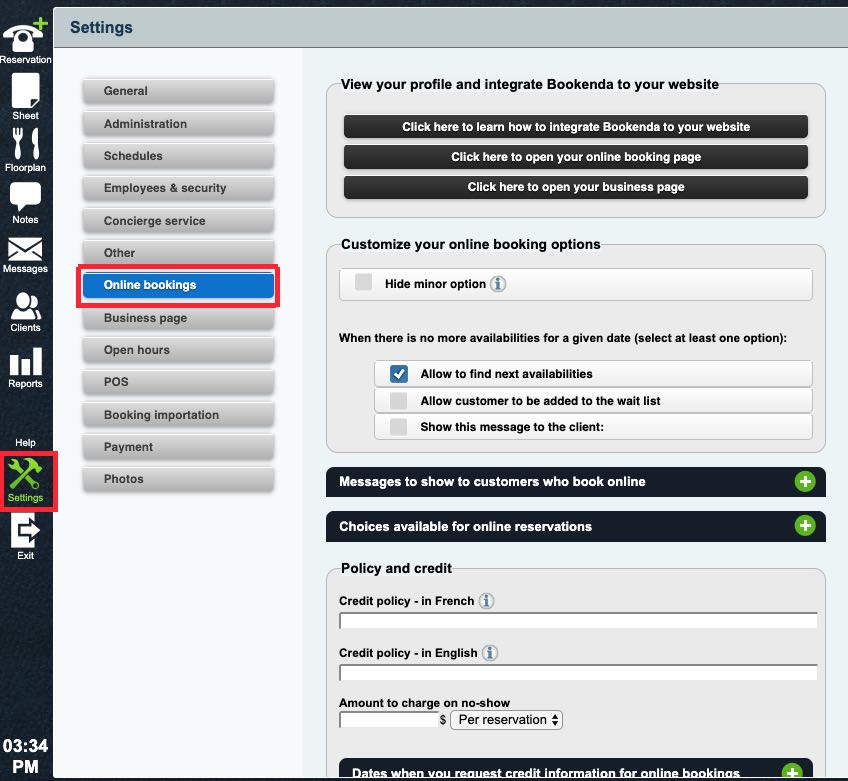
Visit Settings | Online Bookings and review the settings. These settings are explained in detail this guide under chapter 8.
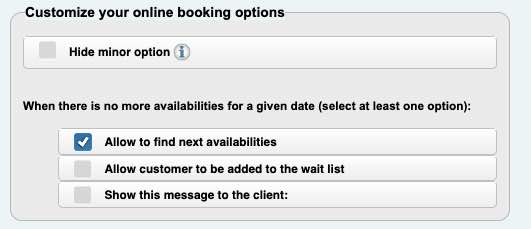
If you are not in Quebec you may want to hide the ability to flag some of the reserving party as minors. If you want customers reserving online to add themselves to a waiting list when on tables are available, disable Allow to find next availabilities and enable Allow customer to be added to the wait list.
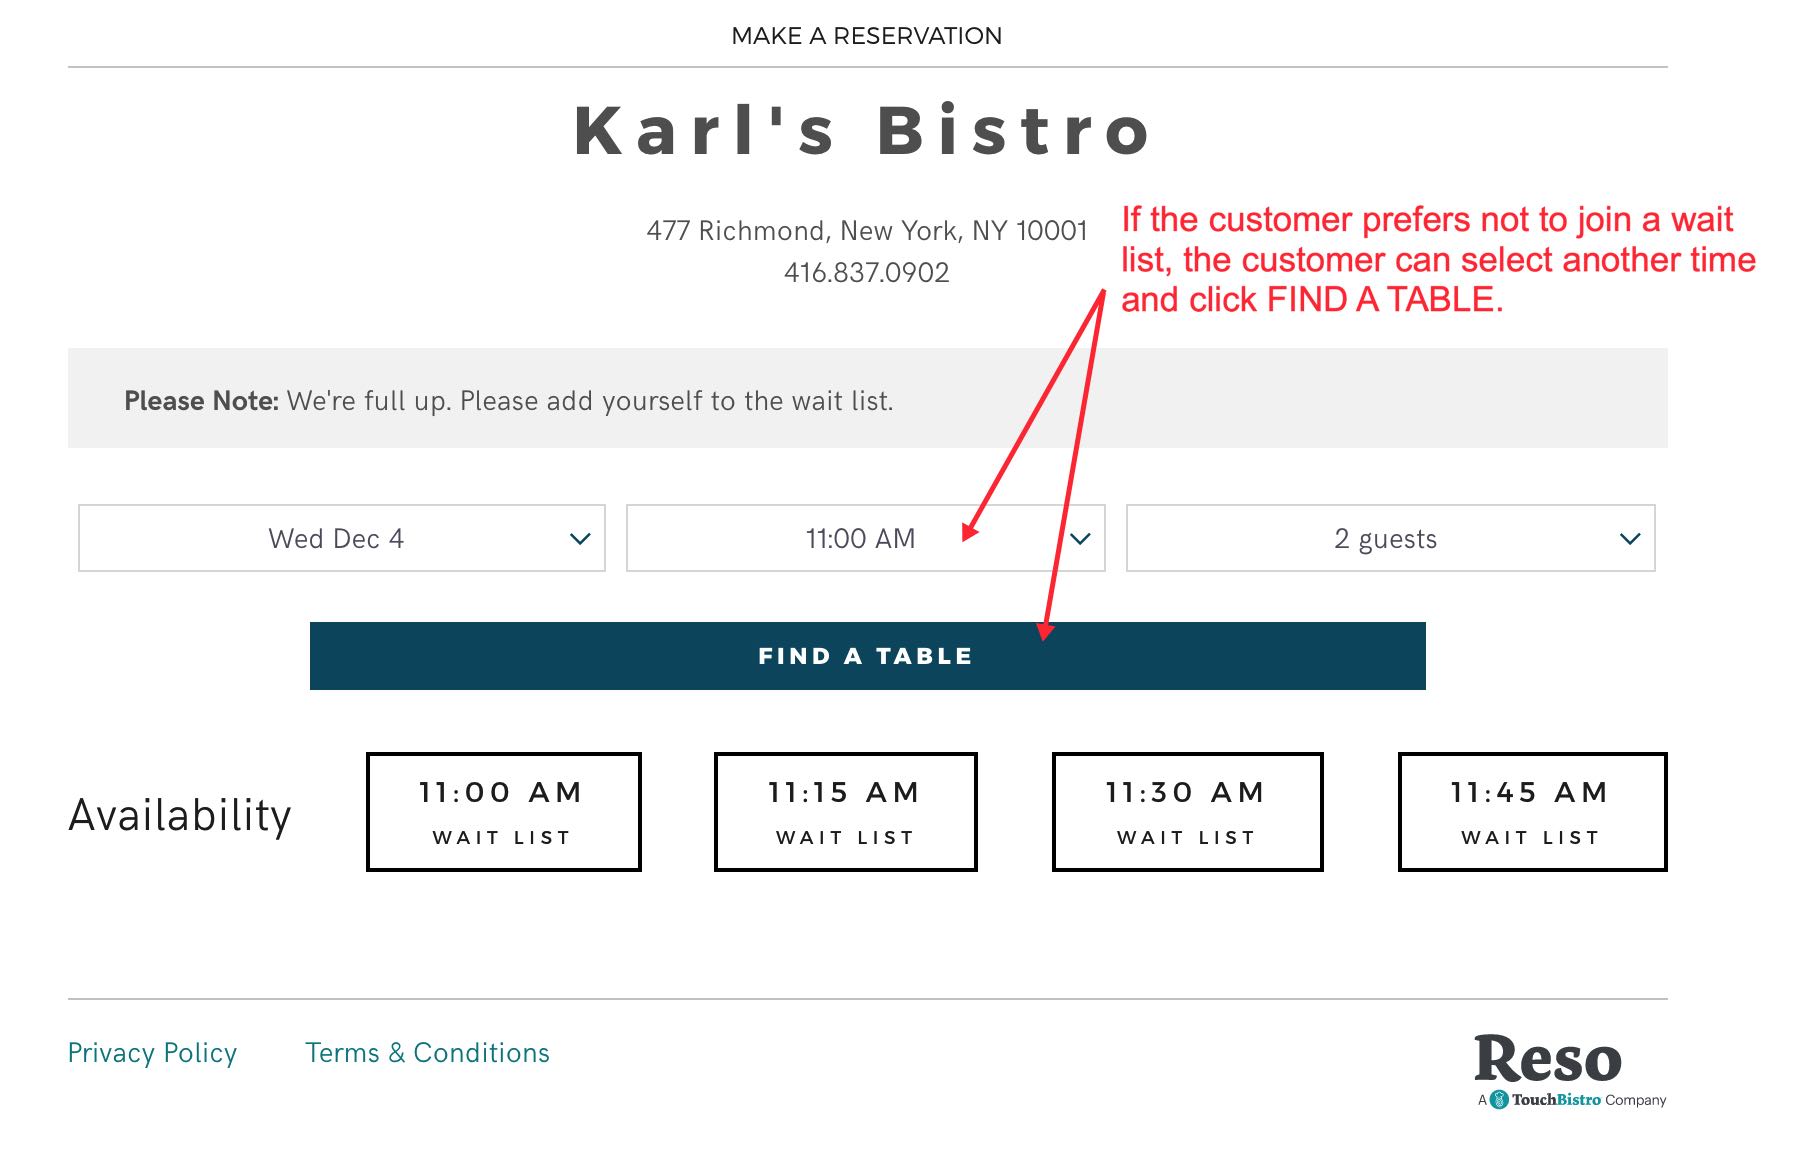
If you allow customers to wait list themselves, you’ll see wait list options for unavailable times on their booking page.
Chapter 7. Step 6 – Review Your Business Page
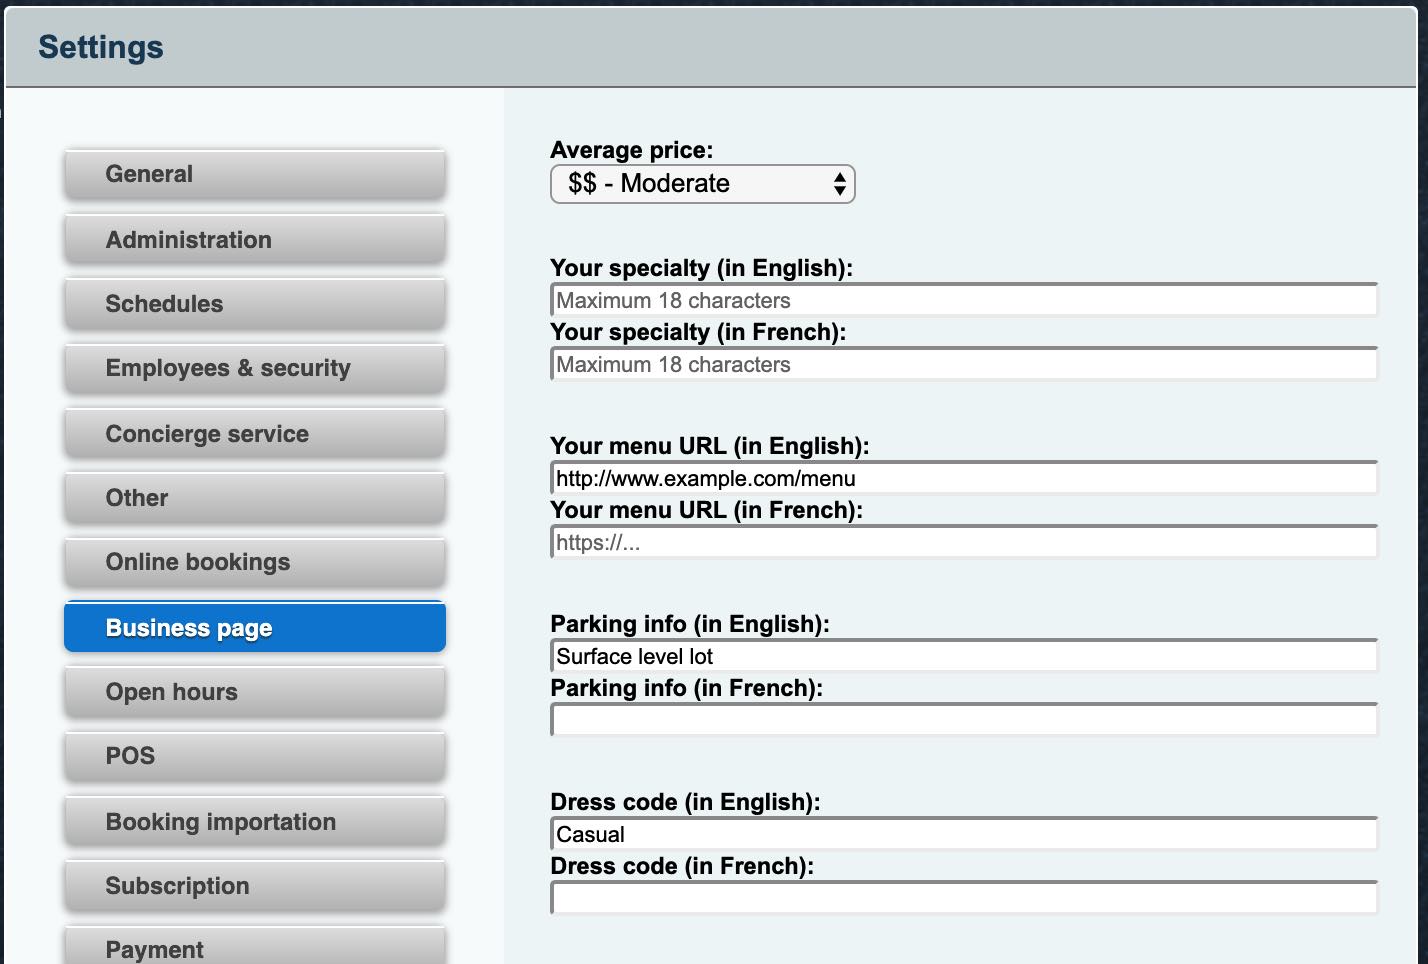
Visit Settings | Business page and review the settings.
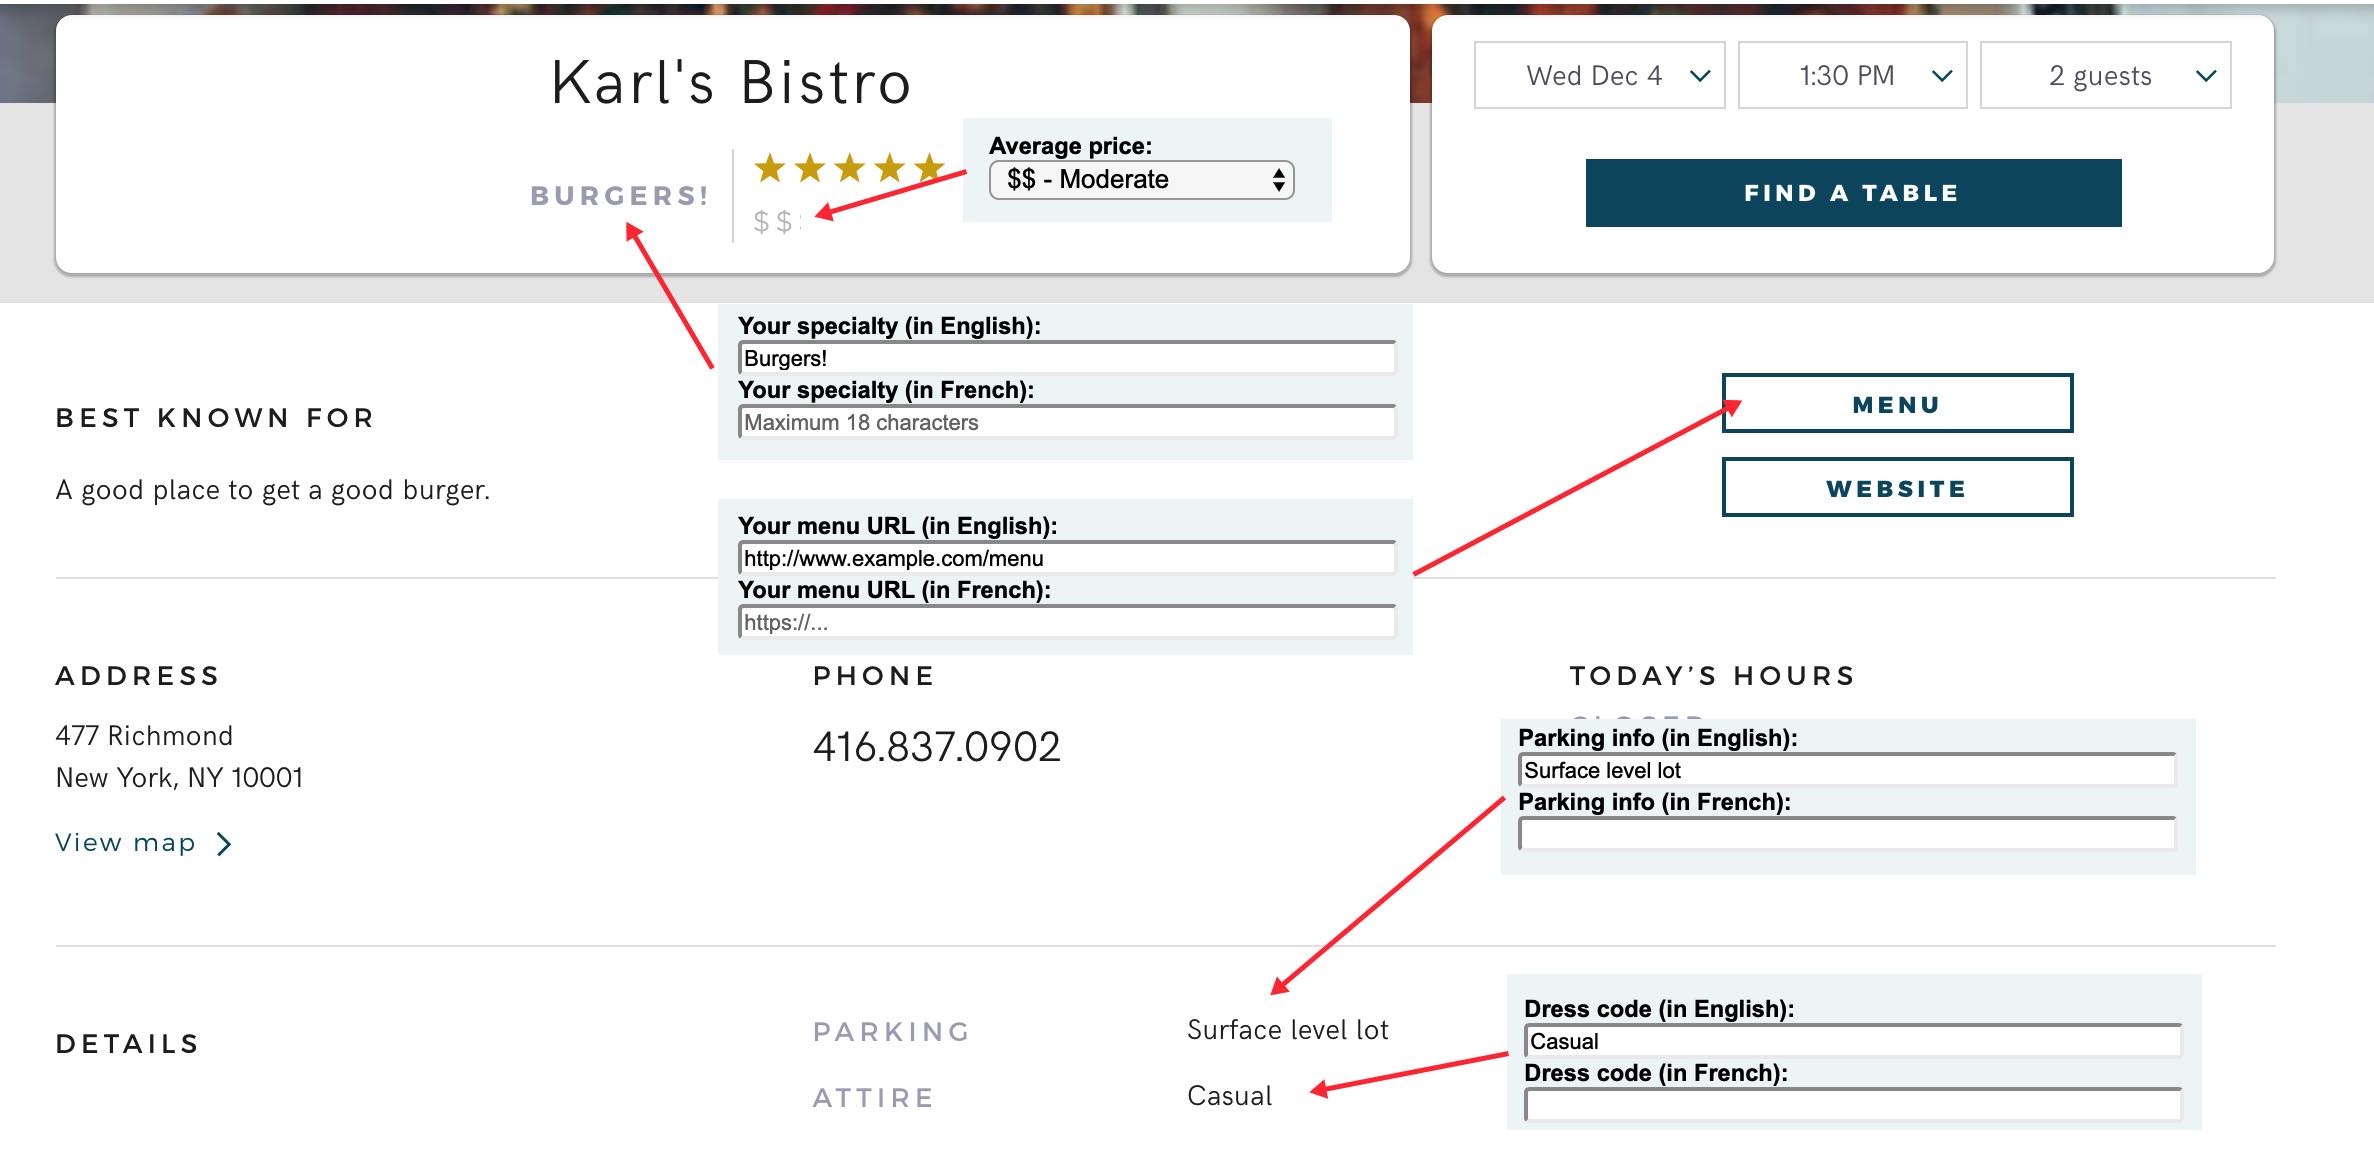
The Business page section allows you to define specifics on your TouchBistro Reservations business page.
Chapter 8. Step 7 – Set Open Hours
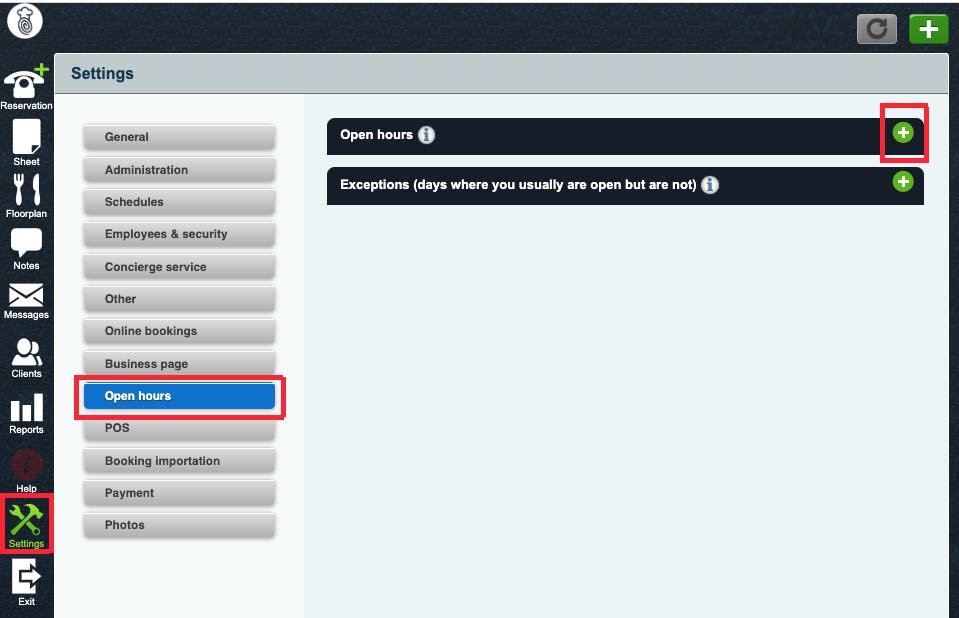
Visit Settings | Open hours and set your opening hours. For full details about this page (for example, how to set exceptions), see Chapter 10 in this guide.
The Open hours section lets you set how your open hours displays on your business page. Click the Add + button at the top right to add a new open hours.
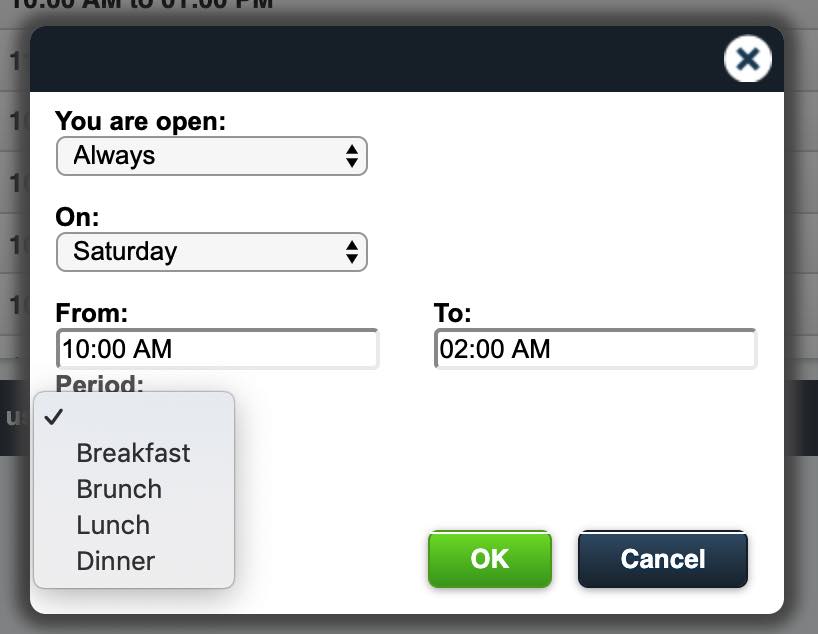
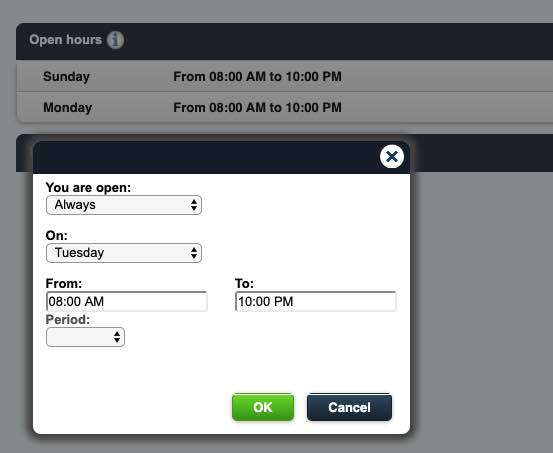
Define your hours for each day.
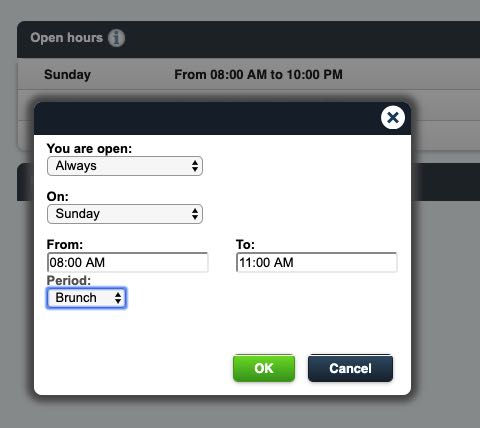
However, you can also break out different time periods. For example, you could set, say, Sunday 8 am to 11 am as Brunch.
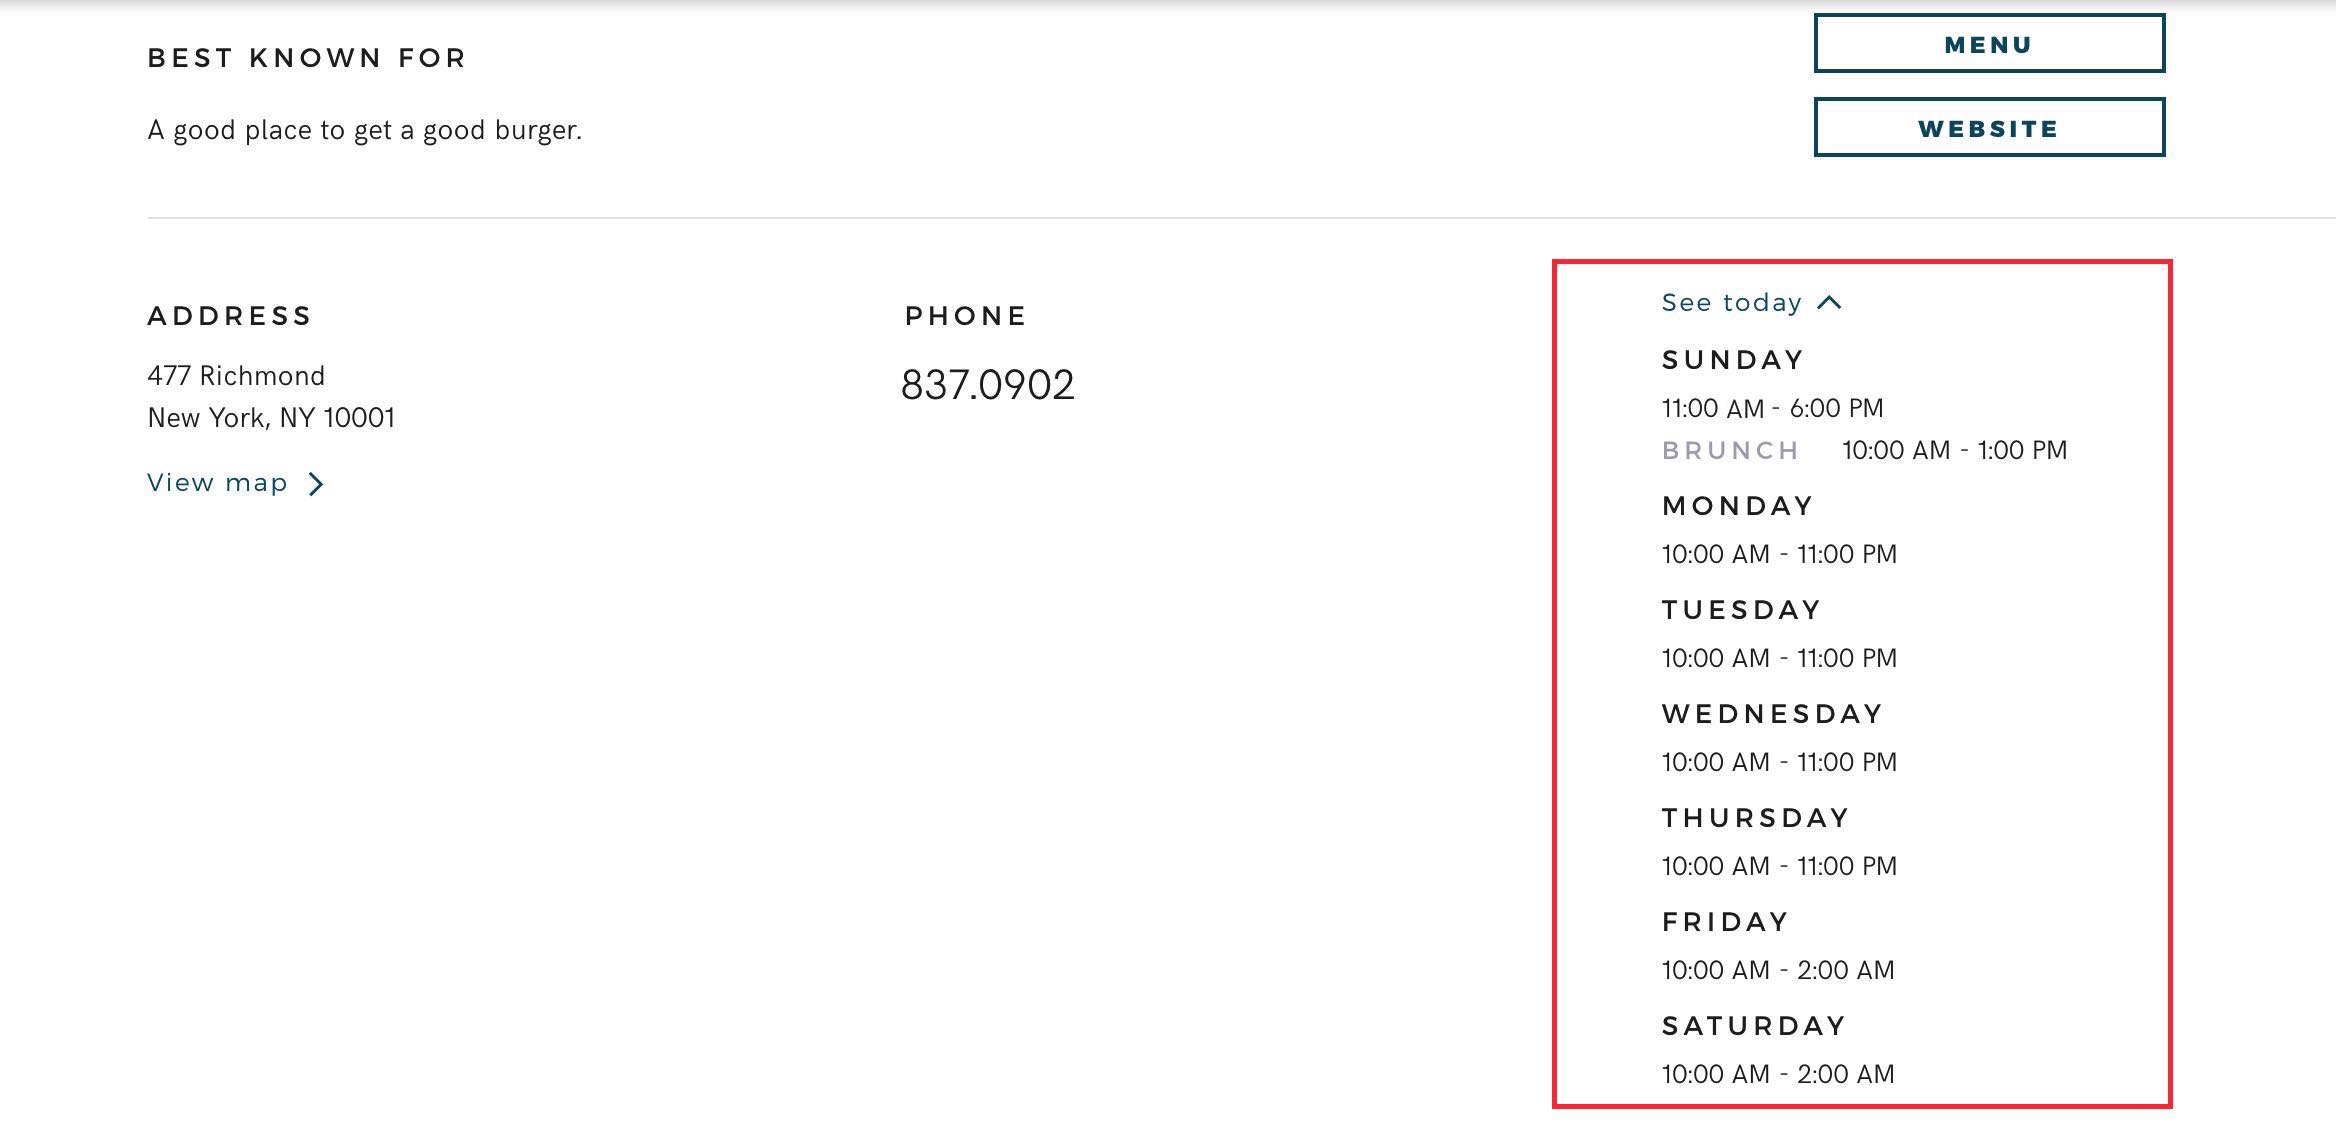
Your configured hours display on your business page as pictured above.
Chapter 9. Step 8 – Set Up Photos
There are two places where you should upload prepared photos or images.
Section 1. Venue Logo
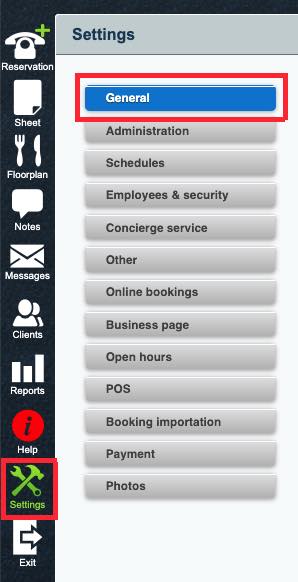
Visit Settings | General to set your venue’s logo. For full details about this page (for example, how to set exceptions), see Chapter 2 in this guide.
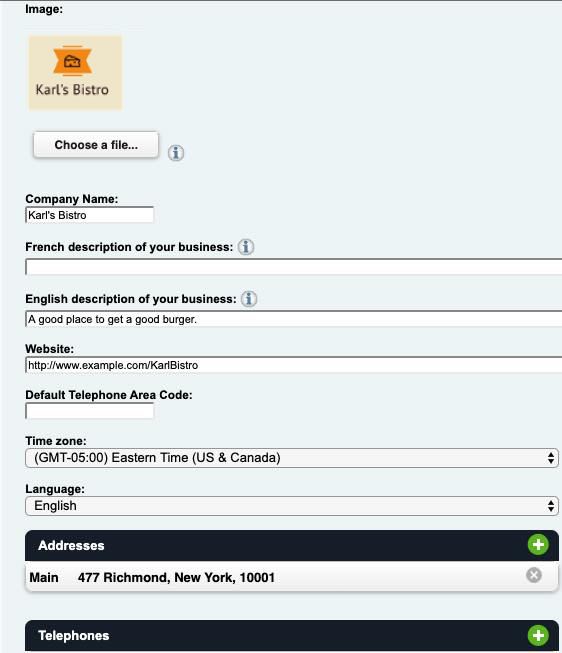
Tap Choose a file to upload your venue’s logo.
Your logo is primarily used in communications with reserving parties. For example, it’s used on your customer’s chat page.
Section 2. Business Page Banner Image
Visit Settings | Photos to set your business page’s banner image. For full details about this page (for example, how to set exceptions), see Chapter 14 in this guide.
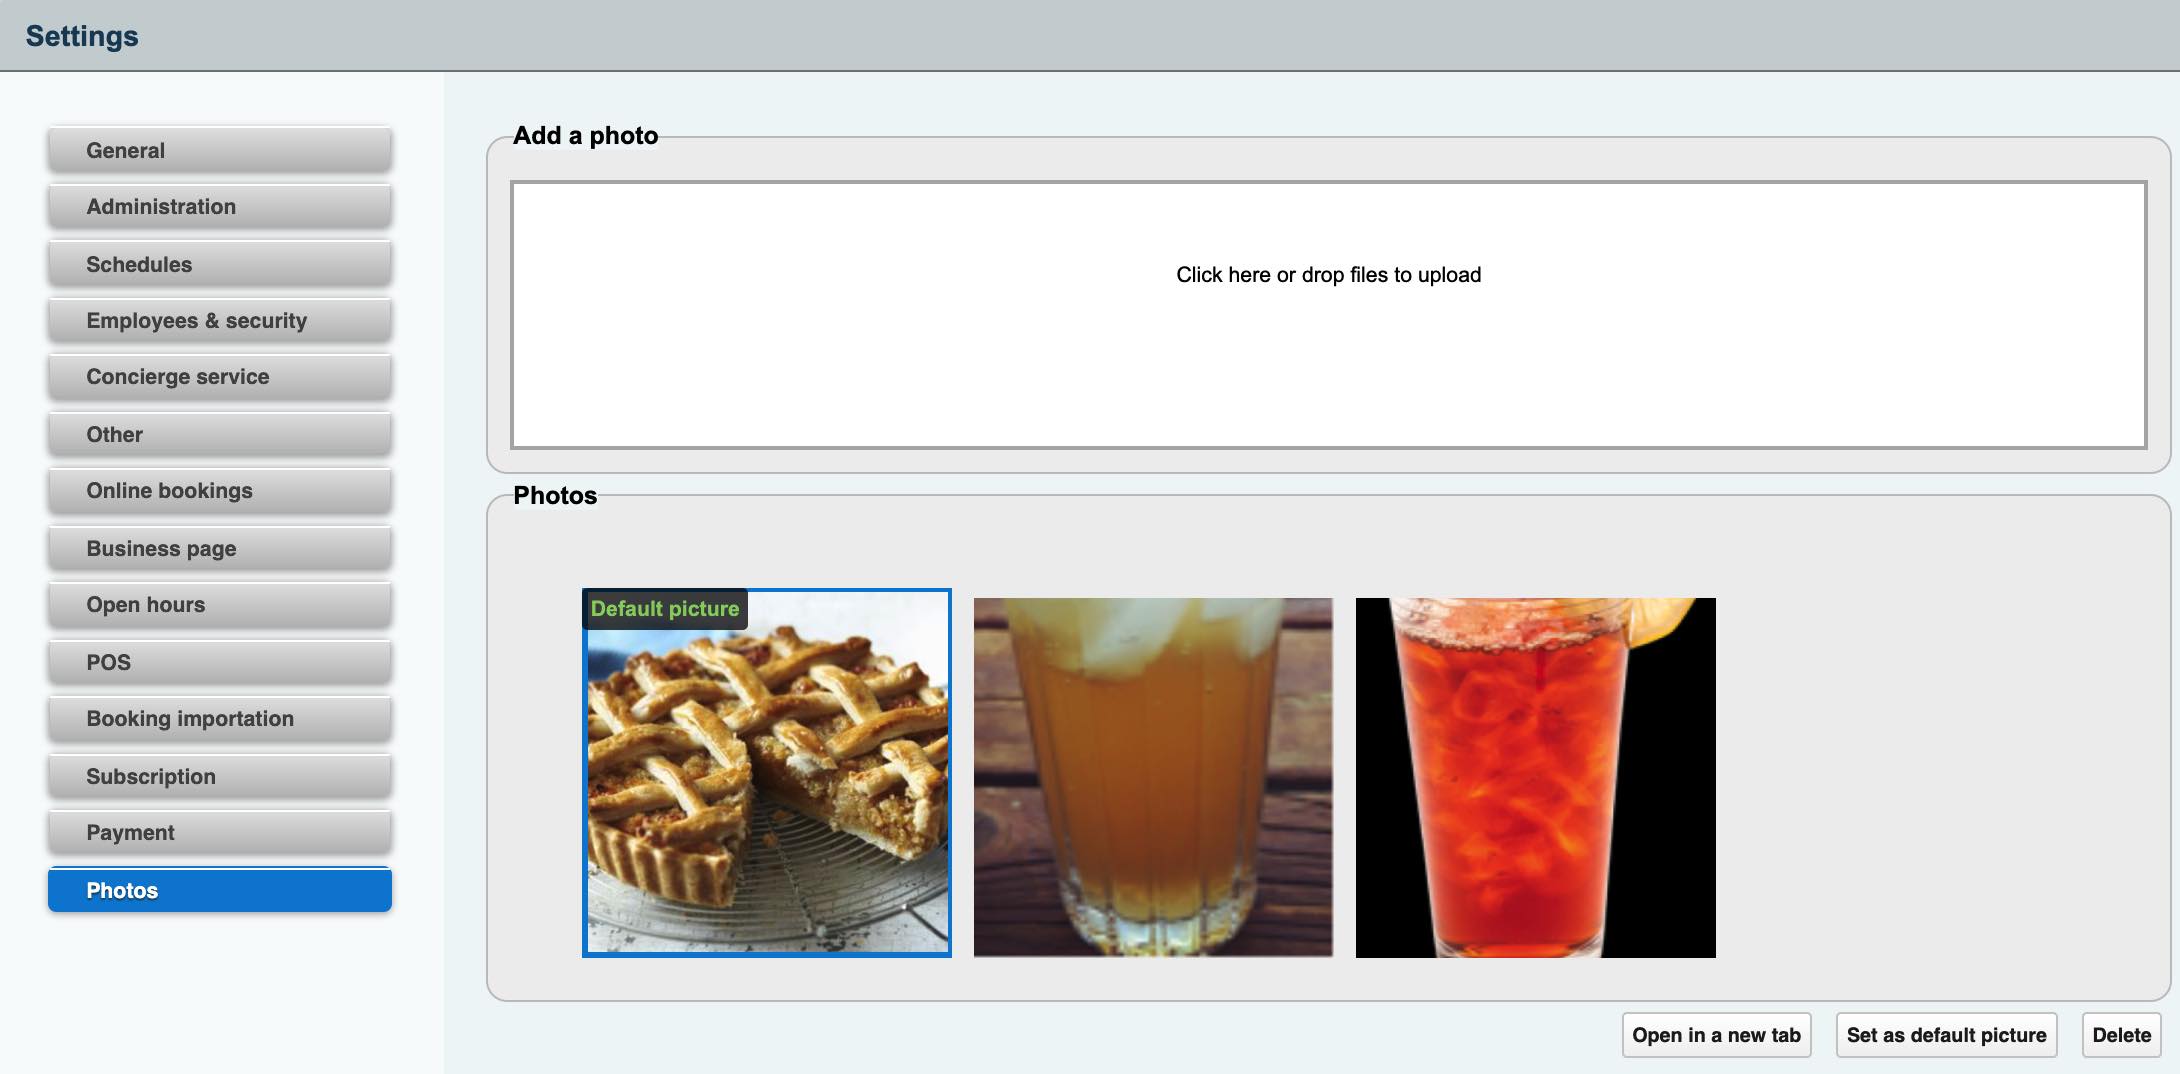
The Photos section lets drag and drop photos to add into the Add a photo section. Alternatively, you can click in the area and locate the files via a dialog box. Photos should be 1000√ó700 pixels for optimal display on your business page.
Click on an uploaded photo and click Set as default picture to set the picture as the image used in your business page.
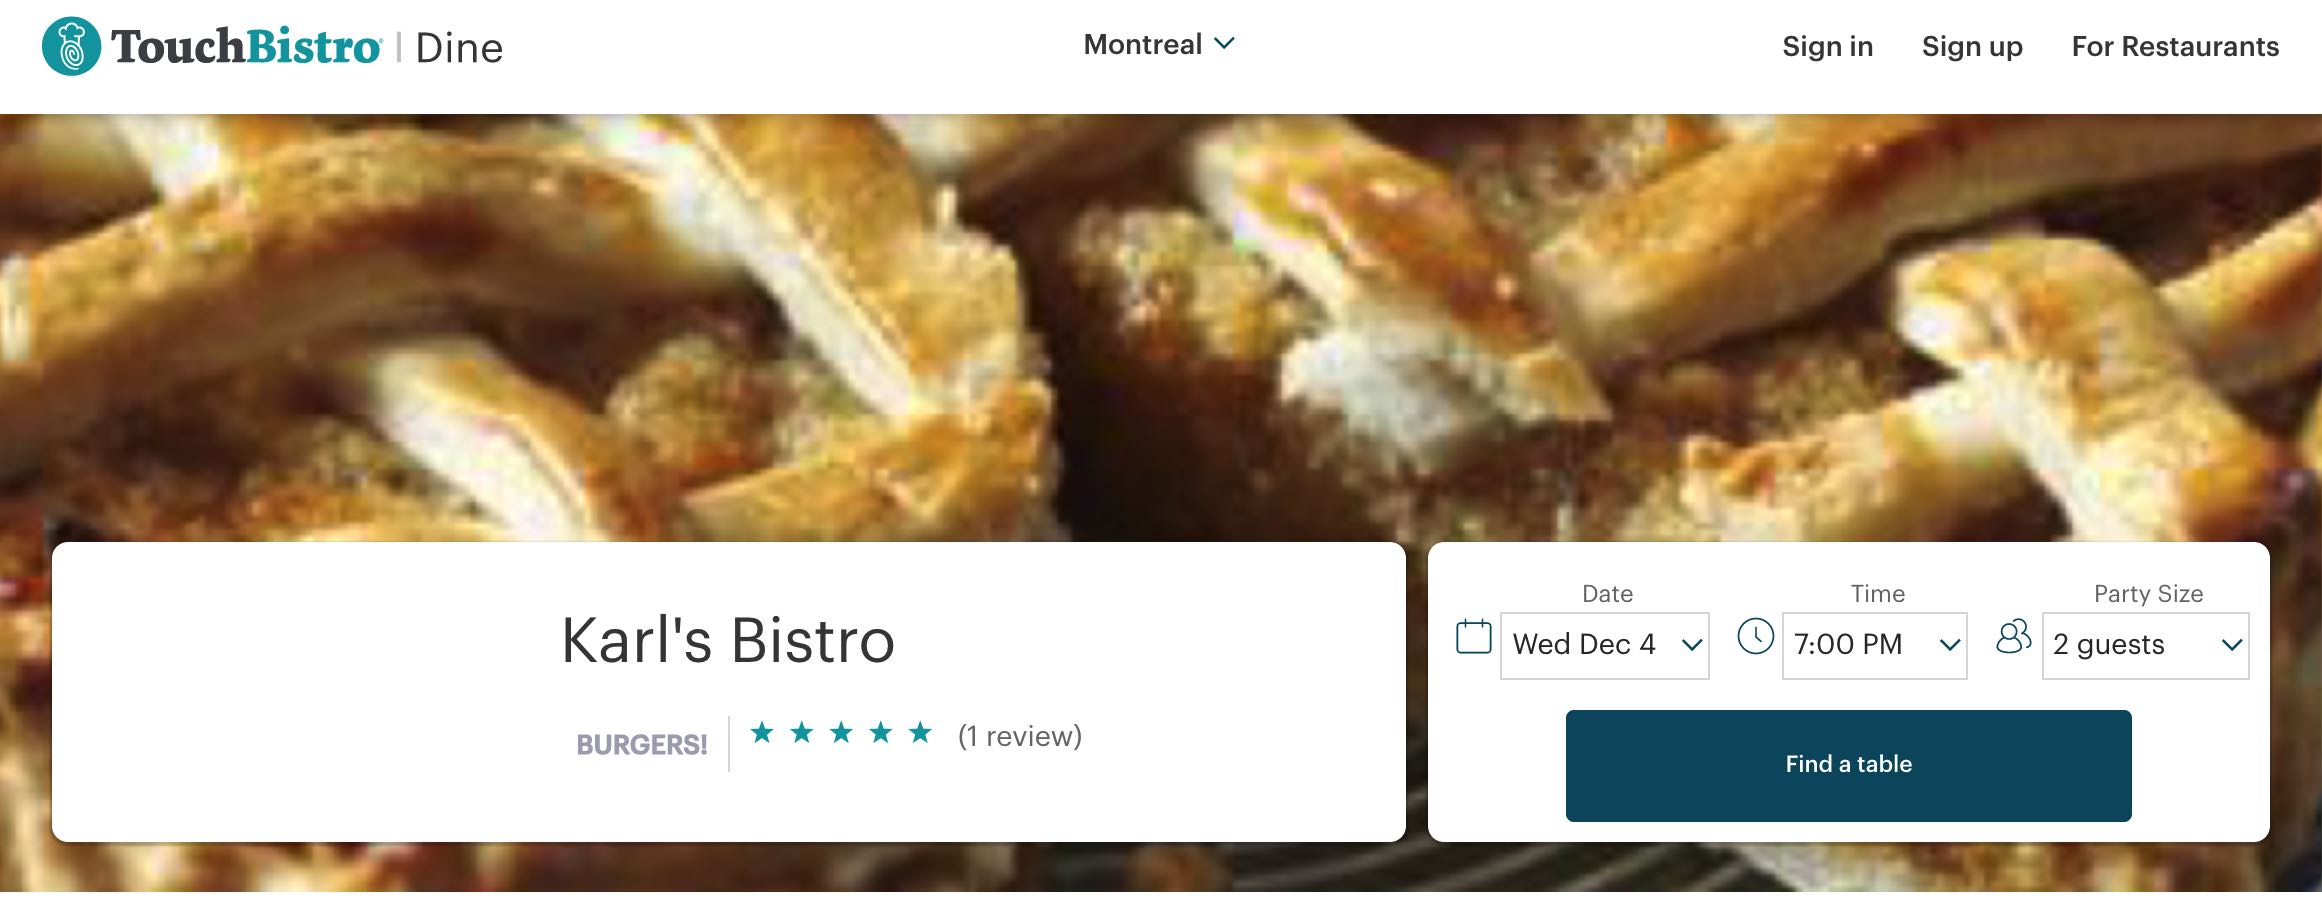
The default photo is used as your business page’s header image. If you’ve uploaded multiple photos, you can display only one photo at a time.
Chapter 10. Step 9 – Fine Tune and Build Out Your Venue
Now that you’ve set up the basics of your venue, you’re ready to build out additional aspects and workflows:
Visit the Setting page for complete details about how to create exceptional schedules and closure times, add employees, set up concierge accounts, set up predefined notes, set up payments for reservations with your Stripe account and a whole lot more.
Visit the Working with Employees page for additional details about how to set up employee accounts and assign them to Floorplan sections.
Visit the Fine Tuning Your Floorplan page for additional details on how to set up additional floors, fine tune your tables, and create alternative Floorplan set ups for specials days (like holidays or days with special events).
Visit the Creating a Setup and Schedule Configuration for Valentine’s Day page for details on how to set up an alternative Floorplan to accommodate more couples for Valentine’s Day.
Visit the Notes page for details on how to create notes for staff.


 Email
Support
 Frequently
Asked Questions
